Introduction to Rancher
Rancher is a container management platform that helps organizations deploy and manage containers quickly and easily in a production environment.Rancher can easily manage Kubernetes in a variety of environments, meet IT needs, and support the DevOps team.
Kubernetes has not only become a container organization standard, it is also rapidly becoming a standard infrastructure provided by various cloud and virtualization vendors.Rancher users can choose to create a Kubernetes cluster using Rancher Kubernetes Engine(RKE), or use cloud Kubernetes services such as GKE, AKS, and EKS.Rancher users can also import and manage existing Kubernetes clusters.
Rancher supports a variety of centralized authentication systems to manage the Kubernetes cluster.For example, employees in large enterprises can access the Kubernetes cluster in GKE using their corporate Active Directory credentials.IT administrators can set access control and security policies in users, groups, projects, clusters, and the cloud.IT administrators can monitor the health and capacity of all Kubernetes clusters on a single page.
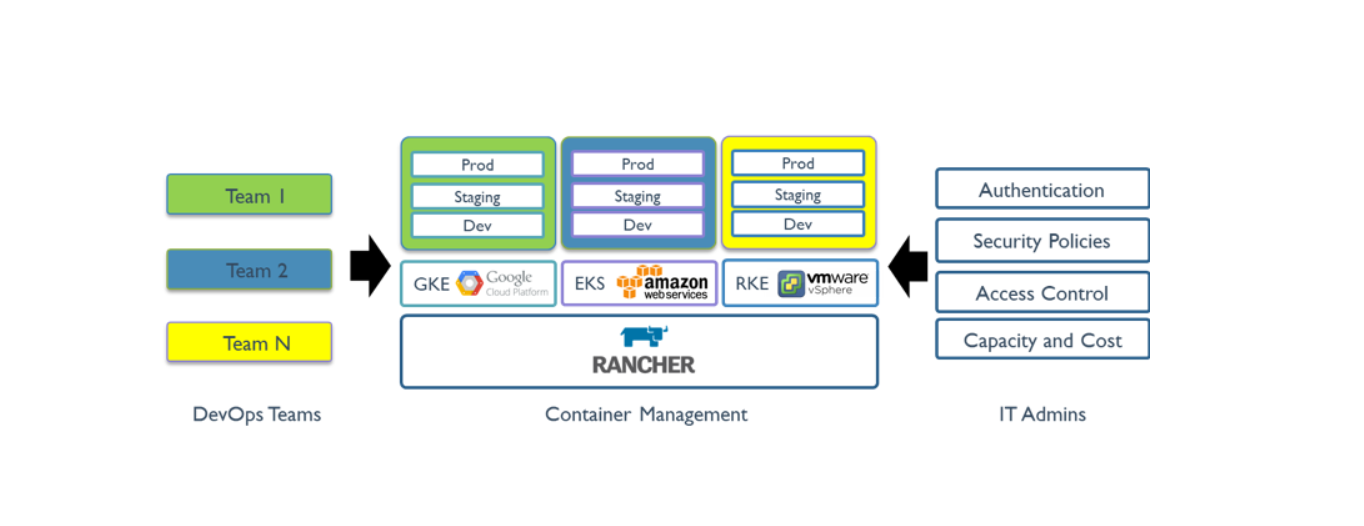
Rancher provides DevOps engineers with an intuitive user interface to manage their service containers and allows users to start using Rancher without having to learn more about Kubernetes concepts.Rancher includes an app store that supports one-click deployment of Helm and Compact templates.Rancher is certified for a variety of cloud and local ecosystem products, including security tools, monitoring systems, container warehouses, and storage and network drivers.The following figure illustrates the role Rancher plays in IT and DevOps organizations.Each team deploys the application on the public or private cloud of their choice.
Introduction to Helm
Helm is a tool that simplifies the installation and management of Kubernetes applications.Think of it as apt/yum/homebrew.
Helm has two parts: client(helm) and server(tiller)
Tiller runs inside your Kubernetes cluster and manages the publishing (installation) of chart s.
Helm can run on your laptop or anywhere.
chart is a Helm package that contains at least two things:
Description of the package (Chart.yaml)
One or more templates, containing the Kubernetes manifest file
Charts can be stored on disk or retrieved from remote chart repositories such as Debian or RedHat packages.
Introduction to RKE
RKE is a Kubernetes installation program written in Golang. It is extremely simple and easy to use. Users no longer need to do much preparation to have a lightning-fast Kubernetes installation and deployment experience.
Deployment Environment
| host name | IP Address | role | To configure |
|---|---|---|---|
| master | 192.168.1.4 | Primary Node | 2C/4G |
| node01 | 192.168.1.6 | Work Node 1 | 2C/2G |
| node02 | 192.168.1.7 | Work Node | 2C/2G |
Installation method:
1. Direct docker pull mirror, suitable for experimental environment, not for online environment, can refer to https://docs.rancher.cn/rancher2x/quick-start.html
2. Use k8s cluster deployment to recommend online environment for offline network. This method is used in this paper, refer to the offline tutorial https://docs.rancher.cn/rancher2x/
Deployment process
-------------------------------------------- Operate on all three servers-----------------------------------
1. Docker installation and deployment
Reference Blog https://blog.51cto.com/13760351/2488508
2. User Settings
1. Create user zhangsan, set password
useradd zhangsan
psswd zhangsan
vim /etc/sudoers
Insert:
zhangsan        ALL=(ALL)       ALL
2. Add users to the docker group
usermod -aG docker zhangsan
3. Configure ssh secret-free landing
1. Generate ssh key
su zhangsan
ssh-keygen
2. Send the ssh public key to three machines
ssh-copy-id -i .ssh/id_rsa.pub zhangsan@node1
ssh-copy-id -i .ssh/id_rsa.pub zhangsan@node2
ssh-copy-id -i .ssh/id_rsa.pub zhangsan@master
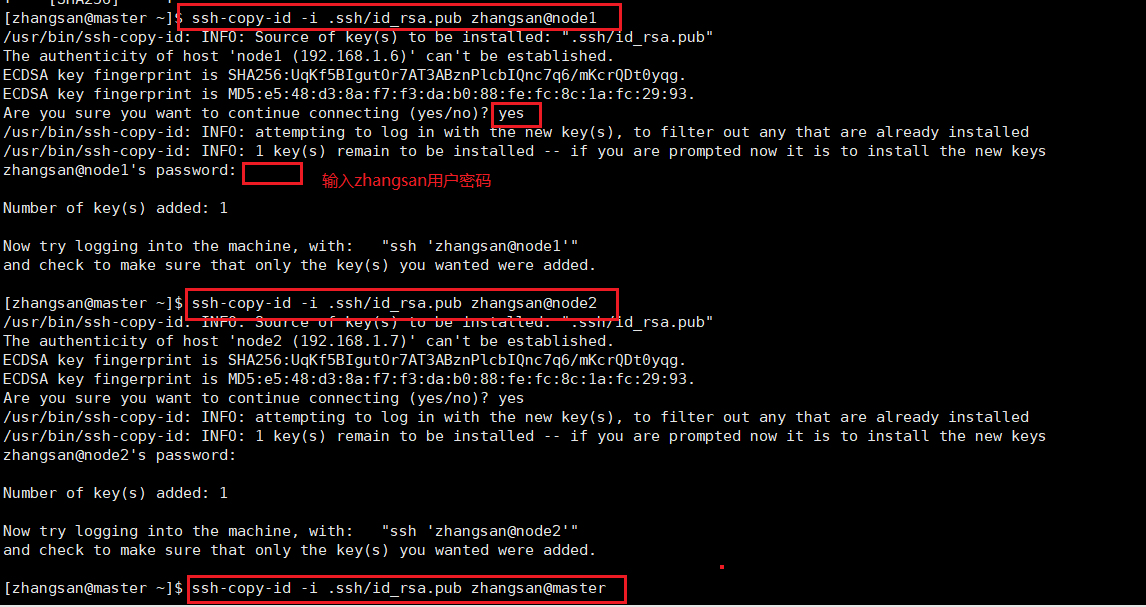
3. Verification
ssh zhangsan@node1
ssh zhangsan@node2
ssh zhangsan@master

**------------------------------------- on the master server-----------------------**
4. RKE Create K8s Cluster
1. Download kubectl, rke, helm and upload to master
Download address: https://docs.rancher.cn/rancher2x/install-prepare/download/
Cd/home/zhangsan #Enter user directory
sudo mv linux-amd64-v1.18.2-kubectl kubectl #rename
sudo mv v1.1.1-rke_linux-amd64 rke
sudo chmod +x rke kubectl #Authorization
sudo cp kubectl rke /usr/bin
2. Install helm
tar xvf helm-v3.0.3-linux-amd64.tar.gz
sudo cp linux-amd64/helm /usr/bin/
3. Create rancher-cluster.yml
vim rancher-cluster.yml
nodes:
- address: 192.168.1.4
user: zhangsan
role: [controlplane, worker, etcd]
- address: 192.168.1.6
user: zhangsan
role: [controlplane, worker, etcd]
- address: 192.168.1.7
user: zhangsan
role: [controlplane, worker, etcd]
services:
etcd:
snapshot: true
creation: 6h
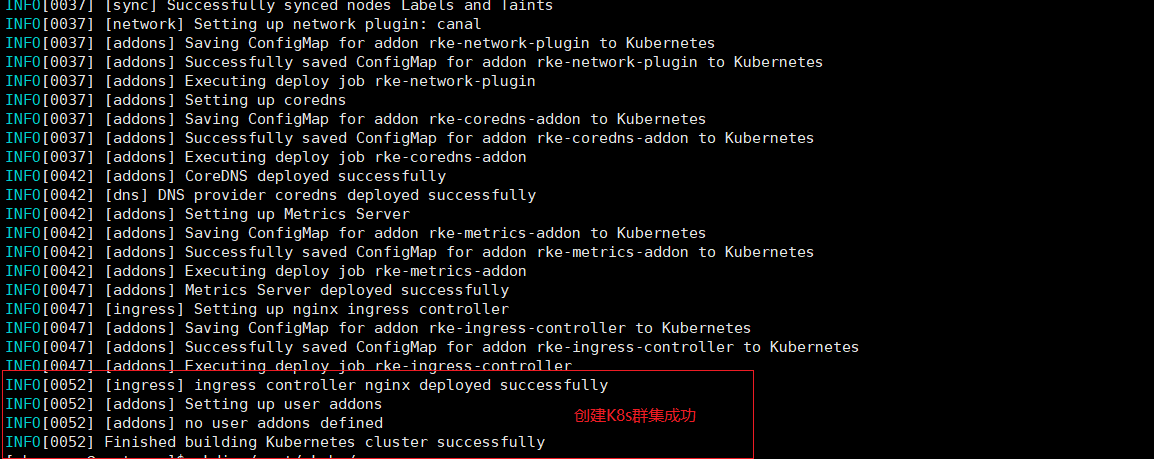
retention: 24h4. Create clusters using rke
Use rke to install k8s here
./rke up --config ./rancher-cluster.yml
If the following error occurs: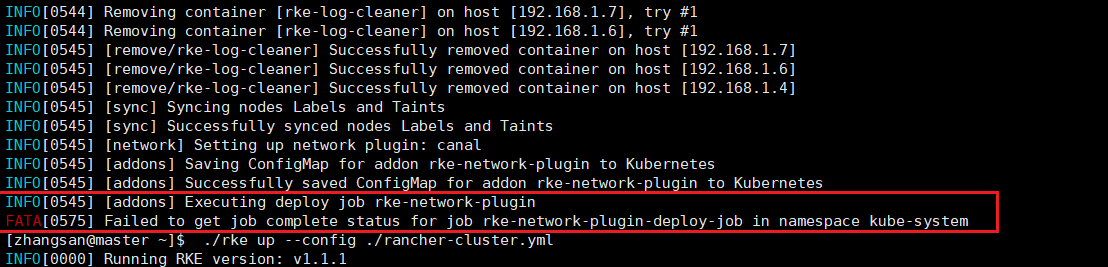
Don't panic, just do it again
./rke up --config ./rancher-cluster.yml
5. View the status of all nodes
sudo mkdir $HOME/.kube/
sudo cp kube_config_rancher-cluster.yml $HOME/.kube/config
kubectl --kubeconfig=kube_config_rancher-cluster.yml get nodes
kubectl --kubeconfig=kube_config_rancher-cluster.yml get pods --all-namespaces
5. Install ssl certificate
1. Write one-click certificate generation script
vim cert.sh
#!/bin/bash -e

help ()
{
    echo  ' ================================================================ '
    echo  ' --ssl-domain: generate ssl The primary domain name required for the certificate, if not specified, defaults to localhost,If it is ip Access to services can be ignored;'
    echo  ' --ssl-trusted-ip: commonly ssl Certificates only trust domain name access requests and sometimes need to be used ip To visit server,Then you need to give ssl Certificate Add Extension IP,Multiple IP Separate them with commas;'
    echo  ' --ssl-trusted-domain: If you want multiple domain names to access, add an extended domain name ( SSL_TRUSTED_DOMAIN),Multiple extended domain names are separated by commas;'
    echo  ' --ssl-size: ssl Encrypted bits, default 2048;'
    echo  ' --ssl-date: ssl Validity period, default 10 years;'
    echo  ' --ca-date: ca Validity period, default 10 years;'
    echo  ' --ssl-cn: Country Code(2 A code of letters),default CN;'
    echo  ' Use examples:'
    echo  ' ./create_self-signed-cert.sh --ssl-domain=www.test.com --ssl-trusted-domain=www.test2.com \ '
    echo  ' --ssl-trusted-ip=1.1.1.1,2.2.2.2,3.3.3.3 --ssl-size=2048 --ssl-date=3650'
    echo  ' ================================================================'
}

case "$1" in
    -h|--help) help; exit;;
esac

if [[ $1 == '' ]];then
    help;
    exit;
fi

CMDOPTS="$*"
for OPTS in $CMDOPTS;
do
    key=$(echo ${OPTS} | awk -F"=" '{print $1}' )
    value=$(echo ${OPTS} | awk -F"=" '{print $2}' )
    case "$key" in
        --ssl-domain) SSL_DOMAIN=$value ;;
        --ssl-trusted-ip) SSL_TRUSTED_IP=$value ;;
        --ssl-trusted-domain) SSL_TRUSTED_DOMAIN=$value ;;
        --ssl-size) SSL_SIZE=$value ;;
        --ssl-date) SSL_DATE=$value ;;
        --ca-date) CA_DATE=$value ;;
        --ssl-cn) CN=$value ;;
    esac
done

#CA-related configuration
CA_DATE=${CA_DATE:-3650}
CA_KEY=${CA_KEY:-cakey.pem}
CA_CERT=${CA_CERT:-cacerts.pem}
CA_DOMAIN=localhost

#ssl-related configuration
SSL_CONFIG=${SSL_CONFIG:-$PWD/openssl.cnf}
SSL_DOMAIN=${SSL_DOMAIN:-localhost}
SSL_DATE=${SSL_DATE:-3650}
SSL_SIZE=${SSL_SIZE:-2048}

##Country code (2-letter code), default CN;
CN=${CN:-CN}

SSL_KEY=$SSL_DOMAIN.key
SSL_CSR=$SSL_DOMAIN.csr
SSL_CERT=$SSL_DOMAIN.crt

echo -e "\033[32m ---------------------------- \033[0m"
echo -e "\033[32m       | generate SSL Cert |       \033[0m"
echo -e "\033[32m ---------------------------- \033[0m"

if [[ -e ./${CA_KEY} ]]; then
    echo -e "\033[32m ====> 1. Found already exists CA Private key, backup"${CA_KEY}"by"${CA_KEY}"-bak,Then recreate \033[0m"
    mv ${CA_KEY} "${CA_KEY}"-bak
    openssl genrsa -out ${CA_KEY} ${SSL_SIZE}
else
    echo -e "\033[32m ====> 1. Generate New CA private key ${CA_KEY} \033[0m"
    openssl genrsa -out ${CA_KEY} ${SSL_SIZE}
fi

if [[ -e ./${CA_CERT} ]]; then
    echo -e "\033[32m ====> 2. Found already exists CA Certificate, backup first"${CA_CERT}"by"${CA_CERT}"-bak,Then recreate \033[0m"
    mv ${CA_CERT} "${CA_CERT}"-bak
    openssl req -x509 -sha256 -new -nodes -key ${CA_KEY} -days ${CA_DATE} -out ${CA_CERT} -subj "/C=${CN}/CN=${CA_DOMAIN}"
else
    echo -e "\033[32m ====> 2. Generate New CA certificate ${CA_CERT} \033[0m"
    openssl req -x509 -sha256 -new -nodes -key ${CA_KEY} -days ${CA_DATE} -out ${CA_CERT} -subj "/C=${CN}/CN=${CA_DOMAIN}"
fi

echo -e "\033[32m ====> 3. generate Openssl configuration file ${SSL_CONFIG} \033[0m"
cat > ${SSL_CONFIG} <<EOM
[req]
req_extensions = v3_req
distinguished_name = req_distinguished_name
[req_distinguished_name]
[ v3_req ]
basicConstraints = CA:FALSE
keyUsage = nonRepudiation, digitalSignature, keyEncipherment
extendedKeyUsage = clientAuth, serverAuth
EOM

if [[ -n ${SSL_TRUSTED_IP} || -n ${SSL_TRUSTED_DOMAIN} ]]; then
    cat >> ${SSL_CONFIG} <<EOM
subjectAltName = @alt_names
[alt_names]
EOM
    IFS=","
    dns=(${SSL_TRUSTED_DOMAIN})
    dns+=(${SSL_DOMAIN})
    for i in "${!dns[@]}"; do
      echo DNS.$((i+1)) = ${dns[$i]} >> ${SSL_CONFIG}
    done

    if [[ -n ${SSL_TRUSTED_IP} ]]; then
        ip=(${SSL_TRUSTED_IP})
        for i in "${!ip[@]}"; do
          echo IP.$((i+1)) = ${ip[$i]} >> ${SSL_CONFIG}
        done
    fi
fi

echo -e "\033[32m ====> 4. Generate Service SSL KEY ${SSL_KEY} \033[0m"
openssl genrsa -out ${SSL_KEY} ${SSL_SIZE}

echo -e "\033[32m ====> 5. Generate Service SSL CSR ${SSL_CSR} \033[0m"
openssl req -sha256 -new -key ${SSL_KEY} -out ${SSL_CSR} -subj "/C=${CN}/CN=${SSL_DOMAIN}" -config ${SSL_CONFIG}

echo -e "\033[32m ====> 6. Generate Service SSL CERT ${SSL_CERT} \033[0m"
openssl x509 -sha256 -req -in ${SSL_CSR} -CA ${CA_CERT} \
    -CAkey ${CA_KEY} -CAcreateserial -out ${SSL_CERT} \
    -days ${SSL_DATE} -extensions v3_req \
    -extfile ${SSL_CONFIG}

echo -e "\033[32m ====> 7. Certificate production completed \033[0m"
echo
echo -e "\033[32m ====> 8. with YAML Format Output Results \033[0m"
echo "----------------------------------------------------------"
echo "ca_key: |"
cat $CA_KEY | sed 's/^/  /'
echo
echo "ca_cert: |"
cat $CA_CERT | sed 's/^/  /'
echo
echo "ssl_key: |"
cat $SSL_KEY | sed 's/^/  /'
echo
echo "ssl_csr: |"
cat $SSL_CSR | sed 's/^/  /'
echo
echo "ssl_cert: |"
cat $SSL_CERT | sed 's/^/  /'
echo

echo -e "\033[32m ====> 9. additional CA Certificate to Cert file \033[0m"
cat ${CA_CERT} >> ${SSL_CERT}
echo "ssl_cert: |"
cat $SSL_CERT | sed 's/^/  /'
echo

echo -e "\033[32m ====> 10. Rename service certificate \033[0m"
echo "cp ${SSL_DOMAIN}.key tls.key"
cp ${SSL_DOMAIN}.key tls.key
echo "cp ${SSL_DOMAIN}.crt tls.crt"
cp ${SSL_DOMAIN}.crt tls.crt
2. Generate certificate file
sudo chmod +x cert.sh
./cert.sh --ssl-domain=rancher.sigs.applysquare.net --ssl-size=2048 --ssl-date=3650
3. Create a namespace
kubectl create namespace cattle-system
4. Service certificate and private key cryptography
kubectl -n cattle-system create \
secret tls tls-rancher-ingress \
--cert=./tls.crt \
--key=./tls.key
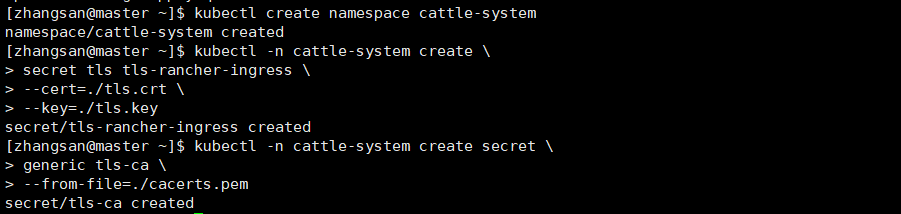
5.ca Certificate Cryptography
kubectl -n cattle-system create secret \
generic tls-ca \
--from-file=./cacerts.pem
Be careful:
Certificate, private key, ca name must be tls.crt, tls.key, cacerts.pem
6. Helm Installation Rancher
1. Add Chart Warehouse Address
helm repo add rancher-stable https://releases.rancher.com/server-charts/stable
2. Install rancher
helm install rancher rancher-stable/rancher \
--namespace cattle-system \
--set hostname=rancher.test.com \
--set ingress.tls.source=secret \
--set privateCA=true
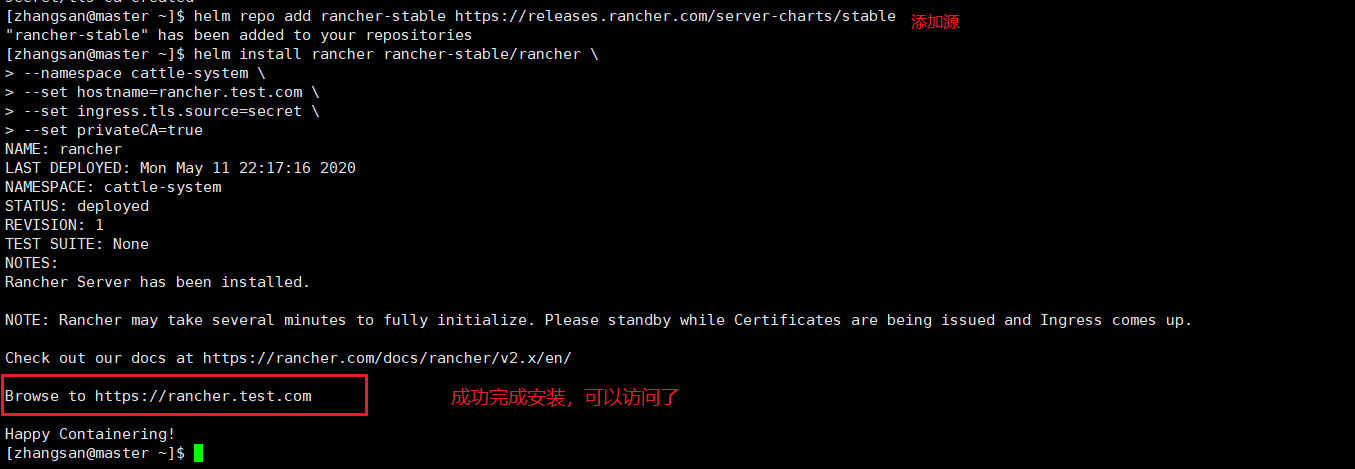
Be careful:
The domain name corresponding to the certificate needs to match the hostname option, otherwise Ingres will not be able to proxy access to Rancher.
3. View the running status of the pod
kubectl --kubeconfig=kube_config_rancher-cluster.yml get pods --all-namespaces
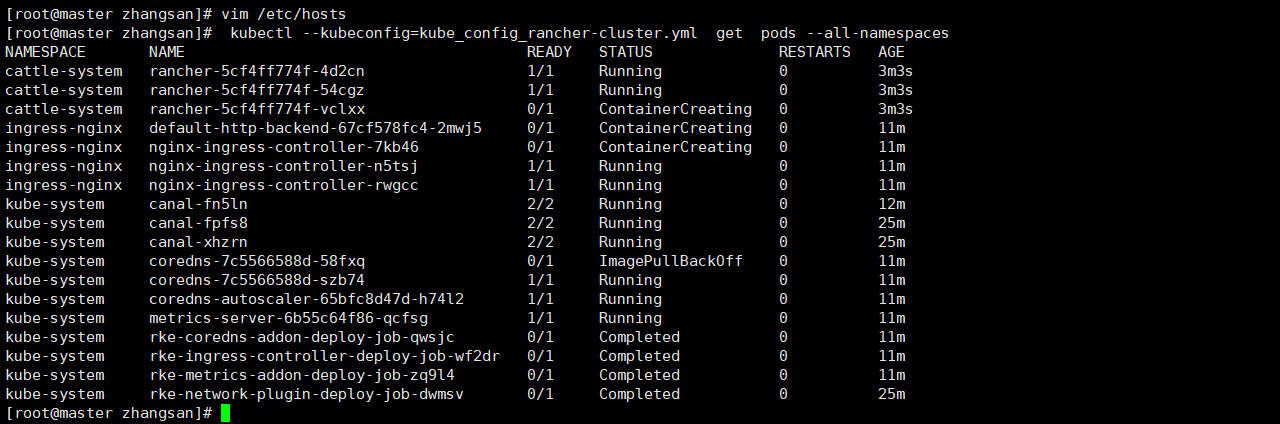
4. Add (including hosts) to each server hosts file
192.168.1.4 rancher.test.com
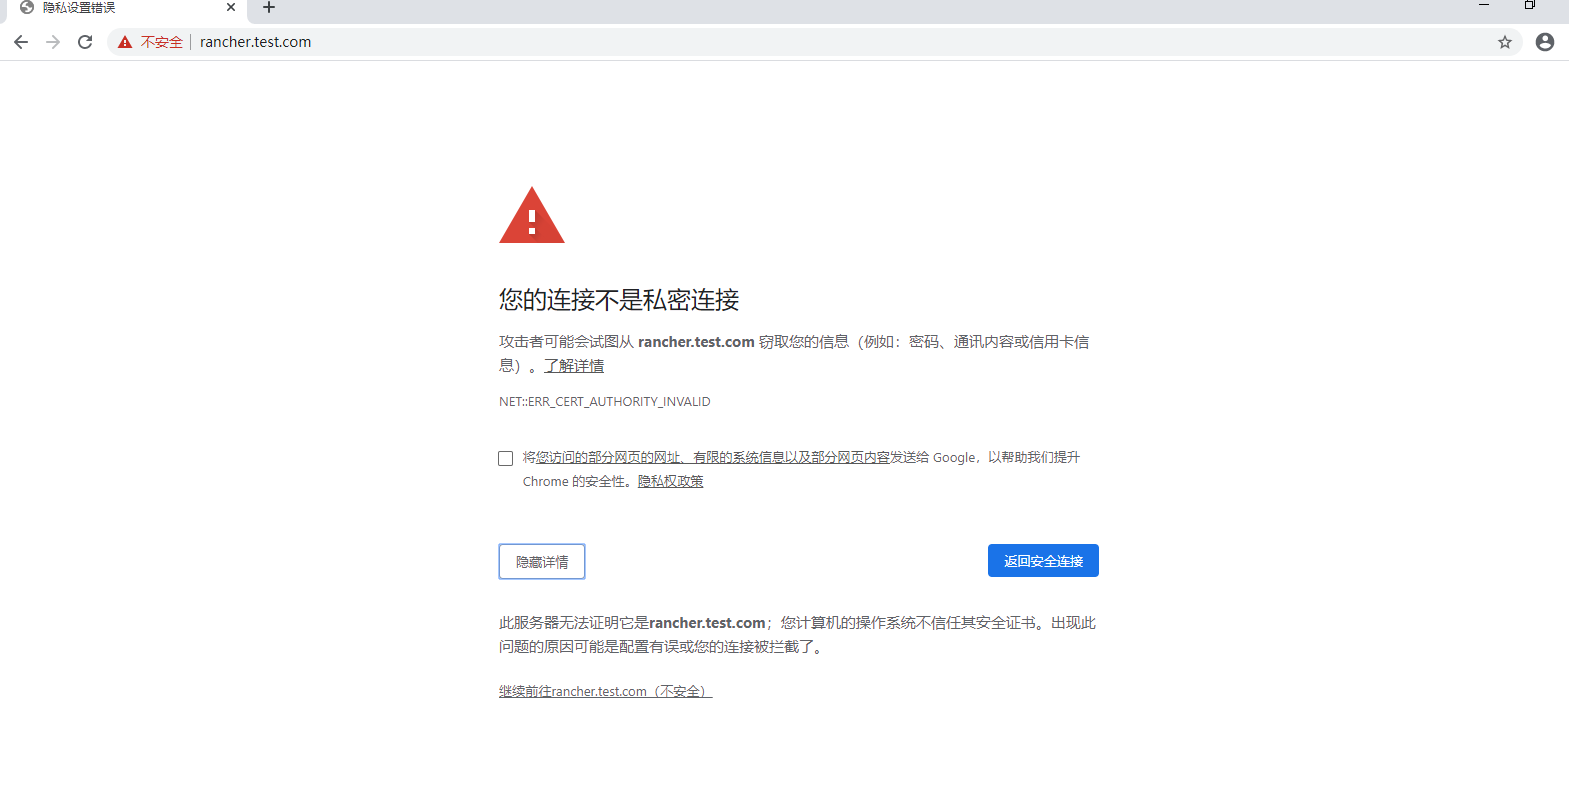
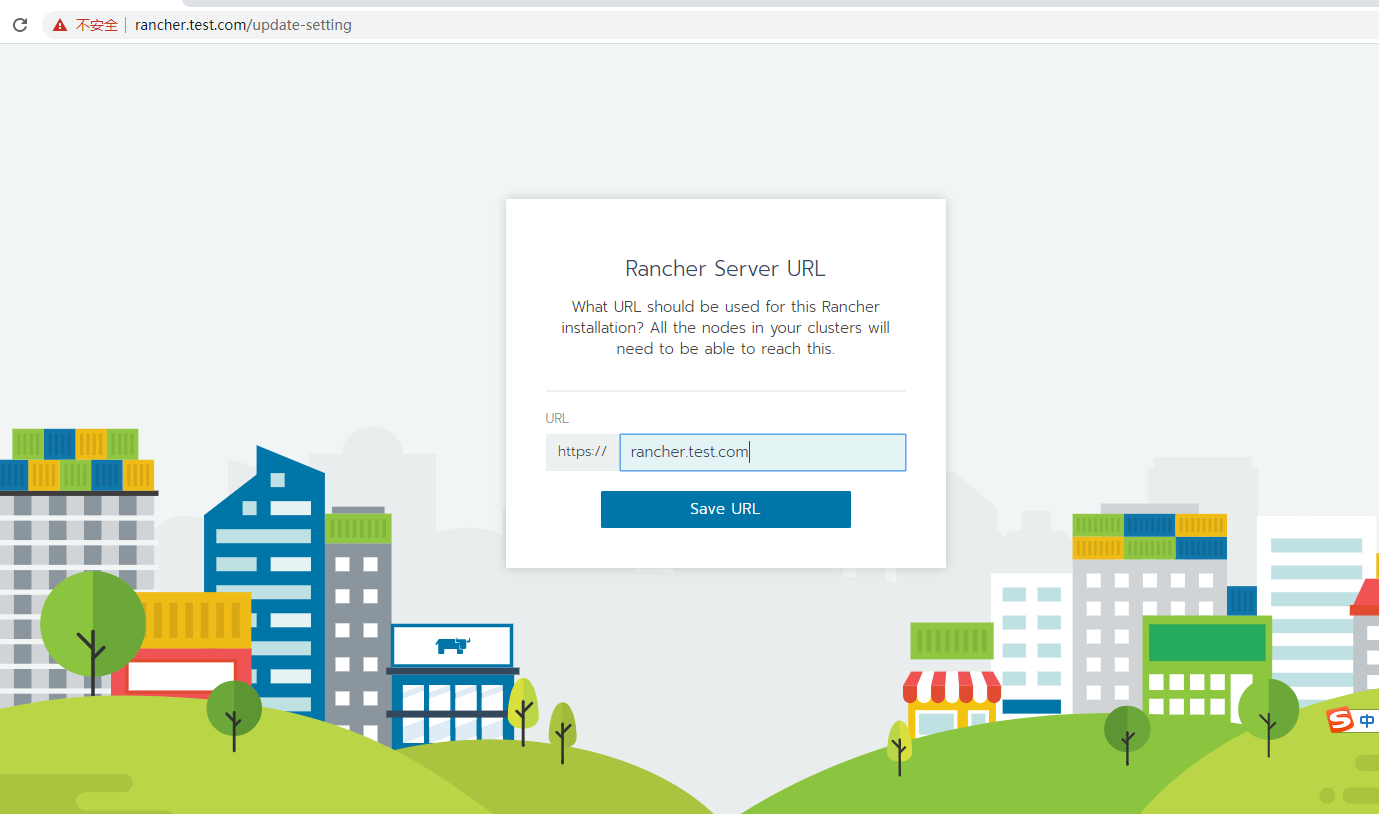
4. Page access: https://rancher.test.com/
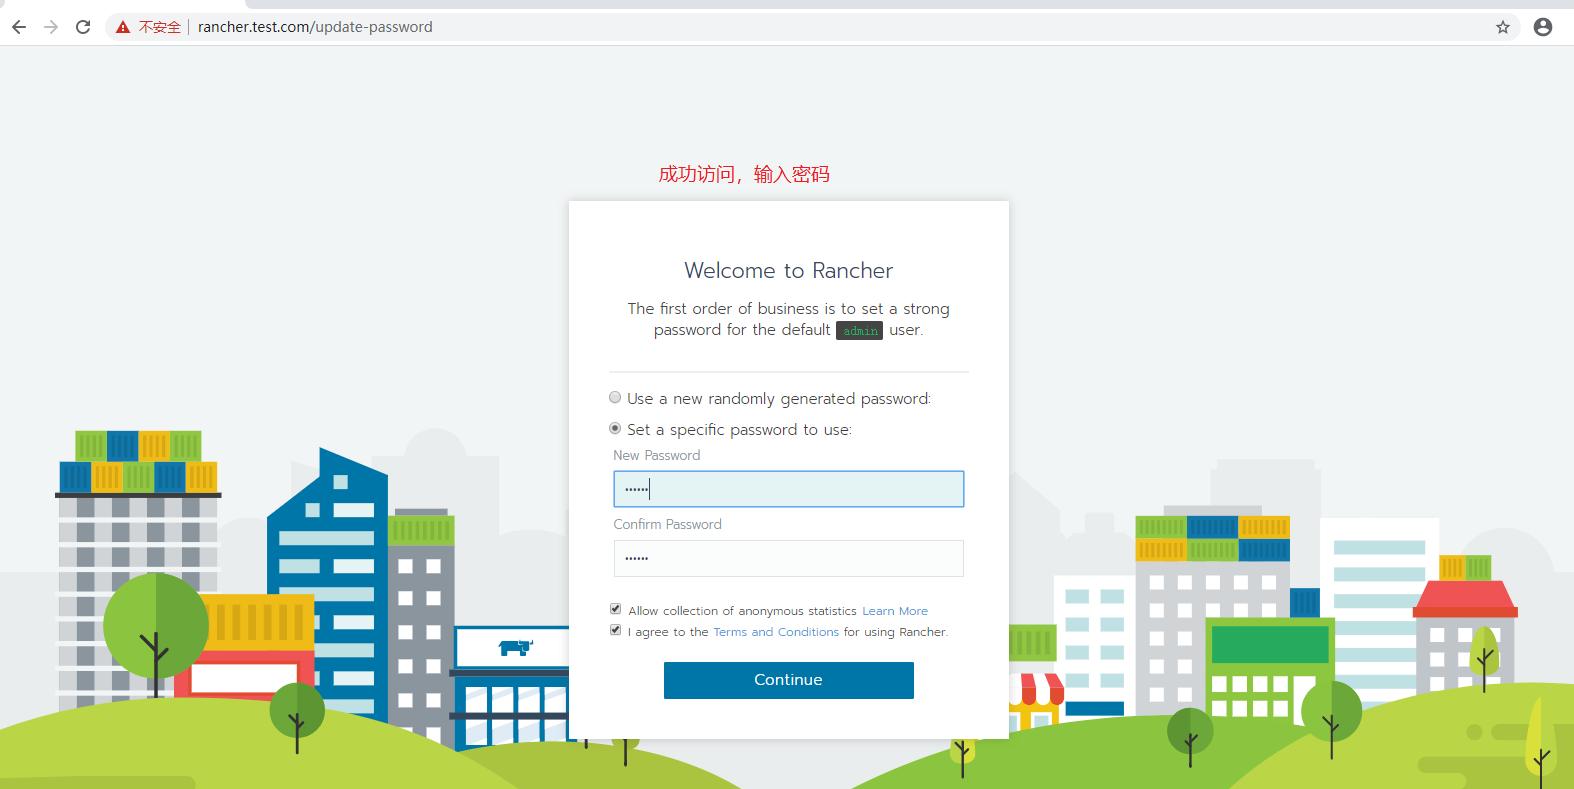
4.1 The first login will require administrator password, default administrator account is: admin
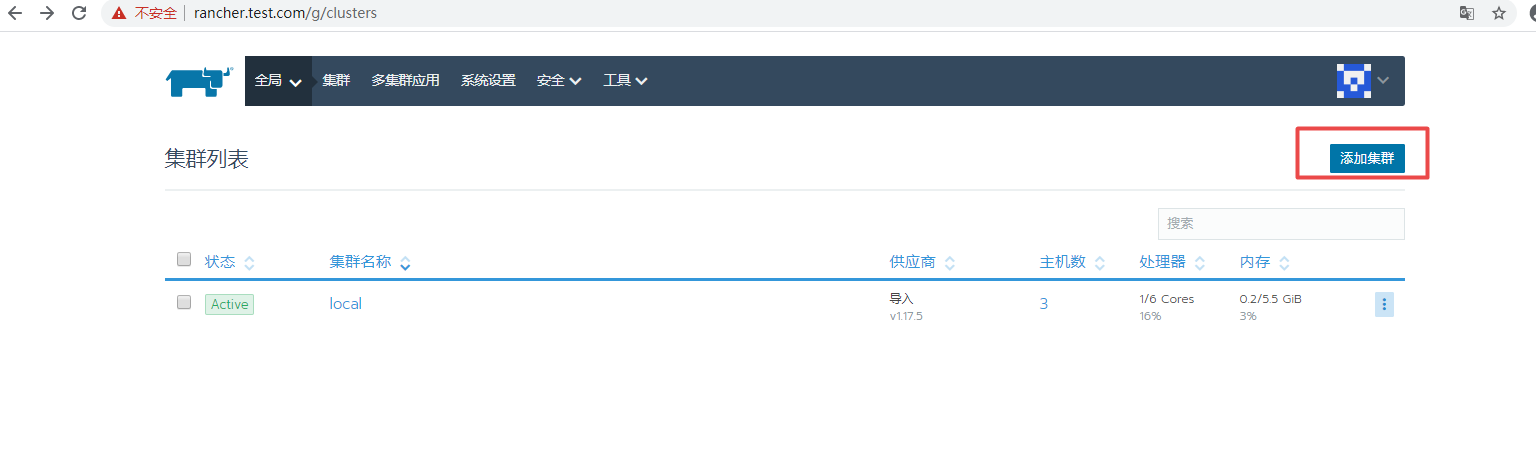
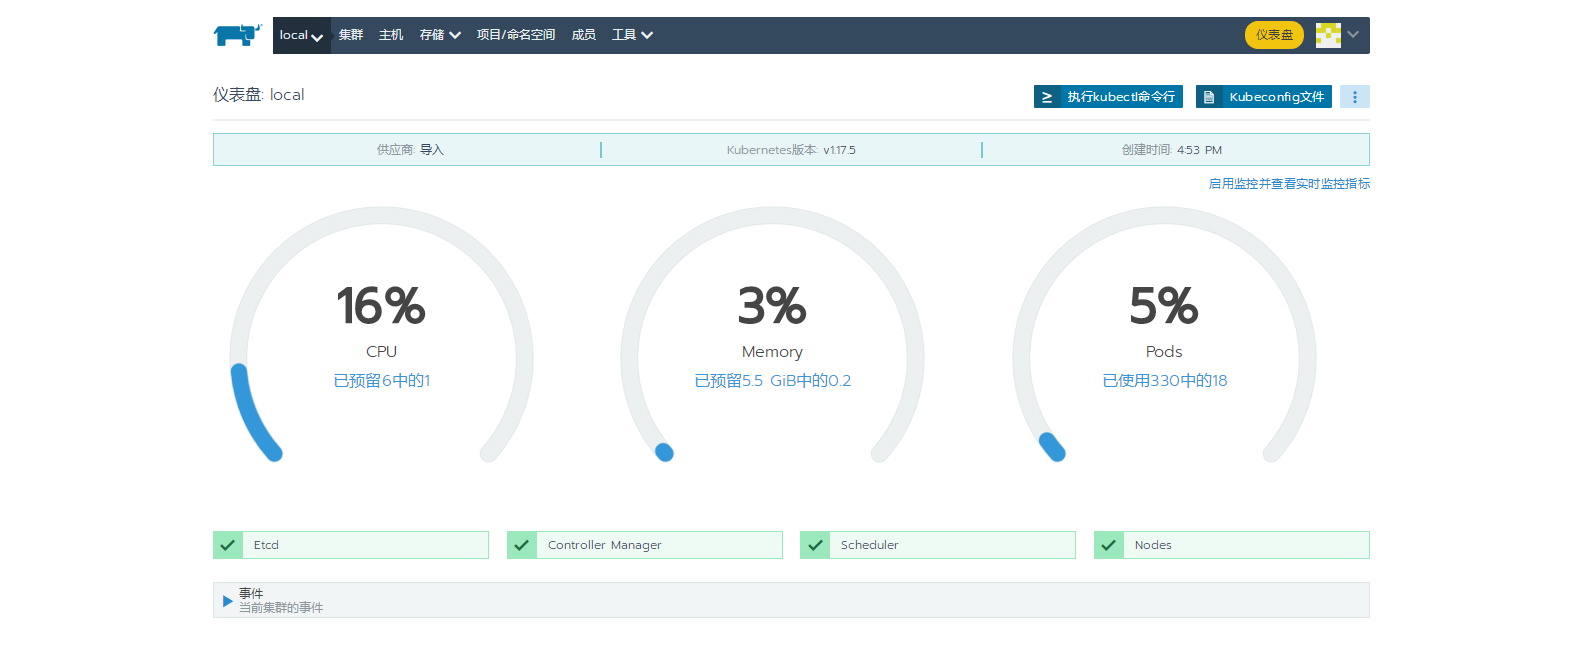
4.2. View cluster status
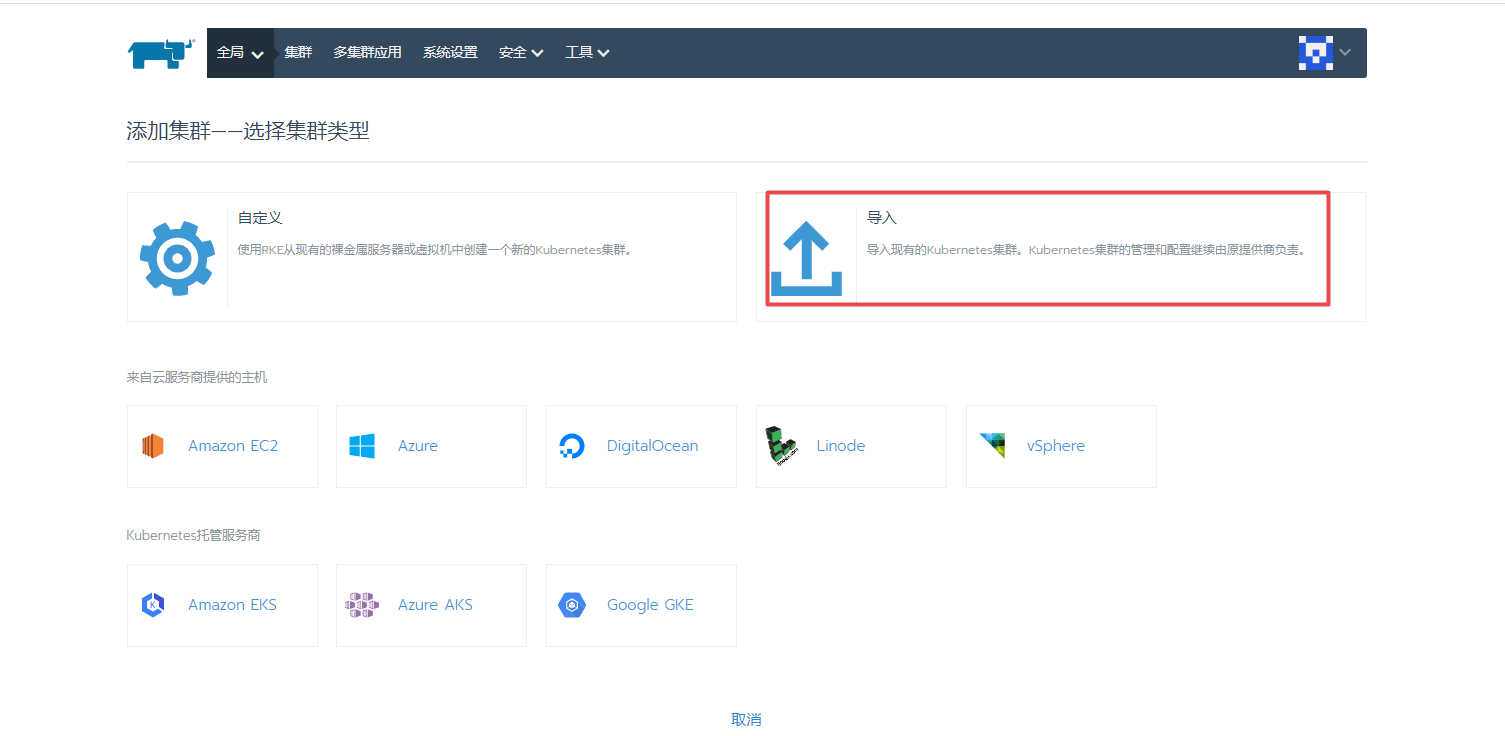
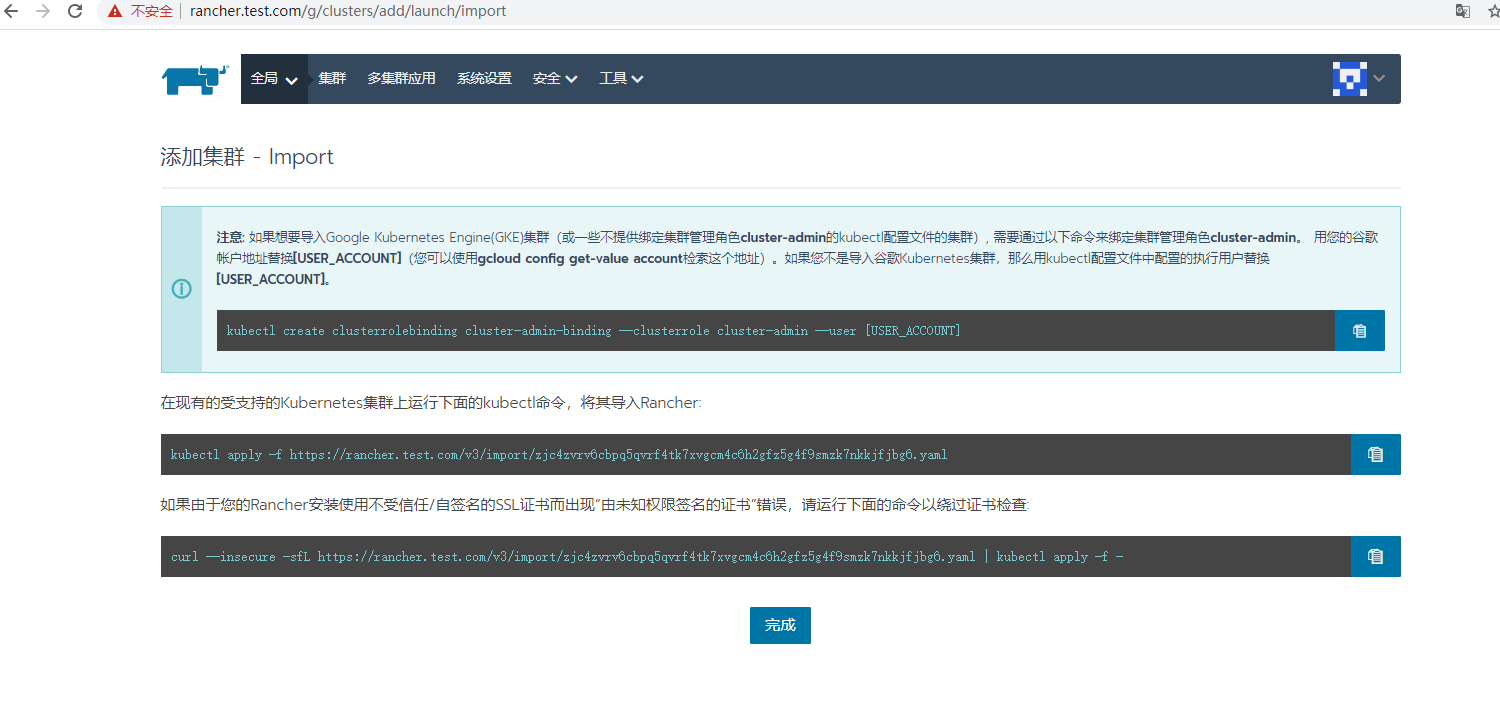
4.3 If you want to import a new K8s cluster, you can do this:


If the following error occurs when accessing the page:

Solution:
1. View the firewall
2. View hosts files
3. Restart docker
Reference File
1.rancher Official Documents https://docs.rancher.cn/rancher2x/
2.rancherhttps://rancher2.docs.rancher.cn/