K8s Multi-node Deployment --> Load Balancing Using Nginx Service --> UI Interface Display
Special note: a k8s cluster with a single master must be deployed before this experiment can begin
See my previous blog: https://blog.csdn.net/JarryZho/article/details/104193913
Environment Deployment:
Related packages and documentation:
Link: https://pan.baidu.com/s/1l4vVCkZ03la-VpIFXSz1dA
Extraction Code: rg99
Use Nginx Do load balancing:
lb1:192.168.195.147/24 mini-2
lb2:192.168.195.133/24 mini-3
Master Node:
master1:192.168.18.128/24 CentOS 7-3
master2:192.168.18.132/24 mini-1
Node Node:
node1: 192.168.18.148/24 CentOS 7-4
node2: 192.168.18.145/24 CentOS 7-5
VRRP Drift address: 192.168.18.100
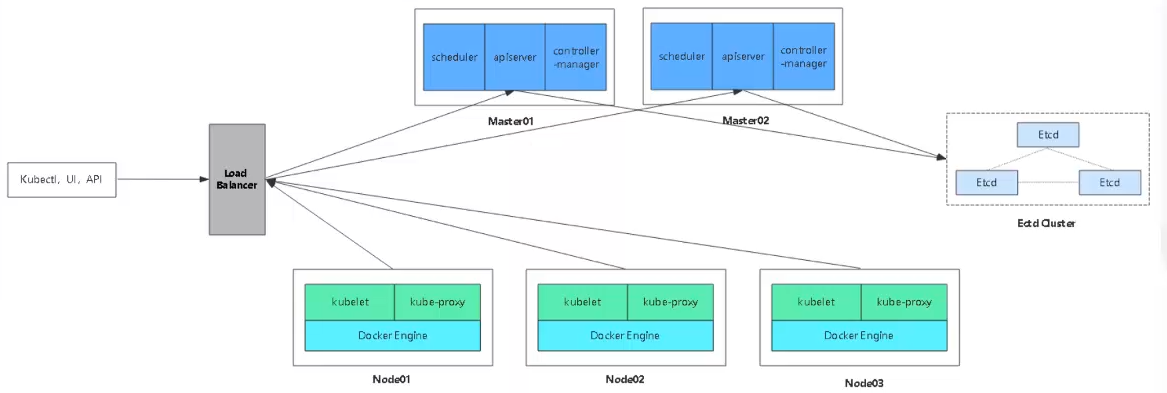
Multi-master cluster architecture diagram:
--------- Master 2 deployment---------
Step 1: Turn off Master 2 firewall services first
[root@master2 ~]# systemctl stop firewalld.service
[root@master2 ~]# setenforce 0
Step 2: Operate on master 1 and copy the kubernetes directory to master 2
[root@master1 k8s]# scp -r /opt/kubernetes/ root@192.168.18.132:/opt
The authenticity of host '192.168.18.132 (192.168.18.132)' can't be established.
ECDSA key fingerprint is SHA256:mTT+FEtzAu4X3D5srZlz93S3gye8MzbqVZFDzfJd4Gk.
ECDSA key fingerprint is MD5:fa:5a:88:23:49:60:9b:b8:7e:4b:14:4b:3f:cd:96:a0.
Are you sure you want to continue connecting (yes/no)? yes
Warning: Permanently added '192.168.18.132' (ECDSA) to the list of known hosts.
root@192.168.18.132's password:
token.csv                                                 100%   84    90.2KB/s   00:00
kube-apiserver                                            100%  934   960.7KB/s   00:00
kube-scheduler                                            100%   94   109.4KB/s   00:00
kube-controller-manager                                   100%  483   648.6KB/s   00:00
kube-apiserver                                            100%  184MB  82.9MB/s   00:02
kubectl                                                   100%   55MB  81.5MB/s   00:00
kube-controller-manager                                   100%  155MB  70.6MB/s   00:02
kube-scheduler                                            100%   55MB  77.4MB/s   00:00
ca-key.pem                                                100% 1675     1.2MB/s   00:00
ca.pem                                                    100% 1359     1.5MB/s   00:00
server-key.pem                                            100% 1675     1.2MB/s   00:00
server.pem                                                100% 1643     1.7MB/s   00:00
Step 3: Copy the three component startup scripts from master 1, kube-apiserver.service, kube-controller-manager.service, kube-scheduler.service, to master 2
[root@master1 k8s]# scp /usr/lib/systemd/system/{kube-apiserver,kube-controller-manager,kube-scheduler}.service root@192.168.18.132:/usr/lib/systemd/system/
root@192.168.18.132's password:
kube-apiserver.service                                    100%  282   286.6KB/s   00:00
kube-controller-manager.service                           100%  317   223.9KB/s   00:00
kube-scheduler.service                                    100%  281   362.4KB/s   00:00
Step 4: Modify the IP in the configuration file kube-apiserver by operating on Master 2
[root@master2 ~]# cd /opt/kubernetes/cfg/
[root@master2 cfg]# ls
kube-apiserver  kube-controller-manager  kube-scheduler  token.csv
[root@master2 cfg]# vim kube-apiserver
5 --bind-address=192.168.18.132 \
7 --advertise-address=192.168.18.132 \
#Lines 5 and 7 IP address needs to be changed to master 2 address
#Press Esc to exit insert mode after modification is completed, enter: wq save to exit
Step 5: Copy the etcd certificate already on master 1 for Master 2
Special note: Master 2 must have an etcd certificate, otherwise the apiserver service cannot start
[root@master1 k8s]# scp -r /opt/etcd/ root@192.168.18.132:/opt/
root@192.168.18.132's password:
etcd                                                      100%  516   535.5KB/s   00:00
etcd                                                      100%   18MB  90.6MB/s   00:00
etcdctl                                                   100%   15MB  80.5MB/s   00:00
ca-key.pem                                                100% 1675     1.4MB/s   00:00
ca.pem                                                    100% 1265   411.6KB/s   00:00
server-key.pem                                            100% 1679     2.0MB/s   00:00
server.pem                                                100% 1338   429.6KB/s   00:00
Step 6: Start the three component services in master 2
[root@master2 cfg]# systemctl start kube-apiserver.service
[root@master2 cfg]# systemctl enable kube-apiserver.service
Created symlink from /etc/systemd/system/multi-user.target.wants/kube-apiserver.service to /usr/lib/systemd/system/kube-apiserver.service.
[root@master2 cfg]# systemctl status kube-apiserver.service
● kube-apiserver.service - Kubernetes API Server
   Loaded: loaded (/usr/lib/systemd/system/kube-apiserver.service; enabled; vendor preset: disabled)
   Active: active (running) since Five 2020-02-07 09:16:57 CST; 56min ago

[root@master2 cfg]# systemctl start kube-controller-manager.service
[root@master2 cfg]# systemctl enable kube-controller-manager.service
Created symlink from /etc/systemd/system/multi-user.target.wants/kube-controller-manager.service to /usr/lib/systemd/system/kube-controller-manager.service.
[root@master2 cfg]# systemctl status kube-controller-manager.service
● kube-controller-manager.service - Kubernetes Controller Manager
   Loaded: loaded (/usr/lib/systemd/system/kube-controller-manager.service; enabled; vendor preset: disabled)
   Active: active (running) since Five 2020-02-07 09:17:02 CST; 57min ago

[root@master2 cfg]# systemctl start kube-scheduler.service
[root@master2 cfg]# systemctl enable kube-scheduler.service
Created symlink from /etc/systemd/system/multi-user.target.wants/kube-scheduler.service to /usr/lib/systemd/system/kube-scheduler.service.
[root@master2 cfg]# systemctl status kube-scheduler.service
● kube-scheduler.service - Kubernetes Scheduler
   Loaded: loaded (/usr/lib/systemd/system/kube-scheduler.service; enabled; vendor preset: disabled)
   Active: active (running) since Five 2020-02-07 09:17:07 CST; 58min ago
Step 7: Add environmental variables and take effect
[root@master2 cfg]# vim /etc/profile
#End Add
export PATH=$PATH:/opt/kubernetes/bin/
[root@master2 cfg]# source /etc/profile
[root@master2 cfg]# kubectl get node
NAME             STATUS   ROLES    AGE   VERSION
192.168.18.145   Ready    <none>   21h   v1.12.3
192.168.18.148   Ready    <none>   22h   v1.12.3
#You can now see the addition of node1 and node2
Now Master 2 is deployed
--------Nginx Load Balancing Deployment-------
Note: The nginx service is used here for load balancing. After version 1.9, nginx has four layers of forwarding (load balancing), which includes more stream s.
Multi-node principle:
Unlike a single node, the core point of a multi-node is to point to a core address. We have previously written the vip address definition to the k8s-cert.sh script file (192.168.18.100) when making a single node. vip opens the apiserver, and the multi-master opens the port accepts the apiserver request from the node node. If a new node joins, it is not directly looking for the moster node, whileIs to find vip directly for spiserver requests, then vip is dispatched and distributed to a master for execution, at which point the master receives the request and issues a certificate to the node change
Step 1: Upload two files, keepalived.conf and nginx.sh, to the root directory of lb1 and lb2
`lb1`
[root@lb1 ~]# ls
anaconda-ks.cfg       keepalived.conf  Public Video Document Music
initial-setup-ks.cfg  nginx.sh         Template Picture Download Desktop

`lb2`
[root@lb2 ~]# ls
anaconda-ks.cfg       keepalived.conf  Public Video Document Music
initial-setup-ks.cfg  nginx.sh         Template Picture Download Desktop
Step 2: lb1 (192.168.18.147) operation
[root@lb1 ~]# systemctl stop firewalld.service
[root@lb1 ~]# setenforce 0
[root@lb1 ~]# vim /etc/yum.repos.d/nginx.repo
[nginx]
name=nginx repo
baseurl=http://nginx.org/packages/centos/7/$basearch/
gpgcheck=0
#Press Esc to exit insert mode after modification is completed, enter: wq save to exit
`Reload yum Warehouse`
[root@lb1 ~]# yum list
`install nginx service`
[root@lb1 ~]# yum install nginx -y
[root@lb1 ~]# vim /etc/nginx/nginx.conf
#Insert the following under line 12
stream {
log_format main '$remote_addr $upstream_addr - [$time_local] $status $upstream_bytes_sent';
access_log /var/log/nginx/k8s-access.log main;
upstream k8s-apiserver {
server 192.168.18.128:6443; #This is the ip address of master 1
server 192.168.18.132:6443; #This is the ip address of Master 2
}
server {
listen 6443;
proxy_pass k8s-apiserver;
}
}
#Press Esc to exit insert mode after modification is completed, enter: wq save to exit
`Detect Grammar`
[root@lb1 ~]# nginx -t
nginx: the configuration file /etc/nginx/nginx.conf syntax is ok
nginx: configuration file /etc/nginx/nginx.conf test is successful
[root@lb1 ~]# cd /usr/share/nginx/html/
[root@lb1 html]# ls
50x.html index.html
[root@lb1 html]# vim index.html
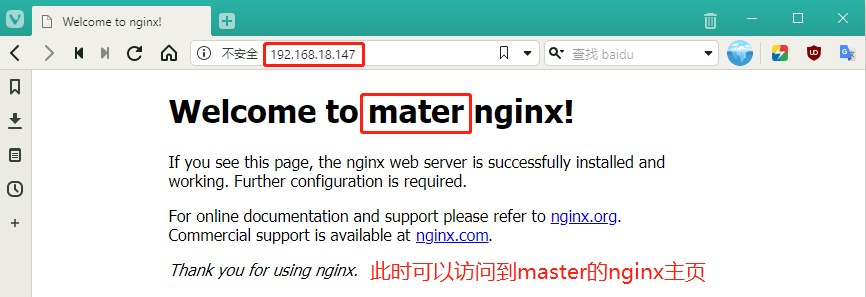
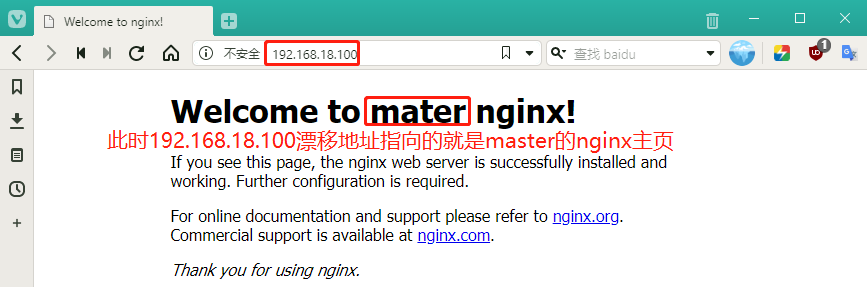
14 <h1>Welcome to mater nginx!</h1> #Add master to 14 lines to distinguish
#Press Esc to exit insert mode after modification is completed, enter: wq save to exit
`Start Services`
[root@lb2 ~]# systemctl start nginxBrowser validation access, enter 192.168.18.147 to access master's nginx home page
Deploy keepalived service
[root@lb1 html]# yum install keepalived -y
`Modify Profile`
[root@lb1 html]# cd ~
[root@lb1 ~]# cp keepalived.conf /etc/keepalived/keepalived.conf
cp: Whether to Overwrite"/etc/keepalived/keepalived.conf"? yes
#Use the keepalived.conf configuration file we uploaded earlier to overwrite the original configuration file after installation

[root@lb1 ~]# vim /etc/keepalived/keepalived.conf
18     script "/etc/nginx/check_nginx.sh"       #Change the 18-Line directory to/etc/nginx/, write after the script
23     interface ens33      #eth0 to ens33, where the name of the network card can be queried using the ifconfig command
24     virtual_router_id 51     #vrrp routing ID instance, each instance is unique
25     priority 100             #Priority, Standby Server Settings 90
31     virtual_ipaddress {
32         192.168.18.100/24    #Change vip address to 192.168.18.100
#Delete below 38 lines
#Press Esc to exit insert mode after modification is completed, enter: wq save to exit

`Write a script`
[root@lb1 ~]# vim /etc/nginx/check_nginx.sh
count=$(ps -ef |grep nginx |egrep -cv "grep|$$")    #Statistics Quantity

if [ "$count" -eq 0 ];then
    systemctl stop keepalived
fi
#Match 0, turn off keepalived service
#Press Esc to exit insert mode after writing, enter: wq save to exit
[root@lb1 ~]# chmod +x /etc/nginx/check_nginx.sh
[root@lb1 ~]# ls /etc/nginx/check_nginx.sh
/etc/nginx/check_nginx.sh       #The script is now executable, green
[root@lb1 ~]# systemctl start keepalived

[root@lb1 ~]# ip a
2: ens33: <BROADCAST,MULTICAST,UP,LOWER_UP> mtu 1500 qdisc pfifo_fast state UP qlen 1000
    link/ether 00:0c:29:24:63:be brd ff:ff:ff:ff:ff:ff
    inet 192.168.18.147/24 brd 192.168.18.255 scope global dynamic ens33
       valid_lft 1370sec preferred_lft 1370sec
    inet `192.168.18.100/24` scope global secondary ens33       #The drift address is now in lb1
       valid_lft forever preferred_lft forever
    inet6 fe80::1cb1:b734:7f72:576f/64 scope link
       valid_lft forever preferred_lft forever
    inet6 fe80::578f:4368:6a2c:80d7/64 scope link tentative dadfailed
       valid_lft forever preferred_lft forever
    inet6 fe80::6a0c:e6a0:7978:3543/64 scope link tentative dadfailed
       valid_lft forever preferred_lft forever
Step 3: lb2 (192.168.18.133) operation
[root@lb2 ~]# systemctl stop firewalld.service
[root@lb2 ~]# setenforce 0
[root@lb2 ~]# vim /etc/yum.repos.d/nginx.repo
[nginx]
name=nginx repo
baseurl=http://nginx.org/packages/centos/7/$basearch/
gpgcheck=0
#Press Esc to exit insert mode after modification is completed, enter: wq save to exit
`Reload yum Warehouse`
[root@lb2 ~]# yum list
`install nginx service`
[root@lb2 ~]# yum install nginx -y
[root@lb2 ~]# vim /etc/nginx/nginx.conf
#Insert the following under line 12
stream {
log_format main '$remote_addr $upstream_addr - [$time_local] $status $upstream_bytes_sent';
access_log /var/log/nginx/k8s-access.log main;
upstream k8s-apiserver {
server 192.168.18.128:6443; #This is the ip address of master 1
server 192.168.18.132:6443; #This is the ip address of Master 2
}
server {
listen 6443;
proxy_pass k8s-apiserver;
}
}
#Press Esc to exit insert mode after modification is completed, enter: wq save to exit
`Detect Grammar`
[root@lb2 ~]# nginx -t
nginx: the configuration file /etc/nginx/nginx.conf syntax is ok
nginx: configuration file /etc/nginx/nginx.conf test is successful
[root@lb2 ~]# vim /usr/share/nginx/html/index.html
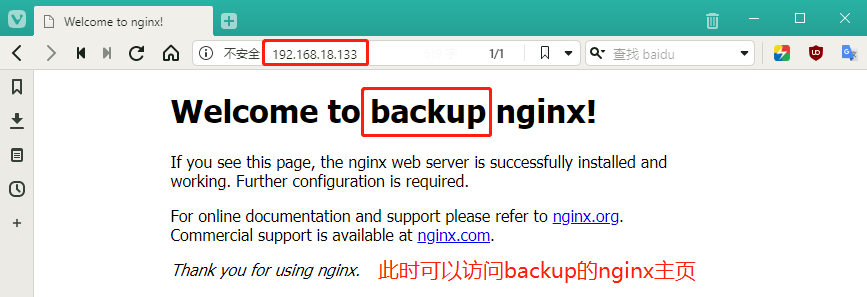
14 <h1>Welcome to backup nginx!</h1> #Add backup in line 14 to distinguish
#Press Esc to exit insert mode after modification is completed, enter: wq save to exit
`Start Services`
[root@lb2 ~]# systemctl start nginxBrowser validation access, enter 192.168.18.133 to access master's nginx home page
Deploy keepalived service
[root@lb2 ~]# yum install keepalived -y
`Modify Profile`
[root@lb2 ~]# cp keepalived.conf /etc/keepalived/keepalived.conf
cp: Whether to Overwrite"/etc/keepalived/keepalived.conf"? yes
#Use the keepalived.conf configuration file we uploaded earlier to overwrite the original configuration file after installation

[root@lb2 ~]# vim /etc/keepalived/keepalived.conf
18     script "/etc/nginx/check_nginx.sh"       #Change the 18-Line directory to/etc/nginx/, write after the script
22     state BACKUP     #22 rows role MASTER changed to BACKUP
23     interface ens33  #Change eth0 to ens33
24     virtual_router_id 51     #vrrp routing ID instance, each instance is unique
25     priority 90      #Priority, standby server is 90
31     virtual_ipaddress {
32         192.168.18.100/24    #Change vip address to 192.168.18.100
#Delete below 38 lines
#Press Esc to exit insert mode after modification is completed, enter: wq save to exit

`Write a script`
[root@lb2 ~]# vim /etc/nginx/check_nginx.sh
count=$(ps -ef |grep nginx |egrep -cv "grep|$$")    #Statistics Quantity

if [ "$count" -eq 0 ];then
    systemctl stop keepalived
fi
#Match 0, turn off keepalived service
#Press Esc to exit insert mode after writing, enter: wq save to exit
[root@lb2 ~]# chmod +x /etc/nginx/check_nginx.sh
[root@lb2 ~]# ls /etc/nginx/check_nginx.sh
/etc/nginx/check_nginx.sh       #The script is now executable, green

[root@lb2 ~]# systemctl start keepalived
[root@lb2 ~]# ip a
2: ens33: <BROADCAST,MULTICAST,UP,LOWER_UP> mtu 1500 qdisc pfifo_fast state UP qlen 1000
    link/ether 00:0c:29:9d:b7:83 brd ff:ff:ff:ff:ff:ff
    inet 192.168.18.133/24 brd 192.168.18.255 scope global dynamic ens33
       valid_lft 958sec preferred_lft 958sec
    inet6 fe80::578f:4368:6a2c:80d7/64 scope link
       valid_lft forever preferred_lft forever
    inet6 fe80::6a0c:e6a0:7978:3543/64 scope link tentative dadfailed
       valid_lft forever preferred_lft forever
#There is no 192.168.18.100 at this time because the address is on lb1 (master)
Step 4: Verify address drift
`Stop it lb1 In nginx service`
[root@lb1 ~]# pkill nginx
[root@lb1 ~]# systemctl status nginx
● nginx.service - nginx - high performance web server
   Loaded: loaded (/usr/lib/systemd/system/nginx.service; disabled; vendor preset: disabled)
   Active: failed (Result: exit-code) since Five 2020-02-07 12:16:39 CST; 1min 40s ago
#The state is off at this time

`inspect keepalived Is the service shut down at the same time`
[root@lb1 ~]# systemctl status keepalived.service
● keepalived.service - LVS and VRRP High Availability Monitor
   Loaded: loaded (/usr/lib/systemd/system/keepalived.service; disabled; vendor preset: disabled)
   Active: inactive (dead)
#The keepalived service is shut down at this time, indicating that the check_nginx.sh script executed successfully

[root@lb1 ~]# ps -ef |grep nginx |egrep -cv "grep|$$"
0
#At this point, the criterion is 0 and the keepalived service should be stopped

`See lb1 Does the drift address on exist`
[root@lb1 ~]# ip a
2: ens33: <BROADCAST,MULTICAST,UP,LOWER_UP> mtu 1500 qdisc pfifo_fast state UP qlen 1000
    link/ether 00:0c:29:24:63:be brd ff:ff:ff:ff:ff:ff
    inet 192.168.18.147/24 brd 192.168.18.255 scope global dynamic ens33
       valid_lft 1771sec preferred_lft 1771sec
    inet6 fe80::1cb1:b734:7f72:576f/64 scope link
       valid_lft forever preferred_lft forever
    inet6 fe80::578f:4368:6a2c:80d7/64 scope link tentative dadfailed
       valid_lft forever preferred_lft forever
    inet6 fe80::6a0c:e6a0:7978:3543/64 scope link tentative dadfailed
       valid_lft forever preferred_lft forever
#The 192.168.18.100 drift address disappears at this time, and should drift to lb2 if the dual-machine hot-up succeeds.

`View Again lb2 See if drift address exists`
[root@lb2 ~]# ip a
2: ens33: <BROADCAST,MULTICAST,UP,LOWER_UP> mtu 1500 qdisc pfifo_fast state UP qlen 1000
    link/ether 00:0c:29:9d:b7:83 brd ff:ff:ff:ff:ff:ff
    inet 192.168.18.133/24 brd 192.168.18.255 scope global dynamic ens33
       valid_lft 1656sec preferred_lft 1656sec
    inet 192.168.18.100/24 scope global secondary ens33
       valid_lft forever preferred_lft forever
    inet6 fe80::578f:4368:6a2c:80d7/64 scope link
       valid_lft forever preferred_lft forever
    inet6 fe80::6a0c:e6a0:7978:3543/64 scope link tentative dadfailed
       valid_lft forever preferred_lft forever
#At this point, the drift address 192.168.18.100 to lb2 indicates that the dual-machine is ready successfully.
Step 5: Resume the operation
`stay lb1 Up Start nginx and keepalived service`
[root@lb1 ~]# systemctl start nginx
[root@lb1 ~]# systemctl start keepalived

`Drift addresses will come back again lb1 upper`
[root@lb1 ~]# ip a
2: ens33: <BROADCAST,MULTICAST,UP,LOWER_UP> mtu 1500 qdisc pfifo_fast state UP qlen 1000
    link/ether 00:0c:29:24:63:be brd ff:ff:ff:ff:ff:ff
    inet 192.168.18.147/24 brd 192.168.18.255 scope global dynamic ens33
       valid_lft 1051sec preferred_lft 1051sec
    inet 192.168.18.100/24 scope global secondary ens33
       valid_lft forever preferred_lft forever
    inet6 fe80::1cb1:b734:7f72:576f/64 scope link
       valid_lft forever preferred_lft forever
    inet6 fe80::578f:4368:6a2c:80d7/64 scope link tentative dadfailed
       valid_lft forever preferred_lft forever
    inet6 fe80::6a0c:e6a0:7978:3543/64 scope link tentative dadfailed
       valid_lft forever preferred_lft forever
#Conversely, drift addresses on lb2 disappear
Step 6: At this point we use the host's cmd command to test if the drift address is connected
C:\Users\zhn>ping 192.168.18.100

Ping 192.168.18.100 with 32 bytes of data:
Reply from 192.168.18.100: Byte=32 Time <1ms TTL=64
 Reply from 192.168.18.100: Byte=32 Time <1ms TTL=64
 Reply from 192.168.18.100: Byte=32 Time=1ms TTL=64
 Reply from 192.168.18.100: Byte=32 Time <1ms TTL=64

Ping STATISTICS OF 192.168.18.100:
    Packet: sent = 4, received = 4, lost = 0 (0% lost),
Estimated round-trip time in milliseconds:
    Minimum = 0ms, Maximum = 1ms, Average = 0ms
 #You can ping at this point, indicating you can access this virtual IP
Step 7: Using 192.168.18.100 address on the host machine should access the master's nginx home page, which is lb1
Step 8: Start modifying the node node configuration file Unified VIP (bootstrap.kubeconfig,kubelet.kubeconfig)
node1:
[root@node1 ~]# vim /opt/kubernetes/cfg/bootstrap.kubeconfig
5     server: https://192.168.18.100:6443 Line #5 Changed to Vip's address
#Press Esc to exit insert mode after modification is completed, enter: wq save to exit

[root@node1 ~]# vim /opt/kubernetes/cfg/kubelet.kubeconfig
5     server: https://192.168.18.128:6443 Line #5 Changed to Vip's address
#Press Esc to exit insert mode after modification is completed, enter: wq save to exit

[root@node1 ~]# vim /opt/kubernetes/cfg/kube-proxy.kubeconfig
5     server: https://192.168.18.128:6443 Line #5 Changed to Vip's address
#Press Esc to exit insert mode after modification is completed, enter: wq save to exit

`Replacement Complete Direct Self-Check`
[root@node1 ~]# cd /opt/kubernetes/cfg/
[root@node1 cfg]# grep 100 *
bootstrap.kubeconfig:    server: https://192.168.18.100:6443
kubelet.kubeconfig:    server: https://192.168.18.100:6443
kube-proxy.kubeconfig:    server: https://192.168.18.100:6443

[root@node1 cfg]# systemctl restart kubelet.service
[root@node1 cfg]# systemctl restart kube-proxy.service
node2:
[root@node2 ~]# vim /opt/kubernetes/cfg/bootstrap.kubeconfig
5     server: https://192.168.18.100:6443 Line #5 Changed to Vip's address
#Press Esc to exit insert mode after modification is completed, enter: wq save to exit

[root@node2 ~]# vim /opt/kubernetes/cfg/kubelet.kubeconfig
5     server: https://192.168.18.128:6443 Line #5 Changed to Vip's address
#Press Esc to exit insert mode after modification is completed, enter: wq save to exit

[root@node2 ~]# vim /opt/kubernetes/cfg/kube-proxy.kubeconfig
5     server: https://192.168.18.128:6443 Line #5 Changed to Vip's address
#Press Esc to exit insert mode after modification is completed, enter: wq save to exit

`Replacement Complete Direct Self-Check`
[root@node2 ~]# cd /opt/kubernetes/cfg/
[root@node2 cfg]# grep 100 *
bootstrap.kubeconfig:    server: https://192.168.18.100:6443
kubelet.kubeconfig:    server: https://192.168.18.100:6443
kube-proxy.kubeconfig:    server: https://192.168.18.100:6443

[root@node2 cfg]# systemctl restart kubelet.service
[root@node2 cfg]# systemctl restart kube-proxy.service
Step 9: View the k8s log of nginx on lb01
[root@lb1 ~]# tail /var/log/nginx/k8s-access.log
192.168.18.145 192.168.18.128:6443 - [07/Feb/2020:14:18:54 +0800] 200 1119
192.168.18.145 192.168.18.132:6443 - [07/Feb/2020:14:18:54 +0800] 200 1119
192.168.18.148 192.168.18.128:6443 - [07/Feb/2020:14:18:57 +0800] 200 1120
192.168.18.148 192.168.18.132:6443 - [07/Feb/2020:14:18:57 +0800] 200 1120
Step 10: Operate on master 1
`Test Creation pod`
[root@master1 ~]# kubectl run nginx --image=nginx
kubectl run --generator=deployment/apps.v1beta1 is DEPRECATED and will be removed in a future version. Use kubectl create instead.
deployment.apps/nginx created

`View Status`
[root@master1 ~]# kubectl get pods
NAME                    READY   STATUS              RESTARTS   AGE
nginx-dbddb74b8-7hdfj   0/1     ContainerCreating   0          32s
#ContainerCreating is now being created

[root@master1 ~]# kubectl get pods
NAME                    READY   STATUS    RESTARTS   AGE
nginx-dbddb74b8-7hdfj   1/1     Running   0          73s
#At this point the state is Running, indicating that the creation is complete and running

`Note: Logging issues`
[root@master1 ~]# kubectl logs nginx-dbddb74b8-7hdfj
Error from server (Forbidden): Forbidden (user=system:anonymous, verb=get, resource=nodes, subresource=proxy) ( pods/log nginx-dbddb74b8-7hdfj)
#The log is not viewable at this time and permissions need to be turned on

`Anonymous users in the bound cluster grant administrator privileges`
[root@master1 ~]# kubectl create clusterrolebinding cluster-system-anonymous --clusterrole=cluster-admin --user=system:anonymous
clusterrolebinding.rbac.authorization.k8s.io/cluster-system-anonymous created
[root@master1 ~]# kubectl logs nginx-dbddb74b8-7hdfj        #You won't make a mistake at this time

`See pod network`
[root@master1 ~]# kubectl get pods -o wide
NAME                  READY     STATUS    RESTARTS   AGE      IP            NODE         NOMINATED NODE
nginx-dbddb74b8-7hdfj   1/1     Running   0          20m   172.17.32.2   192.168.18.148  <none>
Operations on the corresponding segment's node1 node are directly accessible
[root@node1 ~]# curl 172.17.32.2
<!DOCTYPE html>
<html>
<head>
<title>Welcome to nginx!</title>
<style>
    body {
        width: 35em;
        margin: 0 auto;
        font-family: Tahoma, Verdana, Arial, sans-serif;
    }
</style>
</head>
<body>
<h1>Welcome to nginx!</h1>
<p>If you see this page, the nginx web server is successfully installed and
working. Further configuration is required.</p>

<p>For online documentation and support please refer to
<a href="http://nginx.org/">nginx.org</a>.<br/>
Commercial support is available at
<a href="http://nginx.com/">nginx.com</a>.</p>

<p><em>Thank you for using nginx.</em></p>
</body>
</html>
#What you see here is information about nginx in the container
Access produces a log, so we can go back to master 1 and view the log
[root@master1 ~]# kubectl logs nginx-dbddb74b8-7hdfj
172.17.32.1 - - [07/Feb/2020:06:52:53 +0000] "GET / HTTP/1.1" 200 612 "-" "curl/7.29.0" "-"
#You can now see the record that node1 accessed using the gateway (172.17.32.1)
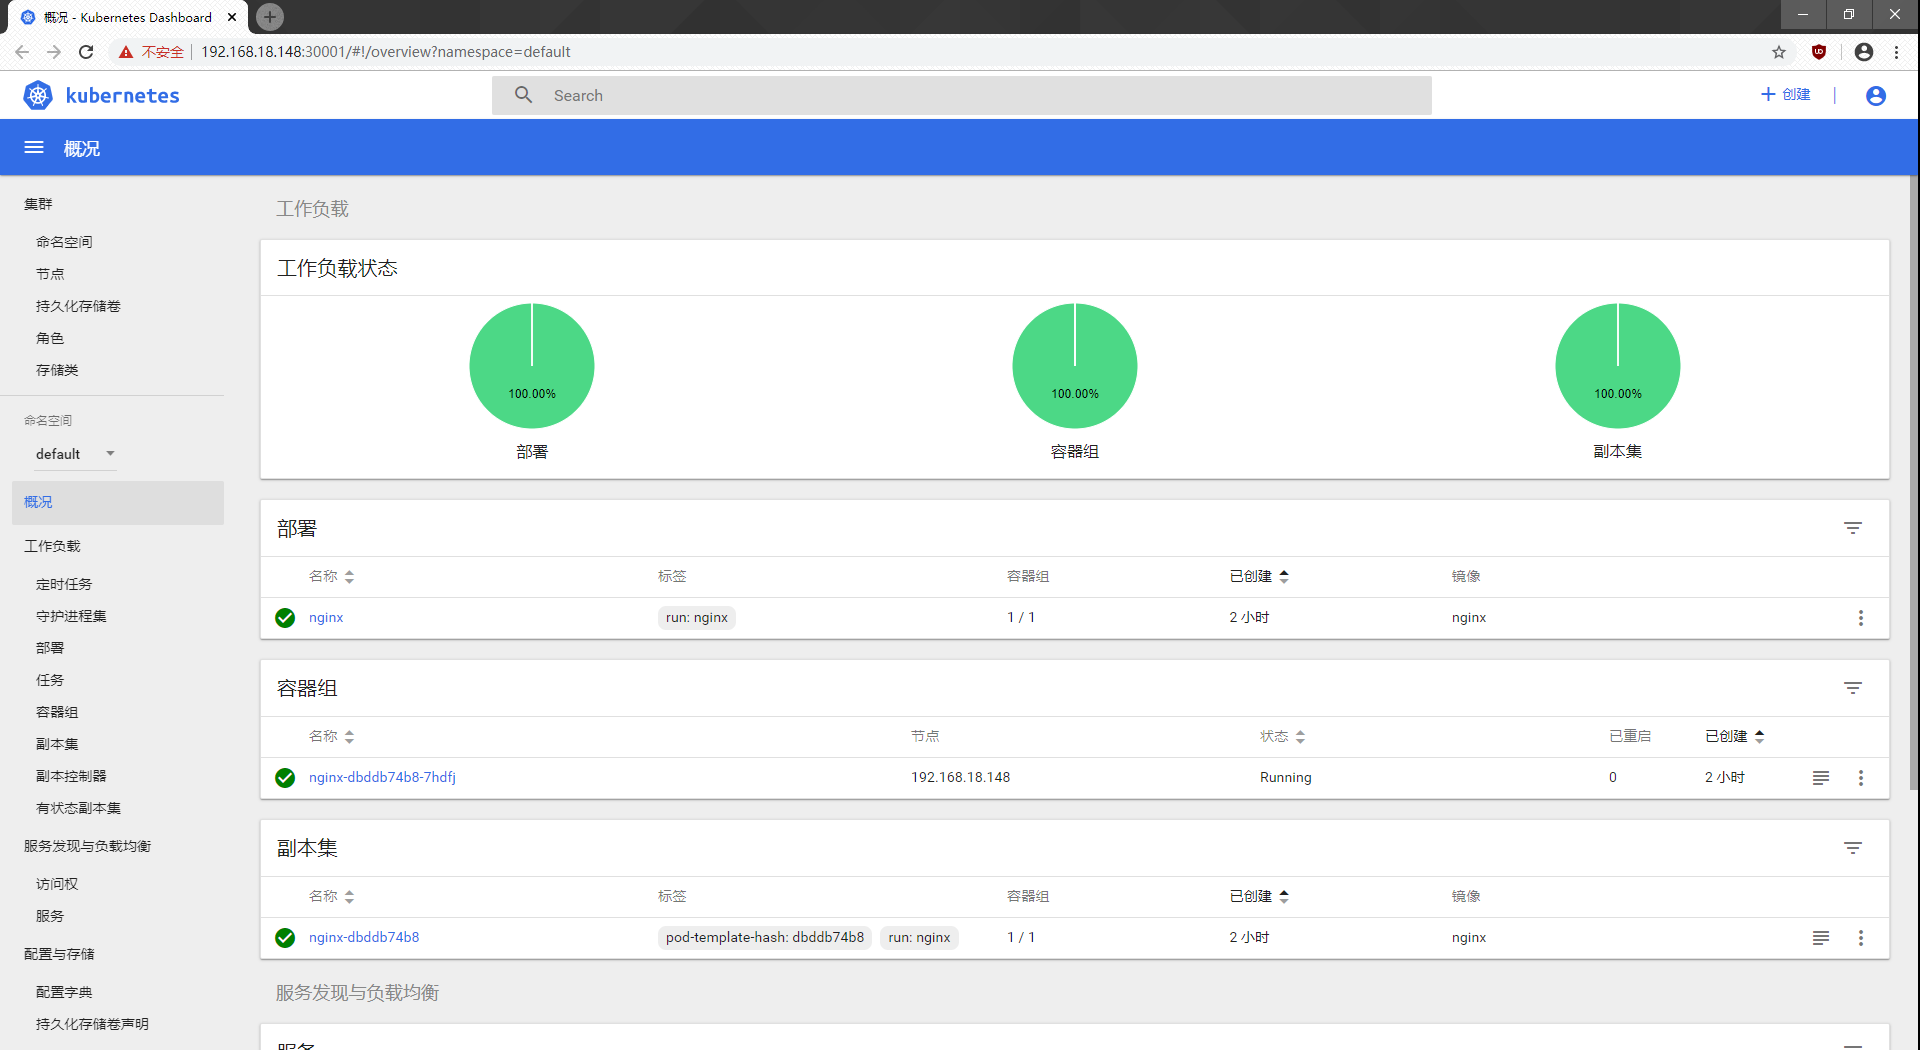
-------Create UI display interface-------
Create dashborad working directory on master 1
[root@master1 ~]# cd k8s/
[root@master1 k8s]# mkdir dashboard
[root@master1 k8s]# cd dashboard/
#Page files need to be uploaded to this folder here
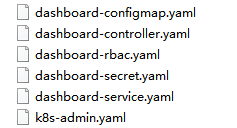
`Now you can see the page's yaml file`
[root@master1 dashboard]# ls
dashboard-configmap.yaml   dashboard-rbac.yaml    dashboard-service.yaml
dashboard-controller.yaml  dashboard-secret.yaml  k8s-admin.yaml

`Create pages in a sequence that requires attention`
[root@master1 dashboard]# kubectl create -f dashboard-rbac.yaml     #Authorized access to api
role.rbac.authorization.k8s.io/kubernetes-dashboard-minimal created
rolebinding.rbac.authorization.k8s.io/kubernetes-dashboard-minimal created
[root@master1 dashboard]# kubectl create -f dashboard-secret.yaml   #Encrypt
secret/kubernetes-dashboard-certs created
secret/kubernetes-dashboard-key-holder created
[root@master1 dashboard]# kubectl create -f dashboard-configmap.yaml    #Configure Application
configmap/kubernetes-dashboard-settings created
[root@master1 dashboard]# kubectl create -f dashboard-controller.yaml   #Controller
serviceaccount/kubernetes-dashboard created
deployment.apps/kubernetes-dashboard created
[root@master1 dashboard]# kubectl create -f dashboard-service.yaml      #Publish for access
service/kubernetes-dashboard created

`View creation after completion at specified kube-system Under Namespace`
[root@master1 dashboard]# kubectl get pods -n kube-system
NAME                                    READY   STATUS    RESTARTS   AGE
kubernetes-dashboard-65f974f565-9qs8j   1/1     Running   0          3m27s

`See how to access`
[root@master1 dashboard]# kubectl get pods -n kube-system
NAME                                    READY   STATUS    RESTARTS   AGE
kubernetes-dashboard-65f974f565-9qs8j   1/1     Running   0          3m27s
[root@master1 dashboard]# kubectl get pods,svc -n kube-system
NAME                                        READY   STATUS    RESTARTS   AGE
pod/kubernetes-dashboard-65f974f565-9qs8j   1/1     Running   0          4m21s

NAME                           TYPE       CLUSTER-IP   EXTERNAL-IP   PORT(S)         AGE
service/kubernetes-dashboard   NodePort   10.0.0.169   <none>        443:30001/TCP   4m15s
Validation: Enter nodeIP in the browser to access:
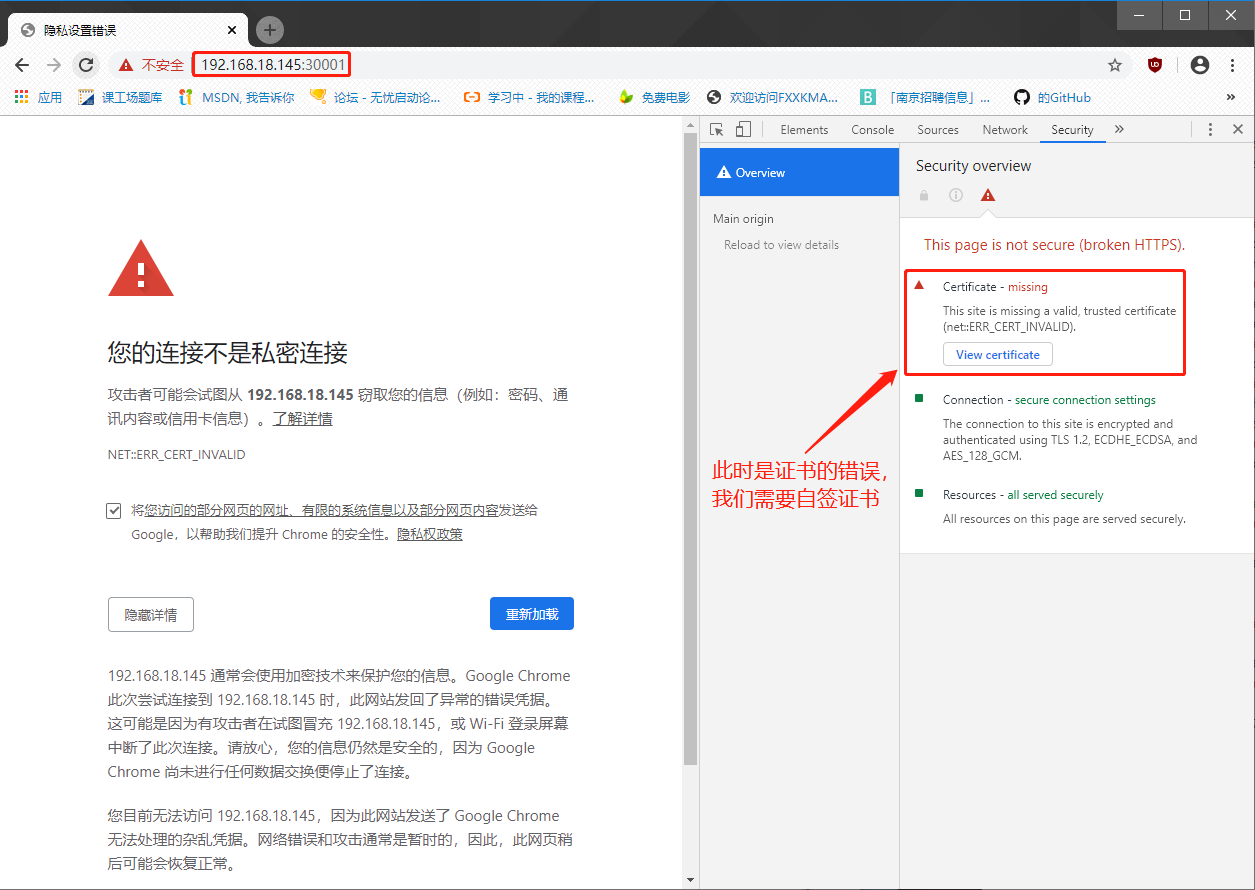
Solution: About Google Browser's inaccessibility
`stay master1 Medium:`
[root@master1 dashboard]# vim dashboard-cert.sh
cat > dashboard-csr.json <<EOF
{
   "CN": "Dashboard",
   "hosts": [],
   "key": {
       "algo": "rsa",
       "size": 2048
   },
   "names": [
       {
           "C": "CN",
           "L": "NanJing",
           "ST": "NanJing"
       }
   ]
}
EOF

K8S_CA=$1
cfssl gencert -ca=$K8S_CA/ca.pem -ca-key=$K8S_CA/ca-key.pem -config=$K8S_CA/ca-config.json -profile=kubernetes dashboard-csr.json | cfssljson -bare dashboard
kubectl delete secret kubernetes-dashboard-certs -n kube-system
kubectl create secret generic kubernetes-dashboard-certs --from-file=./ -n kube-system
#Press Esc to exit insert mode after modification is completed, enter: wq save to exit

[root@master1 dashboard]# bash dashboard-cert.sh /root/k8s/k8s-cert/
2020/02/07 16:47:49 [INFO] generate received request
2020/02/07 16:47:49 [INFO] received CSR
2020/02/07 16:47:49 [INFO] generating key: rsa-2048
2020/02/07 16:47:49 [INFO] encoded CSR
2020/02/07 16:47:49 [INFO] signed certificate with serial number 612466244367800695250627555980294380133655299692
2020/02/07 16:47:49 [WARNING] This certificate lacks a "hosts" field. This makes it unsuitable for
websites. For more information see the Baseline Requirements for the Issuance and Management
of Publicly-Trusted Certificates, v.1.1.6, from the CA/Browser Forum (https://cabforum.org);
specifically, section 10.2.3 ("Information Requirements").
secret "kubernetes-dashboard-certs" deleted
secret/kubernetes-dashboard-certs created

[root@master1 dashboard]# vim dashboard-controller.yaml
 45         args:
 46           # PLATFORM-SPECIFIC ARGS HERE
 47           - --auto-generate-certificates
 #Insert the following under line 47
 48           - --tls-key-file=dashboard-key.pem
 49           - --tls-cert-file=dashboard.pem
#Press Esc to exit insert mode after modification is completed, enter: wq save to exit

`Redeployment`
[root@master1 dashboard]# kubectl apply -f dashboard-controller.yaml
Warning: kubectl apply should be used on resource created by either kubectl create --save-config or kubectl apply
serviceaccount/kubernetes-dashboard configured
Warning: kubectl apply should be used on resource created by either kubectl create --save-config or kubectl apply
deployment.apps/kubernetes-dashboard configured
#At this point the page will prompt: Continue to 192.168.18.148 (unsafe)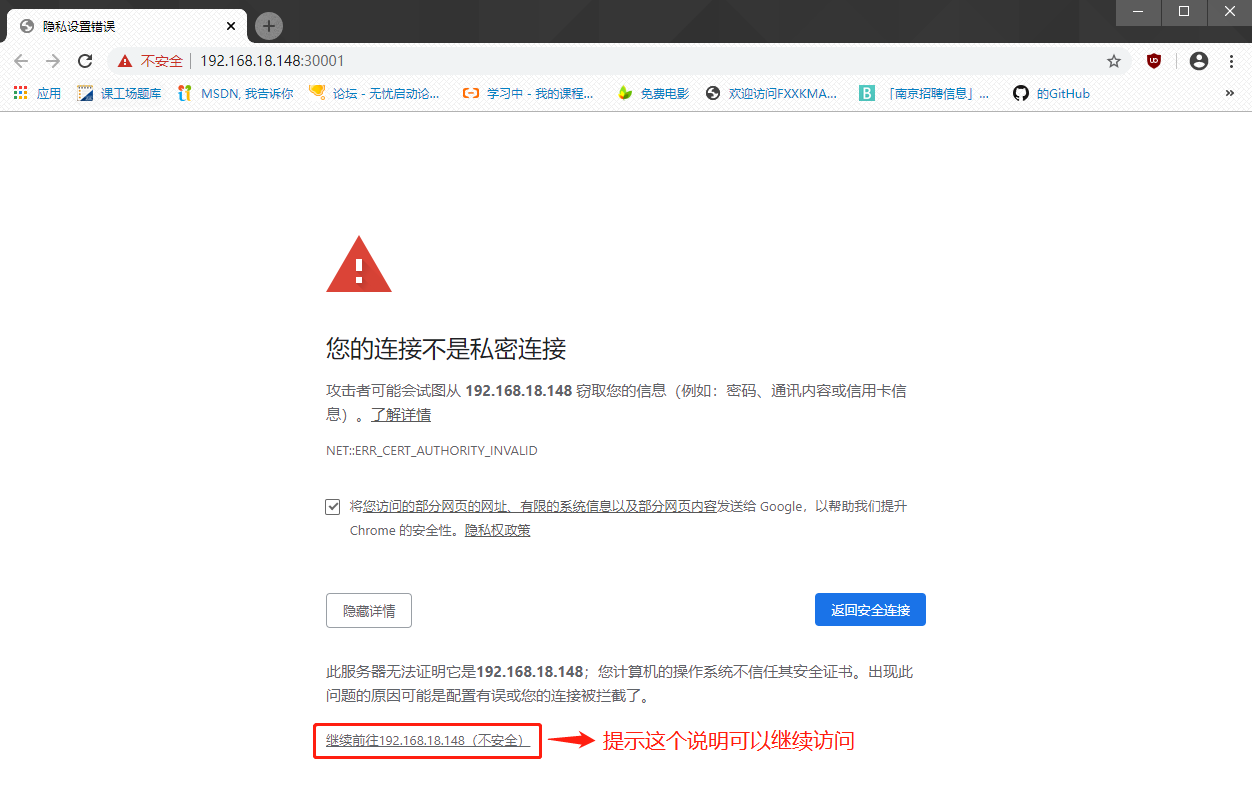
`Generate token`
[root@master1 dashboard]# kubectl create -f k8s-admin.yaml
serviceaccount/dashboard-admin created
clusterrolebinding.rbac.authorization.k8s.io/dashboard-admin created
`Preservation`
[root@master1 dashboard]# kubectl get secret -n kube-system
NAME TYPE DATA AGE
dashboard-admin-token-l9z5f kubernetes.io/service-account-token 3 30s
#To view tokens after dashboard-admin-token-l9z5f
default-token-8hwtl kubernetes.io/service-account-token 3 2d3h
kubernetes-dashboard-certs Opaque 11 11m
kubernetes-dashboard-key-holder Opaque 2 26m
kubernetes-dashboard-token-crqvs kubernetes.io/service-account-token 3 25m
`View tokens`
[root@master1 dashboard]# kubectl describe secret dashboard-admin-token-l9z5f -n kube-system
Name: dashboard-admin-token-l9z5f
Namespace: kube-system
Labels: <none>
Annotations: kubernetes.io/service-account.name: dashboard-admin
kubernetes.io/service-account.uid: 115a70a5-4988-11ea-b617-000c2986f9b2
Type: kubernetes.io/service-account-token
Data
====
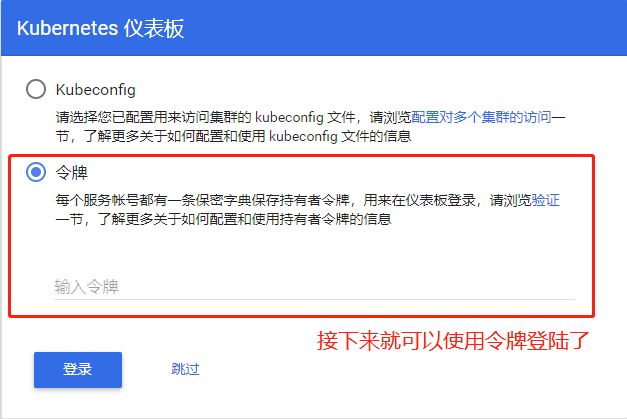
token: eyJhbGciOiJSUzI1NiIsImtpZCI6IiJ9.eyJpc3MiOiJrdWJlcm5ldGVzL3NlcnZpY2VhY2NvdW50Iiwia3ViZXJuZXRlcy5pby9zZXJ2aWNlYWNjb3VudC9uYW1lc3BhY2UiOiJrdWJlLXN5c3RlbSIsImt1YmVybmV0ZXMuaW8vc2VydmljZWFjY291bnQvc2VjcmV0Lm5hbWUiOiJkYXNoYm9hcmQtYWRtaW4tdG9rZW4tbDl6NWYiLCJrdWJlcm5ldGVzLmlvL3NlcnZpY2VhY2NvdW50L3NlcnZpY2UtYWNjb3VudC5uYW1lIjoiZGFzaGJvYXJkLWFkbWluIiwia3ViZXJuZXRlcy5pby9zZXJ2aWNlYWNjb3VudC9zZXJ2aWNlLWFjY291bnQudWlkIjoiMTE1YTcwYTUtNDk4OC0xMWVhLWI2MTctMDAwYzI5ODZmOWIyIiwic3ViIjoic3lzdGVtOnNlcnZpY2VhY2NvdW50Omt1YmUtc3lzdGVtOmRhc2hib2FyZC1hZG1pbiJ9.DdqS8xHxQYUw68NpqR1XIqQRgOFS3nsrfhjPe1pdqbt6PepAf1pOaDYTJ2cGtbA89J4v0go-6ZWc1BiwidMcthVv_LgXD9cD_5RXN_GoYqsEFFFgkzdyG0y4_BSowMCheS9tGCzuo-O-w_U5gPz3LGTwMRPyRbfEVDaS3Dign_b8SASD_56WkHkSGecI42t1Zct5h1Mnsam_qPhpfgMCzwxQ8l8_8XK6t5NK6orSwL9ozAmX5XGR9j4EL06OKy6al5hAHoB1k0srqT_mcj8Lngt7iq6VPuLVVAF7azAuItlL471VR5EMfvSCRrUG2nPiv44vjQPghnRYXMWS71_B5w
ca.crt: 1359 bytes
namespace: 11 bytes
#The entire token paragraph is the token we need to copyPaste the token and log in to get the UI interface: