Kubernetes basic concepts
1.kubernetes has the following features:
- Service discovery and load balancing
Kubernetes can use DNS name or its own IP address to expose the container. If the traffic entering the container is large, kubernetes can load balance and distribute network traffic, so as to stabilize the deployment. - Storage orchestration
Kubernetes allows you to automatically mount the storage system of your choice, such as local storage, public cloud providers, etc.
- Automatic deployment and rollback
You can use Kubernetes to describe the required state of deployed containers, which can change the actual state to the desired state at a controlled rate. For example, you can automate Kubernetes to create new containers for your deployment, delete existing containers and use all their resources for the new container. - Automatically complete packing calculation
Kubernetes allows you to specify the CPU and memory (RAM) required for each container. When the container specifies a resource request, kubernetes can make better decisions to manage the container's resources.
- Self repair
Kubernetes restarts failed containers, replaces containers, kills containers that do not respond to user-defined health checks, and does not advertise them to clients until the service is ready. - Key and configuration management
Kubernetes allows you to store and manage sensitive information, such as passwords, OAuth tokens, and ssh keys. You can deploy and update the key and application configuration without rebuilding the container image, and you don't need to expose the key in the stack configuration.
2. Structure
1. Working mode
Kubernetes Cluster = N Master Node + N Worker Node: n master node + n worker node; N>=1
2. Component architecture
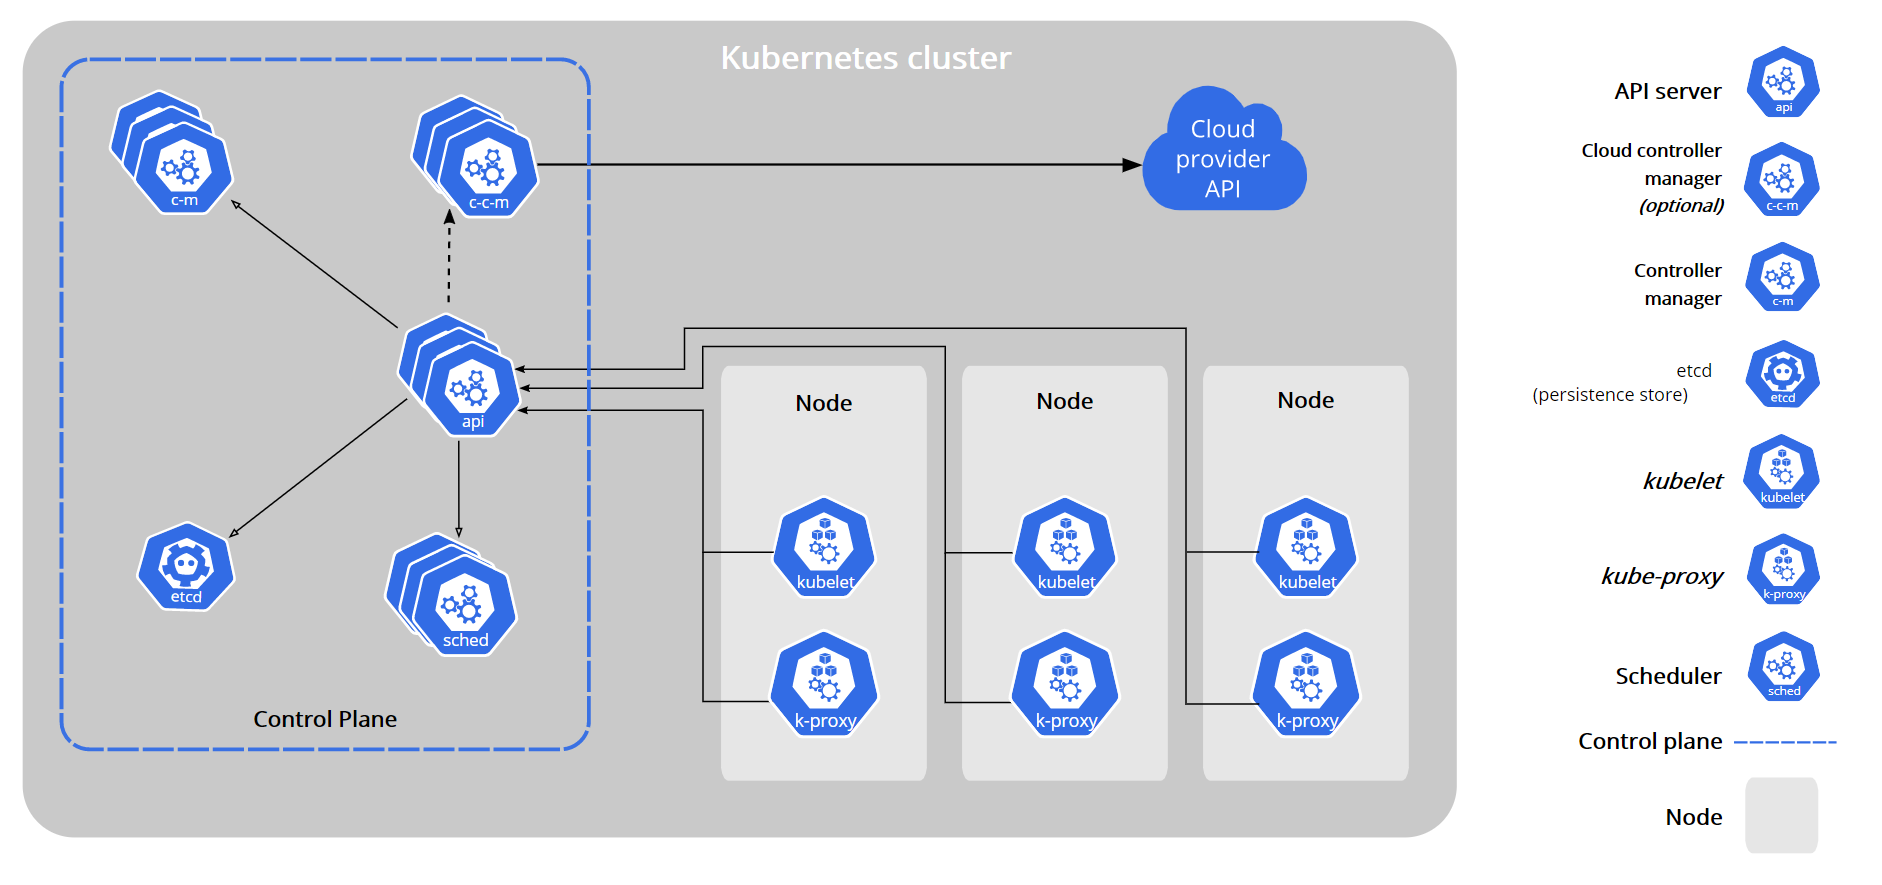
1. Control Plane Components
The components of the control plane make global decisions on the cluster (such as scheduling), and detect and respond to cluster events (for example, start a new cluster when the replicas field of the deployment is not satisfied) pod).
The control plane component can run on any node in the cluster. However, for simplicity, setup scripts typically start all control plane components on the same computer and do not run the user container on that computer. see also Building high availability clusters with kubedm Examples of multi VM control plane settings in.
kube-apiserver
The API server is Kubernetes Control surface Component that exposes the Kubernetes API. API server is the front end of Kubernetes control surface.
The main implementation of Kubernetes API server is kube-apiserver . Kube apiserver is designed to scale horizontally, that is, it can scale by deploying multiple instances. You can run multiple instances of Kube apiserver and balance traffic between these instances.
etcd
etcd is a key value database with consistency and high availability. It can be used as a background database to store all cluster data of Kubernetes.
The etcd database of your Kubernetes cluster usually needs to have a backup plan.
For further information on etcd, refer to etcd document.
kube-scheduler
The control plane component is responsible for monitoring the newly created and unspecified operation node of Pods , select the node and let the Pod run on it.
The factors considered in the scheduling decision include the resource requirements of a single Pod and Pod set, hardware / software / policy constraints, affinity and anti affinity specifications, data location, interference between workloads and deadline.
kube-controller-manager
Run on master node controller Components of.
Logically, each controller Are a separate process, but in order to reduce complexity, they are compiled into the same executable and run in a process.
These controllers include:
- Node Controller: it is responsible for notifying and responding to node failures
- Job controller: monitor job objects representing one-time tasks, and then create Pods to run these tasks until they are completed
- Endpoints Controller: populate endpoints objects (i.e. add Service and Pod)
- Service account & token controllers: create a default account and API access token for the new namespace
cloud-controller-manager
A cloud controller manager is a device that embeds the control logic of a specific cloud Control plane Components. The cloud controller manager allows you to link the cluster to the application programming interface of the cloud provider and separate the components that interact with the cloud platform from those that only interact with your cluster.
Cloud controller manager only runs cloud platform specific control loops. If you run Kubernetes in your own environment or run the learning environment on your local computer, the deployed environment does not need a cloud controller manager.
Similar to Kube controller manager, cloud controller manager combines several logically independent control loops into the same executable file for you to run in the same process. You can scale it horizontally (running more than one copy) to improve performance or enhance fault tolerance.
The following controllers include dependencies on cloud platform drivers:
- Node Controller: used to check the cloud provider after the node terminates the response to determine whether the node has been deleted
- Route Controller: used to set routes in the underlying cloud infrastructure
- Service Controller: used to create, update and delete cloud provider load balancers
2. Node component
Node components run on each node, maintain the running Pod and provide Kubernetes running environment.
kubelet
One in each cluster node Agent running on. It guarantees containers All running in Pod Yes.
The description of the various types of containers is provided to specs pods through the operation of specs pods. kubelet does not manage containers that were not created by Kubernetes.
kube-proxy
kube-proxy It is the network agent running on each node in the cluster and implements Kubernetes Service Part of the concept.
Kube proxy maintains network rules on nodes. These network rules allow network communication with the Pod from network sessions inside or outside the cluster.
If the operating system provides a packet filtering layer and is available, Kube proxy will use it to implement network rules. Otherwise, Kube proxy forwards only the traffic itself.
k8s cluster deployment:
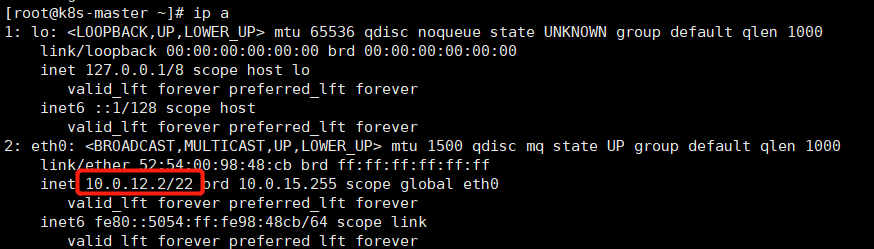
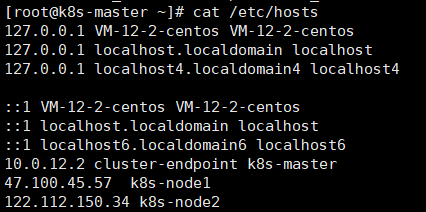
Environment: 124.222.108.201 k8s-master # intranet address: 10.0.12.2
47.100.45.57 k8s-node1
122.112.150.34 k8s-node2
Steps:
1. Install docker
yum install -y yum-utils
yum-config-manager --add-repo http://mirrors.aliyun.com/docker-ce/linux/centos/docker-ce.repo
yum makecache fast
yum install -y docker-ce-20.10.7 docker-ce-cli-20.10.7  containerd.io-1.4.6
sudo yum install docker-ce-19.03.9 docker-ce-cli-19.03.9 containerd.io -y
systemctl enable docker --now
sudo mkdir -p /etc/docker
sudo tee /etc/docker/daemon.json <<-'EOF'
{
  "registry-mirrors": ["https://vtozzi4l.mirror.aliyuncs.com"]
}
EOF
sudo systemctl daemon-reload
sudo systemctl restart docker
2. Basic environment
#Each machine sets its own domain name
hostnamectl set-hostname xxxx


# Set SELinux to permissive mode (equivalent to disabling it)
sudo setenforce 0
sudo sed -i 's/^SELINUX=enforcing$/SELINUX=permissive/' /etc/selinux/config

#Close swap
swapoff -a
sed -ri 's/.*swap.*/#&/' /etc/fstab

#Allow iptables to check bridge traffic
    cat <<EOF | sudo tee /etc/modules-load.d/k8s.conf
br_netfilter
EOF

cat <<EOF | sudo tee /etc/sysctl.d/k8s.conf
net.bridge.bridge-nf-call-ip6tables = 1
net.bridge.bridge-nf-call-iptables = 1
EOF
sudo sysctl --system


cat > /etc/docker/daemon.json <<EOF
{
  "exec-opts": ["native.cgroupdriver=systemd"],
  "log-driver": "json-file",
  "log-opts": {
    "max-size": "100m"
  },
  "storage-driver": "overlay2",
  "storage-opts": [
    "overlay2.override_kernel_check=true"
  ]
}
EOF
    sysctl -w net.ipv4.ip_forward=1

systemctl restart docker
systemctl status docker
3. Install kubelet, kubedm, kubectl
cat <<EOF | sudo tee /etc/yum.repos.d/kubernetes.repo
[kubernetes]
name=Kubernetes
baseurl=http://mirrors.aliyun.com/kubernetes/yum/repos/kubernetes-el7-x86_64
enabled=1
gpgcheck=0
repo_gpgcheck=0
gpgkey=http://mirrors.aliyun.com/kubernetes/yum/doc/yum-key.gpg
   http://mirrors.aliyun.com/kubernetes/yum/doc/rpm-package-key.gpg
exclude=kubelet kubeadm kubectl
EOF

sudo yum install -y kubelet-1.20.9 kubeadm-1.20.9 kubectl-1.20.9 --disableexcludes=kubernetes
sudo systemctl enable --now kubelet
2. Boot the cluster using kubedm
1. Download the images required by each machine
sudo tee ./images.sh <<-'EOF'
#!/bin/bash
images=(
kube-apiserver:v1.20.9
kube-proxy:v1.20.9
kube-controller-manager:v1.20.9
kube-scheduler:v1.20.9
coredns:1.7.0
etcd:3.4.13-0
pause:3.2
)
for imageName in ${images[@]} ; do
docker pull registry.cn-hangzhou.aliyuncs.com/lfy_k8s_images/$imageName
done
EOF

chmod +x ./images.sh && ./images.sh
2. Initialize master node
Domain name resolution: k8s master
k8s-node1 k8s-node2
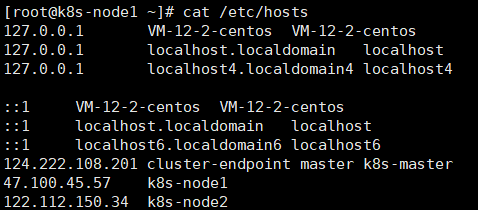
In master:
echo "10.0.12.2  cluster-endpoint" >> /etc/hosts
kubeadm init \
--apiserver-advertise-address=172.25.73.2 \
--control-plane-endpoint=cluster-endpoint \
--image-repository registry.cn-hangzhou.aliyuncs.com/lfy_k8s_images \
--kubernetes-version v1.20.9 \
--service-cidr=10.96.0.0/16 \
--pod-network-cidr=192.168.0.0/16 --ignore-preflight-errors=...
Your Kubernetes control-plane has initialized successfully!

To start using your cluster, you need to run the following as a regular user:

  mkdir -p $HOME/.kube
  sudo cp -i /etc/kubernetes/admin.conf $HOME/.kube/config
  sudo chown $(id -u):$(id -g) $HOME/.kube/config

Alternatively, if you are the root user, you can run:

  export KUBECONFIG=/etc/kubernetes/admin.conf

You should now deploy a pod network to the cluster.
Run "kubectl apply -f [podnetwork].yaml" with one of the options listed at:
  https://kubernetes.io/docs/concepts/cluster-administration/addons/

You can now join any number of control-plane nodes by copying certificate authorities
and service account keys on each node and then running the following as root:

  kubeadm join cluster-endpoint:6443 --token m9k8pe.p69bfs76mt5ok2i8 \
    --discovery-token-ca-cert-hash sha256:e0c92ba237a00da6f063f4864e3ae5dc1fc29073c024e7a3146f8613236d781f \
    --control-plane

Then you can join any number of worker nodes by running the following on each as root:

kubeadm join cluster-endpoint:6443 --token m9k8pe.p69bfs76mt5ok2i8 \
    --discovery-token-ca-cert-hash sha256:e0c92ba237a00da6f063f4864e3ae5dc1fc29073c024e7a3146f8613236d781f
mkdir -p $HOME/.kube
sudo cp -i /etc/kubernetes/admin.conf $HOME/.kube/config
sudo chown $(id -u):$(id -g) $HOME/.kube/config
k8s-node1 k8s-node2
kubeadm join cluster-endpoint:6443 --token m9k8pe.p69bfs76mt5ok2i8 --discovery-token-ca-cert-hash sha256:e0c92ba237a00da6f063f4864e3ae5dc1fc29073c024e7a3146f8613236d781f --ignore-preflight-errors=...
After joining
View node information in the master node
kubectl get nodes