Environmental description:
| host name | Operating System Version | ip | docker version | kubelet version | To configure | Remarks |
|---|---|---|---|---|---|---|
| master | Centos 7.6.1810 | 172.27.9.131 | Docker 18.09.6 | V1.14.2 | 2C2G | Remarks |
| node01 | Centos 7.6.1810 | 172.27.9.135 | Docker 18.09.6 | V1.14.2 | 2C2G | Remarks |
| node02 | Centos 7.6.1810 | 172.27.9.136 | Docker 18.09.6 | V1.14.2 | 2C2G | Remarks |
The deployment of k8s cluster is detailed in: Centos 7.6 Deploys k8s(v1.14.2) Cluster
See k8s Learning Materials for more details: Basic concepts, kubectl commands and data sharing
Compute Resources Management
1. Concept
When configuring Pod, we can specify the computing resources (CPU and memory) to be used for each container. There are two kinds of allocation items for computing resources: Requests and Limits. Requests indicate the amount of fully guaranteed resources (resource requests) that the container wishes to be allocated; Limits are the maximum amount of resources (resource limits) that the container can use.
_Resource requests can ensure that Pod has enough resources to run, while resource restrictions prevent one Pod from using resources unrestrictedly, leading to other Pod crashes.
_When we create a pod, we can specify the resource requests and resource constraints of the container for CPU and memory, which are not defined in the pod, but are specified separately for each container. The amount of requests and limits pod imposes on resources is the sum of the requests and limits of all containers it contains.
Requests and Limits in CPU and memory have the following characteristics:
- Requests and Limits are optional. When creating and updating a Pod, if Requests and Limits are not set, the default values provided by the system are used, depending on the cluster configuration.
- If Requests are not configured, the default setting is equal to Limits.
- In any case, Limits should be set to be greater than or equal to Requests.
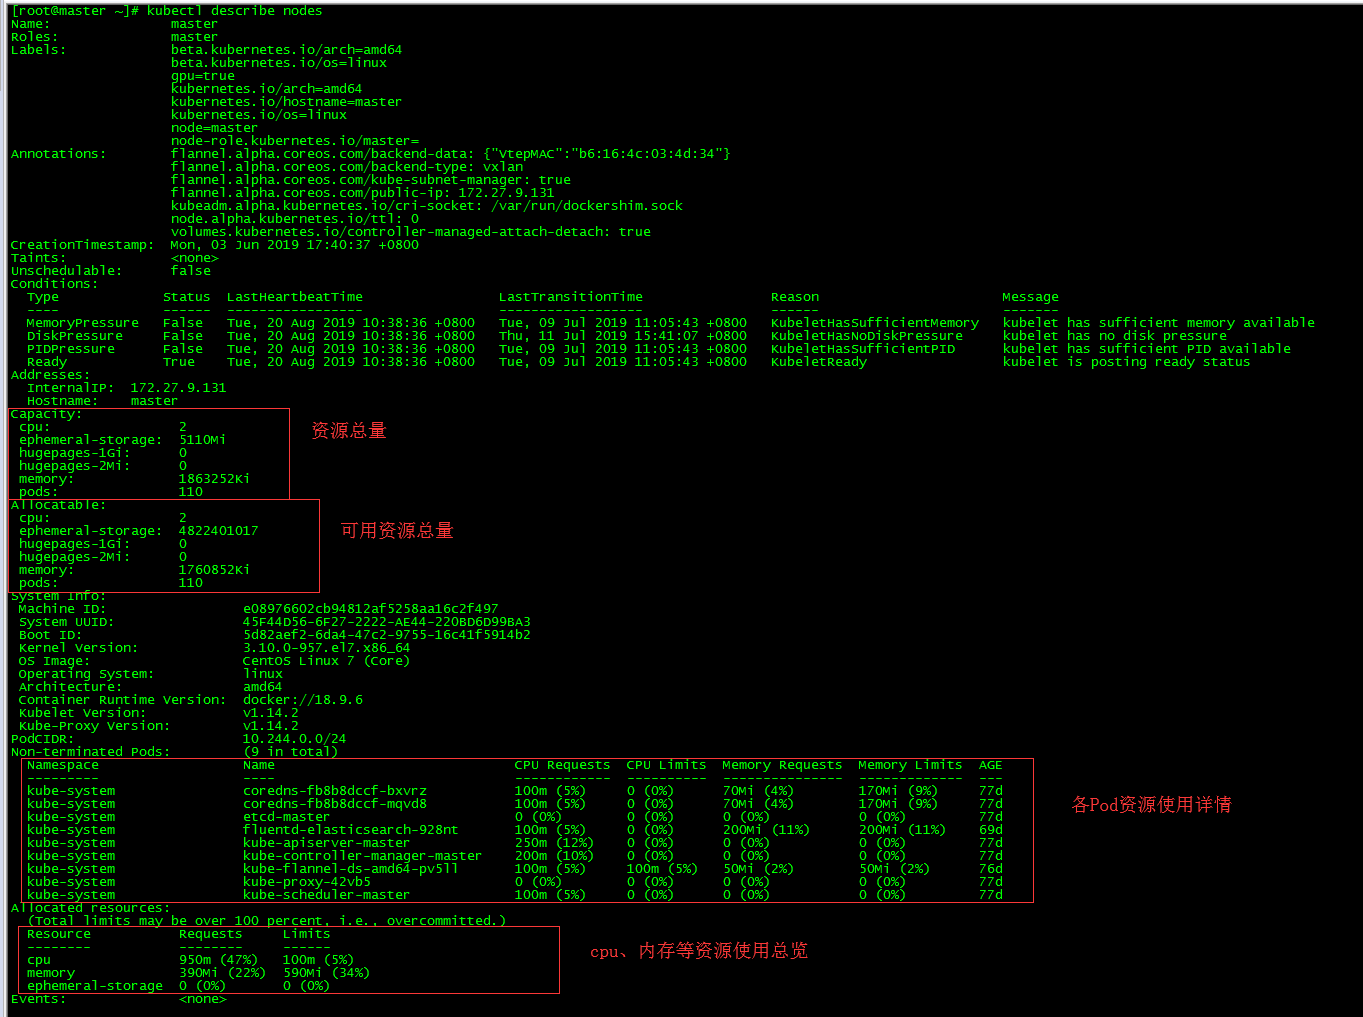
2. View the total resources of nodes
2.1 Command Mode
[root@master ~]# kubectl describe nodes
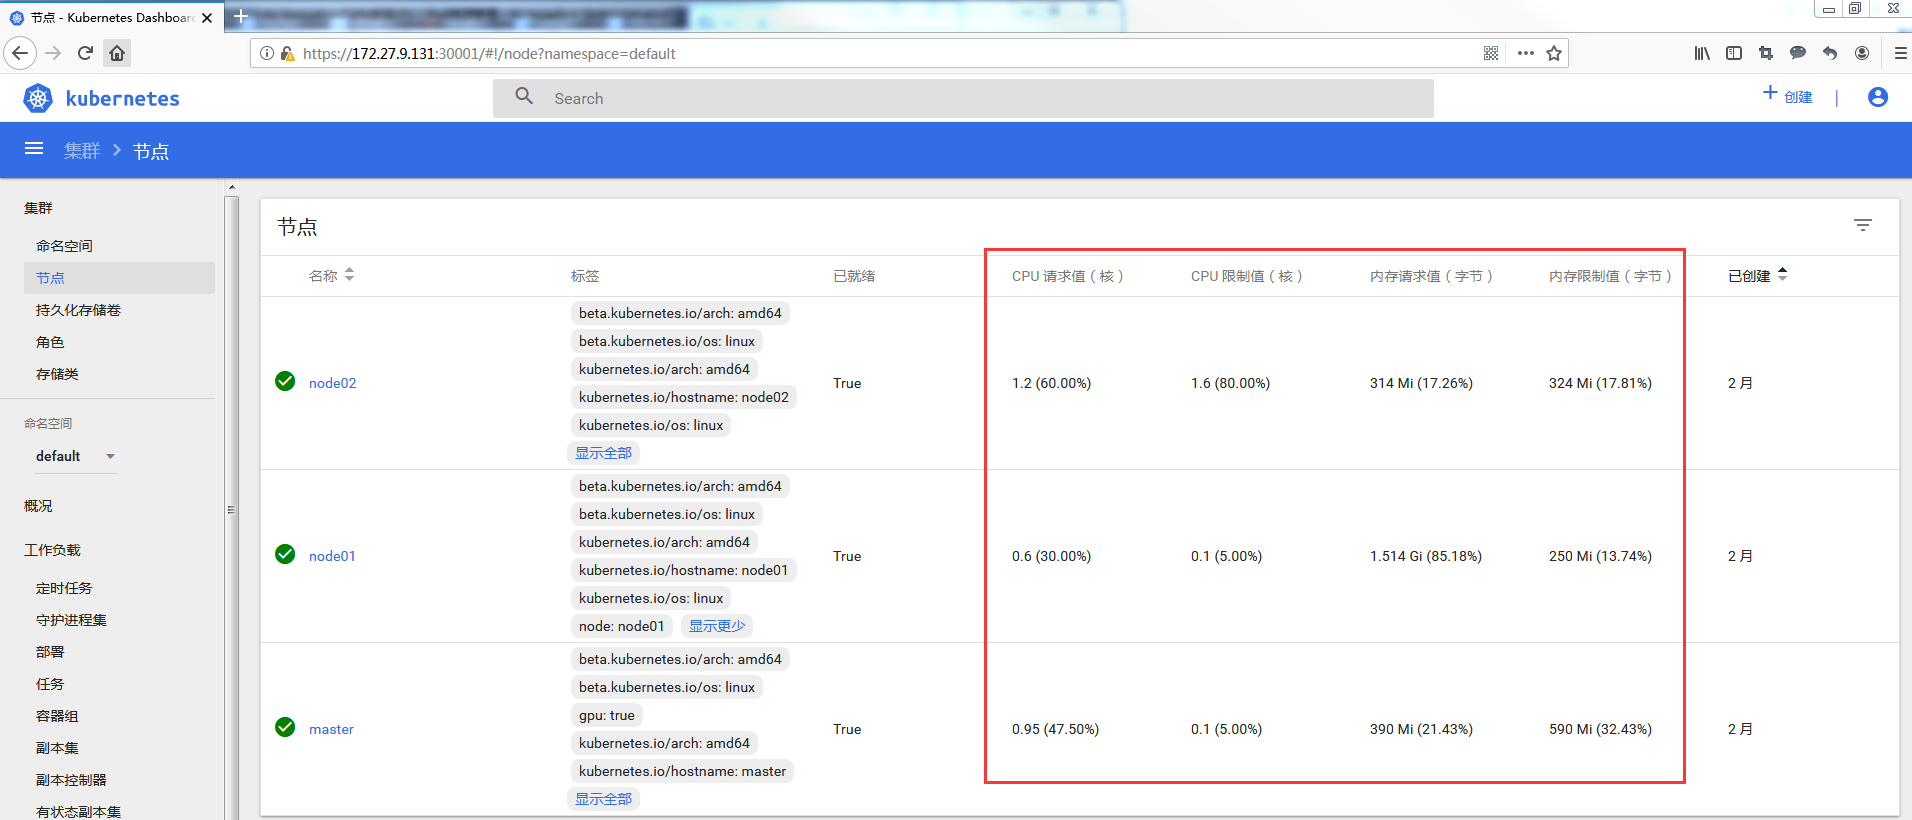
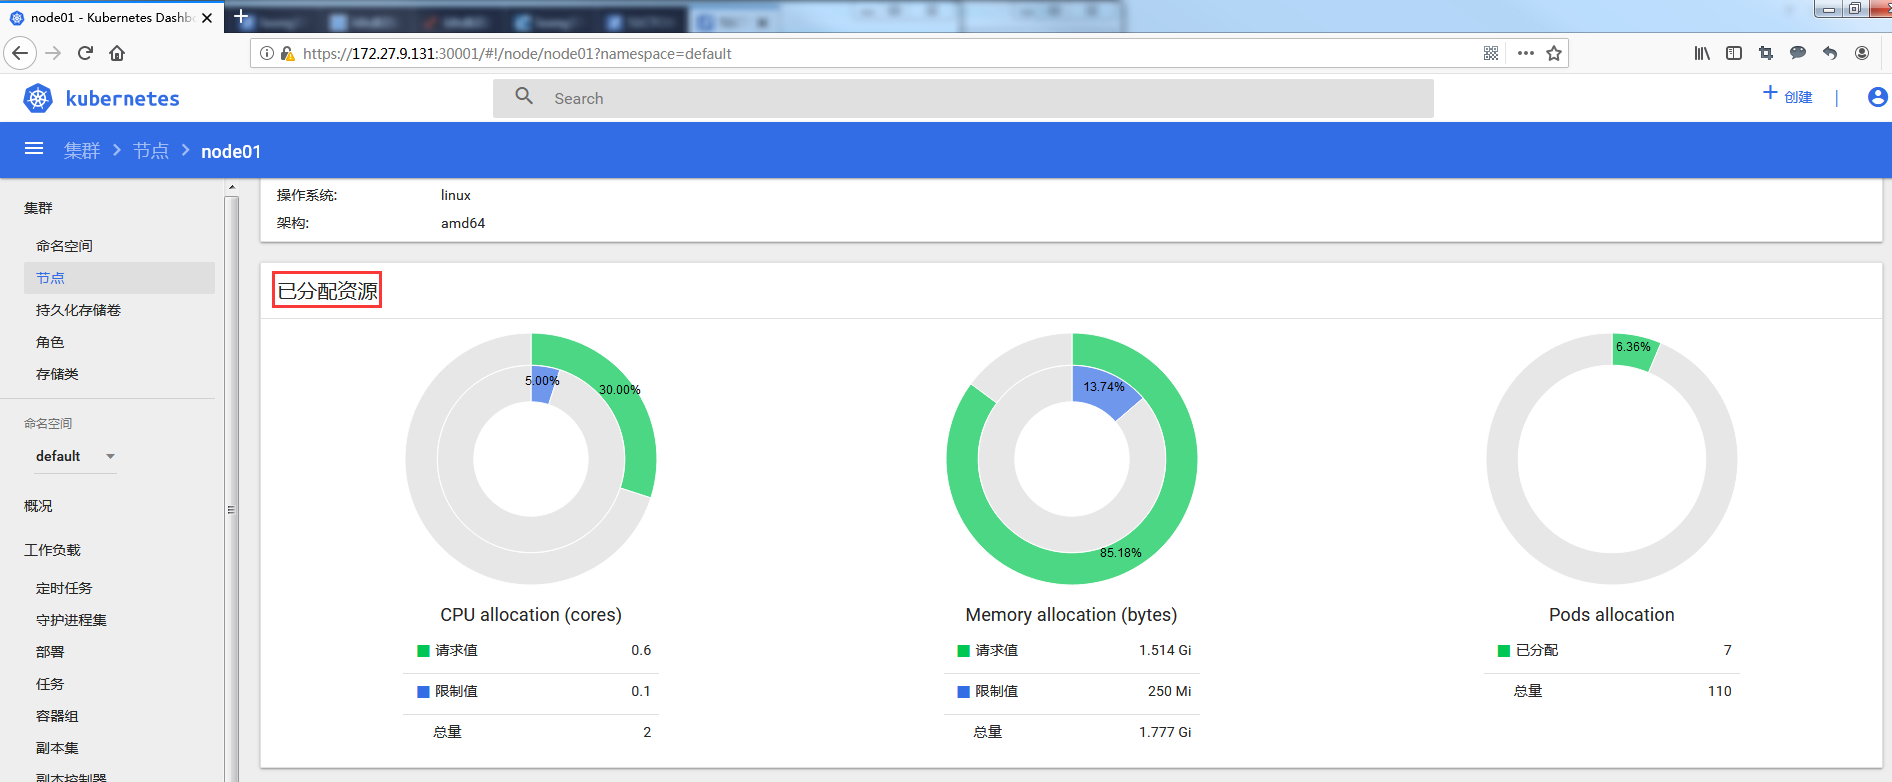
2.2 Dashboard approach
3. requests
3.1 Create a pod containing resource requests
[root@master ~]# more requests-pod.yaml
apiVersion: v1
kind: Pod
metadata:
  name: requests-pod
spec:
  containers:
  - image: busybox
    name: busybox
    args:
    - /bin/sh
    - -c
    - sleep 60000
    resources:
      requests:          #Resource application
        cpu: 500m        #Container application 500 millinucleus (1/2 of a CPU core time)
        memory: 500Mi    #Container Request 500M Memory
  nodeName: node01
[root@master ~]# kubectl apply -f requests-pod.yaml
pod/requests-pod created
On the Kubernetes system, the CPU of one unit is equivalent to one virtual CPU(vCPU) on the virtual machine or a Hyperthread (or logical CPU) on the physical machine. It supports fractional metering. One core is equivalent to 1000 microcores, so 500 m is equivalent to 0.5 cores. That is, one-half of the core. Memory is measured in the same way as everyday usage. The default unit is bytes. E,P, T, G, M and K can also be used as unit suffixes, or unit suffixes in the form of Ei, Pi, Ti, Gi, Mi and Ki.
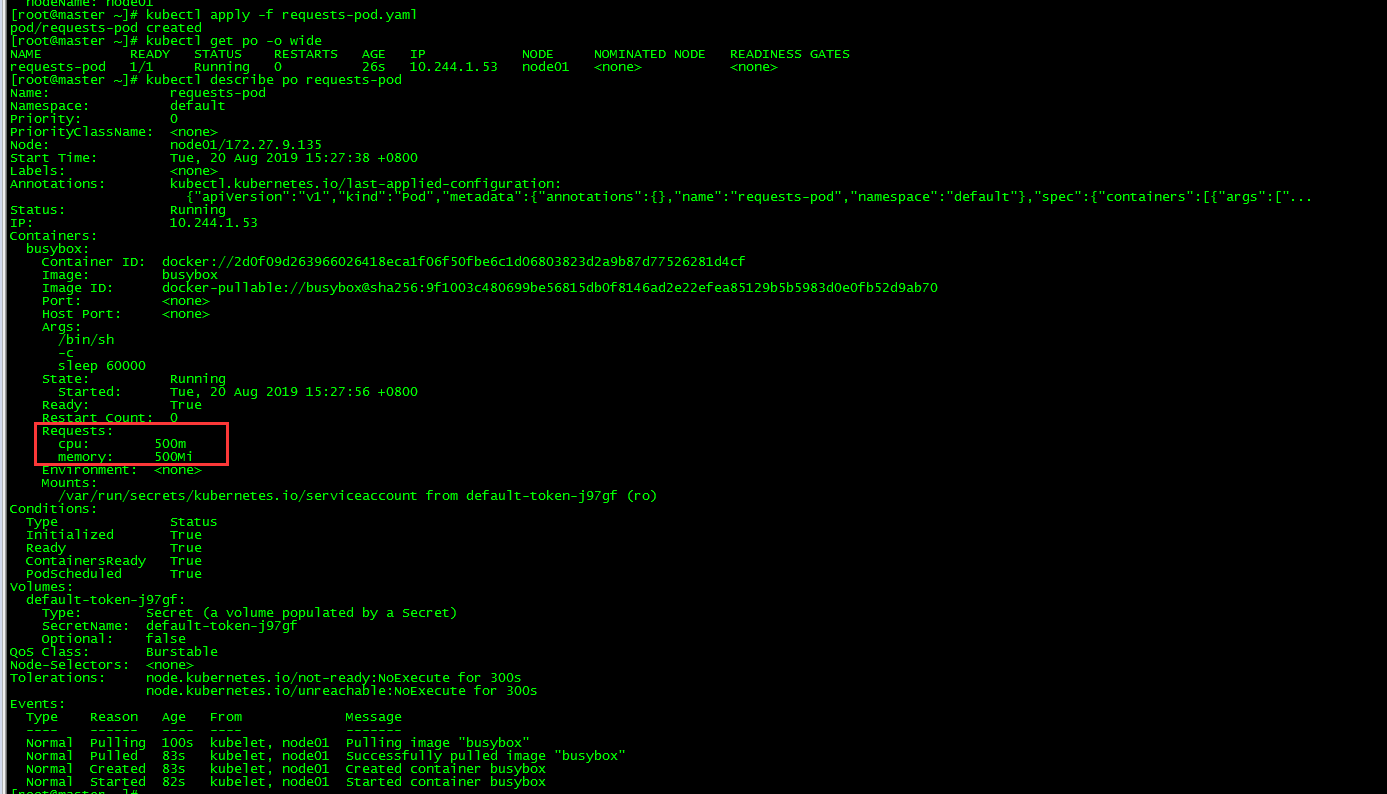
3.2 View pod
[root@master ~]# kubectl get po -o wide
[root@master ~]# kubectl describe po requests-pod
3.3 request-based pod scheduling mechanism
3.3.1 does not specify requests
[root@master ~]# kubectl delete all --all
[root@master ~]# more deploy-busybox.yaml
apiVersion: apps/v1
kind: Deployment
metadata:
  name: busybox
spec:
  selector:
    matchLabels:
      env: prod
  replicas: 10
  template:
    metadata:
      labels:
        env: prod
    spec:
      containers:
      - name: busybox
        image: busybox
        args:
        - /bin/sh
        - -c
        - sleep 60000
      nodeSelector:
        node: node01
[root@master ~]# kubectl apply -f deploy-busybox.yaml
deployment.apps/busybox created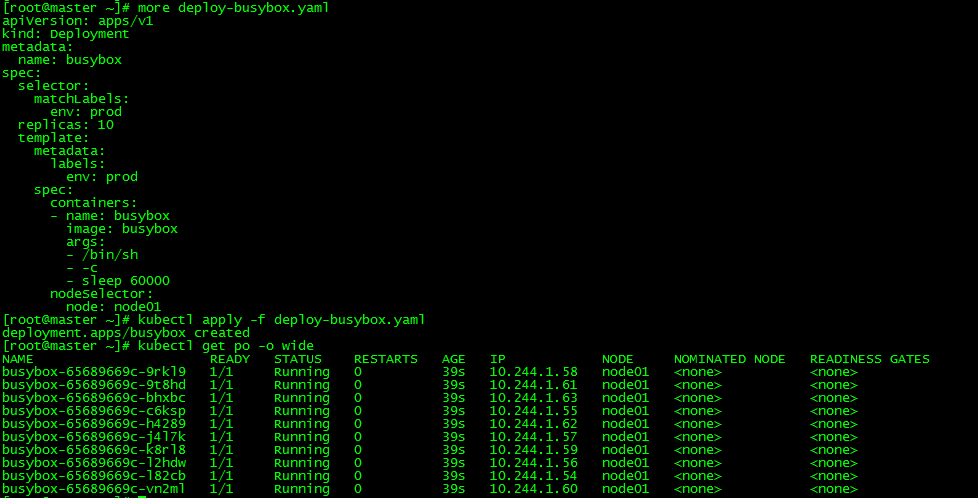
Without specifying the amount of resource requests, 10 pod s can be successfully run on node node 01
3.3.2 OutOfmemory
[root@master ~]# more requests-pod.yaml
apiVersion: v1
kind: Pod
metadata:
  name: requests-pod
spec:
  containers:
  - image: busybox
    name: busybox
    args:
    - /bin/sh
    - -c
    - sleep 60000
    resources:
      requests:          #Resource application
        cpu: 500m        #Container application 500 millinucleus (1/2 of a CPU core time)
        memory: 800Mi    #Container Request 800M Memory
  nodeName: node01
[root@master ~]# more requests-pod-2.yaml
apiVersion: v1
kind: Pod
metadata:
  name: requests-pod-2
spec:
  containers:
  - image: busybox
    name: busybox
    args:
    - /bin/sh
    - -c
    - sleep 60000
    resources:
      requests:
        cpu: 500m
        memory: 800Mi
  nodeName: node01
[root@master ~]# kubectl apply -f requests-pod.yaml
pod/requests-pod created
[root@master ~]# kubectl get po -o wide
NAME           READY   STATUS    RESTARTS   AGE   IP            NODE     NOMINATED NODE   READINESS GATES
requests-pod   1/1     Running   0          4s    10.244.1.67   node01   <none>           <none>
[root@master ~]# kubectl apply -f requests-pod-2.yaml
pod/requests-pod-2 created
[root@master ~]# kubectl get po -o wide
NAME             READY   STATUS        RESTARTS   AGE   IP            NODE     NOMINATED NODE   READINESS GATES
requests-pod     1/1     Running       0          14s   10.244.1.67   node01   <none>           <none>
requests-pod-2   0/1     OutOfmemory   0          2s    <none>        node01   <none>           <none>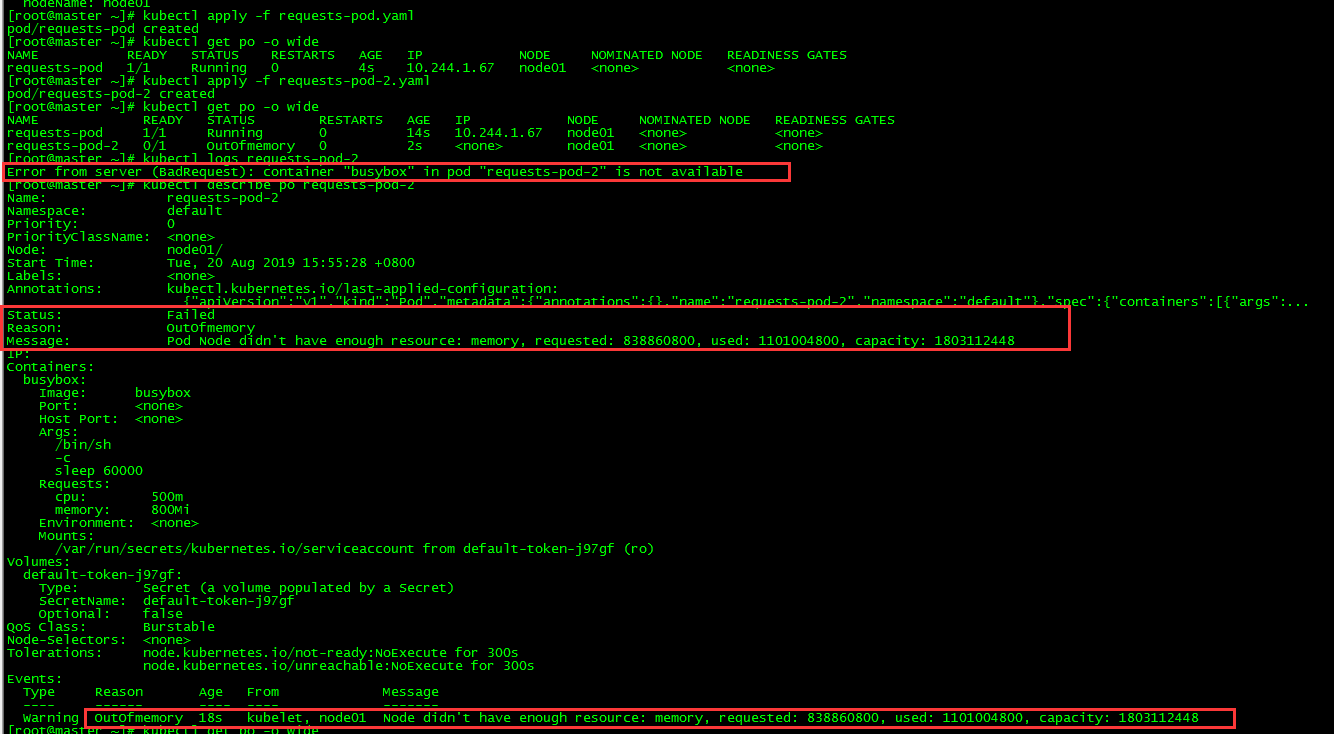
pod requests-pod-2 scheduling failed due to insufficient memory resources of node 01
3.3.3 OutOfcpu
[root@master ~]# kubectl delete all --all
[root@master ~]# more requests-pod.yaml
apiVersion: v1
kind: Pod
metadata:
  name: requests-pod
spec:
  containers:
  - image: busybox
    name: busybox
    args:
    - /bin/sh
    - -c
    - sleep 60000
    resources:
      requests:          #Resource application
        cpu: 1           #Container Application for a CPU Core Time
        memory: 80Mi    #Container Request 80M Memory
  nodeName: node01
[root@master ~]# more requests-pod-2.yaml
apiVersion: v1
kind: Pod
metadata:
  name: requests-pod-2
spec:
  containers:
  - image: busybox
    name: busybox
    args:
    - /bin/sh
    - -c
    - sleep 60000
    resources:
      requests:
        cpu: 1
        memory: 80Mi
  nodeName: node01
[root@master ~]# kubectl apply -f requests-pod.yaml
pod/requests-pod created
[root@master ~]# kubectl get po -o wide
NAME           READY   STATUS    RESTARTS   AGE   IP            NODE     NOMINATED NODE   READINESS GATES
requests-pod   1/1     Running   0          4s    10.244.1.68   node01   <none>           <none>
[root@master ~]# kubectl apply -f requests-pod-2.yaml
pod/requests-pod-2 created
[root@master ~]# kubectl get po -o wide
NAME             READY   STATUS     RESTARTS   AGE   IP            NODE     NOMINATED NODE   READINESS GATES
requests-pod     1/1     Running    0          13s   10.244.1.68   node01   <none>           <none>
requests-pod-2   0/1     OutOfcpu   0          2s    <none>        node01   <none>           <none>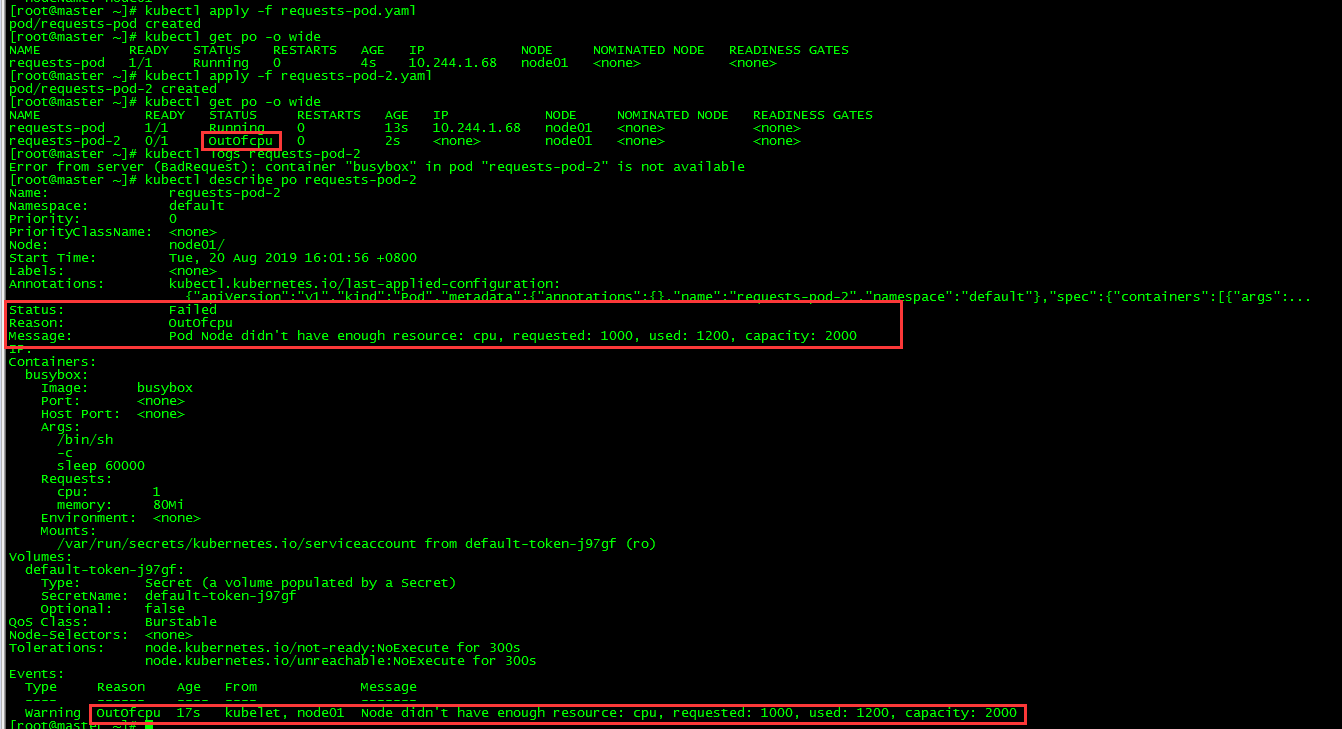
Noe01 CPU resource is insufficient and pod requests-pod-2 scheduling fails
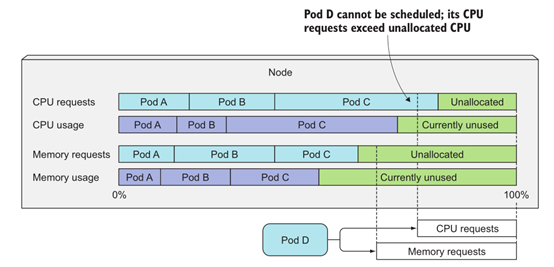
3.3.4 Conclusion
- Scheduler does not pay attention to the actual usage of various resources at the current time when scheduling (node01 can run 10 busybox pod s at the same time)
- The scheduler only cares about the sum of all pod resource requests deployed on the node (OutOfmemory or OutOfcpu will be reported if they exceed)
- Although the actual use of existing pods resources may be less than its application, using scheduling algorithms based on actual resource consumption will break the system's guarantee of providing sufficient resources for these deployed successful pods.
4. limits
4.1 Create a pod with resource limits
[root@master ~]# more limited-pod.yaml
apiVersion: v1
kind: Pod
metadata:
  name: limited-pod
spec:
  containers:
  - image: busybox
    command: ["sleep","600000"]
    name: busybox
    resources:
      requests:         #Resource application
        cpu: 200m       #Container application for 200 millicores (1/5 of a CPU core time)
        memory: 80Mi    #Container Request 80M Memory
      limits:           #Resource constraints
        cpu: 2          #Maximum 2-core CPU allowed for containers
        memory: 2Gi     #Containers are allowed to use up to 2GB of memory
  nodeName: node01
[root@master ~]# kubectl apply -f limited-pod.yaml
pod/limited-pod created
[root@master ~]# kubectl get po -o wide
NAME          READY   STATUS    RESTARTS   AGE   IP            NODE     NOMINATED NODE   READINESS GATES
limited-pod   1/1     Running   0          12s   10.244.1.75   node01   <none>           <none>
Create pod limited-pod, resource limited to cpu 2 core, memory 2G
4.2 limits overcommitted
4.2.1 Create a pod

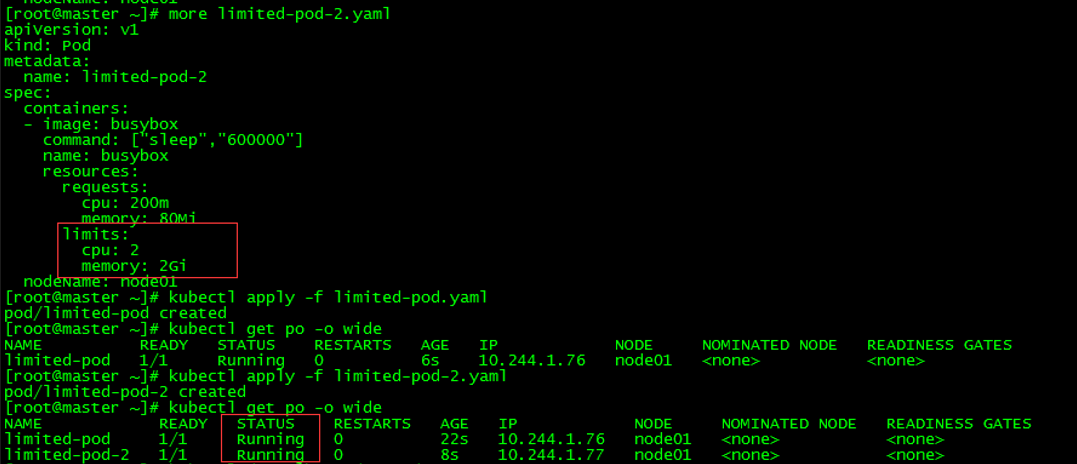
Create limited-pod and limited-pod-2, cpu is 2 cores, memory is 2G, pod is running normally.
4.2.2 View node01 resource usage
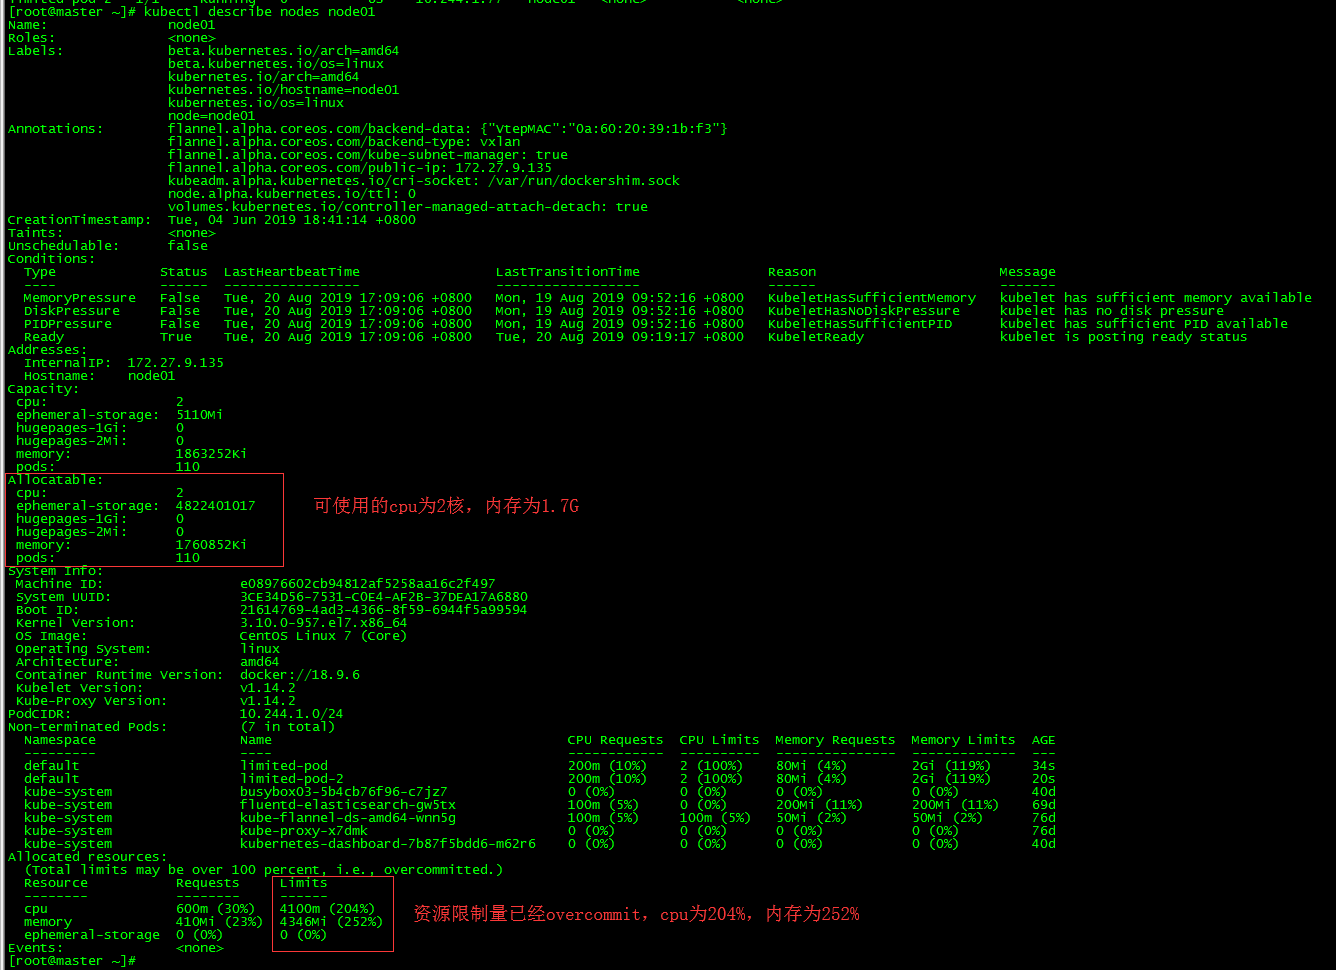
4.2.3 Conclusion
- The sum of resource limits of all pod s on a node can exceed 100% of the total resource of the node.
- Different from requests, limits do not affect pod scheduling results

2. Service Quality Management (QoS)
1. Concept
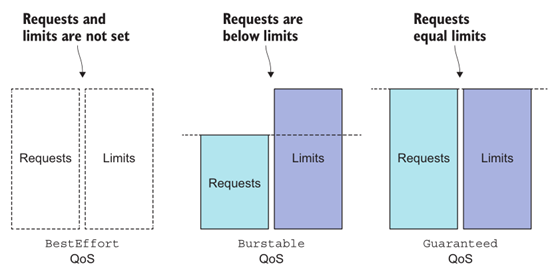
As mentioned earlier, Kubernetes allows node resources to be overloaded with Limits, which means that a node cannot simultaneously satisfy all Pod objects on it to run in a resource-loaded manner. So, when memory resources are scarce, which Pod objects should be terminated in what order? Kubernetes can't make a decision on this by itself. It needs the help of the priority of the Pod object to complete the decision. According to the requests and limits attributes of the Pod object, Kubernetes classifies the Pod image into three categories: Best Effort, Burstable and Guaranteed, which are specified as follows.
-
Guaranteed: Each Container Sets requests and limits attributes with the same value for CPU resources, and each container sets requests and limits attributes with the same value for memory resources, which automatically belongs to this category. This kind of Pod resource has the highest priority.
-
Burstable: At least one container sets CPU or memory resource requests properties, but Pod resources that do not meet the requirements of the Guaranteed category are automatically assigned to this category, and they have medium priority.
- Best Effort: The Pod resources that do not have requests or limits attributes set for any container will automatically fall into this category, with their priority being at the lowest level.
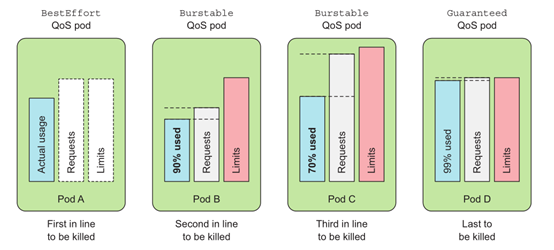
In an overcommitted system, the QoS level determines which container is the first to be killed, so the released resources can be provided for higher priority pod use. The Best Effort pod was first killed, followed by Burstable pod, and finally Guaranteed pod. Guaranteed pod is killed only when the system process needs memory.
2. Defining QoS
requests, limits, and QoS levels of resources
3. The same level of quality of service container handling
Each row state container has its OOM score, and the higher the score, the higher the priority will be killed. OOM scores are calculated mainly in two latitudes: the default score inherited from the QoS category and the ratio of available memory resources to containers. The default score of the same category of POD resources is the same. When POD resources with the same rank priority are in OOM, the Pod object with the largest memory occupation ratio will be killed first compared with its own requests attribute.
Limit Range
1. Concept
By default, all containers in Kubernetes have no CPU or memory limitations. LimitRange is used to add a resource constraint to Namespace, including minimum, maximum and default resources.
2. Why need LimitRange
It is necessary to set up resource requests and limits for a single container: 1. Upgrade the quality of service to prevent kill ing first in OOM; 2. By default, Pod runs with unlimited CPU and memory, possibly swallowing up all available computing resources on the working node.
_By configuring Pod's computing resources Requests and Limits, we can restrict the use of Pod's resources, but for Kubemetes cluster administrators, configuring each Pod's Requests and Limits is cumbersome and restrictive. More often, what we need is a global and unified limitation on the configuration of Requests and Limits in the cluster.
3 Create LimitRange
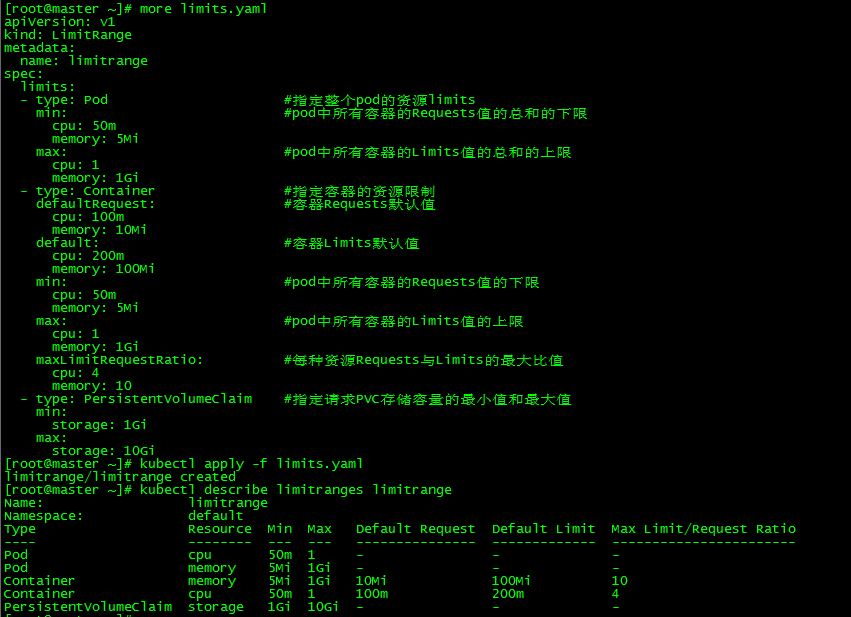
[root@master ~]# more limits.yaml
apiVersion: v1
kind: LimitRange
metadata:
  name: limitrange
spec:
  limits:
  - type: Pod                      #Specify resource limits for the entire pod
    min:                           #Lower limit for the sum of Requests values for all containers in pod
      cpu: 50m
      memory: 5Mi
    max:                           #The upper limit of the sum of Limits values for all containers in pod
      cpu: 1
      memory: 1Gi
  - type: Container                #Resource constraints for specified containers
    defaultRequest:                #Container Requests Default
      cpu: 100m
      memory: 10Mi
    default:                       #Container Limits default
      cpu: 200m
      memory: 100Mi
    min:                           #Lower Limit of Requests Value for All Containers in pod
      cpu: 50m
      memory: 5Mi
    max:                           #Limits of all containers in pod
      cpu: 1
      memory: 1Gi
    maxLimitRequestRatio:          #Maximum ratio of Requests to Limits for each resource
      cpu: 4
      memory: 10
  - type: PersistentVolumeClaim    #Specifies the minimum and maximum storage capacity of the requested PVC
    min:
      storage: 1Gi
    max:
      storage: 10Gi
[root@master ~]# kubectl apply -f limits.yaml
limitrange/limitrange created
LimitRange resource support limits system resource usage for Container, Pod, and Persistent Volume Claim resource objects
4. Check LimitRange
[root@master ~]# kubectl describe limitranges limitrange
5. LimitRange test
5.1 Default values for requests and limits
New pod
[root@master ~]# more default.yaml
apiVersion: v1
kind: Pod
metadata:
  name: default-pod
spec:
  containers:
  - image: busybox
    name: busybox
    args:
    - /bin/sh
    - -c
    - sleep 60000
[root@master ~]# kubectl apply -f default.yaml
pod/default-pod created
[root@master ~]# kubectl get po -o wide
NAME            READY   STATUS    RESTARTS   AGE   IP            NODE     NOMINATED NODE   READINESS GATES
default-pod     1/1     Running   0          8s    10.244.2.43   node02   <none>           <none>
limited-pod     1/1     Running   1          22h   10.244.1.81   node01   <none>           <none>
limited-pod-2   1/1     Running   1          22h   10.244.1.82   node01   <none>           <none>
New pod default-pod, no requests and limits specified in yaml
View pod
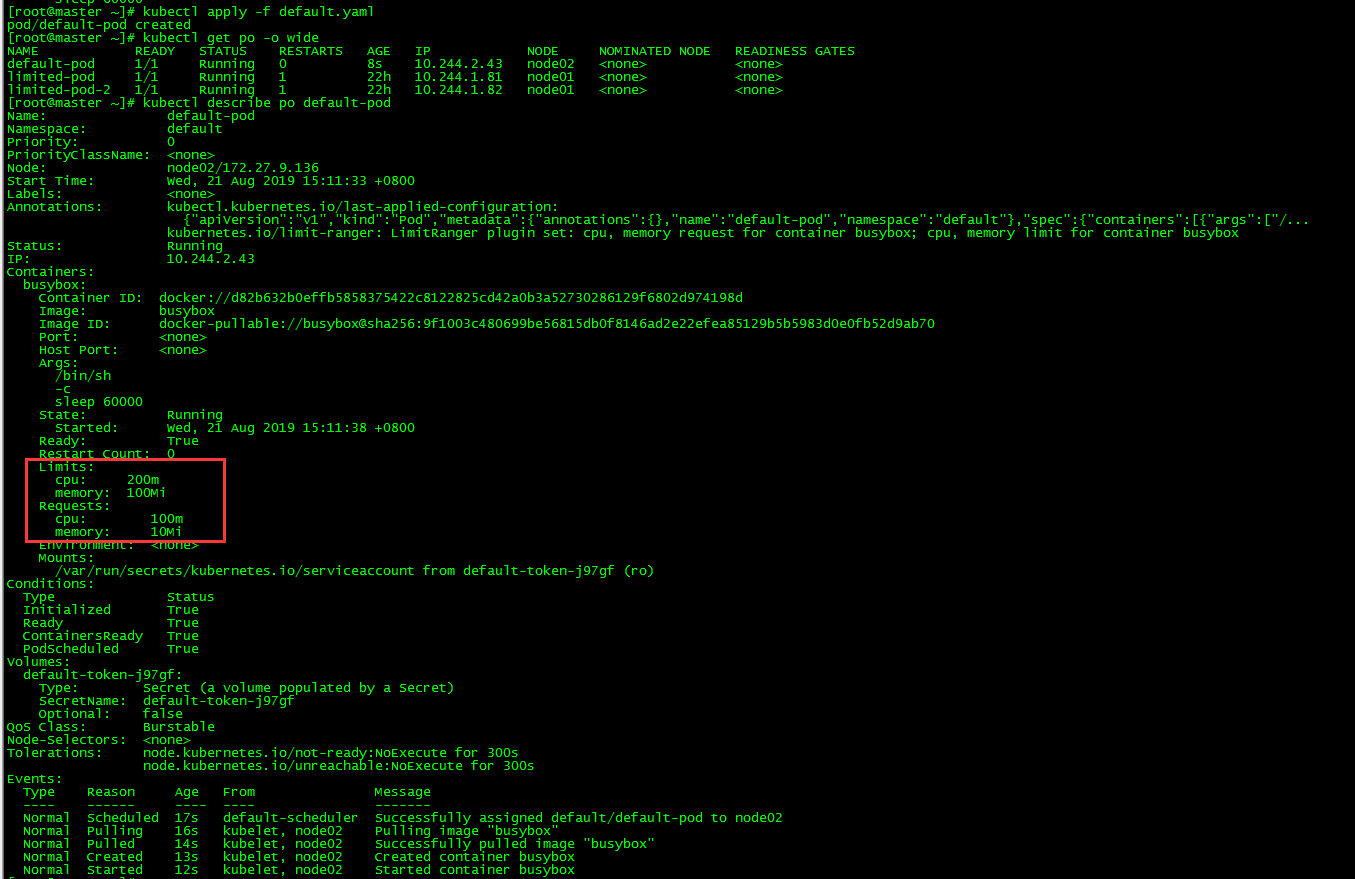
The requests and limits of the container are consistent with what we set in the LimitRange object.
5.2 Mandatory Restrictions
5.2.1 cpu over-limit
[root@master ~]# kubectl run  cpu-over --image=busybox --restart=Never --requests='cpu=1200m,memory=30Mi' sleep 6000
The Pod "cpu-over" is invalid: spec.containers[0].resources.requests: Invalid value: "1200m": must be less than or equal to cpu limit
5.2.2 Memory Overlimit
[root@master ~]# kubectl run  cpu-over --image=busybox --restart=Never --requests='cpu=200m,memory=300Mi' sleep 6000
The Pod "cpu-over" is invalid: spec.containers[0].resources.requests: Invalid value: "300Mi": must be less than or equal to memory limit

IV. Resource Quota Management
1. Concept
_Kubemetes can check whether the container is still running through a live probe. Each container in the pod can be assigned a viable probe individually. If the probe fails, Kubemetes will periodically execute the probe and restart the container.
Resource Quotas (Resource Quotas) is a mechanism used to limit users'resource usage. It is necessary to create a ResourceQuota object in namespace to limit requests for Pod to no more than the quota.
Resource quota types:
- Computing resources. Including cpu and memory
- Storage resources. Includes the total amount of storage resources and the total number of storage class es specified
- Number of objects. Number of objects that can be created
2. ResourceQuota role
Although LimitRange resources can limit the amount of computing resources or storage resources related to a single container, Pod and PVC, users can still create a large number of such resource objects and encroach on all system resources. Thus, Kubernetes provides ResourceQuota resources for defining the number of objects in namespaces or system resource quotas.
3. Create ResourceQuota for CPU and memory
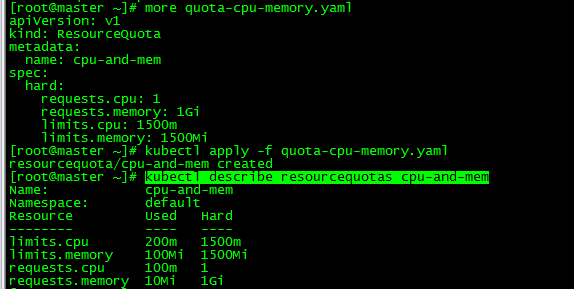
[root@master ~]# more quota-cpu-memory.yaml
apiVersion: v1
kind: ResourceQuota
metadata:
  name: cpu-and-mem
spec:
  hard:
    requests.cpu: 1
    requests.memory: 1Gi
    limits.cpu: 1500m
    limits.memory: 1500Mi
[root@master ~]# kubectl apply -f quota-cpu-memory.yaml
resourcequota/cpu-and-mem created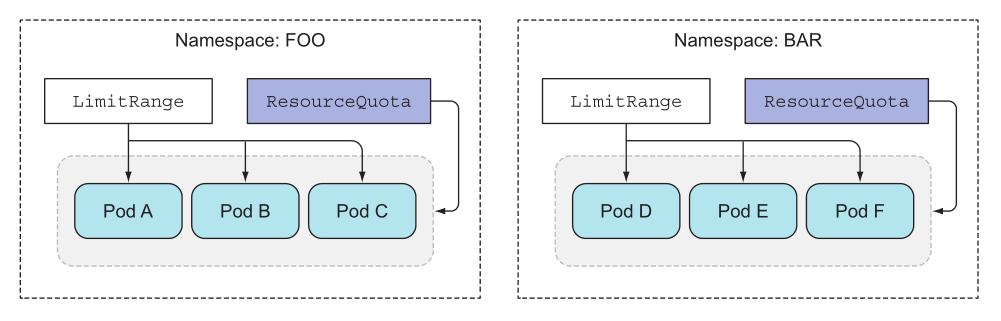
LimitRange applies to individual pods, ResourceQuota applies to all pods in the namespace
3.1 Check ResourceQuota
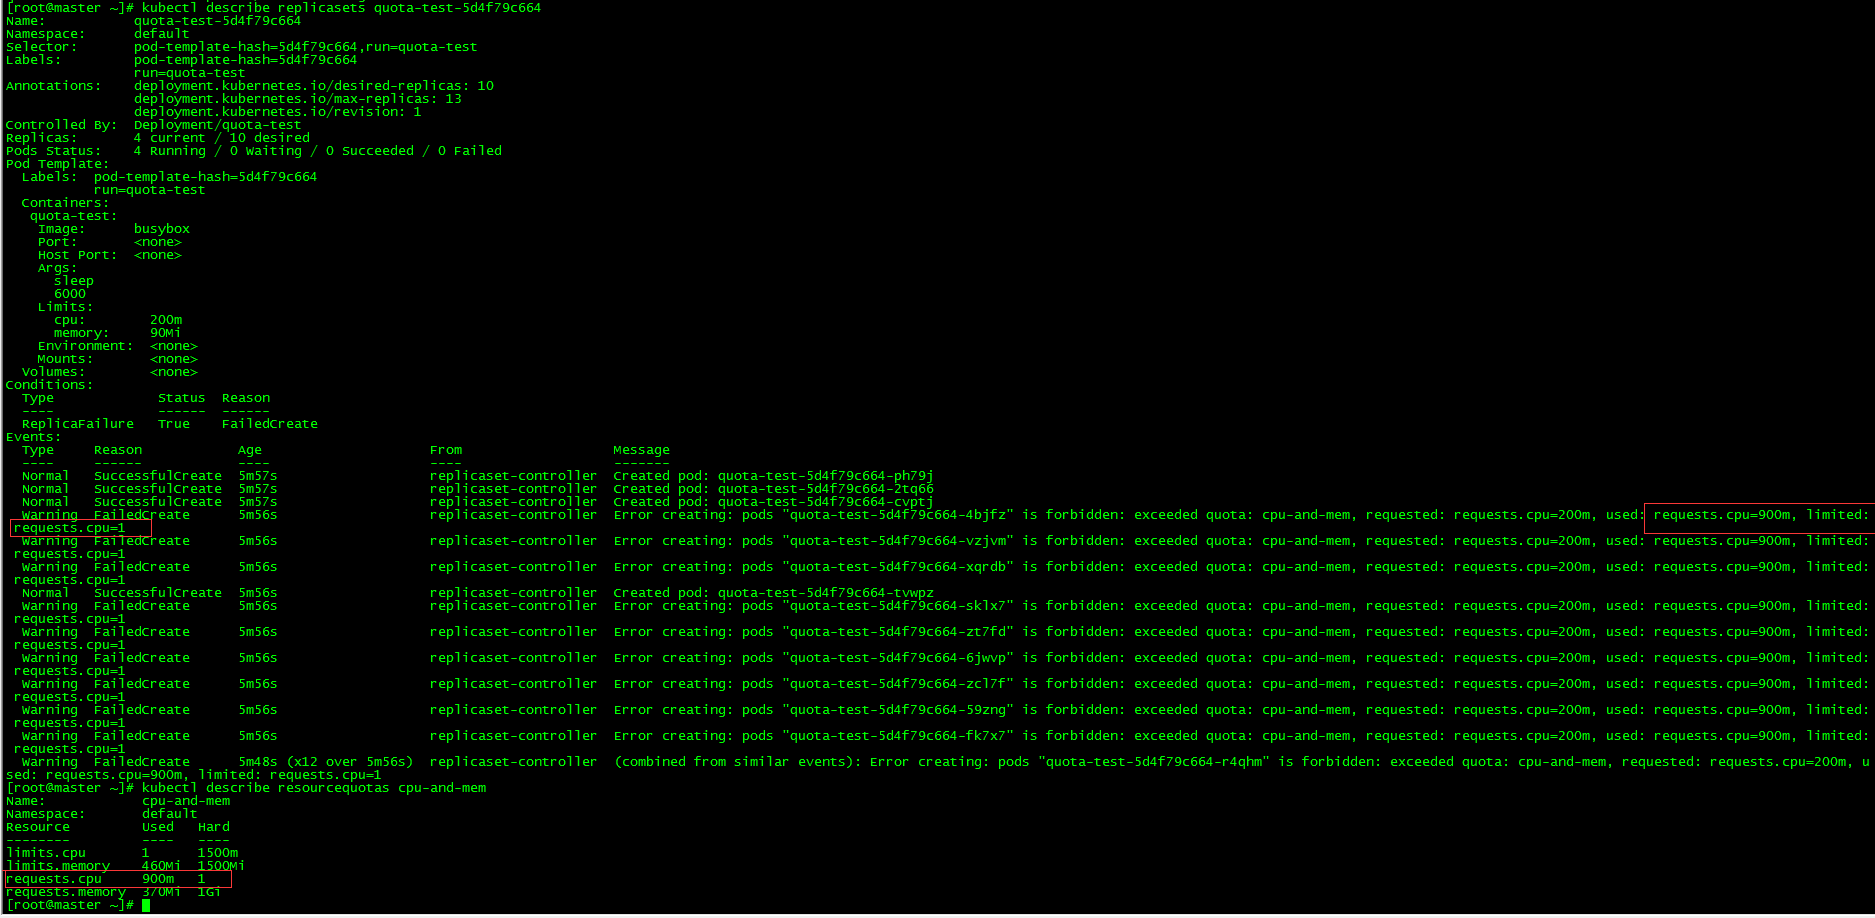
[root@master ~]# kubectl describe resourcequotas cpu-and-mem
3.2 resourcequota test
[root@master ~]# kubectl run  quota-test --image=busybox  --limits='cpu=200m,memory=90Mi' --replicas=10 sleep 6000
kubectl run --generator=deployment/apps.v1 is DEPRECATED and will be removed in a future version. Use kubectl run --generator=run-pod/v1 or kubectl create instead.
deployment.apps/quota-test created
[root@master ~]# kubectl get po -o wide
NAME                          READY   STATUS    RESTARTS   AGE     IP            NODE     NOMINATED NODE   READINESS GATES
default-pod                   1/1     Running   0          31m     10.244.2.52   node02   <none>           <none>
quota-test-5d4f79c664-2tq66   1/1     Running   0          5m44s   10.244.1.90   node01   <none>           <none>
quota-test-5d4f79c664-cvptj   1/1     Running   0          5m44s   10.244.0.68   master   <none>           <none>
quota-test-5d4f79c664-ph79j   1/1     Running   0          5m44s   10.244.2.64   node02   <none>           <none>
quota-test-5d4f79c664-tvwpz   1/1     Running   0          5m44s   10.244.2.65   node02   <none>           <none>
It was found that only four pods were running, because the cpu of requests was 200 (the same as limits when requests were not set), and the limited value of requests.cpu in resourcequotas was 1000m. The system used 100m(default-pod) before, so only 900m was available, so only four new pods could be created at most.
4. Limit the number of objects that can be created
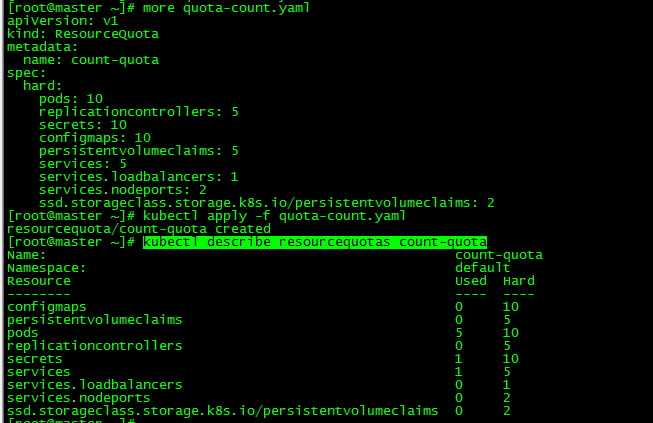
[root@master ~]# more quota-count.yaml
apiVersion: v1
kind: ResourceQuota
metadata:
  name: count-quota
spec:
  hard:
    pods: 10
    replicationcontrollers: 5
    secrets: 10
    configmaps: 10
    persistentvolumeclaims: 5
    services: 5
    services.loadbalancers: 1
    services.nodeports: 2
    ssd.storageclass.storage.k8s.io/persistentvolumeclaims: 2
[root@master ~]# kubectl apply -f quota-count.yaml
resourcequota/count-quota created
The namespace creates up to 10 pod s, 5 Replication Controller s, 10 Secret s, 10 ConfigMap s, 4 PVCs, 5 Service s, 1 Load Balancer, 2 NodePort s and 2 Storage Classes as ssd PVCs.
| pod | Replication Controller | Secret | ConfigMap | PVC | Service | LoadBalancer | NodePort | ssd PVC |
|---|---|---|---|---|---|---|---|---|
| 10 | 5 | 10 | 10 | 4 | 5 | 1 | 2 | 2 |
4.1 Check ResourceQuota
[root@master ~]# kubectl describe resourcequotas count-quota
4.2 resourcequota test
[root@master ~]# kubectl create service nodeport nodeport01 --tcp=5678:8080
service/nodeport01 created
[root@master ~]# kubectl create service nodeport nodeport02 --tcp=5678:8081
service/nodeport02 created
[root@master ~]# kubectl create service nodeport nodeport03 --tcp=5678:8082
Error from server (Forbidden): services "nodeport03" is forbidden: exceeded quota: count-quota, requested: services.nodeports=1, used: services.nodeports=2, limited: services.nodeports=2
services.nodeports can only create two, which is wrong when creating the third.

5. Specific pod status or assigned quotas at the QoS level
[root@master ~]# more quota-scoped.yaml
apiVersion: v1
kind: ResourceQuota
metadata:
  name: scoped-quota
spec:
  scopes:
  - BestEffort
  - NotTerminating
  hard:
    pods: 4
[root@master ~]# kubectl apply -f quota-scoped.yaml
resourcequota/scoped-quota created
This quota can only be applied to pods with Best Effort QoS and no validity period. Only four such pods are allowed.
5.1 Check ResourceQuota
[root@master ~]# kubectl describe resourcequotas scoped-quota

The idea of resourcequota testing is the same as cpu-and-mem and count-quota, which is not discussed here.
All scripts and configuration files in this article have been uploaded to github: https://github.com/loong576/k8s-Managing-pods-computational-resources.git