1. Scanning and packet capturing analysis
1.1 problems
This case requires to be familiar with common security tools in Linux host environment and complete the following tasks:
- Use nmap scan to obtain information about the specified host / network segment
- Script scanning using nmap
- Analysis of plaintext exchange information in FTP access using tcpdump
1.2 scheme
Kali is a Linux distribution based on Debian. Kali Linux contains hundreds of security related tools
Such as penetration test, security detection, password security, reverse engineering, etc., official website: Kali org.
Prepare the experimental environment and execute the command on the real machine to initialize the virtual machine.
Important: kali virtual machine user name is kali and password is kali.
#kali reset                    #Initialize virtual machine
#virt-manager                  #Open kvm virtual machine manager
Modify the network card configuration. Select private1: isolate network from network source, as shown in figure-1.
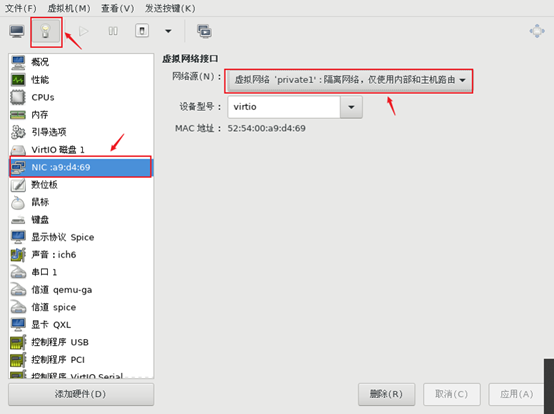
Figure-1
Configure IP address for kali virtual machine:
$ ip  a  s                      #View network card device name (device name)
$ nmcli  connection  show     #View network connection name (network card name)
#Note: carefully distinguish the network card name and device name. The two names may be inconsistent (normal). Pay attention when configuring IP!!!
$ sudo nmcli connection modify "Wired connection 1" \
ipv4.method manual \
ipv4.addr 192.168.4.40/24 \
autoconnect yes
#Configure the IP address and autoconnect to set the network card to activate automatically after startup
#\Represents a newline character
$ sudo nmcli connection up "Wired connection 1"
1.3 steps
To implement this case, you need to follow the following steps.
Step 1: use NMAP scan to obtain the relevant information of the specified host / network segment
1) Basic usage
Basic usage:
# nmap [scan type] [options] < scan target... >
#Common scan types
# -sS, TCP SYN scan (half open)
# -sT, TCP connection scan (fully open)
# -sU, UDP scan
# -sP, ICMP scan
# -A. Comprehensive analysis of target system
Please test the following experiment according to your actual situation. Everyone's IP address may be different!
2) Check 192.168 4.5 whether the host can ping (192.168.4.5 host is assumed here)
[kali@kali ~]$ sudo nmap  -sP  192.168.4.5
Starting Nmap 6.40 ( http://nmap.org ) at 2028-06-06 21:59 CST
mass_dns: warning: Unable to determine any DNS servers. Reverse DNS is disabled. Try using --system-dns or specify valid servers with --dns-servers
Nmap scan report for host3 (192.168.4.5)
Host is up (0.00036s latency).
MAC Address: 52:54:00:71:07:76 (QEMU Virtual NIC)
Nmap done: 1 IP address (1 host up) scanned in 0.02 seconds
Use the - n option to not perform DNS resolution
[kali@kali ~]$ sudo nmap -n -sP  192.168.4.5
Starting Nmap 6.40 ( http://nmap.org ) at 2028-06-06 22:00 CST
Nmap scan report for 192.168.4.5
Host is up (0.00046s latency).
MAC Address: 52:54:00:71:07:76 (QEMU Virtual NIC)
Nmap done: 1 IP address (1 host up) scanned in 0.03 seconds
3) Check 192.168 Which hosts in the 4.0/24 network segment can be ping ed
[kali@kali ~]$ sudo nmap -n -sP 192.168.4.0/24
Starting Nmap 5.51 ( http://nmap.org ) at 2027-05-17 18:01 CST
Nmap scan report for 192.168.4.5
Host is up.
Nmap scan report for 192.168.4.7
Host is up.
Nmap scan report for 192.168.4.120
Host is up (0.00027s latency).
MAC Address: 00:0C:29:74:BE:21 (VMware)
Nmap scan report for 192.168.4.110
Host is up (0.00016s latency).
MAC Address: 00:50:56:C0:00:01 (VMware)
Nmap scan report for 192.168.4.120
Host is up (0.00046s latency).
MAC Address: 00:0C:29:DB:84:46 (VMware)
Nmap done: 256 IP addresses (5 hosts up) scanned in 3.57 seconds
4)Check that the target host is turned on TCP service
```shell
[kali@kali ~]$ sudo nmap -sT 192.168.4.254
Starting Nmap 5.51 ( http://nmap.org ) at 2028-05-17 17:55 CST
Nmap scan report for 192.168.4.254
Host is up (0.00028s latency).
Not shown: 990 closed ports
PORT    STATE SERVICE
21/tcp  open  ftp
22/tcp  open  ssh
25/tcp  open  smtp
80/tcp  open  http
110/tcp open  pop3
111/tcp open  rpcbind
143/tcp open  imap
443/tcp open  https
993/tcp open  imaps
995/tcp open  pop3s
MAC Address: 00:0C:29:74:BE:21 (VMware)
Nmap done: 1 IP address (1 host up) scanned in 1.31 seconds
5) Check 192.168 Which hosts in the 4.0/24 network segment have FTP and SSH services enabled
[kali@kali ~]$ sudo nmap -p 21-22 192.168.4.0/24
Starting Nmap 5.51 ( http://nmap.org ) at 2027-05-17 18:00 CST
Nmap scan report for 192.168.4.5
Host is up (0.000025s latency).
PORT   STATE SERVICE
21/tcp open  ftp
22/tcp open  ssh
Nmap scan report for 192.168.4.7
Host is up.
PORT   STATE    SERVICE
21/tcp filtered ftp
22/tcp filtered ssh
Nmap scan report for 192.168.4.120
Host is up (0.00052s latency).
PORT   STATE SERVICE
21/tcp open  ftp
22/tcp open  ssh
MAC Address: 00:0C:29:74:BE:21 (VMware)
Nmap scan report for pc110.tarena.com (192.168.4.110)
Host is up (0.00038s latency).
PORT   STATE  SERVICE
21/tcp closed ftp
22/tcp closed ssh
MAC Address: 00:50:56:C0:00:01 (VMware)
Nmap scan report for 192.168.4.120
Host is up (0.00051s latency).
PORT   STATE  SERVICE
21/tcp closed ftp
22/tcp closed ssh
MAC Address: 00:0C:29:DB:84:46 (VMware)
Nmap done: 256 IP addresses (5 hosts up) scanned in 4.88 seconds
6) Check the UDP service opened by the target host
[kali@kali ~]$ sudo nmap   -sU  192.168.4.5                #Specify - sU scan UDP
53/udp   open          domain
111/udp  open          rpcbind
7) Comprehensively analyze the target host 192.168 4.100 and 192.168 4.5 operating system information
[kali@kali ~]$ sudo nmap -A 192.168.4.100,5
Starting Nmap 5.51 ( http://nmap.org ) at 2017-05-17 18:03 CST
Nmap scan report for 192.168.4.100                      #Scan report for host mail
Host is up (0.0016s latency).
Not shown: 990 closed ports
PORT    STATE SERVICE  VERSION
21/tcp  open  ftp      vsftpd 2.2.2
| ftp-anon: Anonymous FTP login allowed (FTP code 230)
| -rw-r--r--    1 0        0            1719 Aug 17 13:33 UserB.pub
| -rw-r--r--    1 0        0             122 Aug 13 05:27 dl.txt
| drwxr-xr-x    2 14       0            4096 Aug 13 09:07 pub
| -rw-rw-r--    1 505      505           170 Aug 17 13:18 tools-1.2.3.tar.gz
|_-rw-rw-r--    1 505      505           287 Aug 17 13:22 tools-1.2.3.tar.gz.sig
22/tcp  open  ssh      OpenSSH 5.3 (protocol 2.0)
| ssh-hostkey: 1024 86:be:d6:89:c1:2d:d9:1f:57:2f:66:d1:af:a8:d3:c6 (DSA)
|_2048 16:0a:15:01:fa:bb:91:1d:cc:ab:68:17:58:f9:49:4f (RSA)
25/tcp  open  smtp     Postfix smtpd
80/tcp  open  http     Apache httpd 2.4.10 ((Red Hat))
|_http-methods: No Allow or Public header in OPTIONS response (status code 302)
| http-title: 302 Found
|_Did not follow redirect to https://192.168.4.100//
110/tcp open  pop3     Dovecot pop3d
|_pop3-capabilities: USER CAPA UIDL TOP OK(K) RESP-CODES PIPELINING STLS SASL(PLAIN)
111/tcp open  rpcbind
MAC Address: 00:0C:29:74:BE:21 (VMware)
No exact OS matches for host (If you know what OS is running on it, see http://nmap.org/submit/ ).
TCP/IP fingerprint:
OS:SCAN(V=5.51%D=8/19%OT=21%CT=1%CU=34804%PV=Y%DS=1%DC=D%G=Y%M=000C29%TM=52
OS:11ED90%P=x86_64-redhat-linux-gnu)SEQ(SP=106%GCD=1%ISR=10B%TI=Z%CI=Z%II=I
OS:%TS=A)OPS(O1=M5B4ST11NW6%O2=M5B4ST11NW6%O3=M5B4NNT11NW6%O4=M5B4ST11NW6%O
OS:5=M5B4ST11NW6%O6=M5B4ST11)WIN(W1=3890%W2=3890%W3=3890%W4=3890%W5=3890%W6
OS:=3890)ECN(R=Y%DF=Y%T=40%W=3908%O=M5B4NNSNW6%CC=Y%Q=)T1(R=Y%DF=Y%T=40%S=O
OS:%A=S+%F=AS%RD=0%Q=)T2(R=N)T3(R=N)T4(R=Y%DF=Y%T=40%W=0%S=A%A=Z%F=R%O=%RD=
OS:0%Q=)T5(R=Y%DF=Y%T=40%W=0%S=Z%A=S+%F=AR%O=%RD=0%Q=)T6(R=Y%DF=Y%T=40%W=0%
OS:S=A%A=Z%F=R%O=%RD=0%Q=)T7(R=Y%DF=Y%T=40%W=0%S=Z%A=S+%F=AR%O=%RD=0%Q=)U1(
OS:R=Y%DF=N%T=40%IPL=164%UN=0%RIPL=G%RID=G%RIPCK=G%RUCK=G%RUD=G)IE(R=Y%DFI=
OS:N%T=40%CD=S)
Network Distance: 1 hop
Service Info: Host:  mail.tarena.com; OS: Unix
TRACEROUTE
HOP RTT     ADDRESS
1   1.55 ms 192.168.4.100
Step 2: perform script scanning using nmap
1) Prepare a Vsftpd server (192.168.4.5 host operation)
[root@proxy ~]# yum -y install vsftpd
[root@proxy ~]# systemctl restart vsftpd
[root@proxy ~]# useradd  tom
[root@proxy ~]# echo 123 | passwd --stdin tom
2) FTP related scanning script (operated on kali host)
Relevant script storage directory: / usr/share/nmap/scripts /.
[kali@kali ~]$ sudo nmap  --script=ftp-anon.nse  192.168.4.5  -p 21
#Anonymous access scan
[kali@kali ~]$ sudo nmap  --script=ftp-syst.nse  192.168.4.5  -p  21
#Scan ftp software related information (such as version number, whether there is bandwidth limit, timeout, etc.)
[kali@kali ~]$ sudo nmap  --script=ftp-vsftpd-backdoor.nse 192.168.4.5  -p 21
#Backdoor scanning
[kali@kali ~]$ sudo nmap  --script=ftp-brute.nse  192.168.4.5  -p 21
#Brute force password cracking
3) SSH related scanning (operating on kali host)
[kali@kali ~]$ sudo nmap  --script=ssh-brute.nse 192.168.4.5 -p 22
#Brute force ssh password
[kali@kali ~]$ sudo vi /tmp/users.lst                  #Create a new file to store account information
root
tom
[kali@kali ~]$ sudo vi /tmp/pass.lst                   #Create a new file to store password information
123456
654321
[kali@kali ~]$ sudo nmap  --script=ssh-brute.nse \
--script-args userdb=/tmp/users.lst,passdb=/tmp/pass.lst  192.168.4.5 -p 22
#Use your own account and password book to brutally crack ssh passwords
At 192.168 4.5 the host can view the log
[root@proxy ~]# tail /var/log/secure #view log
4) HTTP related scanning (kali host operation)
192.168 is assumed here 4.5 http service is available.
[kali@kali ~]$ sudo nmap  --script=http-methods.nse  192.168.4.5  -p 80
#Request method scanning (such as get, post, header, etc.)
[kali@kali ~]$ sudo nmap  --script=http-sql-injection.nse 192.168.4.5  -p  80
#SQL injection scan
Note: SQL injection means that the web application does not judge or filter the legitimacy of the user's input data. The attacker can add additional SQL statements at the end of the pre-defined query statements in the web application to realize illegal operations without the knowledge of the administrator, so as to deceive the database server to execute unauthorized arbitrary queries, So as to further obtain the corresponding data information.
SQL injection is to modify and splice the input parameters of the original URL, form field or data package of the Web page into SQL statements, which are passed to the Web server, and then to the database server to execute database commands.
5) SMB related scan (kali host operation)
Suppose there is a windows host 192.168 137.4.
[kali@kali ~]$ sudo nmap --script=smb-brute.nse 192.168.137.4
[kali@kali ~]$ sudo nmap --script=smb-brute.nse  \
--script-args=userdb=/Codebook,passdb=/Codebook 192.168.137.4
6) Brute force password cracking (kali host operation)
$ sudo   john  --single  /etc/shadow              #Crack the fool password
$ sudo   john   /etc/shadow                       #Dictionary brute force cracking (ctrl+c termination at any time)
$ sudo   john  --wordlist=Codebook   /etc/shadow   #Crack with custom password book
$ sudo   john  --show  /etc/shadow                #Show cracked passwords
Step 3: use tcpdump to analyze the plaintext exchange information in FTP access
1) Enable tcpdump command line packet capture (kali virtual machine operation)
Execute the tcpdump command line, add appropriate filter conditions, and only crawl and access the host 192.168 4.5 21 port data communication and convert it into easy to read text in ASCII format.
It is assumed here that 192.168 4.5 the host has vsftpd service. If not, install and start the service in advance!!!
Warning: all packet capturing commands in the case do not specify a network card. Each student needs to specify the name of the packet capturing network card according to the actual situation.
[kali@kali ~]$ sudo tcpdump -i Network card name -A host 192.168.4.5 and tcp port 21
tcpdump: verbose output suppressed, use -v or -vv for full protocol decode
listening on eth0, link-type EN10MB (Ethernet), capture size 65535 bytes
.. ..                                            #Enter the state of waiting to capture packets
#The monitoring options are as follows:
# -i. Specify the network interface to monitor (listen to the first network card by default)
# -A. Convert to ACSII code for easy reading
# -w. Saves the packet information to the specified file
# -r. Reads packet information from the specified file
#Filter conditions of tcpdump:
# Type: host, net, port, portrange
# Direction: src (source address), dst (destination address)
# Protocol: tcp, udp, ip, wlan, arp
# Multiple condition combinations: and, or, not
3) Perform FTP access and observe tcpdump packet capture results
Access host 192.168 from kali host 4.5 vsftpd service.
[kali@kali ~]$ ftp 192.168.4.5
Connected to 192.168.4.5 (192.168.4.5).
220 (vsFTPd 3.0.2)
Name (192.168.4.5:root): tom       #enter one user name
331 Please specify the password.
Password:                              #Input password
530 Login incorrect.
Login failed.
ftp>quit                               #sign out
Observe the packet capture results (observe the packet capture results of tcpdump on kali host):
[kali@kali ~]$
... ...
18:47:27.960530 IP 192.168.2.100.novation > 192.168.4.5.ftp: Flags [P.], seq 1:14, ack 21, win 65515, length 13
E..5..@.@......x...d.*..G.\c.1BvP.......USER tom
18:47:29.657364 IP 192.168.2.100.novation > 192.168.4.5.ftp: Flags [P.], seq 14:27, ack 55, win 65481, length 13
E..5..@.@......x...d.*..G.\p.1B.P.......PASS 123
4) Use tcpdump to capture the packet again. Use the - w option to save the captured packet as a file for later analysis.
[kali@kali ~]$ sudo tcpdump  -i Network card name  -A  -w  ftp.cap  \
host 192.168.4.5  and  tcp  port  21                            #Capture and save
The - r option of the tcpdump command allows you to read the previously captured historical data file
[kali@kali ~]$ sudo tcpdump  -A  -r  ftp.cap | egrep  '(USER|PASS)'    #Analysis packet
.. ..
E..(..@.@.. ...x...d.*..G.\c.1BbP.............
18:47:25.967592 IP 192.168.2.5.ftp > 192.168.2.100.novation: Flags [P.], seq 1:21, ack 1, win 229, length 20
E..<FJ@.@.jE...d...x...*.1BbG.\cP...V...220 (vsFTPd 2.2.2)
... ...
18:47:27.960530 IP 192.168.2.100.novation > 192.168.2.5.ftp: Flags [P.], seq 1:14, ack 21, win 65515, length 13
E..5..@.@......x...d.*..G.\c.1BvP.......USER tom
... ...
18:47:27.960783 IP 192.168.2.5.ftp > 192.168.2.100.novation: Flags [P.], seq 21:55, ack 14, win 229, length 34
E..JFL@.@.j5...d...x...*.1BvG.\pP...i~..331 Please specify the password.
... ...
18:47:29.657364 IP 192.168.2.5.ftp > 192.168.2.100.novation: Flags [P.], seq 14:27, ack 55, win 65481, length 13
E..5..@.@......x...d.*..G.\p.1B.P.......PASS 123
... ...
18:47:29.702671 IP 192.168.2.100.novation > 192.168.2.5.ftp: Flags [P.], seq 55:78, ack 27, win 229, length 23
E..?FN@.@.j>...d...x...*.1B.G.\}P.......230 Login successful.
2. Strengthen the security of common services
2.1 problems
This case requires to optimize and improve the security of common network services, mainly to complete the following tasks:
- Optimize the security configuration of Nginx service
2.2 scheme
Nginx security optimization includes: modifying version information, limiting concurrency, rejecting illegal requests, and preventing buffer overflow.
2.3 steps
To implement this case, you need to follow the following steps.
Step 1: optimize the security configuration of Nginx service
1) Modify the version information and hide the specific version number
By default, Nginx will display version information and specific version number, which brings convenience to attackers to find vulnerabilities in specific versions.
If you need to mask the version number information, perform the following operations to hide the version number.
[root@proxy ~]# vim /usr/local/nginx/conf/nginx.conf
... ...
http{
     server_tokens off;                            #Manually add such a line under http
     ... ...
}
[root@proxy ~]# /usr/local/nginx/sbin/nginx -s reload
[root@proxy ~]# curl -I http://192.168. 4.5 # viewing header information of server response
2) Limit concurrency
DDOS attackers will send a large number of concurrent connections and occupy server resources (including the number of connections, bandwidth, etc.), which will cause normal users to wait or cannot access the server.
Nginx provides an ngx_http_limit_req_module module can effectively reduce the risk of DDOS attack. The operation methods are as follows:
[root@proxy ~]# vim /usr/local/nginx/conf/nginx.conf
... ...
http{
... ...
limit_req_zone $binary_remote_addr zone=one:10m rate=1r/s;
    server {
        listen 80;
        server_name localhost;
        limit_req zone=one burst=5;
            }
}
#Remarks:
#limit_ req_ The syntax format of zone is as follows:
#limit_req_zone key zone=name:size rate=rate;
#In the above case, the client IP information is stored in a shared memory named one, with a memory space of 10M
#1M can store 8000 IP information, 10M can store 80000 host connection status, and the capacity can be adjusted as needed
#Only one request is accepted per second, and the excess is put into the funnel
#If there are more than 5 funnels, an error is reported
[root@proxy ~]# /usr/local/nginx/sbin/nginx -s reload
The client uses ab test software to test the effect:
[root@client ~]# ab -c 100 -n 100 http://192.168.4.5/
3) Reject illegal request
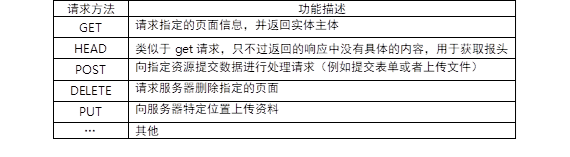
The website uses HTTP protocol, which defines many methods to allow users to connect to the server and obtain the required resources. However, in practical applications, only get and post are required.
The meaning of specific HTTP request methods is shown in TABLE-1.
TABLE-1 HTTP request method and meaning
Before modifying the server configuration, the client uses different request methods to test:
[root@client ~]# curl -i -X GET  http://192.168. 4.5 # normal
[root@client ~]# curl -i -X HEAD http://192.168. 4.5 # normal
#Description of curl command options:
#-i option: displays HTTP header information when accessing the server page
#-X option: Specifies the method of requesting the server
The following settings allow Nginx to reject illegal request methods:
[root@proxy ~]# vim /usr/local/nginx/conf/nginx.conf
http{
       server {
                 listen 80;
#Here,! The symbol represents the negation of the regular, and the ~ symbol is the regular matching symbol
#retrun returns an error message if the user uses a non GET or POST method to access the website
              if ($request_method !~ ^(GET|POST)$ ) {
                     return 444;
               }
        }
}
[root@proxy ~]# /usr/local/nginx/sbin/nginx -s reload
After modifying the server configuration, the client uses different request methods to test:
[root@client ~]# curl -i -X GET  http://192.168. 4.5 # normal
[root@client ~]# curl -i -X HEAD http://192.168. 4.5 # error reporting
4) Prevent buffer overflow
When the client connects to the server, the server will enable various caches to store the connection status information.
If an attacker sends a large number of connection requests and the server does not limit the cache, the memory data may overflow (insufficient space).
Modifying the Nginx configuration file and adjusting various buffer parameters can effectively reduce the overflow risk.
[root@proxy ~]# vim /usr/local/nginx/conf/nginx.conf
http{
client_body_buffer_size  1k;
client_header_buffer_size 1k;
client_max_body_size 1k;
large_client_header_buffers 2 1k;
 ... ...
}
[root@proxy ~]# /usr/local/nginx/sbin/nginx -s reload
3. Basic protective measures
3.1 problems
This case requires to practice the basic protective measures of Linux system and complete the following tasks:
- Modify the account attribute of user zhangsan and set it to expire on December 31, 2019 (login is prohibited)
- Temporarily lock the user lisi's account so that he can't log in. Unlock it after verifying the effect
- Modify the tty terminal prompt so that the first line of text seen before login is "Windows Server 2012 Enterprise R2", and the second line of text is "NT 6.2 Hybrid"
- Lock the file / etc / resolv Conf, / etc/hosts to prevent their contents from being inadvertently modified
- Turn off unneeded services
3.2 steps
To implement this case, you need to follow the following steps.
Step 1: modify the account attribute of user zhangsan and set it to expire on December 31, 2019 (login is prohibited)
1) Under normal circumstances, the unexpired account can be logged in normally, and the account validity can be modified by using chat.
chage Syntax format of the command:
chage -l    title of account                #View account information
chage -E Time account name                #Modify account validity
2) Invalid users will not be able to log in
Use the chat command to set the account of user zhangsan as currently invalid (for example, a certain time has passed):
[root@proxy ~]# useradd zhangsan        #Create account
[root@proxy ~]# passwd zhangsan        #Set password
[root@proxy ~]# chage -E 2017-12-31 zhangsan    #Set account expiration time
Try to log in again as user zhangsan, enter the correct user name and password, and then directly flash back and return to the login page, indicating that this account has expired.
3) Reset the attribute of user zhangsan and set the expiration time to December 31, 2019
[root@proxy ~]# chage -E 2019-12-31 zhangsan              #Modify expiration date
[root@proxy ~]# chage -l zhangsan                        #View account age information
Last password change                     : May 15, 2017
Password expires                       : never
Password inactive                       : never
Account expires                          : Dec 31, 2019
Minimum number of days between password change          : 0
Maximum number of days between password change           : 99999
Number of days of warning before password expires         : 7
4) Reset the properties of user zhangsan and set the expiration time to never expire
[root@proxy ~]# chage -E -1 zhangsan #Set account never to expire
5) Define default validity period (extended knowledge)
/etc/login.defs this configuration file determines the default validity period of the account password.
[root@proxy ~]# cat /etc/login.defs
PASS_MAX_DAYS    99999                        #Maximum password validity
PASS_MIN_DAYS    0                            #Minimum password validity
PASS_MIN_LEN    5                            #Minimum password length
PASS_WARN_AGE    7                            #A few days before the password expires, a warning message will be prompted
UID_MIN                  1000                #UID min
UID_MAX                  60000                #UID Max
Step 2: temporarily lock the account of user zhangsan so that he can't log in. Unlock it after verifying the effect
1) Lock user account
Use the passwd or usermod command to lock the account of user zhangsan.
[root@proxy ~]# passwd -l zhangsan           #Lock user account (lock)
Lock user zhangsan Your password.
passwd: Operation succeeded
[root@proxy ~]# passwd -S zhangsan          #View status
zhangsan LK 2018-02-22 0 99999 7 -1 (The password is locked.)
2) The authentication user zhangsan has been unable to log in, indicating that the lock is effective
Enter the correct user name and password, and always prompt "Login incorrect", unable to log in.
3) Unlock user zhangsan
[root@proxy ~]# passwd -u zhangsan           #Unlock user account (unlock)
Unlock user zhangsan Your password.
passwd: Operation succeeded
[root@proxy ~]# passwd -S zhangsan          #View status
zhangsan PS 2018-08-14 0 99999 7 -1 (Password set, use SHA512 Encryption.)
Step 3: modify the prompt information of tty login and hide the system version
1) When the account logs in to the Linux system, the login information (including the operating system kernel information) will be displayed by default
/These login information is saved in the configuration file of etc/issue. Modify the file to prevent kernel information disclosure.
[root@proxy ~]# cat /etc/issue                      #Confirm original document
Red Hat Enterprise Linux Server release 7.5
Kernel \r on an \m
[root@proxy ~]# cp /etc/issue /etc/issue.origin      #Backup file
[root@proxy ~]# vim /etc/issue                      #Modify file content
Windows Server 2012 Enterprise R2
NT 6.2 Hybrid
2) Test version camouflage effect
Exit the logged in tty terminal or restart the Linux system, and the refreshed terminal prompt information will become user-defined text content, as shown in figure-1.

Figure-1
Step 4: lock the file / etc / resolv conf,/etc/hosts
1) Syntax format:
# chattr +i  file name            #Locked file (unable to modify, delete, append, etc.)
# chattr -i  file name            #Unlock file
# chattr +a  file name            #After locking, the file can only be appended
# chattr -a  file name            #Unlock file
# lsattr file name                #View file special properties
···
2) use+i Locking files, using lsattr View properties
```shell
[root@proxy ~]# chattr +i /etc/resolv.conf
[root@proxy ~]# lsattr /etc/resolv.conf
----i---------- /etc/resolv.conf
3) Use + a to lock the file (append only) and lsattr to view the properties
[root@proxy ~]# chattr +a /etc/hosts
[root@proxy ~]# lsattr /etc/hosts
-----a---------- /etc/hosts
4) Test file locking effect
[root@proxy ~]# rm -rf /etc/resolv.conf
rm: Cannot delete"/etc/resolv.conf": Operation not allowed
[root@proxy ~]# echo xyz > /etc/resolv.conf
-bash: resolv.conf: insufficient privilege
[root@proxy ~]# rm -rf  /etc/hosts                         #fail
[root@proxy ~]# echo "192.168.4.1  xyz" > /etc/hosts     #fail
[root@proxy ~]# echo "192.168.4.1  xyz" >> /etc/hosts    #success
5) Restore the original properties of these two files (to avoid affecting subsequent experiments)
[root@proxy ~]# chattr -i /etc/resolv.conf
[root@proxy ~]# chattr -i /etc/hosts
[root@proxy ~]# lsattr /etc/resolv.conf /etc/hosts
--------------- /etc/resolv.conf
--------------- /etc/hosts
Additional mind map, as shown in figure-5:
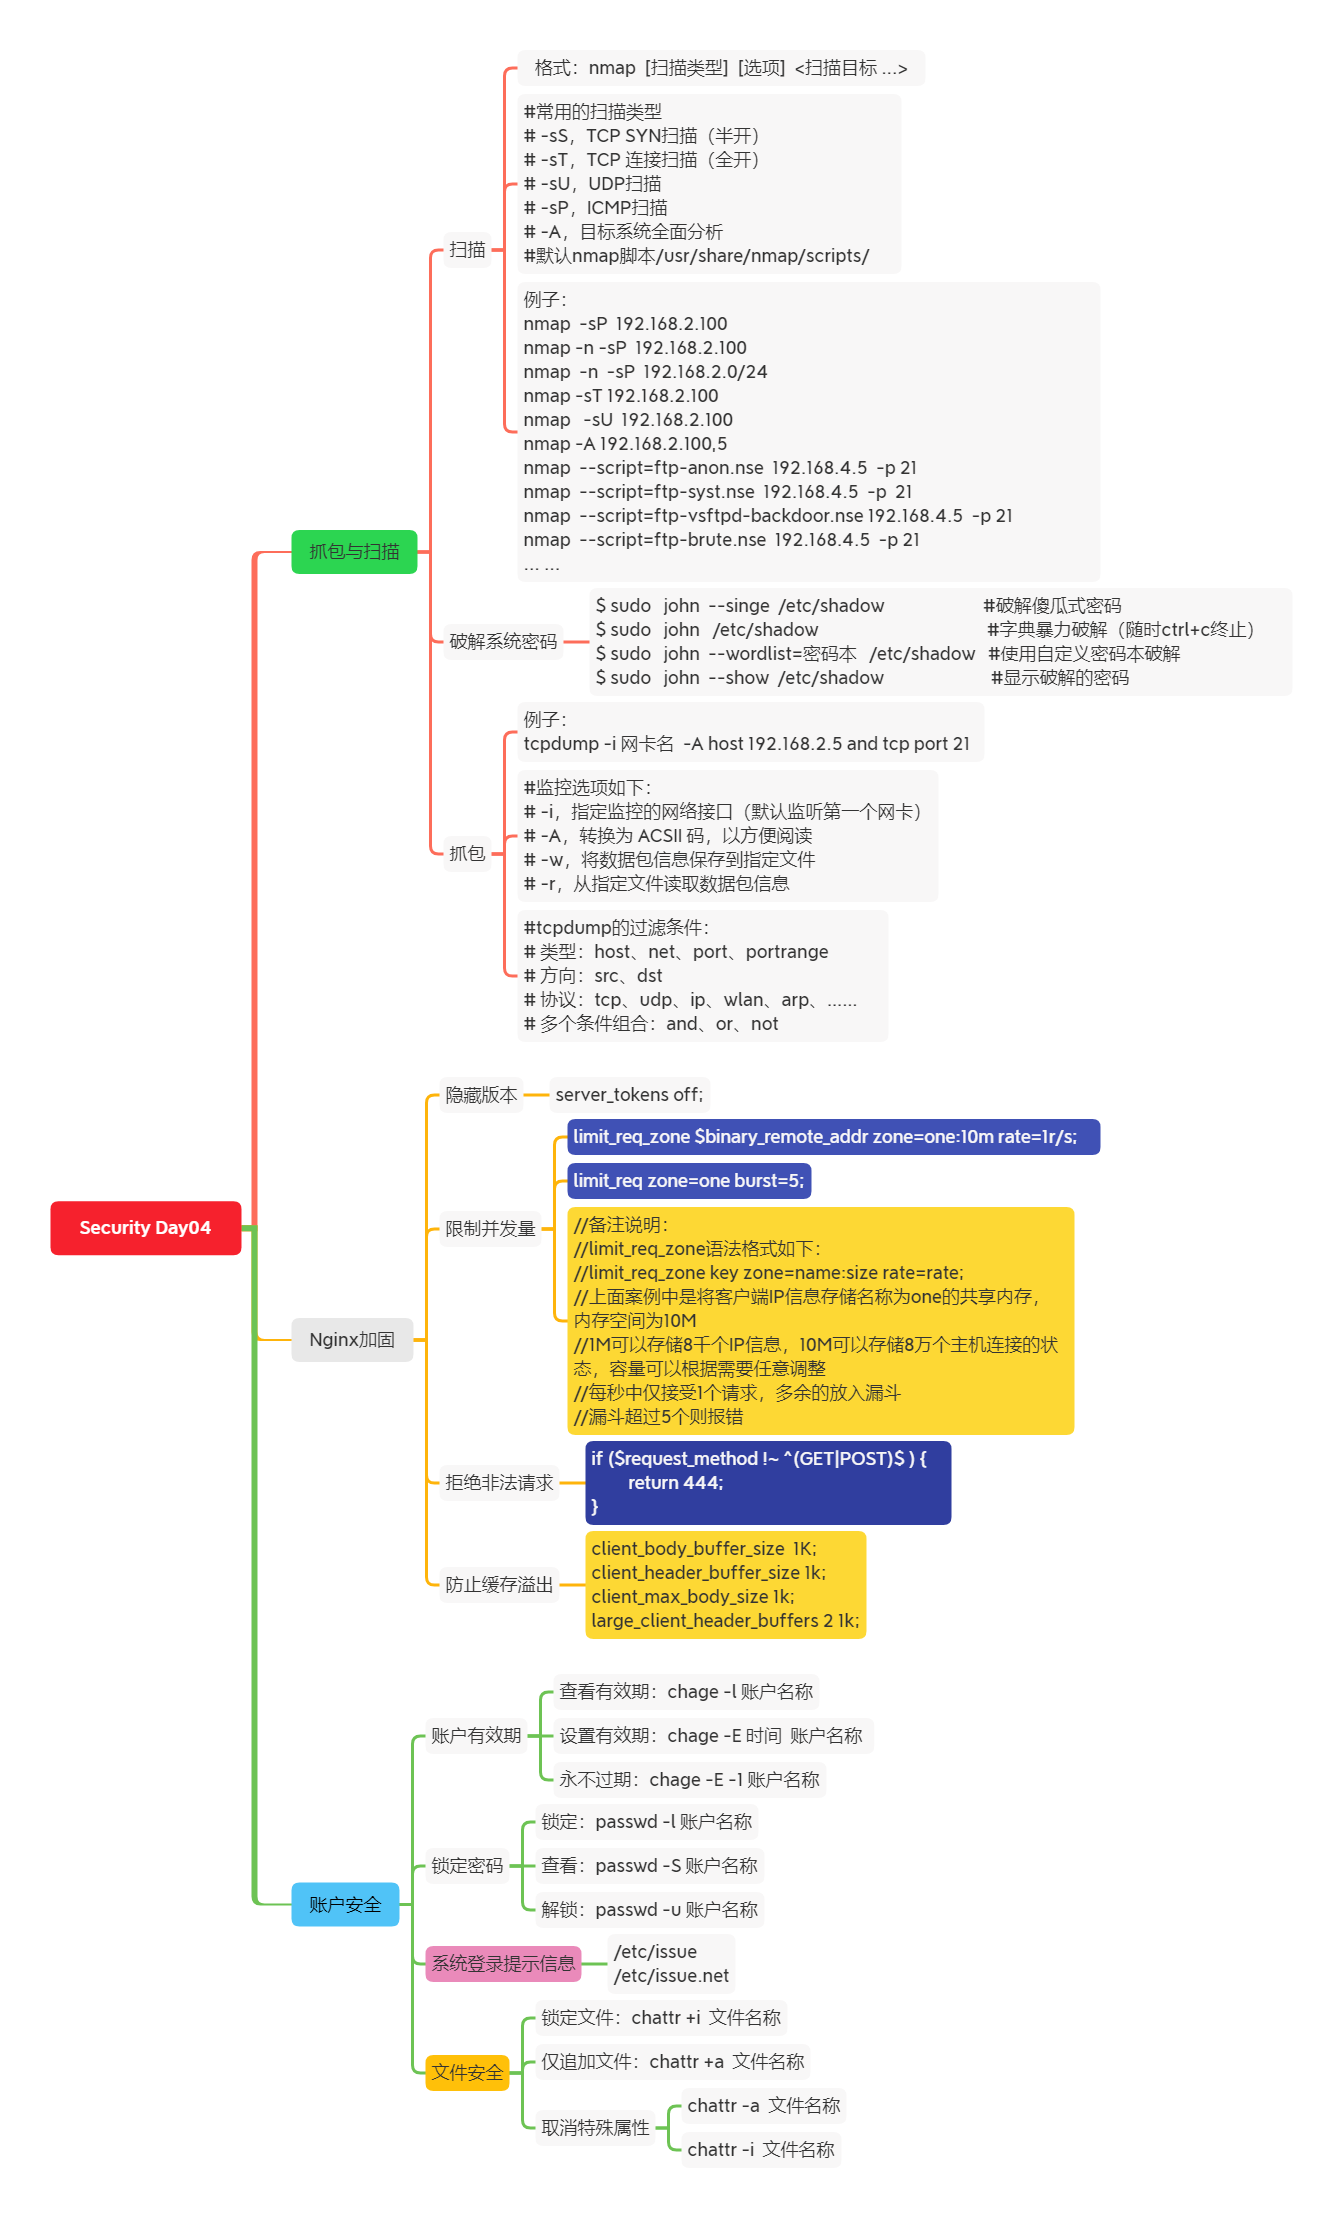
Figure-5
Exercise
1 read the following nmap scanning operations and complete the command options in parentheses according to the functional requirements of the notes
[root@svr7 ~]# nmap - () svr7.tarena.com / / scan for open UDP services
53/udp   open          domain
[root@svr7 ~]# nmap - () () 192.168.4.0/24 / / scan which hosts are open to FTP and SSH
[root@svr7 ~]# nmap - () 192.168.4.110 / / scan operating system types
[root@svr7 ~]# nmap - (sU) svr7.tarena.com / / scan for open UDP services
53/udp   open          domain
[root@svr7 ~]# nmap - (p) (21-22) 192.168.4.0/24 / / scan which hosts open FTP and SSH
[root@svr7 ~]# nmap - (A) 192.168.4.110 / / scan operating system types
2. Brief description of ngx_http_limit_req_module module usage?
limit_req_zone $binary_remote_addr  zone=one:10m rate=1r/s;
limit_req zone=one burst=5;
Syntax: limit_req_zone key zone=name:size rate=rate;
Will client IP The information store name is one Shared memory, space 10 M
1M Can store 8000 IP Information, 10 M Save 80000 hosts
 Only one request is accepted per second, and the excess is put into the funnel
 If there are more than 5 funnels, an error is reported
3. Configure attribute restrictions when creating a new user
For newly created users, the maximum password usage time is 60 days, the minimum password usage time is 1 day, and a warning is issued within 7 days before the password expires.
[root@svr5 ~]# vim /etc/login.defs
PASS_MAX_DAYS   60
PASS_MIN_DAYS   1
PASS_WARN_AGE   7
4 how to lock and unlock the password of Linux users
[root@svr5 ~]# passwd -l username
[root@svr5 ~]# passwd -u username
In case of infringement, please contact the author to delete