Dual machine hot standby scheme
Kept + MySQL master-slave replication to realize active and standby
1.1 deployment mode
The two servers deploy the same running environment and services. The running environment includes java running environment, redis, mysql, kept and java background services
1.2 realization effect
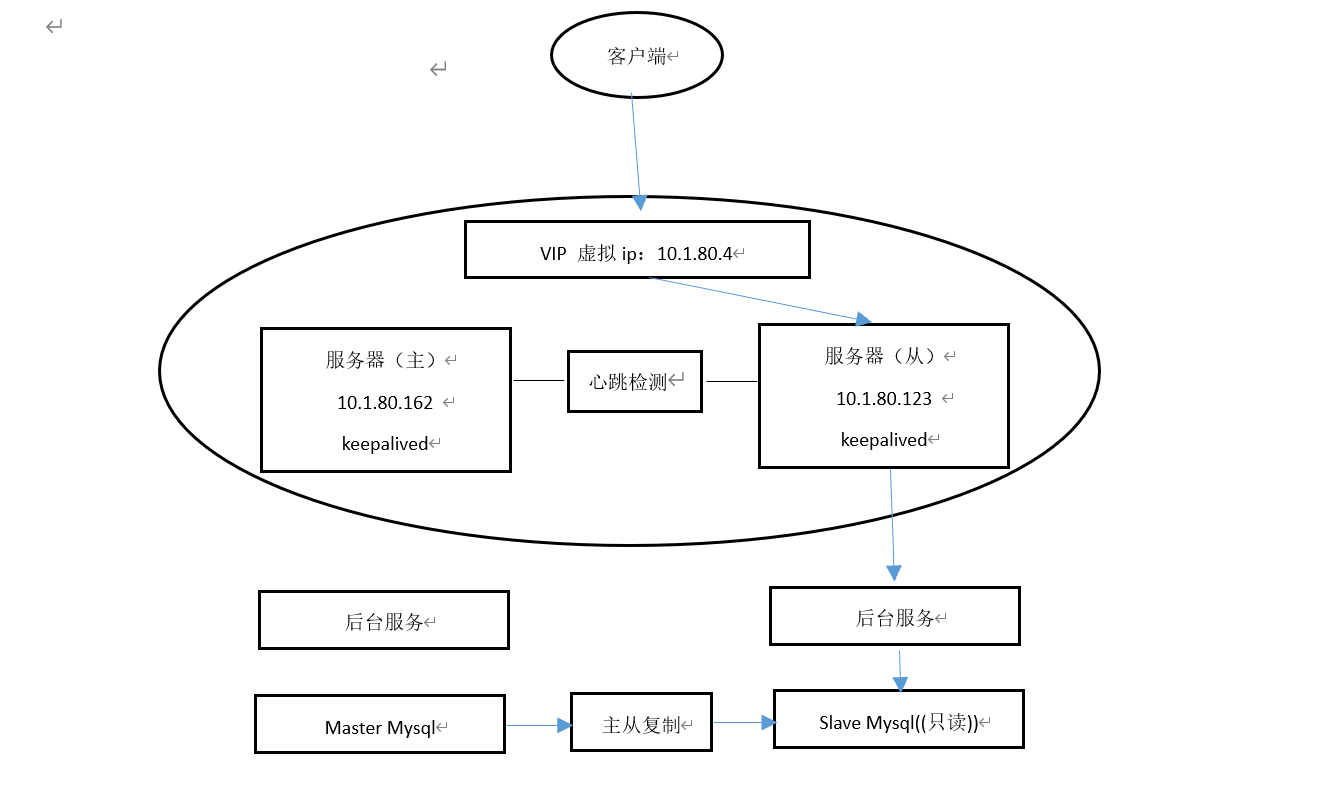
When the background process of the master server stops or the master server goes down, the background service will automatically switch to the slave server, as shown in the figure
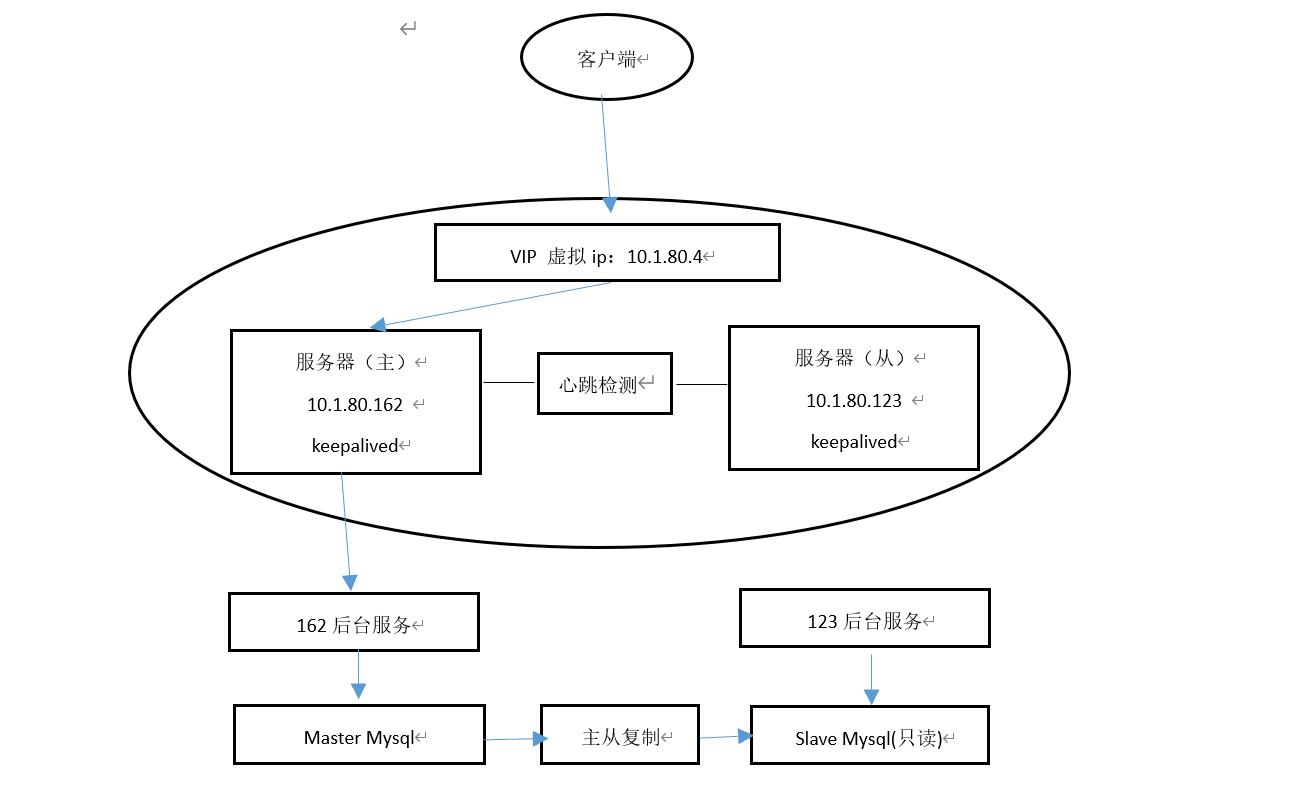
Health detection diagram
The initial state in which the background service of the master server is running normally
Virtual ip drift to slave server
Master slave copy diagram
MySQL client writes data to master database.
The master database will write the changed record data to the binary log binlog.
The slave database will subscribe to the binlog log of the master database and pull the log from the specified location of the binlog through an I/O thread for master-slave synchronization. At this moment, the master database will a Binlog Dump thread to read the binlog log and synchronize the data with the slave I/O thread.
After the slave I/O thread reads the log, it will first write it to the relay log replay log.
The slave database reads the relay log through an SQL thread for log playback, realizing the synchronization between the master and slave databases.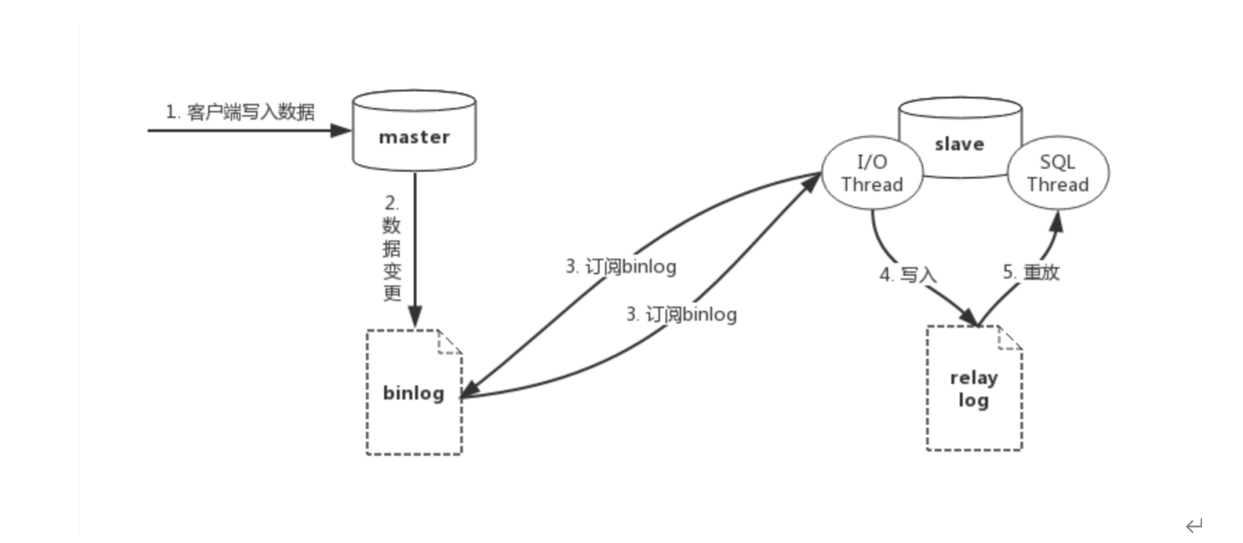
1.3 disadvantages
(1) In order to ensure the synchronization of static resources between the two servers, it is necessary to apply for static resource servers and related interface industries
The service code and database table need to be changed, otherwise the primary server will be down and the client will not be able to present static resources when the standby server is started
(2) In order to ensure the data synchronization between the two servers, the master-slave database needs to be configured, and the data is not synchronized
Risk and high development cost
Master slave database configuration
2.1 view account permissions
replication slave and replication client permissions are required for the replication account
view user permission
SELECT * FROM mysql.user WHERE user='csdataapp';
Permission:
Repl_slave_priv: Y;
Repl_client_priv: Y;
No permission:
Repl_slave_priv: N;
Repl_client_priv: N;
2.2 empowerment
(1) Authorization command
grant select, Replication Slave, Replication Client on *.* to username@"%" identified by 'password' ;
(2) Refresh permissions
FLUSH PRIVILEGES;
2.3 precautions
Both mysql servers need to enable the binary log function
Before starting master-slave replication, you must ensure the consistency of the master-slave database (database table structure and data). During the following configuration, it is forbidden to add, delete, modify and query the database. In order to reduce errors in binary log transmission and data rewriting, the slave database is set to read-only.
2.4 data initialization
(1) Backup
The main database mysql executes the backup command:
mysql -uroot -p123456 csdata_app > 20200119.sql
(2) Initialization
Execute table structure and view sql from the database first;
Execute the restore command from mysql Library:
mysql -uroot -p123456 csdata_app --one-database < 20200119.sql
2.5 master database configuration
(1) New configuration
open vim /etc/my.cnf
Add the following configuration
[mysqld]
server-id=110 #Set to the last six digits of ip
log_bin=master-bin
(2) Restart mysql
service mysqld restart;
(3) View binary log
Enter the mysql command line
mysql -uxxx -pxxx
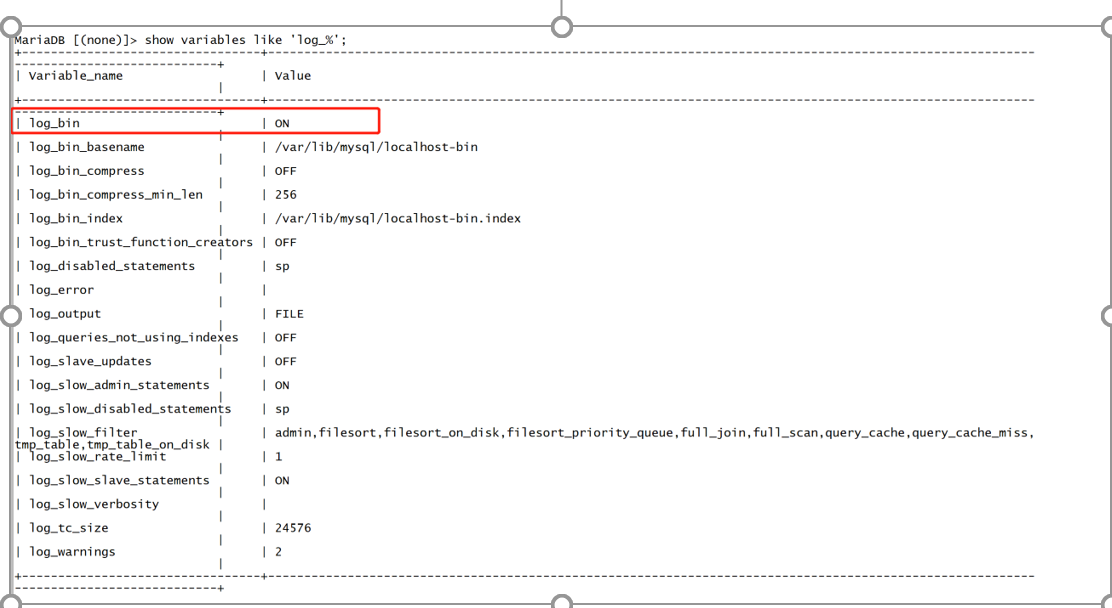
Check whether the binary log is normally opened, as shown in the figure
show variables like 'log_%';
(4) Check whether binary files are generated normally, as shown below
show master logs;

2.6 configuration from database
(1) New configuration
Command line open vim /etc/my.cnf
New configuration:
Enable the binary log and relay log to allow the standby database to record replayed events in its own binary log
Make the database read-only
[mysqld]
log_bin = slave-bin
server-id = 2
#relay_log = /opt/app/relay/mysql-relay-bin
read_only=ON
log_slave_updates = 1
(2) Restart mysql
service mysqld restart;
(3) View binary
Enter the mysql command line
mysql -uUSER -pPASS
Check whether the binary log is normally opened, as shown in the figure
show variables like 'log_%';
(4) Re execute the command
When pointing to another primary database, you do not need to restart the standby database, just re execute the following commands
MASTER_HOST Master library ip
MASTER_LOG_FILE Value is the binary name in the main library Log_name,See Step 4 of main library configuration
MASTER_LOG_POS Value master library File_size,See Step 4 of main library configuration
 Standby database entry mysql After that, execute the following command
CHANGE MASTER TO
MASTER_HOST='10.1.80.162',
MASTER_USER='root',
MASTER_PASSWORD='1234qwer',
MASTER_LOG_FILE='localhost-bin.000001',
MASTER_LOG_POS=332;
(5) Start slave master replication
start slave;
(6) View standby database synchronization status
show slave status\G
As shown in the figure, if the master database is changed and the status of both threads is yes, the master-slave synchronization is successful
(7) View the connections initiated by the I/O threads of the standby library on the primary library
show processlist\G
Monitoring of master-slave replication
The master-slave synchronization cannot guarantee the strong consistency of data, so the database repair tools Pt table checksum and Pt table sync need to be used for regular data detection and repair
Database repair tool pt-table-checksum And pt-table-sync
 Download and install
wget https://www.percona.com/downloads/percona-toolkit/3.1.0/binary/tarball/percona-toolkit-3.1.0_x86_64.tar.gz
tar -zxvf percona-toolkit-3.1.0_x86_64.tar.gz
yum -y install perl-devel perl-Digest-MD5 perl-DBI perl-DBD-MySQL perl-IO-Socket-SSL.noarch perl-Time-HiRes
cd percona-toolkit-3.1.0/
perl Makefile.PL PREFIX=/usr/local/
make
make install

./configure --prefix=/usr/local/percona-toolkit-3.1.0
pt-table-checksum
 check, View the differences of all tables in a single library
pt-table-checksum  --nocheck-replication-filters --replicate=test.checksums --databases=csdata_app h=127.0.0.1,u=root,p=1234qwer,P=3306 --no-check-binlog-format --function=MD5
pt-table-checksum check
Check list library all tables
pt-table-checksum --nocheck-replication-filters --replicate=test.checksums --databases=csdata_app h=127.0.0.1,u=root,p=1234qwer,P=3306 --no-check-binlog-format --function=MD5
Checklist library table
pt-table-checksum  --nocheck-replication-filters --replicate=test.checksums --databases=mysql --tables=tableName  h=127.0.0.1,u=root,p=1234qwer,P=3306
pt-table-sync correct
 Only data is synchronized. It does not synchronize table structures, indexes, or any other schema objects. So before fixing consistency, you need to ensure that their tables exist
 First use –print Output inconsistent data and then use - execute Synchronize data
 Repair entire database differences
pt-table-sync --replicate=test.checksums h=10.1.80.162, u=root,p=1234qwer h=10.1.80.123, u=root,p=1234qwer  --function=MD5  --execute
 Repair single table variance
pt-table-sync --replicate=test.checksums h=10.1.80.162,u=root,p=1234qwer h=10.1.80.123, u=root,p=1234qwer --tables=vis_sk_trad --function=MD5  --execute
 Errors in operation
 The slave library cannot be found automatically. Please confirm processlist or host or dsns The way is right.
Diffs cannot be detected because no slaves were found.  Please read the --recursion-method documentation for information.
CRC32 never needs BIT_XOR optimization at /root/perl5/bin/pt-table-checksum line 6166.
host configuration error
Error resolution
2.7.1 MySQL multi-source active / standby synchronization error
Last_IO_Error: Got fatal error 1236 from master when reading data from binary log
Solution:
(1) Main library refresh binary log
flush logs;
show master status;
(2) Stop slave from database
stop slave;
(4) Reset the server change master to... See slave server configuration for details
CHANGE MASTER TO
MASTER_HOST='10.1.80.162',
MASTER_USER='root',
MASTER_PASSWORD='1234qwer',
MASTER_LOG_FILE='mysql-bin.000003',
MASTER_LOG_POS=154;
START SLAVE;
(5) The server starts the slave
start slave;
(6) Check whether the process status of the server is normal
show slave status\G
2.7.2 authority issues
[Err] 1449 - The user specified as a definer ('csdataapp'@'%') does not exist
terms of settlement
Assign the following permissions to users from the database
grant select, Replication Slave, Replication Client on *.* to csdataapp@"%" identified by 'password' ;
Refresh permissions
flush privileges;
2.7.3
Got fatal error 1236 from master when reading data from binary log: 'log event entry exceeded max_allowed_packet; Increase max_allowed_packet on master; the first event 'slave-bin.000041' at 403, the last event read from 'slave-bin.000041' at 403, the last byte read from 'slave-bin.000041' at 422.'
solve:
stop slave;
reset slave;
start slave;
keepalived installation documentation
Installation environment
su - root
yum -y install kernel-devel*
yum -y install openssl-*
yum -y install popt-devel
yum -y install lrzsz
yum -y install openssh-clients
yum -y install libnl libnl-devel popt
 install keepalived
 take keepalived-1.2.15.tar.gz Upload to server/usr/local/Down.
wget http://www.keepalived.org/software/keepalived-1.2.15.tar.gz
cd /usr/local
tar -zxvf keepalived-1.2.15.tar.gz
cd keepalived-1.2.15

Execute configuration command
./configure --prefix=/usr/local/keepalived

3,compile
make
4,install
make install

So far, the installation is successful

5,Copy execution file
cp /usr/local/keepalived/sbin/keepalived /usr/sbin/
6,take init.d Copy files to etc lower,Add boot entry
cp /usr/local/keepalived/etc/rc.d/init.d/keepalived /etc/init.d/keepalived
7,take keepalived Copy files to etc Next, add network card configuration
cp /usr/local/keepalived/etc/sysconfig/keepalived /etc/sysconfig/
8,establish keepalived folder
mkdir -p /etc/keepalived
9,take keepalived Copy configuration file to etc lower
cp /usr/local/keepalived/etc/keepalived/keepalived.conf /etc/keepalived/keepalived.conf
10,Add executable permissions
chmod +x /etc/init.d/keepalived
 Join startup:
chkconfig --add keepalived	#You must ensure / etc / init D / keepalived exists
chkconfig keepalived on

After adding, you can query whether the system service exists: chkconfig --list

start-up,Stop, restart keepalived
 Start: service keepalived start
 stop it: service keepalived stop
 Restart: service keepalived restart
 To view the installation startup status:
systemctl status keepalived.service
configure log files
1. Output the keepalived log to local0:
vi /etc/sysconfig/keepalived
KEEPALIVED_OPTIONS="-D -d -S 0"
2. In / etc / rsyslog Add in conf:
local0.* /var/log/keepalived.log
3. Restart the keepalived and rsyslog services:
service rsyslog restart
service keepalived restart
Open the communication address of the firewall
iptables -A INPUT -d 224.0.0.18 -j ACCEPT
Permanent preservation
/etc/rc.d/init.d/iptables save or
sudo service iptables save
keepalived configuration
Modify profile
vi /etc/keepalived/keepalived.conf
View network card configuration
Ifconfig
Master library global configuration
The script is as follows
global_defs {
   notification_email {  #Specify the objects that keepalived needs to send email to when switching occurs, one line at a time
    xxx@163.com
   }
   notification_email_from xxx@qq.com  #Specify sender
   #smtp_server XXX.smtp.com                             #Specify smtp server address
   #smtp_connect_timeout 30                               #Specify smtp connection timeout
   router_id LVS_DEVEL                                    #An identification of the machine running keepalived
}

vrrp_script check_java_process {
    script "/etc/keepalived/check_java_process.sh"#Script path
    interval 2
    weight -50
}

vrrp_instance VI_1 {
    state MASTER           #Indicates that the status is MASTER and the BACKUP machine is BACKUP
    interface eno1           #Set the network card bound by the instance
    virtual_router_id 51   #Virtual under the same instance_ router_ ID must be the same
    priority 100           #MASTER is more important than BACKUP
    advert_int 1           #The time interval between synchronization checks between MASTER and BACKUP load balancer, in seconds
    authentication {       #Set authentication
        auth_type PASS     #Authentication method of master-slave server
        auth_pass 8888
    }
   track_script {
        check_java_process        #Monitoring script
}
    virtual_ipaddress {    #Set up vip
         10.1.80.4       #Multiple virtual IP S can be set, just wrap
    }
}
Create a new keepalived monitoring script
New script
vi check_java_process.sh
Edit as follows
A=ps -ef | grep csdataapp-0.0.1-SNAPSHOT.jar | wc -l # pay attention to modifying the package name
B=ps -ef | grep manager-admin.jar | wc -l # pay attention to modifying the package name
if [ $A -lt 2 ];then
notes         killall keepalived
         exit -1
fi
if [ $B -lt 2 ];then
 notes         killall keepalived
         exit -1
fi
exit 0
Global configuration from library
global_defs {
   notification_email {
    xxx@163.com
   }
   notification_email_from xxx@qq.com
   #smtp_server XXX.smtp.com
   #smtp_connect_timeout 30
   router_id LVS_DEVEL
}
vrrp_instance VI_1 {
    state BACKUP           #BACKUP
    interface eno1
    virtual_router_id 51   #virtual_router_id
    mcast_src_ip 10.1.80.123 # master nginx ip
    priority 80
    advert_int 1
    authentication {
        auth_type PASS
        auth_pass 8888
    }
    virtual_ipaddress {    #vip
        10.1.80.4
    }
}
Empowering scripts
chmod a+x Script name
Start the master library and slave library respectively
systemctl start keepalived.service
Check the running status (running is normal and dead is abnormal), as shown in the following figure
systemctl status keepalived.service
View virtual ip
ip add show eno1
At this time, the virtual ip is bound to the 162 server
At this point, stop keepalived or stop the java process
Enter 123 server
View virtual ip: ip add show eno1
Virtual ip has drifted to 123 servers