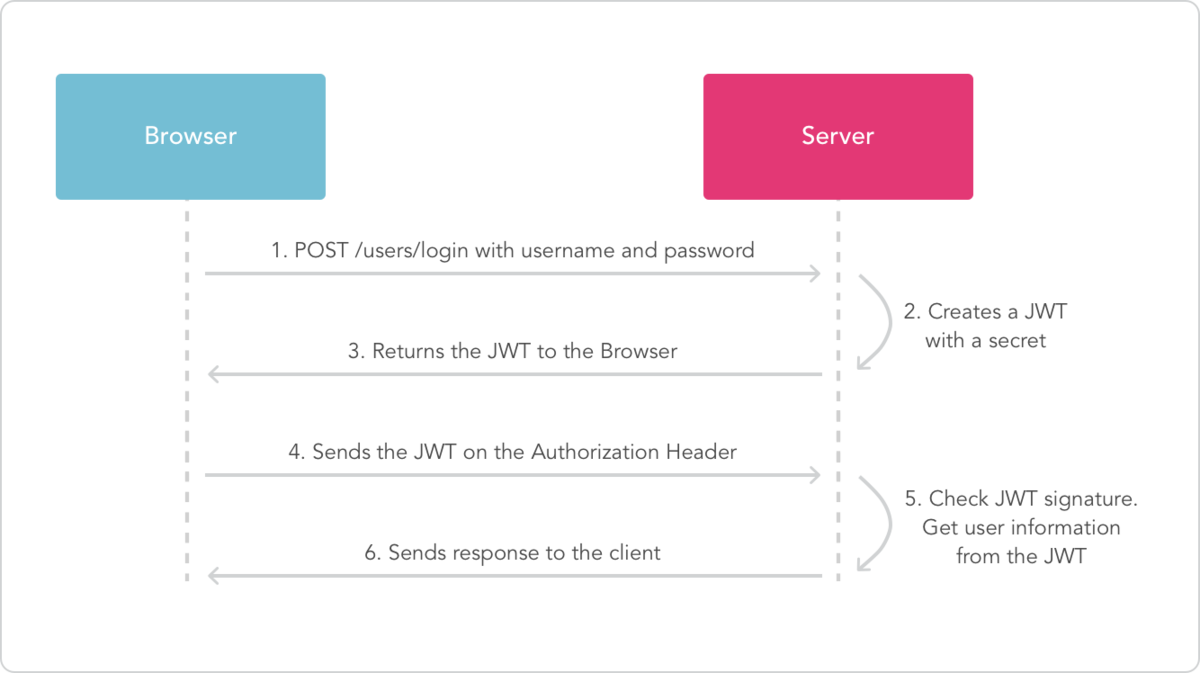
User login authentication is a very common business in Web applications. The general process is as follows:
- The client sends the user name and password to the server
- After the server-side verification is passed, save relevant data in the current session, such as login time, login IP, etc.
- The server returns a session to the client_ ID, which the client saves in a Cookie.
- When the client sends a request to the server again, the session_ The ID is returned to the server.
- Get the session on the server side_ After the user ID, the user's identity is identified.
In the case of stand-alone, this mode has no problem, but it is very painful for Web applications with front and back-end separation. So there is another solution. The server no longer saves the session data, but saves it in the client. Each time the client initiates a request, it sends the data to the server for verification. JWT (JSON Web Token) is a typical representative of this scheme.
1, About JWT
JWT is the most popular one at present Cross domain Authentication solution: the client initiates a user login request. After the server receives and authenticates successfully, it generates a JSON object (as shown below), and then returns it to the client.
{
  "sub": "wanger",
  "created": 1645700436900,
  "exp": 1646305236
}
When the client communicates with the server again, take this JSON object as a credential for mutual trust between the front and back ends. After receiving the request, the server authenticates the user's identity through JSON object, so there is no need to save any session data.
If I now use the user name wanger and password 123456 to access the login interface of Codingmore, the actual JWT is a string that looks like encrypted.
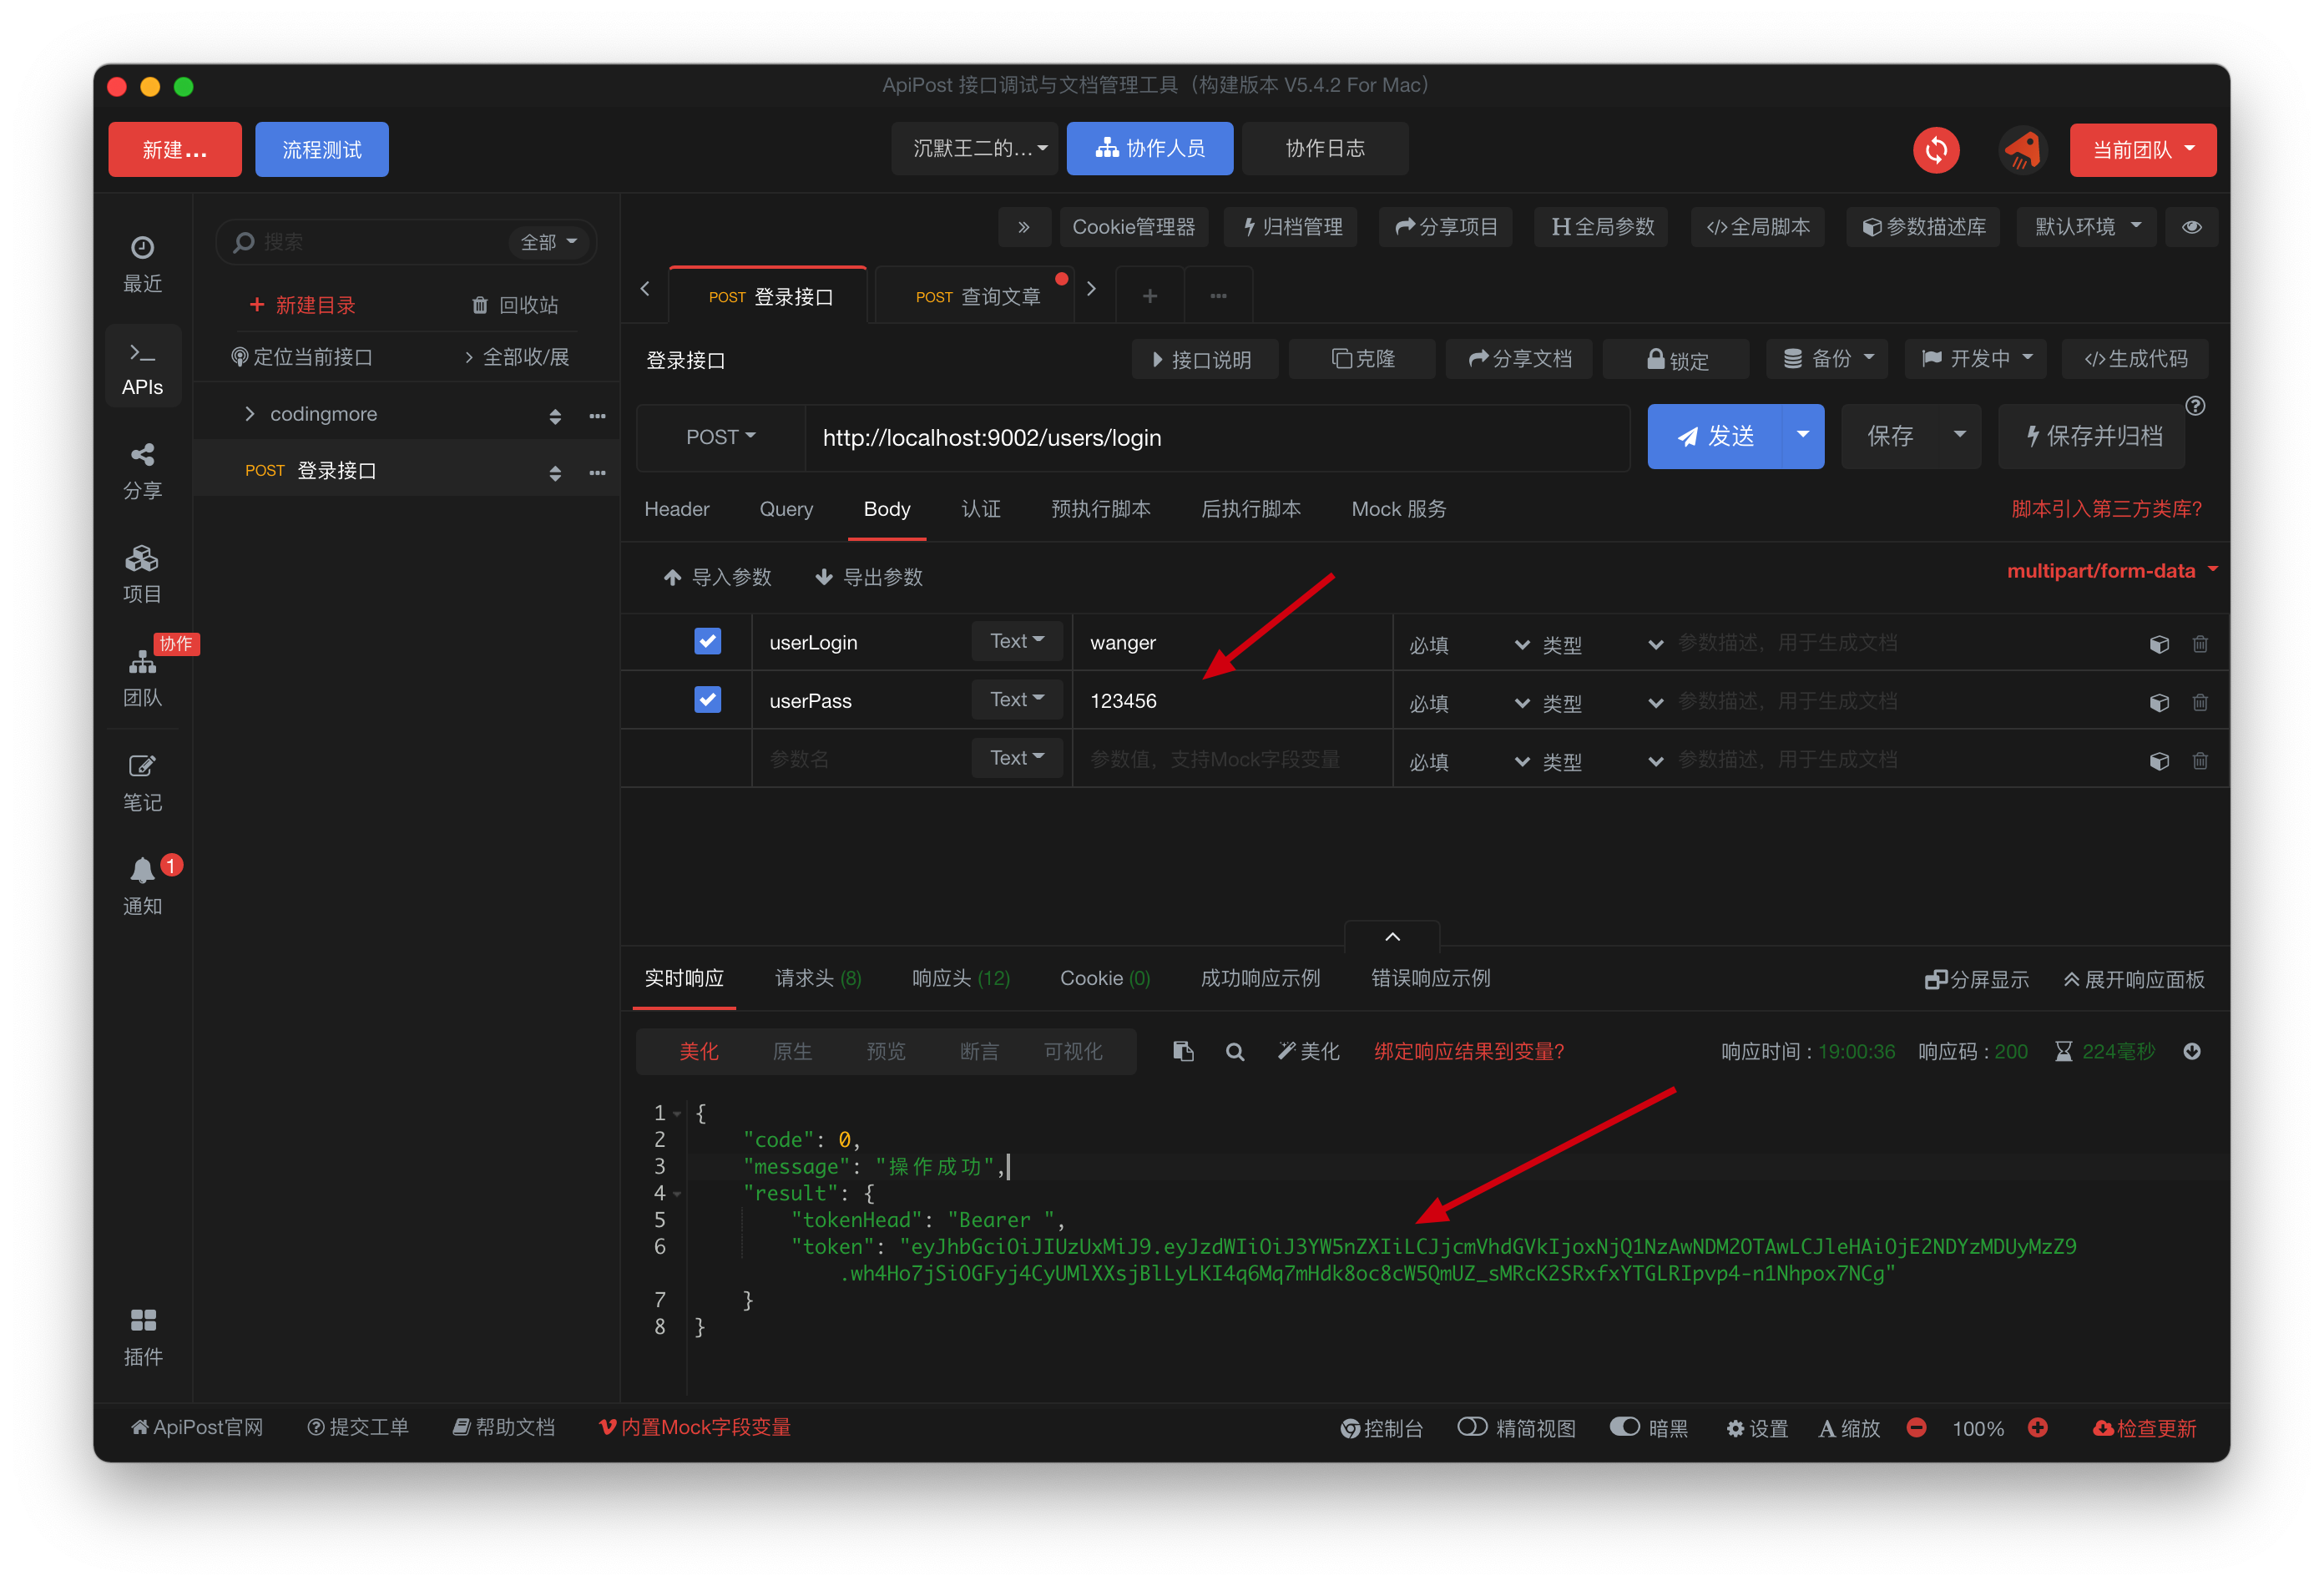
In order to make you see it more clearly, I copied it to jwt's official website.
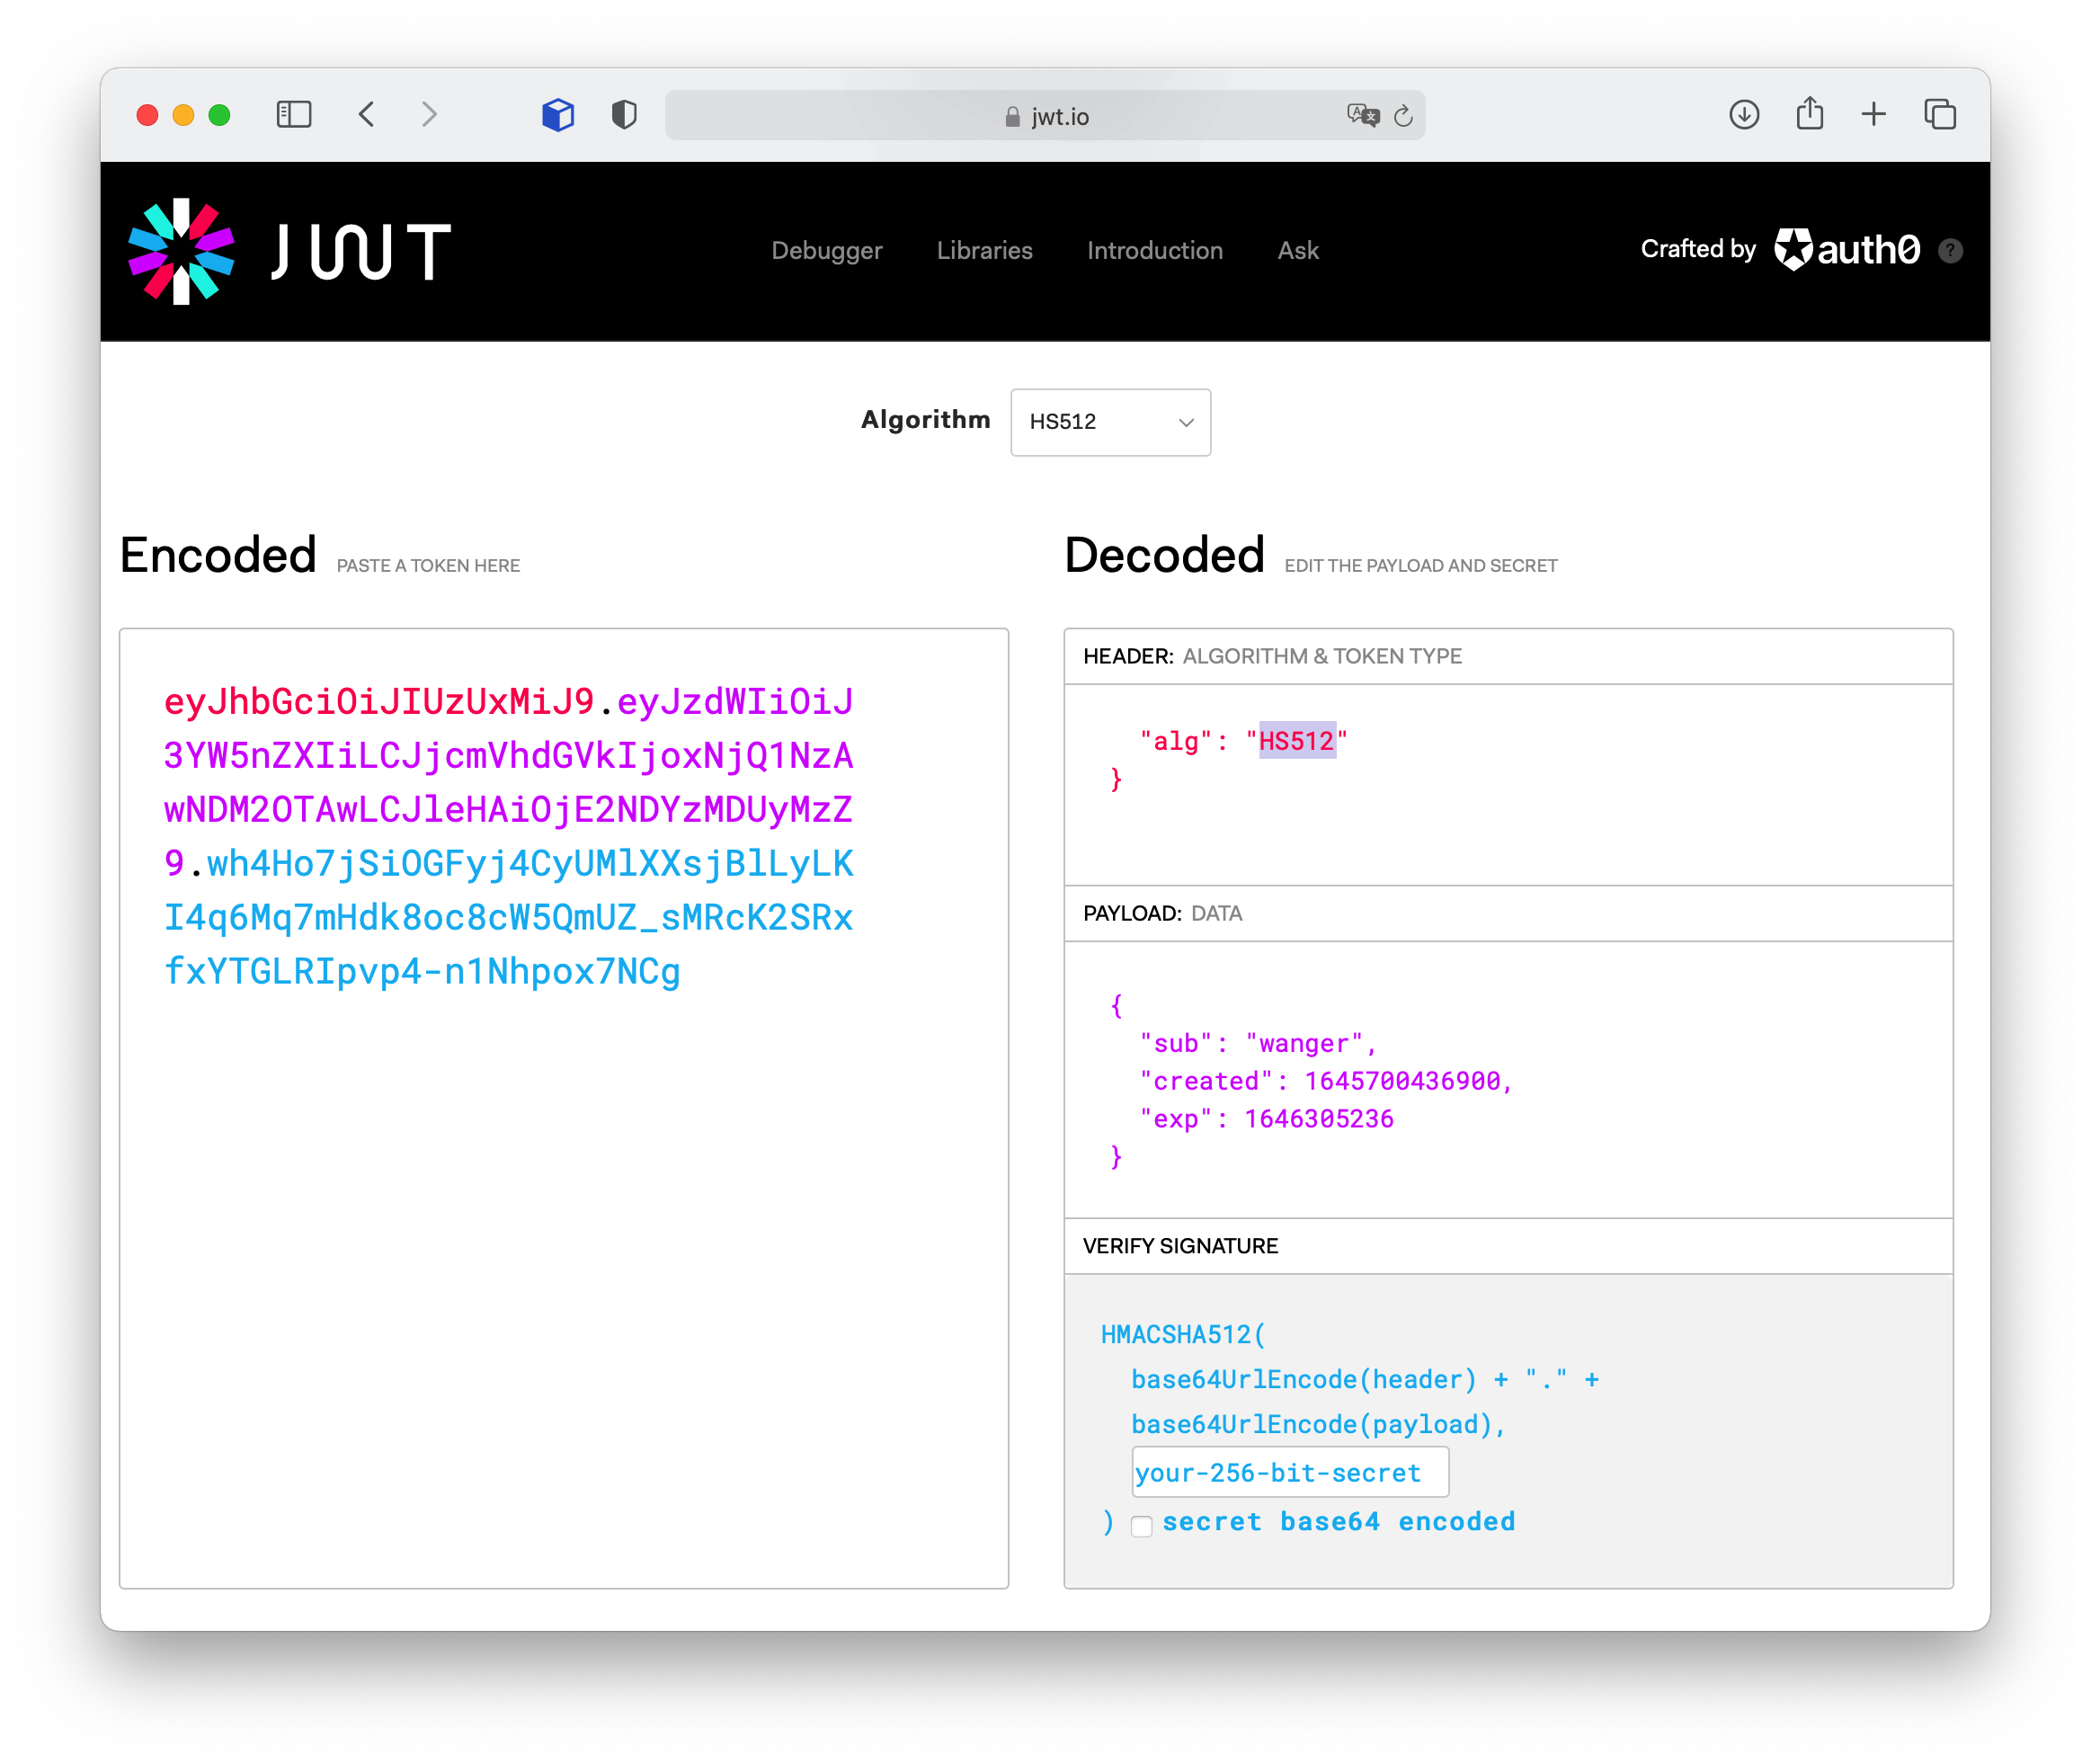
The Encoded part on the left is the JWT ciphertext, with "." in the middle Divided into three parts (the Decoded part on the right):
- Header (header), which describes the metadata of JWT, in which the alg attribute represents the signature algorithm (currently HS512);
- Payload (load) is used to store the data that needs to be transferred. The sub attribute represents the subject (the actual value is the user name), the created attribute represents the generation time of JWT, and the exp attribute represents the expiration time
- Signature: the signature of the first two parts to prevent data tampering; Here, the server side needs to specify a key (only the server side knows it) that cannot be disclosed to the client, and then use the signature algorithm specified in the Header to generate a signature according to the following formula:
HMACSHA512(
  base64UrlEncode(header) + "." +
  base64UrlEncode(payload),
  your-256-bit-secret
)
After calculating the Signature, splice the Header, Payload and Signature into a string, with "." in the middle Split, you can return to the client.
After the client gets the JWT, it can be placed in localStorage or cookies.
const TokenKey = '1D596CD8-8A20-4CEC-98DD-CDC12282D65C' // createUuid()

export function getToken () {
  return Cookies.get(TokenKey)
}

export function setToken (token) {
  return Cookies.set(TokenKey, token)
}
In the future, when the client communicates with the server, it will bring this JWT, which is generally placed in the Authorization field of the HTTP request header.
Authorization: Bearer <token>
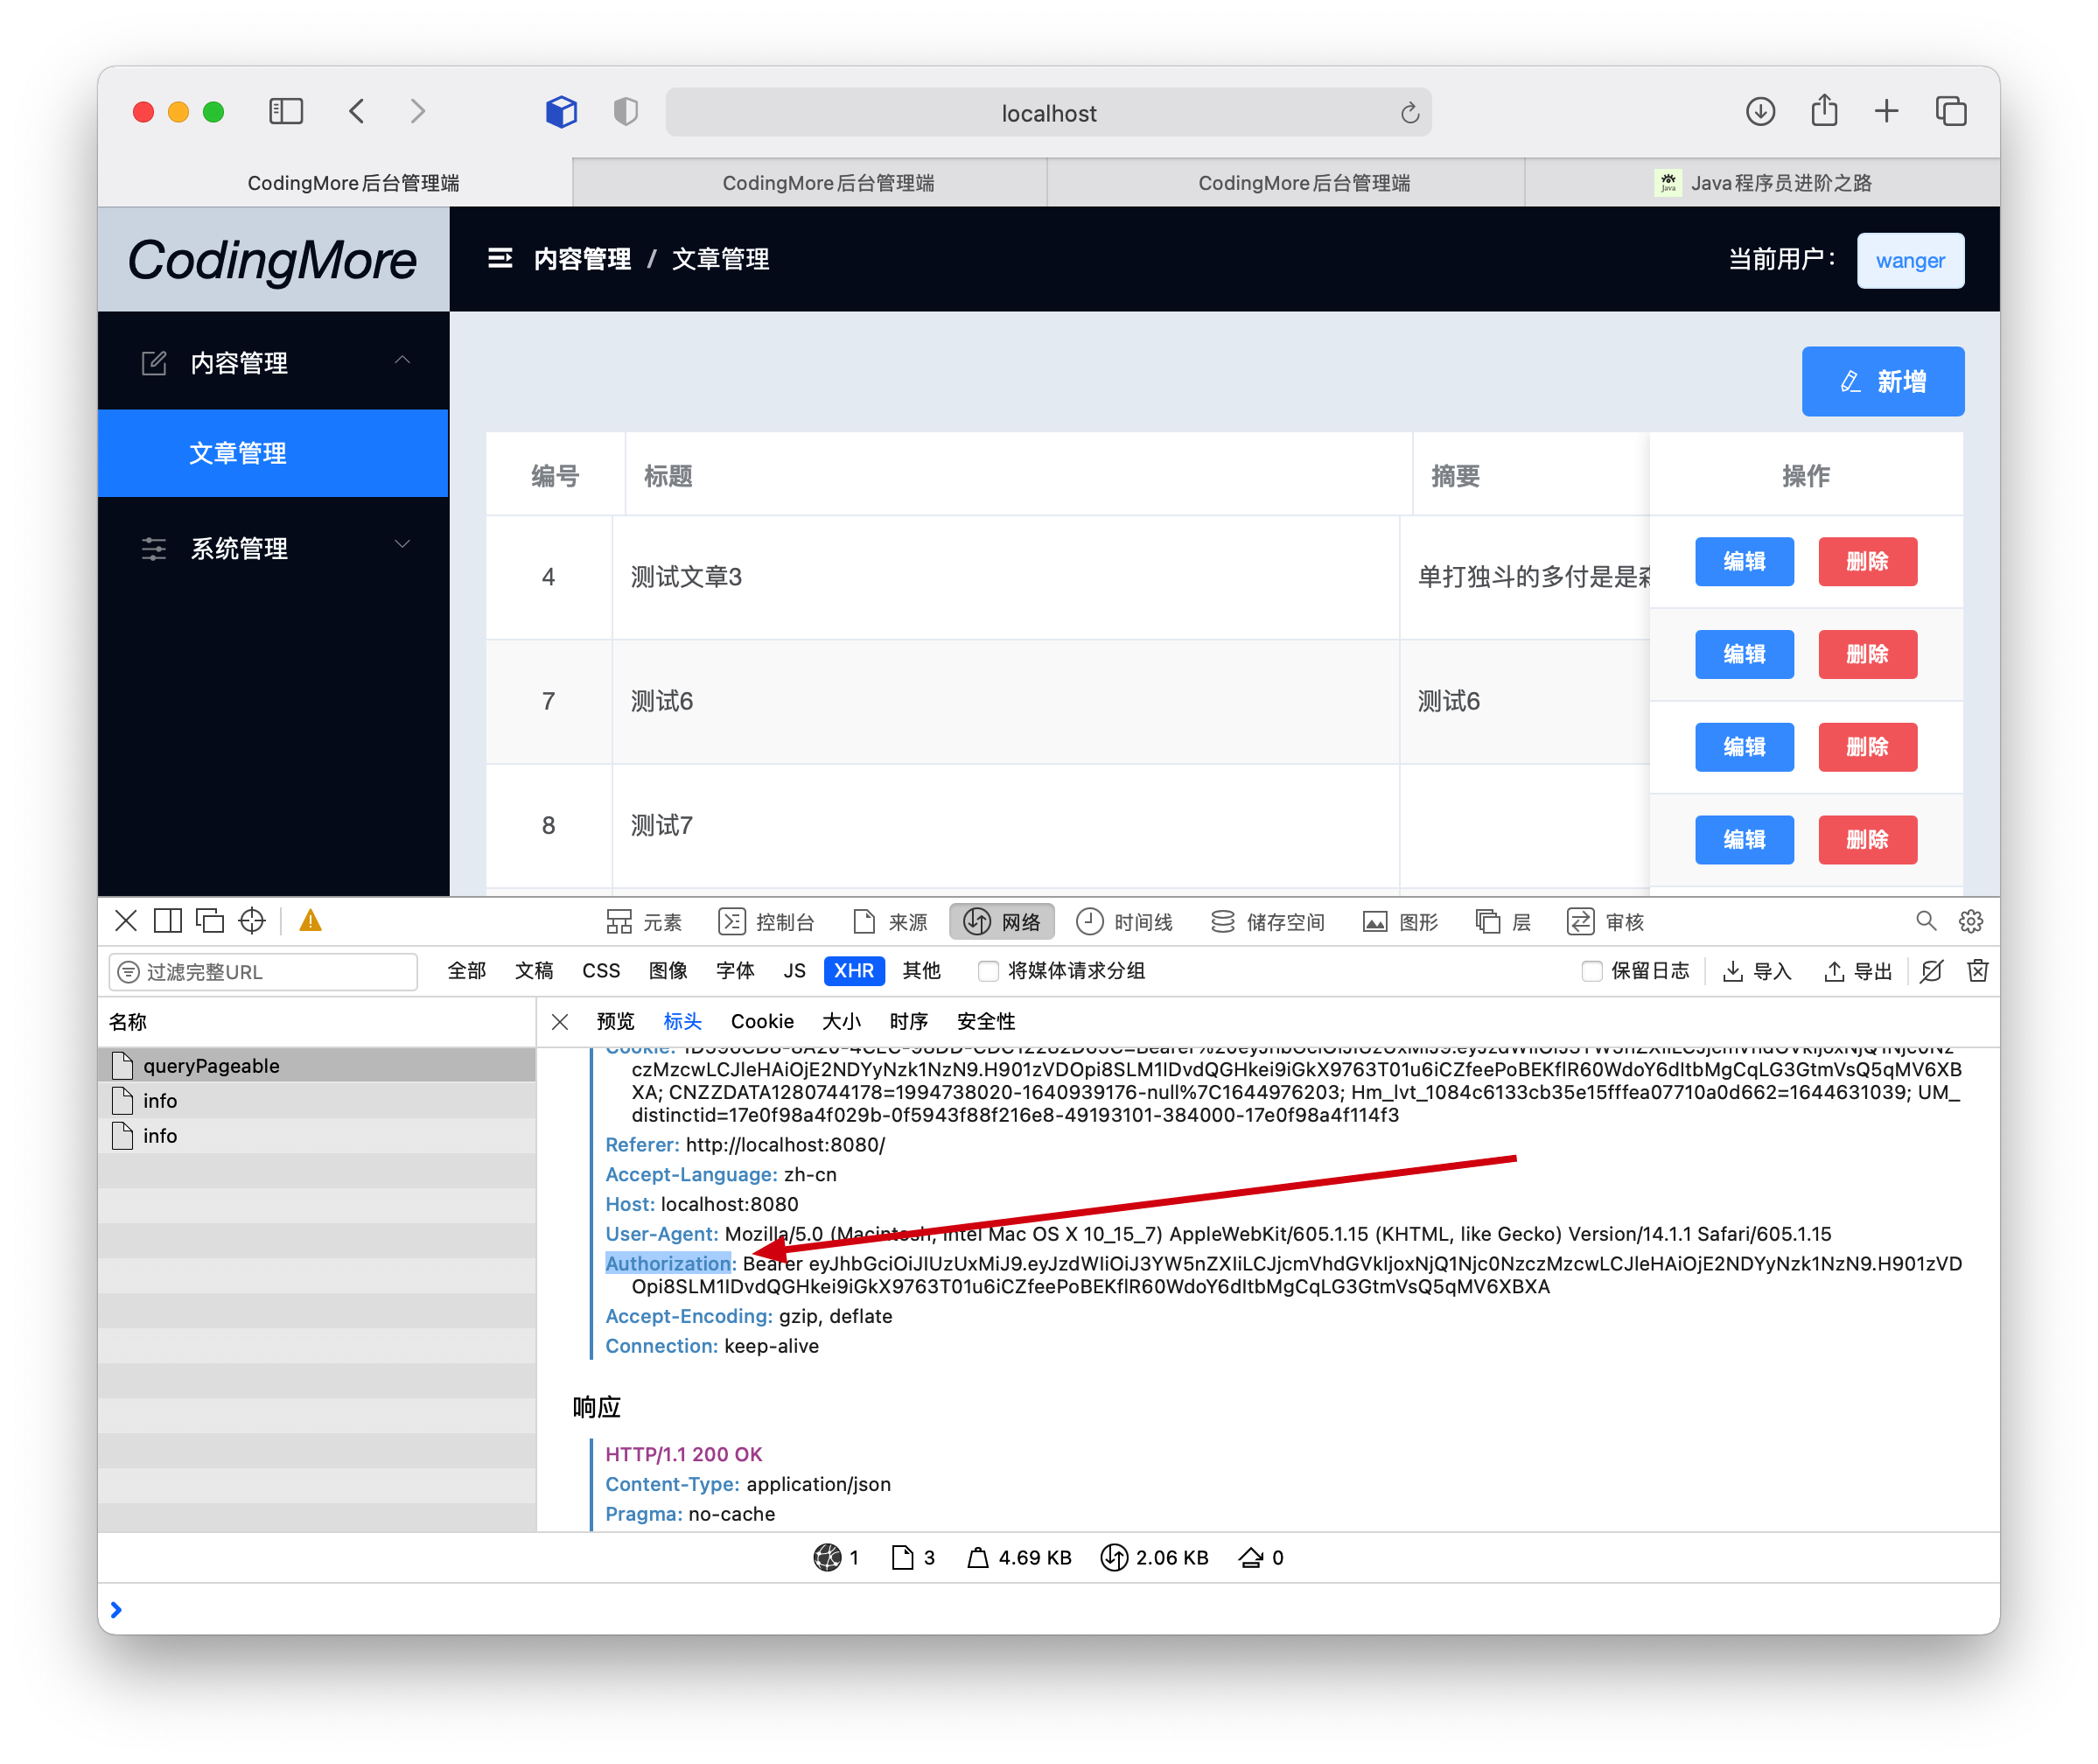
After receiving the request, the server will verify the JWT. If the verification is passed, the corresponding resources will be returned.
2, Actual JWT
The first step is in POM Add JWT dependencies to the XML file.
<dependency>
    <groupId>io.jsonwebtoken</groupId>
    <artifactId>jjwt</artifactId>
    <version>0.9.0</version>
</dependency>
The second step is in application Add JWT configuration item to YML.
jwt:
  tokenHeader: Authorization #Request header stored by JWT
  secret: codingmore-admin-secret #Key used for JWT encryption and decryption
  expiration: 604800 #Overdue time of JWT (60 * 60 * 24 * 7)
  tokenHead: 'Bearer '  #Get the start in JWT load
Step 3: create a new jwttokenutil Java tool class mainly has three methods:
- Generatetoken (userdetails): generates a token based on the logged in user
- getUserNameFromToken(String token): get the login user from the token
- Validatetoken (string token, userdetails, userdetails): judge whether the token is still valid
public class JwtTokenUtil {

    @Value("${jwt.secret}")
    private String secret;
    @Value("${jwt.expiration}")
    private Long expiration;
    @Value("${jwt.tokenHead}")
    private String tokenHead;

    /**
     * Generate a token based on user information
     */
    public String generateToken(UserDetails userDetails) {
        Map<String, Object> claims = new HashMap<>();
        claims.put(CLAIM_KEY_USERNAME, userDetails.getUsername());
        claims.put(CLAIM_KEY_CREATED, new Date());
        return generateToken(claims);
    }

    /**
     * Generate the token of JWT according to the user name and creation time
     */
    private String generateToken(Map<String, Object> claims) {
        return Jwts.builder()
                .setClaims(claims)
                .setExpiration(generateExpirationDate())
                .signWith(SignatureAlgorithm.HS512, secret)
                .compact();
    }

    /**
     * Get login user name from token
     */
    public String getUserNameFromToken(String token) {
        String username = null;
        Claims claims = getClaimsFromToken(token);
        if (claims != null) {
            username = claims.getSubject();
        }

        return username;
    }

    /**
     * Get the load in JWT from token
     */
    private Claims getClaimsFromToken(String token) {
        Claims claims = null;
        try {
            claims = Jwts.parser()
                    .setSigningKey(secret)
                    .parseClaimsJws(token)
                    .getBody();
        } catch (Exception e) {
            LOGGER.info("JWT Format validation failed:{}", token);
        }
        return claims;
    }

    /**
     * Verify whether the token is still valid
     *
     * @param token       token passed in by the client
     * @param userDetails User information queried from the database
     */
    public boolean validateToken(String token, UserDetails userDetails) {
        String username = getUserNameFromToken(token);
        return username.equals(userDetails.getUsername()) && !isTokenExpired(token);
    }

    /**
     * Judge whether the token has expired
     */
    private boolean isTokenExpired(String token) {
        Date expiredDate = getExpiredDateFromToken(token);
        return expiredDate.before(new Date());
    }

    /**
     * Get expiration time from token
     */
    private Date getExpiredDateFromToken(String token) {
        Claims claims = getClaimsFromToken(token);
        return claims.getExpiration();
    }
}
Step 4: in userscontroller The login login interface is added in Java to receive the user name and password and return the JWT to the client.
@Controller
@Api(tags="user")
@RequestMapping("/users")
public class UsersController {
    @Autowired
    private IUsersService usersService;
    @Value("${jwt.tokenHeader}")
    private String tokenHeader;
    @Value("${jwt.tokenHead}")
    private String tokenHead;

    @ApiOperation(value = "Return after login token")
    @RequestMapping(value = "/login", method = RequestMethod.POST)
    @ResponseBody
    public ResultObject login(@Validated UsersLoginParam users, BindingResult result) {
        String token = usersService.login(users.getUserLogin(), users.getUserPass());

        if (token == null) {
            return ResultObject.validateFailed("Wrong user name or password");
        }

        // Pass the JWT back to the client
        Map<String, String> tokenMap = new HashMap<>();
        tokenMap.put("token", token);
        tokenMap.put("tokenHead", tokenHead);
        return ResultObject.success(tokenMap);
    }

}
Step 5: in usersserviceimpl The login method is added in Java to query the user from the database according to the user name. After the password is verified, JWT is generated.
@Service
public class UsersServiceImpl extends ServiceImpl<UsersMapper, Users> implements IUsersService {

    @Autowired
    private PasswordEncoder passwordEncoder;
    @Autowired
    private JwtTokenUtil jwtTokenUtil;

    public String login(String username, String password) {
        String token = null;
        //The password needs to be passed after being encrypted by the client
        try {
            // Query user + user resources
            UserDetails userDetails = loadUserByUsername(username);

            // Verify password
            if (!passwordEncoder.matches(password, userDetails.getPassword())) {
                Asserts.fail("Incorrect password");
            }

            // Return to JWT
            token = jwtTokenUtil.generateToken(userDetails);
        } catch (AuthenticationException e) {
            LOGGER.warn("Login exception:{}", e.getMessage());
        }
        return token;
    }
}
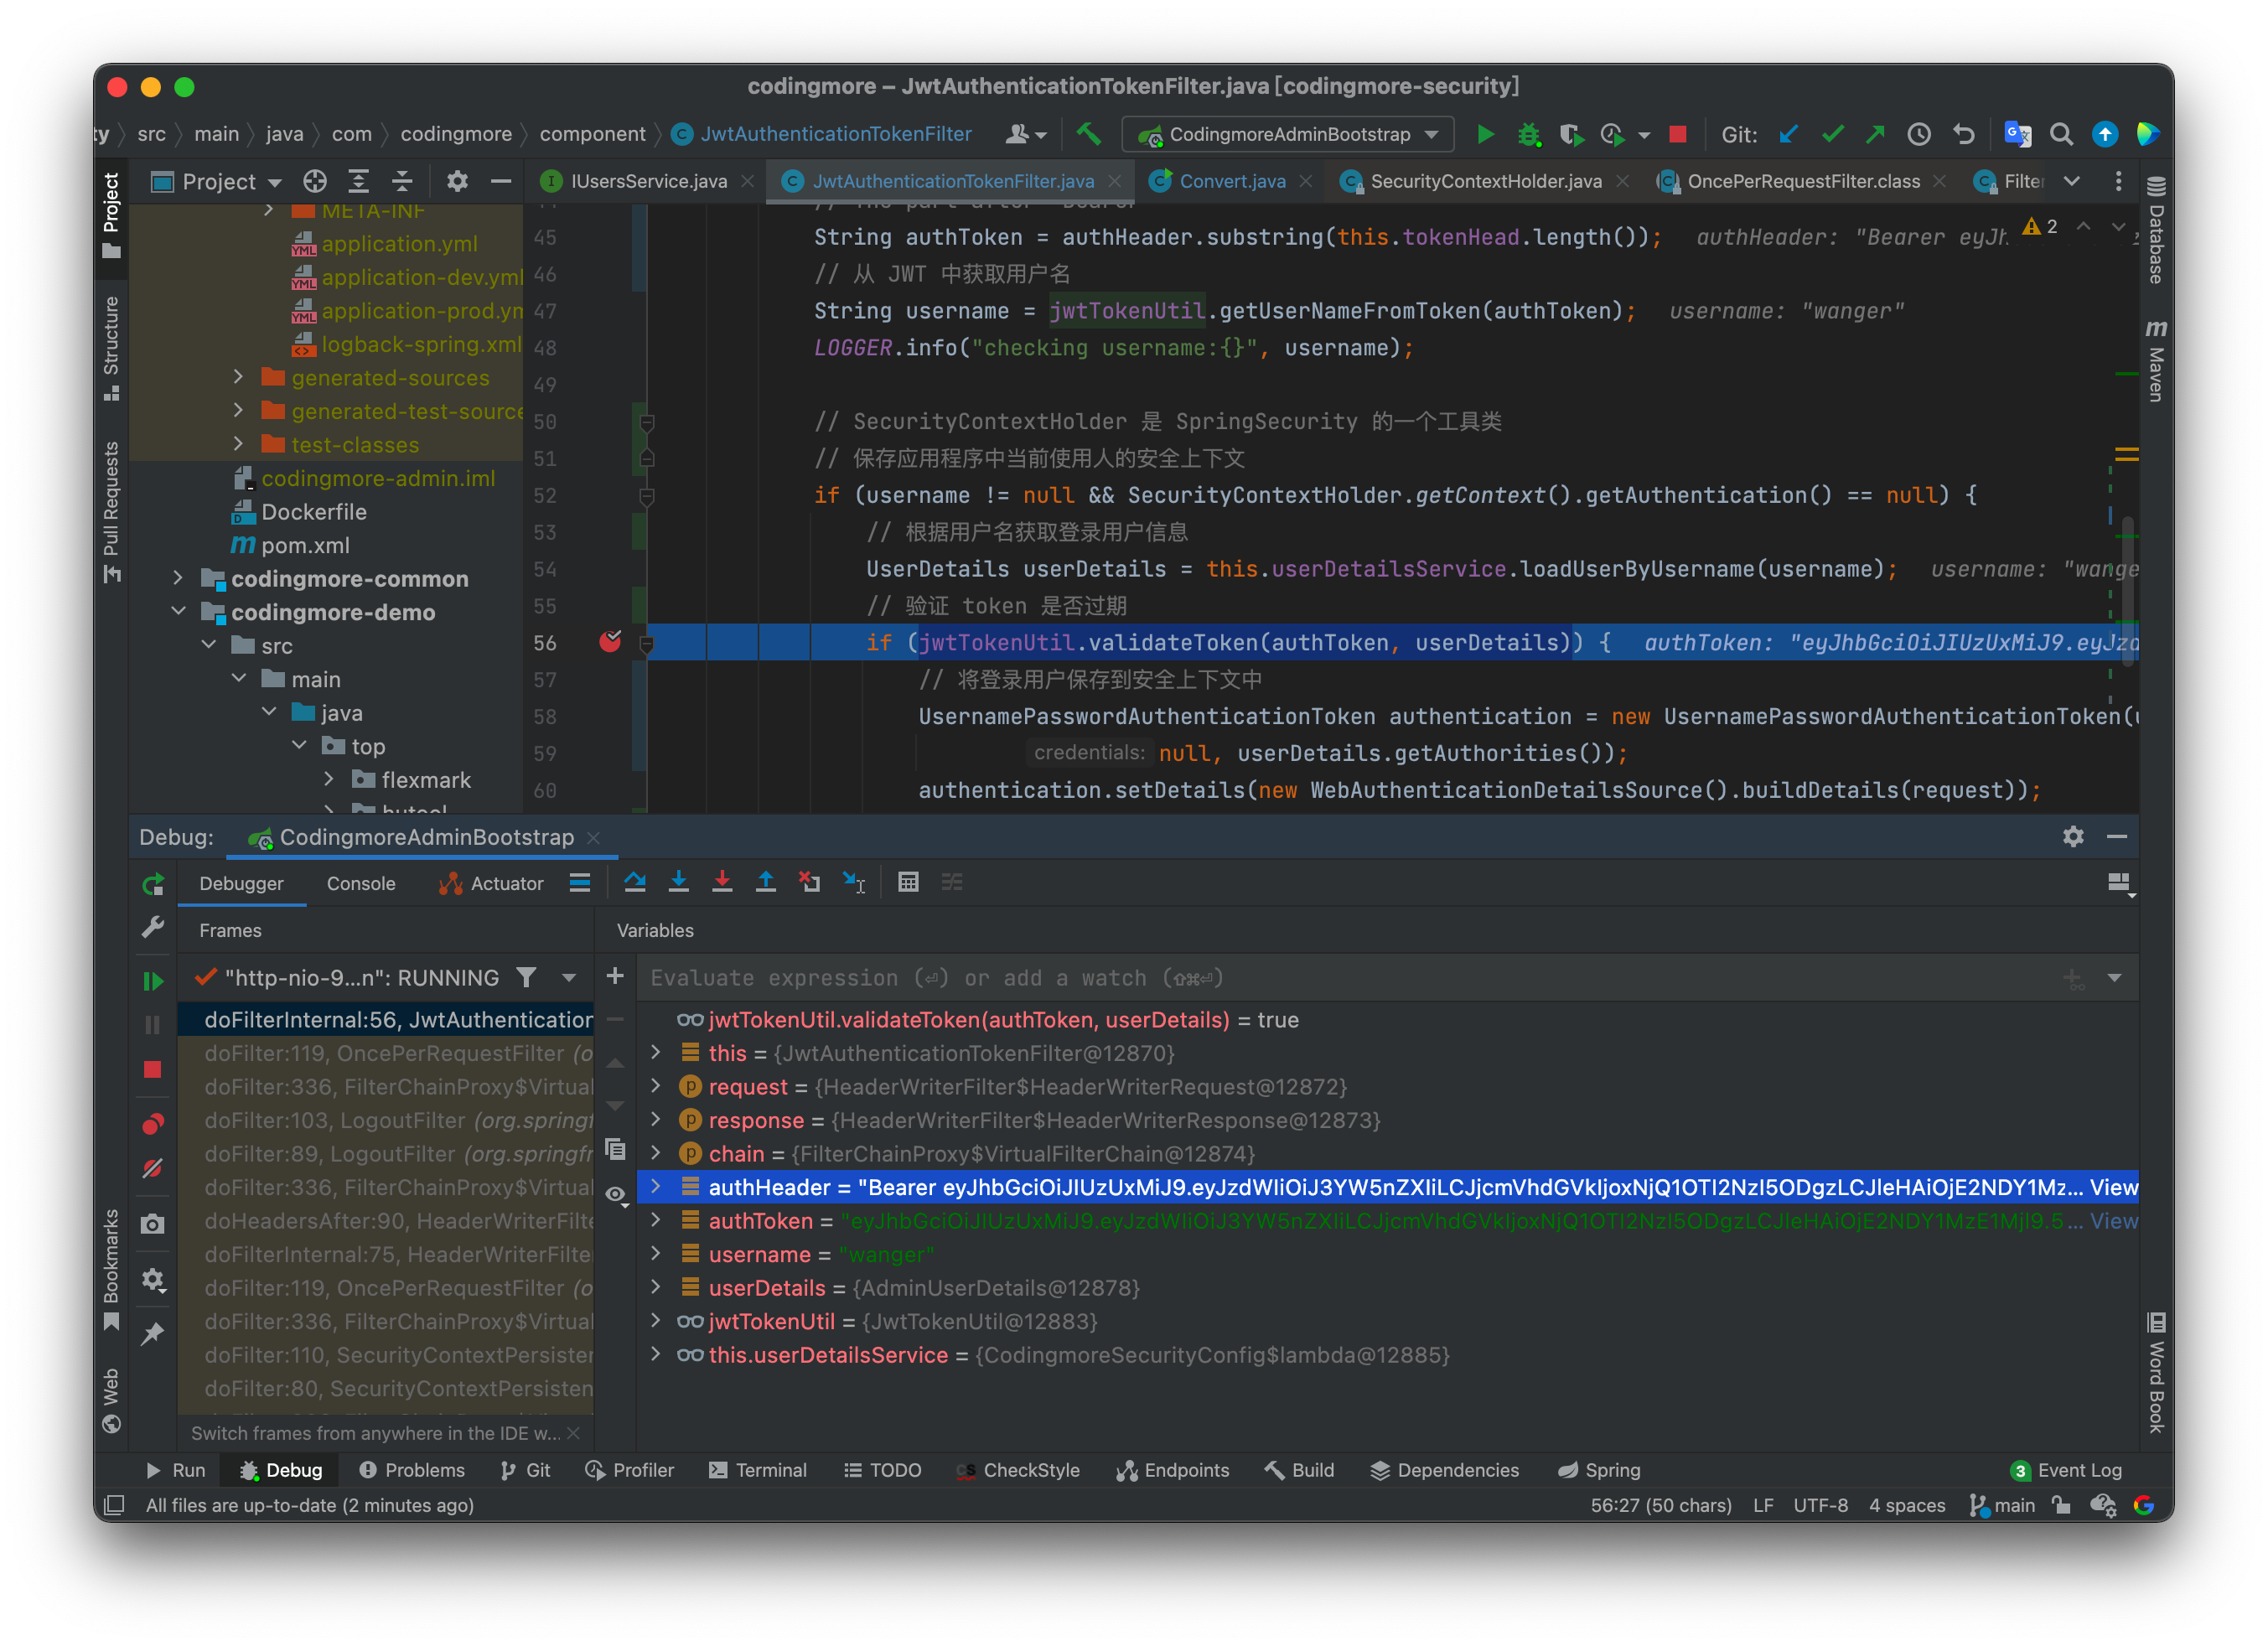
Step 6: add jwtauthenticationtokenfilter Java to verify JWT every time the client initiates a request.
public class JwtAuthenticationTokenFilter extends OncePerRequestFilter {
    private static final Logger LOGGER = LoggerFactory.getLogger(JwtAuthenticationTokenFilter.class);
    @Autowired
    private UserDetailsService userDetailsService;
    @Autowired
    private JwtTokenUtil jwtTokenUtil;
    @Value("${jwt.tokenHeader}")
    private String tokenHeader;
    @Value("${jwt.tokenHead}")
    private String tokenHead;

    @Override
    protected void doFilterInternal(HttpServletRequest request,
                                    HttpServletResponse response,
                                    FilterChain chain) throws ServletException, IOException {
        // Get JWT from client request
        String authHeader = request.getHeader(this.tokenHeader);
        // The JWT is in the format specified by us, starting with tokenHead
        if (authHeader != null && authHeader.startsWith(this.tokenHead)) {
            // The part after "Bearer "
            String authToken = authHeader.substring(this.tokenHead.length());
            // Get user name from JWT
            String username = jwtTokenUtil.getUserNameFromToken(authToken);
            LOGGER.info("checking username:{}", username);

            // SecurityContextHolder is a tool class of spring security
            // Saves the security context of the current user in the application
            if (username != null && SecurityContextHolder.getContext().getAuthentication() == null) {
                // Obtain login user information according to user name
                UserDetails userDetails = this.userDetailsService.loadUserByUsername(username);
                // Verify whether the token is expired
                if (jwtTokenUtil.validateToken(authToken, userDetails)) {
                    // Save the logged in user to a security context
                    UsernamePasswordAuthenticationToken authentication = new UsernamePasswordAuthenticationToken(userDetails,
                            null, userDetails.getAuthorities());
                    authentication.setDetails(new WebAuthenticationDetailsSource().buildDetails(request));
                    SecurityContextHolder.getContext().setAuthentication(authentication);

                    LOGGER.info("authenticated user:{}", username);
                }
            }
        }
        chain.doFilter(request, response);
    }
}
JwtAuthenticationTokenFilter inherits OncePerRequestFilter, which can ensure that a request only passes through the filter once without repeated execution. That is, the filter executes every time the client initiates a request.
This filter is very important. Basically, I added comments to every line of code. Of course, in order to ensure that everyone can figure out what this class does, I'll draw a flow chart to make it clear.
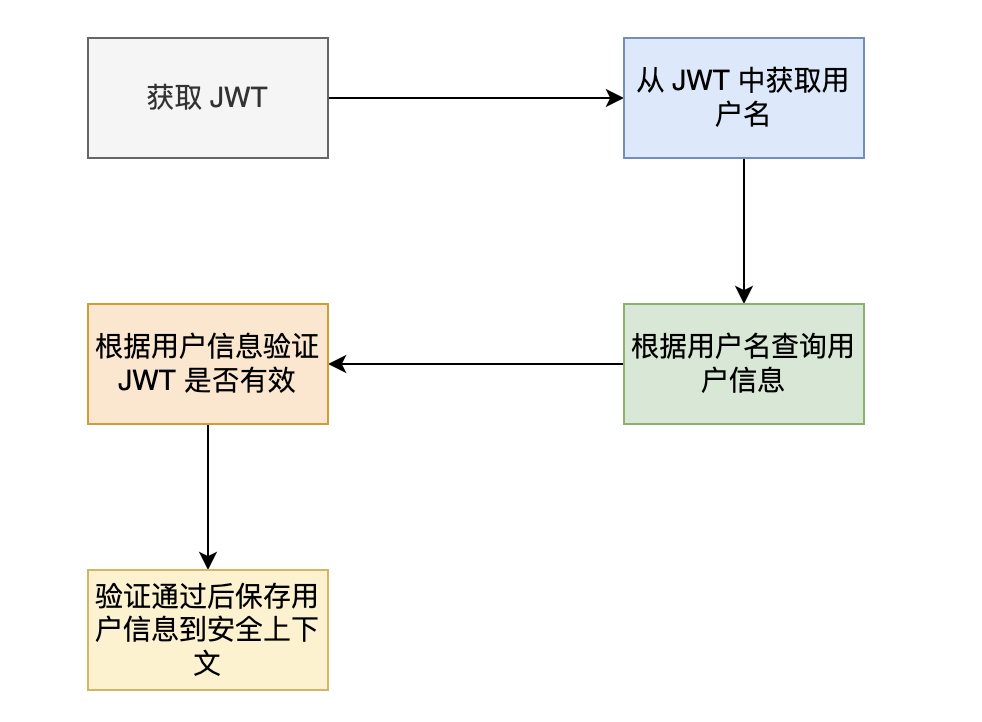
SpringSecurity is a security management framework, which can be seamlessly connected with Spring Boot applications. SecurityContextHolder is a very key tool class. It holds security context information, which contains key information such as who the current user is, whether the user has been authenticated, and the permissions the user has.
By default, the SecurityContextHolder uses ThreadLocal policy to store authentication information. ThreadLocal is characterized by the data in it, which Thread stores it and which Thread can access it. This means that different requests will be processed by different threads after entering the server. For example, Thread A stores the user information of request 1 in ThreadLocal, and Thread B cannot obtain the user information when processing request 2.
Therefore, the JwtAuthenticationTokenFilter filter will verify the JWT every time the request comes, so as to ensure that the request from the client is secure. Then spring security will release the next request interface. This is also the fundamental difference between JWT and Session:
- JWT needs to verify every request, and as long as JWT does not expire, even if the server is restarted, the authentication is still valid.
- The Session does not need to re verify the user information if it has not expired. After the server is restarted, the user needs to log in again to obtain a new Session.
In other words, under the scheme of JWT, the secret saved by the server must not be disclosed, otherwise the client can forge the user's authentication information according to the signature algorithm.
3, Add JWT validation to Swagger
For back-end developers, how to Swagger (integrated Knife4j for beautification) How to add JWT verification in?
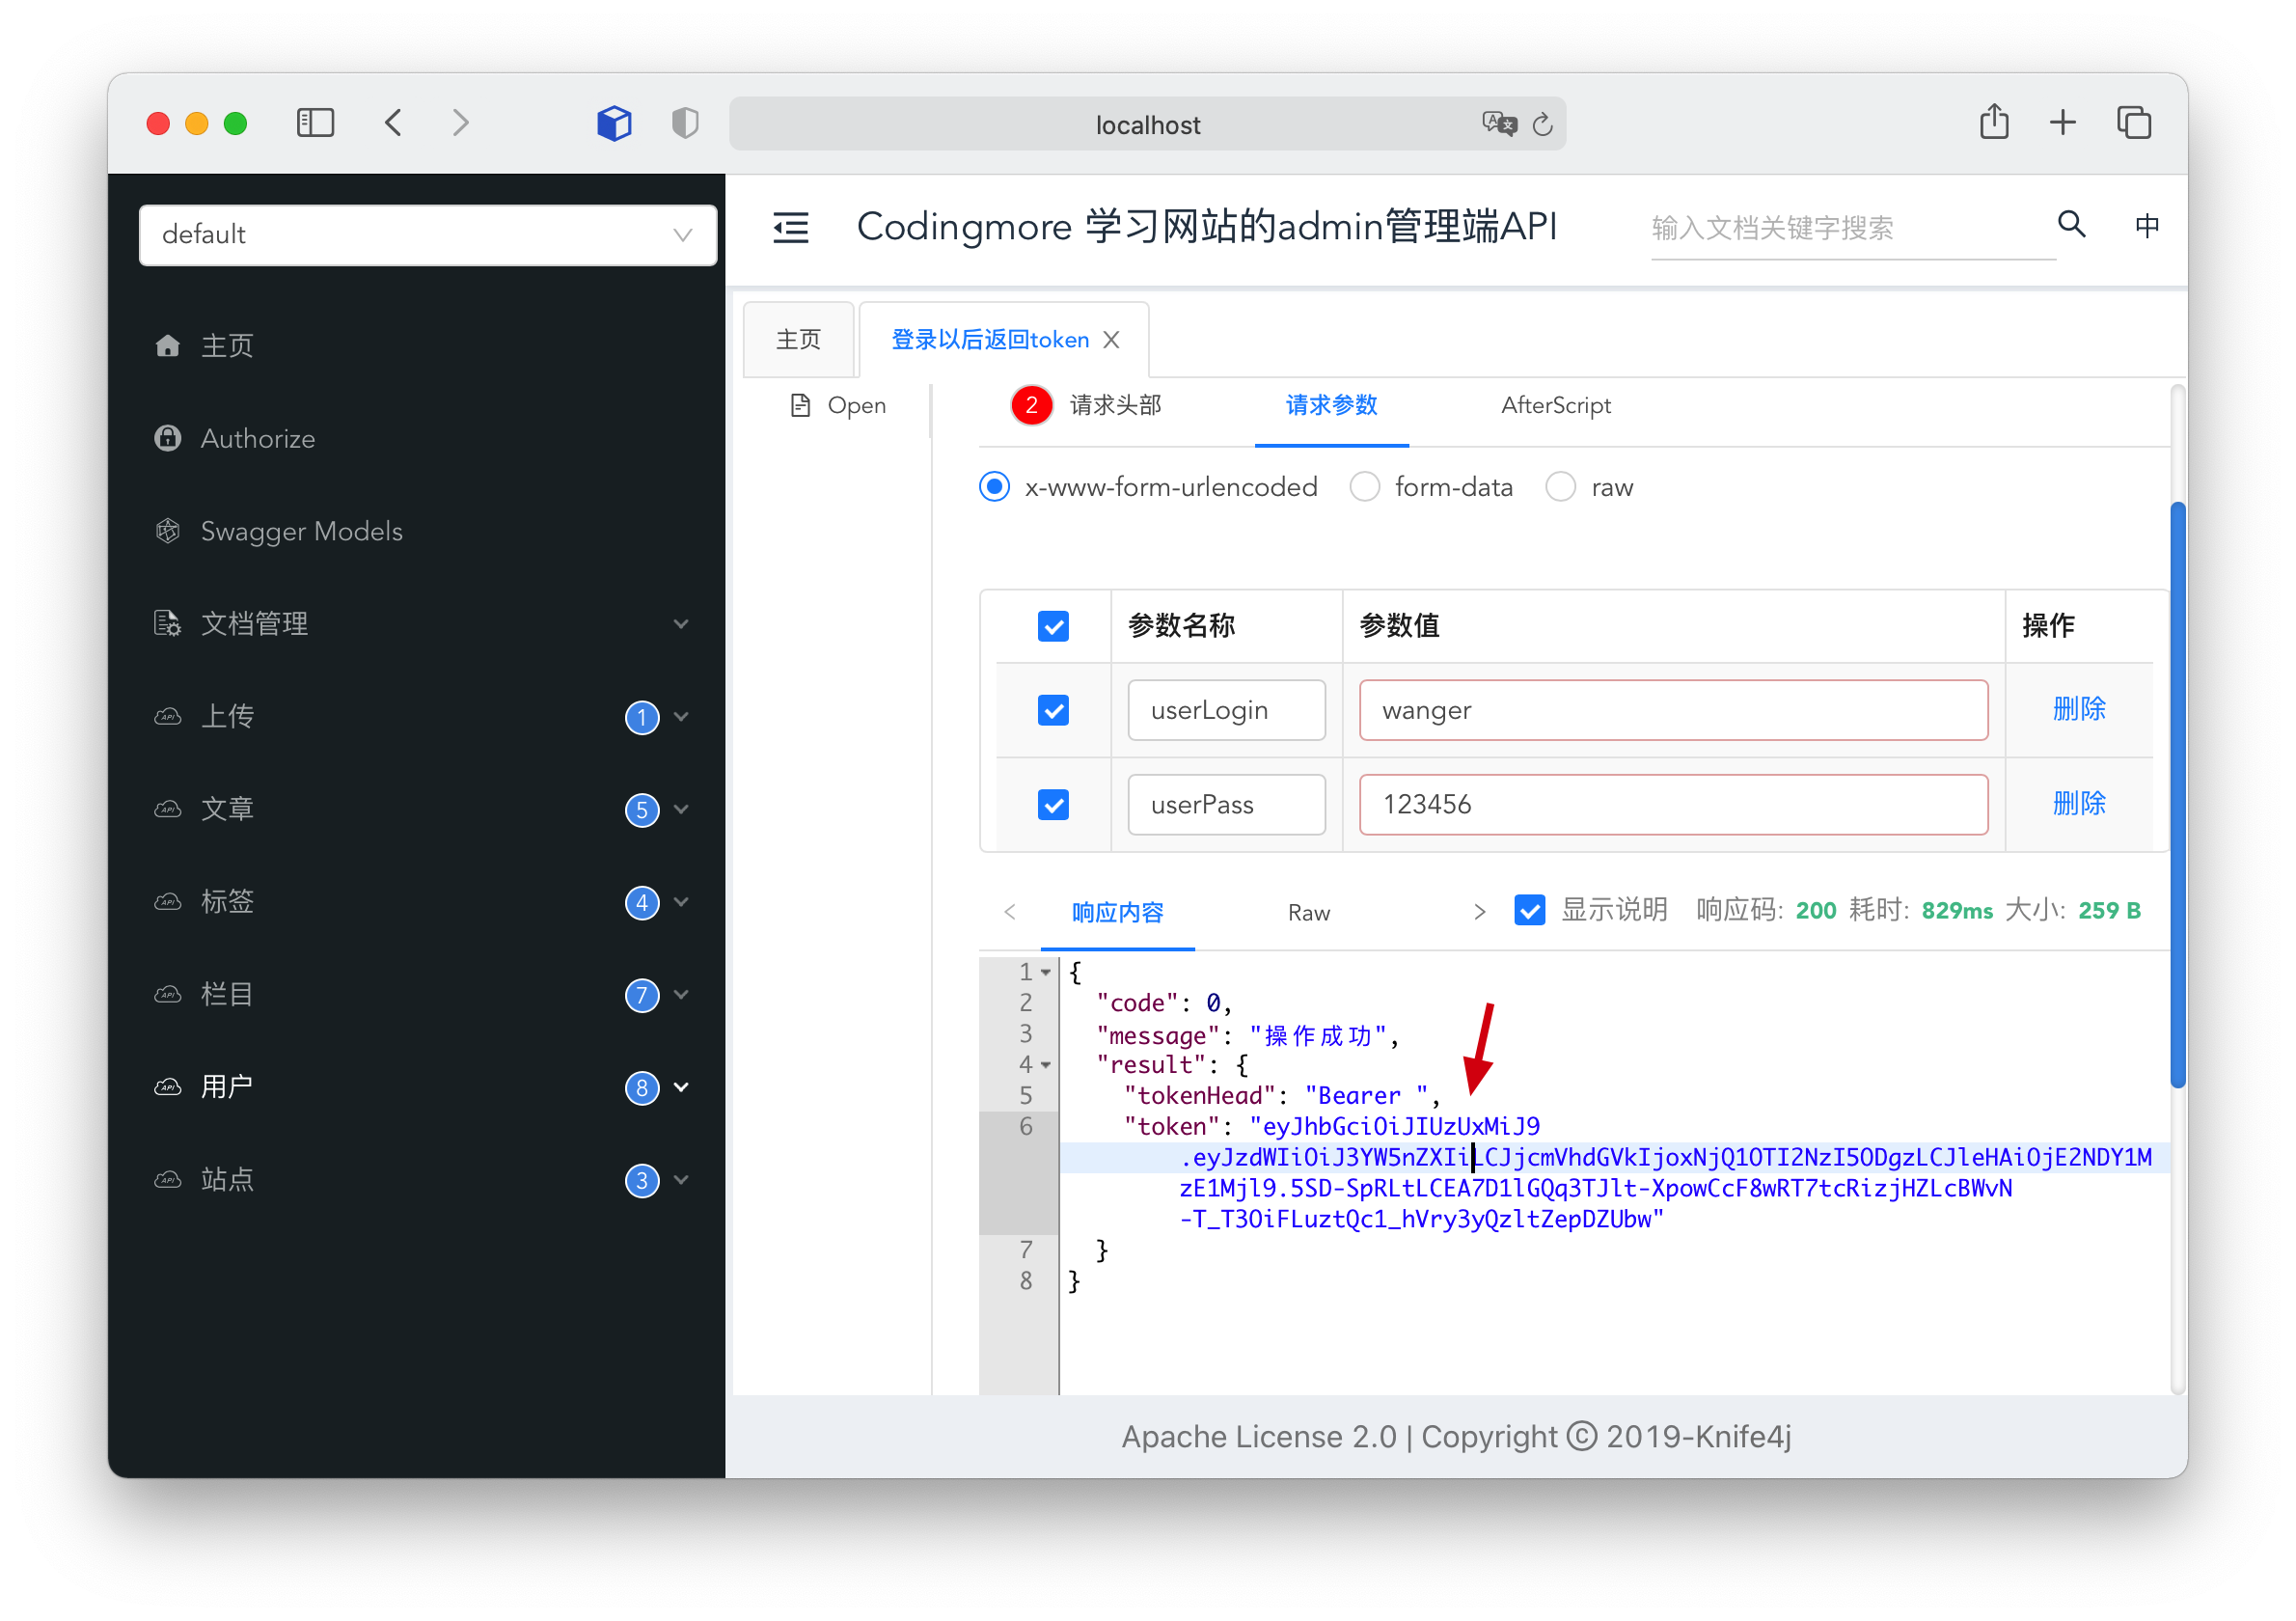
The first step is to access the login interface, enter the user name and password to log in, and obtain the JWT returned by the server.
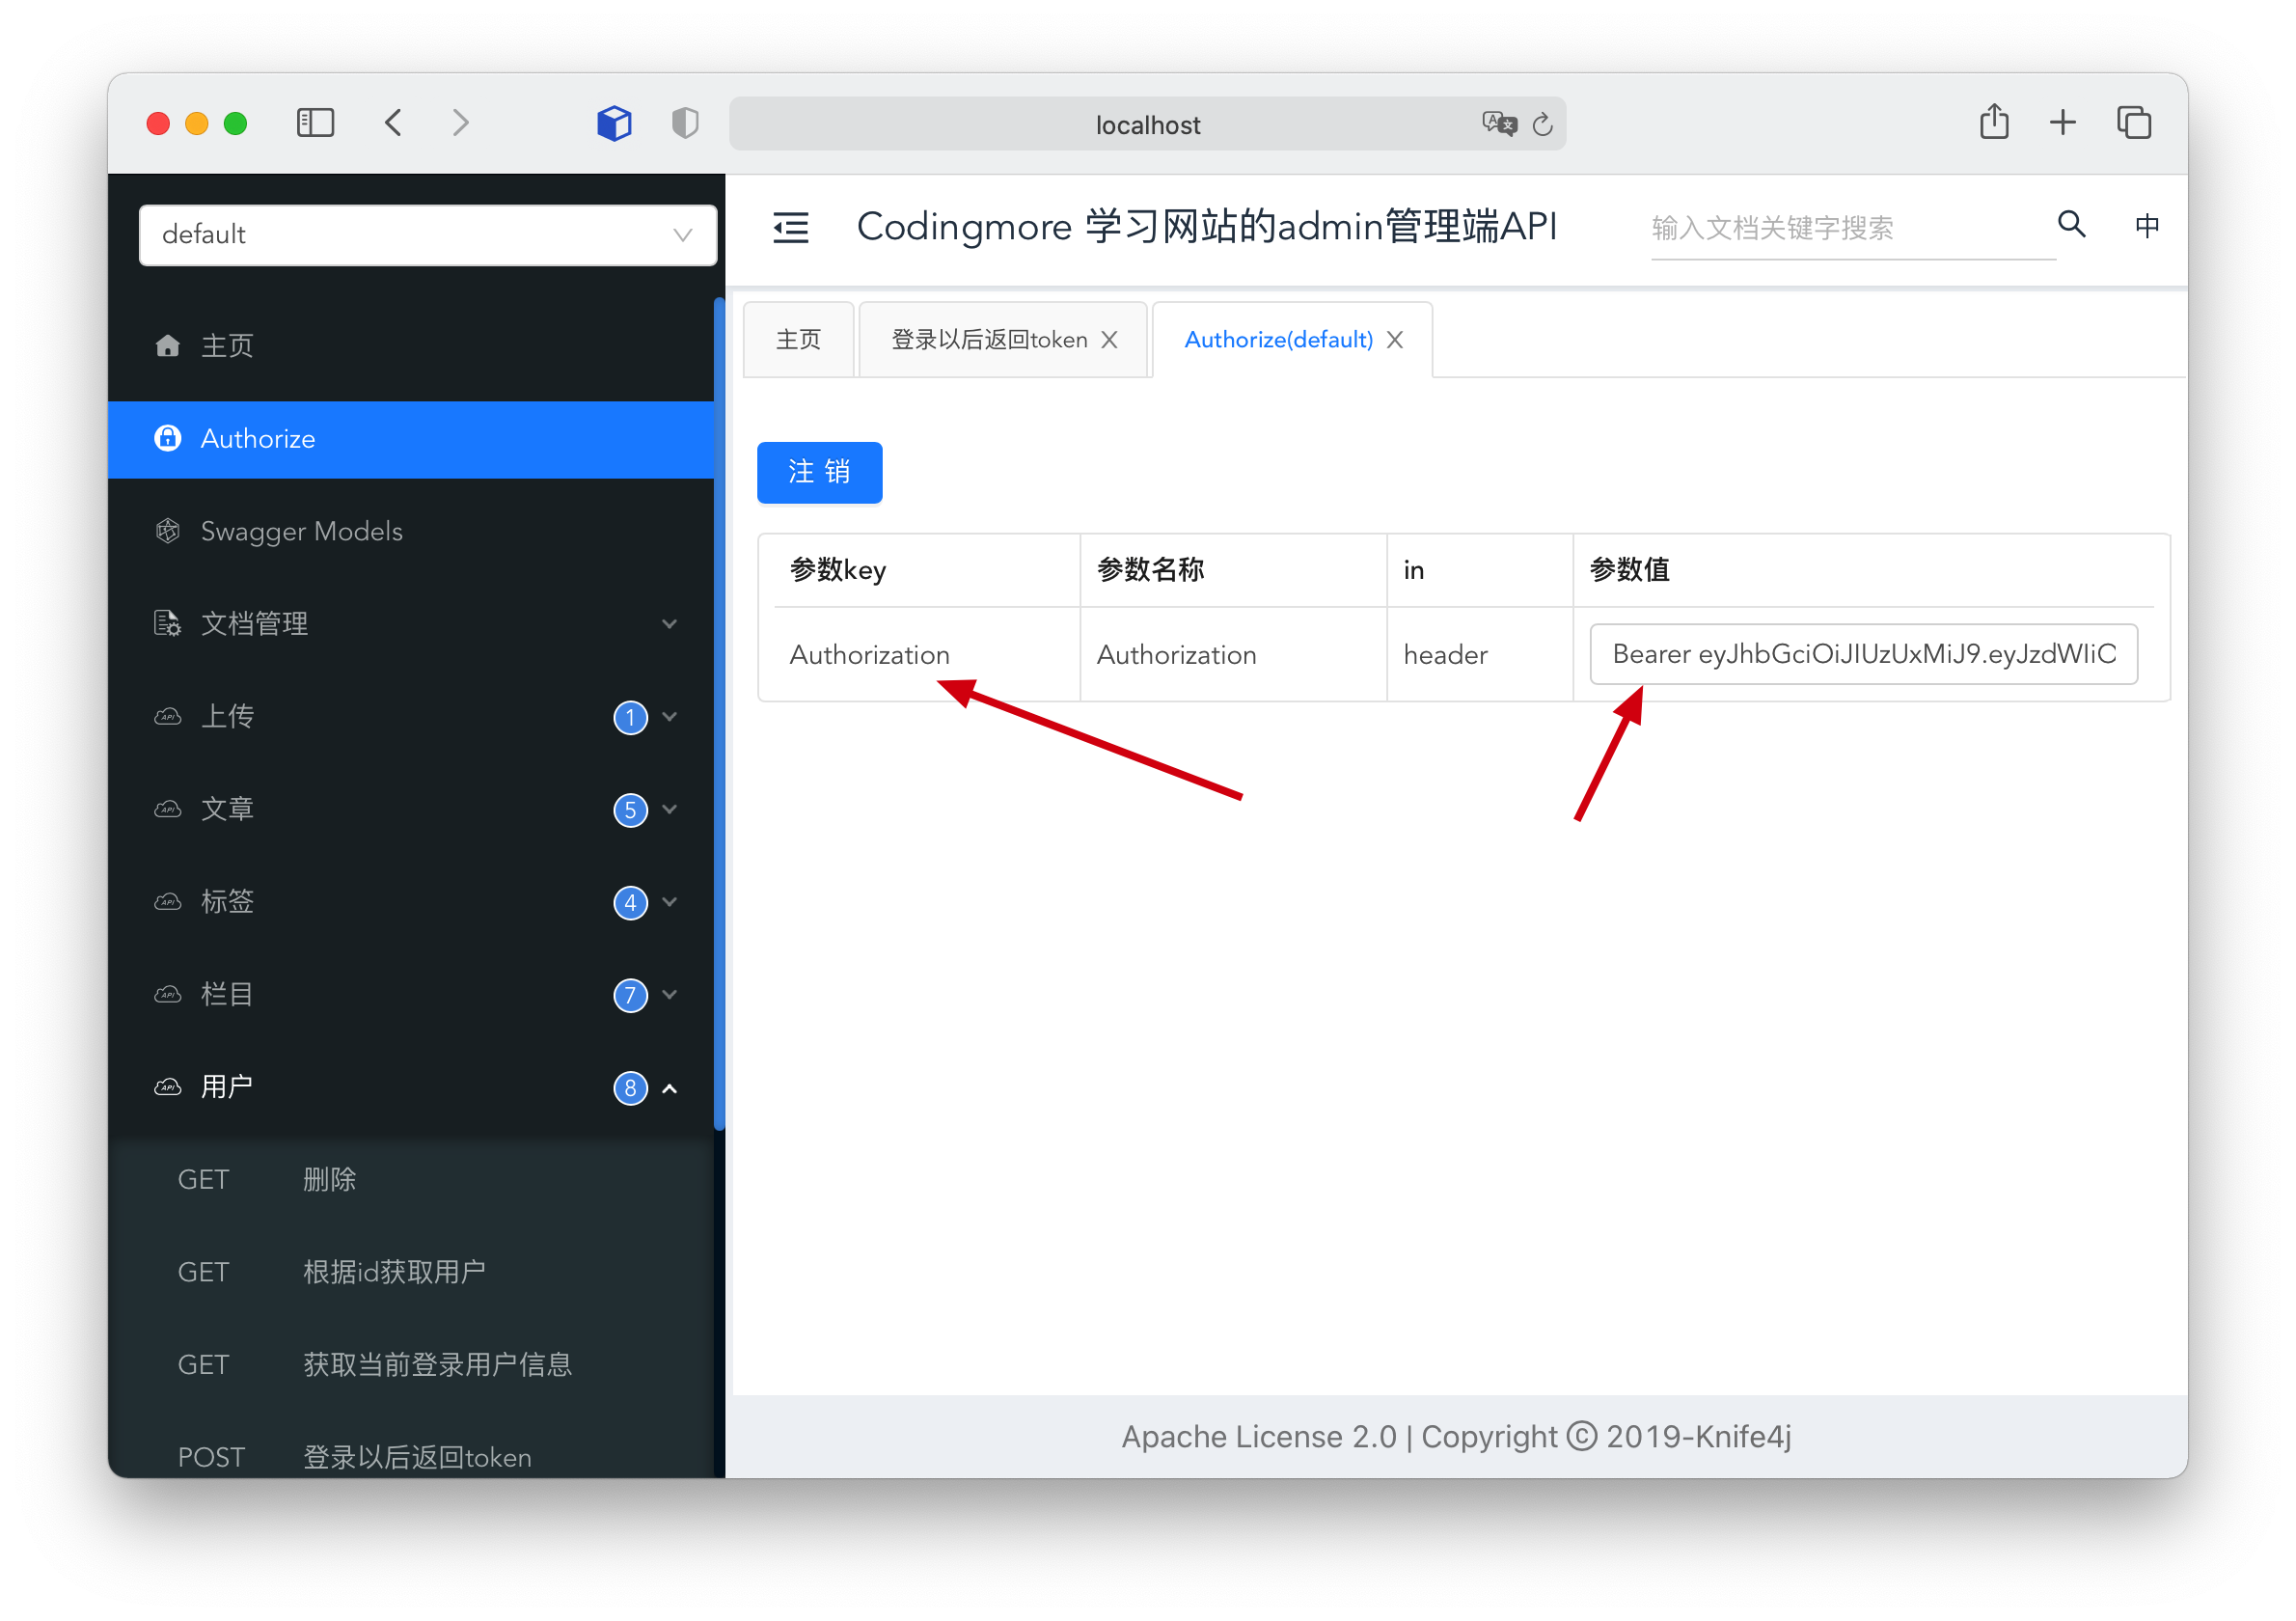
The second step is to collect the tokenHead and token returned by the server and fill them in Authorize (note that there is a space between tokenHead and token) to complete login authentication.
Step 3: when requesting other interfaces again, Swagger will automatically send the Authorization to the server as the request header information.
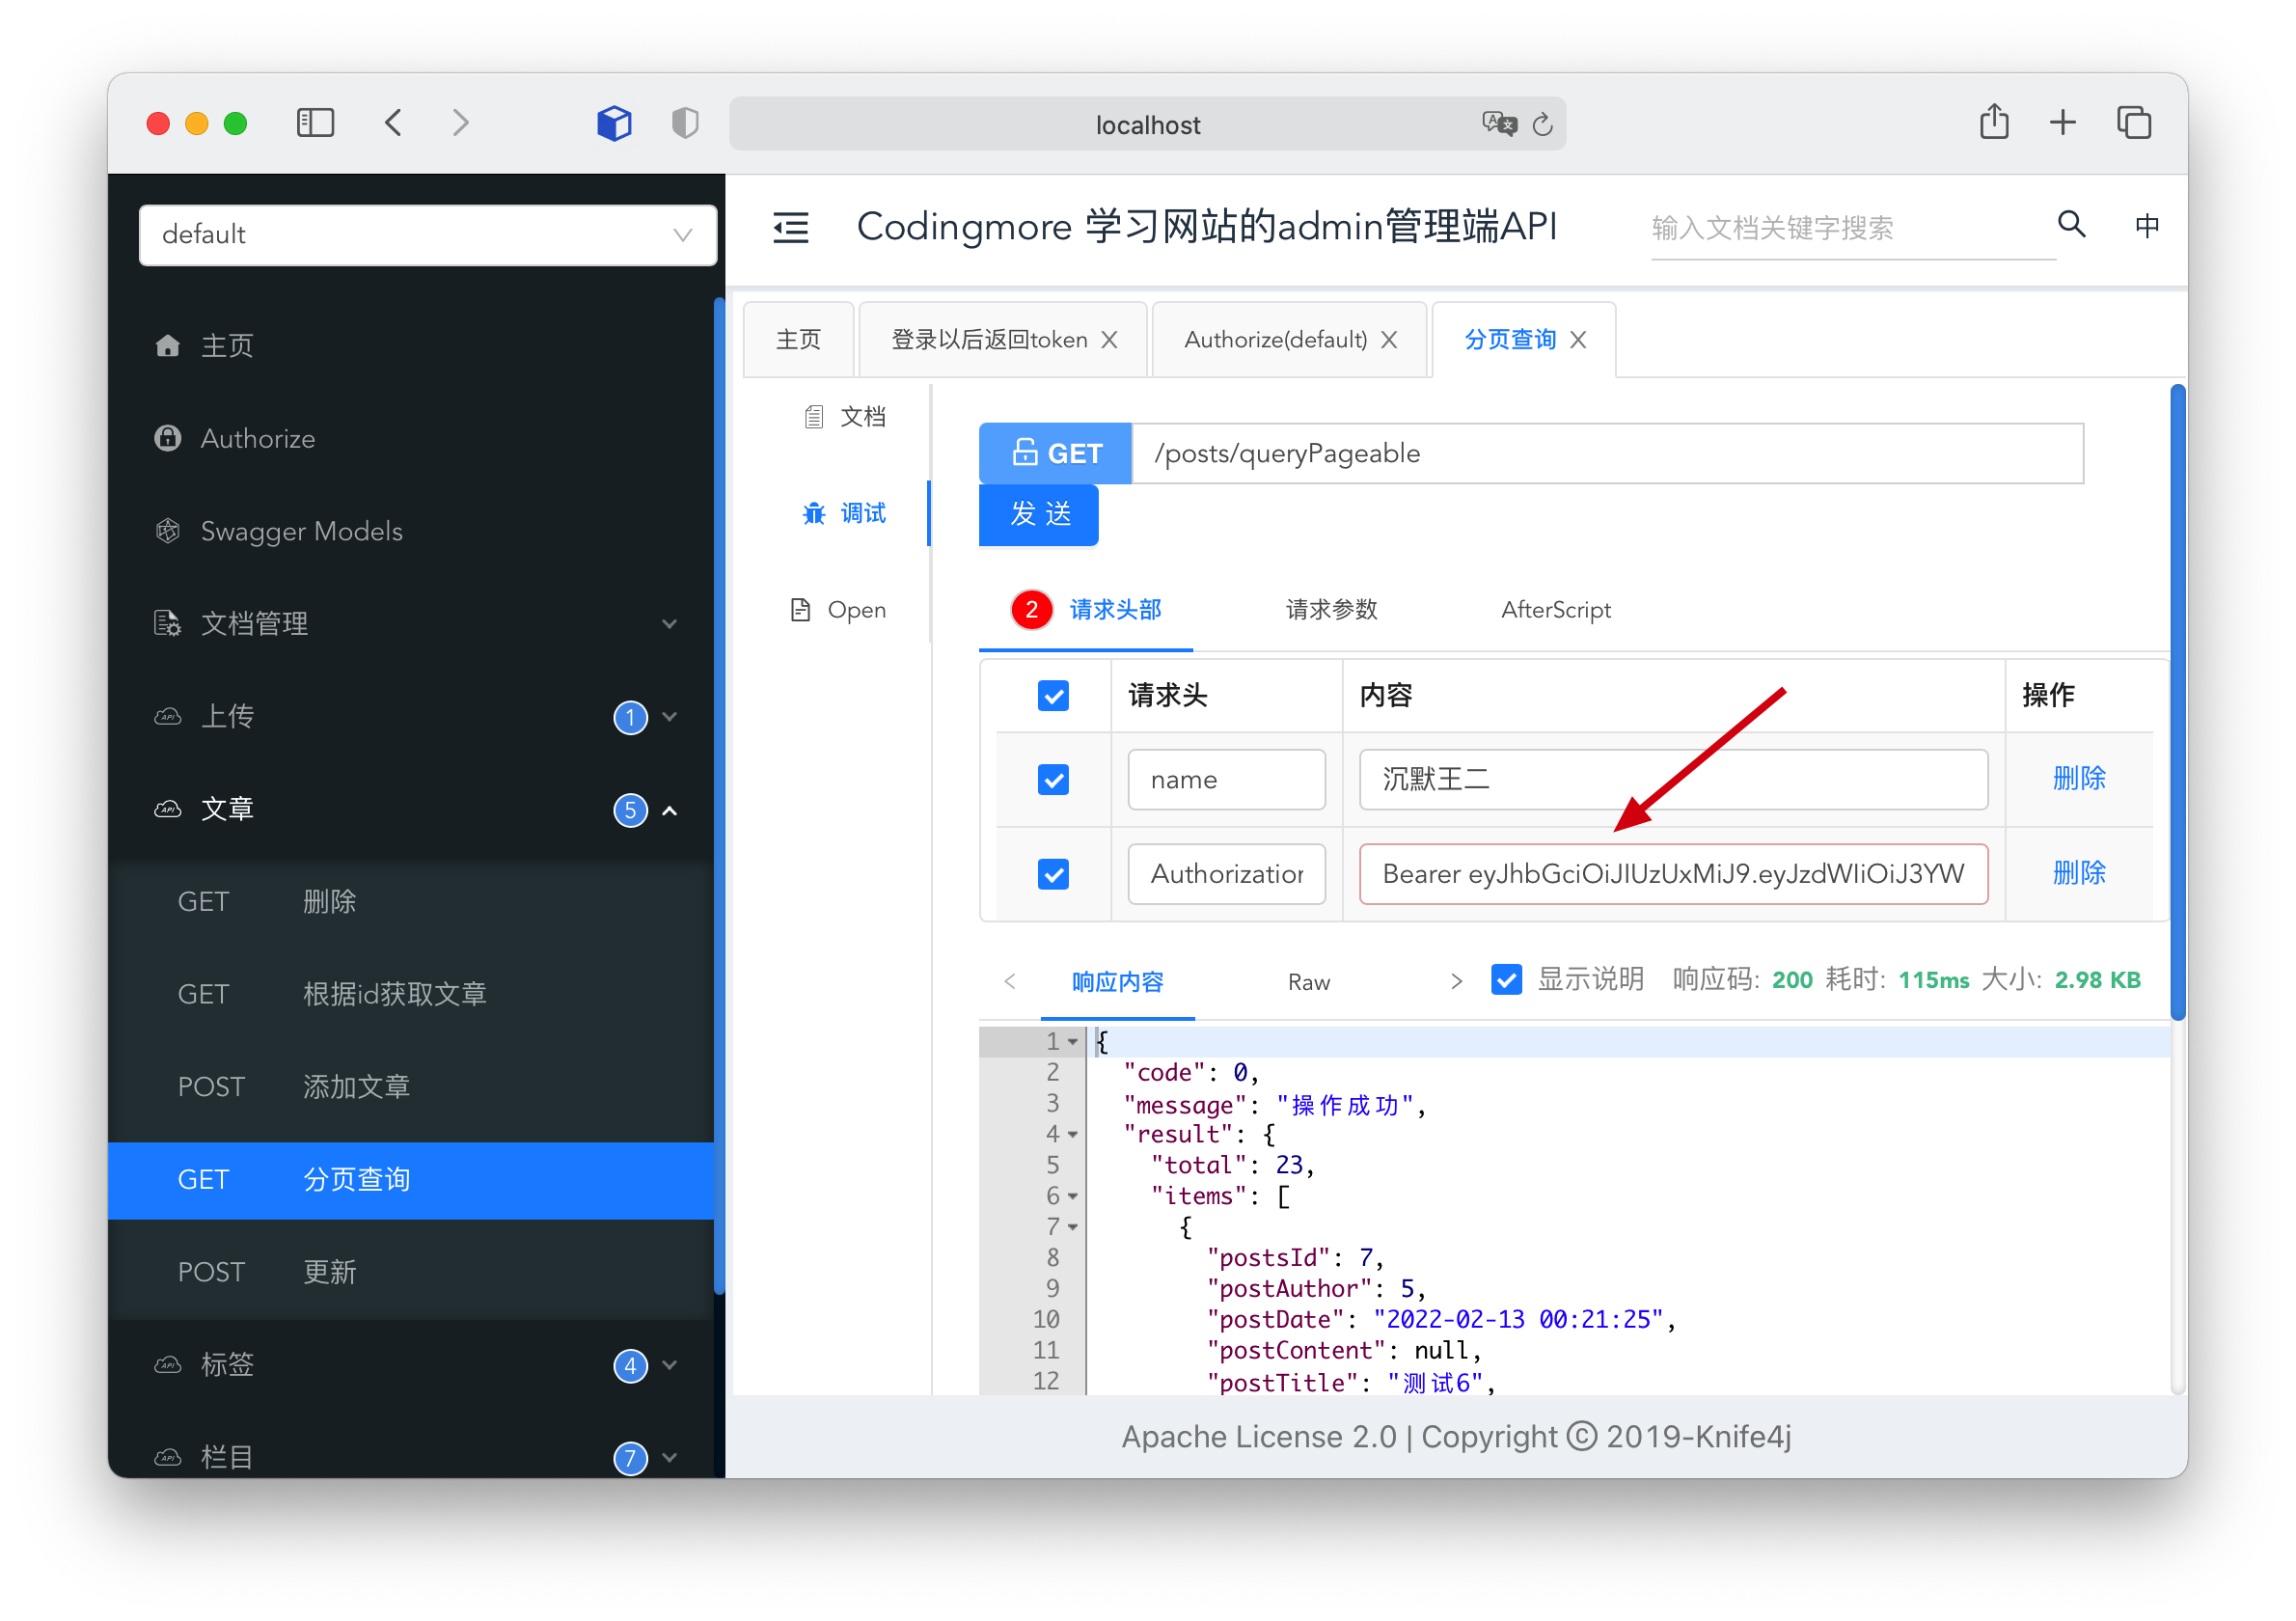
Step 4: after receiving the request, the server will verify the JWT through the JwtAuthenticationTokenFilter filter.
So far, the whole process has been opened up, perfect!
4, Summary
To sum up, it is very smooth to use JWT to solve the cross domain authentication in the front and rear end separation project, which is mainly due to the universality of JSON, which can be supported across languages, JavaScript and Java; In addition, the composition of JWT is very simple and easy to transmit; In addition, JWT does not need to save Session information on the server side, which is very easy to expand.
Of course, in order to ensure the security of JWT, do not save sensitive information in JWT, because once the private key is leaked, JWT is easy to be decrypted on the client; If you can, please use HTTPS protocol.
Reference link:
Ruan Yifeng: https://www.ruanyifeng.com/blog/2018/07/json_web_token-tutorial.html
Spring, summer, autumn and winter: https://segmentfault.com/a/1190000012557493
A little rain in Jiangnan: https://cloud.tencent.com/developer/article/1612175
Dearmadman: https://www.jianshu.com/p/576dbf44b2ae
mcarozheng: http://www.macrozheng.com/
Source code path:
https://github.com/itwanger/coding-more
This article has been included in the open source column of star 1.6k+ star on GitHub, "the way to advanced Java programmers". It is said that every excellent java programmer likes her, which is funny, humorous and easy to understand. The content includes Java foundation, Java Concurrent Programming, Java virtual machine, Java enterprise development, Java interview and other core knowledge points. Learn Java and recognize the advanced path of Java programmers 😄.
https://github.com/itwanger/toBeBetterJavaer
star this warehouse means that you have the potential to become an excellent Java Engineer. You can also stamp the link below to jump to the official website of the advanced road of Java programmers and start a pleasant learning journey.

Nothing makes me stay - except for the purpose. Even if there are roses, shade and quiet harbor on the shore, I am not a boat.