
In order to make full use of the advantages of Android Plugin for Gradle 3.0 +, it is becoming more and more common to split Android projects into multiple modules. However, with the increase of the number of modules, we will soon encounter the confusion of dependency management.
There are three different ways to manage Gradle dependencies:
- Manual management
- Use "ext" recommended by Google
- Kotlin + buildSrc
1. Manual management
This is a method that most people use to manage dependencies, but a lot of manual changes need to be made each time they upgrade the dependency library.
module_a/build.gradle
implementation "com.android.support:support-annotations:27.0.2"
implementation "com.android.support:appcompat-v7:27.0.2"
implementation "com.squareup.retrofit2:retrofit:2.3.0"
implementation "com.squareup.retrofit2:adapter-rxjava2:2.3.0"
implementation "io.reactivex.rxjava2:rxjava:2.1.9"
module_b/build.gradle
implementation "com.android.support:support-annotations:27.0.2"
implementation "com.android.support:appcompat-v7:27.0.2"
implementation "com.squareup.retrofit2:retrofit:2.3.0"
implementation "com.squareup.retrofit2:adapter-rxjava2:2.3.0"
implementation "io.reactivex.rxjava2:rxjava:2.1.9"
There are many duplicate configurations, and it is difficult to manage the version updates of dependent libraries when your project has many module s.
Google recommends: use the extra attribute of gradle
Google recommends this method of managing dependencies in the official Android documentation. Many projects, such as ButterKnife and Picasso, use this method.
This method is very suitable for updating the version of the support library, because each support library has the same version number. You only need to change it in one place. The same is true for other third-party libraries such as Retrofit.
Root-level build.gradle
ext {
  versions = [
    support_lib: "27.0.2",
    retrofit: "2.3.0",
    rxjava: "2.1.9"
  ]
  libs = [
    support_annotations: "com.android.support:support-annotations:${versions.support_lib}",
    support_appcompat_v7: "com.android.support:appcompat-v7:${versions.support_lib}",
    retrofit :"com.squareup.retrofit2:retrofit:${versions.retrofit}",
    retrofit_rxjava_adapter: "com.squareup.retrofit2:adapter-rxjava2:${versions.retrofit}",
    rxjava: "io.reactivex.rxjava2:rxjava:${versions.rxjava}"
  ]
}
module_a/build.gradle
implementation libs.support_annotations
implementation libs.support_appcompat_v7
implementation libs.retrofit
implementation libs.retrofit_rxjava_adapter
implementation libs.rxjava
module_b/build.gradle
implementation libs.support_annotations
implementation libs.support_appcompat_v7
implementation libs.retrofit
implementation libs.retrofit_rxjava_adapter
implementation libs.rxjava
This method is a great progress in manual management, but it lacks the support of IDE. More accurately, IDE cannot complete automatically when updating dependency libraries.
Kotlin + buildSrc == Android Studio Autocomplete 😎 🎉

You need to create a buildSrc module in your project, and then write kotlin code to manage the dependency library, so that the IDE supports automatic completion.
There is a paragraph in the Gradle document:
When you run gradle, it will check whether there is a directory named buildSrc in the project. Gradle then automatically compiles and tests the code and puts it in the classpath of the build script. You do not need to provide any further tips.
You only need to create two new files in buildSrc module:
- build.gradle.kts
- A file for writing Kotlin code (in this article, Dependencies.kt)

buildSrc/build.gradle.kts:
plugins {
    `kotlin-dsl`
}
buildSrc/src/main/java/Dependencies.kt
object Versions {
    val support_lib = "27.0.2"
    val retrofit = "2.3.0"
    val rxjava = "2.1.9"
}

object Libs {
 val support_annotations = "com.android.support:support-annotations:${Versions.support_lib}"
 val support_appcompat_v7 = "com.android.support:appcompat-v7:${Versions.support_lib}"
 val retrofit = "com.squareup.retrofit2:retrofit:${Versions.retrofit}"
 val retrofit_rxjava_adapter = "com.squareup.retrofit2:adapter-rxjava2:${Versions.retrofit}"
 val rxjava = "io.reactivex.rxjava2:rxjava:${Versions.rxjava}"
}
After the above two steps, execute the Gradle Sync task once. Now we can access dependencies in Android Studio Any value in KT.
The result looks very similar to "ext", but it supports automatic completion and click jump.
module_a/build.gradle
implementation Libs.support_annotations
implementation Libs.support_appcompat_v7
implementation Libs.retrofit
implementation Libs.retrofit_rxjava_adapter
implementation Libs.rxjava
module_a/build.gradle
implementation Libs.support_annotations
implementation Libs.support_appcompat_v7
implementation Libs.retrofit
implementation Libs.retrofit_rxjava_adapter
implementation Libs.rxjava
Conclusion
I strongly recommend that you use the "Kotlin + buildSrc" method. It supports automatic completion and click jump, so that you do not need to manually switch back and forth between files, which is convenient for you to better manage Gradle dependencies.
Hands on:
The new module name must be buildSrc
At first, according to the author's original description, I right-click the project in Android Studio, and a New Android Library named buildSrc was created. After trying it several times, I was prompted with the error of "Gradle sync failed: Plugin with id 'com.android.library' not found".
Later, referring to the practice here, I manually created the buildSrc module. The steps are as follows:
- 1. Create a new folder named buildSrc under the root directory of the project (the same level as the app folder in the project).
- 2. In the buildSrc folder, create a file named build gradle. KTS file. Refer to the previous description for the contents of the file.
- 3. Create the src/main/java folder in the buildSrc folder, as shown in the following figure. And create dependencies KT file. Refer to the previous description for the contents of the file.
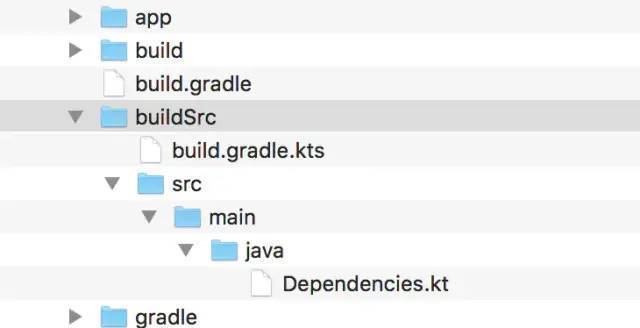
- build your project again, then restart your Android Studio, and a module named buildSrc will be added to the project.
Advanced notes of Android advanced development system, latest interview review notes PDF, My GitHub
end of document
Your favorite collection is my greatest encouragement!
Welcome to follow me, share Android dry goods and exchange Android technology.
If you have any opinions on the article or any technical problems, please leave a message in the comment area for discussion!