1: Contents of this chapter
- Kubernetes
- Function introduction of required components
- Environmental planning and description
- Deployment process
- Summary
2: Kubernetes
1. Overview: kubernetes, or K8s for short, is an abbreviation that uses 8 characters instead of "ubernete". Kubernetes is an open source application for managing containerized applications on multiple hosts in the cloud platform. Kubernetes aims to make the deployment of containerized applications simple and efficient. Kubernetes provides a mechanism for application deployment, planning, update and maintenance.
The traditional way of application deployment is to install applications through plug-ins or scripts. The disadvantage of this is that the operation, configuration, management and all life cycles of the application will be bound with the current operating system, which is not conducive to the upgrade, update, rollback and other operations of the application. Of course, some functions can also be realized by creating virtual machines, but virtual machines are very important and not conducive to portability.
2. Characteristics of Kubernetes:
- Portable: support public cloud, private cloud, hybrid cloud, multi cloud
- Extensible: modular, plug-in, mountable, composable
- Automation: automatic deployment, automatic restart, automatic replication, automatic scaling / expansion
3: Function introduction of required components
| Component name | Component function | Node of component |
|---|---|---|
| ETCD | Etcd is the default storage system provided by Kubernetes, which saves all cluster data. When using, it needs to provide backup plan for etcd data. | Master |
| kube-apiserver | Kube apiserver is used to expose the Kubernetes API. Any resource request / call operation is performed through the interface provided by Kube API server. | Master |
| kube-controller-manager | Kube controller manager runs the management controllers, which are the background threads in the cluster dealing with general tasks. Logically, each controller is a separate process, but to reduce complexity, they are compiled into a single binary file and run in a single process. | Master |
| kube-scheduler | Monitor the newly created Pod that is not assigned to a Node, and select a Node for the Pod. | Master |
| kubelet | kubelet is the primary node agent that monitors the pod assigned to the node | Node |
| kube-proxy | Kube proxy implements Kubernetes service abstraction by maintaining network rules on the host and performing connection forwarding. | Node |
| docker | docker is used to run containers | Node and Master |
4: Environmental planning and description
| host name | IP | Components to be installed |
|---|---|---|
| Master(centos7.4) | 192.168.243.128 | etcd,kube-apiserver,kube-controller-manager,kube-scheduler,docker |
| Node1(centos7.4) | 192.168.243.149 | kubelet,kube-proxy,docker |
| Node2(centos7.4) | 192.168.243.150 | kubelet,kube-proxy,docker |
Note: 1. Turn off firewalld 2. Turn off SELinux 3. Turn off swap partition 4. Use 2G memory and 2 CPUs.
5: Deployment process
5.1 the master and node nodes should do well in domain name resolution, turn off firewalld, turn off selinux, and turn off swap partition
[root@master ~]# systemctl stop firewalld
[root@master ~]# vim /etc/selinux/config
SELINUX=disabled //Change to disabled
[root@master ~]# swapoff /dev/mapper/centos-swap //Do a good job in domain name resolution
[root@master ~]# vim /etc/hosts127.0.0.1 localhost localhost.localdomain localhost4 localhost4.localdomain4
::1 localhost localhost.localdomain localhost6 localhost6.localdomain6192.168.243.128 master
192.168.243.149 node1
192.168.243.150 node2
5.2 install ipvs module:
cat > /etc/sysconfig/modules/ipvs.modules <<EOF
#!/bin/bash
modprobe -- ip_vs
modprobe -- ip_vs_rr
modprobe -- ip_vs_wrr
modprobe -- ip_vs_sh
modprobe -- nf_conntrack_ipv4
EOF
chmod 755 /etc/sysconfig/modules/ipvs.modules && bash
/etc/sysconfig/modules/ipvs.modules && lsmod | grep -e ip_vs -e nf_conntrack_ipv4
5.3 configure the image address to start the installation, which is required in Master and Node
[root@master ~]#cat <<EOF > /etc/yum.repos.d/kubernetes.repo
[kubernetes]
name=Kubernetes
baseurl=https://mirrors.aliyun.com/kubernetes/yum/repos/kubernetes-el7-x86_64/
enabled=1
gpgcheck=1
repo_gpgcheck=1
gpgkey=https://mirrors.aliyun.com/kubernetes/yum/doc/yum-key.gpg https://mirrors.aliyun.com/kubernetes/yum/doc/rpm-package-key.gpg
EOF
[root@master ~]# yum install -y kubelet kubeadm kubectl //Install k8s client tools
[root@master ~]# yum install -y yum-utils device-mapper-persistent-data lvm2 //Necessary tools for installing the system
[root@master ~]# yum-config-manager --add-repo https://mirrors.aliyun.com/docker-ce/linux/centos/docker-ce.repo //Add software source information
[root@master ~]# yum makecache fast
[root@master ~]# yum -y install docker-ce //Update and install docker
[root@master ~]# vim /etc/docker/daemon.jsonn / / configure the docker accelerator{
"registry-mirrors": ["https://dxbdst4t.mirror.aliyuncs.com"]
}
[root@master ~]# systemctl daemon-reload
[root@master ~]# systemctl restart docker.service
[root@master ~]# echo "1" > /proc/sys/net/bridge/bridge-nf-call-iptables
[root@master ~]# echo "1" > /proc/sys/net/bridge/bridge-nf-call-ip6tables //Enable IP forwarding
[root@master ~]# systemctl enable kubelet //Set start-up and start kubelet. Start kubelet is not required here
[root@master ~]# echo "1" >> /proc/sys/net/bridge/bridge-nf-call-iptables
[root@master ~]# Kubeadm init -- apiserver-advertisement-address = 192.168.243.128 -- pod network CIDR = 10.244.0.0/16 -- service CIDR = 10.96.0.0/12 -- kubernetes version = v1.17.4 -- image repository registry.aliyuncs.com/google_containers / / start to initialize the cluster -- note that 192.168.243.128 here needs to be replaced with its own master IP address
The following results are obtained. Initialization is successful
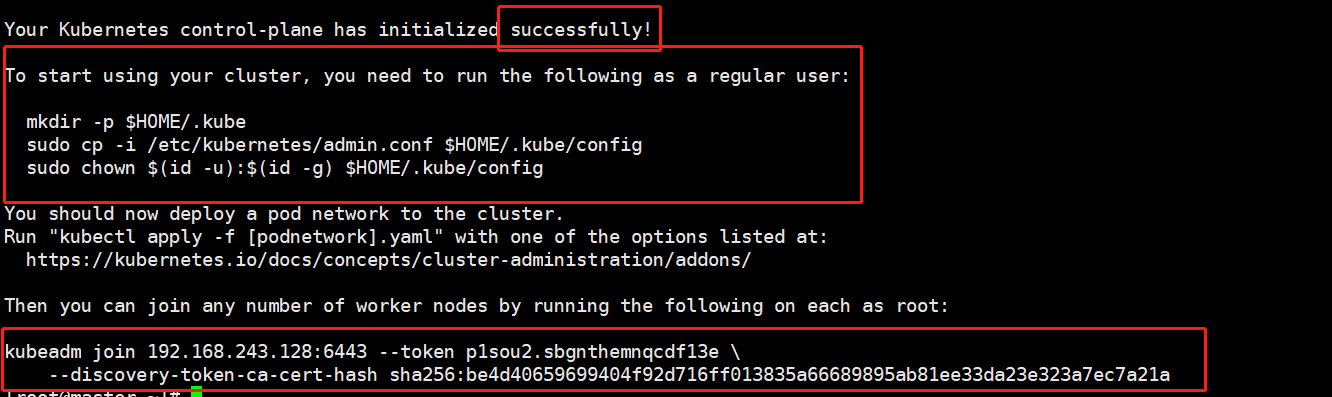
The above picture shows that you need to execute the appeal order manually:
[root@master ~]# mkdir -p $HOME/.kube
[root@master ~]# cp -i /etc/kubernetes/admin.conf $HOME/.kube/config
[root@master ~]# chown $(id -u):$(id -g) $HOME/.kube/config
5.4 node1 and node2 start to join the master
Execute on node1 and node2 respectively:
[root@node1 ~]# kubeadm join 192.168.243.128:6443 --token p1sou2.sbgnthemnqcdf13e \<br/>--discovery-token-ca-cert-hash sha256:be4d40659699404f92d716ff013835a66689895ab81ee33da23e323a7ec7a21a
5.5 deploy the flannel network plug-in on the master
`[root@master docker]# kubectl apply -f https://raw.githubusercontent.com/coreos/flannel/master/Documentation/kube-flannel.yml
****It will take a long time. He will pull the image and start it pod****
[root@master ~]# kubectl get node / / execute this command to check whether the node status is ready. The deployment of the network plug-in succeeds
NAME     STATUS   ROLES    AGE   VERSION
master   Ready    master   53m   v1.17.4
node1    Ready    <none>   28m   v1.17.4
node2    Ready    <none>   25m   v1.17.4

`
k8s completion