1, Environmental preparation
1. Check the operating system version (version above 7.5 is recommended)
cat /etc/redhat-release

2. For host name resolution, in order to facilitate direct calls between cluster nodes, add the following information in the / etc/hosts file
192.168.225.130 master
192.168.225.131 node1
192.168.225.132 node2
After configuration, use ping naming to check whether the configuration is correct
ping master

3. Time synchronization
kubernetes requires that the time of nodes in the cluster must be accurate and consistent. Here, the chronyd service is directly used to synchronize the time from the network
#Start the chronyd service
systemctl start chronyd
#Set the startup of the chronyd service
systemctl enable chronyd
Use the date command to check whether the time is synchronized, and the results are consistent


4. Disable iptables and firewalld services
kubernetes and docker will generate a large number of iptables rules during operation. In order not to confuse the system rules with them, close the firewall of the system directly
#Turn off firewalld service
systemctl stop firewalld
#Disable firewalld service startup
systemctl disable firewalld
-----------------------------
#Close iptables service
systemctl stop iptables
#Disable iptables service startup
systemctl disable iptables
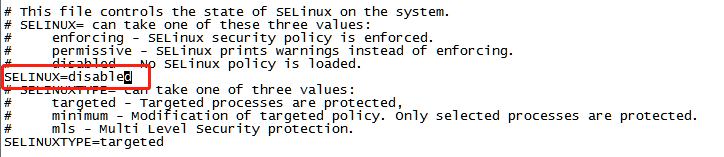
5. Disable selinux
selinux is a security service of linux system. It will cause various problems if it is not closed
Edit the / etc/selinux/config file, change the value of SELINUX to disabled, and restart the linux service after modification
6. Disable swap partition
swap partition refers to virtual memory partition. Its function is to convert disk space into virtual memory after physical memory is used up.
Starting the swap device will have a very negative impact on the system performance, so kubernetes requires that each node disable the swap partition.
Edit / etc/fstab and comment out the swap partition line

7. Modify linux kernel parameters
Edit / etc / sysctl d/kubernetes. Conf file, add the following configuration
net.bridge.bridge-nf-call-ip6tables = 1
net.bridge.bridge-nf-call-iptables = 1
net.ipv4.ip.forward = 1
Reload configuration
sysctl -p
Load bridge filter module
modprobe br_netfilter
Check whether the bridge filter module is loaded successfully
lsmod | grep br_netfilter

8. Configure ipvs function
In kubernetes, service has two proxy models, one based on iptables and the other based on ipvs. Compared with the two, the performance of ipvs is obviously higher, but if you want to use it, you need to load the ipvs module manually
Install ipset and ipvsadm
yum install ipset ipvsadmin -y
#If you are prompted with No package ipvsadmin available Need to use
yum install ipvsadm
Add the modules to be loaded and write to the script file / etc / sysconfig / modules / IPVS modules
modprobe -- ip_vs
modprobe -- ip_vs_rr
modprobe -- ip_vs_wrr
modprobe -- ip_vs_sh
modprobe -- nf_conntrack_ipv4
Add script file execution permission
chmod +x /etc/sysconfig/modules/ipvs.modules
Execute script file
/bin/bash /etc/sysconfig/modules/ipvs.modules
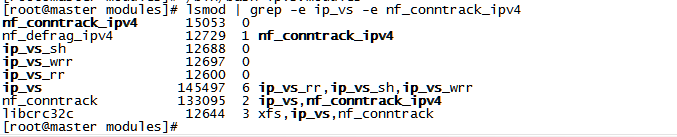
Check whether the module is loaded successfully
lsmod | grep -e ip_vs -e nf_conntrack_ipv4
9. Restart the server
reboot
10. Check whether the configuration is effective
Are selinux and swap both disabled
#Viewing selinux status
getenforce
#View memory usage
free -m

II. Installation of components (docker, kubedm, kubelet, kubectl)
1. Installation of docker
#Switch mirror source
wget https://mirrors.aliyun.com/docker-ce/linux/centos/docker-ce.repo -O /etc/yum.repos.d/docker-ce.repo
#View the supported docker versions in the current image
yum list docker-ce --showduplicates
#Install the specified version of docker CE
yum install --setopt=obsoletes=0 docker-ce-18.06.3.ce-3.el7 -y
#Add docker's configuration file / etc / docker / daemon json
{
    "exec-opts" : ["native.cgroupdriver=systemd"],
    "registry-mirrors" : ["http://kn0t2bca.mirror.aliyuncs.com"]
}
#Start docker
systemctl start docker
#Set docker to start automatically
systemctl enable docker
2. Install kubernetes components
#Switch domestic image source
#Edit / etc / yum.com repos. d/kubernetes. Repo, add the following configuration
[kubernetes]
name=Kubernetes
baseurl=http://mirrors.aliyun.com/kubernetes/yum/repos/kubernetes-el7-x86_64
enabled=1
gpgcheck=0
repo_gpgcheck=0
gpgkey=http://mirrors.aliyun.com/kubernetes/yum/doc/yum-key.gpg http://mirrors.aliyun.com/kubernetes/yum/doc/rpm-package-key.gpg

#Install kubedm, kubelet, kubectl
yum install --setopt=obsoletes=0 kubeadm-1.17.4-0 kubelet-1.17.4-0 kubectl-1.17.4-0 -y

#Configure cgroup of kubelet
#Edit / etc/sysconfig/kubelet and add the following configuration
KUBELET_CGROUP_ARGS="--cgroup-driver=systemd"
KUBE_PROXY_MODE="ipvs"

#Set startup and self startup
systemctl enable kubelet
3. Prepare cluster image
3.1 view the required image name and version
kubeadm config images list

3.2 due to network reasons, you need to download the image from the alicloud image warehouse first, and then rename the image name
Script file (k8simages.sh)
#!/bin/bash
images=(
    kube-apiserver:v1.17.4
    kube-controller-manager:v1.17.4
    kube-scheduler:v1.17.4
    kube-proxy:v1.17.4
    pause:3.1
    etcd:3.4.3-0
    coredns:1.6.5
)

for imageName in ${images[@]} ; do
    docker pull registry.cn-hangzhou.aliyuncs.com/google_containers/$imageName
    docker tag registry.cn-hangzhou.aliyuncs.com/google_containers/$imageName k8s.gcr.io/$imageName
    docker rmi registry.cn-hangzhou.aliyuncs.com/google_containers/$imageName
done
Increase the execution permission of script file
chmod +x k8simages.sh
Execute script
./k8simages.sh
View the image after pulling
docker images

4. Cluster initialization (just execute on the master node)
--The value of apiserver advertisement address is the ip address of your master node
kubeadm init --kubernetes-version=v1.17.4 \
 --pod-network-cidr=10.244.0.0/16 \
 --service-cidr=10.96.0.0/12 \
 --apiserver-advertise-address=192.168.225.130
The following prompt will be given after completion
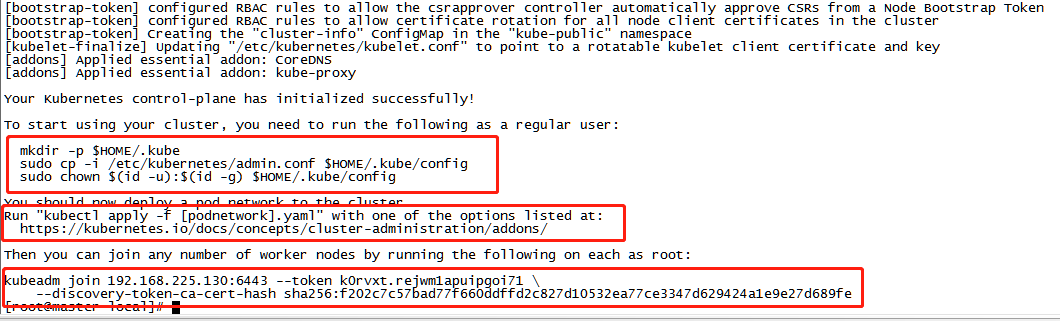
4.1 create necessary documents
mkdir -p $HOME/.kube
sudo cp -i /etc/kubernetes/admin.conf $HOME/.kube/config
sudo chown $(id -u):$(id -g) $HOME/.kube/config
4.2 join the node node to the cluster (execute the command at the node according to the prompt)
kubeadm join 192.168.225.130:6443 --token k0rvxt.rejwm1apuipgoi71 \
     --discovery-token-ca-cert-hash sha256:f202c7c57bad77f660ddffd2c827d10532ea77ce3347d629424a1e9e27d689fe
Results after adding

4.3 installation of network plug-in flannel (only in the master node)
#Get flannel
wget https://raw.githubusercontent.com/coreos/flannel/master/Documentation/kube-flannel.yml
#Start flannel using the configuration file
kubectl apply -f kube-flannel.yml
4.4 viewing cluster status
kubectl get nodes

All three are in Ready status, indicating success
#If the status is NotReady for a long time, you need to modify / var / lib / kubelet / kubedm flags Env, delete -- Network plugin = CNI
vim /var/lib/kubelet/kubeadm-flags.env
#Restart
systemctl daemon-reload
systemctl restart kubelet
View the status of all pod s
kubectl get pods --all-namespaces
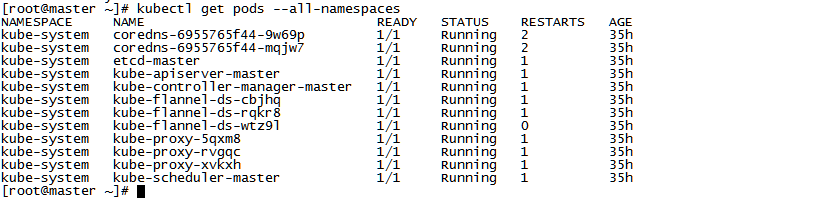
The installation of Kubernetes cluster is ok. Go and have a try!