summary
the life cycle of containers may be very short and will be created and destroyed frequently. When the container is destroyed, the data saved in the container will also be cleared. This result is undesirable to users in some cases. kubernetes introduces the concept of Volume in order to persist the data of the container.
Volume is a shared directory that can be accessed by multiple containers in a Pod. It is defined on the Pod and then mounted to a specific file directory by multiple containers in a Pod. kubernetes realizes data sharing and persistent storage of data between different containers in the same Pod through Volume. The life container of a Volume is not related to the life cycle of a single container in the Pod. When the container is terminated or restarted, the data in the Volume will not be lost.
kubernetes Volume supports many types, including the following:
- Simple storage: EmptyDir, HostPath, NFS
- Advanced storage: PV, PVC
- Configuration storage: ConfigMap, Secret
Basic storage
EmptyDir
EmptyDir is the most basic Volume type. An EmptyDir is an empty directory on the Host.
EmptyDir is created when the Pod is allocated to the Node. Its initial content is empty, and there is no need to specify the corresponding directory file on the host, because kubernetes will automatically allocate a directory. When the Pod is destroyed, the data in EmptyDir will also be permanently deleted. The purpose of EmptyDir is as follows:
-
Temporary space, such as a temporary directory required for some applications to run, and does not need to be permanently reserved
-
A directory where one container needs to get data from another container (multi container shared directory)
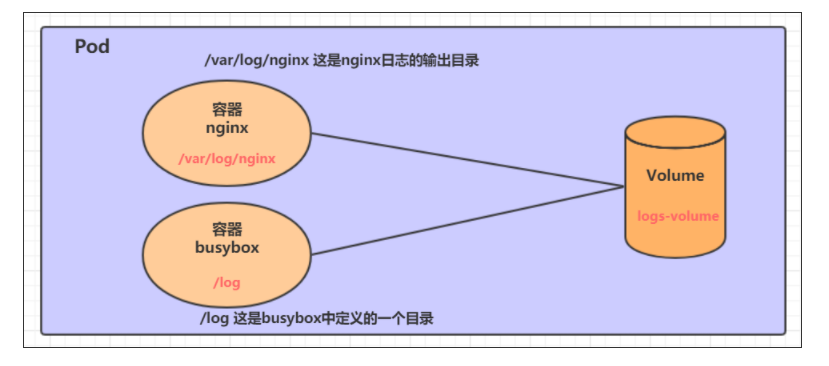
Next, use EmptyDir through a case of file sharing between containers.
prepare two containers nginx and busybox in a Pod, and then declare that a Volume is hung in the directories of the two containers respectively. Then the nginx container is responsible for writing logs to the Volume, and busybox reads the log contents to the console through commands.
Create a volume emptydir yaml
apiVersion: v1
kind: Pod
metadata:
  name: volume-emptydir
  namespace: dev
spec:
  containers:
    - name: nginx
      image: nginx:1.14-alpine
      ports:
        - containerPort: 80
      volumeMounts:  # Hang logs volume in the nginx container, and the corresponding directory is / var/log/nginx
        - name: logs-volume
          mountPath: /var/log/nginx # This is the default log path of nginx
    - name: busybox
      image: busybox:1.30
      command: ["/bin/sh","-c","tail -f /logs/access.log"] # The initial command dynamically reads the contents of the specified file
      volumeMounts:  # Hang logs volume in the busybox container, and the corresponding directory is / logs
        - name: logs-volume
          mountPath: /logs
  volumes: # Declare volume, the name is logs volume, and the type is emptyDir
    - name: logs-volume
      emptyDir: {}
# establish
[root@master ingress-controller]# kubectl apply -f volume-emptydir.yaml
pod/volume-emptydir created
# View pod
[root@master ingress-controller]# kubectl get pods -n dev -o wide
NAME              READY   STATUS    RESTARTS   AGE   IP            NODE    NOMINATED NODE   READINESS GATES
volume-emptydir   2/2     Running   0          19s   10.244.2.46   node2   <none>           <none>
# Access nginx to generate log information, and access nginx through podIp
[root@master ingress-controller]# curl 10.244.2.46
[root@master ingress-controller]# curl 10.244.2.46
[root@master ingress-controller]# curl 10.244.2.46
# View the standard output of the specified container through the kubectl logs command
[root@master ingress-controller]# kubectl logs -f volume-emptydir -n dev -c busybox
10.244.0.0 - - [04/Mar/2022:07:45:33 +0000] "GET / HTTP/1.1" 200 612 "-" "curl/7.29.0" "-"
10.244.0.0 - - [04/Mar/2022:07:45:36 +0000] "GET / HTTP/1.1" 200 612 "-" "curl/7.29.0" "-"
10.244.0.0 - - [04/Mar/2022:07:45:36 +0000] "GET / HTTP/1.1" 200 612 "-" "curl/7.29.0" "-"
HostPath
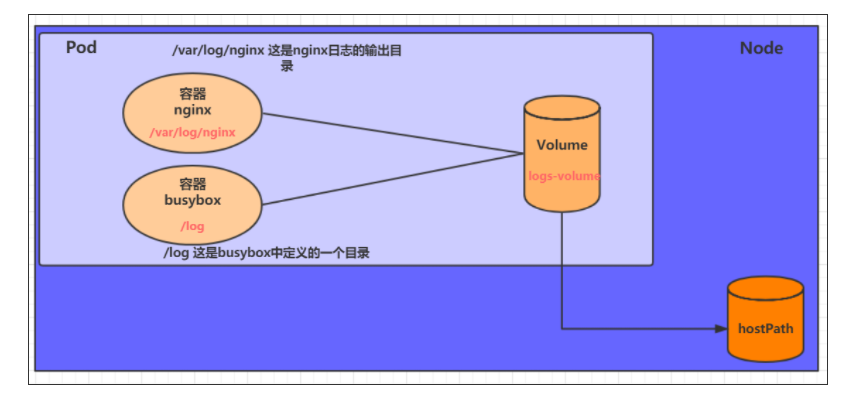
as mentioned above, the data in EmptyDir will not be persisted. It will be destroyed with the end of Pod. If you want to simply persist the data to the host, you can choose HostPath.
HostPath is to hang an actual directory in the Node host in the Pod for use by the container. This design can ensure that the Pod is destroyed, but the data basis can exist on the Node host.
Create a volume hostpath yaml:
apiVersion: v1
kind: Pod
metadata:
  name: volume-hostpath
  namespace: dev
spec:
  containers:
    - name: nginx
      image: nginx:1.17.1
      ports:
        - containerPort: 80
      volumeMounts:
        - name: logs-volume
          mountPath: /var/log/nginx
    - name: busybox
      image: busybox:1.30
      command: [ "/bin/sh","-c","tail -f /logs/access.log" ]
      volumeMounts:
        - name: logs-volume
          mountPath: /logs
  volumes:
    - name: logs-volume
      hostPath:
        path: /root/logs
        type: DirectoryOrCreate  # If the directory exists, it will be used. If it does not exist, it will be created first and then used
about type A description of the value of:
	DirectoryOrCreate If the directory exists, it will be used. If it does not exist, it will be created first and then used
	Directory	Directory must exist
	FileOrCreate  If a file exists, it will be used. If it does not exist, it will be created first and then used
	File File must exist
    Socket	unix Socket must exist
	CharDevice	Character device must exist
	BlockDevice Block device must exist
# Create Pod
[root@master k8sYamlForCSDN]# kubectl apply -f volume-hostpath.yaml
pod/volume-hostpath created

# View Pod
[root@master k8sYamlForCSDN]# kubectl get pods -n dev -o wide
NAME              READY   STATUS    RESTARTS   AGE     IP             NODE    NOMINATED NODE   READINESS GATES
volume-hostpath   2/2     Running   0          2m52s   10.244.1.109   node1   <none>           <none>


#Access nginx
[root@master k8sYamlForCSDN]# curl 10.244.1.109
[root@master k8sYamlForCSDN]# curl 10.244.1.109

# Next, you can go to the / root/logs directory of the host to view the stored files
###  Note: the following operations need to run on the node where the Pod is located (node1 in this case)
[root@node1 ~]# tail -f /root/logs/access.log
10.244.0.0 - - [04/Mar/2022:07:58:29 +0000] "GET / HTTP/1.1" 200 612 "-" "curl/7.29.0" "-"
10.244.0.0 - - [04/Mar/2022:07:58:31 +0000] "GET / HTTP/1.1" 200 612 "-" "curl/7.29.0" "-"
# Delete the pod and check the directory. The file still exists
[root@master k8sYamlForCSDN]# kubectl delete -f volume-hostpath.yaml
pod "volume-hostpath" deleted
[root@node1 ~]# ls /root/logs/
access.log  error.log

# Similarly, if you create a file in this directory, you can see it in the container
NFS
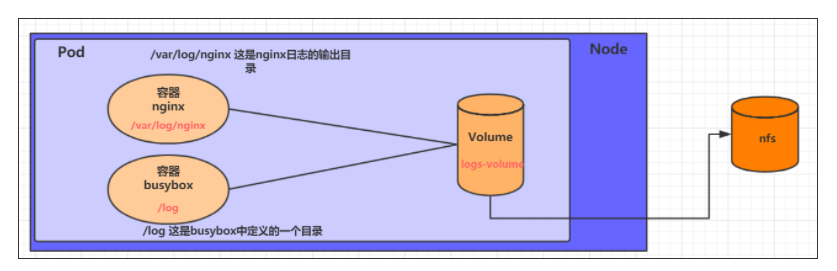
HostPath can solve the problem of data persistence, but once the Node fails, if the Pod is transferred to another Node, there will be a problem again (a new hostpath volume will be created in another Node, but the original data will be lost). At this time, it is necessary to prepare a single network storage system, and NFS and CIFS are commonly used.
NFS is a network file storage system. You can build an NFS server, and then directly connect the storage in the Pod to the NFS system. In this way, no matter how the Pod is transferred on the Node, as long as the connection between the Node and NFS is OK, the data can be accessed successfully.
- First, prepare the nfs server. For simplicity, the master node is directly used as the nfs server
# Installing nfs service on master
[root@master ~]# yum install nfs-utils -y

# Prepare a shared directory
[root@master ~]# mkdir /root/data/nfs -pv

# Expose the shared directory to all hosts in the 192.168.109.0/24 network segment with read and write permissions
[root@master ~]# vim /etc/exports
# Write the following sentence, wq save and exit
/root/data/nfs     192.168.109.0/24(rw,no_root_squash)

# Start nfs service
[root@master ~]# systemctl start nfs
- Next, you need to install nfs on each node node in order that the node node can drive nfs devices
# Install the nfs service on the node. Note that it does not need to be started
[root@master ~]# yum install nfs-utils -y
- Now you can write the configuration file of pod and create volume NFS yaml
apiVersion: v1
kind: Pod
metadata:
  name: volume-nfs
  namespace: dev
spec:
  containers:
    - name: nginx
      image: nginx:1.17.1
      ports:
        - containerPort: 80
      volumeMounts:
        - name: logs-volume
          mountPath: /var/log/nginx
    - name: busybox
      image: busybox:1.30
      command: [ "/bin/sh","-c","tail -f /logs/access.log" ]
      volumeMounts:
        - name: logs-volume
          mountPath: /logs
  volumes:
    - name: logs-volume
      nfs:
        server: 192.168.109.100  #nfs server address
        path: /root/data/nfs #Shared file path
- Finally, run the pod and observe the results
# Create pod
[root@master ingress-controller]# kubectl apply -f volume-nfs.yaml
pod/volume-nfs created

# View pod
[root@master ingress-controller]# kubectl get pods -n dev
NAME         READY   STATUS    RESTARTS   AGE
volume-nfs   2/2     Running   0          29s

# Visit twice
[root@master data]# curl 10.244.2.48
[root@master data]# curl 10.244.2.48

# Check the shared directory on the nfs server and find that there are already files
[root@master ingress-controller]# cd /root/data/nfs
[root@master nfs]# ls
access.log  error.log
[root@master nfs]# tail -f access.log
10.244.0.0 - - [04/Mar/2022:08:14:33 +0000] "GET / HTTP/1.1" 200 612 "-" "curl/7.29.0" "-"
10.244.0.0 - - [04/Mar/2022:08:14:34 +0000] "GET / HTTP/1.1" 200 612 "-" "curl/7.29.0" "-"
Advanced storage
PVC and PV
I have learned to use NFS to provide storage. At this time, users are required to build NFS system and configure NFS in yaml. Since kubernetes supports many storage systems, it is obviously unrealistic for customers to master them all. In order to shield the details of the underlying storage implementation and facilitate users' use, kubernetes introduces PV and PVC resource objects.
PV (Persistent Volume) means Persistent Volume, which is an abstraction of the underlying shared storage. Generally, PV is created and configured by kubernetes administrator. It is related to the underlying specific shared storage technology, and completes the connection with shared storage through plug-ins.
PVC (Persistent Volume Claim) is a Persistent Volume Claim, which means a user's declaration of storage requirements. In other words, PVC is actually a resource demand application sent by users to kubernetes system.
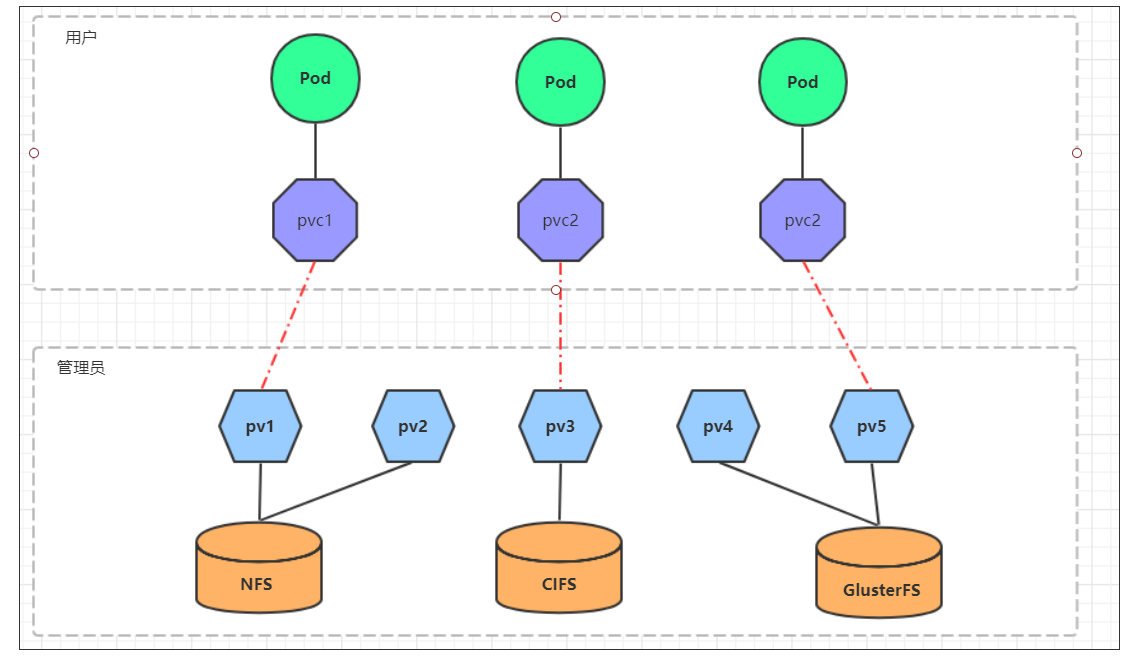
After using PV and PVC, the work can be further subdivided:
- Storage: Storage Engineer Maintenance
- PV: kubernetes administrator maintenance
- PVC: kubernetes user maintenance
PV
PV is the abstraction of storage resources. The following is the resource list file:
apiVersion: v1
kind: PersistentVolume
metadata:
  name: pv2
spec:
  nfs: # Storage type, corresponding to the underlying real storage (nfs,cifs...)
  capacity: # Storage capacity. At present, only storage space settings are supported
    storage: 2Gi
  accessModes:  # Access mode
  storageClassName: # Storage category
  persistentVolumeReclaimPolicy: # Recycling strategy
Description of key configuration parameters of PV:
-
Storage type
kubernetes supports multiple storage types, and the configuration of each storage type is different
-
Storage capacity
At present, only the setting of storage space (storage=1Gi) is supported, but the configuration of IOPS, throughput and other indicators may be added in the future
-
Access modes
It is used to describe the access rights of user applications to storage resources. The access rights include the following ways:
- ReadWriteOnce (RWO): read and write permission, but can only be mounted by a single node
- ReadOnlyMany (ROX): read-only permission, which can be mounted by multiple nodes
- ReadWriteMany (RWX): read and write permission. It can be mounted by multiple nodes
It should be noted that different underlying storage types may support different access modes
-
Persistent volumereclaimpolicy
When PV is no longer used, how to deal with it. Currently, three strategies are supported:
- Retain to retain data, which requires the administrator to manually clean up the data
- Recycle clears the data in the PV. The effect is equivalent to executing rm -rf /thevolume/*
- Delete: the back-end storage connected to the PV completes the deletion of volume. Of course, this is common in the storage services of cloud service providers
It should be noted that different storage types at the bottom may support different recycling strategies
-
Storage category
PV can specify a storage category through the storageClassName parameter
-
A PV with a specific category can only be bound to a PVC that requests that category
-
PVS without a category can only be bound to PVC that does not request any category
-
-
status
In the life cycle of a PV, it may be in 4 different stages:
- Available: indicates the available status and has not been bound by any PVC
- Bound: indicates that PV has been bound by PVC
- Released: indicates that the PVC has been deleted, but the resource has not been redeclared by the cluster
- Failed: indicates that the automatic recycling of this PV failed
experiment
Use NFS as storage to demonstrate the use of PVS. Create three PVS corresponding to three exposed paths in NFS.
- Prepare NFS environment
# Create directory
[root@master ~]# mkdir /root/data/{pv1,pv2,pv3} -pv

# Exposure services
[root@master ~]# vi/etc/exports
/root/data/pv1     192.168.109.0/24(rw,no_root_squash)
/root/data/pv2     192.168.109.0/24(rw,no_root_squash)
/root/data/pv3     192.168.109.0/24(rw,no_root_squash)

# Restart service
[root@master ~]#  systemctl restart nfs
- Create PV yaml
apiVersion: v1
kind: PersistentVolume
metadata:
  name:  pv1
spec:
  capacity:
    storage: 1Gi
  accessModes:
    - ReadWriteMany
  persistentVolumeReclaimPolicy: Retain
  nfs:
    path: /root/data/pv1
    server: 192.168.109.100

---

apiVersion: v1
kind: PersistentVolume
metadata:
  name:  pv2
spec:
  capacity:
    storage: 2Gi
  accessModes:
    - ReadWriteMany
  persistentVolumeReclaimPolicy: Retain
  nfs:
    path: /root/data/pv2
    server: 192.168.109.100

---

apiVersion: v1
kind: PersistentVolume
metadata:
  name:  pv3
spec:
  capacity:
    storage: 3Gi
  accessModes:
    - ReadWriteMany
  persistentVolumeReclaimPolicy: Retain
  nfs:
    path: /root/data/pv3
    server: 192.168.109.100
- establish
# Create pv
[root@master k8sYamlForCSDN]# kubectl apply -f pv.yaml
persistentvolume/pv1 created
persistentvolume/pv2 created
persistentvolume/pv3 created

# View pv
[root@master k8sYamlForCSDN]# kubectl get pv -o wide
NAME   CAPACITY   ACCESS MODES   RECLAIM POLICY   STATUS      CLAIM   STORAGECLASS   REASON   AGE   VOLUMEMODE
pv1    1Gi        RWX            Retain           Available                                   16s   Filesystem
pv2    2Gi        RWX            Retain           Available                                   16s   Filesystem
pv3    3Gi        RWX            Retain           Available                                   16s   Filesystem
PVC
PVC is a resource application, which is used to declare the demand information for storage space, access mode and storage category. Here is the resource manifest file:
apiVersion: v1
kind: PersistentVolumeClaim
metadata:
  name: pvc
  namespace: dev
spec:
  accessModes: # Access mode
  selector: # PV selection with label
  storageClassName: # Storage category
  resources: # Request space
    requests:
      storage: # storage capacity
Description of key configuration parameters of PVC:
-
Access modes
Used to describe the access rights of user applications to storage resources
-
Selection criteria
Through the setting of Label Selector, PVC can filter the existing PV in the system
-
Storage category (storageClassName)
When defining PVC, you can set the required back-end storage category. Only the pv with this class can be selected by the system
-
Resource requests
Describes the request for storage resources
test
- Create PVC Yaml, apply for pv
apiVersion: v1
kind: PersistentVolumeClaim
metadata:
  name: pvc1
  namespace: dev
spec:
  accessModes:
    - ReadWriteMany
  resources:
    requests:
      storage: 1Gi

---

apiVersion: v1
kind: PersistentVolumeClaim
metadata:
  name: pvc2
  namespace: dev
spec:
  accessModes:
    - ReadWriteMany
  resources:
    requests:
      storage: 3Gi

---

apiVersion: v1
kind: PersistentVolumeClaim
metadata:
  name: pvc3
  namespace: dev
spec:
  accessModes:
    - ReadWriteMany
  resources:
    requests:
      storage: 5Gi
# Create pvc
[root@master k8sYamlForCSDN]# kubectl apply -f pvc.yaml
persistentvolumeclaim/pvc1 created
persistentvolumeclaim/pvc2 created
persistentvolumeclaim/pvc3 created
# View pvc
[root@master k8sYamlForCSDN]# kubectl get pvc -n dev
NAME   STATUS    VOLUME   CAPACITY   ACCESS MODES   STORAGECLASS   AGE
pvc1   Bound     pv1      1Gi        RWX                           6s
pvc2   Bound     pv3      3Gi        RWX                           6s
pvc3   Pending                                                     6s
# View pv
[root@master k8sYamlForCSDN]# kubectl get pv
NAME   CAPACITY   ACCESS MODES   RECLAIM POLICY   STATUS      CLAIM      STORAGECLASS   REASON   AGE
pv1    1Gi        RWX            Retain           Bound       dev/pvc1                           9m46s
pv2    2Gi        RWX            Retain           Available                                      9m46s
pv3    3Gi        RWX            Retain           Bound       dev/pvc2                           9m46s
- Create pods Yaml, pvc
apiVersion: v1
kind: Pod
metadata:
  name: pod1
  namespace: dev
spec:
  containers:
    - name: busybox
      image: busybox:1.30
      command: [ "/bin/sh","-c","while true;do echo pod1 >> /root/out.txt; sleep 10; done;" ]
      volumeMounts:
        - name: volume
          mountPath: /root/
  volumes:
    - name: volume
      persistentVolumeClaim:
        claimName: pvc1
        readOnly: false
---
apiVersion: v1
kind: Pod
metadata:
  name: pod2
  namespace: dev
spec:
  containers:
    - name: busybox
      image: busybox:1.30
      command: [ "/bin/sh","-c","while true;do echo pod2 >> /root/out.txt; sleep 10; done;" ]
      volumeMounts:
        - name: volume
          mountPath: /root/
  volumes:
    - name: volume
      persistentVolumeClaim:
        claimName: pvc2
        readOnly: false
- Check the details
# Create pod
[root@master k8sYamlForCSDN]# kubectl create -f pods.yaml
pod/pod1 created
pod/pod2 created

# View pod
[root@master k8sYamlForCSDN]# kubectl get pods -n dev -o wide
NAME   READY   STATUS    RESTARTS   AGE    IP             NODE    NOMINATED NODE   READINESS GATES
pod1   1/1     Running   0          106s   10.244.1.110   node1   <none>           <none>
pod2   1/1     Running   0          106s   10.244.2.49    node2   <none>           <none>

# View pvc
[root@master k8sYamlForCSDN]# kubectl get pvc -n dev
NAME   STATUS    VOLUME   CAPACITY   ACCESS MODES   STORAGECLASS   AGE
pvc1   Bound     pv1      1Gi        RWX                           13m
pvc2   Bound     pv3      3Gi        RWX                           13m
pvc3   Pending                                                     13m

# View pv
[root@master k8sYamlForCSDN]# kubectl get pv -n dev -o wide
NAME   CAPACITY   ACCESS MODES   RECLAIM POLICY   STATUS      CLAIM      STORAGECLASS   REASON   AGE   VOLUMEMODE
pv1    1Gi        RWX            Retain           Bound       dev/pvc1                           22m   Filesystem
pv2    2Gi        RWX            Retain           Available                                      22m   Filesystem
pv3    3Gi        RWX            Retain           Bound       dev/pvc2                           22m   Filesystem

# View file stores in nfs
[root@master pv3]# more /root/data/pv1/out.txt
pod1
pod1
pod1
[root@master pv3]# more /root/data/pv2/out.txt
/root/data/pv2/out.txt: There is no such file or directory
# This is because pvc1 - > PV1, pvc2 - > pv3, pod1 - > pvc1, pods2 - > pvc2
[root@master pv3]# more /root/data/pv3/out.txt
pod2
pod2
pod2
- Delete pod and pvc and check the status of pv
[root@master k8sYamlForCSDN]# kubectl delete -f pods.yaml
pod "pod1" deleted
pod "pod2" deleted
[root@master k8sYamlForCSDN]# kubectl delete -f pvc.yaml
persistentvolumeclaim "pvc1" deleted
persistentvolumeclaim "pvc2" deleted
persistentvolumeclaim "pvc3" deleted
[root@master k8sYamlForCSDN]# kubectl get pv -o wide
NAME   CAPACITY   ACCESS MODES   RECLAIM POLICY   STATUS      CLAIM      STORAGECLASS   REASON   AGE   VOLUMEMODE
pv1    1Gi        RWX            Retain           Released    dev/pvc1                           32m   Filesystem
pv2    2Gi        RWX            Retain           Available                                      32m   Filesystem
pv3    3Gi        RWX            Retain           Released    dev/pvc2                           32m   Filesystem
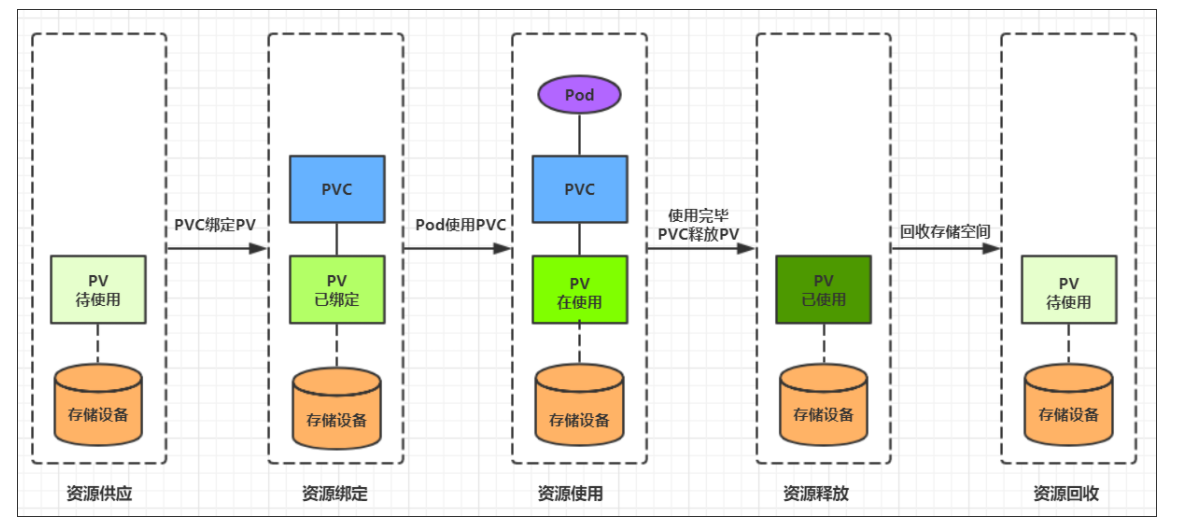
life cycle
PVC and PV are one-to-one correspondence, and the interaction between PV and PVC follows the following life cycle:
-
Provisioning: administrators manually create underlying storage and PV
-
Resource binding: users create PVC, and kubernetes is responsible for finding PV and binding according to the declaration of PVC
After the user defines the PVC, the system will select one of the existing PVS that meets the conditions according to the PVC's request for storage resources
-
Once found, bind the PV with the user-defined PVC, and the user's application can use the PVC
-
If it cannot be found, the PVC will remain Pending indefinitely until the system administrator creates a PV that meets its requirements
Once PV is bound to a PVC, it will be monopolized by this PVC and can no longer be bound with other PVC
-
-
Resource usage: users can use pvc in pod like volume
Pod uses the definition of Volume to mount PVC to a path in the container for use.
-
Resource release: users delete pvc to release pv
When the storage resource is used up, the user can delete the PVC, and the PV bound to the PVC will be marked as "released", but it cannot be bound to other PVC immediately. The data written through the previous PVC may still be left on the storage device, and the PV can be used again only after it is cleared.
-
Resource recycling: kubernetes recycles resources according to the recycling policy set by pv
For PV, the administrator can set the recycling policy to set how to deal with the legacy data after the PVC bound to it releases resources. Only after the storage space of PV is recycled can it be bound and used by new PVC
Configure storage
ConfigMap
ConfigMap is a special storage volume. Its main function is to store configuration information.
Create configmap Yaml, as follows:
apiVersion: v1
kind: ConfigMap
metadata:
  name: configmap
  namespace: dev
data: # info is key, followed by value
  info: | # |Indicates that line breaks are reserved
    username:admin
    password:123456
Next, use this configuration file to create a configmap
# Create configmap
[root@master k8sYamlForCSDN]# kubectl apply -f configmap.yaml
configmap/configmap created
# View configmap details
[root@master k8sYamlForCSDN]# kubectl get configmaps -n dev
NAME               DATA   AGE
configmap          1      19s
kube-root-ca.crt   1      21h
# View configmap details
[root@master k8sYamlForCSDN]# kubectl describe configmaps configmap -n dev
Name:         configmap
Namespace:    dev
Labels:       <none>
Annotations:  <none>
Data
====
info:
----
username:admin
password:123456

BinaryData
====
Events:  <none>
Next, create a pod configmap Yaml, mount the configmap created above
apiVersion: v1
kind: Pod
metadata:
  name: pod-configmap
  namespace: dev
spec:
  containers:
  - name: nginx
    image: nginx:1.17.1
    volumeMounts: # Mount the configmap to the directory
    - name: config
      mountPath: /configmap/config
  volumes: # Reference configmap
  - name: config
    configMap:
      name: configmap # Note that the name here is the configmap created above
# Create pod
[root@master k8sYamlForCSDN]# kubectl apply -f pod-configmap.yaml
pod/pod-configmap created
# View pod
[root@master k8sYamlForCSDN]# kubectl get pods pod-configmap -n dev
NAME            READY   STATUS    RESTARTS   AGE
pod-configmap   1/1     Running   0          10s
#Enter container
[root@master k8sYamlForCSDN]# kubectl exec -it pod-configmap -n dev -- sh
# cd /configmap/config
# ls
info
# more info
username:admin
password:123456
# You can see that the mapping has been successful, and each configmap has been mapped into a directory
# Key --- > file value --- > contents in the file
# At this time, if the contents of the configmap are updated, the values in the container will also be updated dynamically
Secret
in kubernetes, there is also an object very similar to ConfigMap, called Secret object. It is mainly used to store sensitive information, such as passwords, Secret keys, certificates and so on.
- First, use base64 to encode the data
[root@master ~]# echo -n 'admin' | base64 #Prepare username
YWRtaW4=
[root@master ~]# echo -n '123456' | base64 #Prepare password
MTIzNDU2
- Next, write Secret Yaml and create a Secret
apiVersion: v1
kind: Secret
metadata:
  name: secret
  namespace: dev
type: Opaque
data:
  username: YWRtaW4=
  password: MTIzNDU2
# Create secret
[root@master k8sYamlForCSDN]# vi secret.yaml
[root@master k8sYamlForCSDN]# kubectl apply -f secret.yaml
secret/secret created

# View secret details
[root@master k8sYamlForCSDN]# kubectl describe secrets secret -n dev
Name:         secret
Namespace:    dev
Labels:       <none>
Annotations:  <none>

Type:  Opaque

Data
====
password:  6 bytes
username:  5 bytes
- Create pod secret Yaml, mount the secret created above:
apiVersion: v1
kind: Pod
metadata:
  name: pod-secret
  namespace: dev
spec:
  containers:
    - name: nginx
      image: nginx:1.17.1
      volumeMounts: # Mount secret to directory
        - name: config
          mountPath: /secret/config
  volumes:
    - name: config
      secret:
        secretName: secret
# Create pod
[root@master k8sYamlForCSDN]# vi pod-secret.yaml
[root@master k8sYamlForCSDN]# kubectl apply -f pod-secret.yaml
pod/pod-secret created
# View pod
[root@master k8sYamlForCSDN]# kubectl get pods pod-secret -n dev
NAME         READY   STATUS    RESTARTS   AGE
pod-secret   1/1     Running   0          10s
# Enter the container, check the secret information, and find that it has been automatically decoded
[root@master k8sYamlForCSDN]# kubectl exec -it pod-secret -n dev -- sh
# cd /secret/config
# ls
password  username
# more username
admin
# more password
123456
# So far, the encoding of information using secret has been realized.