1. Deployment strategy in kubernetes
In this article, we will learn how to use the Kubernetes container to orchestrate the deployment strategy when the system deploys the container. At the end of this article, we will learn how to deploy in different ways in the Kubernetes cluster. If you find this topic interesting, please read on! The code for this tutorial can be found on Github.
2. Kubernetes quick introduction
Containerization has become increasingly popular over time and has revolutionized the process of building, transporting, and maintaining applications, so these containers need to be managed effectively. Many container orchestration tools have been introduced to manage the lifecycle of these containers in large systems.
Kubernetes is such an orchestration tool, which is responsible for configuration and deployment, resource allocation, load balancing, service discovery, providing high availability, and other important aspects of any system. With this platform, we can decompose our applications into smaller systems (called microservices) while developing; then, we can combine (or orchestrate) these systems at deployment time.
The adoption of cloud native method increases the development of applications based on micro service architecture. For such applications, one of the biggest challenges facing organizations is deployment. It is necessary to have an appropriate strategy for deployment. In Kubernetes, there are many ways to publish applications; During application deployment or update, it is necessary to select the right strategy to make your infrastructure reliable. For example, in a production environment, it is always necessary to ensure that end users do not experience any downtime. In the Kubernetes orchestration, the correct policy ensures that different versions of container images are managed correctly. To sum up, this paper will mainly focus on different deployment strategies in Kubernetes.
3. Conditions precedent
To continue reading this article, we need some previous experience with Kubernetes. If you are not familiar with this platform, check out the step-by-step introduction to the basic Kubernetes concept tutorial. There, you can follow the instructions here to learn everything you need. If necessary, we also recommend that you read the Kubernetes documentation.
In addition, we need kubectl, a command line interface (CLI) tool that enables us to control your cluster from the terminal. If you do not have this tool, please check the instructions in installing Kube Control (kubectl). We also need to have a basic understanding of Linux and YAML.
4. What is the deployment in kubernetes?
Deployment is a resource object in Kubernetes, which defines the required state for our program. Deployment is declarative, which means that we don't specify how to implement state. Instead, we declare the desired state and allow the deployment controller to automatically achieve the final goal in the most efficient way. Deployment allows us to describe the life cycle of the application, such as which images the application uses, how many pod s it should have, and how it should be updated.
5. Benefits of deploying with Kubernetes
The process of manually updating containerized applications can be time-consuming and tedious. Kubernetes deployment automates and repeats this process. The deployment is completely managed by the kubernetes backend. The whole update process is performed on the server side without client interaction.
In addition, Kubernetes deployment controller always monitors the health of pod and nodes. It can replace the failed pod and skip the failed node to ensure the continuity of key applications.
6. Deployment strategy
Rolling Update deployment Rolling Update
Rolling deployment is the default deployment policy in Kubernetes. It replaces the previous version of the pod of our application one by one with the new version of the pod without any cluster downtime. Rolling deployment slowly replaces the previous version of the application instance with an instance of the new version of the application.
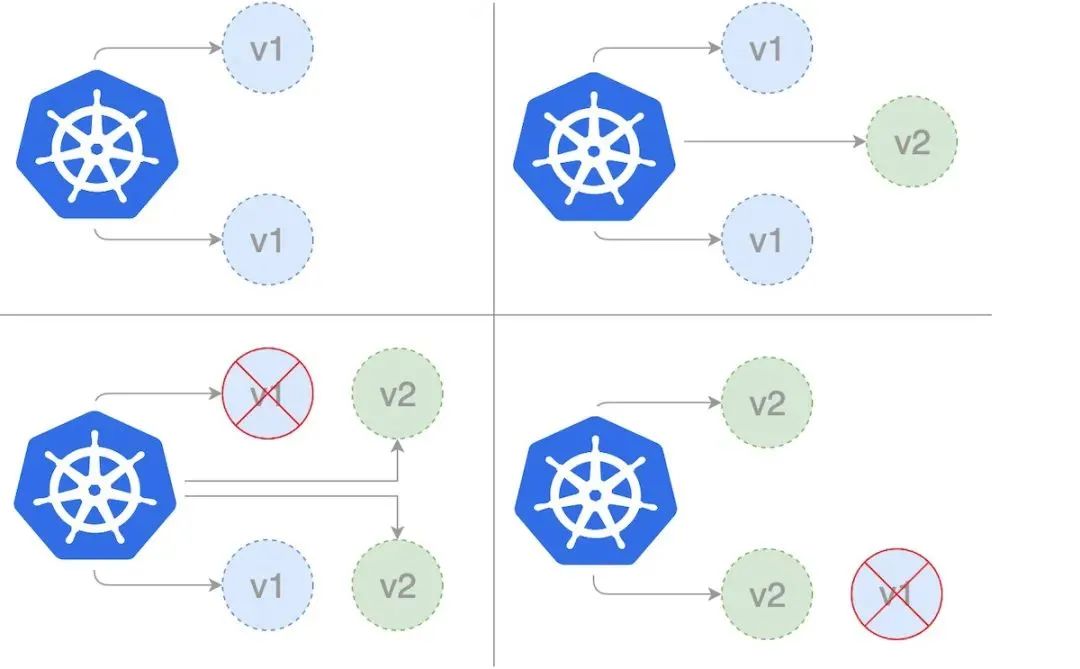
When using the RollingUpdate policy, there are two other options that allow us to fine tune the update process:
-
maxSurge: the number of pods that can be created during the update exceeds the required number of pods. This can be an absolute number or a percentage of the replica count. The default value is 25%.
-
maxUnavailable: the number of pods that may not be available during the update process. This can be an absolute number or percentage of copy counts; The default value is 25%.
First, we create rollingupdate Yaml deployment template. In the following template, we set maxSurge to 2 and maxUnavailable to 1.
apiVersion: apps/v1
kind: Deployment
metadata:
  name: rollingupdate-strategy
  version: nanoserver-1709
spec:
  strategy:
    type: RollingUpdate
    rollingUpdate:
      maxSurge: 2
      maxUnavailable: 1
  selector:
    matchLabels:
      app: web-app-rollingupdate-strategy
      version: nanoserver-1709
  replicas: 3
  template:
    metadata:
      labels:
        app: web-app-rollingupdate-strategy
        version: nanoserver-1709
    spec:
      containers:
        - name: web-app-rollingupdate-strategy
          image: hello-world:nanoserver-1709
We can then create the deployment using the kubectl command.
$ kubectl apply -f rollingupdate.yaml
Once we have the deployments template, we can provide a way to access deployment instances by creating services. Note that we are using version nanoserver-1709 to deploy the image Hello world. Therefore, in this case, we have two label s, name = web app rolling update strategy and version= nanoserver-1709. We set these as tag selectors for the following services. Save this to the "service.yaml" file.
apiVersion: v1
kind: Service
metadata:
  name: web-app-rollingupdate-strategy
  labels:
    name: web-app-rollingupdate-strategy
    version: nanoserver-1709
spec:
  ports:
    - name: http
      port: 80
      targetPort: 80
  selector:
    name: web-app-rollingupdate-strategy
    version: nanoserver-1709
  type: LoadBalancer
Now to create the service, you will create a load balancer that can be accessed outside the cluster.
$ kubectl apply -f service.yaml
Run "kubectl get deployments" to check whether a Deployment has been created. If the Deployment is still being created, the output should look like the following:
$ kubectl get deployments

NAME                             READY   UP-TO-DATE   AVAILABLE   AGE
rollingupdate-strategy   0/3     0            0           1s
If we run "kubectl get deployment" again in a few seconds. The output should be similar:
$ kubectl get deployments

NAME                             READY   UP-TO-DATE   AVAILABLE   AGE
rollingupdate-strategy   3/3     0            0           7s
To view the ReplicaSet (rs) created by Deployment, run kubectl get rs. The output should be similar:
$ kubectl get rs

NAME                                    DESIRED   CURRENT   READY   AGE
rollingupdate-strategy-87875f5897   3         3         3       18s
To view the 3 pods running for deployment, run kubectl get pods. The created ReplicaSet ensures that three pods are running. The output should be similar to the following.
$ kubectl get pods

NAME                                      READY     STATUS    RESTARTS   AGE
rollingupdate-strategy-87875f5897-55i7o   1/1       Running   0          12s
rollingupdate-strategy-87875f5897-abszs   1/1       Running   0          12s
rollingupdate-strategy-87875f5897-qazrt   1/1       Running   0          12s
Let's update rollingupdate Yaml deploys the template to use the Hello World: nanoserver-1809 image instead of the Hello World: nanoserver-1709 image. Then use the kubectl command to update the image of the existing running deployment.
$ kubectl set image deployment/rollingupdate-strategy web-app-rollingupdate-strategy=hello-world:nanoserver-1809 --record
The output is similar to the following.
deployment.apps/rollingupdate-strategy image updated
We are now using version nanoserver-1809 to deploy the image Hello world. Therefore, in this case, we will have to update the tag in "service.yaml". The label will be updated to "version = nanoserver-1809". We will run the following kubectl command again to update the service so that it can choose a new pod to run on the new image. (you can see that not only the business image but also the service must be updated.)
$ kubectl apply -f service.yaml
To view the status of deployment, run the kubectl command below.
$ kubectl rollout status deployment/rollingupdate-strategy

Waiting for rollout to finish: 2 out of 3 new replicas have been updated...
Run again to verify that the deployment was successful.
$ kubectl rollout status deployment/rollingupdate-strategy

deployment "rollingupdate-strategy" successfully rolled out
After the Deployment is successful, we can view the Deployment by running the command kubectl get deployments. The output is similar to:
$ kubectl get deployments

NAME                             READY   UP-TO-DATE   AVAILABLE   AGE
rollingupdate-strategy   3/3     0            0           7s
Run kubectl get rs to see if the Deployment has been updated. The new Pod is created in a new ReplicaSet and expanded to 3 replicas. The old ReplicaSet was reduced to 0 replicas.
$ kubectl get rs

NAME                                    DESIRED   CURRENT   READY   AGE
rollingupdate-strategy-87875f5897   3         3         3       55s
rollingupdate-strategy-89999f7895   0         0         0       12s
Run kubectl get pods, which should now display only the new pods in the new ReplicaSet.
$ kubectl get pods

NAME                                      READY     STATUS    RESTARTS   AGE
rollingupdate-strategy-89999f7895-55i7o   1/1       Running   0          12s
rollingupdate-strategy-89999f7895-abszs   1/1       Running   0          12s
rollingupdate-strategy-89999f7895-qazrt   1/1       Running   0          12s
kubectl's rollback command is very useful here. We can use it to check how our deployment is going. By default, this command waits for all pods in the deployment to start successfully. When the deployment is successful, the command exits with a return code of zero to indicate success. If the deployment fails, the command exits with a non-zero code.
$ kubectl rollout status deployment rollingupdate-strategy

Waiting for deployment "rollingupdate-strategy" rollout to finish: 0 of 3 updated replicas are available...
Waiting for deployment "rollingupdate-strategy" rollout to finish: 1 of 3 updated replicas are available...
Waiting for deployment "rollingupdate-strategy" rollout to finish: 2 of 3 updated replicas are available...

deployment "rollingupdate-strategy" successfully rolled out
If the deployment fails in Kubernetes, the deployment process will stop, but the pod in the failed deployment will remain. When deployment fails, our environment may contain pods from old and new deployments. In order to restore to a stable working state, we can use the rollback undo command to restore the working pod and clean up the failed deployment.
$ kubectl rollout undo deployment rollingupdate-strategy

deployment.extensions/rollingupdate-strategy
Then we will verify the status of the deployment again.
$ kubectl rollout status deployment rollingupdate-strategy

deployment "rollingupdate-strategy" successfully rolled out
In order for kubernetes to know when the application is ready, it needs some help from the application. Kubernetes uses the ready probe to check the operation of the application. Once the application instance begins to respond with a positive response to the ready probe, the instance is considered ready for use. The ready probe tells kubernetes when the application is ready, but it does not tell kubernetes whether the application is ready. If the application continues to fail, it may never respond positively to kubernetes.
Rolling deployment usually passes the readiness check and waits for the new Pod to be ready before shrinking the old component. If a major problem occurs, you can abort the rolling deployment. If a problem occurs, you can abort the rolling update or deployment without shutting down the entire cluster.
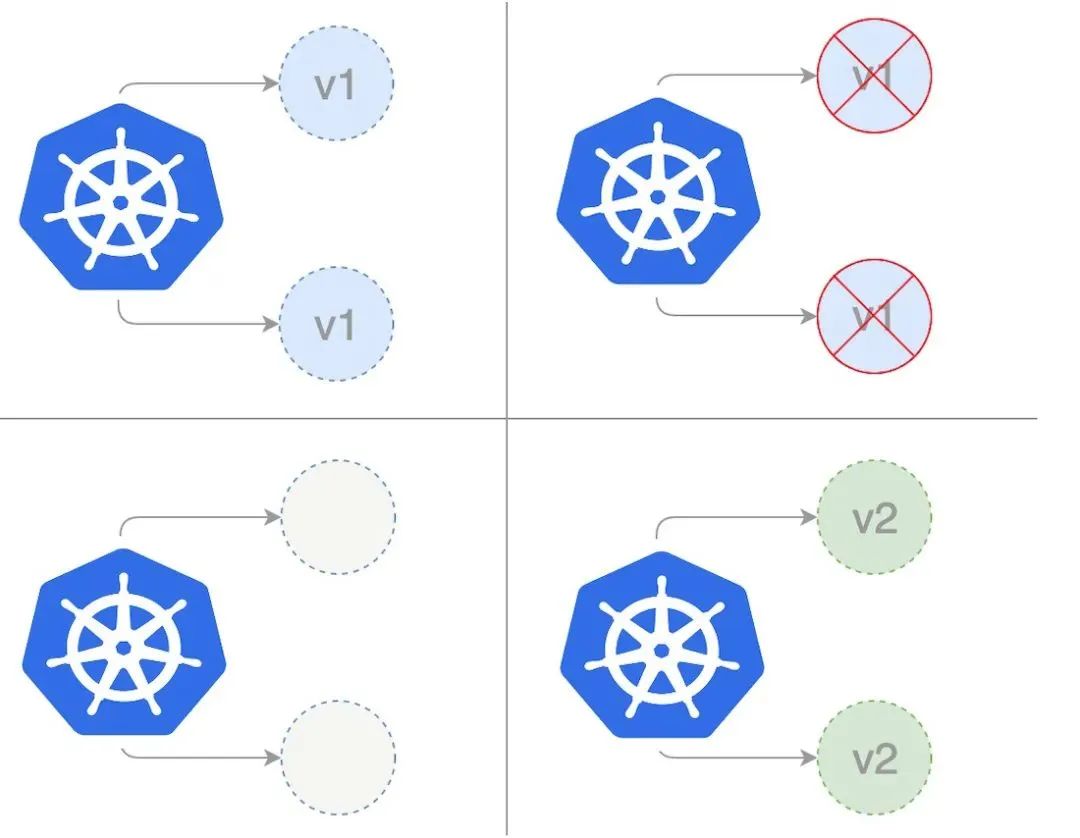
Recreate deployment
In the re creation deployment, we completely shrink the existing application version before extending the new application version. In the following figure, version 1 represents the current application version and version 2 represents the new application version. When updating the current application version, we first reduce the existing copy of version 1 to zero, and then deploy the copy concurrently with the new version.
The following template shows the deployment using the recreate policy: first, we save the following yaml to the file recreate Yaml to create our re creation deployment
apiVersion: apps/v1
kind: Deployment
metadata:
  name: recreate-strategy
spec:
  strategy:
    type: Recreate
  selector:
    matchLabels:
      app: web-app-recreate-strategy
      version: nanoserver-1809
  replicas: 3
  template:
    metadata:
      labels:
        app: web-app-recreate-strategy
    spec:
      containers:
        - name: web-app-recreate-strategy
          image: hello-world:nanoserver-1809
We can then create the deployment using the kubectl command.
$ kubectl apply -f recreate.yaml
Once we have the deployment template, we can provide a way to access the deployment instance by creating a service. Note that we are using version nanoserver-1809 to deploy the image Hello world. So in this case, we have two tags, "name = web app recreate strategy" and "version = nanoserver-1809". We set these as tag selectors for the following services. Save it to service Yaml file.
apiVersion: v1
kind: Service
metadata:
  name: web-app-recreate-strategy
  labels:
    name: web-app-recreate-strategy
    version: nanoserver-1809
spec:
  ports:
    - name: http
      port: 80
      targetPort: 80
  selector:
    name: web-app-recreate-strategy
    version: nanoserver-1809
  type: LoadBalancer
Creating the service now creates a load balancer that can be accessed outside the cluster.
$ kubectl apply -f service.yaml
The re creation method involves some downtime during the update process. Downtime is not an issue for applications that can handle maintenance windows or interruptions. However, if there are mission critical applications with high service level agreements (SLAs) and availability requirements, choosing a different deployment strategy will be the right approach. Recreate deployment is generally used in the developer's development phase because it is easy to set up and the application state will be completely updated with the new version. In addition, we don't have to manage multiple application versions in parallel, so we avoid the backward compatibility challenges of data and applications.