I. high availability of Kubernetes
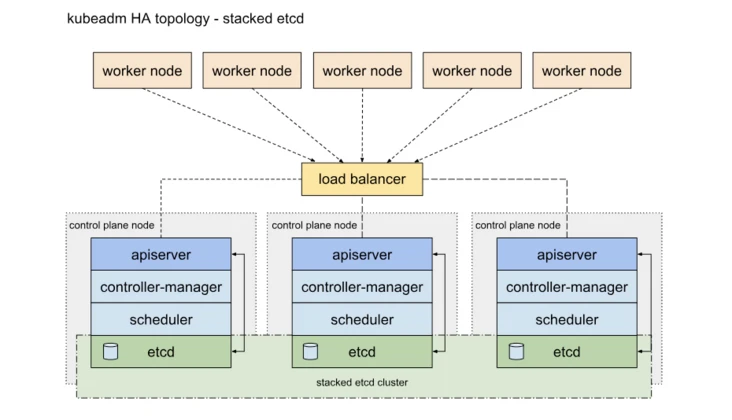
The high availability of Kubernetes mainly refers to the high availability of the control plane. In short, there are multiple sets of Master node components and etcd components, and the work nodes are connected to each Master through load balancing. HA has two methods. One is to mix etcd with Master node components:
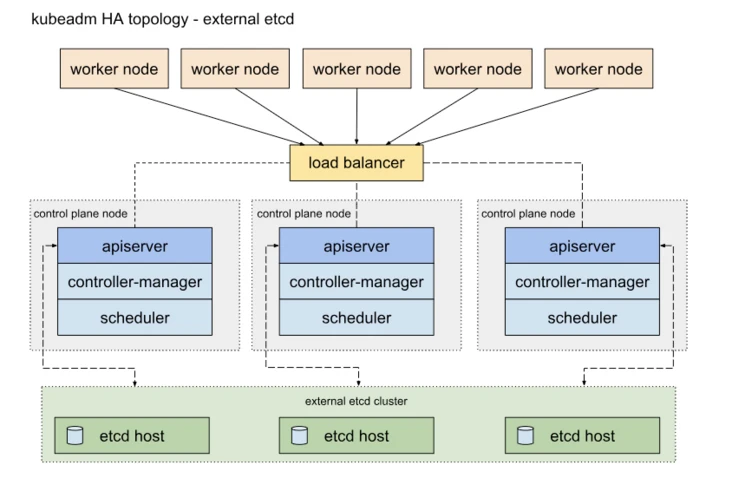
Another way is to use an independent Etcd cluster without mixing with the Master node
The similarities between the two methods are that they both provide redundancy of the control plane and realize high availability of the cluster. The differences are: Etcd mixed distribution mode:
It requires less machine resources and is simple to deploy, which is conducive to management and easy to expand horizontally
The risk is high. If one host hangs up, there will be less master and etcd, and the cluster redundancy will be greatly affected. Etcd independent deployment mode:
More machine resources are required (according to the odd number principle of Etcd cluster, the cluster control plane of this topology needs at least 6 host computers).
The deployment is relatively complex, and etcd cluster and master cluster should be managed independently.
The control plane and etcd are decoupled. The cluster has low risk and strong robustness. A single master or etcd has little impact on the cluster.
II. Deployment environment
In the following deployment test, only a cluster of 5 machines, including 2hproxy, 2master and 2*node, will be deployed in a mixed manner. In fact, since the etcd election requires more than half, at least 3 master nodes are required to form a highly available cluster. In the production environment, the topology with low risk should be selected as much as possible according to the actual situation.
III. deployment steps
1 operate on all nodes
1.1 close SELinux and firewall
setenforce  0
sed -i 's/SELINUX=enforcing/SELINUX=permissive/' /etc/selinux/config
systemctl stop firewalld
systemctl disable firewalld
1.2 turn off swap (the requirement after version 1.8 is to prevent swap from interfering with the memory limit available to the pod)
swapoff -a
1.3 modify the following kernel parameters, otherwise there may be a problem with the routing of the request data through iptables
cat <<EOF >  /etc/sysctl.d/k8s.conf
net.bridge.bridge-nf-call-ip6tables = 1
net.bridge.bridge-nf-call-iptables = 1
EOF
sysctl --system
2. Install kubedm and docker
2.1 edit the warehouse file and transfer it to other hosts
[dvd]
name=dvd
baseurl=http://172.25.9.254/rhel7.6
gpgcheck=0

[HighAvailability]
name=HighAvailability
baseurl=http://172.25.9.254/rhel7.6/addons/HighAvailability
gpgcheck=0

----------------------------------------------
cat docker.repo
[docker]
name=docker-ce
baseurl=http://172.25.9.254/docker-ce
gpgcheck=0
2.2 operate on all nodes except haproxy
 yum install -y  kubelet kubeadm kubectl
 yum install -y docker-ce
3. Install and configure load balancing
3.1 server5 and server6 install the haproxy component pcs and set the startup and self startup
yum install -y pacemaker pcs psmisc policycoreutils-python
systemctl enable --now pcsd.service
3.2 create the password given by user hacluster and authorize cluster authentication
passwd hacluster
pcs cluster auth server5 server6


3.3 setting cluster mycluster in server5
pcs cluster setup --name mycluster server5 server6
3.4 start pcs cluster
pcs cluster start --all
pcs cluster enable --all
3.5 close fence warning
pcs property set stonith-enabled=false
crm_verify -L -V
3.6 create vip, 172.25 9.100, locking service through vip
pcs resource create vip ocf:heartbeat:IPaddr2 ip=172.25.9.100 op monitor interval=30s
ip addr
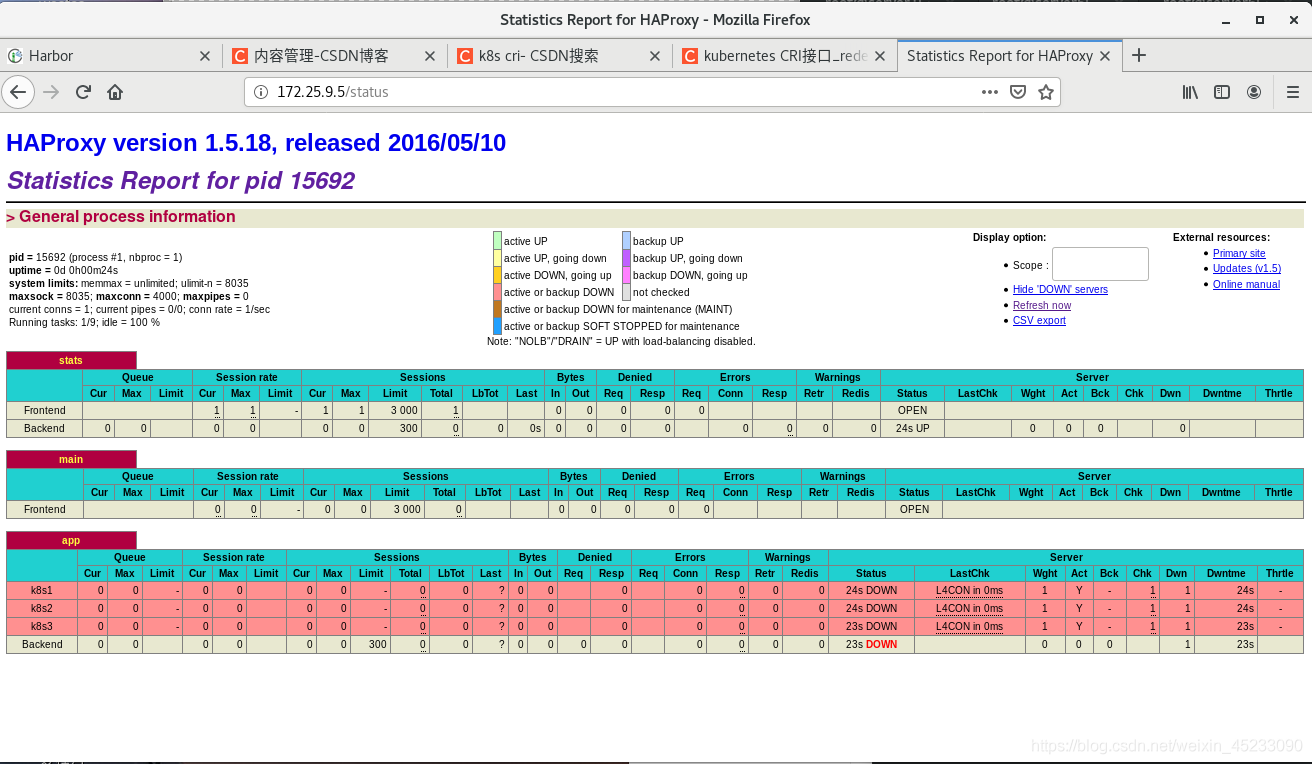
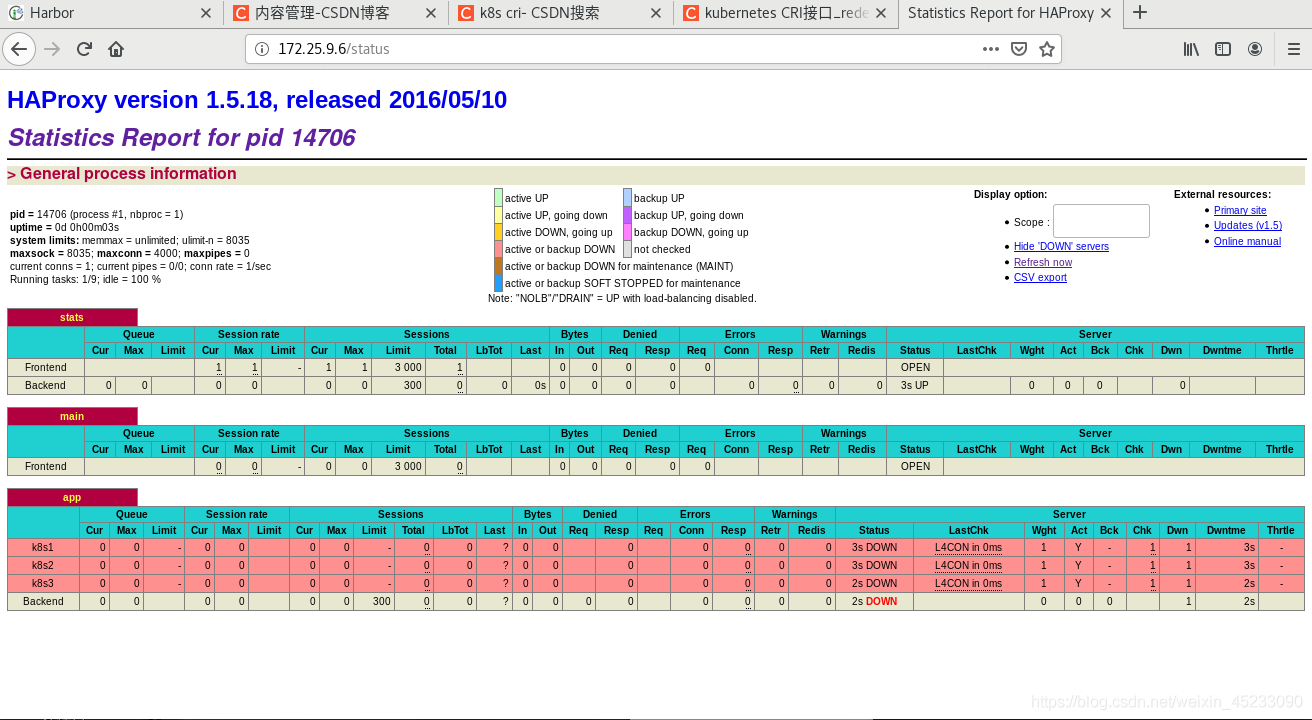
3.7 installing haproxy service and editing configuration file
# Install haproxy
yum install haproxy -y

# Modify haproxy configuration
# Listen to port 80 and view the status of the load balancing node
listen stats *:80
    stats uri /status
...
...
# Set the load balancing listening port to 6443 and the listening mode to tcp
frontend  main *:6443
    mode tcp
    default_backend             app
backend app
# Add the load balancing backend node as k8s1/k8s2/k8s3, and check the 6443 ports of their respective IP addresses
    balance     roundrobin
    mode tcp
    server  k8s1 172.25.9.7:6443 check
    server  k8s2 172.25.9.8:6443 check
    server  k8s3 172.25.9.9:6443 check
--------
Copyright notice: This article is CSDN Blogger「Rabbitgo_hyl」Original articles, follow CC 4.0 BY-SA Copyright agreement, please attach the original source link and this statement.
Original link: https://blog.csdn.net/weixin_45233090/article/details/119487710

# After startup, the haproxy is started by default, and the service is started
systemctl enable haproxy
systemctl start haproxy

# Check the service port:
# netstat -lntup | grep 6443
tcp        0      0 0.0.0.0:6443            0.0.0.0:*               LISTEN      3110/haproxy

#Do the same for server6, and close the haproxy service after the access test to ensure that the haproxy given to the cluster is closed.

# Create haproxy service to pcs cluster
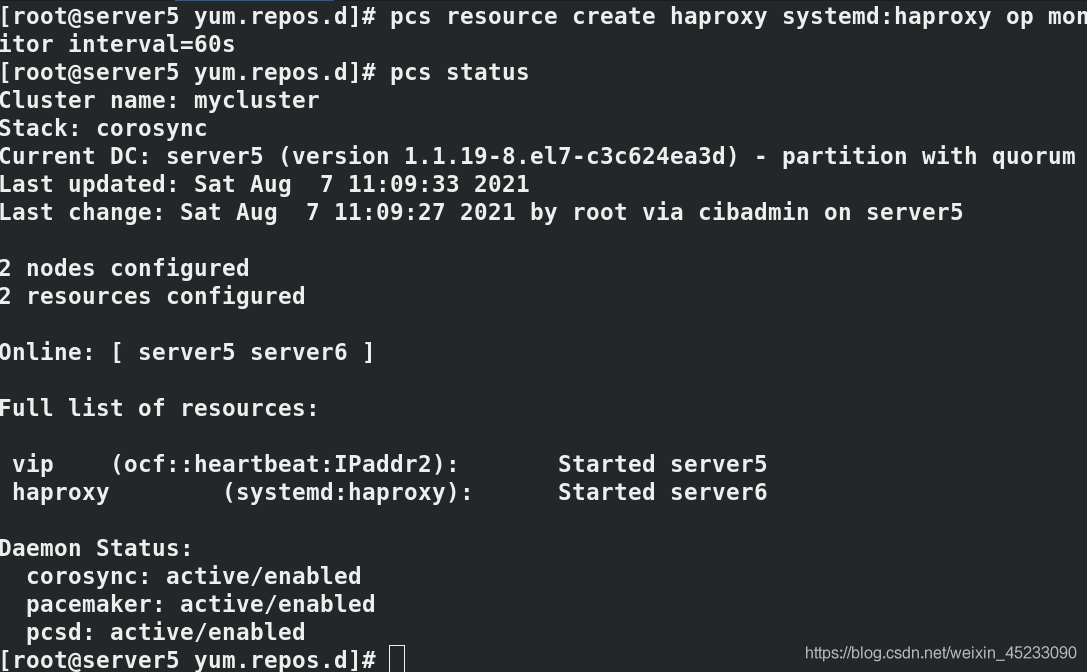
pcs resource create haproxy systemd:haproxy op monitor interval=60s
pcs status
3.8 browser access
(IV) deployment of Kubernetes
1 operate on the master-1 node
1.1 prepare the cluster configuration file. The api version currently used is v1beta1. For specific configuration, please refer to the official reference
cat << EOF > /root/kubeadm-config.yaml
apiVersion: kubeadm.k8s.io/v1beta1
kind: ClusterConfiguration
kubernetesVersion: v1.14.0 # Specify version 1.14
controlPlaneEndpoint: 172.25.9.5:6443 # haproxy address and port
imageRepository: registry.cn-hangzhou.aliyuncs.com/google_containers # Specify the image source as Ali source
networking:
  podSubnet: 10.244.0.0/16 # Plan to use the flannel network plug-in to specify the pod network segment and mask
EOF
1.2 perform node initialization
systemctl enable kubelet
systemctl start kubelet
kubeadm  config images pull  --config kubeadm-config.yaml  # Pre pull the image through Ali source
kubeadm init --config=kubeadm-config.yaml --experimental-upload-certs
1.3 after successful installation, you can see the output
You can now join any number of the control-plane node running the following command on each as root:
# The master node joins the cluster with the following command:

  kubeadm join 172.25.9.100:6443 --token ocb5tz.pv252zn76rl4l3f6 \
    --discovery-token-ca-cert-hash sha256:141bbeb79bf58d81d551f33ace207c7b19bee1cfd7790112ce26a6a300eee5a2 \
    --experimental-control-plane --certificate-key 20366c9cdbfdc1435a6f6d616d988d027f2785e34e2df9383f784cf61bab9826

Then you can join any number of worker nodes by running the following on each as root:
# The work node joins the cluster with the following command:
kubeadm join 172.25.9.100:6443 --token ocb5tz.pv252zn76rl4l3f6 \
    --discovery-token-ca-cert-hash sha256:141bbeb79bf58d81d551f33ace207c7b19bee1cfd7790112ce26a6a300eee5a2
In the original kubedm version, the join command is only used to join work nodes. After the -- experimental contaol plane parameter is added in the new version, the control plane (master) node can also join the cluster through the kubedm join command.
1.4 add another master node
Operate on master-2
kubeadm join 172.25.9.100:6443 --token abcdef.0123456789abcdef > --discovery-token-ca-cert-hash sha256:1f48896bb91d5c6ccf2a322321701eab74b73dba3e9e875d96f800894ac1fc18 > --control-plane --certificate-key
47b29e52516f862eba711a162167913a27e109ccdd2888e089fe7e301de9697c

export KUBECONFIG=/etc/kubernetes/admin.conf
echo "source <(kubectl completion bash)" >> ~/.bashrc #Add command line replenishment function to facilitate subsequent operations
Now, at any master node, execute kubectl get node. You can see that there are already two master nodes in the cluster
# kubectl get node
NAME       STATUS     ROLES    AGE     VERSION
master-1   NotReady   master   34m     v1.14.0
master-2   NotReady   master   4m52s   v1.14.0
1.5 add two work nodes
Operate on two node nodes respectively
kubeadm join 172.25.9.100:6443 --token ocb5tz.pv252zn76rl4l3f6 \
    --discovery-token-ca-cert-hash sha256:141bbeb79bf58d81d551f33ace207c7b19bee1cfd7790112ce26a6a300eee5a2
Execute kubectl get node again
# kubectl  get node
NAME       STATUS   ROLES    AGE    VERSION
master-1   Ready    master   134m   v1.14.0
master-2   Ready    master   104m   v1.14.0
node-1     Ready    <none>   94m    v1.14.0
node-2     Ready    <none>   93m    v1.14.0
2 test
2.1 provide high availability for pod nodes
Run a pod node on the current master host. When the master host is down, the node can still view the status and manage operations on other master hosts.
kubectl run demo --image=myapp:v1
kubectl get pod -o wide
curl 10.244.3.2
Turn off the server7 host and find that the pod is transferred to the server8 node, and the k8s high availability cluster is built successfully.


2.2 cluster test
# deployment-goweb.yaml
apiVersion: apps/v1
kind: Deployment
metadata:
  name: goweb
spec:
  selector:
    matchLabels:
      app: goweb
  replicas: 4
  template:
    metadata:
      labels:
        app: goweb
    spec:
      containers:
      - image: lingtony/goweb
        name: goweb
        ports:
        - containerPort: 8000
# svc-goweb.yaml
apiVersion: v1
kind: Service
metadata:
  name: gowebsvc
spec:
  selector:
    app: goweb
  ports:
  - name: default
    protocol: TCP
    port: 80
    targetPort: 8000
Deployment Services
kubectl apply -f deployment-goweb.yaml
kubectl  apply -y svc-goweb.yaml
View pod s and services
[root@server7 ~]# kubectl  get pod -o wide
NAME                    READY   STATUS    RESTARTS   AGE   IP           NODE     NOMINATED NODE   READINESS GATES
goweb-6c569f884-67z89   1/1     Running   0          25m   10.244.1.2   node-1   <none>           <none>
goweb-6c569f884-bt4p6   1/1     Running   0          25m   10.244.1.3   node-1   <none>           <none>
goweb-6c569f884-dltww   1/1     Running   0          25m   10.244.1.4   node-1   <none>           <none>
goweb-6c569f884-vshkm   1/1     Running   0          25m   10.244.3.4   node-2   <none>           <none>
# It can be seen that the four pod s are distributed on different node s
[root@serve7 ~]# kubectl  get svc
NAME         TYPE        CLUSTER-IP     EXTERNAL-IP   PORT(S)   AGE
gowebsvc     ClusterIP   10.106.202.0   <none>        80/TCP    11m
kubernetes   ClusterIP   10.96.0.1      <none>        443/TCP   21h
# Exposed 80 ports
2.3 test access
[root@server7 ~]# curl http://10.106.202.0/info
Hostname: goweb-6c569f884-bt4p6
[root@server7 ~]# curl http://10.106.202.0/info
Hostname: goweb-6c569f884-67z89
[root@server7 ~]# curl http://10.106.202.0/info
Hostname: goweb-6c569f884-vshkm
#As you can see, the request for SVC will be load balanced among pod s.
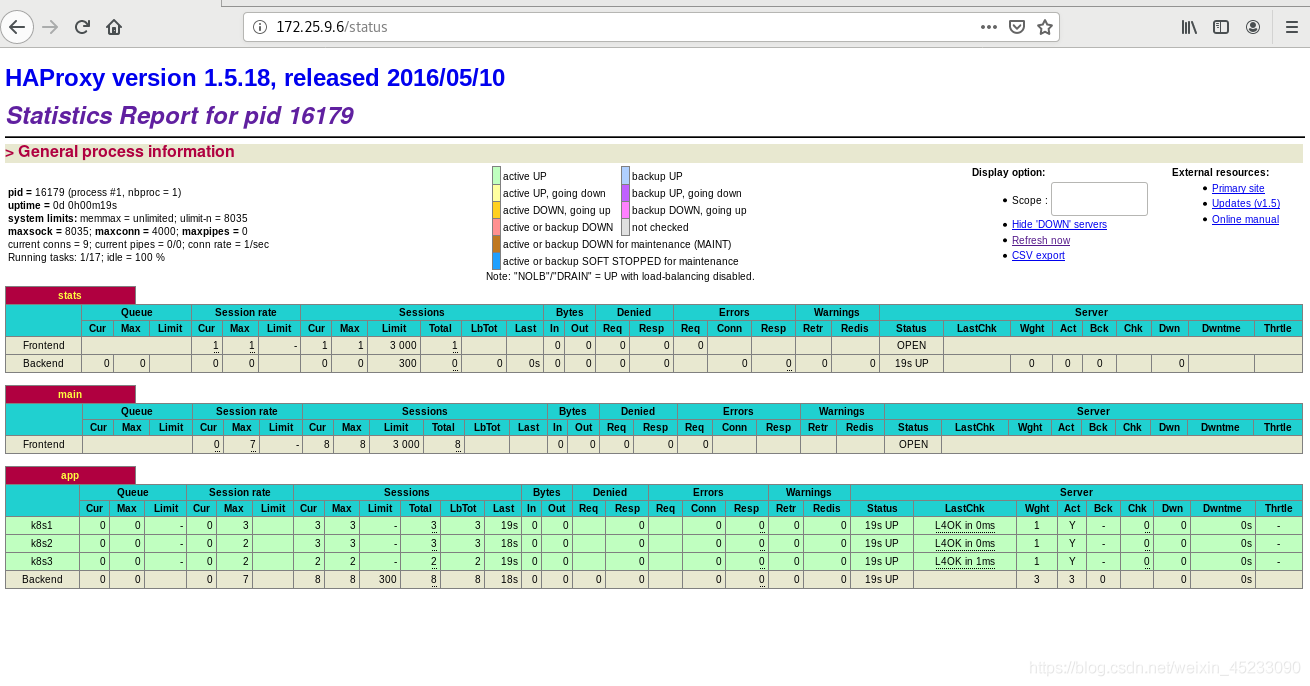
2.4 test whether the access is monitored by haproxy. Visit 172.25 9.6/status, all in visible status, indicating the deployment results of K8s high availability + load balancing cluster
