catalogue
1. Defects of traditional Jenkins master slave scheme
2.Kubernates+Docker+Jenkins continuous integration architecture diagram
3. Benefits of kubernates + docker + Jenkins continuous integration scheme
4. Kubedm installation Kubernetes
5. Installation environment description
6. Install and configure NFS and harbor configuration
7. Install Jenkins master in Kubernetes
8. Integration of Jenkins and Kubernetes
9. Build Jenkins slave custom image
10. Test whether Jenkins slave can be created
1. Defects of traditional Jenkins master slave scheme
① When a single point of failure occurs in the Master node, the whole process is unavailable
② The configuration environment of each Slave node is different to complete the compilation and packaging of different languages, but these differentiated configurations make it very inconvenient to manage and difficult to maintain
③ The resource allocation is uneven. Some Slave nodes queue for job s to run, while some Slave nodes are idle
④ Waste of resources. Each Slave node may be a physical machine or VM. When the Slave node is idle, it will not completely release resources
We can introduce Kubernates to solve the above problems!
2.Kubernates+Docker+Jenkins continuous integration architecture diagram
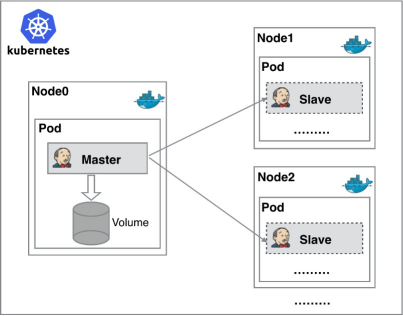
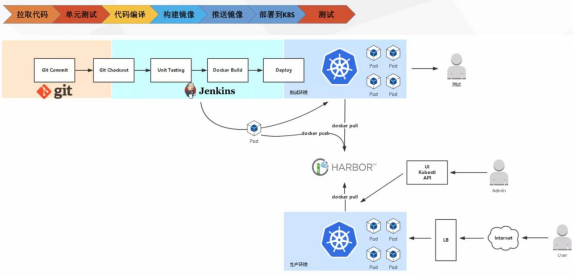
General workflow: manual / automatic build - > Jenkins scheduling K8S API - > dynamically generate Jenkins Slave pod - > Slave pod pull Git code / compile / package image - > push to image warehouse Harbor - > Slave work is completed, pod is automatically destroyed - > deploy to test or production Kubernetes platform. (fully automated without manual intervention)
3. Benefits of kubernates + docker + Jenkins continuous integration scheme
High availability of services: when the Jenkins Master fails, Kubernetes will automatically create a new Jenkins Master container and assign the Volume to the newly created container to ensure no data loss, so as to achieve high availability of cluster services.
Dynamic scaling and rational use of resources: each time a Job is run, a Jenkins Slave will be automatically created. After the Job is completed, the Slave will automatically log off and delete the container, and the resources will be automatically released. Moreover, Kubernetes will dynamically allocate the Slave to the idle node according to the usage of each resource, so as to reduce the occurrence of high resource utilization of a node, It is also queued at the node.
Good scalability: when the Kubernetes cluster is seriously short of resources and leads to Job queuing, it is easy to add a Kubernetes Node to the cluster to realize expansion.
4. Kubedm installation Kubernetes
Kubernetes architecture

API # Server: used to expose Kubernetes # API. The call operation of any resource request is carried out through the interface provided by Kube apiserver.
Etcd: it is the default storage system provided by Kubernetes to save all cluster data. When in use, it is necessary to provide a backup plan for etcd data.
Controller Manager: as the management control center within the cluster, it is responsible for the management of nodes, Pod replicas, service endpoints, namespaces, service accounts and resource quotas in the cluster. When a Node goes down unexpectedly, the controller manager will find and execute the automatic repair process in time, Ensure that the cluster is always in the expected working state.
Scheduler: monitors newly created pods that are not assigned to nodes and selects a Node for the Pod.
Kubelet: responsible for maintaining the life cycle of containers and managing volumes and networks.
Kube proxy: it is the core component of Kubernetes and deployed on each Node. It is an important component to realize the communication and load balancing mechanism of Kubernetes Service.
5. Installation environment description
| Host name | IP address | Installed software |
| k8s-master | 192.168.195.200 | kube-apiserver,kube-controller-manager,kube- scheduler,docker,etcd,calico,NFS |
| k8s-node1 | 192.168.195.201 | kubelet,kubeproxy,Docker18.06.1-ce |
| k8s-node2 | 192.168.195.202 | kubelet,kubeproxy,Docker18.06.1-ce |
The docker environment needs to be configured for all three servers (completed)
[root@localhost ~]# systemctl stop firewalld
[root@localhost ~]# systemctl disable firewalld
[root@localhost ~]# setenforce 0
To make it easier to distinguish, define the name of the server
hostnamectl set-hostname k8s-master
hostnamectl set-hostname k8s-node1
hostnamectl set-hostname k8s-node2
Modify hosts file
[root@localhost ~]# vim /etc/hosts

127.0.0.1   localhost localhost.localdomain localhost4 localhost4.localdomain4
::1         localhost localhost.localdomain localhost6 localhost6.localdomain6
192.168.100.130 k8s-master
192.168.100.131 k8s-node1
192.168.100.132 k8s-node2
Set system parameters and load br_netfilter module
[root@localhost ~]# modprobe br_netfilter
Set to allow routing and forwarding, and do not process the data of the bridge to create files
[root@localhost ~]# vim /etc/sysctl.d/k8s.conf
net.bridge.bridge-nf-call-ip6tables = 1
net.bridge.bridge-nf-call-iptables = 1
net.ipv4.ip_forward = 1
vm.swappiness = 0
Executive document
[root@localhost ~]# sysctl -p /etc/sysctl.d/k8s.conf
Preconditions for Kube proxy to enable ipvs
[root@localhost ~]# cat > /etc/sysconfig/modules/ipvs.modules <<EOF
#!/bin/bash
modprobe -- ip_vs
modprobe -- ip_vs_rr
modprobe -- ip_vs_wrr
modprobe -- ip_vs_sh
modprobe -- nf_conntrack_ipv4
EOF
Set execution permission
[root@localhost ~]# chmod 755 /etc/sysconfig/modules/ipvs.modules && bash
Check whether the configuration is effective by filtering
[root@localhost ~]# /etc/sysconfig/modules/ipvs.modules && lsmod | grep -e ip_vs -e nf_conntrack_ipv4
ip_vs_sh               12688  0
ip_vs_wrr              12697  0
ip_vs_rr               12600  0
ip_vs                 145497  6 ip_vs_rr,ip_vs_sh,ip_vs_wrr
nf_conntrack_ipv4      15053  2
nf_defrag_ipv4         12729  1 nf_conntrack_ipv4
nf_conntrack          133095  7 ip_vs,nf_nat,nf_nat_ipv4,xt_conntrack,nf_nat_masquerade_ipv4,nf_conntrack_netlink,nf_conntrack_ipv4
libcrc32c              12644  4 xfs,ip_vs,nf_nat,nf_conntrack
Close all node swap
[root@localhost ~]# swapoff -a         #Temporarily Closed
[root@localhost ~]# vim /etc/fstab    #Permanently close and comment out the following fields
/dev/mapper/cl-swap swap swap defaults 0 0
Install kubelet, kubedm, kubectl
Empty the yum cache first
[root@localhost ~]# yum clean all
Set yum installation source
[root@localhost ~]# cat <<EOF > /etc/yum.repos.d/kubernetes.repo
[kubernetes]
name=Kubernetes
baseurl=https://mirrors.aliyun.com/kubernetes/yum/repos/kubernetes-el7-x86_64/
enabled=1
gpgcheck=0
repo_gpgcheck=0
gpgkey=https://mirrors.aliyun.com/kubernetes/yum/doc/yum-key.gpg https://mirrors.aliyun.com/kubernetes/yum/doc/rpm-package-key.gpg
EOF
Start installation
[root@localhost ~]# yum install -y kubelet-1.17.0 kubeadm-1.17.0 kubectl-1.17.0
First set the startup self startup
[root@localhost ~]# systemctl enable kubelet
Master node needs to be completed
Run the initialization command and modify the ip address according to its own master address
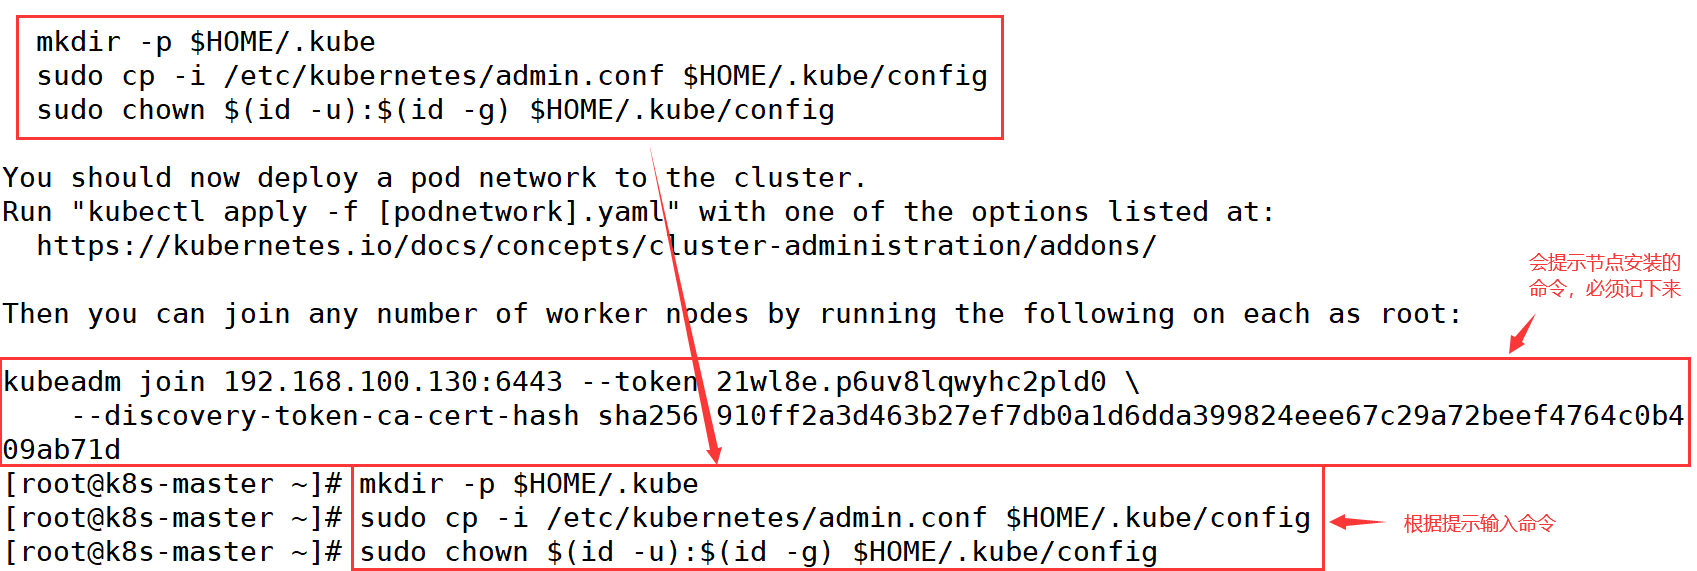
[root@k8s-master ~]# kubeadm init --kubernetes-version=1.17.0 \
--apiserver-advertise-address=192.168.100.130 \
--image-repository registry.aliyuncs.com/google_containers \
--service-cidr=10.1.0.0/16 \
--pod-network-cidr=10.244.0.0/16
After loading, enter the command according to the prompt
Start kubelet service
[root@k8s-master ~]# systemctl restart kubelet
[root@k8s-master ~]# systemctl status kubelet
● kubelet.service - kubelet: The Kubernetes Node Agent
   Loaded: loaded (/usr/lib/systemd/system/kubelet.service; enabled; vendor preset: disabled)
  Drop-In: /usr/lib/systemd/system/kubelet.service.d
           └─10-kubeadm.conf
   Active: active (running) since II. 2022-03-08 00:29:03 CST; 8min ago
     Docs: https://kubernetes.io/docs/
 Main PID: 82931 (kubelet)
    Tasks: 19
   Memory: 33.5M
   CGroup: /system.slice/kubelet.service
           └─82931 /usr/bin/kubelet --bootstrap-kubeconfig=/etc/kubernetes/bootstrap-kubelet.con...
Installing Calico
[root@k8s-master ~]# mkdir k8s
[root@k8s-master ~]# cd k8s/
[root@k8s-master k8s]# wget --no-check-certificate https://docs.projectcalico.org/v3.10/getting-started/kubernetes/installation/hosted/kubernetes-datastore/calico-networking/1.7/calico.yaml
Address change to facilitate communication from the node
[root@k8s-master k8s]# sed -i 's/192.168.0.0/10.244.0.0/g' calico.yaml
[root@k8s-master k8s]# kubectl apply -f calico.yaml
Check the status of all pods and ensure that all pods are in Running status
[root@k8s-master k8s]# kubectl get pod --all-namespaces -o wide

Slave node needs to be completed
Let all nodes join the cluster environment using the commands generated by the Master node before
kubeadm join 192.168.100.130:6443 --token 21wl8e.p6uv8lqwyhc2pld0 \
    --discovery-token-ca-cert-hash sha256:910ff2a3d463b27ef7db0a1d6dda399824eee67c29a72beef4764c0b409ab71d
Start kubele service
[root@k8s-node1 ~]# systemctl start kubelet
[root@k8s-node1 ~]# systemctl status kubelet
● kubelet.service - kubelet: The Kubernetes Node Agent
   Loaded: loaded (/usr/lib/systemd/system/kubelet.service; enabled; vendor preset: disabled)
  Drop-In: /usr/lib/systemd/system/kubelet.service.d
           └─10-kubeadm.conf
   Active: active (running) since II. 2022-03-08 00:53:28 CST; 3min 36s ago
     Docs: https://kubernetes.io/docs/
 Main PID: 79584 (kubelet)
    Tasks: 19
   Memory: 35.1M
   CGroup: /system.slice/kubelet.service
           └─79584 /usr/bin/kubelet --bootstrap-kubeconfig=/etc/kubernetes/bootstrap-kubelet.con...
[root@k8s-node2 ~]# systemctl start kubelet
[root@k8s-node2 ~]# systemctl status kubelet
● kubelet.service - kubelet: The Kubernetes Node Agent
Loaded: loaded (/usr/lib/systemd/system/kubelet.service; enabled; vendor preset: disabled)
Drop-In: /usr/lib/systemd/system/kubelet.service.d
└─10-kubeadm.conf
Active: active (running) since II. 2022-03-08 00:53:52 CST; 3min 21s ago
Docs: https://kubernetes.io/docs/
Main PID: 79532 (kubelet)
Tasks: 20
Memory: 34.1M
CGroup: /system.slice/kubelet.service
└─79532 /usr/bin/kubelet --bootstrap-kubeconfig=/etc/kubernetes/bootstrap-kubelet.con...Go back to the Master node to check. If the Status is all Ready, it means that the cluster environment has been built successfully!!!
[root@k8s-master ~]# kubectl get nodes
NAME         STATUS   ROLES    AGE     VERSION
k8s-master   Ready    master   32m     v1.17.0
k8s-node1    Ready    <none>   5m5s    v1.17.0
k8s-node2    Ready    <none>   4m41s   v1.17.0
6. Install and configure NFS and harbor configuration
The file system and network of NFS can share different functions with each other. We can use NFS to share Jenkins running configuration files, Maven's warehouse dependency files, etc.
Install NFS (required for all three servers)
[root@localhost ~]# yum install -y nfs-utils
harbor configuration is required for all three k8s servers
[root@localhost ~]# vim /etc/docker/daemon.json
{
  "insecure-registries": ["192.168.100.133:85"],
  "registry-mirrors": ["https://05vz3np5.mirror.aliyuncs.com"]
}
Create a shared directory on the master server
[root@k8s-master ~]# mkdir -p /opt/nfs/jenkins
[root@k8s-master ~]# vim /etc/exports         #Write share configuration for NFS
/opt/nfs/jenkins *(rw,no_root_squash)         #The path before sharing and the right not to drop

[root@k8s-master ~]# systemctl enable nfs     #Power on self start
[root@k8s-master ~]# systemctl start nfs      #Start service
View the NFS shared directory on the node node
[root@k8s-node1 ~]# showmount -e 192.168.100.130
Export list for 192.168.100.130:
/opt/nfs/jenkins *
[root@k8s-node2 ~]# showmount -e 192.168.100.130
Export list for 192.168.100.130:
/opt/nfs/jenkins *
7. Install Jenkins master in Kubernetes
Create NFS client provisioner
The existing NFS client provider does not need an external NFS server.
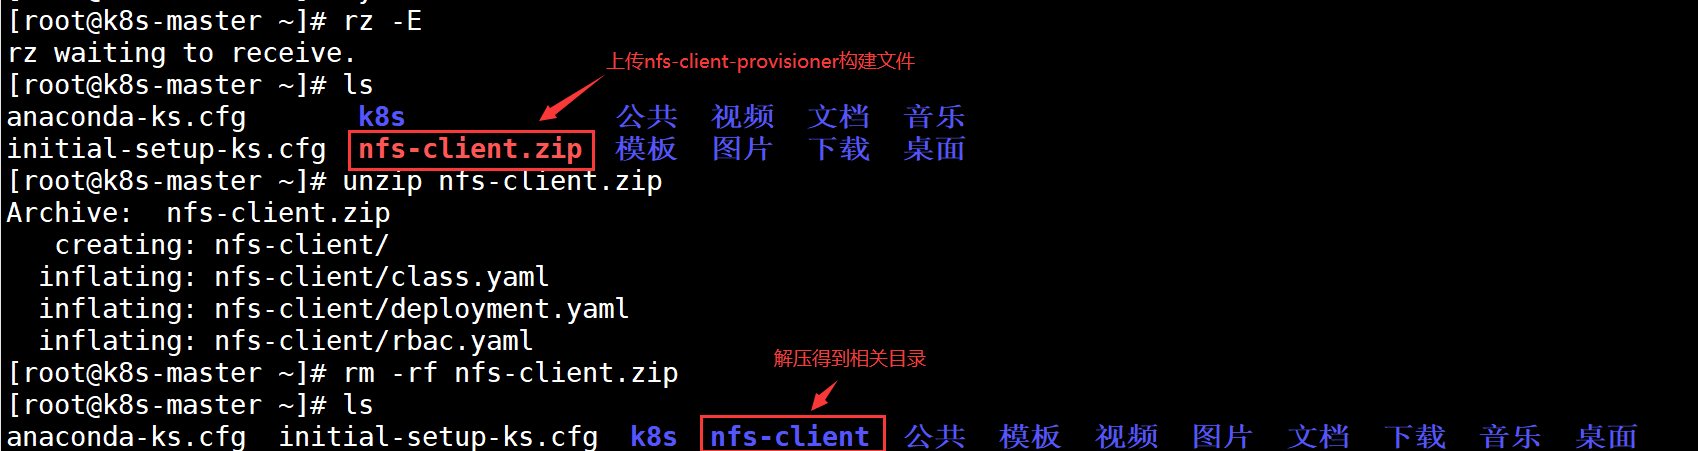
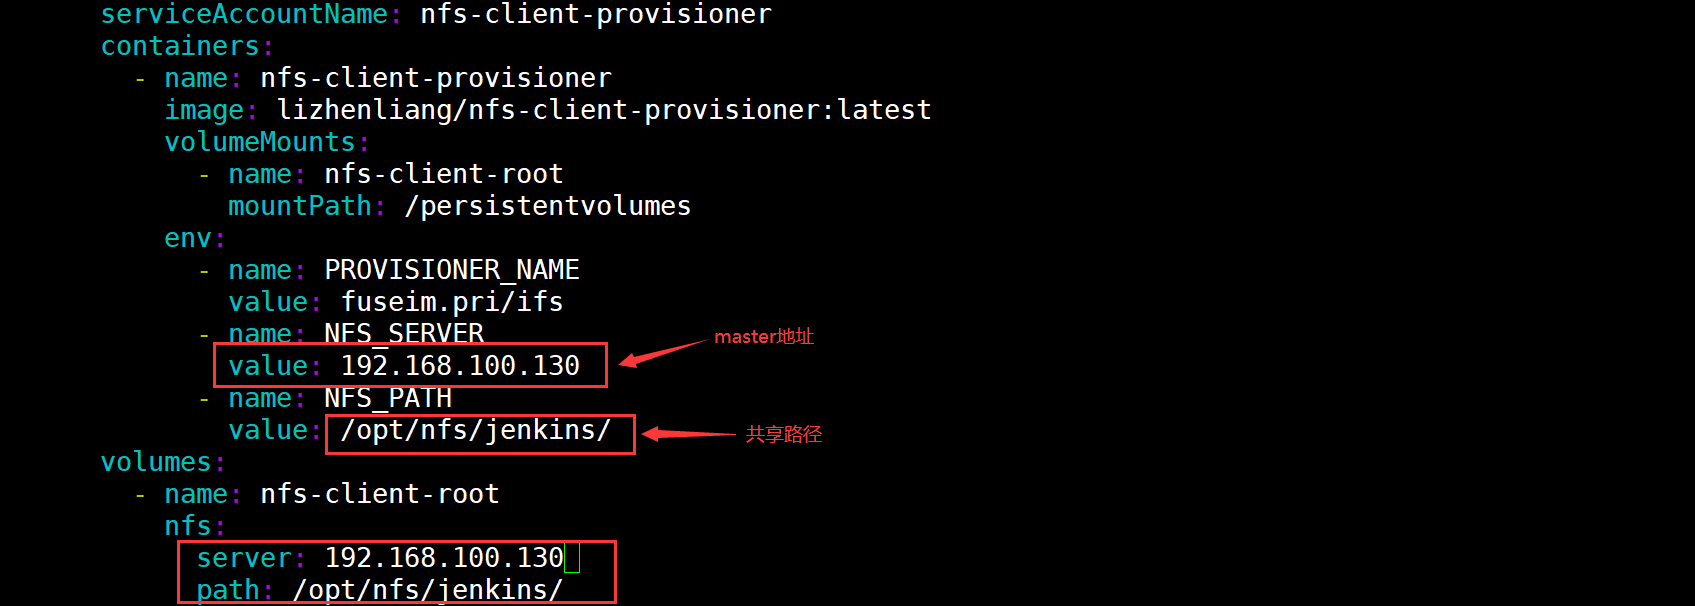
Modify deployment Yaml, configure NFS server and directory before using
Build pod resources of NFS client provider
[root@k8s-master ~]# cd nfs-client/
[root@k8s-master nfs-client]# kubectl create -f .
Check whether the pod is created successfully

Install Jenkins master
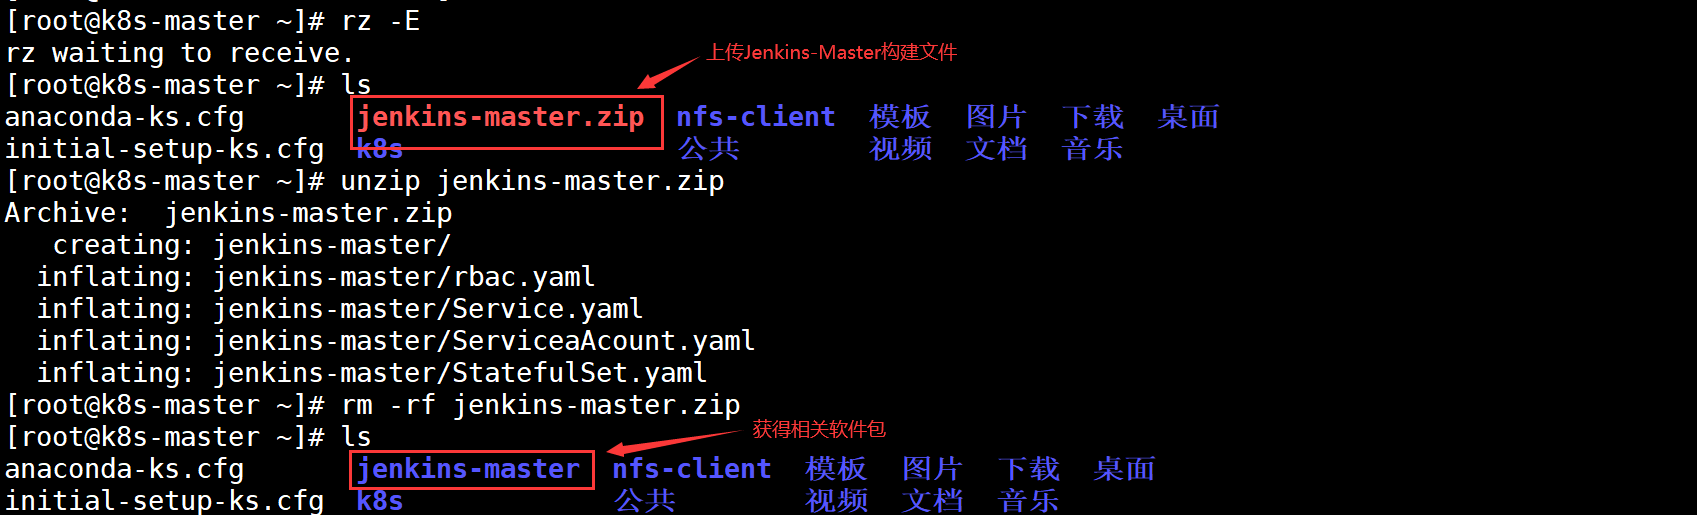
There are two points to note:
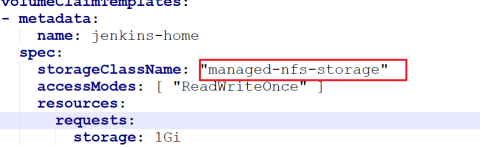
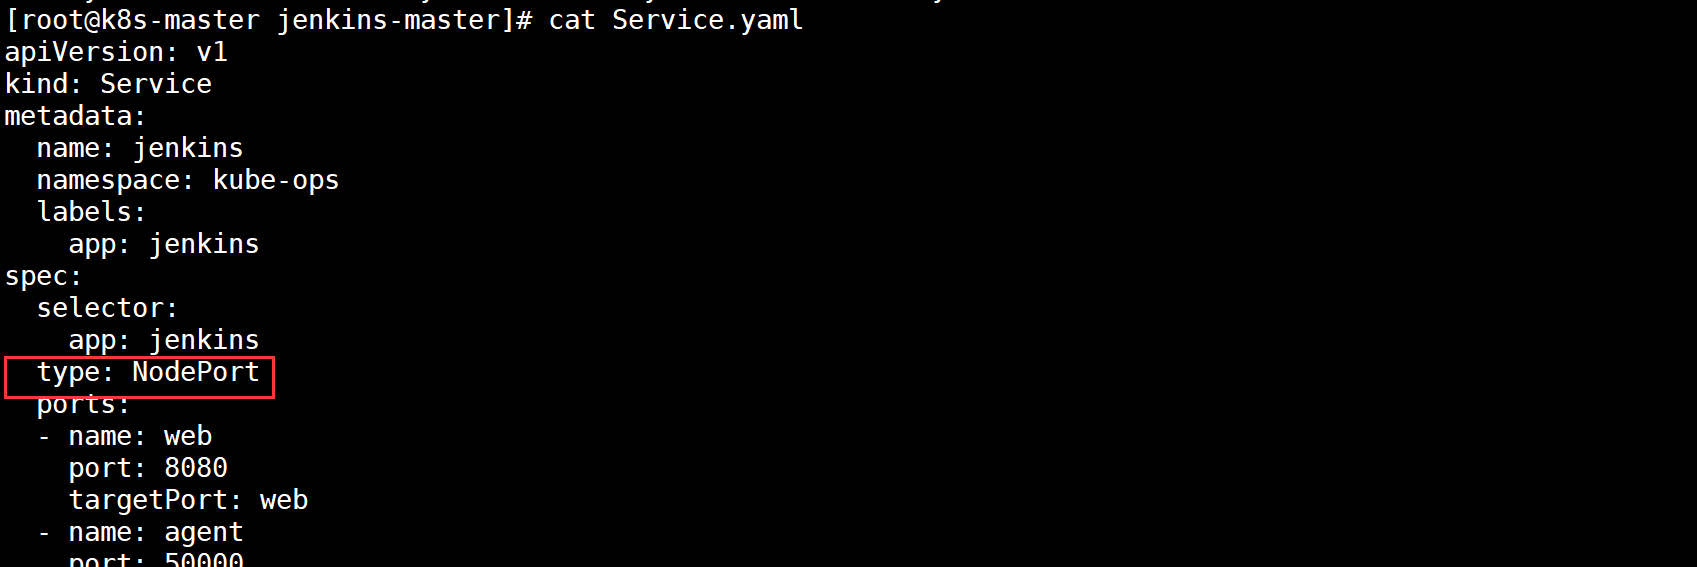
First, in statefulset Yaml file, which declares the Jenkins master file storage using NFS client provider
Second, the Service publishing method adopts NodePort, which will randomly generate node access ports
Create a namespace for Kube Ops
Because we put Jenkins master's pod under Kube ops
[root@k8s-master jenkins-master]# kubectl create namespace kube-ops
namespace/kube-ops created
Build pod resources of Jenkins master
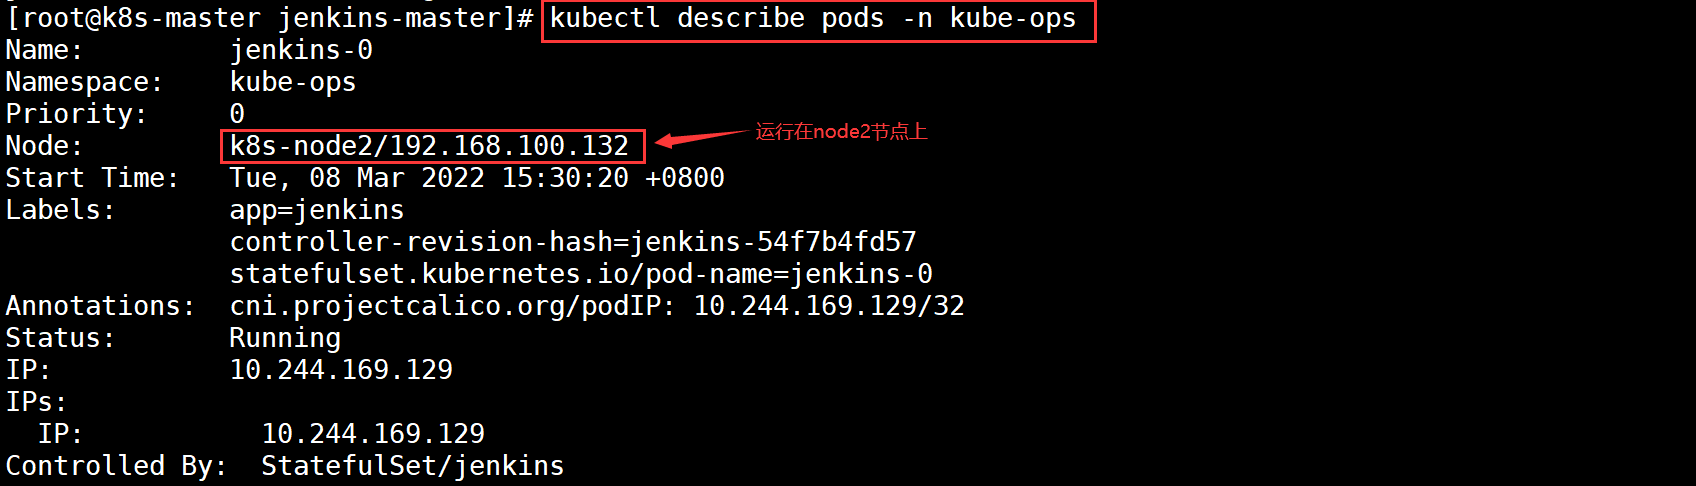
[root@k8s-master ~]# cd jenkins-master/
[root@k8s-master jenkins-master]# kubectl create -f .
[root@k8s-master jenkins-master]# kubectl get pods -n kube-ops
NAME        READY   STATUS    RESTARTS   AGE
jenkins-0   0/1     Running   0          48s
[root@k8s-master jenkins-master]# kubectl describe pods -n kube-ops
Name:         jenkins-0
Namespace:    kube-ops                     #The name of the space is Kube ops
Priority:     0
Node:         k8s-node2/192.168.100.132    #On node2 node
View the information and access the Node on which the Pod is running
View assigned ports

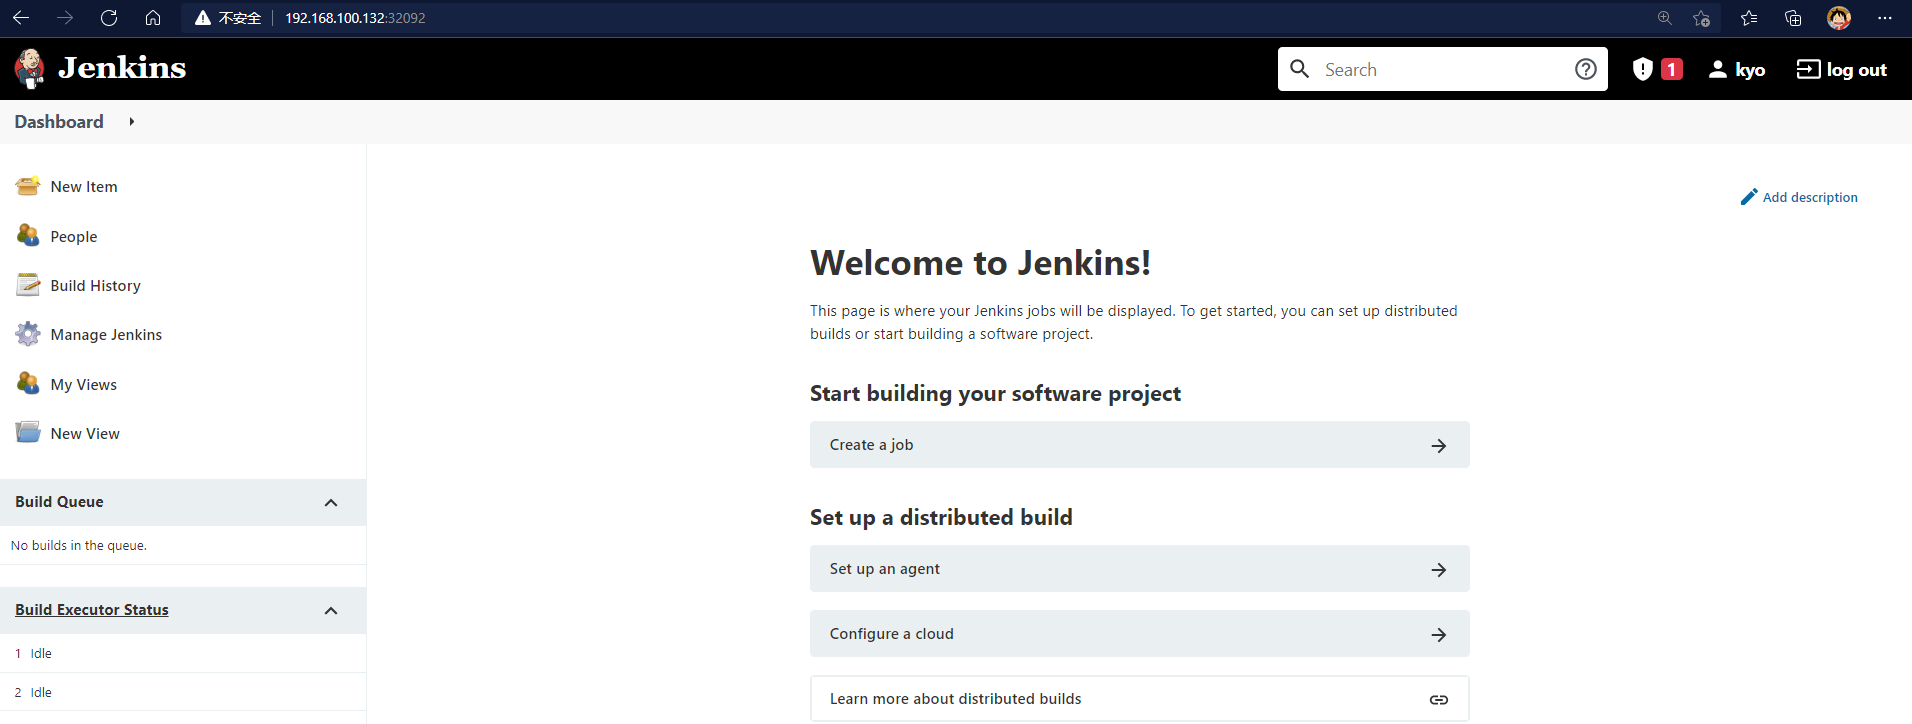
The final access address is: http://192.168.100.132:32092
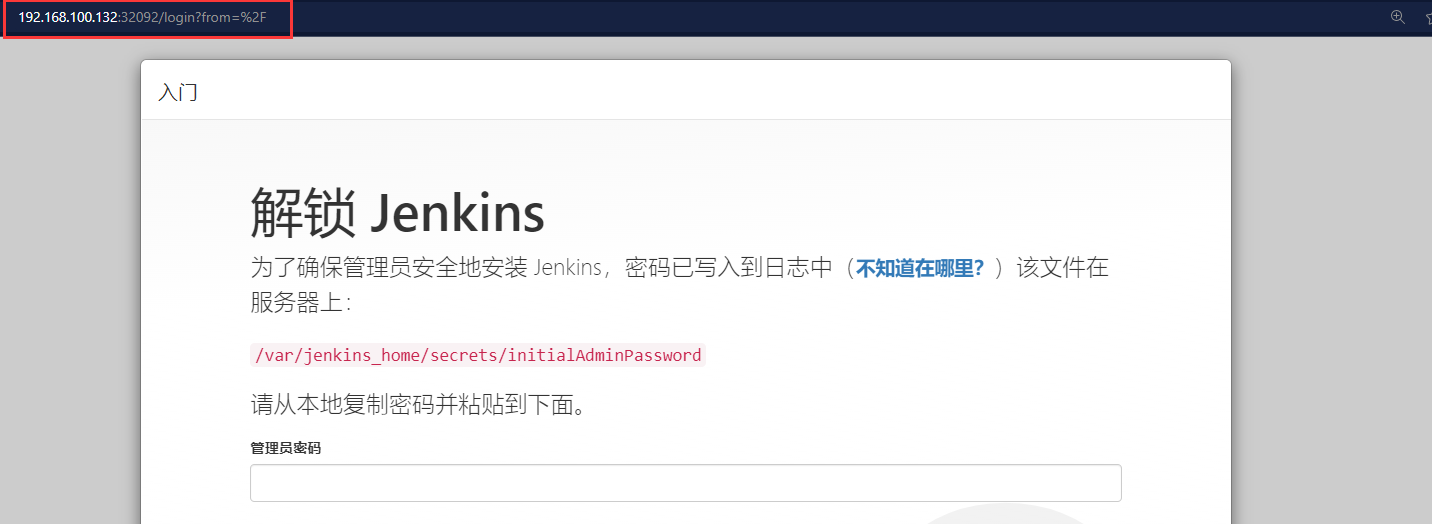
Find the Jenkins key based on the address provided
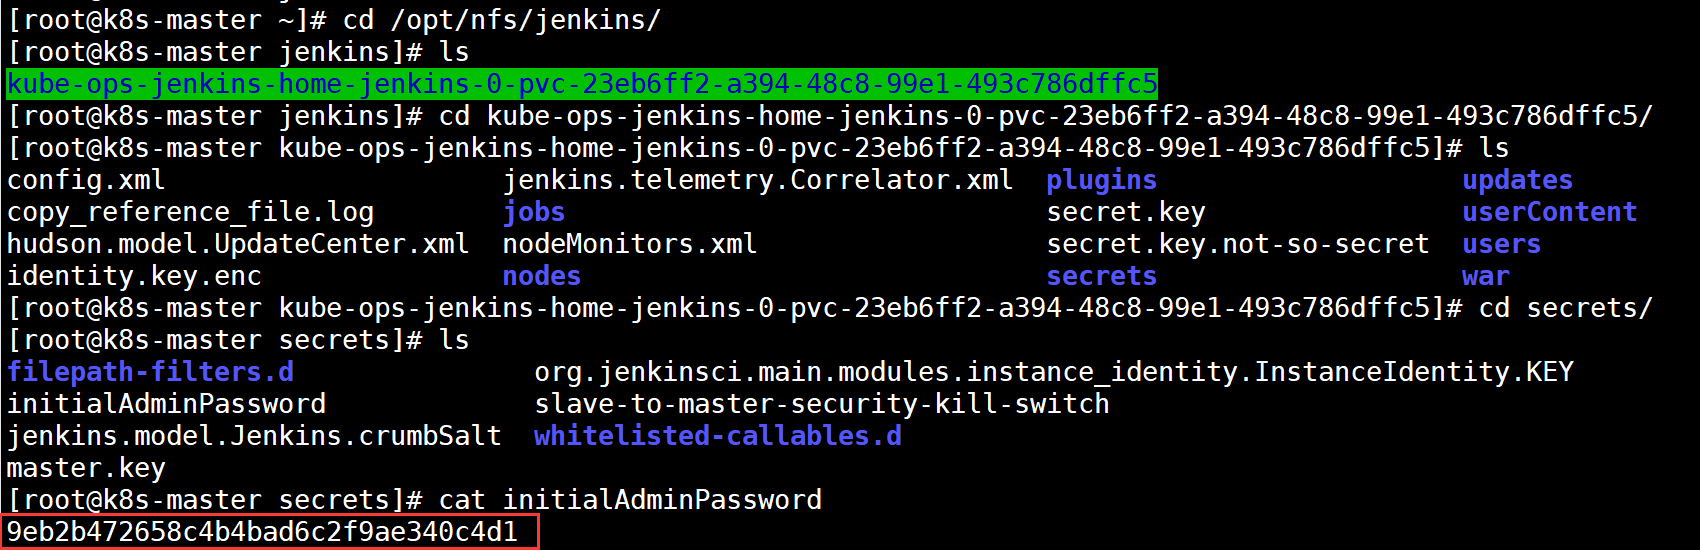
Enter jenkins interface
Set plug-in download address

[root@k8s-master kube-ops-jenkins-home-jenkins-0-pvc-23eb6ff2-a394-48c8-99e1-493c786dffc5]# cd updates/
[root@k8s-master updates]# sed -i 's/http:\/\/updates.jenkins- ci.org\/download/https:\/\/mirrors.tuna.tsinghua.edu.cn\/jenkins/g' default.json && sed -i 's/http:\/\/www.google.com/https:\/\/www.baidu.com/g' default.json
Manage Plugins click Advanced and change the Update Site to the download address of domestic plug-ins
https://mirrors.tuna.tsinghua.edu.cn/jenkins/updates/update-center.json

Install the basic plug-in first
After the installation of Chinese, Git, Pipeline and Extended Choice Parameter, restart Jenkins.
8. Integration of Jenkins and Kubernetes
Install the Kubernetes plug-in
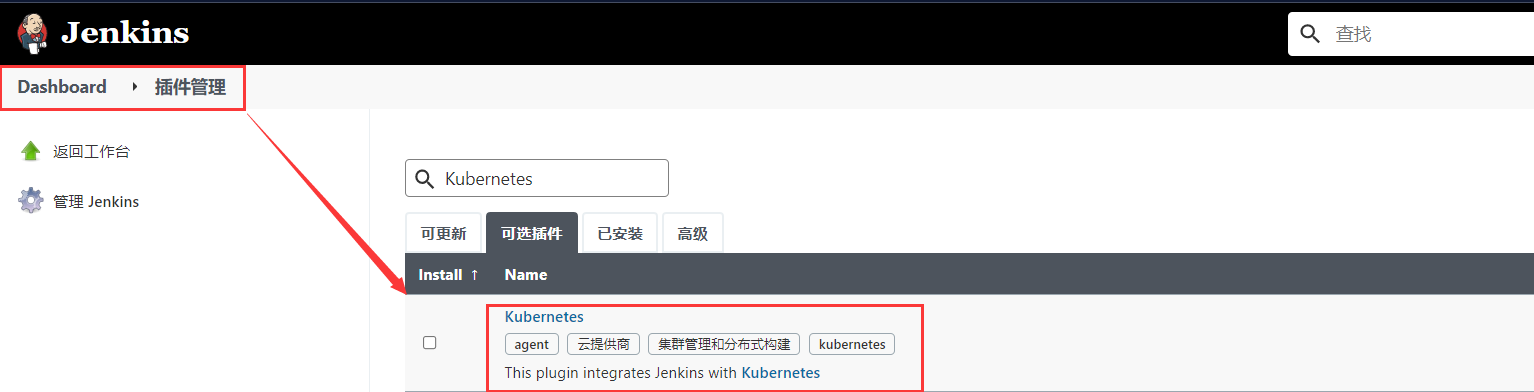
System management - > system configuration - > cloud - > new cloud - > kubernetes

Address of kubernets: https://kubernetes.default.svc.cluster.local
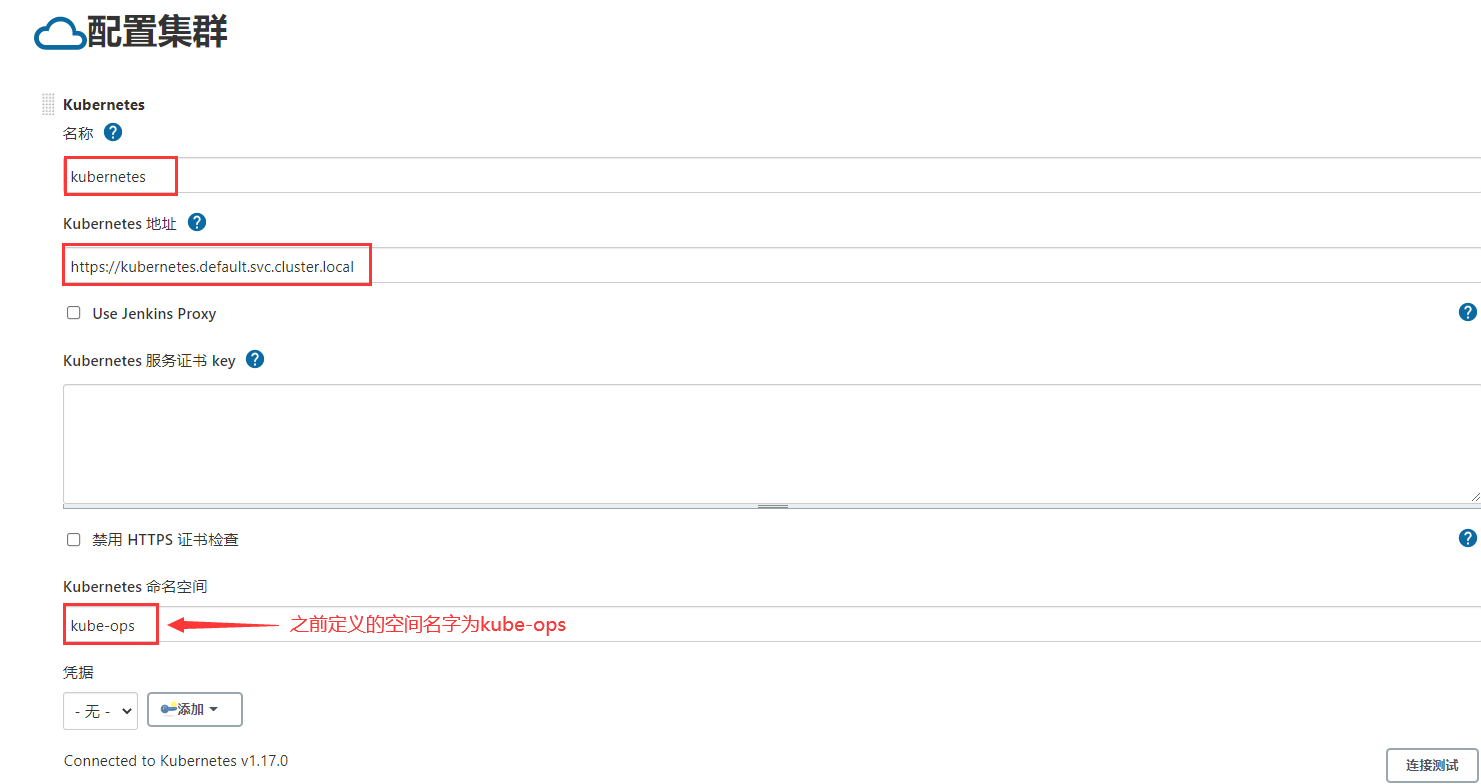
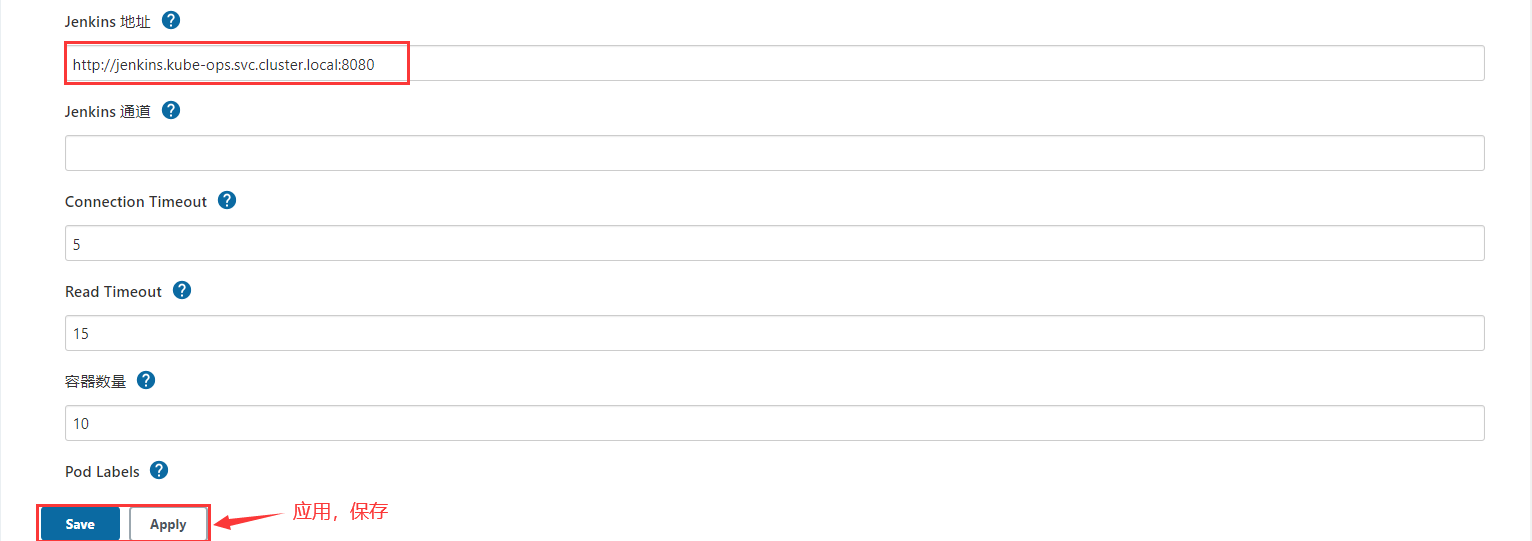
Jenkins URL: http://jenkins.kube-ops.svc.cluster.local:8080
9. Build Jenkins slave custom image
When Jenkins master builds a Job, Kubernetes will create a Pod of Jenkins slave to complete the construction of the Job. We choose the image running Jenkins slave as the official recommended image: Jenkins / JNLP Slave: latest, but there is no Maven environment in this image. For convenience, we need to customize a new image:

Docker "le" file contents are as follows:
FROM jenkins/jnlp-slave:latest
MAINTAINER kgc
# Switch to root account for operation
USER root
# Install maven
COPY apache-maven-3.6.2-bin.tar.gz .
RUN tar -zxf apache-maven-3.6.2-bin.tar.gz && \
mv apache-maven-3.6.2 /usr/local && \
rm -f apache-maven-3.6.2-bin.tar.gz && \
ln -s /usr/local/apache-maven-3.6.2/bin/mvn /usr/bin/mvn && \
ln -s /usr/local/apache-maven-3.6.2 /usr/local/apache-maven && \
mkdir -p /usr/local/apache-maven/repo
COPY settings.xml /usr/local/apache-maven/conf/settings.xml
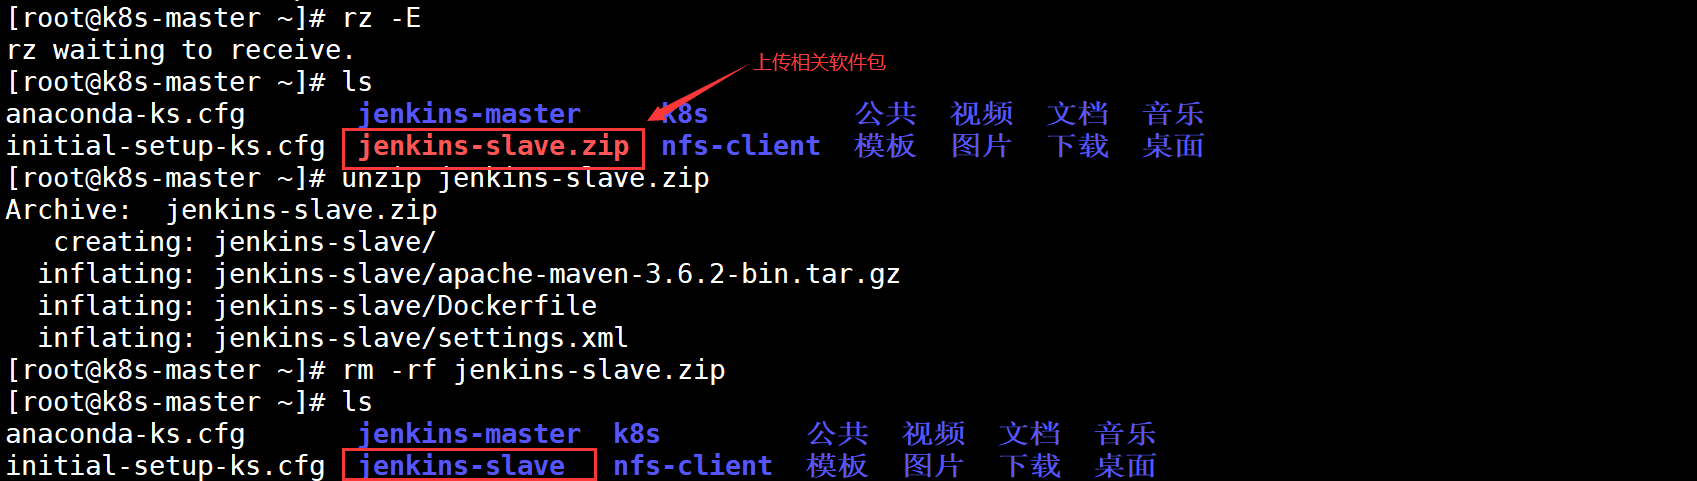
USER jenkinsStart building images
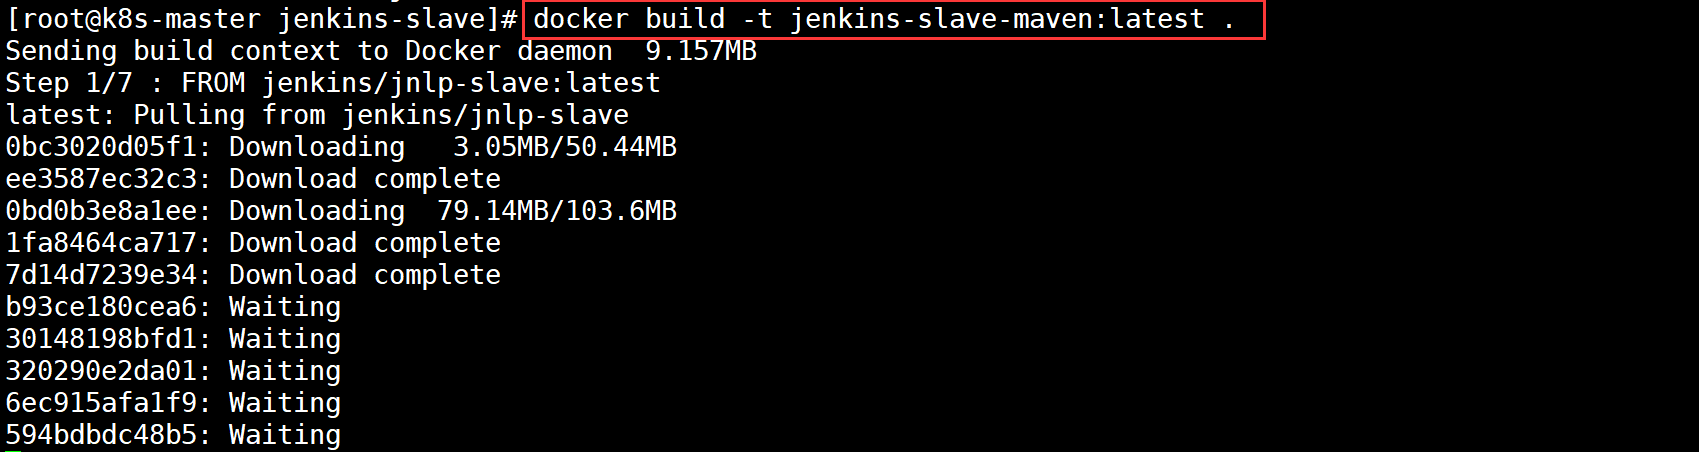
Start uploading after the image construction is completed
[root@k8s-master ~]# docker login -u admin -p Harbor12345 192.168.100.133:85      #Log in to harbor warehouse first
[root@k8s-master ~]# docker tag jenkins-slave-maven:latest 192.168.100.133:85/library/jenkins-slave-maven:latest        #Label the image
[root@k8s-master ~]# docker push 192.168.100.133:85/library/jenkins-slave-maven:latest     #Push in push mode
Check whether there is a pushed image in the harbor warehouse

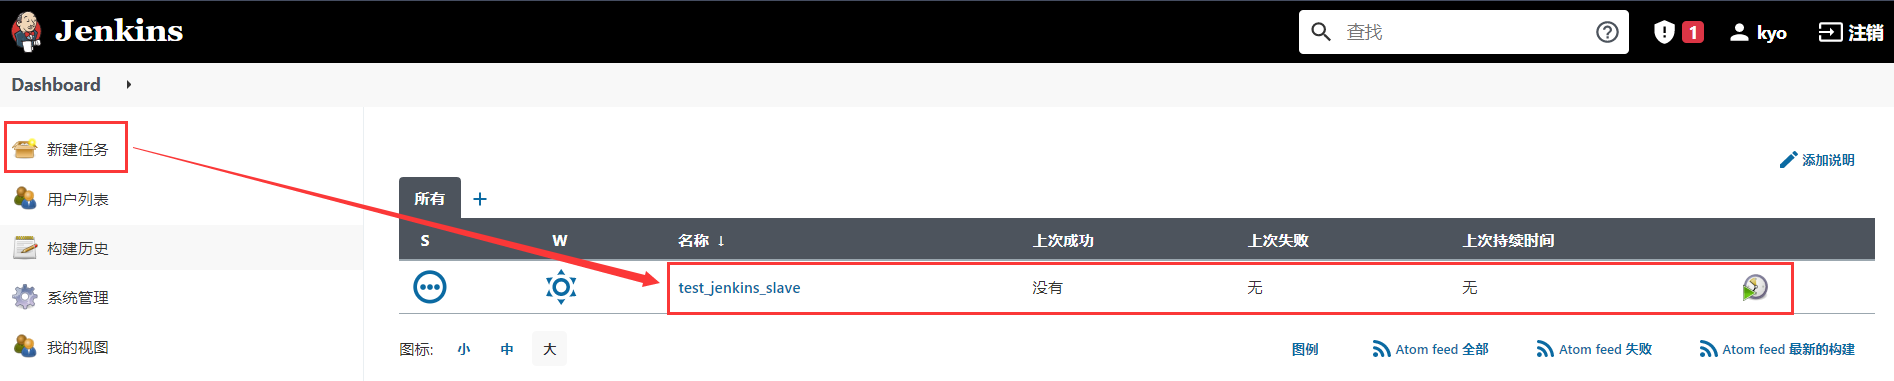
10. Test whether Jenkins slave can be created
Create a pipeline project to test
Add voucher
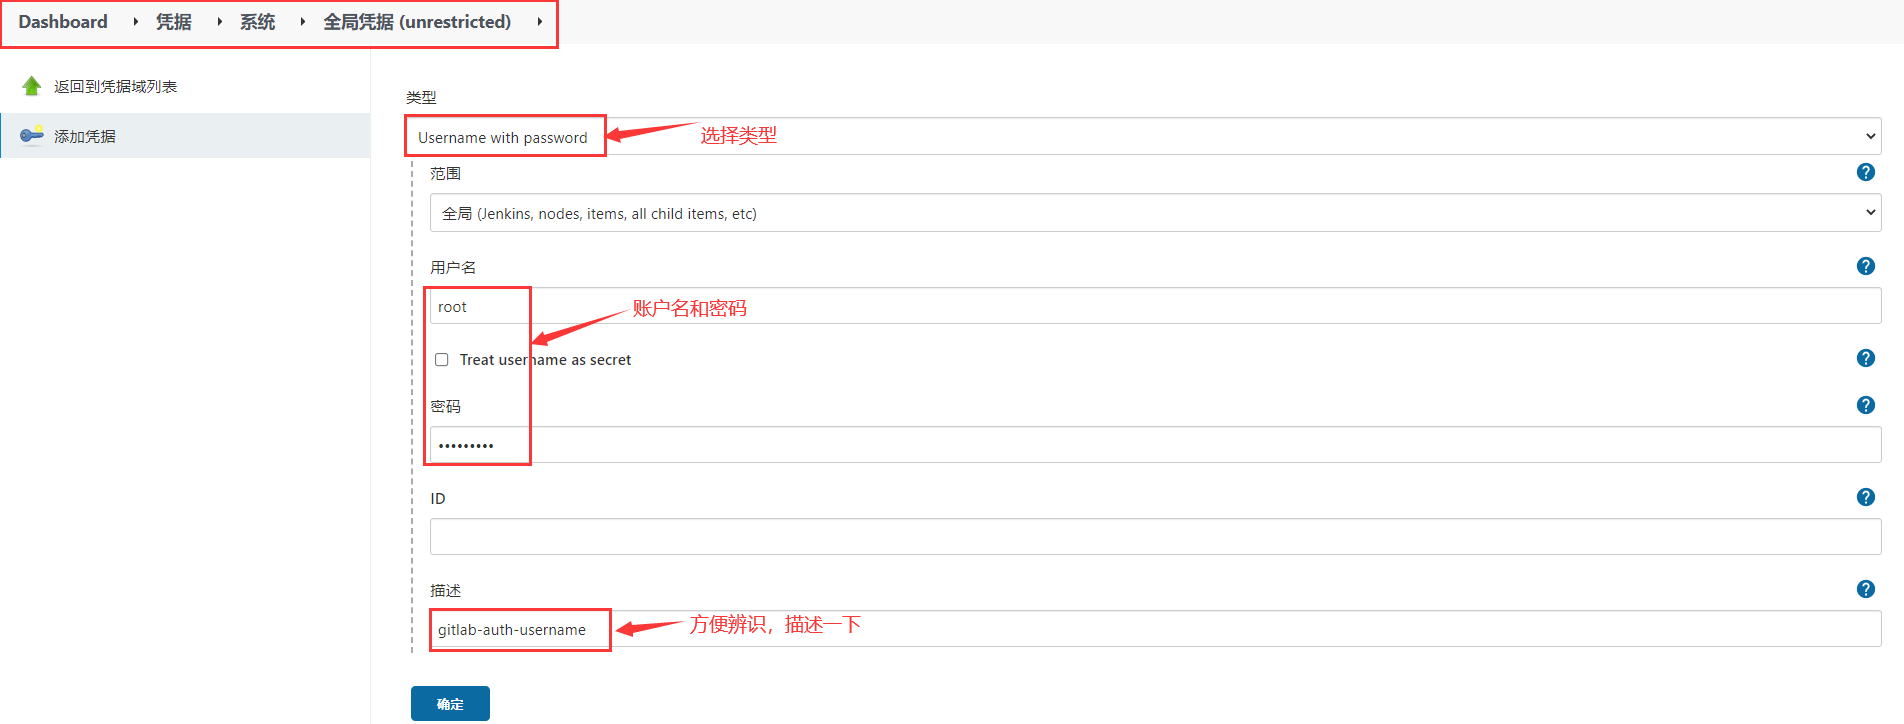
Write Pipeline and pull the code from GItlab (using http)
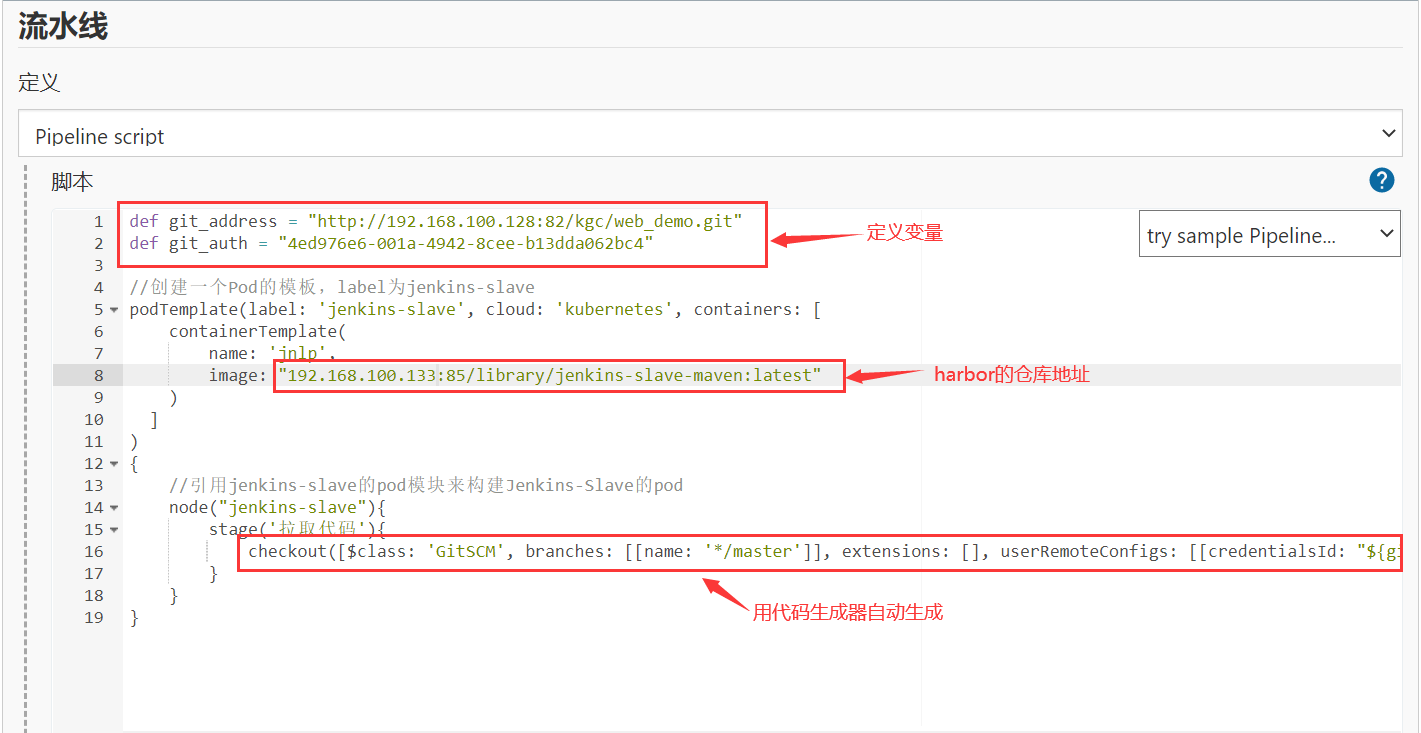
def git_address = "http://192.168.195.180:82/kgc_group/tensquare_back.git"
def git_auth = "f06c4b06-ac26-4683-ad00-2d3599c827ee"
//Create a Pod template with the label Jenkins slave
podTemplate(label: 'jenkins-slave', cloud: 'kubernetes', containers: [
containerTemplate(
name: 'jnlp',
image: "192.168.195.183:85/library/jenkins-slave-maven:latest"
)
]
)
{
//Reference the pod module of Jenkins slave to build the pod of Jenkins slave
node("jenkins-slave"){
stage('Pull code'){
checkout([$class: 'GitSCM', branches: [[name: '*/master']], extensions: [], userRemoteConfigs: [[credentialsId: "${git_auth}", url: "${git_address}"]]])
}
}
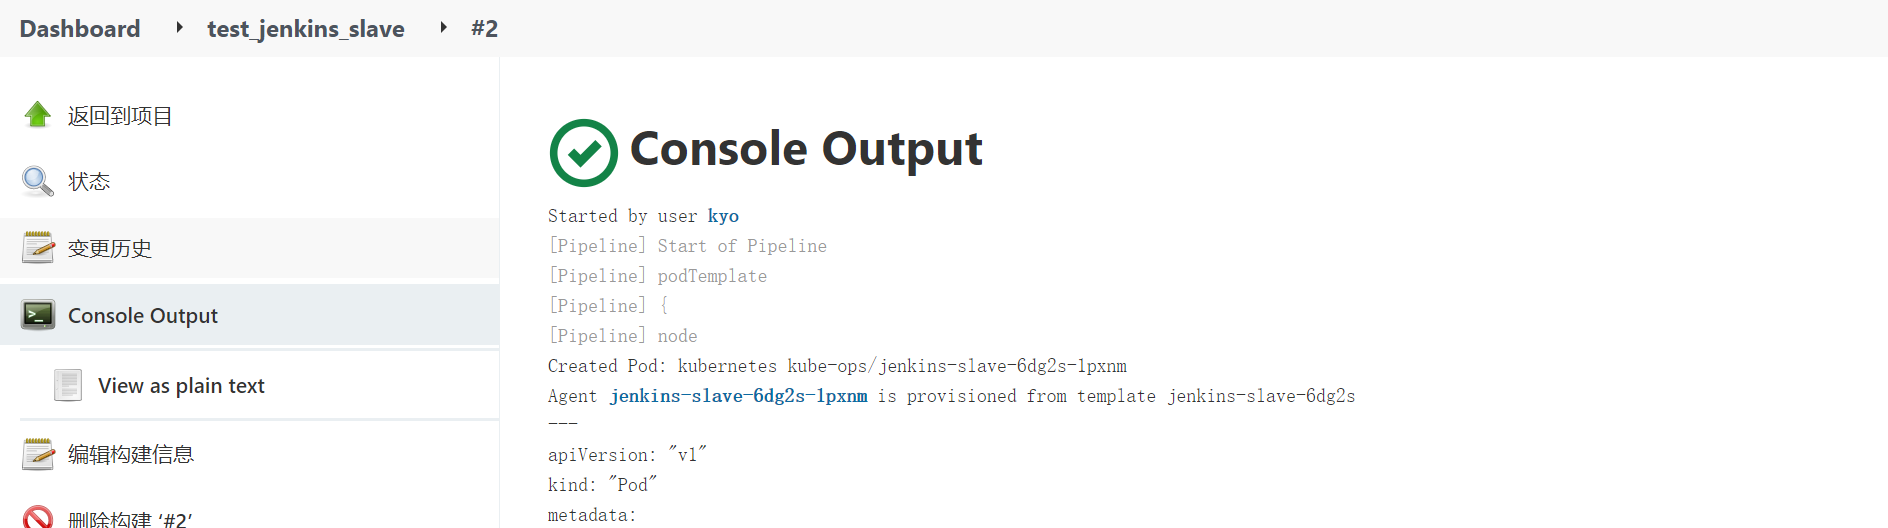
}View the build log (you can open node management to view temporary nodes when creating)
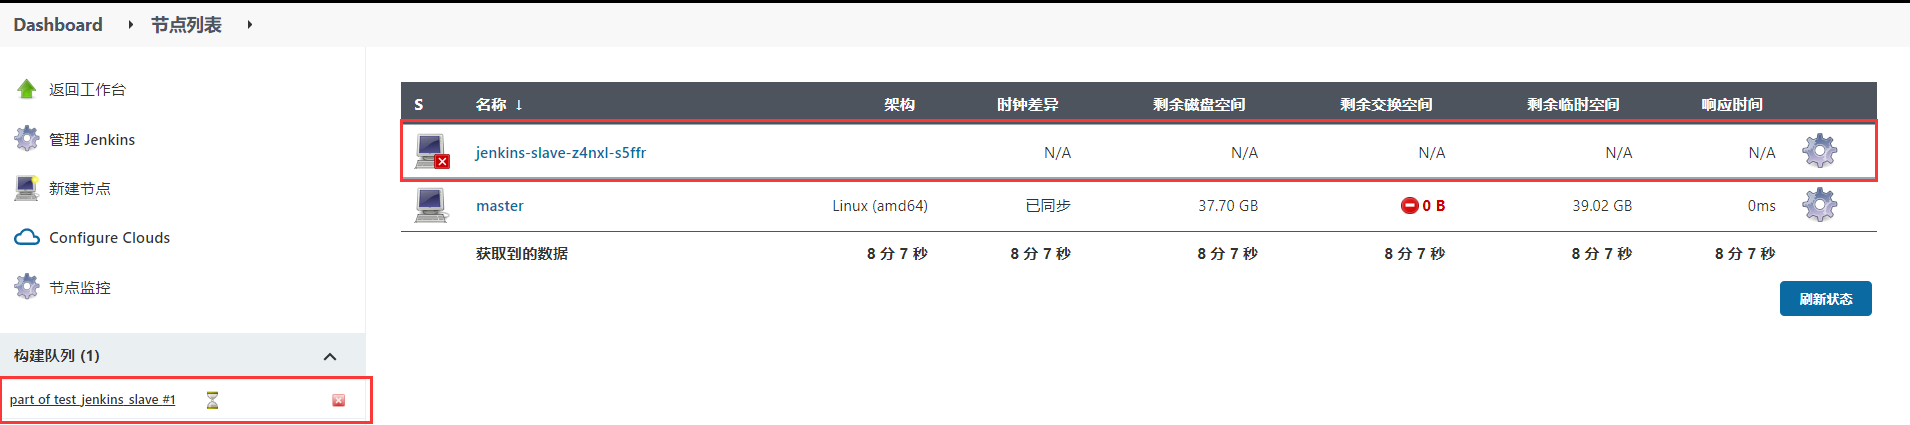
You can see that the slave node appears when you start building, so it is the slave that builds the project. After the project is built, the slave node disappears.