Base environment
System version: CentOS Linux release 7.5.1804 (Core)
Kubernetes version: kubernetes 1.3
Project Background
Guestbook message board system will be built through Pod, RC, Service and other resource objects, and a "Hello World" message will be displayed in the web page after successful launch.Its system architecture is a distributed web application based on PHP+Redis. Front-end PHP Web sites complete query and add functions of user messages by accessing the back-end Redis.Redis is also deployed in Master+Slave mode, enabling read-write separation of data.
Project Architecture
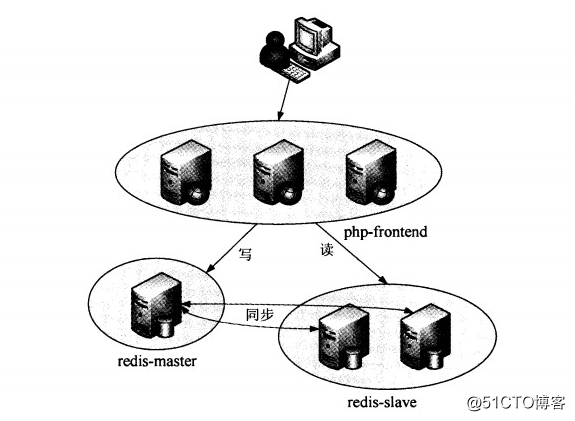
The Web tier is an Apache service based on PHP pages, which starts up three instances to form a cluster to balance the load of visiting websites.Redis Master starts one instance for writing (adding a message) and Redis Slave starts two instances for reading (reading a message).Data synchronization between Redis Master and Slave is accomplished by the data synchronization mechanism that Redis has.
Service Deployment
1. Redis Master deployment
1.1 Create redis-master RC
You can define a service, then define an RC to create and control the associated Pod, or define an RC to create a Pod, then define the associated Service.
First, create a RC definition file named redis-master, redis-master-controller.yaml, for redis-master.
# cat redis-master-controller.yaml
apiVersion: v1
kind: ReplicationController   #Indicates that this is an RC
metadata:
  name: redis-master
  labels:
   name: redis-master
spec:
  replicas: 1
  selector:
   name: redis-master
  template:
   metadata:
     labels:
       name: redis-master
   spec:
     containers:
     - name: master
       image: kubeguide/redis-master
       ports:
       - containerPort: 6379
Once created, publish to the cluster on the master node
# kubectl create -f redis-master-controller.yaml
replicationcontroller/redis-master created
Confirm success of RC and OD creation with kubectl get command
# kubectl get rc
NAME           DESIRED   CURRENT   READY   AGE
redis-master   1         1         0       70s
# kubectl get pods -o wide| grep redis
redis-master-j58mw  1/1     Running   0    3m59s   172.17.39.7   192.168.200.130   <none>  <none>
1.2 Create redis-master service
After redis-master Pod has been created and is functioning properly, create the Service associated with it
# cat redis-master-service.yaml
apiVersion: v1
kind: Service
metadata:
 name: redis-master
 labels:
  name: redis-master
spec:
 ports:
 - port: 6379
   targetPort: 6379
 selector:
  name: redis-master
Run the kubectl create command to create the service
# kubectl create -f redis-master-service.yaml
service/redis-master created
# kubectl get services | grep redis-master
redis-master     ClusterIP   10.0.0.116   <none>    6379/TCP       40s
2. Redis slave deployment
This example starts two copies of the redis-slave service, where the Redis process synchronizes with the redis-master to form a Redis cluster with read-write separation capabilities.The PHP page of the message board reads the message data by accessing the redis-slave service.
2.1. Create redis-slave RC
# cat redis-slave-controller.yaml
apiVersion: v1
kind: ReplicationController
metadata:
  name: redis-slave
  labels:
   name: redis-slave
spec:
  replicas: 2
  selector:
   name: redis-slave
  template:
   metadata:
     labels:
       name: redis-slave
   spec:
     containers:
     - name: slave
       image: kubeguide/guestbook-redis-slave
       env:
       - name: GET_HOSTS_FROM
         value: env
       ports:
         - containerPort: 6379
In the configuration section of the container, an environment variable GET_HOSTS_FROM=env is set, which means to get the IP address information of the redis-master service from the environment variable.
The startup script/run.sh in the redis-slave image is:
# kubectl create -f redis-slave-controller.yaml
replicationcontroller/redis-slave created
# kubectl get rc | grep redis
redis-master   1         1         1       45m
redis-slave    2         2         2       103s
# kubectl get pod | grep redis
redis-master-j58mw                  1/1     Running   0         45m
redis-slave-c42bx                   1/1     Running   0         2m3s
redis-slave-s74b8                   1/1     Running   0         2m3s
2.2 Create redis-slave service
Create a Service related to redis-slave, similar to the redis-master Service.
# cat redis-slave-service.yaml
apiVersion: v1
kind: Service
metadata:
 name: redis-slave
 labels:
  name: redis-slave
spec:
 ports:
 - port: 6379
   targetPort: 6379
 selector:
  name: redis-slave
Run kubectl to create a Service
# kubectl create -f redis-slave-service.yaml
service/redis-slave created
# kubectl get svc | grep redis
redis-master     ClusterIP   10.0.0.116   <none>     6379/TCP       39m
redis-slave     ClusterIP   10.0.0.173   <none>     6379/TCP       49s
3. Deploy frontend
3.1 Create deployment frontend rc
# cat frontend-controller.yaml
apiVersion: v1
kind: ReplicationController
metadata:
name: frontend
labels:
name: frontend
spec:
replicas: 3
selector:
name: frontend
template:
metadata:
labels:
name: frontend
spec:
containers:
- name: frontend
image: kubeguide/guestbook-php-frontend
env:
- name: GET_HOSTS_FROM
value: env
ports:
- containerPort: 80
In the configuration section of the container, an environment variable GET_HOSTS_FROM=env is set, which means to get the IP address information of the redis-master and redis-slave services from the environment variable.
# kubectl create -f frontend-controller.yaml
replicationcontroller/frontend created
View created
# kubectl get rc
NAME           DESIRED   CURRENT   READY   AGE
frontend       3         3         3       5m1s
redis-master   1         1         1       67m
redis-slave    2         2         2       24m
# kubectl get pods
NAME                               READY   STATUS   RESTARTS   AGE
frontend-mnd85                      1/1     Running   0         5m43s
frontend-pmpdb                      1/1     Running   0         5m43s
frontend-zd2n5                      1/1     Running   0         5m43s
3.2 Create deployment frontend service
Finally, a frontend Service is created, mainly to map a port accessible by an external network to a Service in the Kuberbetes cluster using NodePort, the Service's purpose, so that the external network can access the services in the cluster through NodeIP+NodePort.
# cat frontend-service.yaml
apiVersion: v1
kind: Service
metadata:
name: frontend
labels:
name: frontend
spec:
type: NodePort
ports:
- port: 80
nodePort: 30003
selector:
name: frontend
Run the kubectl create command to publish to the cluster
# kubectl create -f frontend-service.yaml
service/frontend created
# kubectl get svc
NAME       TYPE       CLUSTER-IP   EXTERNAL-IP   PORT(S)         AGE
frontend     NodePort    10.0.0.145   <none>        80:30003/TCP     24s
web Page Browsing
http://192.168.200.129:30003/,http://192.168.200.130:30003/ Note: IP for Node node

Sign in again and you'll see a message saying there's no problem reading or writing data.