catalogue
1.2 Kubernetes architecture design
1.3 kubernete service architecture
2.1 basic environment configuration
2.3 configure yum source of kubernetes and install components
2.4 setting kubernetes command completion function
2.6 configure kubectl on the master side
2.7 installing network components
2.8 deletion and recovery of nodes
1, Introduction to Kubernets
Kubernetes is a portable and extensible open source platform for managing containerized workloads and services, which can promote declarative configuration and automation. Kubernetes has a large and fast-growing ecosystem. Kubernetes' services, support and tools are widely available.
Kubernetes abstracts computing resources at a higher level, and gives the final application services to users by carefully combining containers.
1.1 Kubernetes advantages
• hide resource management and error handling. Users only need to pay attention to the development of applications.
• high availability and reliability of services.
• the load can be run in a cluster composed of thousands of machines
1.2 Kubernetes architecture design
Kubernetes cluster includes agent node kubelet and master components (API, scheduler, etc), but they are all based on distributed storage systems.
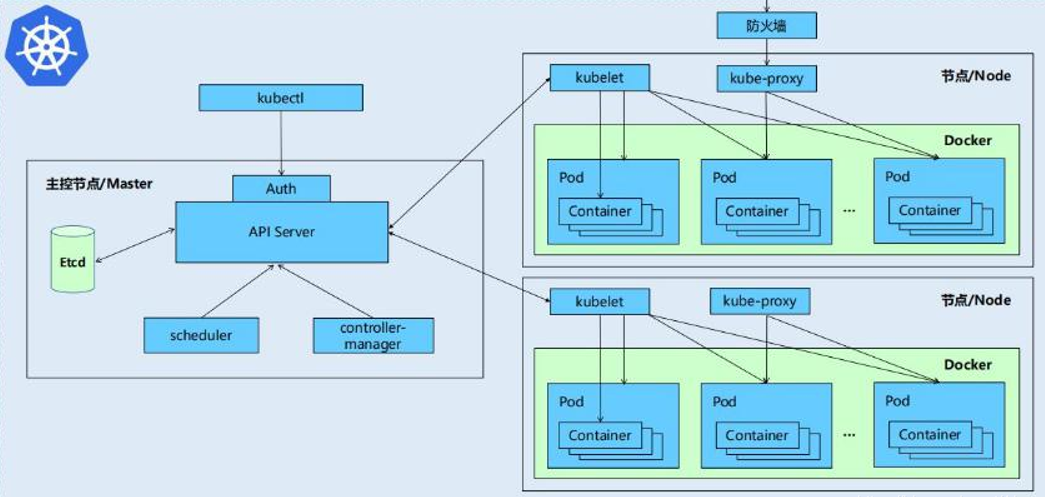 Figure 1 architecture of ubernetes
Core components: etcd, apiserver, controller manager, scheduler, kubelet, container runtime, Kube proxy.
• etcd: saves the status of the entire cluster
• apiserver: it provides a unique entry for resource operation and provides mechanisms such as authentication, authorization, access control, API registration and discovery
• controller manager: responsible for maintaining the status of the cluster, such as fault detection, automatic expansion, rolling update, etc
• scheduler: be responsible for resource scheduling, and schedule the Pod to the corresponding machine according to the predetermined scheduling strategy
• kubelet: responsible for maintaining the life cycle of the container and managing Volume (CVI) and network (CNI)
• Container runtime: responsible for image management and real operation of Pod and container (CRI)
• Kube proxy: responsible for providing Service discovery and load balancing within the cluster for services
Other recommended add ones:
• Kube DNS: responsible for providing DNS services for the whole cluster
• Ingress Controller: provides Internet access for services • Heapster: provides resource monitoring
• Dashboard: provide GUI • Federation: provide clusters across availability zones • fluent d-elastic search: provide cluster log collection, storage and query
1.3 kubernete service architecture
Like Linux, it adopts layered microarchitecture services
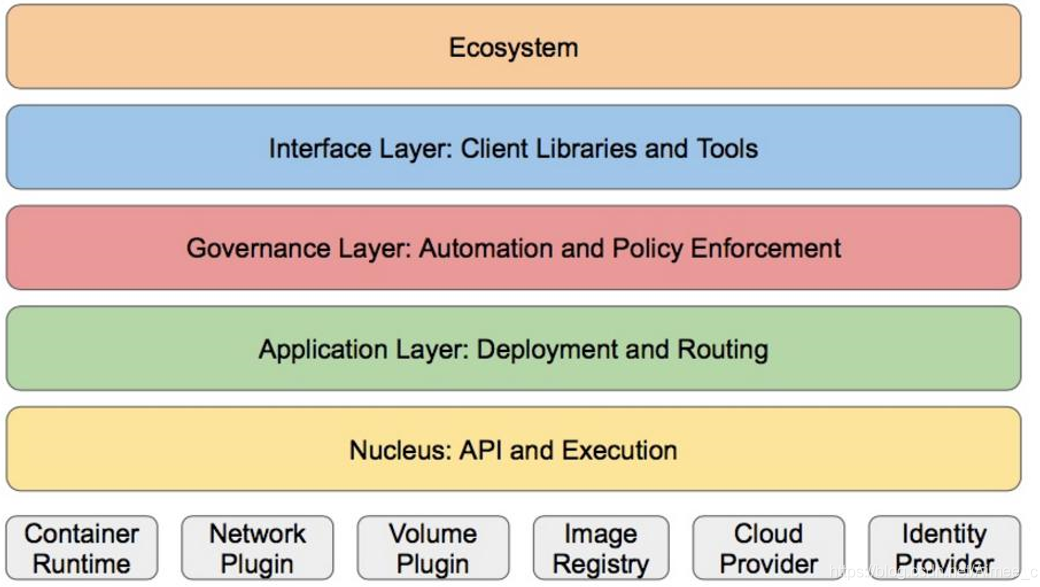 Figure 2 hierarchy of kubernetes
• core layer: the core function of Kubernetes, which provides API for building high-level applications externally and plug-in application execution environment internally
• application layer: Deployment (stateless applications, stateful applications, batch tasks, cluster applications, etc.) and routing (service discovery, DNS resolution, etc.)
• Management: system measurement (such as infrastructure, container and network measurement), automation (such as automatic expansion, dynamic Provision, etc.) and policy management (RBAC, Quota, PSP, NetworkPolicy, etc.)
• interface layer: kubectl command line tool, CLIENT SDK and cluster Federation
• ecosystem: the ecosystem of large container cluster management and scheduling on the interface layer can be divided into two categories
• Kubernetes external: log, monitoring, configuration management, CI, CD, Workflow, FaaS, OTS application, ChatOps, etc
• Kubernetes internal: CRI, CNI, CVI, image warehouse, Cloud Provider, cluster configuration and management, etc
For more information: What is kubernetes| Kubernetes
2, Kubernetes deployment
Official deployment documents: https://kubernetes.io/docs/setup/production-environment/tools/kubeadm/create-cluster-kubeadm/
2.1 basic environment configuration:
• based on redhat7 3 basic services of 6 -- server1 (master) server2 server3
• turn off selinux and iptables firewalls on all hosts
• deploy docker engine, set k8s the network configuration and restart the service on all nodes
##The yum warehouse is configured in advance. The configuration file can be configured according to docker when writing, or refer to aliyu.com Com can be configured
##Install docker
[root@server1 ~]# yum install -y docker-ce docker-cli
##Write k8s the configuration file
[root@server1 ~]# vim /etc/sysctl.d/k8s.conf
####content#####
net.bridge.bridge-nf-call-ip6tables = 1
net.bridge.bridge-nf-call-iptables = 1
##Service overload
[root@server1 ~]# sysctl --system
##Reconfigure docker engine
[root@server1 ~]# vim /etc/docker/daemon.json
####content####
{
"exec-opts": ["native.cgroupdriver=systemd"],
"log-driver": "json-file",
"log-opts": {
"max-size": "100m"
},
"storage-driver": "overlay2",
"storage-opts": [
"overlay2.override_kernel_check=true"
]
}
##Set the docker service to start automatically
[root@server1 ~]# systemctl enable docker --now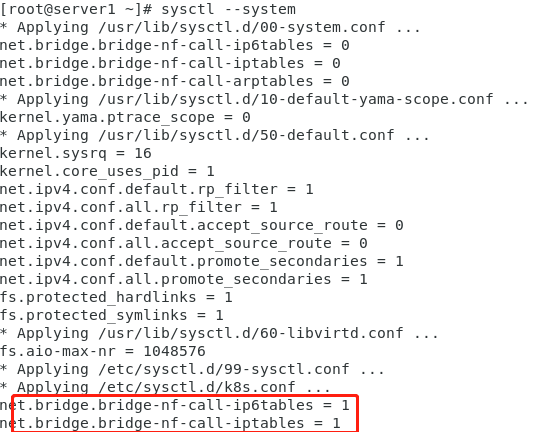 Figure 3 setting gateway
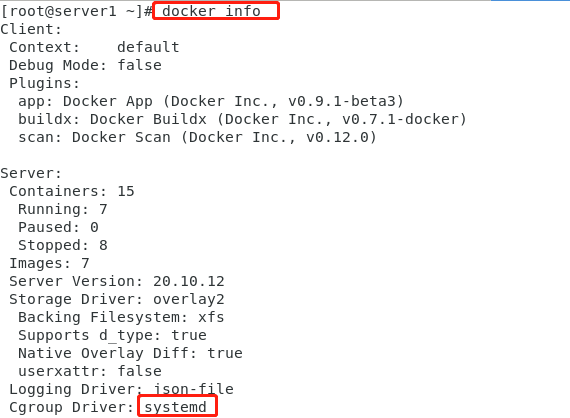 Figure 4 setting docker driver
2.2 disable swap partition
##Disable swap partition for all nodes
[root@server1 ~]# swapoff -a

##Disable the swap definition in the / etc/fstab file
[root@server1 ~]# vim /etc/fstab
[root@server1 ~]# tail -1 /etc/fstab
#UUID=2a714265-f92d-4429-87da-9f09e32e6ff2 swap                    swap    defaults        0 0
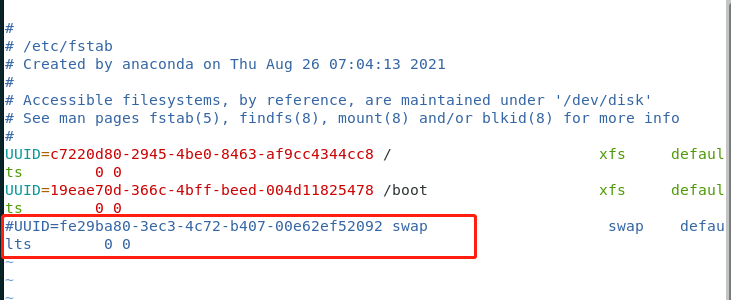 Figure 5 setting swap disabled
2.3 configure yum source of kubernetes and install components
###yum source for kubernetes:
https://kubernetes.io/docs/setup/production-environment/tools/kubeadm/install-kubeadm/#configure-cgroup-driver-used-by-kubelet-on-control-plane-node

##Write configuration file
[root@server1 ~]# vim /etc/yum.repos.d/kubernetes.repo

####Document content####
[kubernetes]
name=Kubernetes
baseurl=https://mirrors.aliyun.com/kubernetes/yum/repos/kubernetes-el7-x86_64/
enabled=1
gpgcheck=0

###Install kubelet kubedm kubectl
[root@server1 ~]# yum install -y kubelet kubeadm kubectl

##Set startup and self startup
[root@server1 ~]# systemctl enable --now kubelet

##View basic information of default configuration
[root@server1 ~]# kubeadm config print init-defaults

##List the required mirrors
[root@server1 ~]# kubeadm config images list --image-repository registry.aliyuncs.com/google_containers

##Pull the corresponding image
[root@server1 ~]# kubeadm config images pull --image-repository registry.aliyuncs.com/google_containers

##View acquired images
[root@server1 ~]# docker images

##The non controlling node only needs to obtain three images
google_containers/kube-proxy,google_containers/coredns,google_containers/pause

##The corresponding image is packaged -- > transmitted to server2 and Server3 -- > decompressed and uploaded to docker image

[root@server1 ~]# docker save registry.aliyuncs.com/google_containers/kube-proxy registry.aliyuncs.com/google_containers/coredns registry.aliyuncs.com/google_containers/pause  > node.tar

[root@server2 ~]# docker load -i node.tar
[root@server2 ~]# docker load -i node.tar
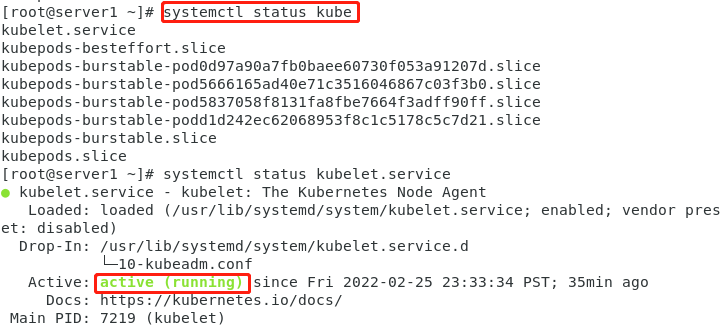 Figure 6 opening kubelet service
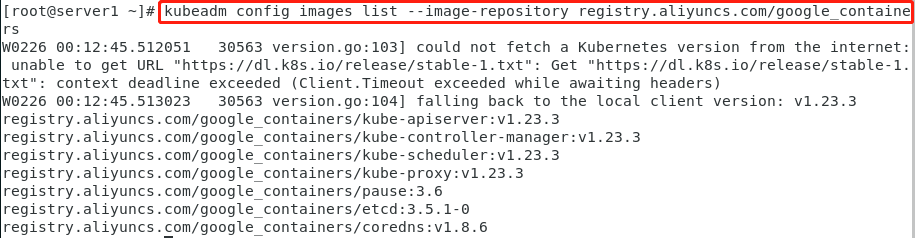 Figure 7 view the required images
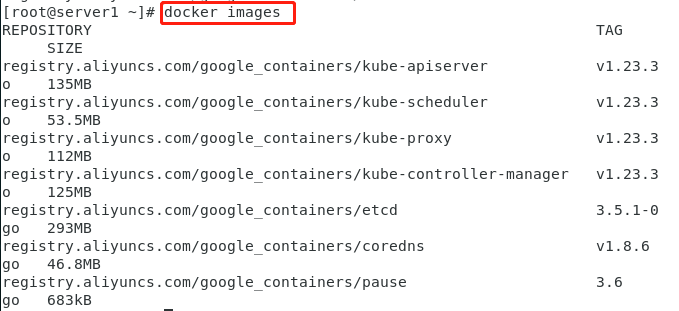 Figure 8 download the corresponding iamges
2.4 setting kubernetes command completion function
##kubernetes command completion
[root@server1 ~]# echo "source <(kubectl completion bash)" >> ~/.bashrc
[root@server1 ~]# source .bashrc
 Figure 9 setting command line completion
2.5 cluster initialization
##Initialize the cluster on the management side

[root@server1 ~]# kubeadm init --pod-network-cidr=10.244.0.0/16 --image-repository registry.aliyuncs.com/google_containers

                 --pod-network-cidr=10.244.0.0/16 ##Must be added when using the flannel network component
                 --kubernetes-version //Specify k8s installation version
##Reset
[root@server1 ~]# kubeadm reset
Note: the token is valid for 24h. If it exceeds the time limit, a new token needs to be generated
Generate a new token:
kubeadm token create
View new hash code:
openssl x509 -pubkey -in /etc/kubernetes/pki/ca.crt | openssl rsa -pubin -outform der 2>/dev/null | \ openssl dgst -sha256 -hex | sed 's/^.* //'
 Figure 10 initialization service
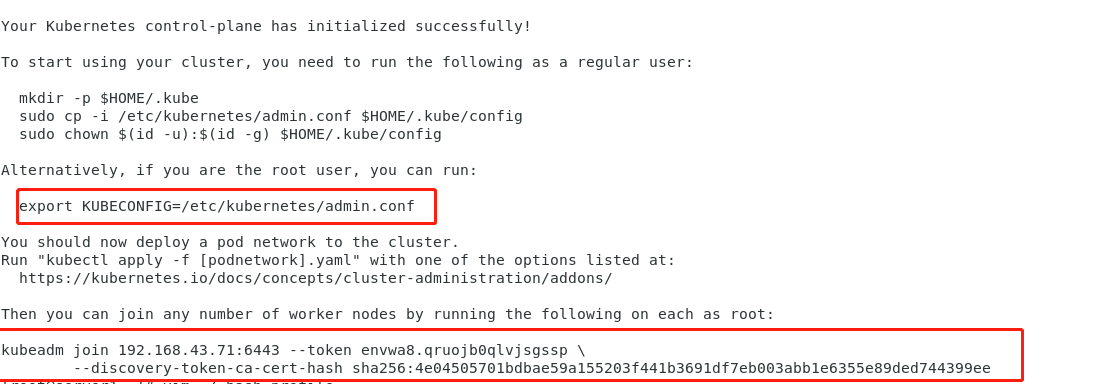 Figure 11 shows the corresponding method of adding clusters
2.6 configure kubectl on the master side
##Add kubedm user and set corresponding permissions
[root@server1 ~]# useradd kubeadm
[root@server1 ~]# vim /etc/sudoers

####Set kubeadm jurisdiction####
kubeadm    ALL =(ALL)    NOPASSWD:ALL

##Create profile -- > write profile -- > set file permissions
[root@server1 ~]# vim /etc/sudoers

[root@server1 ~]# su - kubeadm
[kubeadm@server1 ~]$ mkdir -p $HOME/.kube
[kubeadm@server1 ~]$ cp -i /etc/kubernetes/admin.conf $HOME/.kube/config
cp: cannot open '/etc/kubernetes/admin.conf' for reading: Permission denied
[kubeadm@server1 ~]$ sudo cp -i /etc/kubernetes/admin.conf $HOME/.kube/config
[kubeadm@server1 ~]$ sudo chown $(id -u):$(id -g) $HOME/.kube/config

##The root user only needs to execute
[kubeadm@server1 ~]$ vim ~/.bash_profile
[kubeadm@server1 ~]$ export KUBECONFIG=/etc/kubernetes/admin.conf

##View cluster nodes
[kubeadm@server1 .kube]$ kubectl get node
 Figure 12 creating ordinary users
 Figure 13 general user permission settings
 Figure 14 view the owned nodes
2.7 installing network components
###Download configuration files from the network
[root@server1 ~]# kubectl apply -f https://raw.githubusercontent.com/coreos/flannel/master/Documentation/kube-flannel.yml
master To configure and deploy files kube-fannel.ym,All nodes should be configured with address resolution of the warehouse, and flannel Software Group
##To view component status, all components must be running
[root@server1 ~]# kubectl get pod --all-namespaces
##Other network installations
https://kubernetes.io/zh/docs/concepts/cluster-administration/addons/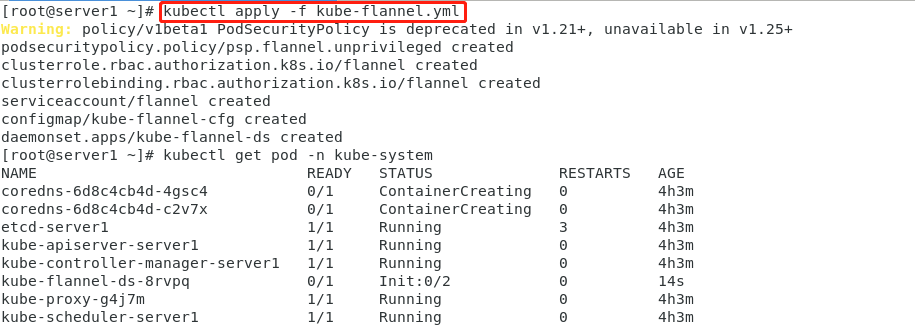 Figure 15 configuring flannel network components
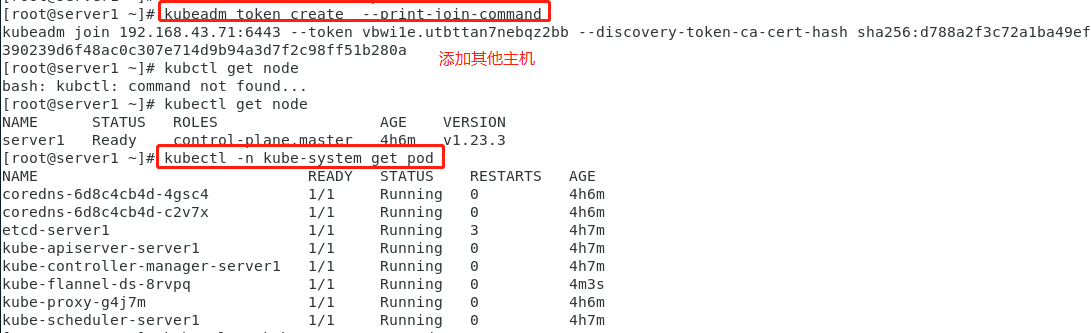 Figure 16 viewing the configured network nodes
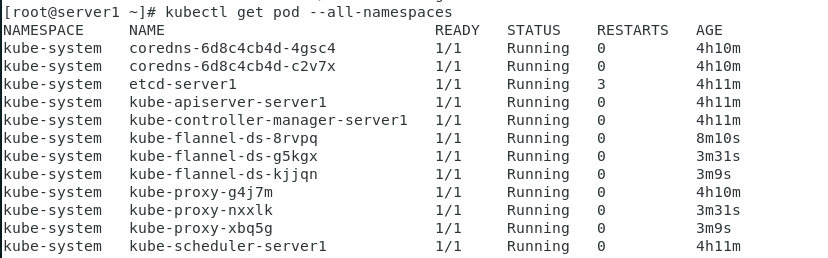 Figure 17 view the basic information of network operation
2.8 deletion and recovery of nodes
##Delete nodes on the master side
[root@server1 ~]# kubectl drain server3 --delete-local-data --force --ignore-daemonsets
[root@server1 ~]# kubectl delete node server3

##Abnormal node
[root@server1 ~]# kubeadm reset
3, Kubectl command
Operation manual: https://kubernetes.io/docs/reference/generated/kubectl/kubectlcommands
kubectl get cs
kubectl get node
kubectl get pod -n kube-system
kubectl get pod -o wide -n kube-system
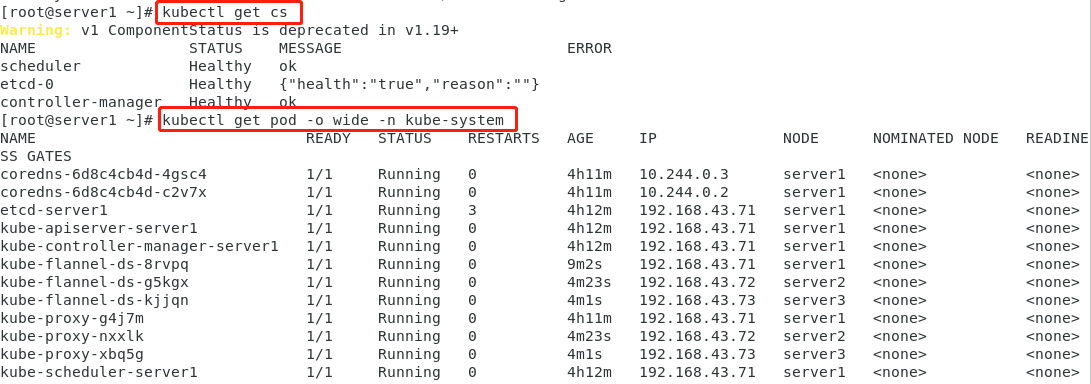 Figure 18 application of basic commands