What is Helm
Before using helm to deploy applications to kubernetes, we need to deploy deployment, svc, etc. in turn. The steps are cumbersome. Moreover, with the microservicing of many projects, the deployment and management of complex applications in containers become more complex. Helm supports release version management and control by packaging, which greatly simplifies the deployment and management of kubernetes applications. Helm essentially allows k8s application management (Deployment,Service, etc.) can be configured and dynamically generated. By dynamically generating K8s resource manifest files (deployment.yaml, service.yaml), and then calling Kubectl to automatically execute K8s resource deployment Helm is an official YUM like package manager, which is the process encapsulation of the deployment environment. Helm has two important concepts: chart and Helm.
- The package format used by Helm is called chart.
chart is a collection of information to create an application, including configuration templates, parameter definitions, dependencies and documentation of various Kubernetes objects
Ming et al. Chart is a self-contained logical unit for application deployment. You can think of chart as a software installation package in apt and yum. - Chart file structure
Chart is a collection organized in the file directory. The directory name is the chart name (no version information). Therefore, chart describing wordpress can be stored in wordpress / directory.
In this directory, Helm expects to match the following structure:
wordpress/
  Chart.yaml          # YAML file containing chart information
  LICENSE             # Optional: a plain text file containing a chart license
  README.md           # Optional: readable README file
  values.yaml         # chart default configuration value
  values.schema.json  # Optional: a values.yaml file using JSON structure
  charts/             # Contains other charts that chart depends on
  crds/               # Definition of custom resources
  templates/          # Template directory, when combined with values, can generate a valid Kubernetes manifest file
  templates/NOTES.txt # Optional: plain text file with brief instructions
- Several concepts involved in Helm
- Repository: a repository for centralized storage and distribution of Chart, similar to Perl's CPAN or Python's PyPI.
- Config: Chart instantiates the configuration information used by the installation runtime.
- Release: Chart instantiates an application instance running in the Kubernetes cluster after configuration; on the same cluster, a chart can be installed repeatedly with different configs, and a new release will be created each time
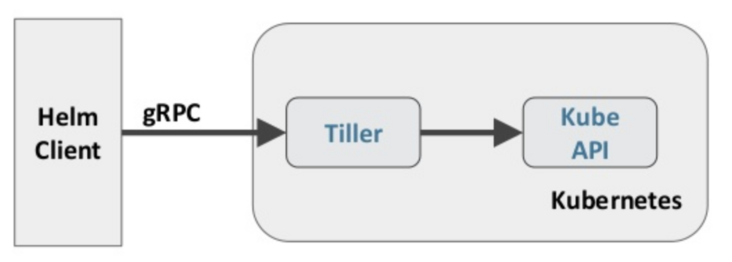
- Helm consists of two components: helm client and Tiller server, as shown in the following figure

- The Helm client is responsible for the creation and management of chart and release and the interaction with Tiller. The Tiller server runs in the Kubernetes cluster
In, it processes requests from Helm clients and interacts with Kubernetes API Server
Helm deployment
helm v3 version can be used directly without Tiller
Download the appropriate version on the official website:
https://helm.sh/zh/docs/intro...
helm warehouse
- Install helm v3
[root@k8s-master helm]# ls
helm-v3.6.1-linux-amd64.tar.gz
[root@k8s-master helm]# tar -xf helm-v3.6.1-linux-amd64.tar.gz
l[root@k8s-master helm]# ls
helm-v3.6.1-linux-amd64.tar.gz  linux-amd64
[root@k8s-master helm]# cd linux-amd64/
[root@k8s-master linux-amd64]# ls
helm  LICENSE  README.md
- helm is an executable binary file that is copied directly to
[root@k8s-master linux-amd64]# cp helm /usr/local/bin/helm

[root@k8s-master linux-amd64]# helm --help
The Kubernetes package manager

Common actions for Helm:

- helm search:    search for charts
- helm pull:      download a chart to your local directory to view
- helm install:   upload the chart to Kubernetes
- helm list:      list releases of charts

Environment variables:
......
Helm common commands
[root@k8s-master helm]# helm list -A   #View all Helms or specify namespace s
[root@k8s-master helm]# helm repo list   #View warehouse
[root@k8s-master helm]# helm search hub  grafana   #hup search
[root@k8s-master helm]# helm search repo  grafana   #Warehouse search
NAME                          CHART VERSION    APP VERSION    DESCRIPTION
grafana/grafana               6.13.6           8.0.3          The leading tool for querying and visualizing t...
grafana/enterprise-metrics    1.3.5            v1.3.0         Grafana Enterprise Metrics

[root@k8s-master helm]#  helm pull grafana/grafana   #Download Chart to local
Addition of helm hub and repository warehouse
helm search hub
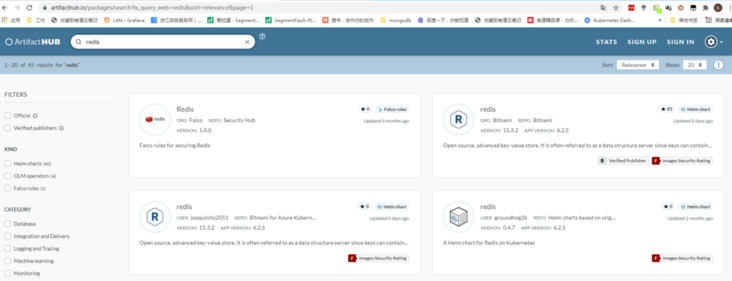
- Search redis in helm hub warehouse

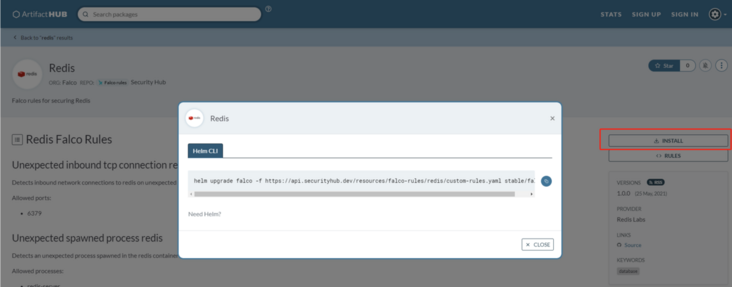
- Click install on the right to add the warehouse address as prompted

- Search the warehouse address through the helm search hub to find the appropriate version and install it directly
[root@k8s-master repository]# helm search hub redis -o yaml
- app_version: 6.2.5
  description: A Helm chart for Redis on Kubernetes
  url: https://artifacthub.io/packages/helm/groundhog2k/redis
  version: 0.4.7
- app_version: 6.0.11
  description: Open source, advanced key-value store. It is often referred to as a
    data structure server since keys can contain strings, hashes, lists, sets and
    sorted sets.
  url: https://artifacthub.io/packages/helm/taalhuizen-service/redis
  version: 12.7.7
- app_version: 1.16.0
  description: Redis with metrics compatible with ARM
  url: https://artifacthub.io/packages/helm/mmontes/redis
  version: 0.1.0
- app_version: 6.2.5
  description: Open source, advanced key-value store. It is often referred to as a
    data structure server since keys can contain strings, hashes, lists, sets and
    sorted sets.
  url: https://artifacthub.io/packages/helm/wenerme/redis
  version: 15.3.2
- app_version: ""
  description: A Redis database for use inside a Kubernetes cluster.
  url: https://artifacthub.io/packages/helm/drycc-canary/redis
  version: 1.0.0
Helm repository warehouse
Common helm warehouse
helm repo add stable https://charts.helm.sh/stable #Official warehouse
helm repo add bitnami https://charts.bitnami.com/bi... #Third party warehouse- View existing warehouse
[root@k8s-master ~]# helm repo list
Error: no repositories to show
- Add helm warehouse
[root@k8s-master ~]# helm repo add bitnami https://charts.bitnami.com/bitnami
[root@k8s-master ~]# helm repo add stable https://charts.helm.sh/stable
"stable" has been added to your repositories
[root@k8s-master ~]# helm repo list
NAME       URL
bitnami    https://charts.bitnami.com/bitnami
stable     https://charts.helm.sh/stable
[root@k8s-master ~]# helm repo update  #Update index information after adding and deleting warehouses
Hang tight while we grab the latest from your chart repositories...
...Successfully got an update from the "stable" chart repository
...Successfully got an update from the "bitnami" chart repository
Update Complete. ⎈Happy Helming!⎈
- Search char
[root@k8s-master ~]# helm search repo redis
NAME                                CHART VERSION    APP VERSION    DESCRIPTION
bitnami/redis                       15.3.2           6.2.5          Open source, advanced key-value store. It is of...
bitnami/redis-cluster               6.3.6            6.2.5          Open source, advanced key-value store. It is of...
stable/prometheus-redis-exporter    3.5.1            1.3.4          DEPRECATED Prometheus exporter for Redis metrics
stable/redis                        10.5.7           5.0.7          DEPRECATED Open source, advanced key-value stor...
stable/redis-ha                     4.4.6            5.0.6          DEPRECATED - Highly available Kubernetes implem...
stable/sensu                        0.2.5            0.28           DEPRECATED Sensu monitoring framework backed by...
Download chart to local
- Method 1 pull direct download
[root@k8s-master ~]# cd mag/helm/
[root@k8s-master helm]# helm pull bitnami/redis  #Download chart locally
[root@k8s-master helm]# ls
helm-v3.6.1-linux-amd64.tar.gz  redis-15.3.2.tgz
[root@k8s-master helm]# tar -xf redis-15.3.2.tgz
[root@k8s-master helm]# cd redis/
[root@k8s-master redis]# ls
Chart.lock  charts  Chart.yaml  ci  img  README.md  templates  values.schema.json  values.yaml
[root@k8s-master redis]#
- Method 2 cannot find chart in buffer file
After the installation command is executed, helm will generate. Cache in the home directory, and the cache file will also contain chart
[root@k8s-master repository]# helm install db  bitnami/redis
[root@k8s-master repository]# pwd
/root/.cache/helm/repository

[root@k8s-master repository]# ll
total 19080
-rw-r--r-- 1 root root    1094 Sep 16 17:45 bitnami-charts.txt
-rw-r--r-- 1 root root 9570808 Sep 16 17:45 bitnami-index.yaml
-rw-r--r-- 1 root root   28227 Jul  1 17:40 grafana-6.13.6.tgz
-rw-r--r-- 1 root root    3908 Jul  7 21:41 myweb
-rw-r--r-- 1 root root    3872 Jul  7 03:13 nginx
-rw-r--r-- 1 root root   77619 Sep 17 11:53 redis-15.3.2.tgz  #redis chart file
-rw-r--r-- 1 root root    3370 Sep 16 17:44 stable-charts.txt
-rw-r--r-- 1 root root 9839197 Sep 16 17:44 stable-index.yaml
[root@k8s-master repository]# tar -xf redis-15.3.2.tgz
[root@k8s-master repository]# ls
bitnami-charts.txt  bitnami-index.yaml  grafana-6.13.6.tgz  myweb  nginx  redis  redis-15.3.2.tgz  stable-charts.txt  stable-index.yaml
[root@k8s-master repository]# cd redis/   #Enter the redis cache file
[root@k8s-master redis]# ls
Chart.lock  charts  Chart.yaml  ci  img  README.md  templates  values.schema.json  values.yaml
- View details of redis chart
[root@k8s-master helm]# helm show all bitnami/redis  #Displays all information about chart
[root@k8s-master helm]# helm show readme  bitnami/redis   #The readme information of chart is displayed. You can view the example, configuration, update details of each version, etc

NAME    NAMESPACE    REVISION    UPDATED    STATUS    CHART    APP VERSION
[root@k8s-master helm]# helm install db  bitnami/redis
NAME: db
LAST DEPLOYED: Fri Sep 17 11:44:05 2021
NAMESPACE: default
STATUS: deployed
REVISION: 1
TEST SUITE: None
NOTES:
** Please be patient while the chart is being deployed **

#The following is a description of the application, including the port connection mode used, etc
Redis™ can be accessed on the following DNS names from within your cluster:

    db-redis-master.default.svc.cluster.local for read/write operations (port 6379)  #port
    db-redis-replicas.default.svc.cluster.local for read-only operations (port 6379)

To get your password run:

    export REDIS_PASSWORD=$(kubectl get secret --namespace default db-redis -o jsonpath="{.data.redis-password}" | base64 --decode)  #Get password

To connect to your Redis™ server:
#Different methods of connecting to redis
1. Run a Redis™ pod that you can use as a client:

   kubectl run --namespace default redis-client --restart='Never'  --env REDIS_PASSWORD=$REDIS_PASSWORD  --image docker.io/bitnami/redis:6.2.5-debian-10-r34 --command -- sleep infinity

   Use the following command to attach to the pod:

   kubectl exec --tty -i redis-client \
   --namespace default -- bash

2. Connect using the Redis™ CLI:
   redis-cli -h db-redis-master -a $REDIS_PASSWORD
   redis-cli -h db-redis-replicas -a $REDIS_PASSWORD

To connect to your database from outside the cluster execute the following commands:

    kubectl port-forward --namespace default svc/db-redis-master 6379:6379 &
    redis-cli -h 127.0.0.1 -p 6379 -a $REDIS_PASSWORD


[root@k8s-master helm]# kubectl get secret --namespace default db-redis -o jsonpath="{.data.redis-password}" | base64 --decode
usubChTbCD

[root@k8s-master helm]# kubectl get pod  #View deployment status
NAME                  READY   STATUS             RESTARTS   AGE
db-redis-master-0     0/1     Pending            0          3m44s  #Pending status
db-redis-replicas-0   0/1     Pending            0          3m44s
mypod-env             0/1     CrashLoopBackOff   506        42h


[root@k8s-master helm]# kubectl describe pod db-redis-master-0    #View description information
.....
Events:
  Type     Reason            Age   From               Message
  ----     ------            ----  ----               -------
  Warning  FailedScheduling  6m2s  default-scheduler  0/4 nodes are available: 4 pod has unbound immediate PersistentVolumeClaims.   #Unable to request PVC resources
  Warning  FailedScheduling  6m1s  default-scheduler  0/4 nodes are available: 4 pod has unbound immediate PersistentVolumeClaims.
Example 2: redis deployment
- Modify chart according to your actual situation
- Enter the previously downloaded chart, modify the values.yaml file, and close the PVC requirements in the test environment
[root@k8s-master redis]# pwd
/root/mag/helm/redis
[root@k8s-master redis]# ls
Chart.lock charts Chart.yaml ci img README.md templates values.schema.json values.yaml
[root@k8s-master redis]# vim values.yaml
persistence:
## @param master.persistence.enabled Enable persistence on Redis™ master nodes using Persistent Volume Claims
##
enabled: false #Turn off the master data persistence test environment and no PVC is set up
## @param master.persistence.path The path the volume will be mounted at on Redis™ master containers
## NOTE: Useful when using different Redis™ images
##
path: /data
## @param master.persistence.subPath The subdirectory of the volume to mount on Redis™ master containers
## NOTE: Useful in dev environments
##
subPath: ""
## @param master.persistence.storageClass Persistent Volume storage class
## If defined, storageClassName: <storageClass>
## If set to "-", storageClassName: "", which disables dynamic provisioning
## If undefined (the default) or set to null, no storageClassName spec is set, choosing the default provisioner
##
storageClass: "" #You can choose longhorn if you have deployed longhorn before
## @param master.persistence.accessModes [array] Persistent Volume access modes
##
accessModes:
- ReadWriteOnce
## @param master.persistence.size Persistent Volume size
##
size: 8Gi
persistence:
## @param replica.persistence.enabled Enable persistence on Redis™ replicas nodes using Persistent Volume Claims
##
enabled: false #Turn off the slave data persistence test environment, and no PVC is built
## @param replica.persistence.path The path the volume will be mounted at on Redis™ replicas containers
## NOTE: Useful when using different Redis™ images
##
path: /data
## @param replica.persistence.subPath The subdirectory of the volume to mount on Redis™ replicas containers
## NOTE: Useful in dev environments
##
subPath: ""
## @param replica.persistence.storageClass Persistent Volume storage class
## If defined, storageClassName: <storageClass>
## If set to "-", storageClassName: "", which disables dynamic provisioning
## If undefined (the default) or set to null, no storageClassName spec is set, choosing the default provisioner
##
storageClass: ""
## @param replica.persistence.accessModes [array] Persistent Volume access modes
##
accessModes:
- ReadWriteOnce
## @param replica.persistence.size Persistent Volume size
##
size: 8Gi
#The number of copies to be modified is 1. It is modified according to your needs. The default value is 3
replica:
## @param replica.replicaCount Number of Redis™ replicas to deploy
##
replicaCount: 1Redeploy installation
helm passes parameters and refers to three variables
- Mode 1 is also the chart in the repo warehouse, but the variable configuration file is specified
[root@k8s-master helm]# helm install db bitnami/redis -f ./redis/values.yaml
- Mode 2: Command direct shutdown during installation
[root@k8s-master helm]# helm install db bitnami/redis --set master.persistence.enabled=false --set replica.persistence.enabled=false --set replice.replicaCount=1
- Method 3: directly use the modified chart
[root@k8s-master helm]# helm install db redis
NAME: db
LAST DEPLOYED: Fri Sep 17 15:46:50 2021
NAMESPACE: default
STATUS: deployed
REVISION: 1
TEST SUITE: None
NOTES:
** Please be patient while the chart is being deployed **

Redis™ can be accessed on the following DNS names from within your cluster:

    db-redis-master.default.svc.cluster.local for read/write operations (port 6379)
    db-redis-replicas.default.svc.cluster.local for read-only operations (port 6379)

To get your password run:

    export REDIS_PASSWORD=$(kubectl get secret --namespace default db-redis -o jsonpath="{.data.redis-password}" | base64 --decode)

To connect to your Redis™ server:

1. Run a Redis™ pod that you can use as a client:

   kubectl run --namespace default redis-client --restart='Never'  --env REDIS_PASSWORD=$REDIS_PASSWORD  --image docker.io/bitnami/redis:6.2.5-debian-10-r34 --command -- sleep infinity

   Use the following command to attach to the pod:

   kubectl exec --tty -i redis-client \
   --namespace default -- bash

2. Connect using the Redis™ CLI:
   redis-cli -h db-redis-master -a $REDIS_PASSWORD
   redis-cli -h db-redis-replicas -a $REDIS_PASSWORD

To connect to your database from outside the cluster execute the following commands:

    kubectl port-forward --namespace default svc/db-redis-master 6379:6379 &
redis-cli -h 127.0.0.1 -p 6379 -a $REDIS_PASSWORD- The above connection mode information does not need to be saved. You can view it again through status
[root@k8s-master helm]# helm status  db
[root@k8s-master helm]# kubectl get pod
NAME                  READY   STATUS    RESTARTS   AGE
db-redis-master-0     1/1     Running   0          39s
db-redis-replicas-0   0/1     Running   0          39s
- Get redis password
[root@k8s-master helm]# kubectl get secret --namespace default db-redis -o jsonpath="{.data.redis-password}" | base64 --decode
0Wf7jcy379[root@k8s-master helm]# - Login master node
[root@k8s-master helm]# kubectl exec db-redis-master-0 -it -- /bin/sh
$ redis-cli -a 0Wf7jcy379
Warning: Using a password with '-a' or '-u' option on the command line interface may not be safe.
127.0.0.1:6379> set mykey www.google.com
OK
127.0.0.1:6379> set mykey2 www.baidu.com
OK
127.0.0.1:6379> get mykey2
"www.baidu.com"
127.0.0.1:6379> exit

$ redis-cli -h db-redis-replicas -a 0Wf7jcy379  #Log in to the slave node to see if the data has been synchronized
Warning: Using a password with '-a' or '-u' option on the command line interface may not be safe.
db-redis-replicas:6379> get mykey
"www.google.com"
db-redis-replicas:6379> get mykey2
"www.baidu.com"
db-redis-replicas:6379>

[root@k8s-master helm]# helm  install   db2 redis -n dev  #Deploy redis in dev namespace

[root@k8s-master helm]# helm  delete  db2 redis -n dev #Delete db2