Recently, I began to learn relevant knowledge of Kubernetes through geek time In depth analysis of Kubernetes For the practical courses related to muke.com, I also have a preliminary understanding of Kubernetes. Blogging is also to record the learning process.
Let's start the environment construction of Kubernetes
Pre knowledge
- Learn about docker
- Knowledge of Linux
- Learn about some common development software (such as nginx,mysql, etc.)
Environmental description
- Windows 10 operating system
- The latest version of virtual box
- vagrant latest edition
- centos7
The above software can be downloaded on the official website
The Kubernetes cluster needs to be built here, so you need to use virtual box to create multiple virtual machines, and then use vagrant to manage multiple virtual machines.
Virtual machine environment construction
Create three virtual machines through vagrant, one manager master node and two node nodes
download centos And add the box to your local
After downloading, add a box, execute vagrant box add centos/7 to download the box path, and add the corresponding box
Define the Vagrantfile file. The contents of the file are as follows. The file defines three virtual machines, namely master, node1 and node2. Allocate the corresponding static ip, memory and cpu cores. Since Kubernetes requires that the minimum number of nodes should not be less than 2048M and the number of cpu cores should be greater than or equal to 2, it cannot be lower than the configuration I gave. Assign a private network to the virtual machine, and execute the setup.sh script when creating to download docker on the virtual machine
# -*- mode: ruby -*-
# vi: set ft=ruby :

Vagrant.require_version ">= 1.6.0"

boxes = [
    {
        :name => "master",
        :eth1 => "192.168.205.10",
        :mem => "2048",
        :cpu => "2"
    },
    {
        :name => "node1",
        :eth1 => "192.168.205.11",
        :mem => "2048",
        :cpu => "2"
    },
    {
        :name => "node2",
        :eth1 => "192.168.205.12",
        :mem => "2048",
        :cpu => "2"
    }
]

Vagrant.configure(2) do |config|

  config.vm.box = "centos/7"

  boxes.each do |opts|
      config.vm.define opts[:name] do |config|
        config.vm.hostname = opts[:name]
        config.vm.provider "vmware_fusion" do |v|
          v.vmx["memsize"] = opts[:mem]
          v.vmx["numvcpus"] = opts[:cpu]
        end

        config.vm.provider "virtualbox" do |v|
          v.customize ["modifyvm", :id, "--memory", opts[:mem]]
          v.customize ["modifyvm", :id, "--cpus", opts[:cpu]]
        end

        config.vm.network :private_network, ip: opts[:eth1]
      end
  end

  config.vm.provision "shell", privileged: true, path: "./setup.sh"

end
The contents of the setup.sh file are as follows:
#/bin/sh

# install some tools
sudo yum install -y git vim gcc glibc-static telnet bridge-utils

# install docker
curl -fsSL get.docker.com -o get-docker.sh
sh get-docker.sh

# start docker service
sudo groupadd docker
sudo gpasswd -a vagrant docker
sudo systemctl start docker
sudo systemctl enable docker.service
rm -rf get-docker.sh
Then execute vagrant up to start the virtual machine, which may take some time to create the virtual machine and initialize the environment
Kubernetes cluster construction
After the virtual machine is started, you can enter the corresponding virtual machine through the vagrant ssh virtual machine name
First, we enter the master node and install the Kubernetes cluster master node on the master node
Turn on br_netfilter
cat <<EOF | sudo tee /etc/modules-load.d/k8s.conf
br_netfilter
EOF
Deliver the bridged IPV4 traffic to iptables (if docker is used, there is no problem not setting it, because dockerd will help us set it, but if containerd is used, it needs to be set)
cat <<EOF | sudo tee /etc/sysctl.d/k8s.conf
net.bridge.bridge-nf-call-ip6tables = 1
net.bridge.bridge-nf-call-iptables = 1
EOF
Make sysctl effective
sysctl --system
Alicloud source configured k8s
cat >>/etc/yum.repos.d/kubernetes.repo <<EOF
[kubernetes]
name=Kubernetes
baseurl=https://mirrors.aliyun.com/kubernetes/yum/repos/kubernetes-el7-x86_64/
enabled=1
gpgcheck=1
repo_gpgcheck=1
gpgkey=https://mirrors.aliyun.com/kubernetes/yum/doc/yum-key.gpg https://mirrors.aliyun.com/kubernetes/yum/doc/rpm-package-key.gpg
EOF
Install kubelet, kubedm, kubectl
yum install -y kubelet-1.19.3 kubeadm-1.19.3 kubectl-1.19.3
Power on
systemctl enable kubelet
On the master, set the hostname
hostnamectl set-hostname master
Configure / etc/hosts
192.168.205.10 master
192.168.205.11 node1
192.168.205.12 node2
Initialize kubedm
Before initializing kubedm, there are some considerations
Note: the minimum node configuration is 2-core 2G, so when configuring the virtual machine, the minimum configuration is 2-core 2G
Create the / etc/docker/daemon.json file to add content, set the docker driver, and restart the docker service
{
 "exec-opts": ["native.cgroupdriver=systemd"]
}
Close swap and add the ignore preflight errors parameter during initialization
swapoff -a
sed -ri 's/.*swap.*/#&/' /etc/fstab
Initialize the master node with kubedm
The essence of kubedm is to run kubelet directly on the host, and then deploy other Kubernetes components using containers.
The first step in using kubedm is to manually install kubedm, kubelet, and kubectl binaries on the machine.
After you execute the kubedm init command, the first thing kubedm should do is a series of checks to determine that the machine can be used to deploy Kubernetes. This step of inspection, which we call "Preflight Checks", can save you a lot of follow-up trouble.
After passing Preflight Checks, kubedm needs to generate various certificates and corresponding directories required by Kubernetes to provide services.
Next, kubedm will generate a Pod configuration file for the Master component.
Then, kubedm will generate a bootstrap token for the cluster. Later, as long as the token is held, any node with kubelet and kubadm installed can join the cluster through kubedm join.
The final step of kubedm init is to install the default plug-in. Kubernetes default Kube proxy and DNS plug-ins must be installed. They are used to provide service discovery and DNS functions of the whole cluster. In fact, these two plug-ins are just two container images, so kubedm just needs to create two pods with kubernetes client.
kubeadm init --kubernetes-version=1.19.3
 --apiserver-advertise-address=192.168.205.10 \ --image-repository registry.aliyuncs.com/google_containers \ --service-cidr=10.1.0.0/16 \ --pod-network-cidr=10.244.0.0/16
Note: the – kubernetes version is the kubernetes version installed above, and the – apiserver advertisement address is the ip address of the master node
See successful! That means it's successful
Configure kube environment
mkdir -p $HOME/.kube
sudo cp -i /etc/kubernetes/admin.conf $HOME/.kube/config
sudo chown $(id -u):$(id -g) $HOME/.kube/config
The Kubernetes cluster requires encrypted access by default. Therefore, these commands are to save the security configuration file of the Kubernetes cluster just deployed and generated to the. kube directory of the current user. kubectl will use the authorization information in this directory to access the Kubernetes cluster by default.
If we don't, we need to tell kubectl the location of the security configuration file through the export KUBECONFIG environment variable every time.
Configure kubeconfig environment variable
echo "export KUBECONFIG=/etc/kubernetes/admin.conf" >>~/.bash_profile
Make configuration effective
source ~/.bash_profile
Verify that the following information shows that the configuration has taken effect, but the master node of the current cluster has not taken effect and is in NotReady state because we have not installed network components
[vagrant@master ~]$ kubectl get node
NAME            STATUS     ROLES    AGE   VERSION
master         NotReady   master   45m   v1.19.3
[vagrant@master ~]$
Under the guidance of the design concept of "everything is a container" of Kubernetes project, deploying network plug-ins is very simple. You only need to execute a kubectl apply instruction
After installing calico network components, calico.yaml can be downloaded directly to the calico official website to the virtual machine, execute the following command
kubectl apply -f calico.yaml
View nodes again
[vagrant@master ~]$ kubectl get node
NAME            STATUS   ROLES    AGE   VERSION
master          Ready    master   48m   v1.19.3
[vagrant@master ~]$
Check out which pod s kubernetes are running
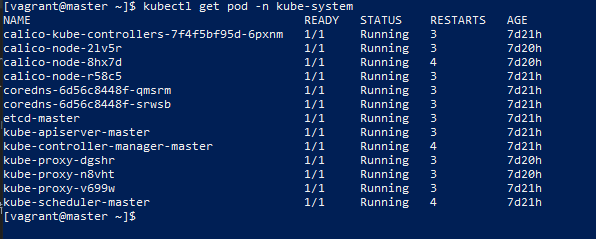
So far, the master node has been configured. Next, configure the node node
node configuration
Entering the node1 node is similar to the previous operation of the master node. First install the corresponding environment, that is, the operation before initializing kubedm
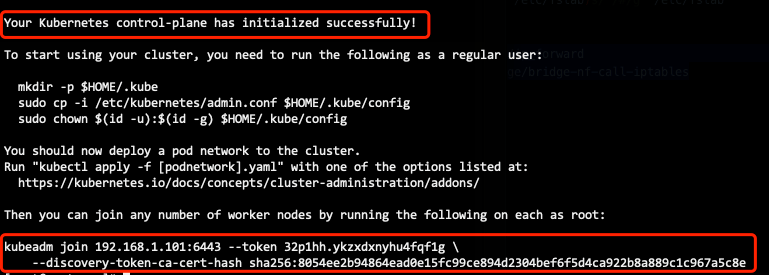
The kubedm join command displayed just after the master node is initialized successfully enables the node node to join the cluster
Copy kubedm join to join the cluster command, which can be viewed through the command kubedm token create – print join command:
kubeadm join 192.168.205.10:6443 --token d3jpig.rv554dxknrb3ptsd --discovery-token-ca-cert-hash sha256:3cab09ca90964bd8f74952ae572b6f8ee79b4ca09e6b09fdbcad1883bb8e2b15
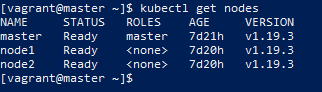
After joining the cluster, you can view the node in the master again, and you can see that node1 node has joined the cluster
[vagrant@master ~]$ kubectl get node
NAME     STATUS   ROLES    AGE   VERSION
master   Ready    master   34m   v1.19.3
node1    Ready    <none>   64s   v1.19.3
The node2 node operates the same as node1 node. After the operation is completed, the cluster initialization operation is officially completed and Kubernetes can be formally started.