kubernetes experiment
Add root user
zzs@master:~$ sudo passwd root
Change mirror source
root@master:/etc/apt# vim sources.list
#Clear all contents ggdG
deb http://mirrors.aliyun.com/ubuntu/ xenial main restricted
deb http://mirrors.aliyun.com/ubuntu/ xenial-updates main restricted
deb http://mirrors.aliyun.com/ubuntu/ xenial universe
deb http://mirrors.aliyun.com/ubuntu/ xenial-updates universe
deb http://mirrors.aliyun.com/ubuntu/ xenial multiverse
deb http://mirrors.aliyun.com/ubuntu/ xenial-updates multiverse
deb http://mirrors.aliyun.com/ubuntu/ xenial-backports main restricted universe multiverse
deb http://mirrors.aliyun.com/ubuntu xenial-security main restricted
deb http://mirrors.aliyun.com/ubuntu xenial-security universe
deb http://mirrors.aliyun.com/ubuntu xenial-security multiverse
Disable firewall: # ufw disable
root@master:/etc/apt# ufw disable
Firewall stopped and disabled on system startup
Close swap:
root@master:/etc/apt# cat /etc/fstab
# /etc/fstab: static file system information.
#
# Use 'blkid' to print the universally unique identifier for a
# device; this may be used with UUID= as a more robust way to name devices
# that works even if disks are added and removed. See fstab(5).
#
# <file system> <mount point>   <type>  <options>       <dump>  <pass>
# / was on /dev/sda1 during installation
UUID=4ac71650-5c12-4eb7-9ae5-435e4e538015 /               ext4    errors=remount-ro 0       1
# swap was on /dev/sda5 during installation
#UUID=4fa6c3dd-b33c-4790-ae43-f2c30addcb38 none            swap    sw              0       0
Disable selinux:
apt-get update
root@master:/etc/apt# apt install -y selinux-utils
root@master:/etc/apt# setenforce 0
setenforce: SELinux is disabled
root@master:/etc/apt# setenforce -r now
usage:  setenforce [ Enforcing | Permissive | 1 | 0 ]
root@master:/etc/apt# getenforce
Disabled
Clone the virtual machine into node1 and node2 nodes.
Modify host name
vim /etc/hostnae
vim /etc/hosts
Install docker
apt-get update
apt-get install -y curl telnet wget man apt-transport-https ca-certificates software-properties-common vim libltdl7
(https://download.docker.com/linux/ubuntu/dists/bionic/pool/stable/amd64/docker-ce_18.06.1ce3-0~ubuntu_amd64.deb)
dpkg -i /home/zzs/docker-ce_18.06.1~ce~3-0~ubuntu_amd64.deb
docker version
# systemctl enable docker
# systemctl start docker
# systemctl status docker
docker -v
root@master:/home/zzs# cat /etc/docker/daemon.json
{
  "registry-mirrors": ["https://h7l6c354.mirror.aliyuncs.com"]
}
root@master:/home/zzs# systemctl daemon-reload
root@master:/home/zzs# systemctl restart docker
zzs@master:~$ sudo groupadd docker
zzs@master:~$ sudo usermod -aG docker $USER
Install Kubernetes
Kubernetes version: k8s 1.13.1
Configure k8s mirror accelerator
Create the file / etc/apt/sources.list.d/kubernetes.list as follows:
root@master:/# vim /etc/apt/sources.list.d/kubernetes.list
deb http://mirrors.ustc.edu.cn/kubernetes/apt kubernetes-xenial main
apt update updates the operating system source
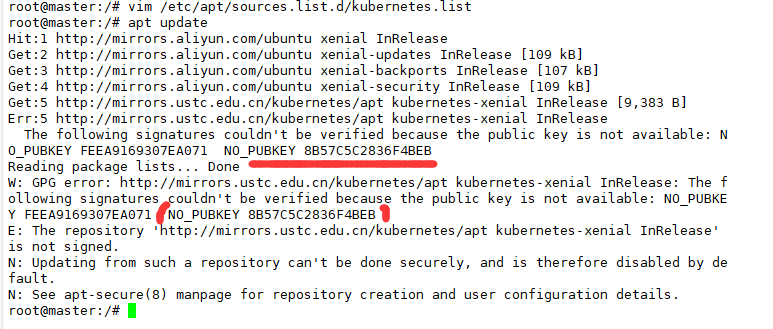
gpg --keyserver keyserver.ubuntu.com --recv-keys 836F4BEB
gpg --export --armor 836F4BEB | sudo apt-key add -
apt update
kubernetes system network configuration:
Create the / etc/sysctl.d/k8s.conf file as follows:
root@master:/# cat /etc/sysctl.d/k8s.conf
net.bridge.bridge-nf-call-ip6tables = 1
net.bridge.bridge-nf-call-iptables = 1
vm.swappiness = 0
(add k8s communication network to iptables)
To validate a profile:
root@master:/# modprobe br_netfilter
root@master:/# sysctl -p /etc/sysctl.d/k8s.conf
Installation k8s
apt update
apt-get install -y kubelet=1.13.1-00 kubernetes-cni=0.6.0-00 kubeadm=1.13.1-00 kubectl=1.13.1-00
systemctl enable kubelet
systemctl start kubelet
shutdown -r now
Configure master
1) Create working directory
$ mkdir /home/hj/working
$ cd /home/hj/working/
2) Create kubedm.conf configuration file
Create k8s the configuration file corresponding to the management tool kubedm
/In the home/hj/working / directory, generate the configuration file:
kubeadm config print init-defaults ClusterConfiguration > kubeadm.conf
By specifying the docker warehouse address in the kubedm configuration file, it is convenient for intranet rapid deployment.
Modify kubedm.conf:
Modify imageRepository: k8s.gcr.io to
imageRepository: registry.cn-beijing.aliyuncs.com/imcto
Modify kubernetes version: v1.13.0 to
kubernetesVersion: v1.13.1
Modify the API server address in kubedm.conf, which will be frequently used later.
localAPIEndpoint:
advertiseAddress: 192.168.10.133 (master Host ip (address)
bindPort: 6443
Configure subnet network:
networking:
dnsDomain: cluster.local
podSubnet: 10.244.0.0/16
serviceSubnet: 10.96.0.0/12
scheduler: {}
10.244.0.0/16 and 10.96.0.0/12 here are children of k8s internal pods and services respectively
Network, it is best to use this address, which is required for subsequent flannel networks.
3) Pull the necessary module image of K8s
Check which image files need to be pulled:
kubeadm config images list --config kubeadm.conf
Pull the image and download all the k8s associated images of the current version:
kubeadm config images pull --config ./kubeadm.conf
4) Initialize kubernetes environment:
#Initialize and start
kubeadm init --config ./kubeadm.conf
Note: a token will be generated here, which needs to be remembered. For example: abcdef.0123456789 ABCDEF
For more kubedm configuration file parameters, see
kubeadm config print-defaults
k8s is started successfully. There are many output contents, but remember the contents at the end. Follow the official prompt to perform the following operations
Make:
1. Execute the following command
mkdir -p $HOME/.kube
sudo cp -i /etc/kubernetes/admin.conf $HOME/.kube/config
sudo chown $(id -u):$(id -g) $HOME/.kube/config
5) Verify kubernetes startup results:
Verify the input. Note that the master status is NotReady, which proves that the server is initialized successfully
zzs@master:~/working$  kubectl get nodes
NAME STATUS ROLES AGE VERSION
master NotReady master 12m v1.13.1
At present, there is only one master, no node, and it is in NotReady status, so we need to set node
Join the cluster managed by the master. Before joining, we need to configure the internal communication network of k8s cluster
The flannel network is used here.
6) Deploy cluster internal communication flannel network
zzs@master:~$ cd $HOME/working
wget https://raw.githubusercontent.com/coreos/flannel/a70459be0084506e4ec919aa1c114638878db11b/Documentation/kube-flannel.yml
Edit the kube-flannel.yml file, make sure the flannel network is correct, and find the net-conf.json tag
Whether the content of is correct.
net-conf.json: |
{ "Network": "10.244.0.0/16", "Backend":
{ "Type": "vxlan"
}
The address of "10.244.0.0/16" and podsubnet in. / kubedm.conf should be consistent.
Apply current flannel profile
zzs@master:~/working$ kubectl apply -f kube-flannel.yml
After installing the flannel network, execute kubectl get nodes, and the output results are as follows
zzs@master:~/working$ systemctl restart kubelet
zzs@master:~/working$ kubectl get nodes
NAME     STATUS   ROLES    AGE   VERSION
master   Ready    master   8h    v1.13.1
(at this time, the master is Ready, which means that the configuration has been successful, so we need to configure it
node to join the cluster.)
Configure node
1) Confirm external environment
Close swap
Disable selinux
Turn off firewall
2) Configure k8s cluster Node host environment
Start k8s background service:
systemctl enable kubelet
systemctl start kubelet
Copy a copy of / etc/kubernetes/admin.conf of the master machine to node1 and node2: (write your own IP address and directory)
sudo scp /etc/kubernetes/admin.conf zzs@192.168.10.132:/home/zzs/
sudo scp /etc/kubernetes/admin.conf zzs@192.168.10.131:/home/zzs/
Log in to the node terminal and create the basic kube configuration file environment
zzs@node1:~$ mkdir -p $HOME/.kube
zzs@node1:~$ sudo cp -i $HOME/admin.conf $HOME/.kube/config
zzs@node1:~$ sudo chown $(id -u):$(id -g) $HOME/.kube/config
node1 and node2 are connected to the master cluster respectively. Kubedm join is used here
Instruction:
zzs@node1:~/.kube$ sudo kubeadm join 192.168.10.133:6443 --token abcdef.0123456789abcdef --discovery-token-ca-cert-hash sha256:66326cad87851e64a1652326184361e61085ccdbe839bbee7dcf9330bb7366c6
Note that the hash used should be generated after the master host kubedm init succeeds
Into a hash code.
If you forget hash Code:
root@master:~/.kube# kubeadm token create --print-join-command --ttl 0
root@master:~/.kube# kubeadm token list
Two node hosts are applied and the flannel network is applied respectively
Pass kube-flannel.yml in the master to two node nodes respectively
sudo scp /home/zzs/working/kube-flannel.yml zzs@192.168.10.132:/home/zzs/
sudo scp /home/zzs/working/kube-flannel.yml zzs@192.168.10.131:/home/zzs/
Start the flannel network respectively
zzs@node1:~$ kubectl apply -f kube-flannel.yml
zzs@node2:~$ kubectl apply -f kube-flannel.yml
Check whether the node has been added to the k8s cluster (it will take some time to be ready)
zzs@master:~/working$ kubectl get nodes
NAME     STATUS   ROLES    AGE     VERSION
master   Ready    master   9h      v1.13.1
node1    Ready    <none>   9m28s   v1.13.1
node2    Ready    <none>   8m49s   v1.13.1