There are Volume and Mount concepts in the operating system.
- Volume: represents the logical abstraction of physical storage
- Mount: Mount external storage into the system and container.
In order to solve the data storage of containers, kubernetes also introduces the concept of Volume. Kubernetes divides Volume storage into ordinary non persistent volumes and persistent persistent volumes.
1. Volumes
The purpose of ordinary non persistent volumes is to share storage resources between Pod containers and prevent data loss when Kubelet restarts the container. Therefore, their life cycle is the same as that of Pod. The restart of the container in the Pod does not affect the data storage in the Volume. The data in the Volume will be deleted only after the Pod is destroyed.
Kubernetes supports many types of volumes by default, such as emptyDir, hostPath, configMap, secret downwardAPI, etc. mounted to the container as a Volume.
Here are two common types:
- emptyDir type: temporary volume type. It is created when a Pod is assigned to a Node. The life cycle is only maintained during the period when the Pod is still running on the Node. This type can be used in scenarios where two containers share some temporary files.
apiVersion: v1
kind: Pod
metadata:
  name: test-pd
spec:
  containers:
  - image: k8s.gcr.io/test-webserver
    name: test-container
    volumeMounts:
    - mountPath: /cache
      name: cache-volume
  volumes:
  - name: cache-volume
    emptyDir: {}
- hostPath type: this Volume type maps files or directories on the file system of the Host node to the Pod. It can be used when Pod needs to access the data of some Host nodes. After the Pod is deleted, the files on the Host still exist. When the new Pod is scheduled to mount the Volume on the node, you will see the files in the corresponding path.
apiVersion: v1
kind: Pod
metadata:
  name: test-webserver
spec:
  containers:
  - name: test-webserver
    image: k8s.gcr.io/test-webserver:latest
    volumeMounts:
    - mountPath: /var/local/aaa
      name: mydir
    - mountPath: /var/local/aaa/1.txt
      name: myfile
  volumes:
  - name: mydir
    hostPath:
      # Ensure the file directory is created.
      path: /var/local/aaa
      type: DirectoryOrCreate
  - name: myfile
    hostPath:
      path: /var/local/aaa/1.txt
      type: FileOrCreate
Picture from Kubernetes In Action
2. PV & PVC
In addition to temporary storage and shared files, we also need persistent storage. No matter how the Pod is scheduled, the data is always consistent. For example, when we deploy MySQL, MongoDB and other services in Kubernetes, the data we see at any time should be the same. In addition, storage media is an underlying implementation, and Pod should not care about specific underlying storage types. Therefore, in order to realize persistent storage and decouple the underlying storage from Pod, Kuberetes proposed the concept of Persistent Volume, and the demand of Pod for storage resources is abstracted as Persistent Volume claim.
- Persistent Volume: the cluster storage statement provided by the Cluster Administrator is not fundamentally different from the ordinary Volume, but its life cycle is independent of any Pod using PV.
- PersistentVolumeClaim: storage request statement provided by the user (developer).
In this way, in actual use, the cluster can create a batch of PVs in advance to provide storage, while users only need to create PVC and put forward their own storage requirements. Kubernetes will automatically bind PVC and PV. After attaching PVC to Pod, you can read and write data.
Picture from Kubernetes in Action
The following are examples of the use of PV and PVC:
Create PV
The following is an example of PV using local disk and NFS as underlying storage respectively:
apiVersion: v1
kind: PersistentVolume
metadata:
  name: task-pv-volume
  labels:
    type: local
spec:
  storageClassName: manual
  volumeMode: Filesystem
  persistentVolumeReclaimPolicy: Recycle
  capacity:
    storage: 10Gi
  accessModes:
    - ReadWriteOnce
  hostPath:
    path: "/mnt/data"
---

apiVersion: v1
kind: PersistentVolume
metadata:
 name: nfs
spec:
 capacity:
   storage: 1Mi
 accessModes:
   - ReadWriteMany
 nfs:
   server: nfs-server.default.svc.cluster.local
   path: "/"
 mountOptions:
   - nfsvers=4.2
- accessModes: access rights
- ReadWriteOnce allows a single node to read and write PV
- ReadOnlyMany allows multiple nodes to perform read-only operations
- ReadWriteMany allows multiple nodes to read and write
- Capacity: the capacity size of the persistent volume
- volumeMode: persistent volume mode. The default is Filesystem, which means that if the volume storage device is empty when the Pod is mounted, a complete file system directory will be created. Starting from 1.18, the Block option is supported, which means that the volume, as the original Block device, will not create a file system directory. At this point, the Pod application needs to know how to deal with the original Block device.
- persistentVolumeReclaimPolicy: Reclaim policy
- Retain: after PVC is deleted, PV retains data, and PV is not available for other PVC.
- Delete: delete PV and data stored in PV after PVC is deleted.
- Recycle: delete data and make it available to other PVC, deprecated.
Create PVC
apiVersion: v1
kind: PersistentVolumeClaim
metadata:
  name: task-pv-claim
spec:
  storageClassName: manual
  accessModes:
    - ReadWriteOnce
  resources:
    requests:
      storage: 3Gi
PVC can select the qualified PV through storageClassName, accessModes, volumeMode and storage capacity. At the same time, it can also select the selection range of PV through label and Key.
apiVersion: v1
kind: PersistentVolumeClaim
metadata:
  name: myclaim
spec:
  accessModes:
    - ReadWriteOnce
  volumeMode: Filesystem
  resources:
    requests:
      storage: 8Gi
  storageClassName: slow
  selector:
    matchLabels:
      release: "stable"
    matchExpressions:
      - {key: environment, operator: In, values: [dev]}
Pod mount PVC as storage
apiVersion: v1
kind: Pod
metadata:
  name: task-pv-pod
spec:
  volumes:
    - name: task-pv-storage
      persistentVolumeClaim:
        claimName: task-pv-claim
  containers:
    - name: task-pv-container
      image: nginx
      ports:
        - containerPort: 80
          name: "http-server"
      volumeMounts:
        - mountPath: "/usr/share/nginx/html"
          name: task-pv-storage
The following is the life cycle of PV in use:
| stage | |
|---|---|
| Provisioning | In the supply phase, volume resources can be generated manually by the administrator or dynamically allocated by the system according to PVC demand |
| Binding | By means of manual or dynamic allocation, the system can find and appropriate actual PV for a PCV, and then bind them in both directions. |
| Using | The stage when the user actually uses the resource. That is, pvc is used in Pod like volume. |
| Protecting | 1. When an active Pod is using the volume, if you delete the PVC, you will enter this stage. At this time, you will delay deleting the PVC until it is not used. 2. If PV with bound PVC is deleted, it will also enter this stage. PVC will not be deleted until PV and PVC are unbound. |
| Reclaiming | When the user no longer needs PV resources, the volume will enter this stage after deleting PVC. According to the definition, PV will have two processing methods: retention, which is used to maintain the volume, and provide time for manual cleaning. The above data will be deleted directly, including data recycling. (the recycling mode is no longer recommended) |
3. Storage Class
The PV mentioned above is pre created by the Cluster Administrator and belongs to static processing. There are two questions:
- Untimely creation: the Cluster Administrator cannot predict all storage requirements in time. Once the PV is not available after the deployment of the PVC created Pod, the Pod will run incorrectly.
- Demand mismatch: for example, the administrator created a 5G PV in advance, but at this time, the PVC of Pod only needs 3G. At this time, binding will waste 2G of space.
At the same time, the processing method of data in PV is not flexible enough. In addition to retention and deletion, there can also be more detailed processing, such as deletion to the recycle bin and deletion after retention for a period of time. These may require the administrator to manually operate the underlying storage of PV.
Therefore, in order to allocate and manage storage resources timely and flexibly, Kubernetes introduces the method of dynamic storage allocation, which provides the resource object of StorageClass, which is equivalent to the template of PV. This object is based on a storage provider, such as NFS, AWS S3, etc. when users need storage resources, they only need to create the corresponding PVC and specify StorageClass, When the Pod is created and needs to use storage resources, StorageClass will automatically create PV and bind PVC as needed.
Picture from Kubernetes in Action
The following is an example of using AWS EBS as a provider:
apiVersion: storage.k8s.io/v1
kind: StorageClass
metadata:
  name: standard
provisioner: kubernetes.io/aws-ebs
parameters:
  type: gp2
reclaimPolicy: Retain
allowVolumeExpansion: true
mountOptions:
  - debug
volumeBindingMode: Immediate
In this way, you only need to specify the StorageClass when creating PVC
apiVersion: v1
kind: PersistentVolumeClaim
metadata:
name: task-pv-claim
spec:
storageClassName: standard
accessModes:
- ReadWriteOnce
resources:
requests:
storage: 3Gi
In addition, different storageclasses can be created as needed. For example, the following two storageclasses created by GCE PD's provider: slow using standard storage and fast using SSD storage. When creating PVC, you can select the appropriate StorageClass according to your performance needs. In this way, the allocation and use of storage resources can achieve the purpose of flexible allocation on demand. In addition, you can add processing code in the provider to manage the saving and deletion of data and realize more flexible management. Kubernetes officials have clearly suggested abandoning the Recycle strategy. If there are such requirements, Dynamic Provisioning should implement them.
apiVersion: storage.k8s.io/v1
kind: StorageClass
metadata:
  name: slow
provisioner: kubernetes.io/gce-pd
parameters:
  type: pd-standard
---
apiVersion: storage.k8s.io/v1
kind: StorageClass
metadata:
  name: fast
provisioner: kubernetes.io/gce-pd
parameters:
  type: pd-ssd
--
apiVersion: v1
kind: PersistentVolumeClaim
metadata:
  name: claim1
spec:
  accessModes:
    - ReadWriteOnce
  storageClassName: fast
  resources:
    requests:
      storage: 30Gi
4. PV mounting process
PV persistent storage mostly relies on a remote storage service, such as NFS, AWS S3 and other remote storage. Similar to the process of introducing storage devices in the operating system, first we need to prepare the storage device, then attach it to the system as a block device, and finally mount it to the file system to read and write. The operations in Kubernetes are similar:
- Provision: each storage plug-in prepares its own storage space, which is equivalent to preparing a disk for Kuberetes.
- Attach: after the Pod scheduling is completed, add a storage block to the corresponding host and add the remote storage to the local storage, which is equivalent to adding the disk to Kubernetes.. For example, when using GCE Disk service, kubelet needs to call the API of GCE Disk to add remote storage to the host.
- Mount: after the storage block is added, Kuberetes will format the directory and mount the block to the mount point of the host, so that when the volume is mounted in the Pod, the data written to the corresponding directory will be written to the remote storage. The volume directory is usually / var / lib / kubelet / pods / < ID of Pod > / volumes / kubernetes IO ~ < volume type > / < volume name >.
For example, when using EaseMesh, the Pod of Control Plane has three volumes, one of which is a persistent volume. Then the directory and data of the corresponding volume can be found under the above directory of the host computer of the Pod.
node:➜  ~  |>kubectl get pods -n easemesh -o wide                                                                                                                                                                                        [~]
NAME                                                 READY   STATUS    RESTARTS   AGE     IP              NODE    NOMINATED NODE   READINESS GATES
easemesh-control-plane-1                             1/1     Running   0          2d19h   10.233.67.90    node   <none>           <none>


node:➜  ~  |>kubectl describe pod easemesh-control-plane-1 -n easemesh                                                                                                                                                                   [~]
Name:         easemesh-control-plane-1
...
Volumes:
  easegress-control-plane-pv:
    Type:       PersistentVolumeClaim (a reference to a PersistentVolumeClaim in the same namespace)
    ClaimName:  easegress-control-plane-pv-easemesh-control-plane-1
    ReadOnly:   false
  easemesh-cluster-cm:
    Type:      ConfigMap (a volume populated by a ConfigMap)
    Name:      easemesh-cluster-cm
    Optional:  false
  default-token-tcdjd:
    Type:        Secret (a volume populated by a Secret)
    SecretName:  default-token-tcdjd
    Optional:    false
Now view the attached directory of the host based on PodId and VolumeName, and there will be corresponding files
node:➜  ~  |>sudo ls -l  /var/lib/kubelet/pods/1e2cfc60-493e-4bd3-804b-695e7c0af24f/volumes/                                                                                                                                             [~]
total 12
drwxr-xr-x 3 root root 4096 Dec  8 12:45 kubernetes.io~configmap
drwxr-x--- 3 root root 4096 Dec  8 12:45 kubernetes.io~local-volume
drwxr-xr-x 3 root root 4096 Dec  8 12:45 kubernetes.io~secret


node:➜  ~  |>sudo ls -l  /var/lib/kubelet/pods/1e2cfc60-493e-4bd3-804b-695e7c0af24f/volumes/kubernetes.io~configmap                                                                                                                      [~]
total 4
drwxrwxrwx 3 root root 4096 Dec  8 12:45 easemesh-cluster-cm


node:➜  ~  |>sudo ls -l  /var/lib/kubelet/pods/1e2cfc60-493e-4bd3-804b-695e7c0af24f/volumes/kubernetes.io~local-volume                                                                                                                   [~]
total 4
drwxr-xr-x 5 ubuntu ubuntu 4096 Jun 23 06:59 easemesh-storage-pv-3

node:➜  ~  |>sudo ls -l  /var/lib/kubelet/pods/1e2cfc60-493e-4bd3-804b-695e7c0af24f/volumes/kubernetes.io~local-volume/easemesh-storage-pv-3                                                                                             [~]
total 12
drwx------ 3 root root 4096 Dec  8 12:45 data
drwx------ 2 root root 4096 Jun 23 07:00 log
drwx------ 2 root root 4096 Dec  8 12:45 member
You can see that there are directories such as data and logs under the directory corresponding to the persistent volume, and these are the data in our persistent volume storage. We use / volumes / easemesh storage of the host disk as storage, so we can see the same file in this directory:
node:➜  /volumes  |>kubectl describe  pv easemesh-storage-pv-3                                                                                                                                                                    [/volumes]
Name:              easemesh-storage-pv-3
Labels:            <none>
Annotations:       pv.kubernetes.io/bound-by-controller: yes
Finalizers:        [kubernetes.io/pv-protection]
StorageClass:      easemesh-storage
Status:            Bound
Claim:             easemesh/easegress-control-plane-pv-easemesh-control-plane-1
Reclaim Policy:    Delete
Access Modes:      RWO
VolumeMode:        Filesystem
Capacity:          4Gi
Node Affinity:
  Required Terms:
    Term 0:        kubernetes.io/hostname in [node4]
Message:
Source:
    Type:  LocalVolume (a persistent volume backed by local storage on a node)
    Path:  /volumes/easemesh-storage
Events:    <none>

node:➜  /volumes  |>ls -l /volumes/easemesh-storage                                                                                                                                                                               [/volumes]
total 12
drwx------ 3 root root 4096 Dec  8 12:45 data
drwx------ 2 root root 4096 Jun 23 07:00 log
drwx------ 2 root root 4096 Dec  8 12:45 member
The above steps are implemented by the PersistentVolume Controller of Kubernetes, the Attach/Detach Controller controller and the Volume Manager in Kubelet.
- PersistentVolume Controller: execute the control loop to ensure that all bound PVS are available and that all PVC can be bound with the appropriate PV. In the process of fitting, the Controller will call the Provision/Delete interface of the storage driver plug-in as needed.
- Attach/Detach Controller: after PV is bound to PVC and Pod is scheduled to a node, execute the attach operation to add the remote storage to the node corresponding to the host Attact.
- Volume Manager: This is a separate gorouting, which is independent of the main loop of kubelet. It performs specific Mount operations, formats the disk, and mounts the device to the host directory.
After the above operations are completed, when the Pod deployment creates a container, Kubelet will mount our mounted host directory into the container when starting the container, which is equivalent to executing the following command:
$ docker run -v /var/lib/kubelet/pods/<Pod of ID>/volumes/kubernetes.io~<Volume type>/<Volume name>:/<Destination directory in container> ......
The above is a brief overview of the PV mounting process. Of course, if there is mounting, there is unloading. The above three steps correspond to the opposite operations of Delete, Detach and Unmount, which will not be repeated here.
5. CSI plug-in
In addition to the built-in plug-ins, Kubernetes also provides an extension mechanism to implement its own storage plug-ins. The early expansion method was realized through FlexVolume, which has been abandoned in version 1.23. At present, it is mainly realized through CSI (Container Storage Interface). At present, the built-in storage plug-ins in Kubernetes are also undergoing CSI transformation, The built-in plug-ins will eventually be ported from the Kubernetes core.
In the PV mounting process mentioned above, the Provision, Attach, Mount and other operations were finally completed through the built-in Volume plug-in of Kubernetes before CSI.
Picture from
https://medium.com/google-cloud/understanding-the-container-storage-interface-csi-ddbeb966a3b
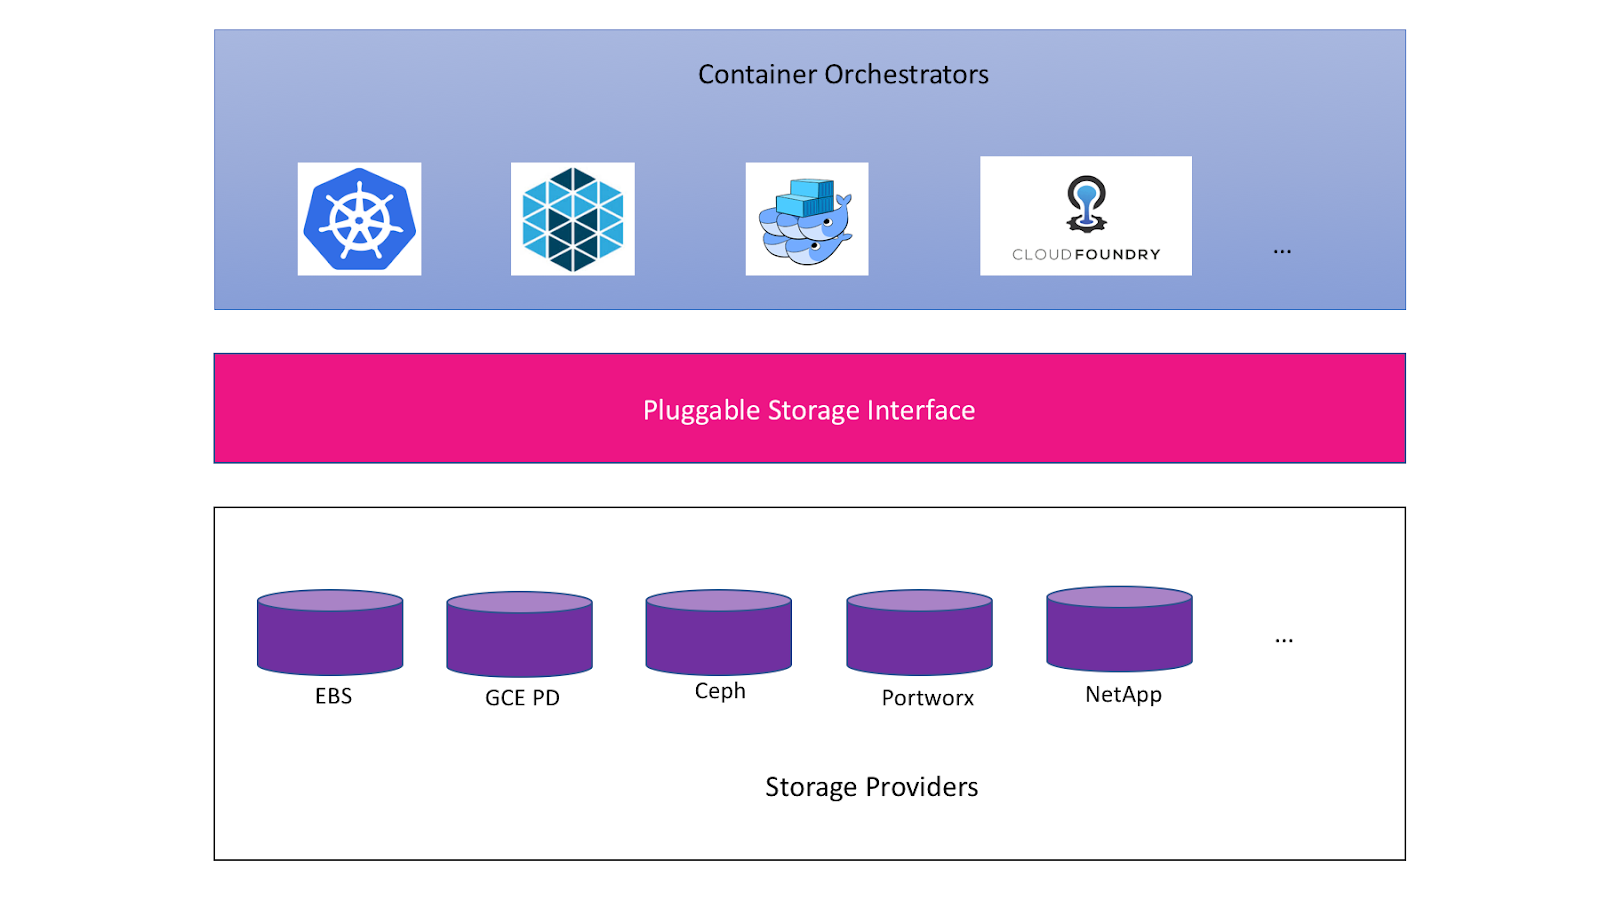
Kubernetes built many Volume plug-ins in the early stage, which played an important role in its wide promotion, but also introduced the following problems:
- Untimely update: the plug-in is built into Kubernetes, so the release rhythm of third-party storage manufacturers must be consistent with Kubernetes..
- Uncontrollable Code: many plug-ins are executable commands provided by third-party storage manufacturers. Putting them together with Kubernetes core code will cause reliability and security problems.
Therefore, Kubernetes started the migration of built-in plug-ins from version 1.14. As seen before, CNI network interface aims to provide consistent container network operation. CSI provides consistent storage access interfaces for all container scheduling systems, such as Kubernetes and Docker swarm. Third party storage plug-ins can meet the needs of all systems only by implementing the corresponding interfaces according to CSI.
Picture from
https://medium.com/google-cloud/understanding-the-container-storage-interface-csi-ddbeb966a3b
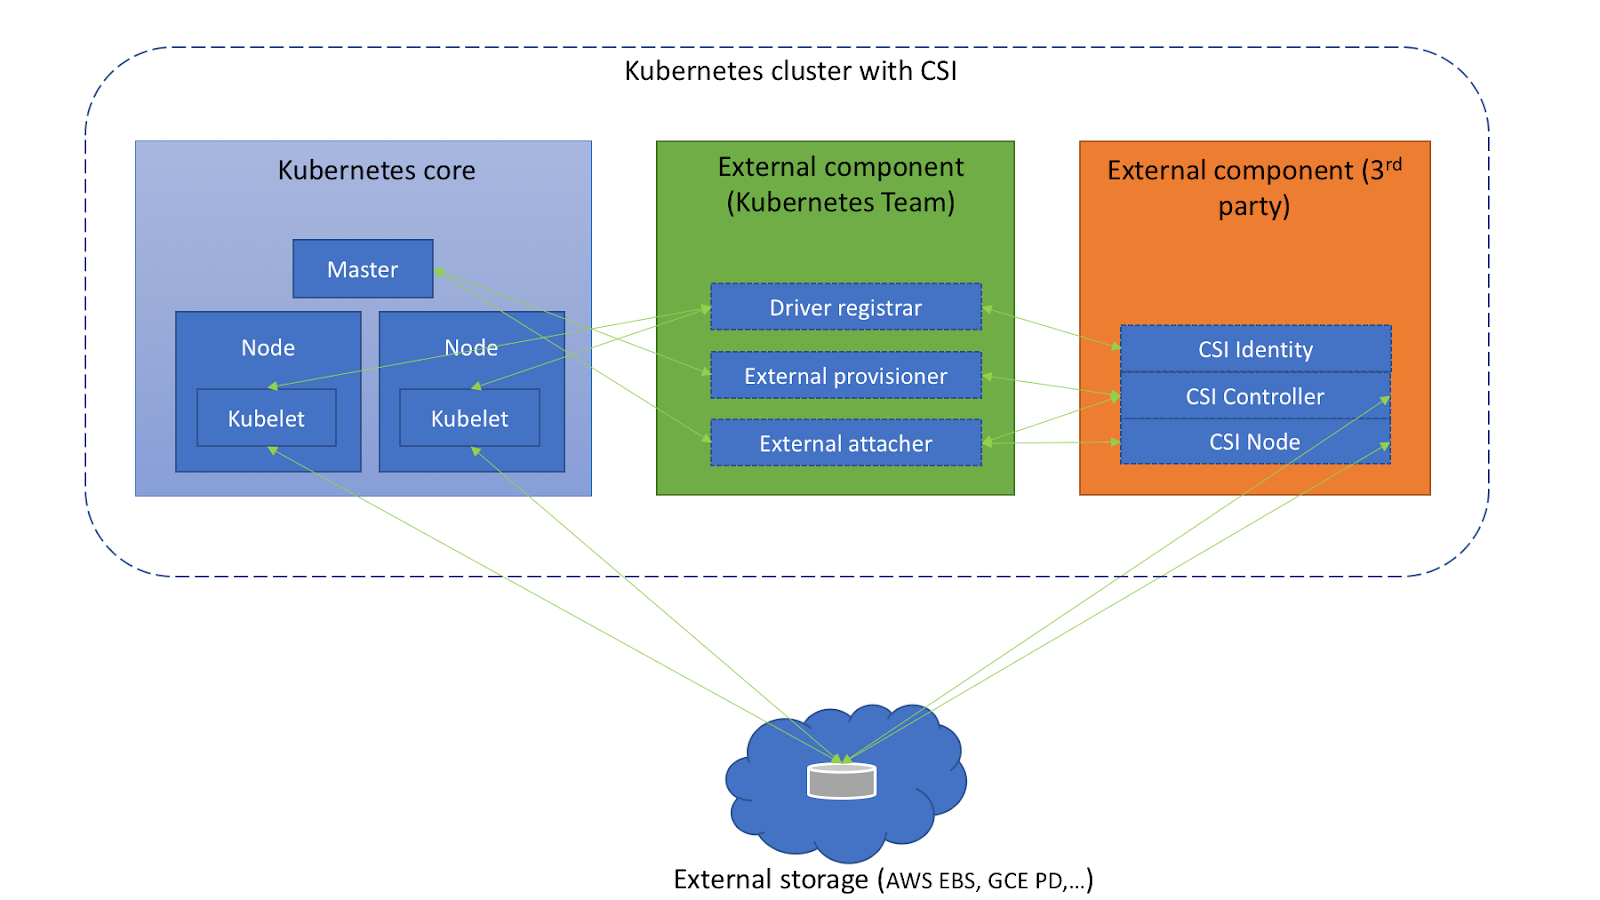
After using CSI plug-in, Kuberetes storage architecture is as follows:
Picture from https://medium.com/google-cloud/understanding-the-container-storage-interface-csi-ddbeb966a3b
The content of CSI mainly includes two parts:
Operation of container system
For example, register and remove the storage plug-in and communicate with the storage plug-in to realize various Volume management, such as calling the third-party storage plug-in to create, delete, expand and shrink the Volume, query the monitoring information, etc. It mainly includes the following components:
- Driver Register: it will be replaced by Node Driver Register, which is responsible for registering third-party plug-ins. After the plug-in is registered into kubelet, it can communicate with the plug-in through gRPC.
- External Provisioner: call the interface of the third-party plug-in to complete the creation and deletion of data volumes.
- External Attacher: call the interface of the third-party plug-in to complete the mounting and operation of the data volume.
- External Resizer: call the third-party plug-in to complete the expansion of data volume.
- External snapshot: call a third-party plug-in to complete the creation and deletion of snapshots.
- External Health Monitor: call a third-party plug-in to provide measurement monitoring data function.
Although this part of the function is separated from the core code of Kubernetes, it is still officially maintained by Kubernetes.
Specific operations of third-party plug-ins
Cloud storage vendors need to implement specific operations. For example, the Provision, Attach and Mount operations mentioned above. There are three main services:
- CSI Identity: used to expose the basic information of the plug-in, such as the plug-in version number, the CSI specification version supported by the plug-in, whether the storage volume creation and deletion functions are supported, whether the storage volume mount function is supported, and so on. In addition, it can also be used to check the health status of plug-ins. Developers can provide stored health measurement information through the implementation of Probe interface.
// IdentityServer is the server API for Identity service.
type IdentityServer interface {
  // return the version and name of the plugin
  GetPluginInfo(context.Context, *GetPluginInfoRequest) (*GetPluginInfoResponse, error)
  // reports whether the plugin has the ability of serving the Controller interface
  GetPluginCapabilities(context.Context, *GetPluginCapabilitiesRequest) (*GetPluginCapabilitiesResponse, error)
  // called by the CO just to check whether the plugin is running or not
  Probe(context.Context, *ProbeRequest) (*ProbeResponse, error)
}
- CSI Controller: provides various management and control interfaces for the storage system, that is, Volume, which is actually the preparation and Attach stages mentioned above. For example, prepare and remove storage (Provision and Delete operations), Attach and Detach storage (Attach and Detach operations), snapshot storage, etc. The storage plug-in does not necessarily implement all methods of this interface. Functions that are not supported by the storage itself can be declared as not provided in the CSI Identity service.
// ControllerServer is the server API for Controller service.
type ControllerServer interface {
// // provisions a volume
CreateVolume(context.Context, *CreateVolumeRequest) (*CreateVolumeResponse, error)
DeleteVolume(context.Context, *DeleteVolumeRequest) (*DeleteVolumeResponse, error)
ControllerPublishVolume(context.Context, *ControllerPublishVolumeRequest) (*ControllerPublishVolumeResponse, error)
ControllerUnpublishVolume(context.Context, *ControllerUnpublishVolumeRequest) (*ControllerUnpublishVolumeResponse, error)
ValidateVolumeCapabilities(context.Context, *ValidateVolumeCapabilitiesRequest) (*ValidateVolumeCapabilitiesResponse, error)
ListVolumes(context.Context, *ListVolumesRequest) (*ListVolumesResponse, error)
GetCapacity(context.Context, *GetCapacityRequest) (*GetCapacityResponse, error)
ControllerGetCapabilities(context.Context, *ControllerGetCapabilitiesRequest) (*ControllerGetCapabilitiesResponse, error)
CreateSnapshot(context.Context, *CreateSnapshotRequest) (*CreateSnapshotResponse, error)
DeleteSnapshot(context.Context, *DeleteSnapshotRequest) (*DeleteSnapshotResponse, error)
ListSnapshots(context.Context, *ListSnapshotsRequest) (*ListSnapshotsResponse, error)
ControllerExpandVolume(context.Context, *ControllerExpandVolumeRequest) (*ControllerExpandVolumeResponse, error)
}
- CSI Node service: the functions defined in the Controller are not operated at the host level. These operations are implemented by the CSI Node service, that is, the mount stage mentioned above. It performs specific operations at the cluster node level, such as partitioning and formatting the Volume, mounting the storage Volume to the specified directory, or unmounting the storage Volume from the specified directory.
// NodeServer is the server API for Node service.
type NodeServer interface {
  // temporarily mount the volume to a staging path
  NodeStageVolume(context.Context, *NodeStageVolumeRequest) (*NodeStageVolumeResponse, error)

  // unmount the volume from staging path
  NodeUnstageVolume(context.Context, *NodeUnstageVolumeRequest) (*NodeUnstageVolumeResponse, error)

  // mount the volume from staging to target path
  NodePublishVolume(context.Context, *NodePublishVolumeRequest) (*NodePublishVolumeResponse, error)

  // unmount the volume from staging path
  NodeUnpublishVolume(context.Context, *NodeUnpublishVolumeRequest) (*NodeUnpublishVolumeResponse, error)

... ...
  // returns the capabilities of the Node plugin
  NodeGetCapabilities(context.Context, *NodeGetCapabilitiesRequest) (*NodeGetCapabilitiesResponse, error)

  // return the info of the node
  NodeGetInfo(context.Context, *NodeGetInfoRequest) (*NodeGetInfoResponse, error)
}
The writing of CSI plug-ins is actually to implement the above three interfaces. Let's take a simple example of csi-s3 plug-ins. The project directory structure is as follows:
csi-s3
├── cmd
│   └── s3driver
│       ├── Dockerfile
│       ├── Dockerfile.full
│       └── main.go

├── pkg
│   ├── driver
│   │   ├── controllerserver.go
│   │   ├── driver.go
│   │   ├── driver_suite_test.go
│   │   ├── driver_test.go
│   │   ├── identityserver.go
│   │   └── nodeserver.go
│   ├── mounter
│   │   ├── goofys.go
│   │   ├── mounter.go
│   │   ├── rclone.go
│   │   ├── s3backer.go
│   │   └── s3fs.go
│   └── s3
│       └── client.go
There are three files in the pkg/driver Directory:
- identityserver.go stands for CSI Identity service, which provides basic information of CSI plug-ins, Probe probe interfaces, etc.
- controllerserver.go represents the CSI Controller service and defines the related operations of operating Volume. The following is a complete list of interfaces in CSI. cis-s3 implements only part of them:
// controller implementation of s3 plug-in
type controllerServer struct {
  *csicommon.DefaultControllerServer
}

func (cs *controllerServer) CreateVolume(ctx context.Context, req *csi.CreateVolumeRequest) (*csi.CreateVolumeResponse, error) {
// Call S3 api to create storage volume
params := req.GetParameters()
capacityBytes := int64(req.GetCapacityRange().GetRequiredBytes())
mounterType := params[mounter.TypeKey]
volumeID := sanitizeVolumeID(req.GetName())
bucketName := volumeID
prefix := ""

client, err := s3.NewClientFromSecret(req.GetSecrets())

if err = client.CreateBucket(bucketName); err != nil {
  return nil, fmt.Errorf("failed to create bucket %s: %v", bucketName, err)
}

return &csi.CreateVolumeResponse{
  Volume: &csi.Volume{
     VolumeId:      volumeID,
     CapacityBytes: capacityBytes,
     VolumeContext: req.GetParameters(),
  },
}, nil


}
func (cs *controllerServer) DeleteVolume(ctx context.Context, req *csi.DeleteVolumeRequest) (*csi.DeleteVolumeResponse, error) {
...
}
...
- nodeserver.go stands for CSI Node service, which defines the operation of attaching Volume on the host, and implements the interface of NodeServer in CSI. The following is the interface list. We mentioned that in the Mount phase, remote storage needs to be added as a block device and mounted to the corresponding directory. These two steps are realized through NodeStageVolume and NodePublishVolume.
The three services communicate with Kubernetes through gRPC. The following is the startup code of the service, which defines the version information and plug-in name of the Driver. The CSI plug-in requires that the name comply with the reverse DNS format.
var (
  vendorVersion = "v1.2.0-rc.1"
  driverName    = "ch.ctrox.csi.s3-driver"
)

// New initializes the driver
func New(nodeID string, endpoint string) (*driver, error) {
  d := csicommon.NewCSIDriver(driverName, vendorVersion, nodeID)
  if d == nil {
     glog.Fatalln("Failed to initialize CSI Driver.")
  }

  s3Driver := &driver{
     endpoint: endpoint,
     driver:   d,
  }
  return s3Driver, nil
}

func (s3 *driver) newIdentityServer(d *csicommon.CSIDriver) *identityServer {
  return &identityServer{
     DefaultIdentityServer: csicommon.NewDefaultIdentityServer(d),
  }
}

func (s3 *driver) newControllerServer(d *csicommon.CSIDriver) *controllerServer {
  return &controllerServer{
     DefaultControllerServer: csicommon.NewDefaultControllerServer(d),
  }
}

func (s3 *driver) newNodeServer(d *csicommon.CSIDriver) *nodeServer {
  return &nodeServer{
     DefaultNodeServer: csicommon.NewDefaultNodeServer(d),
  }
}

func (s3 *driver) Run() {
  ......

  // Create GRPC servers
  s3.ids = s3.newIdentityServer(s3.driver)
  s3.ns = s3.newNodeServer(s3.driver)
  s3.cs = s3.newControllerServer(s3.driver)

  s := csicommon.NewNonBlockingGRPCServer()
  s.Start(s3.endpoint, s3.ids, s3.cs, s3.ns)
  s.Wait()
}
The above is a simple example of csi-c3. After deploying the plug-in to Kuberetes, we can use the plug-in as a provider to dynamically create PV. There are some deployment principles for CSI deployment:
- The CSI Node service needs to interact with the host node, so it needs to start the plug-in at each node through the daemon set to communicate with Kubelet.
- Start a CSI plug-in at any node through StatefulSet and provide CSI Controller service. This can ensure the stability and correctness of CSI services.
After the CSI plug-in is deployed, StorageClass and PVC can be used. Examples are as follows:
Deploy CSI
$ kubectl create -f provisioner.yaml
kubectl create -f attacher.yaml
kubectl create -f csi-s3.yaml
serviceaccount/csi-provisioner-sa created
clusterrole.rbac.authorization.k8s.io/external-provisioner-runner created
clusterrolebinding.rbac.authorization.k8s.io/csi-provisioner-role created
service/csi-provisioner-s3 created
statefulset.apps/csi-provisioner-s3 created
serviceaccount/csi-attacher-sa created
clusterrole.rbac.authorization.k8s.io/external-attacher-runner created
clusterrolebinding.rbac.authorization.k8s.io/csi-attacher-role created
service/csi-attacher-s3 created
statefulset.apps/csi-attacher-s3 created
serviceaccount/csi-s3 created
clusterrole.rbac.authorization.k8s.io/csi-s3 created
clusterrolebinding.rbac.authorization.k8s.io/csi-s3 created
daemonset.apps/csi-s3 created
Use CSI
---
kind: StorageClass
apiVersion: storage.k8s.io/v1
metadata:
  name: csi-s3
provisioner: ch.ctrox.csi.s3-driver
parameters:
  # specify which mounter to use
  # can be set to rclone, s3fs, goofys or s3backer
  mounter: rclone
  # to use an existing bucket, specify it here:
  # bucket: some-existing-bucket
  csi.storage.k8s.io/provisioner-secret-name: csi-s3-secret
  csi.storage.k8s.io/provisioner-secret-namespace: kube-system
  csi.storage.k8s.io/controller-publish-secret-name: csi-s3-secret
  csi.storage.k8s.io/controller-publish-secret-namespace: kube-system
  csi.storage.k8s.io/node-stage-secret-name: csi-s3-secret
  csi.storage.k8s.io/node-stage-secret-namespace: kube-system
  csi.storage.k8s.io/node-publish-secret-name: csi-s3-secret
  csi.storage.k8s.io/node-publish-secret-namespace: kube-system
--
apiVersion: v1
kind: PersistentVolumeClaim
metadata:
 name: csi-s3-pvc
 namespace: default
spec:
 accessModes:
 - ReadWriteOnce
 resources:
   requests:
     storage: 5Gi
 storageClassName: csi-s3
--

apiVersion: v1
kind: Pod
metadata:
 name: csi-s3-test-nginx
 namespace: default
spec:
 containers:
  - name: csi-s3-test-nginx
    image: nginx
    volumeMounts:
      - mountPath: /var/lib/www/html
        name: webroot
 volumes:
  - name: webroot
    persistentVolumeClaim:
      claimName: csi-s3-pvc
      readOnly: false