1, Learn about KunlunDB
1.1 basic concept & Architecture of kunlundb products
KunlunDB is an open source, high-performance distributed relational database, which supports mixed load (HTAP), PB level data volume management and provides a new generation of database solution with millisecond delay.
1.1.1 cluster component architecture diagram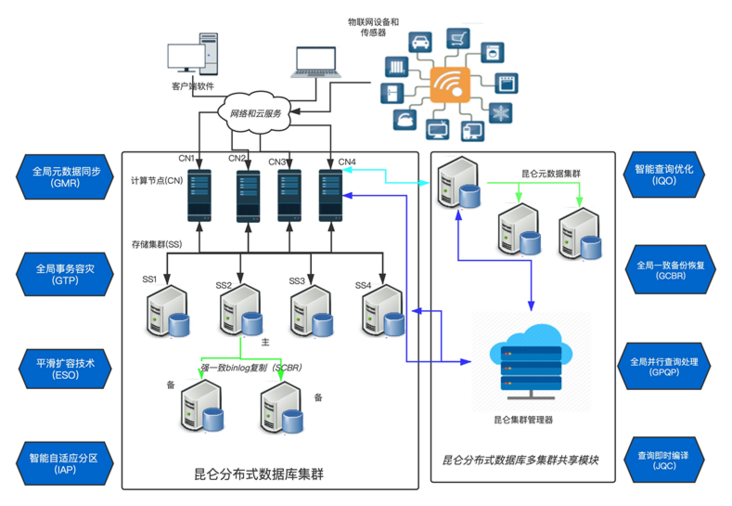
1.2 main components of kunlundb:
1.1.2 kunlunserver (computing node)
The computing node runs stateless Computing & query engine, interacts with Kunlun Storage to execute SQL tasks, and adopts asynchronous communication mode. A computing node can coordinate multiple storage nodes to execute data processing (addition, deletion, modification and query) tasks. The computing node obtains the cluster metadata from the metadata cluster and persists it locally. The SQL layer of Kunlun Server is compatible with PostgreSQL and MySQL protocols (under development...), and each computing node processes SQL computing independently. Kunlun Server supports standard SQL connections.
1.1.3 kunlunstorage (storage node)
Using the shared nothing architecture, each storage node runs a certain number of storage engine instances to persist application (user) data. The storage engine executes SQL statements initiated by the compute node (branches in XA transactions). MGR single master mode or Binlog strong synchronization mode can be used for cluster high availability.
1.1.4 meta cluster
It is used to store the metadata of several Kunlun distributed database clusters and the commit log submitted in two stages of distributed transactions. The metadata cluster adopts the deployment mode of one master and two slaves.
Cluster_mgr runs as a daemon and is responsible for monitoring and maintaining the replication status of each storage cluster and its nodes, metadata and status synchronization between cluster computing nodes and storage nodes, handling distributed transactions, node failure handling, etc. The cluster manager provides API s for third-party management software to call.
Node_mgr runs on each machine in the cluster, detects the status of all computing nodes and storage nodes on the machine, and manages all node instances. It also receives the command of cluster management through HTTP interface, and performs node instance installation, deletion and other functions.
1.1.5 xpanel (operation and maintenance monitoring platform)
The operation and maintenance management module of KunlunDB can manage and monitor the whole cluster environment. Xpanel can monitor the important information of the operating system and key components of each node of the cluster, including operating system resources, operating system error log, Key log error information of Computing & storage engine, etc.
KunlunDMP is a KunlunDB backup and recovery tool, and DataPump is a data loading tool. It supports MySQL,PostgreSQL logical backup and data loading.
2, Quick installation
One click installation process
2.1 installation environment & configuration requirements
2.1.1 hardware configuration
Development and test environment (minimum requirements)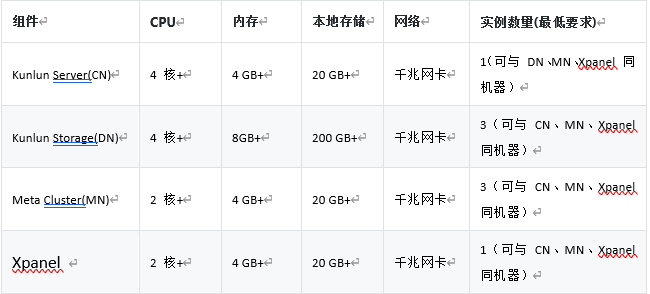
2.1.2 Linux operating system version requirements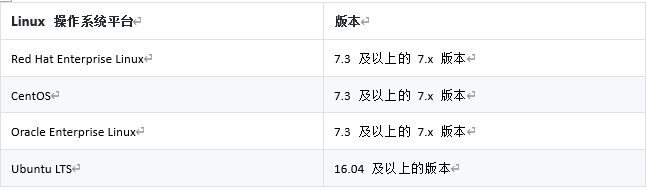
2.2 planning cluster topology
Take the configuration of a three server as an example:
As a development and testing environment, the minimum hardware configuration of each server is: 4-core CPU and 16g memory. (if only for function test, you can download KunlunDB docker image installation, and ordinary notebooks can deploy KunlunDB docker Installation Guide)
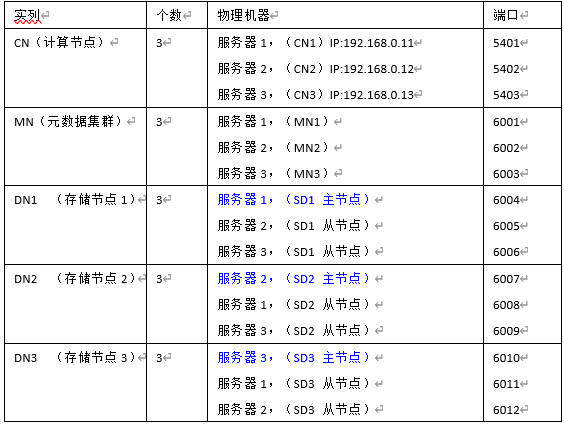
Table 1-1
2.3 preparation of installation environment
Before installation, ensure that the server operating system environment meets the following requirements:
The machine where all nodes are located must be Linux, with bash, SED, gzip, python2, python2 Dev and other tools or libraries installed. The python2 executable is set to python2.
The machine where all cluster nodes are located has correctly set up the user, and the node will start with the user, who can run sudo without a password.
Configure firewall and develop all install The port involved in the JSON configuration file.
For the machine where the storage node is installed, the following Library (Ubuntu 20.04 here) needs to be installed in advance: libncurses5 libaio dev.
For machines with compute nodes installed, the following libraries (Ubuntu 20.04 here) need to be installed in advance: libncurses5 libicu66python setuptools GCC
For installation on centos, refer to Appendix 2.
For the current cluster (untg-1.9.nlr-kuz, untg-0.9.nlr-1.9.nlz) directory, you need to publish the binary package untg-kuz-0.9 in advance In addition, the network between the machine where the tool runs and the machine where the node is located cannot be too slow, because the release package needs to be delivered to these machines.
For all installed machines, you need to set the automatic login authentication of the installation user and root user
ssh after setting username@host.com
For ubuntu, please refer to: automatic authentication of ubuntu login.
centos can refer to: centos login automatic verification.
If sudo is prompted in this step that a password is required, you can refer to: sudonopasswd
2.4 download installation package
Select a server:
Pull Kunlun scripts package on gitee through git clone:
git clone https://github.com/zettadb/cloudnative.git
cd enters kunlunnative/cluster:
cd kunlunnative/cluster
Obtain the download package of the latest version: take 0.9.1 as an example (if there are other latest versions, please use the latest version)
Enter zetuo official website http://downloads.zettadb.com/ , click product download;
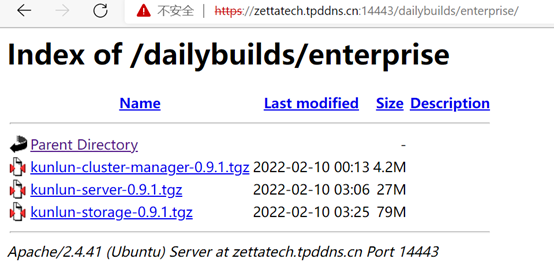
Or directly wget the latest two process package.
wget https://zettatech.tpddns.cn:14443/dailybuilds/enterprise/kunlun-cluster-manager-0.9.1.tgz  --no-check-certificate
wget https://zettatech.tpddns.cn:14443/dailybuilds/enterprise/kunlun-server-0.9.1.tgz--no-check-certificate
wget https://zettatech.tpddns.cn:14443/dailybuilds/enterprise/kunlun-storage-0.9.1.tgz--no-check-certificate
2.5 configure one click installation parameter file
Premise: the three servers create users with the user name kunlun and configure the trust relationship between the three hosts.
Operate on one server: Server1
Log in as kunlun user
Enter the cluster directory and enter install JSON file directory
Edit install JSON file: the example file in the appendix is configured according to the plan in Table 1-1 and can be modified according to the actual situation.
2.6 perform installation
Generate will be used in the installation process_ scripts. Py generates script, action is install, and config is the configuration file just edited install JSON, defuser is set as the default working user.
defuser: most or all machines can use this user. If there is no default user, use the user of machines in the configuration file (specified by yourself)
defbase: most or all machines can create the default working directory. If the default working directory cannot be created, use the basedir of machines in the configuration file (specified by yourself)
Step 1:
$python2 generate_scripts.py--action=install --config=install.json --defuser=kunlun --defbase=/kunlun
Step 2:
$bash install/commands.sh
Wait patiently for about 30 minutes, as long as it doesn't appear!!! FAILURES!!! Or other errors indicate that the installation is successful.
Other instructions:
One click stop: defbase is the default working directory and Action is stop
defbase: most or all machines can create the default working directory. If the default working directory cannot be created, use the basedir of machines in the configuration file (specified by yourself)
$python2 generate_scripts.py --action=stop--config=install.json --defbase=/kunlun

$bash stop/commands.sh
One click cluster start: the action is start
$python2 generate_scripts.py --action=start--config=install.json  --defbase=/kunlun

$bash start/commands.sh
One click Clear cluster: the action is clean
$python2 generate_scripts.py --action=clean --config=install.json --defbase=/kunlun --sudo

$bash clean/commands.sh
Before using this command, the working directory cannot be cleared first, otherwise the script cannot find the working directory and execute this command. After using it, the working directory can be eliminated.
3, Verify that the installation was successful
Login to the calculation node:
$psqlpostgres://abc:abc@127.0.0.1:5401/postgres
View cluster node information:
postgres=# select name ,id ,when_created  from  pg_shard;
  name  | id |        when_created
--------+----+-------------------------------
shard1 |  1 |2021-12-22 03:58:59.599486+08
shard2 |  2 |2021-12-22 03:58:59.599486+08
Shard3 |  3 |2021-12-22 03:58:59.599486+08
Create a partition table test:
CREATETABLE testtable (id int primary key, name char(8)) partition by hash(id);
CREATETABLE  testtable_p1  PARTITION OF testtable FOR VALUES WITH (MODULUS 4, REMAINDER 0);
CREATETABLE  testtable_p2  PARTITION OF testtable FOR VALUES WITH (MODULUS 4, REMAINDER 1);
CREATETABLE  testtable_p3  PARTITION OF testtable FOR VALUES WITH (MODULUS 4, REMAINDER 2);
CREATETABLE  testtable_p4  PARTITION OF testtable FOR VALUES WITH (MODULUS 4, REMAINDER 3);
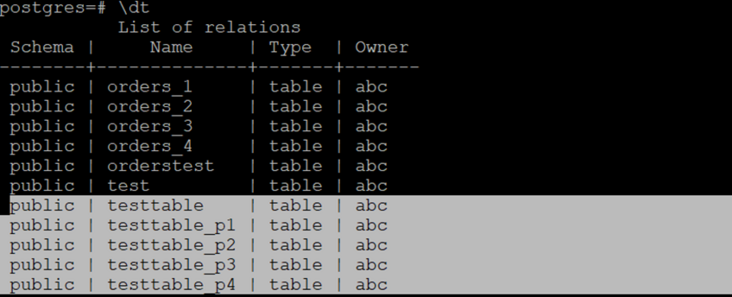
View table information:

Insert data:
insert intotesttable(id) values (1);
insert intotesttable(id) values (2);
insert intotesttable(id) values (3);
insert intotesttable(id) values (4);
View table distribution
postgres=# select relname,relshardid from pg_class where reltype<>0 and relname like'%testtable%';
The cluster has been able to work normally.
4, Benchmark performance test
4.1 preparation environment
4.1.1 in the installation environment, enter the following directory:
/home/kunlun/cloudnative/Tools/sysbench-tpcc
4.1.2 installing sysbench
Apt get install sysbench directly or yum installsysbench
4.1.3 data preparation:
Host, port, database, user, password, number of tables, number of scale s, number of threads, running time s
./prepare.sh hostport dbname user pwd table_num scale_num threads_num times
./prepare.sh127.0.0.1  5401 postgres abc abc 1 1 1
4.2 operation pressure measurement:
./run.sh 1
Test results: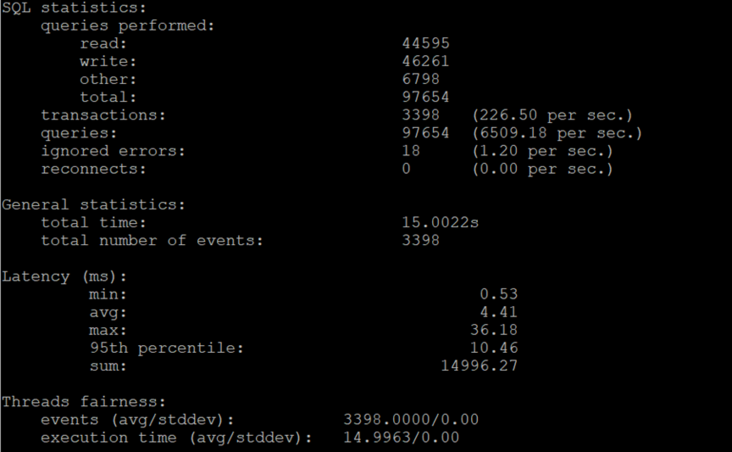
5, Appendix 1: install json
{
   "machines":[
       {
           "ip":"192.168.0.11",
           "basedir":"/kunlun",
           "user":"kunlun"
       },
       {
           "ip":"192.168.0.12",
           "basedir":"/kunlun",
           "user":"kunlun"
       },
      {
           "ip":"192.168.0.13",
           "basedir":"/kunlun",
           "user":"kunlun"
       }
   ],
   "cluster":{
       "name":"clust1",
       "meta":{
           "nodes":[
                {
                   "is_primary":true,
                   "ip":"192.168.0.11",
                    "port":6001,
                    "xport":60010,
                    "mgr_port":60011,
                   "innodb_buffer_pool_size":"64MB",
                   "data_dir_path":"/data1",
                   "log_dir_path":"/data1/log",
                   "user":"kunlun",
                   "election_weight":50
                },
                {
                   "is_primary":false,
                   "ip":"192.168.0.12",
                   "port":6002,
                    "xport":60020,
                    "mgr_port":60021,
                   "innodb_buffer_pool_size":"64MB",
                   "data_dir_path":"/data2",
                   "log_dir_path":"/data2/log",
                   "user":"kunlun",
                   "election_weight":50
                },
                {
                   "is_primary":false,
                   "ip":"192.168.0.13",
                    "port":6003,
                    "xport":60030,
                    "mgr_port":60031,
                   "innodb_buffer_pool_size":"64MB",
                   "data_dir_path":"/data3",
                   "log_dir_path":"/data3/log",
                   "user":"kunlun",
                    "election_weight":50
                }
           ]
       },
       "comp":{
           "nodes":[
                {
                    "id":1,
                   "name":"comp1",
                   "ip":"192.168.0.11",
                    "port":5401,
                   "user":"abc",
                   "password":"abc",
                   "datadir":"/pgdatadir"
                },
                {
                    "id":2,
                   "name":"comp2",
                   "ip":"192.168.0.12",
                    "port":5401,
                   "user":"abc",
                   "password":"abc",
                   "datadir":"/pgdatadir"
                },
                {
                    "id":3,
                   "name":"comp3",
                   "ip":"192.168.0.13",
                    "port":5401,
                   "user":"abc",
                   "password":"abc",
                   "datadir":"/pgdatadir"
                }
           ]
       },
       "data":[
           {
                "nodes":[
                    {
                       "is_primary":true,
                       "ip":"192.168.0.11",
                        "port":6004,
                        "xport":60040,
                       "mgr_port":60041,
                       "innodb_buffer_pool_size":"4000MB",
                       "data_dir_path":"/data4",
                       "log_dir_path":"/data4/log",
                       "user":"kunlun",
                       "election_weight":50
                    },
                    {
                       "is_primary":false,
                       "ip":"192.168.0.12",
                        "port":6005,
                       "xport":60050,
                       "mgr_port":60051,
                       "innodb_buffer_pool_size":"3000MB",
                       "data_dir_path":"/data5",
                       "log_dir_path":"/data5/log",
                       "user":"kunlun",
                       "election_weight":50
                    },
                    {
                       "is_primary":false,
                       "ip":"192.168.0.13",
                        "port":6006,
                       "xport":60060,
                       "mgr_port":60061,
                       "innodb_buffer_pool_size":"3000MB",
                       "data_dir_path":"/data6",
                        "log_dir_path":"/data6/log",
                       "user":"kunlun",
                       "election_weight":50
                    }
                ]
           },
           {
                "nodes":[
                    {
                        "is_primary":true,
                       "ip":"192.168.0.12",
                        "port":6007,
                       "xport":60070,
                       "mgr_port":60071,
                       "innodb_buffer_pool_size":"4000MB",
                        "data_dir_path":"/data7",
                       "log_dir_path":"/data7/log",
                       "user":"kunlun",
                       "election_weight":50
                    },
                    {
                       "is_primary":false,
                       "ip":"192.168.0.11",
                        "port":6008,
                       "xport":60080,
                       "mgr_port":60081,
                       "innodb_buffer_pool_size":"3000MB",
                       "data_dir_path":"/data8",
                       "log_dir_path":"/data8/log",
                       "user":"kunlun",
                       "election_weight":50
                   },
                    {
                       "is_primary":false,
                       "ip":"192.168.0.13",
                        "port":6009,
                       "xport":60090,
                       "mgr_port":60091,
                       "innodb_buffer_pool_size":"3000MB",
                       "data_dir_path":"/data9",
                       "log_dir_path":"/data9/log",
                       "user":"kunlun",
                       "election_weight":50
                    }
                ]
           },

            {
                "nodes":[
                    {
                       "is_primary":true,
                       "ip":"192.168.0.13",
                        "port":6010,
                       "xport":60100,
                       "mgr_port":60101,
                       "innodb_buffer_pool_size":"4000MB",
                       "data_dir_path":"/data7",
                        "log_dir_path":"/data7/log",
                       "user":"kunlun",
                       "election_weight":50
                    },
                    {
                       "is_primary":false,
                       "ip":"192.168.0.11",
                       "port":6011,
                       "xport":60110,
                       "mgr_port":60111,
                       "innodb_buffer_pool_size":"3000MB",
                       "data_dir_path":"/data8",
                       "log_dir_path":"/data8/log",
                       "user":"kunlun",
                       "election_weight":50
                    },
                    {
                        "is_primary":false,
                       "ip":"192.168.0.12",
                        "port":6012,
                       "xport":60120,
                       "mgr_port":60121,
                       "innodb_buffer_pool_size":"3000MB",
                       "data_dir_path":"/data9",
                       "log_dir_path":"/data9/log",
                       "user":"kunlun",
                       "election_weight":50
                   }
                ]
           }
       ],
       "clustermgr":{
           "ip":"192.168.0.11"
       }
    }
}
6, Appendix 2: CentOS supplementary Guide
6.1 install necessary software packages and dependencies (all hosts)
yum install -ypython-setuptools ncurses-libs icu libicu libaio readline python-psycopg2
wget --no-check-certificatehttps://zettatech.tpddns.cn:14443/thirdparty/mysql-connector-python.el7.x86_64.rpm
yum localinstall -ymysql-connector-python.el7.x86_64.rpm
6.2 user environment & network configuration
6.2.1 kunlun user SUDO password free (all hosts)
chmod u+w /etc/sudoers
chmod u+w /etc/sudoers, add write permission for sudoers file.
Then open the file with vi
vi /etc/sudoers, find the following two lines and add kunlun users and groups
##Allow root to run any commands anywhere
root   ALL=(ALL)       ALL
kunlun ALL=(ALL)      NOPASSWD:ALL
## Allows people in group wheel to run all commands
%wheel ALL=(ALL)       ALL
kunlun ALL=(ALL)       NOPASSWD:ALL
Then execute the command chmod u-w /etc/sudoers to revoke the write permission.
6.2.2 SSH password free login
6.2.2.1 host name configured for each host (modified as appropriate):
/etc/hosts

127.0.0.1  localhost localhost.localdomain localhost4 localhost4.localdomain4
::1        localhost localhost.localdomain localhost6 localhost6.localdomain6
192.168.0.130 centos7b
192.168.0.139 centos7c
192.168.0.142 centos7d
192.168.0.130 localhost
6.2.2.2 configure remote SSH password free (remote)
chmod 755 ~/.ssh
cd /home/kunlun/.ssh
If the ". ssh" directory does not exist, execute MKDIR ~ /. In the / home/hadoop directory ssh command creation.
After executing the following command, if prompted, press "Enter" until the public key is generated. (per machine)
ssh-keygen -t rsa
Copy the public key to the server (the server you want to log in to)
scp id_rsa.pubkunlun@centos7c:/home/kunlun/.ssh/authorized_keys_from_centos7b
Log in to the server to be logged in ()/ ssh directory
cd~/.ssh
Merge the public key files sent by the client
cat authorized_keys_from_centos7b >> authorized_keys
Modify directory permissions:
chown kunlun: .ssh
chown kunlun: .ssh/*
chmod 700 .ssh
chmod 600 .ssh/*
6.2.2.3 configure local SSH password free (local - the first installed server)
ssh-keygen -t dsa -P '' -f .ssh/id_dsa
cat .ssh/id_dsa.pub >>.ssh/authorized_keys
chmod 0600 .ssh/authorized_keys
KunlunDB project is open source
[GitHub: ]
https://github.com/zettadb
[Gitee: ]
https://gitee.com/zettadb
END