KVM virtual machine:
1.KVM is the abbreviation of kernel based virtual machine. It is an open source system virtualization module. It has been integrated into various major Linux distributions since Linux 2.6.20. It uses Linux's own scheduler for management, so compared with Xen, its core source code is very few. KVM has become one of the mainstream VMS in academia
2.KVM virtualization requires hardware support (such as Intel VT technology or AMD V Technology). It's full virtualization based on hardware. In the early stage of Xen, paravirtualization was based on software simulation, and the new version was based on full virtualization supported by hardware. However, Xen has its own process scheduler, storage management module, etc., so the code is relatively large. The popular business system virtualization software VMware ESX series is full virtualization based on software simulation
Virtualization development process:
IDC data center equipment leasing → virtualization scheme, OpenVZ → Xen for sharing optimization, semi virtual architecture, but complex operation → full virtual KVM, no need to contact with the kernel, only need to install management tools
Case overview
1. The utilization rate of some Linux servers in the company is not high. In order to make full use of these Linux servers, KVM can be deployed to run multiple business systems on physical machines
2. For example, deploy KVM on the server running Nginx, and then run Tomcat on the virtual machine
Case pre knowledge points
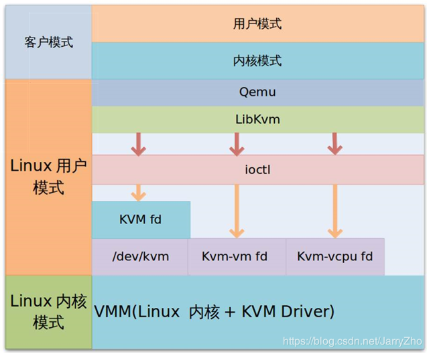
KVM virtualization architecture
KVM module is directly integrated in Linux kernel

KVM composition:

KVM Driver:
1. Virtual machine creation
2. Virtual machine memory allocation
3. Read and write of virtual CPU register
4. Virtual CPU running
QEMU (simplified and modified):
1. User control components simulating PC hardware
2. Provide I/O device model and access to peripherals
There are three modes of KVM Virtualization:
1. Customer mode (virtual machine)
2. User mode (tool)
3. Kernel mode
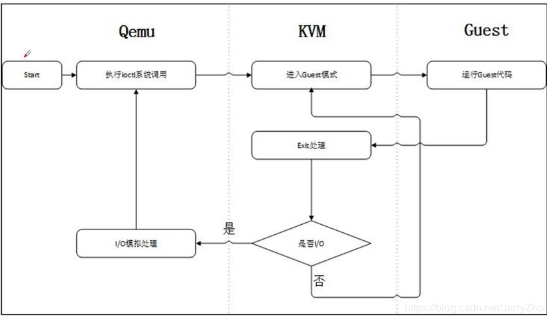
How KVM works:
Demo:
Environmental preparation:
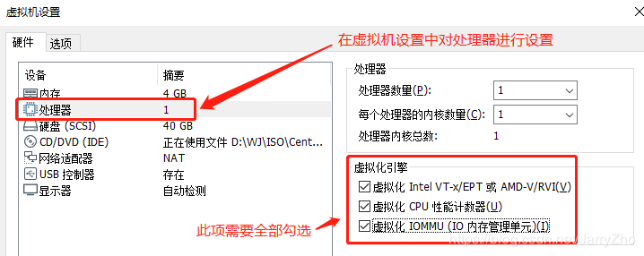
1. Need to add a disk first: the size is 20G
2. Processor settings: check all virtualization engine options
[root@client ~]# cd /dev
[root@client dev]# ls
sda sda1 sda2 sda3 sda4 sda5 sdb
#sdb hard disk is available
[root@client dev]# fdisk /dev/sdb
Welcome to fdisk (util Linux 2.23.2).
Changes stay in memory until you decide to write them to disk.
Think twice before using the write command.
Device does not contain a recognized partition table
Use disk identifier 0xba1e8e30 to create a new DOS disk label.
Command (enter m for help): n ා enter n
Partition type:
p primary (0 primary, 0 extended, 4 free)
e extended
Select (default p): p ා enter p
Partition number (1-4, default 1):
Start sector (2048-41943039, default 2048):
The default value 2048 will be used
Last sector, + sector or +size{K,M,G} (2048-41943039, default is 41943039):
Default value 41943039 will be used
Partition 1 is set to Linux type and size is set to 20 GiB
Command (enter m for help): W ා enter w to save to exit
The partition table has been altered!
Calling ioctl() to re-read partition table.
Synchronizing disks.
[root @ client dev] ා mkfs / dev / sdb1 format
mke2fs 1.42.9 (28-Dec-2013)
File system label=
OS type: Linux
Block size = 4096 (log=2)
Block size = 4096 (log=2)
Stride=0 blocks, Stripe width=0 blocks
1310720 inodes, 5242624 blocks
262131 blocks (5.00%) reserved for the super user
First block = 0
Maximum filesystem blocks=4294967296
160 block groups
32768 blocks per group, 32768 fragments per group
8192 inodes per group
Superblock backups stored on blocks:
32768, 98304, 163840, 229376, 294912, 819200, 884736, 1605632, 2654208,
4096000
Allocating group tables: complete
Writing inode table: done
Writing superblocks and filesystem accounting information: done
[root @ client dev] ා MKDIR / data ා create mount
[root@client dev]# mount /dev/sdb1 /data/
[root@client data]# df -hT
Filesystem type capacity used% free used mount point
/dev/sdb1 ext2 20G 44M 19G 1% /data
#The display shows that it has been mounted
#The folder with CentOS 7 image file in the computer needs to be shared. Set the account Everyone can read it, and then use smbclient-l to view the mount
[root@client data]# smbclient -L //192.168.10.190/
Enter SAMBA\root's password:
OS=[Windows 10 Home China 18363] Server=[Windows 10 Home China 6.3]
Sharename Type Comment
--------- ---- -------
database Disk
F $disk default share
gfs Disk
IPC $IPC remote IPC
ISO Disk
rpm Disk
#The ISO folder is shared
[root@client data]# mount.cifs //192.168.10.190/ISO /mnt
Password for root@//192.168.10.190/ISO:
[root@client data]# df -hT
File system capacity used% free used% mount point
/dev/sdb1 20G 44M 19G 1% /data
//192.168.10.190/ISO 226G 173G 54G 77% /mnt
#At this time, the display file is successfully mounted in the mnt directory
[root@client data]# cd /mnt/
[root@client mnt]# ls
CentOS-7-x86_64-DVD-1708.isoInstall KVM:
[root@client mnt]# yum list         #Carry out self inspection
[root@client mnt]# yum groupinstall "GNOME Desktop" -y      #Desktop Environment
[root@client mnt]# yum install qemu-kvm -y      #KVM module
[root@client mnt]# yum install qemu-kvm-tools -y        #KVM debugging tools
[root@client mnt]# yum install virt-install -y      #Command tools for building virtual machines
[root@client mnt]# yum install qemu-img -y      #qemu component, create disk, start virtual machine
[root@client mnt]# yum install bridge-utils -y      #Network support tools
[root@client mnt]# yum install libvirt -y       #Virtual machine management tools
[root@client mnt]# yum install virt-manager -y      #Image management virtual machine
[root@client mnt]# egrep '(vmx|svm)' /proc/cpuinfo      #See if virtualization is supported

[root@client mnt]# lsmod | grep kvm     #Check if KVM is installed
kvm_intel             170086  0
kvm                   566340  1 kvm_intel
irqbypass              13503  1 kvm

[root@client mnt]# systemctl start libvirtd
[root@client mnt]# systemctl enable libvirtd        #Power on self start
To configure a bridge instance:
[root@client mnt]# cd /data/
[root@client data]# mkdir vdisk viso
[root@client data]# ls
lost+found  vdisk  viso
[root@client data]# cp -r /mnt/CentOS-7-x86_64-DVD-1708.iso /data/viso/
[root@client data]# ls viso/
CentOS-7-x86_64-DVD-1708.iso
[root@client data]# cd /etc/sysconfig/network-scripts/
[root@client network-scripts]# cp -p ifcfg-ens33 ifcfg-br0
[root@client network-scripts]# ifconfig
ens33: flags=4163<UP,BROADCAST,RUNNING,MULTICAST>  mtu 1500
        inet 192.168.18.145  netmask 255.255.255.0  broadcast 192.168.18.255
        inet6 fe80::6a0c:e6a0:7978:3543  prefixlen 64  scopeid 0x20<link>
        ether 00:0c:29:a4:cb:c7  txqueuelen 1000  (Ethernet)
        RX packets 6559352  bytes 9624037086 (8.9 GiB)
        RX errors 0  dropped 0  overruns 0  frame 0
        TX packets 364406  bytes 30690747 (29.2 MiB)
        TX errors 0  dropped 0 overruns 0  carrier 0  collisions 0
......Multiple lines are omitted here
[root@client network-scripts]# vim ifcfg-ens33
#Press o at the last line to insert
BRIDGE=br0
#After the insertion, press Esc to exit the insertion mode, enter: wq to save and exit
[root@client network-scripts]# vim ifcfg-br0
TYPE="bridge"               #Ethernet to bridge
PROXY_METHOD="none"
BROWSER_ONLY="no"
BOOTPROTO="static"          #Change dhcp to static
DEFROUTE="yes"
IPV4_FAILURE_FATAL="no"
IPV6INIT="yes"
IPV6_AUTOCONF="yes"
IPV6_DEFROUTE="yes"
IPV6_FAILURE_FATAL="no"
IPV6_ADDR_GEN_MODE="stable-privacy"
NAME="br0"                  #Change ens33 to br0
DEVICE="br0"                #Change ens33 to br0
ONBOOT="yes"
IPADDR=192.168.18.145       #Enter the IP address of ens33
NETMASK=255.255.255.0       #Enter subnet mask
GATEWAY=192.168.18.1        #Input gateway
#Modify exit insertion mode, enter: wq save exit
[root@client network-scripts]# service network restart      #service network restart
Restarting network (via systemctl):                        [  determine  ]

[root@client network-scripts]# ifconfig
br0: flags=4163<UP,BROADCAST,RUNNING,MULTICAST>  mtu 1500
        inet 192.168.18.145  netmask 255.255.255.0  broadcast 192.168.18.255
        inet6 fe80::e169:c641:eeea:50f7  prefixlen 64  scopeid 0x20<link>
        ether 00:0c:29:a4:cb:c7  txqueuelen 1000  (Ethernet)
        RX packets 20  bytes 1298 (1.2 KiB)
        RX errors 0  dropped 0  overruns 0  frame 0
        TX packets 35  bytes 4588 (4.4 KiB)
        TX errors 0  dropped 0 overruns 0  carrier 0  collisions 0

ens33: flags=4163<UP,BROADCAST,RUNNING,MULTICAST>  mtu 1500
        ether 00:0c:29:a4:cb:c7  txqueuelen 1000  (Ethernet)
        RX packets 6559967  bytes 9624087097 (8.9 GiB)
        RX errors 0  dropped 0  overruns 0  frame 0
        TX packets 364793  bytes 30733147 (29.3 MiB)
        TX errors 0  dropped 0 overruns 0  carrier 0  collisions 0
......Several lines are omitted below
#After bridging, the IP address of the original ens33 network card is on br0
Return to the graphical interface for input:
[root@client ~]# virt-manager
The virtual system manager interface will pop up. We need to add storage pool
After defining the pool name, click Browse directory, select / data/vdisk as the directory, find the folder directory where we mount CentOS7, and click finish
Then click add new volume
Add image storage pool: iso, click forward, select the path as / data/viso
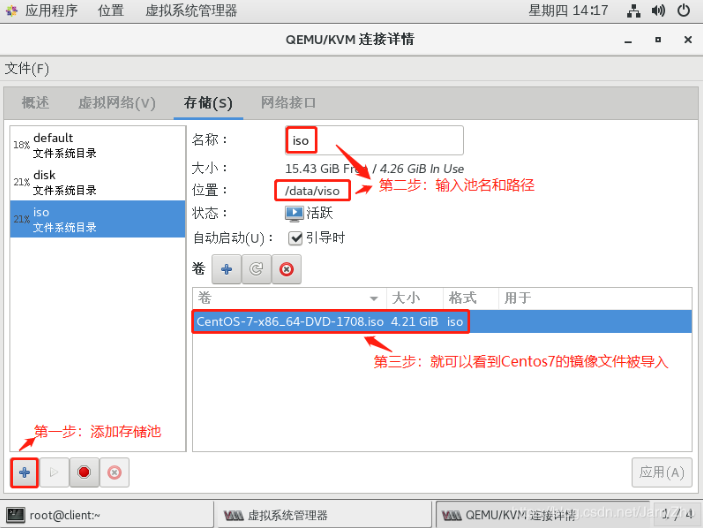
After creation, you can click file in the upper left corner → close
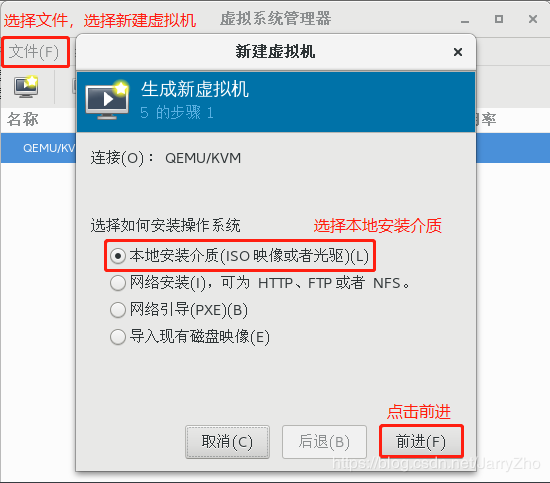
Select new virtual machine in the upper left file of virtual system manager
Install the operating system locally, click forward
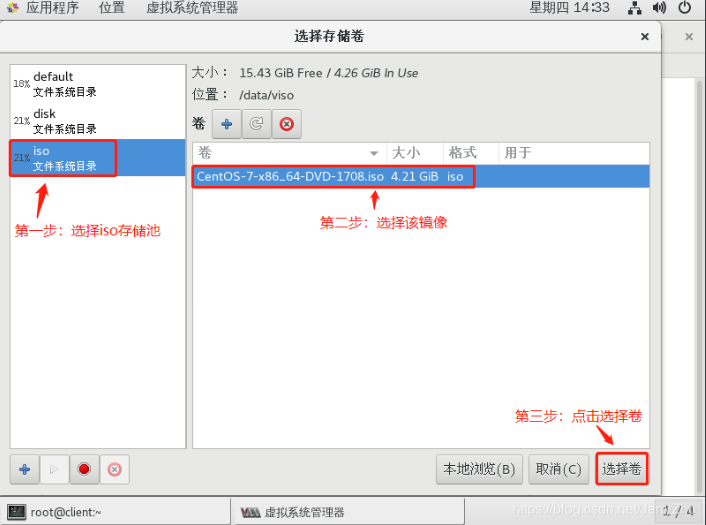
Use ISO image: click browse, select ISO storage pool, find image, click Select volume
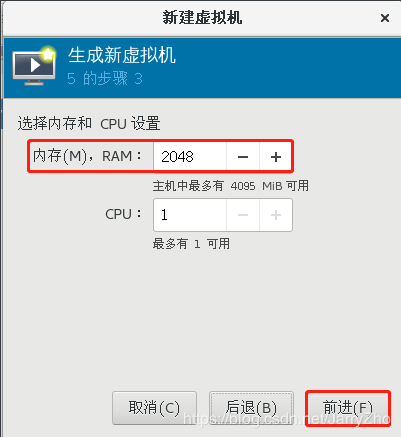
Click forward, memory input 2048, and then click forward
Select or create custom storage, click manage, select disk storage pool, click previous volume, click Select volume

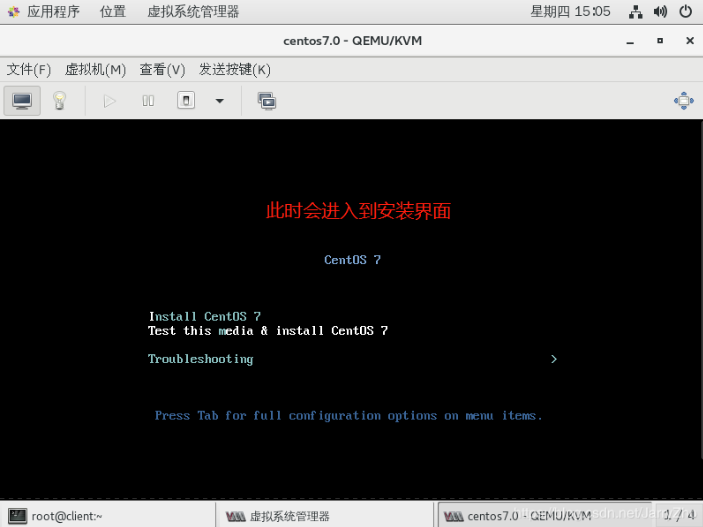
Click forward, and then click Finish to enter the Centos7 installation interface: