Long time no see, I miss you very much!
hello everyone!
I'm breeze Yangyang. Today's article is to talk to you about CSS selectors in detail. I hope you can gain something after reading them. Then my hard codewords are worth it. If you have the greatest motivation to lose and like your creation, I might as well continue to support you. The next article will introduce CSS element styles. See you then~~~
1, CSS3 overview
1. Development of CSS

2. Browser support for CSS3
Popular browsers have good support for CSS, but different browsers deal with many details of CSS3 differently.
3. CSS editor
Dreamweaver CS5,WebStorm,IntelliJ IDEA,VSCode
An example of CSS
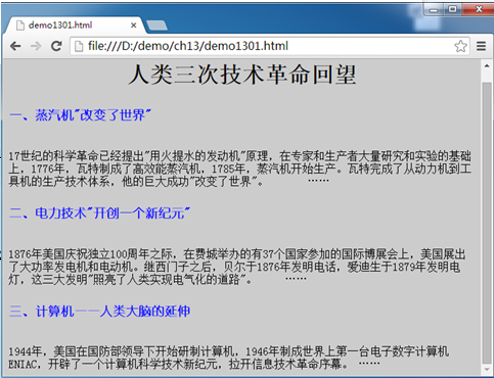
Example: design a page using traditional HTML.
Realization effect
HTML code
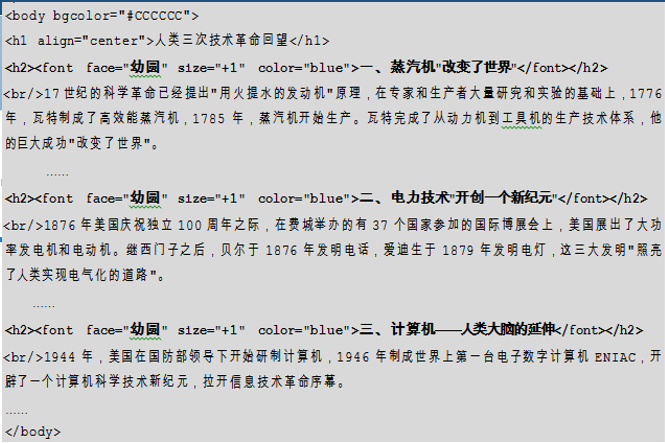
Using CSS to improve HTML page design
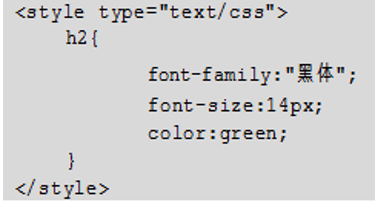
Using CSS has the following main advantages.
(1) Separation of structure and style
(2) Extended HTML tags
(3) Improve website maintenance efficiency
(4) It can realize exquisite page layout
2, Basic selectors for CSS
CSS can be considered as a collection of multiple selectors. Each selector is composed of three basic parts - "selector name", "attribute" and "value". The format is defined as follows.
selector {
property:value;
}
1. Mark selector
An HTML page consists of many different tags, such as < p >, < H1 >, < div >, etc. The CSS tag selector is used to declare the CSS style of these tags.
tagName {
property:value;
}
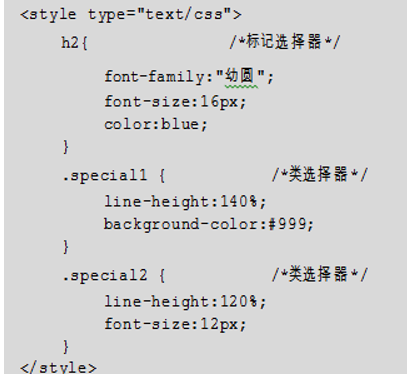
2. Class selector
Class selectors are used to define the same rendering for a series of tags.
.className {
property:value;
}
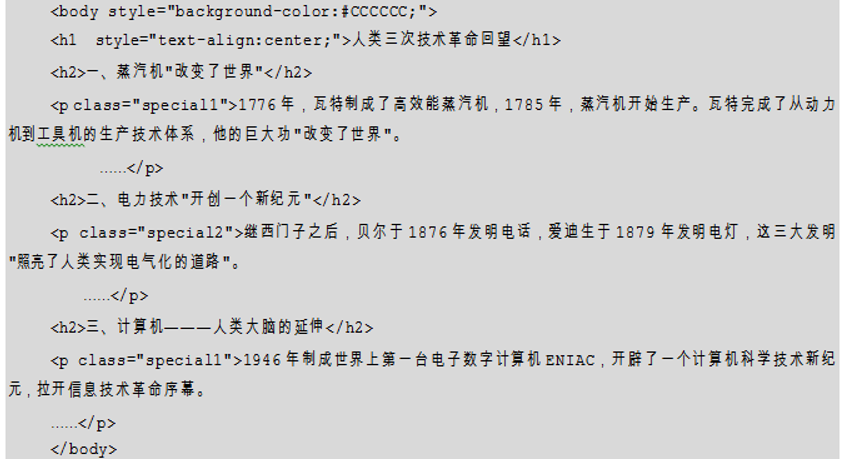
The example shows the comprehensive application of tag selector and class selector
3.ID selector
ID selector and class selector are similar in the function of setting format. They both set the attribute value of a specific attribute.
An important function of ID selector is to be used as the unique identification of web page elements. Therefore, the ID attribute value of an element in an HTML file is unique.
The syntax format for defining the ID selector is as follows.
#idName{
property:value ;
}
When defining the ID selector, you need to add a "#" symbol in front of idName, as shown in the following example.
#font1{
Font family: "young circle";
color:#00F;
}
The main differences between class selector and ID selector are as follows.
(1) The class selector can define styles for any number of tags, but the ID selector can only be used once in the tag of the page.
(2) The ID selector has higher priority than the class selector, that is, when the ID selector conflicts with the class selector in style definition, the style defined by the ID selector takes precedence.
Application of sample ID selector
<!DOCTYPE html>
<html>
<head>
    <meta charset="utf-8">
    <style type="text/css">
        p {
            text-indent: 2em;
        }


        #first {
            /*ID selector*/
            font-family: "Immature";
            color: #00F;
        }


        #second {
            line-height: 130%;
            font-family: "official script";
        }
    </style>
</head>
<body>
<p id="first">The teaching of computational thinking is the inevitable result of the development of computer science.</p>


<p id="second">The early development of computer, under the guidance of computer science, guided what can be done and what can not be done; What is fast and what is slow; What is well done and what is not well done.</p>


<p>There are no rules now. It seems that there is nothing computers can't do. Moreover, the super fast computing speed and super large storage capacity of the computer dominate the theoretical research. This masks some deep-seated essential problems.</p>
</body>
</html>
effect

3, Methods of using CSS in HTML
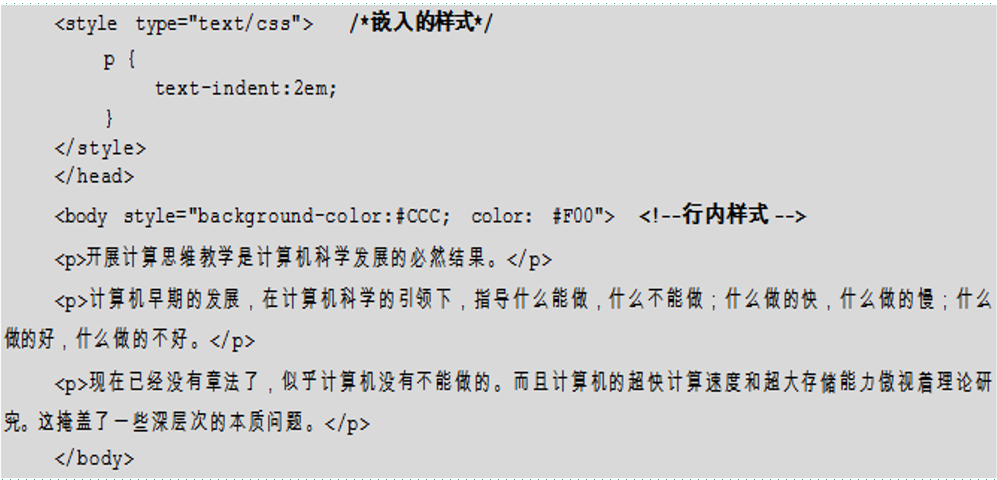
Inline style
The simplest way to use it is to directly add CSS code to the code line of HTML, which is supported by < style > tags. The code example is as follows:
<h1 style="color:blue;font-style:bold"></h1>
Embedded style
As part of the web page code, the style definition is written between < head > and < / head > of the HTML document and declared through < style > and < / style > tags.
Embedded styles are similar to and different from inline styles. Inline styles have only one line of scope, while embedded styles can act on the whole HTML document.
Examples include inline styles and embedded styles.
Link style
Link style is the most frequently used way to introduce CSS into HTML.
- It reflects the separation of "page content" and "style definition"
- It realizes the separation of content description and CSS code
- The pre production and post maintenance of the website are very convenient.
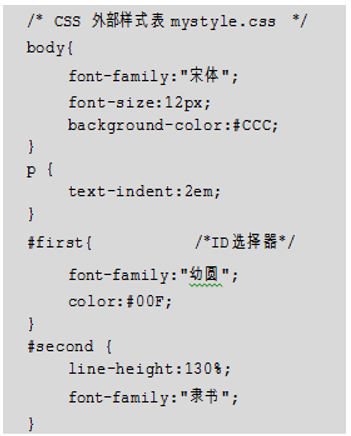
The link style must first define a file with the extension ". CSS" (i.e. external style sheet), which contains the CSS rules that need to be used and does not contain any other HTML code.
The way to link the style sheet is to add code in the < head > part of the HTML file. The format is as follows.
<link rel="stylesheet" type="text/css" href=" mystyle.css" />
An example of a linked style sheet
HTML file
	<!DOCTYPE html>
	<html>
	<head>
	<meta charset="utf-8">
	<link href="css/mystyle.css" type="text/css" rel="stylesheet"/>
	</head>
	<body>
	<p id="first">The teaching of computational thinking is the inevitable result of the development of computer science.</p>

	<p id="second">The early development of computer, under the guidance of computer science, guided what can be done and what can not be done; What is fast and what is slow; What is well done and what is not well done.</p>

	<p>There are no rules now. It seems that there is nothing computers can't do. Moreover, the super fast computing speed and super large storage capacity of the computer dominate the theoretical research. This masks some deep-seated essential problems.</p>
	</body>
	</html>
CSS file
Import style
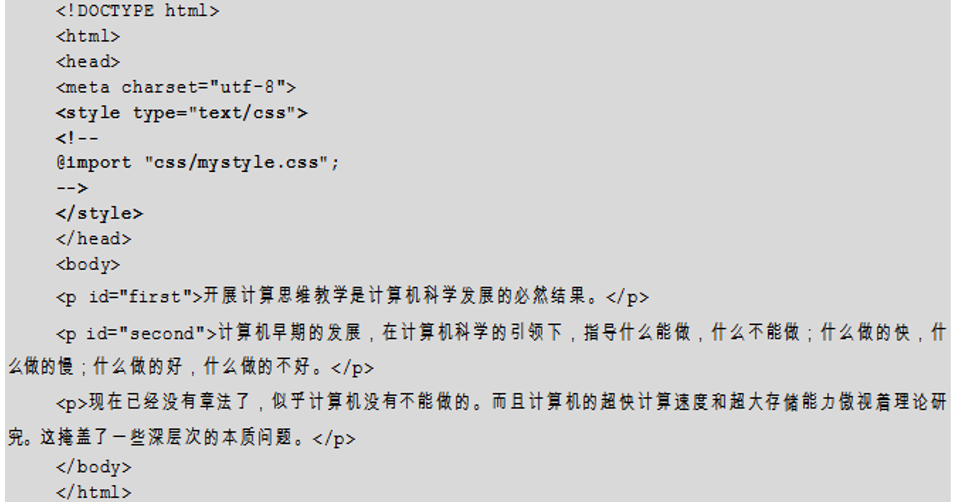
The operation process of importing style and link style is basically the same. Both need a separate external CSS file, and then import it into HTML file, but there are differences in syntax and operation process.
Import style is to import an external CSS file into the HTML file as part of the file during initialization of the HTML file, which is similar to embedding.
To import an external style, you need to use @ import in the < style > tag of the embedded style sheet to import an external CSS file. The example code is as follows.
<style type="text/css">

@import "mystyle.css";

</style>
Examples
Priority of style
1. Comparison between inline style and embedded style
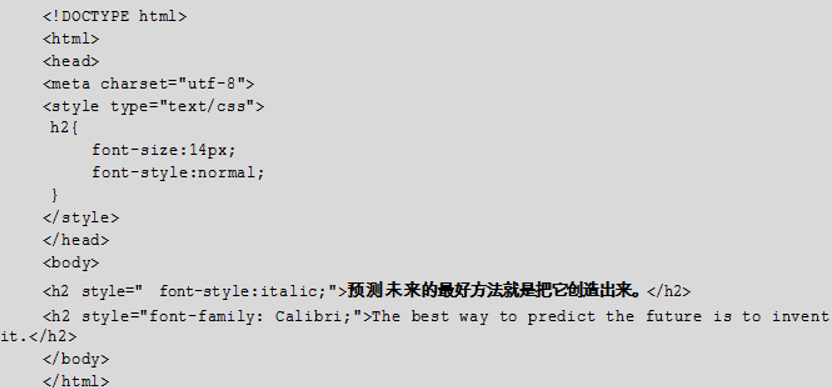
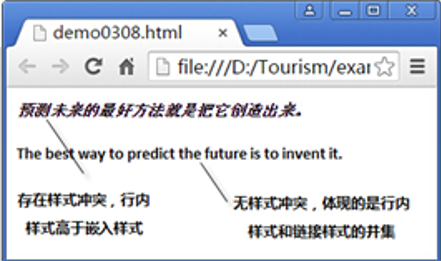
Inline styles take precedence over embedded styles
2. Comparison between embedded style and link style
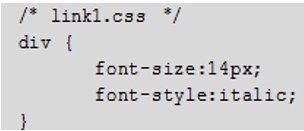
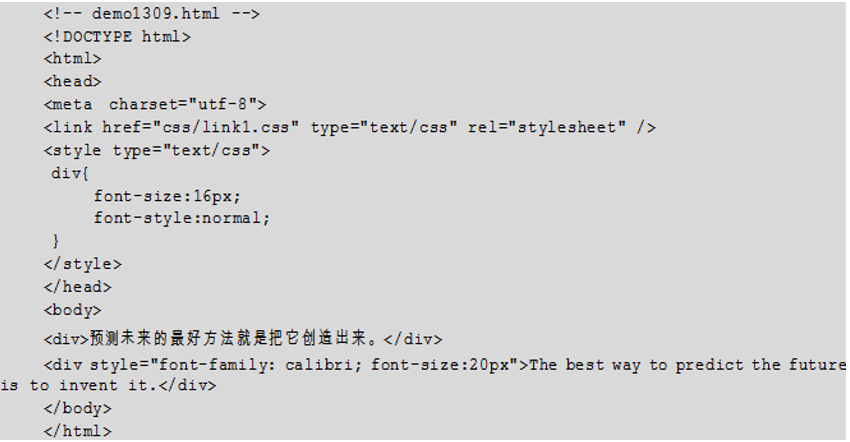
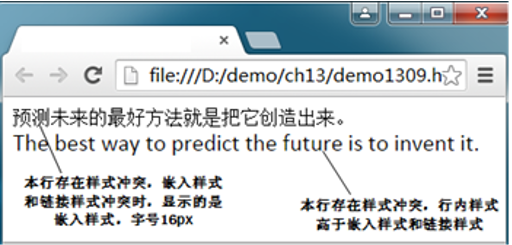
Embedded styles take precedence over linked styles.
3. Link style and import style
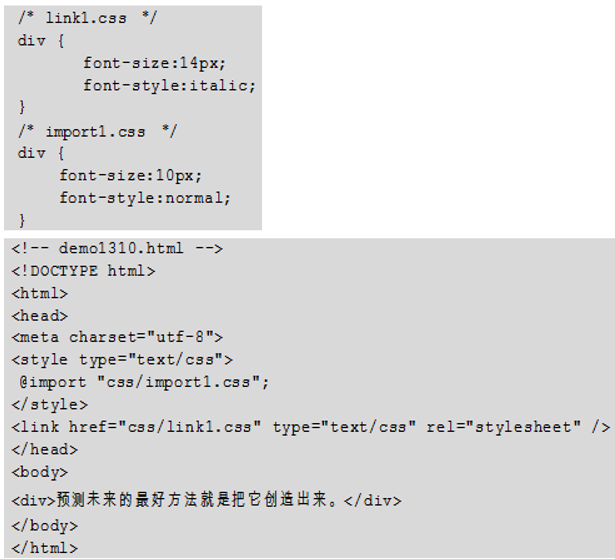
Linked styles take precedence over imported styles.
Through the previous example, the priority of CSS style sheet method from high to low is: inline style, embedded style, link style and import style.
4, CSS composite selector
Compound selector is a selector composed of two or more basic selectors in different ways, which can realize stronger and more convenient selection functions, mainly including intersection selector, union selector and descendant selector.
Intersection selector
The intersection selector is composed of two selectors connected directly, and the result is to select the intersection of their respective scope of action. The first must be a tag selector, and the second must be a class selector or ID selector, for example: "h1.class1; p#id1".
The basic syntax format of intersection selector is as follows.
tagName.className {
property:value;
}
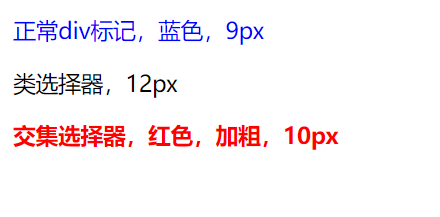
The example demonstrates the function of the intersection selector
code
<!DOCTYPE html>
<head>
    <meta charset="utf-8">
    <style>
        div {
            color: blue;
            font-size: 9px;
        }


        .class1 {
            font-size: 12px;
        }


        div.class1 {
            color: red;
            font-size: 10px;
            font-weight: bold;
        }
    </style>
</head>
<body>
<div>normal div Mark, blue, 9 px</div>
<p class="class1">Class selector, 12 px</p>


<div class="class1">Intersection selector, red, bold, 10 px</div>
</body>
</html>
effect
Union selector
Union selector is a collective declaration of multiple selectors, which are separated by "," and each selector can be of any type.
If some selectors define exactly the same or partially the same style, you can use the union selector.
The following is the syntax format of the union selector.
selector1,selector2,... {
property:value;
}
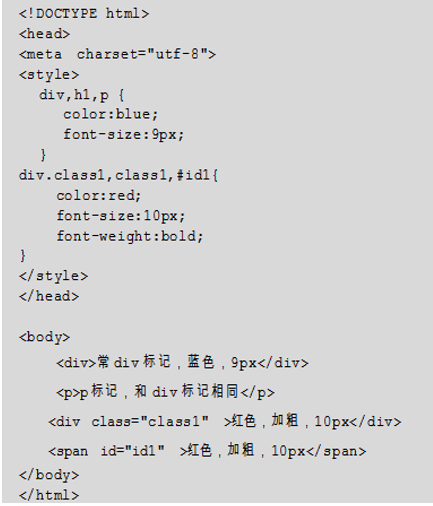
The example demonstrates the function of the union selector
code
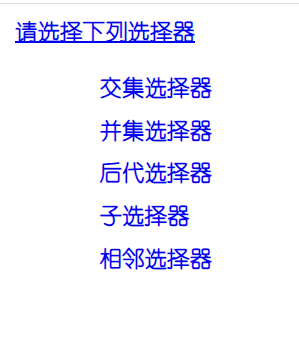
Descendant Selectors
In the CSS selector, you can also control the HTML tags in special positions through nesting. For example, when there is a < b > tag between < div > and < / div >, you can use the descendant selector to define the format of the < b > tag that appears in the < div > tag. The descendant selector is written by writing the outer mark in front and the inner mark in the back, separated by a space.
selector1 selector2 {
property:value;
}
The two selectors are separated by spaces, and selector2 is the object contained in selector1.
Examples
code
	<!DOCTYPE html >
	<head>
	<meta charset="utf-8">
	</head>
	<style>
	div {
	font-family: "Immature";
	color: #003;
	font-size: 12px;
	font-weight: bold;
	}

	div li {
	/*Descendant Selectors */
	margin: 0px;
	padding: 5px;
	list-style: none; /*Hide default list symbols*/
	}

	div li a {
	/*Descendant Selectors */
	text-decoration: none; /*Unlinking hyperlinks*/
	}
	</style>
	<body>
	<div><a href="#"> please select the following selector</a>
	<ul>
	<li><a href="#"> intersection selector</a></li>
	<li><a href="#"> union selector</a></li>
	<li><a href="#"> descendant selector</a></li>
	<li><a href="#"> sub selector</a></li>
	<li><a href="#"> adjacent selectors</a></li>
	</ul>
	</div>
	</body>
	</html>
effect
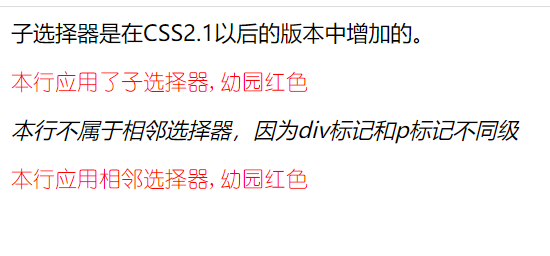
Child selectors
The syntax format of the sub selector is as follows:
selector1>selector2
Examples
code
	<!DOCTYPE html>
	<head>
	<meta charset="utf-8">
	<style>
	div > p {
	font-family: "Immature";
	color: #F00;
	}
	</style>
	</head>
	<body>
	The sub selector is in CSS2.1 Added in later versions.
	<div>
	<p>This line has a sub selector applied,Kindergarten red</p>


	<em>
	<p>This line does not belong to adjacent selectors because div Marking and p Mark different levels</p>
	</em>
	<p>Apply adjacent selectors to this line,Kindergarten red</p>
	</div>

	</body>
	</html>
effect
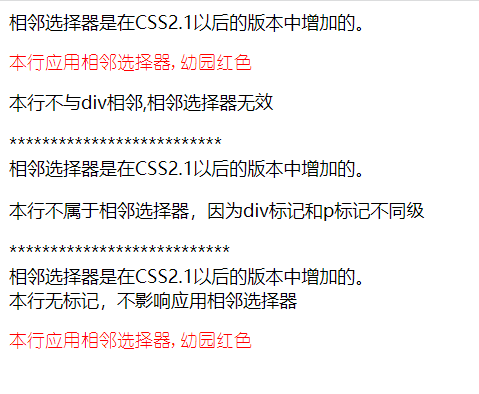
sibling selector
The two selected elements can have a common plus sign (the two selected elements can have a common plus sign)
Examples
code
	<!DOCTYPE html>
	<head>
	<meta charset="utf-8">
	<style>
	div + p {
	font-family: "Immature";
	color: #F00;
	}
	</style>
	</head>
	<body>
	<div>Adjacent selectors are in CSS2.1 Added in later versions.</div>
	<p>Apply adjacent selectors to this line,Kindergarten red</p>

	<p>The bank does not div adjacent,Invalid adjacent selector</p>
	**************************
	<div>Adjacent selectors are in CSS2.1 Added in later versions.
	<p>This line does not belong to adjacent selectors because div Marking and p Mark different levels</p>
	</div>
	***************************
	<div>Adjacent selectors are in CSS2.1 Added in later versions.</div>
	This line is unmarked and does not affect the application of adjacent selectors
	<p>Apply adjacent selectors to this line,Kindergarten red</p>
	</body>
	</html>
effect
5, CSS3 new selector
attribute selectors
Through a variety of attributes, you can add a lot of additional information to the element. For example, through the id attribute, different elements can be distinguished; Through the class attribute, you can set the style of the element.
To extend the function of the attribute selector, you can use three wildcards ^, $and *.
Attribute selector and its functions

The example is an example of an attribute selector
code
	<!DOCTYPE html>
	<html>
	<head>
	<meta charset="utf-8">
	<style type="text/css">
	* {
	/*Format of all text in the web page*/
	text-decoration: none;
	font-size: 16px;
	}

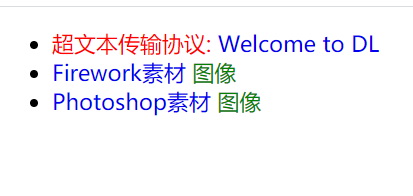
	a[href^=http]:before {
	/*Insert content before specifying a property*/
	content: "Hyper Text Transfer Protocol: ";
	color: red;
	}

	a[href$=jpg]:after, a[href$=png]:after {
	/*Insert content before and after the specified attribute*/
	content: " image";
	color: green;
	}
	</style>
	</head>
	<body>
	<ul>
	<li><a href="http://dltravel.html">Welcome to DL</a></li>
	<li><a href="firework.png">Firework source material</a></li>
	<li><a href="photoShop.jpg">Photoshop source material</a></li>
	</ul>
	</body>
effect
Pseudo class selector
The pseudo class selector is different from the class selector. The class selector is defined by the user, while the pseudo class selector is a selector already defined in CSS.
Pseudo class selectors can be divided into structure pseudo class selectors and UI element pseudo class selectors.
1. Basic structure: pseudo class selector
Basic structure pseudo class selector

Pseudo class selectors can be divided into structure pseudo class selectors and UI element pseudo class selectors.
2. Structure pseudo class selector related to element position
Structure pseudo class selector related to element position

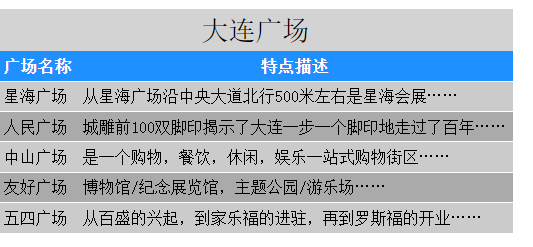
Examples
code
	<!DOCTYPE html>
	<html>
	<head>
	<meta charset="utf-8">
	<style type="text/css">
	table {
	border:none;
	font: 14px Song style;
	}
	table caption { /*Table title*/
	padding: 5px;
	background-color: lightgrey;
	font-size: 24px;
	}
	thead {/*Header definition*/
	background-color:dodgerblue;
	color: white;
	}
	tbody tr:nth-child(odd){/*Table body definition, odd lines and even lines are defined respectively*/
	background-color:#cbcbcb ;
	}
	tbody tr:nth-child(even){
	background-color: #aaa;
	}
	td,th {
	padding: 5px;
	border-bottom: 1px solid white;
	}
	</style>
	</head>
	<body>
	<table cellspacing="0">
	<caption>Dalian square</caption>
	<thead>
	<tr>
	<th>Square name</th><th>Feature description</th>
	</tr>
	</thead>
	<tbody>
	<tr><td>Xinghai Square </td><td>About 500 meters northbound from Xinghai Square along Central Avenue is Xinghai Exhibition</td></tr>
	<tr><td>People's Square</td><td>The first 100 pairs of footprints of the city carving reveal that Dalian has gone through a hundred years step by step</td></tr>
	<tr><td>Zhongshan Square</td><td>It is a one-stop shopping block for shopping, catering, leisure and entertainment</td></tr>
	<tr><td>Friendship Square</td><td>museum/Memorial Exhibition Hall, theme park/Playground</td></tr>
	<tr><td>May 4th Square</td><td>From the rise of Parkson, to the entry of Carrefour, to the opening of Roosevelt</td></tr>
	</tbody>
	</table>
	</body>
	</html>
effect
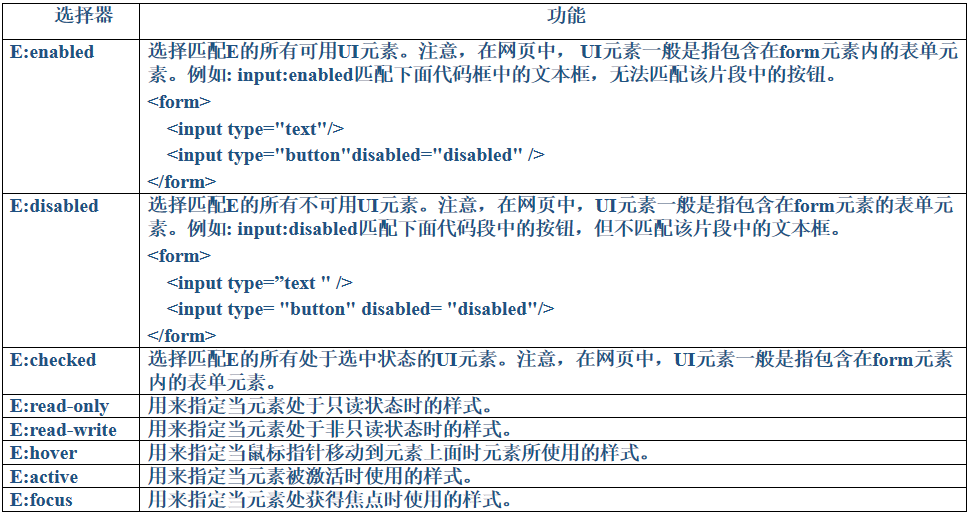
3.UI pseudo class selector
Common UI pseudo class selectors
Examples
code
<html lang="en">
<head>
<meta charset="UTF-8">
<meta name="viewport" content="width=device-width, initial-scale=1, maximum-scale=1, user-scalable=no">
<title>Document</title>
<style>
input[type="text"]:enabled{
background-color:#FF0;
}
input[type="text"]:disalbed{
background-color:#F0F;
}
</style>
</head>
<body>
<form>
surname name:<input type="text" name="text1" disabled/> <br>
ID card No.:<input type="text" name="text2" enabled />
</form>
</body>
</html>
effect

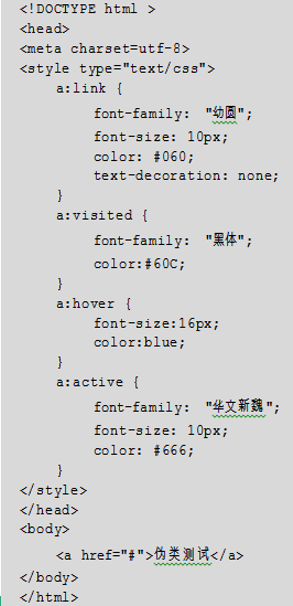
An example is the application of a pseudo class selector for hyperlinks.
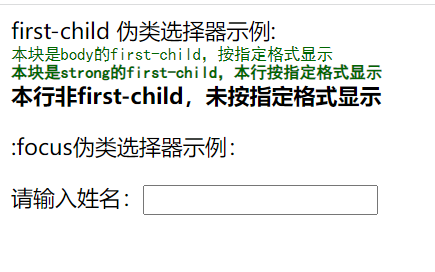
The example shows the functions of pseudo class selectors: focus and: first child
code
	<!DOCTYPE html>
	<head>
	<meta charset=" utf-8"/>
	<title>Pseudo class selector</title>
	<style>
	input:focus {
	background: #FF6;
	font-family: "Blackbody";
	font-size: 12px;
	}

	div:first-child {
	color: #060;
	font-family: "Blackbody";
	font-size: 12px;
	}
	</style>
	</head>
	<body>
	first-child Pseudo class selector example:
	<div>This block is body of first-child,Display in specified format</div>
	<strong>
	<div>This block is strong of first-child,This line is displayed in the specified format</div>
	<div>Non bank first-child,Not displayed in the specified format</div>
	</strong>

	<p>
	:focus Example of pseudo class selector:

	<form name="form1" method="get">
	Please enter your name:<input type="text" name="name"/>
	</form>
	</body>
	</html>
effect
Pseudo element selector
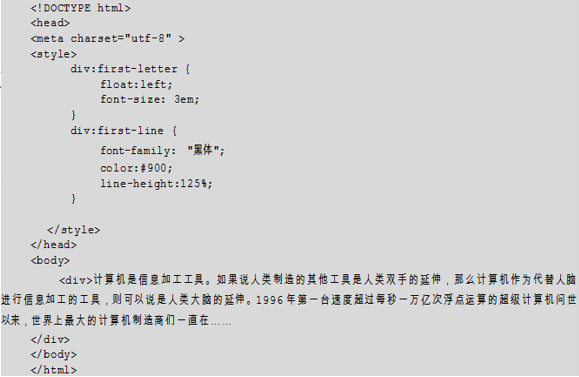
1. First letter and first line
: first letter is used to select the first character of the element content First line is used to select the first line of text in the element.
2. Selectors: before and after
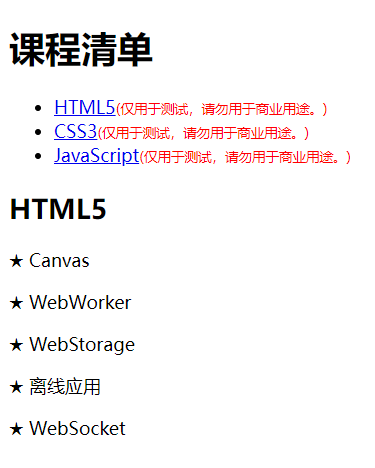
The: before and: after pseudo objects must be used together with the content attribute to make sense. Their function is to generate a new inline tag within the specified tag. The content of the inline element is determined by the content in the content attribute.
The before selector is used to insert content before an element.
: before {
Content: text or other content
}
The after selector is used to insert content after an element.
: after {
Content: text or other content
}
Examples
code
	<!DOCTYPE HTML>
	<html>
	<head>
	<meta charset=utf-8>
	<style>
	li:after {
	content: "(For testing purposes only, do not use for commercial purposes.)";
	font-size: 12px;
	color: red;
	}

	p:before {
	content: "★ ";
	}
	</style>
	</head>
	<body>
	<h1>Course list</h1>
	<ul>
	<li><a href="html.mp4">HTML5</a></li>
	<li><a href="css.mp4">CSS3</a></li>
	<li><a href="JS.mp4">JavaScript</a></li>
	</ul>
	<h2>HTML5</h2>

	<p>Canvas</p>

	<p>WebWorker</p>

	<p>WebStorage</p>

	<p>Offline applications </p>

	<p>WebSocket</p>
	</body>
	</html>
effect
6, Designing web pages using CSS
The layout of the example uses tables. The elements in the page such as text, hyperlinks, forms and horizontal lines are controlled by CSS. The page effect is shown in the figure.

code
<!DOCTYPE html>
<head>
<meta charset="utf-8">
<title>Web front-end technology</title>
<style type="text/css">
<!--
table[id="out"] {
width: 760px;
border: 1px solid #9fa1a0;
margin: 0 auto;
padding: 0;
}
.menu_style,.foot_style { /*Menu settings*/
height: 23px;
line-height: 23px;
background-color: #90d226;
text-align: center;
vertical-align: middle;
}
.menu_style a {/*Hyperlinks*/
display: inline-block;
width: 80px;
text-decoration: none;
}
a:link {
font-size: 12px;
color: #336699;
text-decoration: none;
}
table[id="main"] {
width: 100%;
height: 256px;
border: 0;
padding: 0;
}
.wodeweizhi { /*My position*/
width: 550px;
vertical-align: top;
padding-top: 10px;
padding-left: 10px;
}
hr { /*level*/
width: 500px;
text-align: center;
}
.zw { /*Body Paragraph */
font-size: 12px;
line-height: 1.75em;
color: #666666;
text-align: left;
text-indent: 2em;
}
table[id="search"] {
width: 170px;
height: 110px;
border: 1px solid #CCC;
padding: 0;
margin: 0 auto;
}
form { /*form */
height: 110px;
width: 170px;
}
input { /*Input field*/
height: 17px;
width: 67px;
border: thin solid #467BA7;
}
.dianxingkuangjia { /*Typical framework*/
text-align: center;
font-weight: bold;
color: #06F;
}
.dianxingkuangjia a {
text-decoration: none;
}
.dianjizheli { /*click here */
font-size: 12px;
line-height: 1.75em;
color: #666666;
}
-->
</style>
</head>
<body>
<table id="out">
<tr>
<td style="text-align:center;padding:0;"><img src="images/title3.jpg" style="width:760px; height:161px;"/>
</td>
</tr>
<tr>
<td class="menu_style">
<a href=""> HTML</a>
<a href=""> CSS</a>
<a href="">JavaScript</a>
<a href="">Ajax</a>
<a href="">XML</a>
<a href=""></a>
</td>
</tr>
<tr>
<td>
<table id="main">
<tr>
<td class="wodeweizhi"><p class="zw">My position>>CSS</p>
<hr/>
<p class="zw">CSS(Cascading Style
Sheets,Cascading style sheets)Is a standard layout language used to control the size, color and layout of elements, and to define how to display them HTML Element, pure CSS Layout and XHTML The combination can separate the content performance from the structure, and make the web page easier to maintain and easier to use.
see also<a href="#"> CSS details < / a ></p>
<p class="zw"> common CSS Development tools include Notepad EditPlus Text editor; Visual web development tool Dreamweaver CS5,Frontpage etc..</p>
<p class="zw">about CSS Welcome to share with us some of your questions<a href="#">Email me</a>. </p>
</td>
<td>
<form id="form1" name="form1" method="post" action="">
<table id="search">
<tr>
<td style="width:50%;"><img src="images/username.jpg" /></td>
<td>
<input type="text" name="uname" id="uname"/></td>
</tr>
<tr>
<td><img src="images/password.jpg" /></td>
<td>
<input type="text" name="pwd" id="pwd"/></td>
</tr>
<tr>
<td><span class="dianjizheli">click here </span><a href="#"> registration</a></td>
<td><img src="images/login_1.jpg" style="width:44px;
height:17px;"/></td>
</tr>
</table>
</form>
<div class="dianxingkuangjia">
<p>Typical framework</p>
<p><a href="#">JQuery</a></p>
<p><a href="#">Dojo</a></p>
<p><a href="#">Prototype</a></p>
</div>
</td>
</tr>
</table>
</td>
</tr>
<tr>
<td class="foot_style"><p>copyright</p></td>
</tr>
</table>
</body>
</html>
Attention can improve learning efficiency. Perfect!