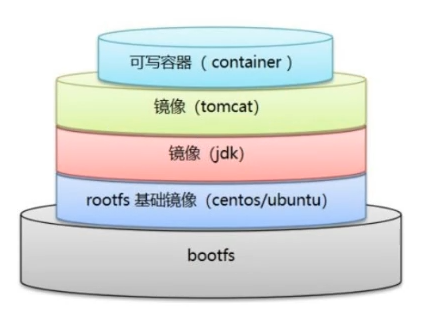
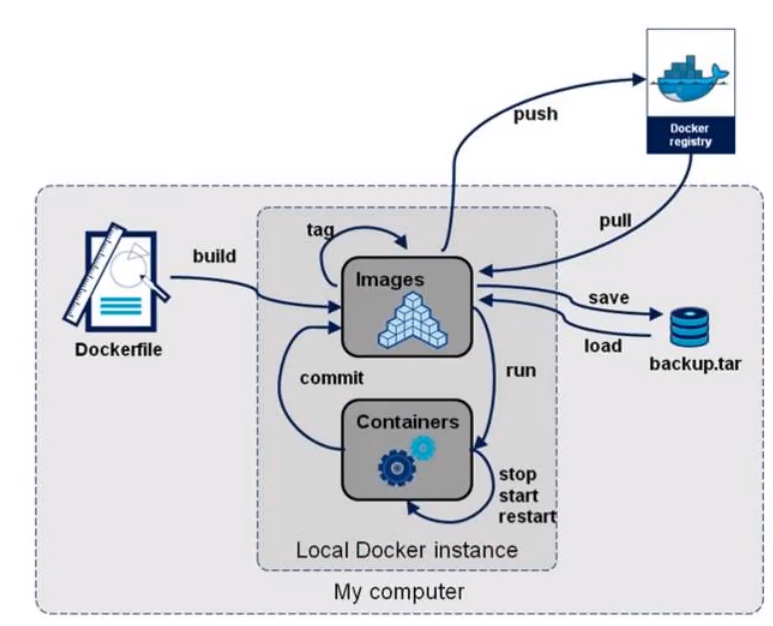
Container data volume
What is a container data volume
Review of docker's concept
Package the application and environment into an image!
data If the data is in the container, we will delete the container and lose the data! Requirement: data can be persistent
Mysql, the container is deleted, delete the database and run! Requirement: MySQL data can be stored locally!
There can be a data sharing technology between containers! Synchronize the data generated in Docker container to the local!
This is volume technology! Directory mount, mount the directory in our container to Linux!
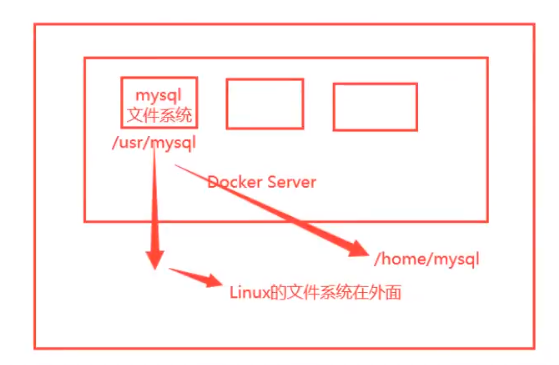
To sum up: container persistence and synchronization! Data can also be shared between containers!
Using data volumes
Method 1: directly use the command to mount - v
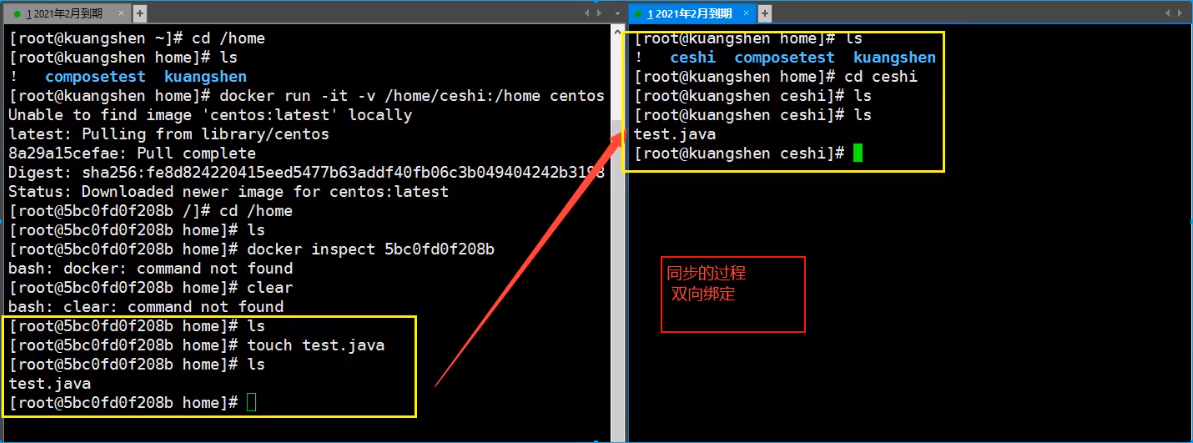
-v, --volume list                    Bind mount a volume

docker run -it -v Host Directory:In container directory  -p Host port:Port in container
# /home/ceshi: ceshi folder under the home directory of the host; mapping: centos container / home
[root@localhost home]# docker run -it -v /home/ceshi:/home centos /bin/bash
#At this time, the / home/ceshi folder of the host is associated with the / home folder of the container, and the two can synchronize files or data
#Is this the same physical partition

#New window
#View through docker inspect container id
[root@localhost home]# docker inspect 5b1e64d8bbc0
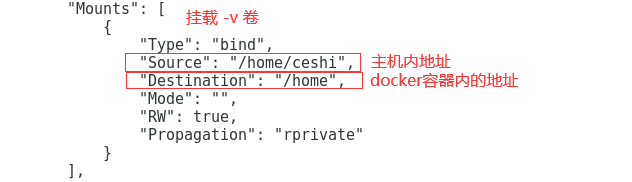
Here's the answer. This is not synchronization. This is using the same partition on the disk. The physical address is one
Test again!
1. Stop container
2. Host modify file
3. Start container
4. The data in the container is still synchronized
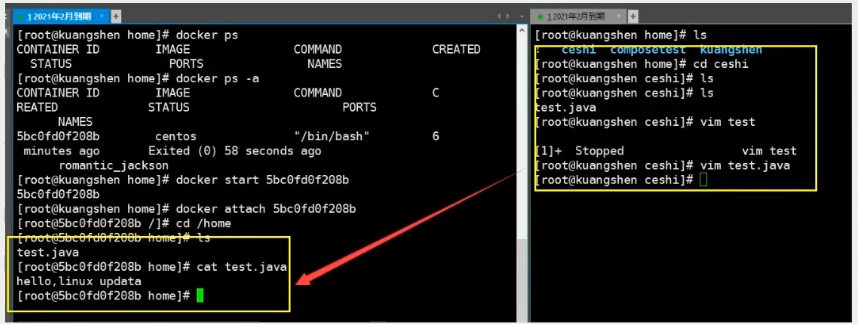
Benefits: we only need to modify locally in the future, and the container will be automatically synchronized!
Actual combat: install MySQL
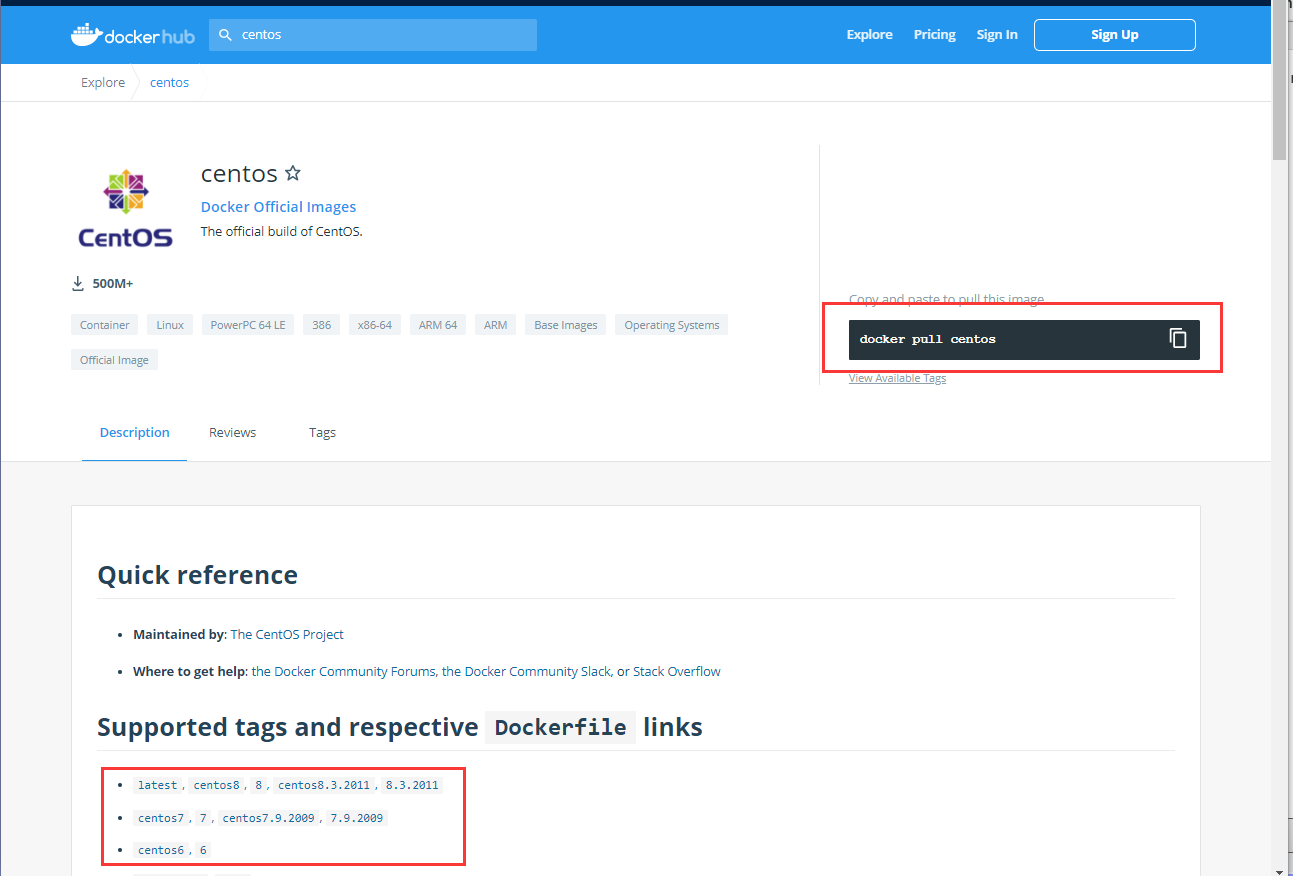
Docker store
Thinking: data persistence of MySQL
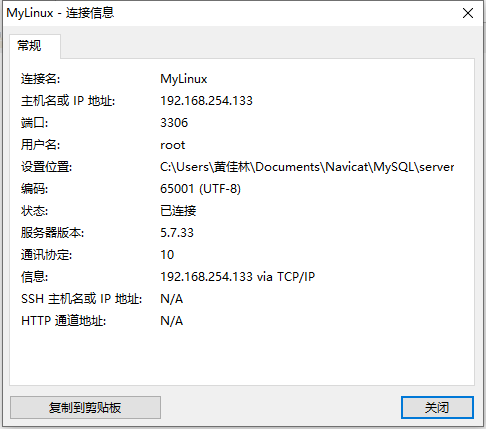
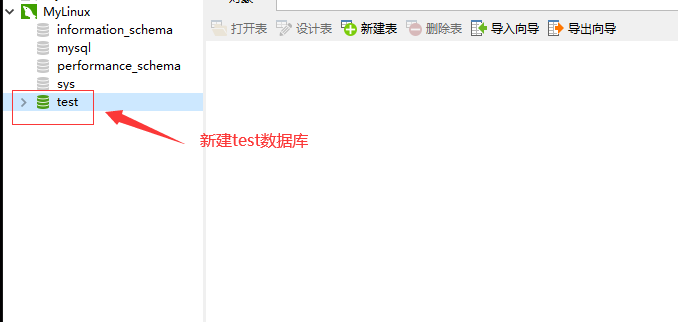
# Get mysql image
[root@localhost home]# docker pull mysql:5.7
# Run container,Data mounting is required #To install and start mysql, you need to configure the password, which should be paid attention to!
# Refer to the official website hub
docker run --name some-mysql -e MYSQL_ROOT_PASSWORD=my-secret-pw -d mysql:tag

#Start, we have to
-d Background operation
-p Port mapping
-v Volume mount
-e Environment configuration
-- name Container name
[root@localhost home]#  docker run -d -p 3306:3306 -v /home/mysql/conf:/etc/mysql/conf.d -v /home/mysql/data:/var/lib/mysql -e MYSQL_ROOT_PASSWORD=123456 --name mysql01 mysql:5.7

# After the startup is successful, let's test it locally with sqlyog
# sqlyog - 3306 connected to the server -- and 3306 mapping in the container

# Create a database in the local test and check whether the mapped path is ok!

[root@localhost home]# ls
ceshi  huang.java  huangjialin  huang.txt  mylinux  mysql  test.java  testTmp
[root@localhost home]# cd mysql
[root@localhost mysql]# ls
conf  data
[root@localhost mysql]# cd data/
[root@localhost data]# ls
auto.cnf    client-cert.pem  ibdata1      ibtmp1              private_key.pem  server-key.pem
ca-key.pem  client-key.pem   ib_logfile0  mysql               public_key.pem   sys
ca.pem      ib_buffer_pool   ib_logfile1  performance_schema  server-cert.pem
New database
More test files
[root@localhost data]# ls
auto.cnf    client-cert.pem  ibdata1      ibtmp1              private_key.pem  server-key.pem
ca-key.pem  client-key.pem   ib_logfile0  mysql               public_key.pem   sys
ca.pem      ib_buffer_pool   ib_logfile1  performance_schema  server-cert.pem  test
Suppose we delete the container
[root@localhost data]# docker rm -f mysql01
mysql01
[root@localhost data]# docker ps
CONTAINER ID   IMAGE     COMMAND       CREATED          STATUS          PORTS     NAMES
5b1e64d8bbc0   centos    "/bin/bash"   56 minutes ago   Up 39 minutes             keen_leavitt
[root@localhost data]# docker ps -a

[root@localhost home]# ls
ceshi  huang.java  huangjialin  huang.txt  mylinux  mysql  test.java  testTmp
[root@localhost home]# cd mysql
[root@localhost mysql]# ls
conf  data
[root@localhost mysql]# cd data/
[root@localhost data]# ls
auto.cnf    client-cert.pem  ibdata1      ibtmp1              private_key.pem  server-key.pem
ca-key.pem  client-key.pem   ib_logfile0  mysql               public_key.pem   sys
ca.pem      ib_buffer_pool   ib_logfile1  performance_schema  server-cert.pem
It is found that the data volume we mounted locally is still not lost, which realizes the container data persistence function.
Named and anonymous mount
# Anonymous mount
-v Path in container!
[root@localhost home]# docker run -d -P --name nginx01 -v /etc/nginx nginx

# View all volumes
[root@localhost home]# docker volume ls
DRIVER              VOLUME NAME # Volume name in container (anonymous volume mount)
local               21159a8518abd468728cdbe8594a75b204a10c26be6c36090cde1ee88965f0d0
local               b17f52d38f528893dd5720899f555caf22b31bf50b0680e7c6d5431dbda2802c

# It is found here that this is anonymous mount. In -v, we only write the path inside the container, not the path outside the container!

# Named mount - P: indicates a random mapping port
[root@localhost home]# docker run -d -P --name nginx01 -v /etc/nginx nginx
a35688cedc667161695f56bd300c12a6468312558c63a634d136bf8e73db4680

# View all volumes
[root@localhost home]# docker volume ls
DRIVER    VOLUME NAME
local     8bef6b16668574673c31978a4d05c212609add5b4ca5ea2f09ff8680bdd304a6
local     a564a190808af4cdca228f6a0ea3664dd14e34fee81811ed7fbae39158337141

# Named mount
[root@localhost home]# ls
ceshi  huang.java  huangjialin  huang.txt  mylinux  mysql  test.java  testTmp
[root@localhost home]# docker run -d -P --name nginx02 -v juming-nginx:/etc/nginx nginx	#Named mount
330f5a75c39945c6bed44292925219ed0d8d37adc0b1bc37b37784aae405b520
[root@localhost home]# docker volume ls
DRIVER    VOLUME NAME
local     8bef6b16668574673c31978a4d05c212609add5b4ca5ea2f09ff8680bdd304a6
local     a564a190808af4cdca228f6a0ea3664dd14e34fee81811ed7fbae39158337141
local     juming-nginx	# Named mount

# Through -v volume name: view the path in the container
# Take a look at this volume
[root@localhost home]# docker volume inspect juming-nginx
[
    {
        "CreatedAt": "2021-04-12T06:53:09-07:00",
        "Driver": "local",
        "Labels": null,
        "Mountpoint": "/var/lib/docker/volumes/juming-nginx/_data",
        "Name": "juming-nginx",
        "Options": null,
        "Scope": "local"
    }
]
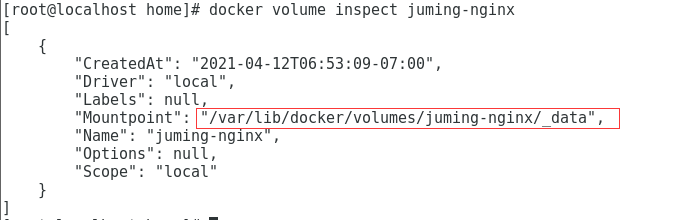
All volumes in the docker container are user-defined volume names in * * / var/lib/docker/volumes / if no directory is specified/_ Under data * *,
We can easily find one of our volumes through named mount, which is used in most cases
[root@localhost home]# cd /var/lib/docker
[root@localhost docker]# ls
buildkit  containers  image  network  overlay2  plugins  runtimes  swarm  tmp  trust  volumes
[root@localhost docker]# cd volumes/
[root@localhost volumes]# ls
8bef6b16668574673c31978a4d05c212609add5b4ca5ea2f09ff8680bdd304a6  backingFsBlockDev  metadata.db
a564a190808af4cdca228f6a0ea3664dd14e34fee81811ed7fbae39158337141  juming-nginx
[root@localhost volumes]# cd juming-nginx/
[root@localhost juming-nginx]# ls
_data
[root@localhost juming-nginx]# cd _data/
[root@localhost _data]# ls
conf.d  fastcgi_params  koi-utf  koi-win  mime.types  modules  nginx.conf  scgi_params  uwsgi_params  win-utf
[root@localhost _data]# cat nginx.conf

user  nginx;
worker_processes  1;

error_log  /var/log/nginx/error.log warn;
pid        /var/run/nginx.pid;


events {
    worker_connections  1024;
}


http {
    include       /etc/nginx/mime.types;
    default_type  application/octet-stream;

    log_format  main  '$remote_addr - $remote_user [$time_local] "$request" '
                      '$status $body_bytes_sent "$http_referer" '
                      '"$http_user_agent" "$http_x_forwarded_for"';

    access_log  /var/log/nginx/access.log  main;

    sendfile        on;
    #tcp_nopush     on;

    keepalive_timeout  65;

    #gzip  on;

    include /etc/nginx/conf.d/*.conf;
}
If a directory is specified, docker volume ls cannot be viewed.
Distinguish three mounting methods
# There are three kinds of Mount: anonymous mount, named mount and specified path mount
-v Path in container			#Anonymous mount
-v Volume name: path inside container		  #Named mount
-v /Host path: path within container #The docker volume ls attached to the specified path cannot be viewed
expand:
# Change the read and write permissions through - v path in container: ro rw
ro #readonly read only
rw #readwrite readable and writable

# Once the container permission is set, the container will limit the content we mount!
[root@localhost home]# docker run -d -P --name nginx05 -v juming:/etc/nginx:ro nginx
[root@localhost home]# docker run -d -P --name nginx05 -v juming:/etc/nginx:rw nginx

# As long as ro sees ro, it means that this path can only be operated through the host, and it cannot be operated inside the container!
Initial Dockerfile
Dockerfile is the build file used to build the docker image! Command script! Experience it first!
Through this script, you can generate images. Images are layer by layer. Scripts are commands one by one, and each command is a layer!
[root@localhost /]# cd /home
[root@localhost home]# ls
ceshi  huang.java  huangjialin  huang.txt  mylinux  mysql  test.java  testTmp
[root@localhost home]# mkdir docker-test-volume
[root@localhost home]# ls
ceshi  docker-test-volume  huang.java  huangjialin  huang.txt  mylinux  mysql  test.java  testTmp
[root@localhost home]# cd docker-test-volume/
[root@localhost docker-test-volume]# pwd
/home/docker-test-volume

#Through this script, you can generate an image
[root@localhost docker-test-volume]# vim dockerfile1
# Create a dockerfile file. The name can be suggested as dockerfile
# Contents in the file: instruction (uppercase) + parameter
[root@localhost docker-test-volume]# vim dockerfile1
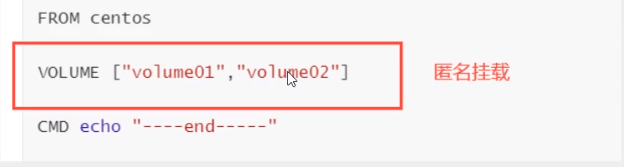
FROM centos # Currently, this image is based on centos
VOLUME ["volume01","volume02"] # List of volume directories on which the volume is mounted (multiple directories)
CMD echo "-----end-----" # Output it for testing
CMD /bin/bash # The default is bash console
[root@localhost docker-test-volume]# cat dockerfile1
FROM centos
VOLUME ["volume01","volume02"]
CMD echo "-----end-----"
CMD /bin/bash
# Every command here is a layer of image!
# Build this image
-f dockerfile1 # f stands for file and refers to the address of the current file (here is dockerfile1 in the current directory)
-t caoshipeng/centos # Note that the "target /" before the "target /" indicates the directory
. # Indicates that it is generated in the current directory
[root@localhost docker-test-volume]# docker build -f dockerfile1 -t huangjialin/centos:1.0 .
Sending build context to Docker daemon 2.048kB
Step 1/4 : FROM centos
---> 300e315adb2f
Step 2/4 : VOLUME ["volume01","volume02"] # Volume name list
---> Running in 2d8ae11d9994
Removing intermediate container 2d8ae11d9994
---> 5893b2c78edd
Step 3/4 : CMD echo "-----end-----" # Output script command
---> Running in 2483f0e77b68
Removing intermediate container 2483f0e77b68
---> 30bf0ad14072
Step 4/4 : CMD /bin/bash
---> Running in 8fee073c961b
Removing intermediate container 8fee073c961b
---> 74f0e59c6da4
Successfully built 74f0e59c6da4
Successfully tagged huangjialin/centos:1.0
# View self built images
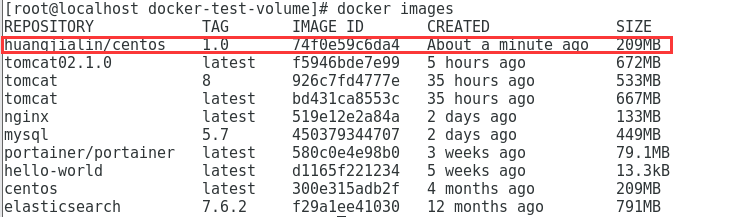
[root@localhost docker-test-volume]# docker images
REPOSITORY TAG IMAGE ID CREATED SIZE
huangjialin/centos 1.0 74f0e59c6da4 About a minute ago 209MB
[root@localhost docker-test-volume]# docker run -it 74f0e59c6da4 /bin/bash
[root@0be9ef3e0f75 /]# ls -l
total 0
lrwxrwxrwx.   1 root root   7 Nov  3 15:22 bin -> usr/bin
drwxr-xr-x.   5 root root 360 Apr 12 14:38 dev
drwxr-xr-x.   1 root root  66 Apr 12 14:38 etc
drwxr-xr-x.   2 root root   6 Nov  3 15:22 home
lrwxrwxrwx.   1 root root   7 Nov  3 15:22 lib -> usr/lib
lrwxrwxrwx.   1 root root   9 Nov  3 15:22 lib64 -> usr/lib64
drwx------.   2 root root   6 Dec  4 17:37 lost+found
drwxr-xr-x.   2 root root   6 Nov  3 15:22 media
drwxr-xr-x.   2 root root   6 Nov  3 15:22 mnt
drwxr-xr-x.   2 root root   6 Nov  3 15:22 opt
dr-xr-xr-x. 253 root root   0 Apr 12 14:38 proc
dr-xr-x---.   2 root root 162 Dec  4 17:37 root
drwxr-xr-x.  11 root root 163 Dec  4 17:37 run
lrwxrwxrwx.   1 root root   8 Nov  3 15:22 sbin -> usr/sbin
drwxr-xr-x.   2 root root   6 Nov  3 15:22 srv
dr-xr-xr-x.  13 root root   0 Apr  7 10:09 sys
drwxrwxrwt.   7 root root 145 Dec  4 17:37 tmp
drwxr-xr-x.  12 root root 144 Dec  4 17:37 usr
drwxr-xr-x.  20 root root 262 Dec  4 17:37 var
drwxr-xr-x.   2 root root   6 Apr 12 14:38 volume01
drwxr-xr-x.   2 root root   6 Apr 12 14:38 volume02
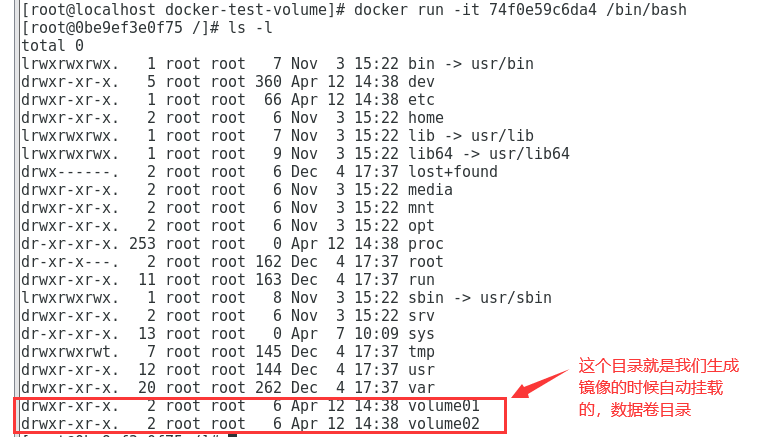
There must be a synchronized directory between this volume and the outside!
[root@0be9ef3e0f75 /]# exit
exit
[root@localhost docker-test-volume]# docker ps
CONTAINER ID   IMAGE     COMMAND                  CREATED             STATUS             PORTS                   NAMES
330f5a75c399   nginx     "/docker-entrypoint...."   54 minutes ago      Up 54 minutes      0.0.0.0:49154->80/tcp   nginx02
a35688cedc66   nginx     "/docker-entrypoint...."   About an hour ago   Up About an hour   0.0.0.0:49153->80/tcp   nginx01
[root@localhost docker-test-volume]# docker run -it 74f0e59c6da4 /bin/bash
[root@f8bd9a180286 /]# cd volume01
[root@f8bd9a180286 volume01]# touch container.txt
[root@f8bd9a180286 volume01]# ls
container.txt
Check the path of the volume mount
# docker inspect container id
$ docker inspect ca3b45913df5
# Another window
[root@localhost home]# docker images
REPOSITORY            TAG       IMAGE ID       CREATED          SIZE
huangjialin/centos    1.0       74f0e59c6da4   18 minutes ago   209MB
tomcat02.1.0          latest    f5946bde7e99   5 hours ago      672MB
tomcat                8         926c7fd4777e   35 hours ago     533MB
tomcat                latest    bd431ca8553c   35 hours ago     667MB
nginx                 latest    519e12e2a84a   2 days ago       133MB
mysql                 5.7       450379344707   2 days ago       449MB
portainer/portainer   latest    580c0e4e98b0   3 weeks ago      79.1MB
hello-world           latest    d1165f221234   5 weeks ago      13.3kB
centos                latest    300e315adb2f   4 months ago     209MB
elasticsearch         7.6.2     f29a1ee41030   12 months ago    791MB
[root@localhost home]# docker ps
CONTAINER ID   IMAGE          COMMAND                  CREATED             STATUS             PORTS                   NAMES
f8bd9a180286   74f0e59c6da4   "/bin/bash"              3 minutes ago       Up 3 minutes                               gifted_mccarthy
330f5a75c399   nginx          "/docker-entrypoint...."   59 minutes ago      Up 59 minutes      0.0.0.0:49154->80/tcp   nginx02
a35688cedc66   nginx          "/docker-entrypoint...."   About an hour ago   Up About an hour   0.0.0.0:49153->80/tcp   nginx01
[root@localhost home]# docker inspect f8bd9a180286
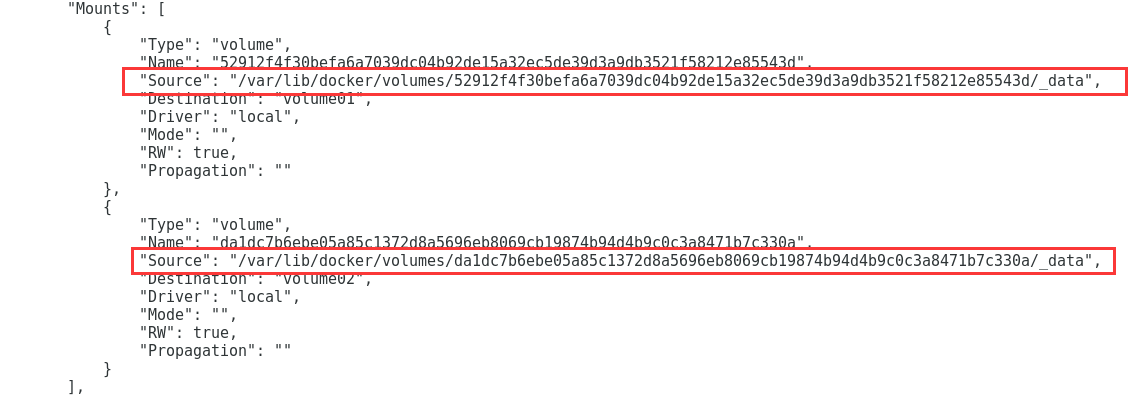
Test whether the files just synced out!
[root@localhost home]# cd /var/lib/docker/volumes/52912f4f30befa6a7039dc04b92de15a32ec5de39d3a9db3521f58212e85543d/_data
[root@localhost _data]# ls
container.txt
This method is used a lot, because we usually build our own image!
Assuming that there is no mounted volume when building the image, manually mount -v volume name: path in container!
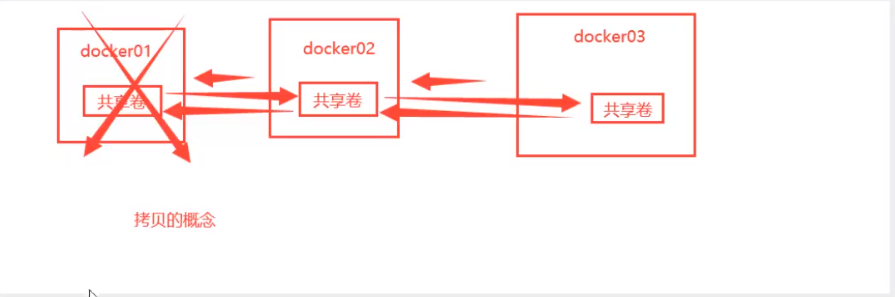
Data volume container
Multiple MySQL synchronization data!
Mount data volume in named container!
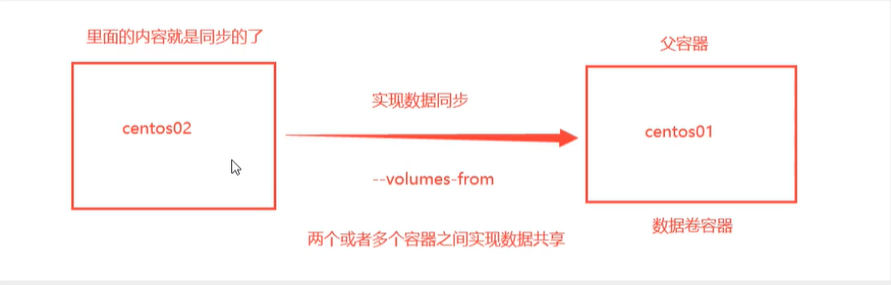
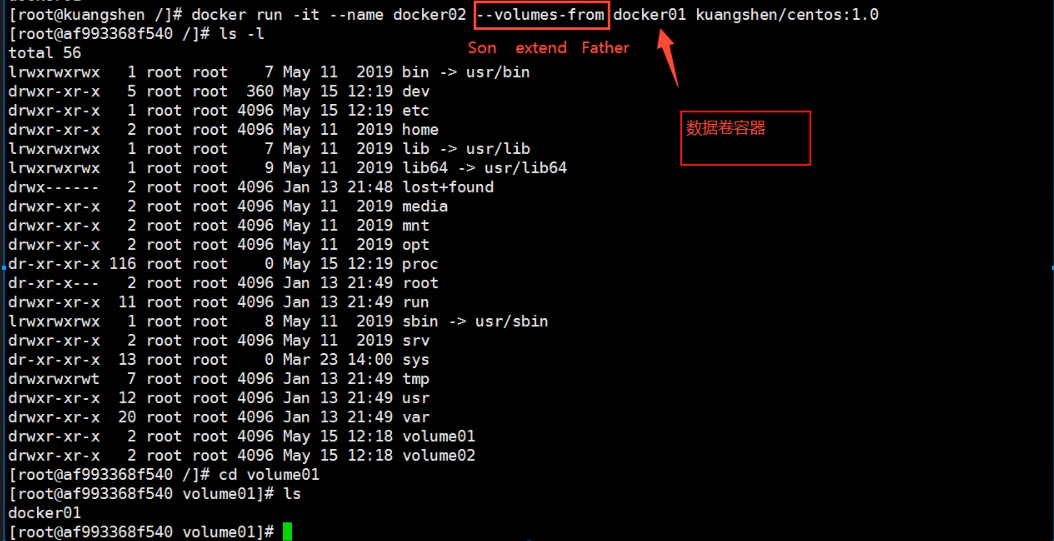
# Test and start three containers through the image you just wrote

[root@localhost _data]# docker images
REPOSITORY            TAG       IMAGE ID       CREATED         SIZE
huangjialin/centos    1.0       74f0e59c6da4   2 hours ago     209MB
tomcat02.1.0          latest    f5946bde7e99   6 hours ago     672MB
tomcat                8         926c7fd4777e   37 hours ago    533MB
tomcat                latest    bd431ca8553c   37 hours ago    667MB
nginx                 latest    519e12e2a84a   2 days ago      133MB
mysql                 5.7       450379344707   2 days ago      449MB
portainer/portainer   latest    580c0e4e98b0   3 weeks ago     79.1MB
hello-world           latest    d1165f221234   5 weeks ago     13.3kB
centos                latest    300e315adb2f   4 months ago    209MB
elasticsearch         7.6.2     f29a1ee41030   12 months ago   791MB


# Create docker01: because my computer is the latest version, I use latest here. Crazy teacher uses 1.0, as shown in the figure below
[root@localhost _data]#  docker run -it --name docker01 huangjialin/centos:1.0

# View container docekr01 contents
[root@8e2660858dca /]# ls
bin  dev  etc  home  lib  lib64  lost+found  media  mnt  opt  proc  root  run  sbin  srv  sys  tmp  usr  var  volume01	volume02


# Exit without closing the container
CTRL + Q + P

# Create docker02: and let docker02 inherit docker01
[root@localhost /]# docker run -it --name docker02 --volumes-from docker01 huangjialin/centos:1.0

# View contents of container docker02
[root@465894e34af8 /]# ls
bin  dev  etc  home  lib  lib64  lost+found  media  mnt  opt  proc  root  run  sbin  srv  sys  tmp  usr  var  volume01	volume02
# Enter docker01
[root@localhost /]# docker ps
CONTAINER ID   IMAGE                    COMMAND                  CREATED         STATUS         PORTS     NAMES
465894e34af8   huangjialin/centos:1.0   "/bin/sh -c /bin/bash"   2 minutes ago   Up 2 minutes             docker02
8e2660858dca   huangjialin/centos:1.0   "/bin/sh -c /bin/bash"   3 minutes ago   Up 3 minutes             docker01
[root@localhost /]# docker attach 8e2660858dca
[root@8e2660858dca /]# ls -l
total 0
lrwxrwxrwx.   1 root root   7 Nov  3 15:22 bin -> usr/bin
drwxr-xr-x.   5 root root 360 Apr 13 05:47 dev
drwxr-xr-x.   1 root root  66 Apr 13 05:47 etc
drwxr-xr-x.   2 root root   6 Nov  3 15:22 home
lrwxrwxrwx.   1 root root   7 Nov  3 15:22 lib -> usr/lib
lrwxrwxrwx.   1 root root   9 Nov  3 15:22 lib64 -> usr/lib64
drwx------.   2 root root   6 Dec  4 17:37 lost+found
drwxr-xr-x.   2 root root   6 Nov  3 15:22 media
drwxr-xr-x.   2 root root   6 Nov  3 15:22 mnt
drwxr-xr-x.   2 root root   6 Nov  3 15:22 opt
dr-xr-xr-x. 242 root root   0 Apr 13 05:47 proc
dr-xr-x---.   2 root root 162 Dec  4 17:37 root
drwxr-xr-x.  11 root root 163 Dec  4 17:37 run
lrwxrwxrwx.   1 root root   8 Nov  3 15:22 sbin -> usr/sbin
drwxr-xr-x.   2 root root   6 Nov  3 15:22 srv
dr-xr-xr-x.  13 root root   0 Apr 13 05:27 sys
drwxrwxrwt.   7 root root 145 Dec  4 17:37 tmp
drwxr-xr-x.  12 root root 144 Dec  4 17:37 usr
drwxr-xr-x.  20 root root 262 Dec  4 17:37 var
drwxr-xr-x.   2 root root   6 Apr 13 05:47 volume01
drwxr-xr-x.   2 root root   6 Apr 13 05:47 volume02
# create a file
[root@8e2660858dca /]# cd volume01
[root@8e2660858dca volume01]# ls
[root@8e2660858dca volume01]# touch docker01
# Enter docker02
[root@localhost /]# docker attach 465894e34af8
[root@465894e34af8 /]# ls  -l
total 0
lrwxrwxrwx.   1 root root   7 Nov  3 15:22 bin -> usr/bin
drwxr-xr-x.   5 root root 360 Apr 13 05:48 dev
drwxr-xr-x.   1 root root  66 Apr 13 05:48 etc
drwxr-xr-x.   2 root root   6 Nov  3 15:22 home
lrwxrwxrwx.   1 root root   7 Nov  3 15:22 lib -> usr/lib
lrwxrwxrwx.   1 root root   9 Nov  3 15:22 lib64 -> usr/lib64
drwx------.   2 root root   6 Dec  4 17:37 lost+found
drwxr-xr-x.   2 root root   6 Nov  3 15:22 media
drwxr-xr-x.   2 root root   6 Nov  3 15:22 mnt
drwxr-xr-x.   2 root root   6 Nov  3 15:22 opt
dr-xr-xr-x. 241 root root   0 Apr 13 05:48 proc
dr-xr-x---.   2 root root 162 Dec  4 17:37 root
drwxr-xr-x.  11 root root 163 Dec  4 17:37 run
lrwxrwxrwx.   1 root root   8 Nov  3 15:22 sbin -> usr/sbin
drwxr-xr-x.   2 root root   6 Nov  3 15:22 srv
dr-xr-xr-x.  13 root root   0 Apr 13 05:27 sys
drwxrwxrwt.   7 root root 145 Dec  4 17:37 tmp
drwxr-xr-x.  12 root root 144 Dec  4 17:37 usr
drwxr-xr-x.  20 root root 262 Dec  4 17:37 var
drwxr-xr-x.   2 root root  22 Apr 13 05:55 volume01
drwxr-xr-x.   2 root root   6 Apr 13 05:47 volume02
# Found files created by docker01
[root@465894e34af8 /]# cd volume01
[root@465894e34af8 volume01]# ls
docker01

Data sharing between containers
The pro test deletion will also be synchronized
# Create another docker03 and inherit docker01
$ docker run -it --name docker03 --volumes-from docker01 caoshipeng/centos:latest
$ cd volume01	#Enter volume01 to check whether the data of docker01 is also synchronized
$ ls
docker01.txt

# Test: you can delete docker01 and check whether docker02 and docker03 can access this file
# The test found that the data remained in docker02 and docker03 and was not deleted
Data sharing with multiple mysql
$ docker run -d -p 3306:3306 -v /home/mysql/conf:/etc/mysql/conf.d -v /home/mysql/data:/var/lib/mysql -e MYSQL_ROOT_PASSWORD=123456 --name mysql01 mysql:5.7

$ docker run -d -p 3310:3306 -e MYSQL_ROOT_PASSWORD=123456 --name mysql02 --volumes-from mysql01  mysql:5.7

# At this time, data synchronization between two containers can be realized!
conclusion
For the transfer of configuration information between containers, the life cycle of data volume containers continues until no containers are used.
But once you persist to the local, the local data will not be deleted at this time!
DockerFile
DockerFile introduction
dockerfile is a file used to build a docker image! Command parameter script!
Construction steps:
1. Write a dockerfile file
2. docker build is called an image
3. docker run run image
4. docker push publishing image (DockerHub, Alibaba cloud warehouse)
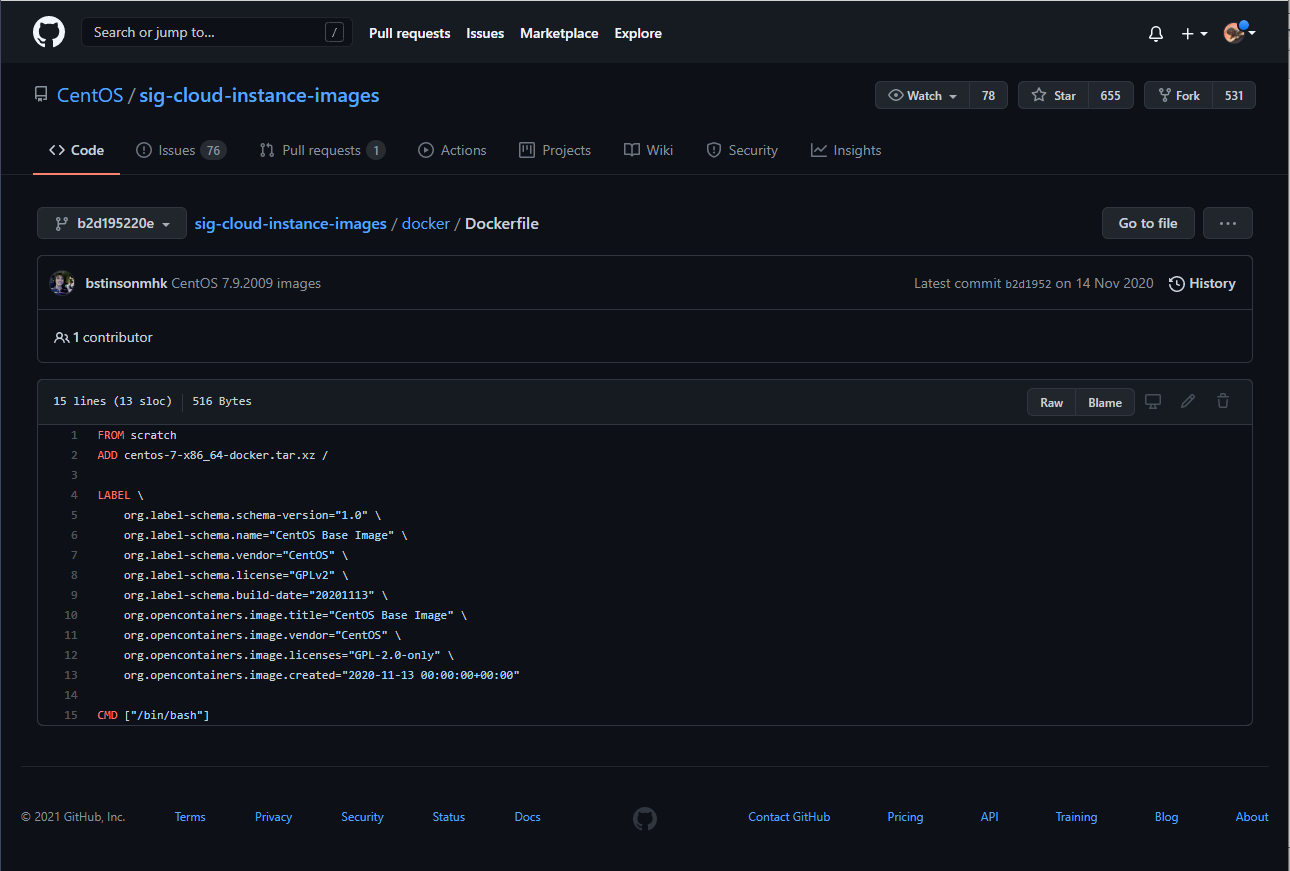
Click the link to jump to GitHub
Many official images are basic packages without many functions. We usually build our own images!
Since the official can make images, so can we!
DockerFile construction process
Basic knowledge:
1. Each reserved keyword (instruction) must be uppercase
2. Perform top-down sequence
3. # indicates a comment
4. Each instruction will create a new mirror layer and submit it!
Dockerfile is development oriented. If we want to publish projects and make images in the future, we need to write a dockerfile file. This file is very simple!
Docker image has gradually become the standard of enterprise delivery, which must be mastered!
Steps: development, deployment, operation and maintenance are indispensable
DockerFile: build a file that defines all the steps and source code
DockerImages: build the generated image through DockerFile, and finally release and run the product.
Docker container: a container is an image that runs to provide services.
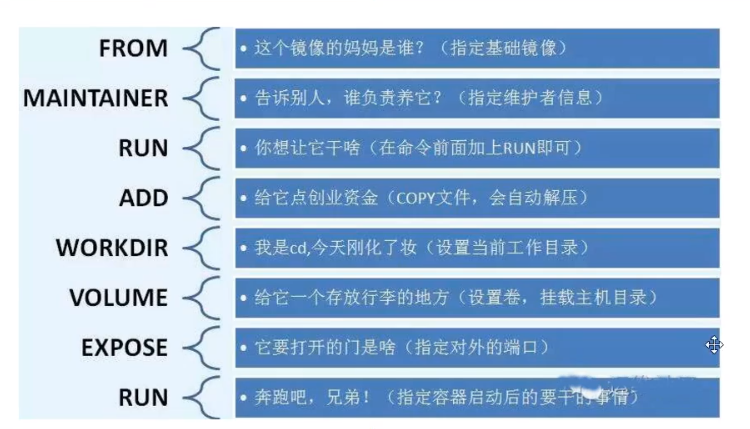
DockerFile instruction
FROM				# From: basic image. Everything starts from here
MAINTAINER			# maintainer: who wrote the image, name + email
RUN					# Run: the command that needs to be run during image construction
ADD					# Add: step, tomcat image, this tomcat compressed package! Add content add same directory
WORKDIR				# workdir: the working directory of the image
VOLUME				# volume: mounted directory
EXPOSE				# expose: reserved port configuration
CMD					# cmd: Specifies the command to run when the container is started. Only the last one will take effect and can be replaced
ENTRYPOINT			# entrypoint: specify the command to be run when the container is started. You can append the command
ONBUILD				# Onbuild: when building an inherited DockerFile, the instruction of onbuild will be run to trigger the instruction
COPY				# Copy: similar to ADD, copy our files to the image
ENV					# env: set environment variables during construction!
Actual test
scratch image
FROM scratch
ADD centos-7-x86_64-docker.tar.xz /

LABEL \
    org.label-schema.schema-version="1.0" \
    org.label-schema.name="CentOS Base Image" \
    org.label-schema.vendor="CentOS" \
    org.label-schema.license="GPLv2" \
    org.label-schema.build-date="20200504" \
    org.opencontainers.image.title="CentOS Base Image" \
    org.opencontainers.image.vendor="CentOS" \
    org.opencontainers.image.licenses="GPL-2.0-only" \
    org.opencontainers.image.created="2020-05-04 00:00:00+01:00"

CMD ["/bin/bash"]
99% of the images in Docker Hub are FROM scratch from this basic image, and then configure the required software and configuration to build.
Create your own centos
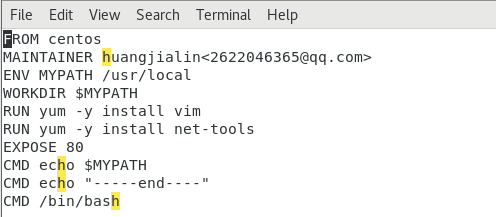
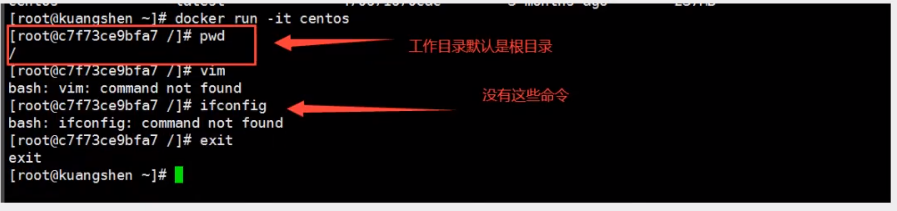
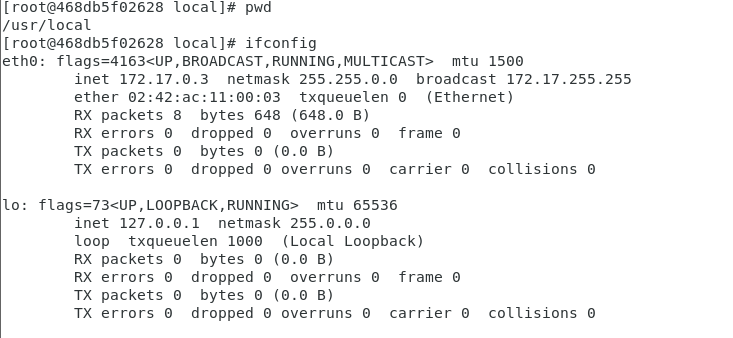
# 1. Create a new dockerfile directory under / home
[root@localhost /]# cd home
[root@localhost home]# mkdir dockerfile

# 2. Create a new mydockerfile CentOS file in the dockerfile directory
[root@localhost home]# cd dockerfile/

[root@localhost dockerfile]# vim mydockerfile-centos

# 3. Write Dockerfile configuration file
FROM centos							# The basic image is the official native centos
MAINTAINER huangjialin<2622046365@qq.com>	# author

ENV MYPATH /usr/local				# Directory for configuring environment variables
WORKDIR $MYPATH						# Set the working directory to MYPATH

RUN yum -y install vim				# Add vim instruction to official native centos
RUN yum -y install net-tools		# Add ifconfig command to official native centos

EXPOSE 80							# The exposed port number is 80

CMD echo $MYPATH					# MYPATH path under output
CMD echo "-----end----"
CMD /bin/bash						# Enter / bin/bash after startup

# 4. Build an image through this file
# Command: docker build -f file path - t image name: [tag]
[root@localhost dockerfile]# docker build -f mydockerfile-centos -t mysentos:0.1 .

# 5. After the following figure appears, the construction is successful
Successfully built 2315251fefdd
Successfully tagged mysentos:0.1
[root@localhost home]# docker images
REPOSITORY            TAG       IMAGE ID       CREATED          SIZE
mysentos              0.1       2315251fefdd   52 seconds ago   291MB
huangjialin/centos    1.0       74f0e59c6da4   18 hours ago     209MB
tomcat02.1.0          latest    f5946bde7e99   22 hours ago     672MB
tomcat                8         926c7fd4777e   2 days ago       533MB
tomcat                latest    bd431ca8553c   2 days ago       667MB
nginx                 latest    519e12e2a84a   3 days ago       133MB
mysql                 5.7       450379344707   3 days ago       449MB
portainer/portainer   latest    580c0e4e98b0   3 weeks ago      79.1MB
hello-world           latest    d1165f221234   5 weeks ago      13.3kB
centos                latest    300e315adb2f   4 months ago     209MB
elasticsearch         7.6.2     f29a1ee41030   12 months ago    791MB

# 6. Test run
[root@localhost home]# docker run -it mysentos:0.1		# Pay attention to bring the version number, or go back to find the latest version every time

[root@468db5f02628 local]# pwd
/usr/local							# It is consistent with MYPATH set by WORKDIR in Dockerfile file
[root@468db5f02628 local]# vim								# The vim instruction can be used
[root@468db5f02628 local]# ifconfig     						# The ifconfig instruction can be used

# docker history image id view image construction history steps
[root@localhost home]# docker history 2315251fefdd
IMAGE          CREATED         CREATED BY                                      SIZE      COMMENT
2315251fefdd   6 minutes ago   /bin/sh -c #(nop)  CMD ["/bin/sh" "-c" "/bin...   0B
be99d496b25c   6 minutes ago   /bin/sh -c #(nop)  CMD ["/bin/sh" "-c" "echo...   0B
34fd97cceb13   6 minutes ago   /bin/sh -c #(nop)  CMD ["/bin/sh" "-c" "echo...   0B
baa95b2530ae   6 minutes ago   /bin/sh -c #(nop)  EXPOSE 80                    0B
ef9b50de0b5b   6 minutes ago   /bin/sh -c yum -y install net-tools             23.4MB
071ef8153ad4   6 minutes ago   /bin/sh -c yum -y install vim                   58.1MB
d6a38a2948f3   7 minutes ago   /bin/sh -c #(nop) WORKDIR /usr/local            0B
98bd16198bff   7 minutes ago   /bin/sh -c #(nop)  ENV MYPATH=/usr/local        0B
53816b10cd26   7 minutes ago   /bin/sh -c #(nop)  MAINTAINER huangjialin<26...   0B
300e315adb2f   4 months ago    /bin/sh -c #(nop)  CMD ["/bin/bash"]            0B
<missing>      4 months ago    /bin/sh -c #(nop)  LABEL org.label-schema.sc...   0B
<missing>      4 months ago    /bin/sh -c #(nop) ADD file:bd7a2aed6ede423b7...   209MB
previous
Later
Change history
We usually get an image. We can use "docker history image id" to study what it is made of
Difference between CMD and ENTRYPOINT
CMD					# Specify the command to run when the container starts. Only the last one will take effect and can be replaced.
ENTRYPOINT			# Specify the commands to be run when the container is started, and you can append commands
Test CMD
# Write dockerfile file
[root@localhost dockerfile]# vim dockerfile-test-cmd
FROM centos
CMD ["ls","-a"]					# Execute ls -a command after startup

# CMD []: the command to run is stored in an array structure.

# Build image
[root@localhost dockerfile]# docker build -f dockerfile-test-cmd -t cmd-test:0.1 .
Sending build context to Docker daemon  3.072kB
Step 1/2 : FROM centos
 ---> 300e315adb2f
Step 2/2 : CMD ["ls","-a"]
 ---> Running in 3d990f51fd5a
Removing intermediate container 3d990f51fd5a
 ---> 0e927777d383
Successfully built 0e927777d383
Successfully tagged cmd-test:0.1

# Run mirror
[root@localhost dockerfile]# docker run 0e927777d383		# From the results, the ls -a command is executed after running
.
..
.dockerenv
bin
dev
etc
home
lib
lib64
lost+found
media
mnt
opt
proc
root
run
sbin
srv
sys
tmp
usr
var


# Want to add a command - l to ls -al: display the detailed data of the list
[root@localhost dockerfile]# docker run cmd-test:0.1 -l
docker: Error response from daemon: OCI runtime create failed: container_linux.go:349: starting container process caused "exec: \"-l\":
executable file not found in $PATH": unknown.
ERRO[0000] error waiting for container: context canceled

# cmd, - l replaces CMD["ls","-l"] but - l is not a command, so an error is reported

[root@localhost dockerfile]# docker run 0e927777d383 ls -al
total 0
drwxr-xr-x.   1 root root   6 Apr 13 08:38 .
drwxr-xr-x.   1 root root   6 Apr 13 08:38 ..
-rwxr-xr-x.   1 root root   0 Apr 13 08:38 .dockerenv
lrwxrwxrwx.   1 root root   7 Nov  3 15:22 bin -> usr/bin
drwxr-xr-x.   5 root root 340 Apr 13 08:38 dev
drwxr-xr-x.   1 root root  66 Apr 13 08:38 etc
drwxr-xr-x.   2 root root   6 Nov  3 15:22 home
lrwxrwxrwx.   1 root root   7 Nov  3 15:22 lib -> usr/lib
lrwxrwxrwx.   1 root root   9 Nov  3 15:22 lib64 -> usr/lib64
drwx------.   2 root root   6 Dec  4 17:37 lost+found
drwxr-xr-x.   2 root root   6 Nov  3 15:22 media
drwxr-xr-x.   2 root root   6 Nov  3 15:22 mnt
drwxr-xr-x.   2 root root   6 Nov  3 15:22 opt
dr-xr-xr-x. 247 root root   0 Apr 13 08:38 proc
dr-xr-x---.   2 root root 162 Dec  4 17:37 root
drwxr-xr-x.  11 root root 163 Dec  4 17:37 run
lrwxrwxrwx.   1 root root   8 Nov  3 15:22 sbin -> usr/sbin
drwxr-xr-x.   2 root root   6 Nov  3 15:22 srv
dr-xr-xr-x.  13 root root   0 Apr 13 05:27 sys
drwxrwxrwt.   7 root root 145 Dec  4 17:37 tmp
drwxr-xr-x.  12 root root 144 Dec  4 17:37 usr
drwxr-xr-x.  20 root root 262 Dec  4 17:37 var
Test ENTRYPOINT
# Write dockerfile file
$ vim dockerfile-test-entrypoint
FROM centos
ENTRYPOINT ["ls","-a"]

# Build image
$ docker build  -f dockerfile-test-entrypoint -t cmd-test:0.1 .

# Run mirror
$ docker run entrypoint-test:0.1
.
..
.dockerenv
bin
dev
etc
home
lib
lib64
lost+found ...

# Our command is directly spliced after our ENTRYPOINT command
$ docker run entrypoint-test:0.1 -l
total 56
drwxr-xr-x   1 root root 4096 May 16 06:32 .
drwxr-xr-x   1 root root 4096 May 16 06:32 ..
-rwxr-xr-x   1 root root    0 May 16 06:32 .dockerenv
lrwxrwxrwx   1 root root    7 May 11  2019 bin -> usr/bin
drwxr-xr-x   5 root root  340 May 16 06:32 dev
drwxr-xr-x   1 root root 4096 May 16 06:32 etc
drwxr-xr-x   2 root root 4096 May 11  2019 home
lrwxrwxrwx   1 root root    7 May 11  2019 lib -> usr/lib
lrwxrwxrwx   1 root root    9 May 11  2019 lib64 -> usr/lib64 ....
Many commands in Dockerfile are very similar. We need to understand their differences. Our best learning is to compare them and test the effect!
Actual combat: Tomcat image
1. Prepare image file
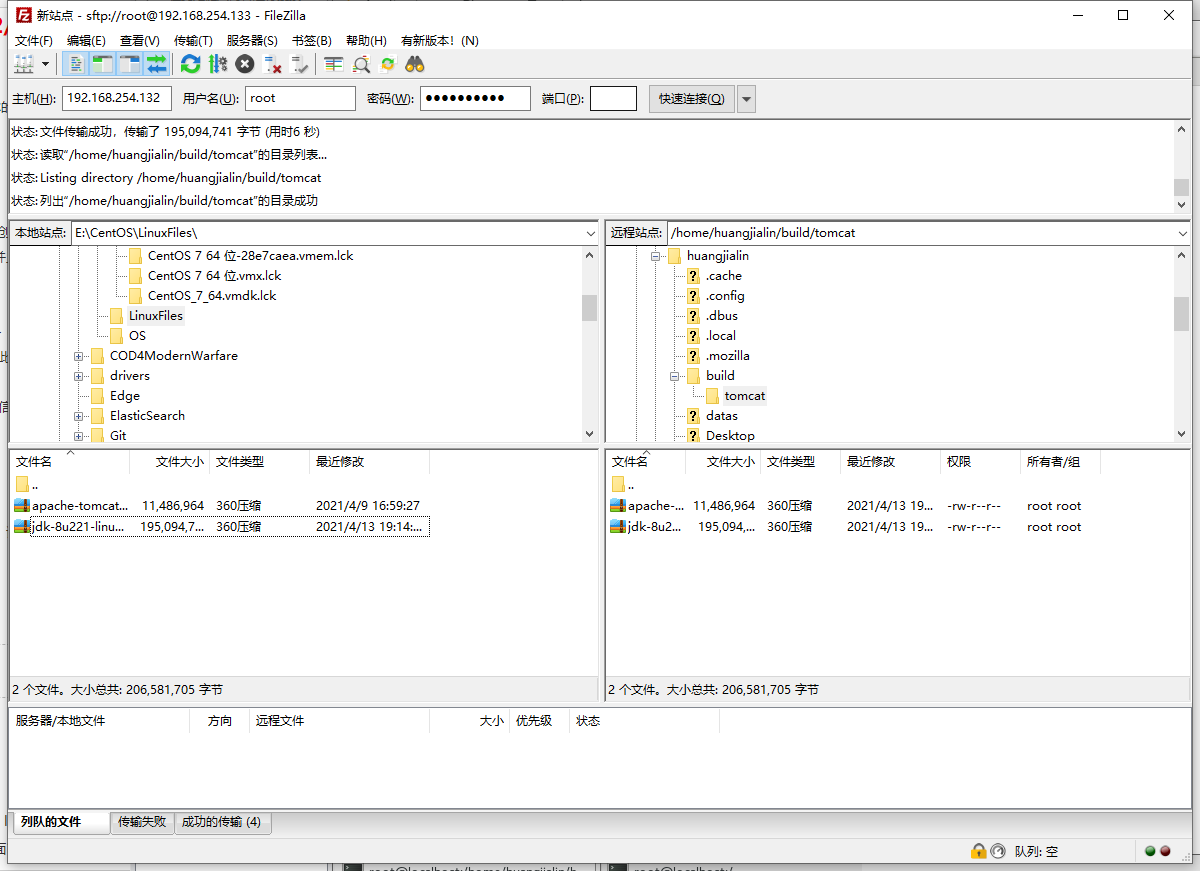
Prepare tomcat and jdk to the current directory and write README
[root@localhost /]# cd /home
[root@localhost home]# ls
ceshi  dockerfile  docker-test-volume  huang.java  huangjialin  huang.txt  mylinux  mysql  test.java  testTmp
[root@localhost home]# cd huangjialin
[root@localhost huangjialin]# ls
datas  Desktop  Documents  Downloads  Music  Pictures  Public  Templates  Videos
# Create directory
[root@localhost huangjialin]# mkdir -vp build/tomcat
mkdir: created directory 'build'
mkdir: created directory 'build/tomcat'
[root@localhost huangjialin]# ls
build  datas  Desktop  Documents  Downloads  Music  Pictures  Public  Templates  Videos
[root@localhost huangjialin]# cd build
[root@localhost build]# cd tomcat
# Import the data package according to the figure below
[root@localhost tomcat]# ls
apache-tomcat-9.0.45.tar.gz  jdk-8u221-linux-x64.tar.gz

2. Write dokerfile
The official name is dockerfile. Build will automatically find this file, so you don't need to specify - f!
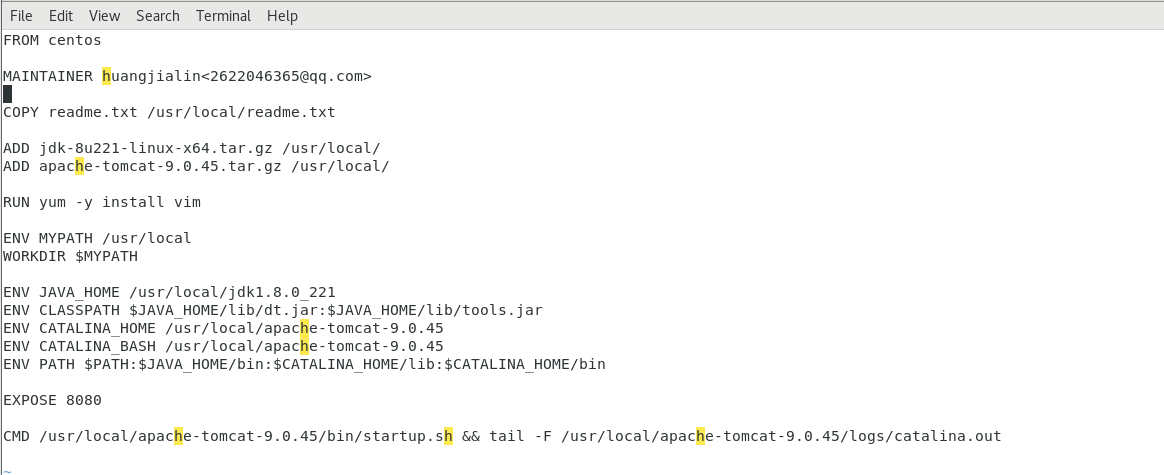
[root@localhost tomcat]# ls
apache-tomcat-9.0.45.tar.gz  jdk-8u221-linux-x64.tar.gz
[root@localhost tomcat]# touch readme.txt
[root@localhost tomcat]# vim Dockerfile

FROM centos 										# Basic image centos
MAINTAINER huangjialin<2622046365@qq.com>					# author
COPY readme.txt /usr/local/readme.txt						# Copy README file
ADD jdk-8u221-linux-x64.tar.gz /usr/local/ 			# ADD jdk and ADD command will decompress automatically
ADD apache-tomcat-9.0.45.tar.gz /usr/local/ 		# ADD tomcat and the ADD command will decompress automatically
RUN yum -y install vim								# Install vim command
ENV MYPATH /usr/local 								# Environment variable setting working directory
WORKDIR $MYPATH

ENV JAVA_HOME /usr/local/jdk1.8.0_221 				# Environment variable: JAVA_HOME environment variable
ENV CLASSPATH $JAVA_HOME/lib/dt.jar:$JAVA_HOME/lib/tools.jar

ENV CATALINA_HOME /usr/local/apache-tomcat-9.0.45 	# Environment variable: tomcat environment variable
ENV CATALINA_BASH /usr/local/apache-tomcat-9.0.45

# Set the environment variable separator to:
ENV PATH $PATH:$JAVA_HOME/bin:$CATALINA_HOME/lib:$CATALINA_HOME/bin

EXPOSE 8080 										# Set exposed ports

CMD /usr/local/apache-tomcat-9.0.45/bin/startup.sh && tail -F /usr/local/apache-tomcat-9.0.45/logs/catalina.out 					# Set default command
3. Build image
# Because Dockerfile naming uses the default naming, you do not need to use - f to specify the file
[root@localhost tomcat]# docker build -t diytomcat .
Run successfully
[root@localhost tomcat]# docker build -t diytomcat .
Sending build context to Docker daemon  206.6MB
Step 1/15 : FROM centos
 ---> 300e315adb2f
Step 2/15 : MAINTAINER huangjialin<2622046365@qq.com>
 ---> Using cache
 ---> 53816b10cd26
Step 3/15 : COPY readme.txt /usr/local/readme.txt
 ---> b17277a321e4
Step 4/15 : ADD jdk-8u221-linux-x64.tar.gz /usr/local/
 ---> bf206090dd5b
Step 5/15 : ADD apache-tomcat-9.0.45.tar.gz /usr/local/
 ---> e7e5d7cb0c43
Step 6/15 : RUN yum -y install vim
 ---> Running in 7984f5e786a8
CentOS Linux 8 - AppStream                      791 kB/s | 6.3 MB     00:08
CentOS Linux 8 - BaseOS                         1.2 MB/s | 2.3 MB     00:01
CentOS Linux 8 - Extras                          18 kB/s | 9.6 kB     00:00
Last metadata expiration check: 0:00:01 ago on Tue Apr 13 11:41:15 2021.
Dependencies resolved.
================================================================================
 Package             Arch        Version                   Repository      Size
================================================================================
Installing:
 vim-enhanced        x86_64      2:8.0.1763-15.el8         appstream      1.4 M
Installing dependencies:
 gpm-libs            x86_64      1.20.7-15.el8             appstream       39 k
 vim-common          x86_64      2:8.0.1763-15.el8         appstream      6.3 M
 vim-filesystem      noarch      2:8.0.1763-15.el8         appstream       48 k
 which               x86_64      2.21-12.el8               baseos          49 k

Transaction Summary
================================================================================
Install  5 Packages

Total download size: 7.8 M
Installed size: 30 M
Downloading Packages:
(1/5): gpm-libs-1.20.7-15.el8.x86_64.rpm        187 kB/s |  39 kB     00:00
(2/5): vim-filesystem-8.0.1763-15.el8.noarch.rp 402 kB/s |  48 kB     00:00
(3/5): which-2.21-12.el8.x86_64.rpm             106 kB/s |  49 kB     00:00
(4/5): vim-enhanced-8.0.1763-15.el8.x86_64.rpm  500 kB/s | 1.4 MB     00:02
(5/5): vim-common-8.0.1763-15.el8.x86_64.rpm    599 kB/s | 6.3 MB     00:10
--------------------------------------------------------------------------------
Total                                           672 kB/s | 7.8 MB     00:11
warning: /var/cache/dnf/appstream-02e86d1c976ab532/packages/gpm-libs-1.20.7-15.el8.x86_64.rpm: Header V3 RSA/SHA256 Signature, key ID 8483c65d: NOKEY
CentOS Linux 8 - AppStream                      107 kB/s | 1.6 kB     00:00
Importing GPG key 0x8483C65D:
 Userid     : "CentOS (CentOS Official Signing Key) <security@centos.org>"
 Fingerprint: 99DB 70FA E1D7 CE22 7FB6 4882 05B5 55B3 8483 C65D
 From       : /etc/pki/rpm-gpg/RPM-GPG-KEY-centosofficial
Key imported successfully
Running transaction check
Transaction check succeeded.
Running transaction test
Transaction test succeeded.
Running transaction
  Preparing        :                                                        1/1
  Installing       : which-2.21-12.el8.x86_64                               1/5
  Installing       : vim-filesystem-2:8.0.1763-15.el8.noarch                2/5
  Installing       : vim-common-2:8.0.1763-15.el8.x86_64                    3/5
  Installing       : gpm-libs-1.20.7-15.el8.x86_64                          4/5
  Running scriptlet: gpm-libs-1.20.7-15.el8.x86_64                          4/5
  Installing       : vim-enhanced-2:8.0.1763-15.el8.x86_64                  5/5
  Running scriptlet: vim-enhanced-2:8.0.1763-15.el8.x86_64                  5/5
  Running scriptlet: vim-common-2:8.0.1763-15.el8.x86_64                    5/5
  Verifying        : gpm-libs-1.20.7-15.el8.x86_64                          1/5
  Verifying        : vim-common-2:8.0.1763-15.el8.x86_64                    2/5
  Verifying        : vim-enhanced-2:8.0.1763-15.el8.x86_64                  3/5
  Verifying        : vim-filesystem-2:8.0.1763-15.el8.noarch                4/5
  Verifying        : which-2.21-12.el8.x86_64                               5/5

Installed:
  gpm-libs-1.20.7-15.el8.x86_64         vim-common-2:8.0.1763-15.el8.x86_64
  vim-enhanced-2:8.0.1763-15.el8.x86_64 vim-filesystem-2:8.0.1763-15.el8.noarch
  which-2.21-12.el8.x86_64

Complete!
Removing intermediate container 7984f5e786a8
 ---> 5e55934a1698
Step 7/15 : ENV MYPATH /usr/local
 ---> Running in 1c27b1556650
Removing intermediate container 1c27b1556650
 ---> bf7676c461b7
Step 8/15 : WORKDIR $MYPATH
 ---> Running in ea7b376828ee
Removing intermediate container ea7b376828ee
 ---> 829e13be0dd2
Step 9/15 : ENV JAVA_HOME /usr/local/jdk1.8.0_221
 ---> Running in e870347689db
Removing intermediate container e870347689db
 ---> 9addfa9f2af9
Step 10/15 : ENV CLASSPATH $JAVA_HOME/lib/dt.jar:$JAVA_HOME/lib/tools.jar
 ---> Running in 35be0d0d1e87
Removing intermediate container 35be0d0d1e87
 ---> 2b8399db457f
Step 11/15 : ENV CATALINA_HOME /usr/local/apache-tomcat-9.0.45
 ---> Running in 6268510dbb10
Removing intermediate container 6268510dbb10
 ---> f587d0e0d7b1
Step 12/15 : ENV CATALINA_BASH /usr/local/apache-tomcat-9.0.45
 ---> Running in 584842f44cb2
Removing intermediate container 584842f44cb2
 ---> 9352b4a38800
Step 13/15 : ENV PATH $PATH:$JAVA_HOME/bin:$CATALINA_HOME/lib:$CATALINA_HOME/bin
 ---> Running in 3882c79944b1
Removing intermediate container 3882c79944b1
 ---> 2189e809aa16
Step 14/15 : EXPOSE 8080
 ---> Running in 2fdcc0bb062d
Removing intermediate container 2fdcc0bb062d
 ---> 2ada2912e565
Step 15/15 : CMD /usr/local/apache-tomcat-9.0.45/bin/startup.sh && tail -F /usr/local/apache-tomcat-9.0.45/logs/catalina.out
 ---> Running in b5253d274a87
Removing intermediate container b5253d274a87
 ---> 62c96b0fe815
Successfully built 62c96b0fe815
Successfully tagged diytomcat:latest
4. run image
# -d: Background operation - p: exposed port -- name: alias - v: binding path
[root@localhost tomcat]# docker run -d -p 9090:8080 --name diytomcat -v /home/huangjialin/build/tomcat/test:/usr/local/apache-tomcat-9.0.45/webapps/test -v /home/huangjialin/build/tomcat/tomcatlogs/:/usr/local/apache-tomcat-9.0.45/logs diytomcat
eefdce2320da80a26d04951fa62ead9155260c9ec2fc7195fb5d78332e70b20e
[root@localhost tomcat]# docker exec -it eefdce2320da80a2 /bin/bash
[root@eefdce2320da local]# ls
apache-tomcat-9.0.45  bin  etc	games  include	jdk1.8.0_221  lib  lib64  libexec  readme.txt  sbin  share  src
[root@eefdce2320da local]# pwd
/usr/local
[root@eefdce2320da local]# ls -l
total 0
drwxr-xr-x. 1 root root  45 Apr 13 11:40 apache-tomcat-9.0.45
drwxr-xr-x. 2 root root   6 Nov  3 15:22 bin
drwxr-xr-x. 2 root root   6 Nov  3 15:22 etc
drwxr-xr-x. 2 root root   6 Nov  3 15:22 games
drwxr-xr-x. 2 root root   6 Nov  3 15:22 include
drwxr-xr-x. 7   10  143 245 Jul  4  2019 jdk1.8.0_221
drwxr-xr-x. 2 root root   6 Nov  3 15:22 lib
drwxr-xr-x. 3 root root  17 Dec  4 17:37 lib64
drwxr-xr-x. 2 root root   6 Nov  3 15:22 libexec
-rw-r--r--. 1 root root   0 Apr 13 11:24 readme.txt
drwxr-xr-x. 2 root root   6 Nov  3 15:22 sbin
drwxr-xr-x. 5 root root  49 Dec  4 17:37 share
drwxr-xr-x. 2 root root   6 Nov  3 15:22 src
[root@eefdce2320da local]# cd apache-tomcat-9.0.45/
[root@eefdce2320da apache-tomcat-9.0.45]# ls
BUILDING.txt  CONTRIBUTING.md  LICENSE	NOTICE	README.md  RELEASE-NOTES  RUNNING.txt  bin  conf  lib  logs  temp  webapps  work
[root@eefdce2320da apache-tomcat-9.0.45]# ls -l
total 128
-rw-r-----. 1 root root 18984 Mar 30 10:29 BUILDING.txt
-rw-r-----. 1 root root  5587 Mar 30 10:29 CONTRIBUTING.md
-rw-r-----. 1 root root 57092 Mar 30 10:29 LICENSE
-rw-r-----. 1 root root  2333 Mar 30 10:29 NOTICE
-rw-r-----. 1 root root  3257 Mar 30 10:29 README.md
-rw-r-----. 1 root root  6898 Mar 30 10:29 RELEASE-NOTES
-rw-r-----. 1 root root 16507 Mar 30 10:29 RUNNING.txt
drwxr-x---. 2 root root  4096 Mar 30 10:29 bin
drwx------. 1 root root    22 Apr 13 12:34 conf
drwxr-x---. 2 root root  4096 Mar 30 10:29 lib
drwxr-xr-x. 2 root root   197 Apr 13 12:34 logs
drwxr-x---. 2 root root    30 Mar 30 10:29 temp
drwxr-x---. 1 root root    18 Apr 13 12:34 webapps
drwxr-x---. 1 root root    22 Apr 13 12:34 work
# Another window
[root@localhost tomcat]# curl localhost:9090
<!DOCTYPE html>
<html lang="en">
    <head>
        <meta charset="UTF-8" />
        <title>Apache Tomcat/9.0.45</title>
        <link href="favicon.ico" rel="icon" type="image/x-icon" />
        <link href="tomcat.css" rel="stylesheet" type="text/css" />
    </head>
...
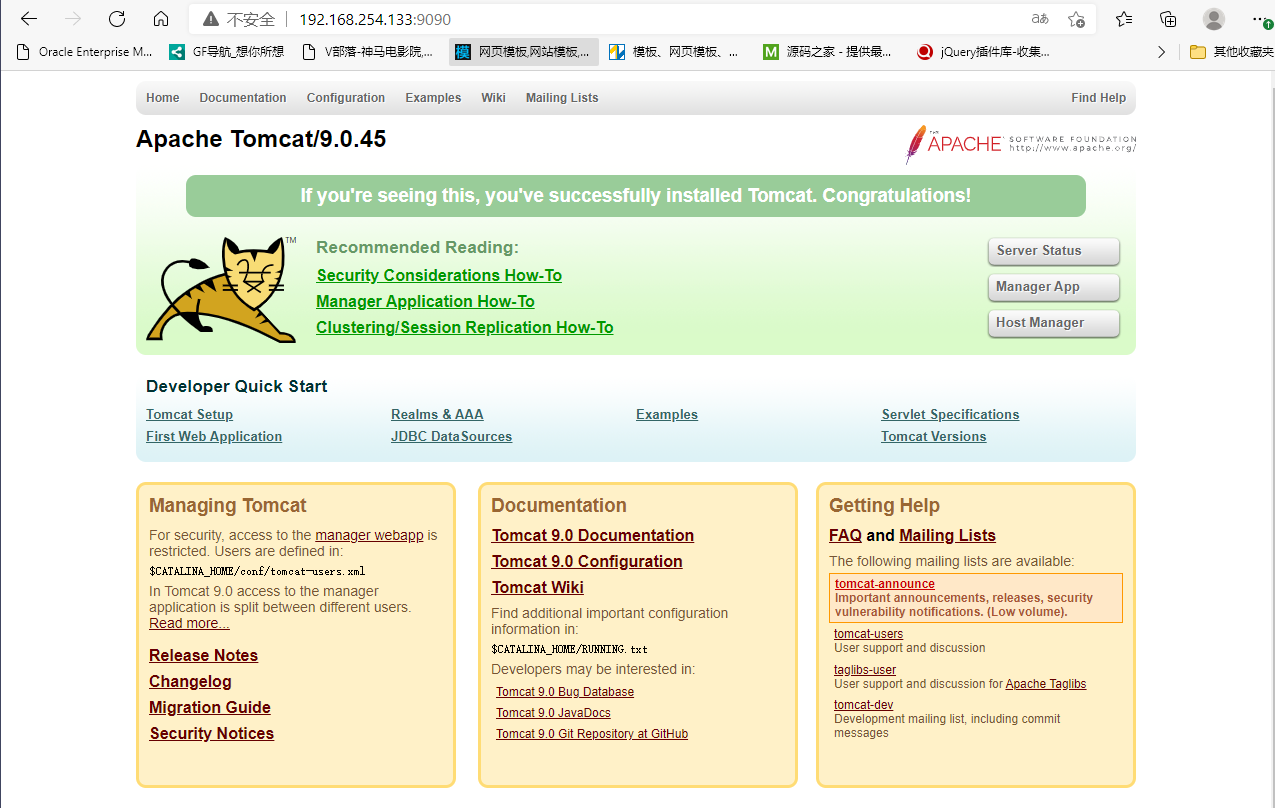
5. Access test
[root@localhost tomcat]# docker exec -it custom container id /bin/bash

[root@localhost tomcat]# cul localhost:9090
6. Publish project
(due to the volume mount, we can write the project locally and release it!)
[root@localhost tomcat]# ls
apache-tomcat-9.0.45.tar.gz  Dockerfile  jdk-8u221-linux-x64.tar.gz  readme.txt  test  tomcatlogs
[root@localhost tomcat]# cd test/
[root@localhost test]# pwd
/home/huangjialin/build/tomcat/test
[root@localhost test]# mkdir WEB-INF
[root@localhost test]# ls
WEB-INF
[root@localhost test]# cd WEB-INF/
[root@localhost WEB-INF]# vim web.xml
[root@localhost WEB-INF]# cd ../
[root@localhost test]# vim index.jsp
Reference link https://segmentfault.com/a/1190000011404088
web.xml
  <?xml version="3.0" encoding="UTF-8"?>
  <web-app xmlns="http://java.sun.com/xml/ns/javaee"
           xmlns:xsi="http://www.w3.org/2001/XMLSchema-instance"
           xsi:schemaLocation="http://java.sun.com/xml/ns/javaee
                               http://java.sun.com/xml/ns/javaee/web-app_2_5.xsd"
           version="3.0">

  </web-app>
Reference link https://www.runoob.com/jsp/jsp-syntax.html
index.jsp
<%@ page language="java" contentType="text/html; charset=UTF-8"
    pageEncoding="UTF-8"%>
<!DOCTYPE html>
<html>
<head>
<meta charset="utf-8">
<title>huangjialin-Rookie tutorial(runoob.com)</title>
</head>
<body>
Hello World!<br/>
<%
System.out.println("Yours IP address " + request.getRemoteAddr());
%>
</body>
</html>
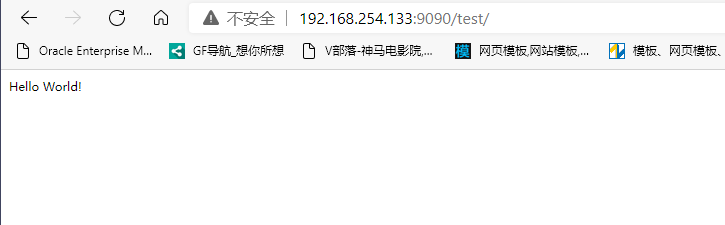
Discovery: the project is deployed successfully and can be accessed directly!
Our next development steps: we need to master the preparation of Dockerfile! After that, we use the docker image to publish and run!
Publish your own image
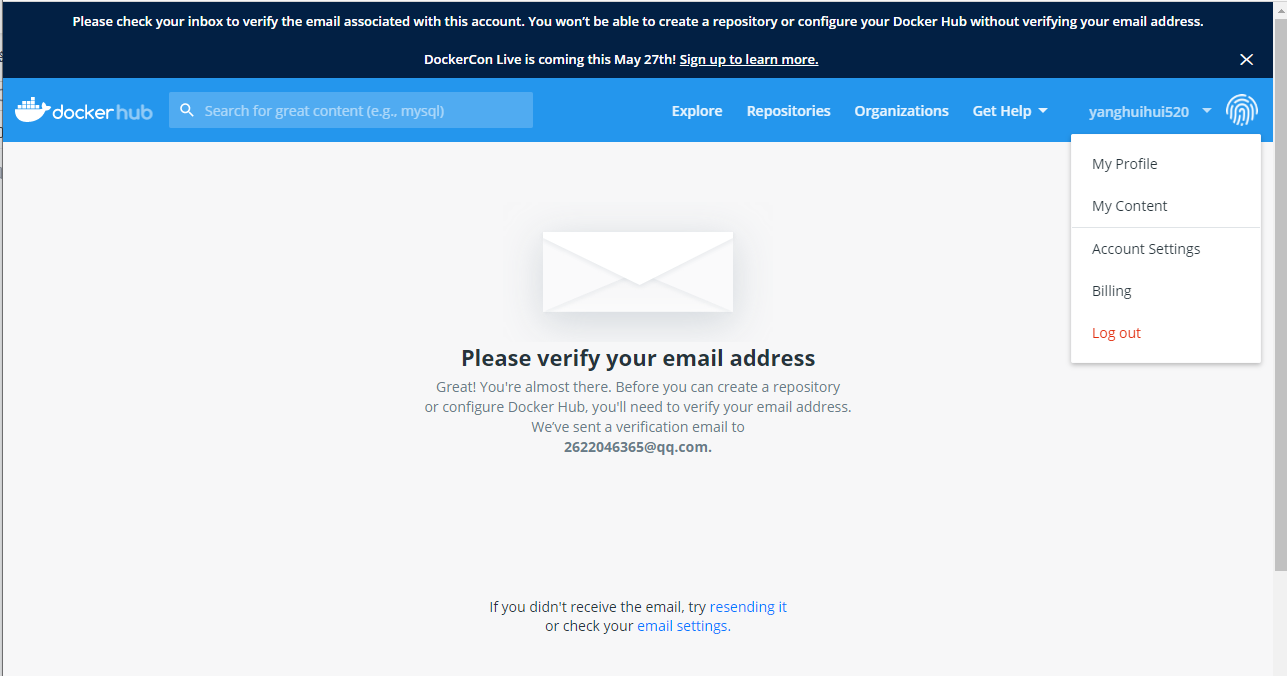
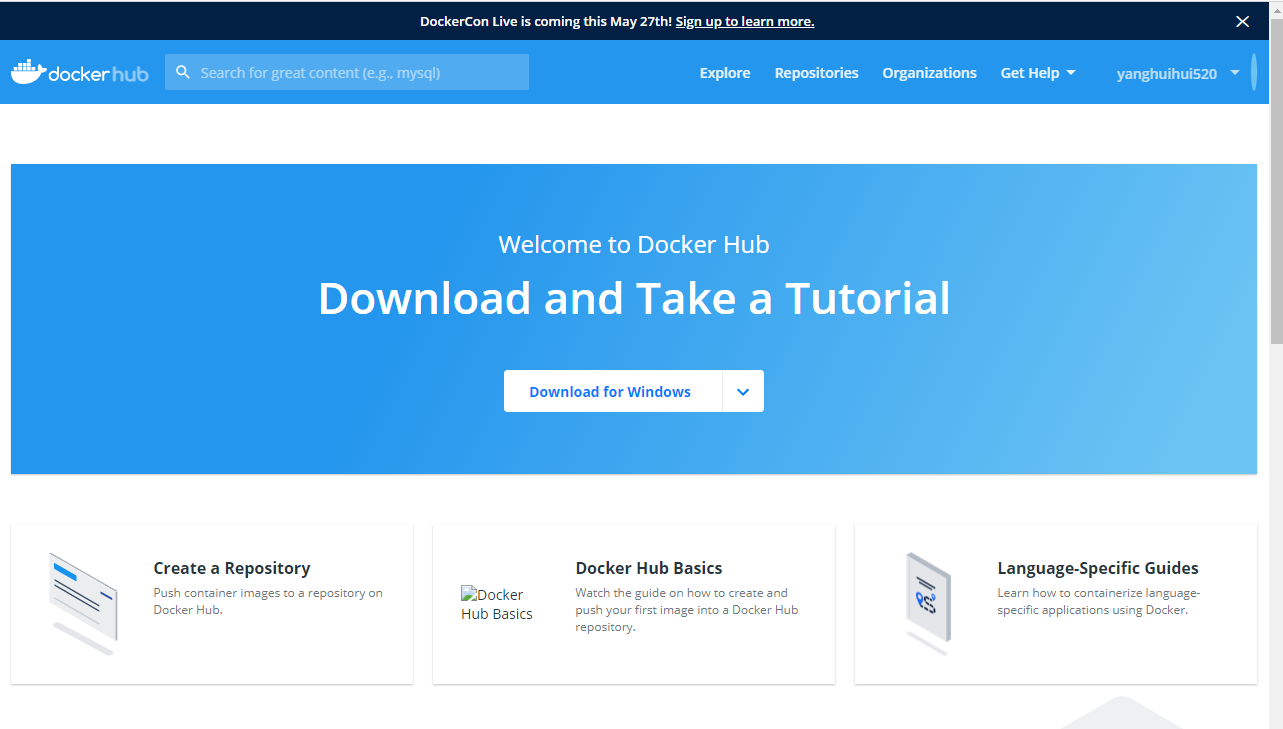
Publish to Docker Hub
1. Address https://hub.docker.com/
2. Make sure this account can log in
3. Login
[root@localhost tomcat]# docker login --help
Usage:  docker login [OPTIONS] [SERVER]

Log in to a Docker registry.
If no server is specified, the default is defined by the daemon.

Options:
  -p, --password string   Password
      --password-stdin    Take the password from stdin
  -u, --username string   Username

[root@localhost tomcat]# docker login -u your username - p your password
[root@localhost tomcat]# docker login -u yanghuihui520
Password:
WARNING! Your password will be stored unencrypted in /root/.docker/config.json.
Configure a credential helper to remove this warning. See
https://docs.docker.com/engine/reference/commandline/login/#credentials-store

Login Succeeded

4. Submit push image
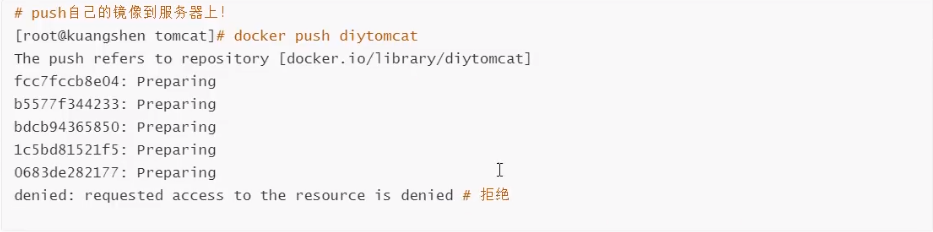
# You will find that the push does not go up, because if there is no prefix, it is pushed to the official library by default
# resolvent:
# In the first build, add your dockerhub user name, and then push it to your warehouse
[root@localhost tomcat]# docker build -t kuangshen/mytomcat:0.1 .

# Second use docker tag #Then push again
[root@localhost tomcat]# docker tag container id kuangshen/mytomcat:1.0
#Then push again
[root@localhost tomcat]# docker push kuangshen/mytomcat:1.0
The correct solution of the corresponding account name is required
[root@localhost tomcat]# docker tag 62c96b0fe815 yanghuihui520/tomcat:1.0
[root@localhost tomcat]# docker images
REPOSITORY             TAG       IMAGE ID       CREATED         SIZE
huangjialin/tomcat     1.0       62c96b0fe815   3 hours ago     690MB
. . .
[root@localhost tomcat]# docker push yanghuihui520/tomcat:1.0
The push refers to repository [docker.io/yanghuihui520/tomcat]
a7b8bb209ca2: Pushing [==========>                                        ]  12.47MB/58.05MB
5ba6c0e6c8ff: Pushing [==========>                                        ]  3.186MB/15.9MB
b3f3595d4705: Pushing [>                                                  ]  3.277MB/406.7MB
50c4c2648dca: Layer already exists
2653d992f4ef: Pushing [=>                                                 ]  7.676MB/209.3MB

Publish image to Alibaba cloud service
The official website is very detailed https://cr.console.aliyun.com/repository/
$ sudo docker login --username=zchengx registry.cn-shenzhen.aliyuncs.com
$ sudo docker tag [ImageId] registry.cn-shenzhen.aliyuncs.com/dsadxzc/cheng:[Mirror version number]

# Modify id and version
sudo docker tag a5ef1f32aaae registry.cn-shenzhen.aliyuncs.com/dsadxzc/cheng:1.0
# Modified version
$ sudo docker push registry.cn-shenzhen.aliyuncs.com/dsadxzc/cheng:[Mirror version number]
Summary
Docker network
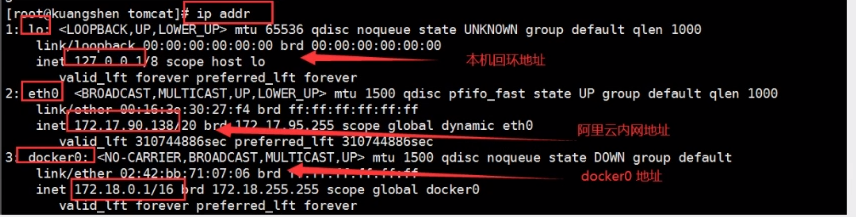
Understand Docker0
Clear the docker image and container before learning
# Delete all containers
$ docker rm -f $(docker ps -aq)

# Delete all mirrors
$ docker rmi -f $(docker images -aq)
test
[root@localhost tomcat]# ip addr
1: lo: <LOOPBACK,UP,LOWER_UP> mtu 65536 qdisc noqueue state UNKNOWN group default qlen 1000
    link/loopback 00:00:00:00:00:00 brd 00:00:00:00:00:00
    inet 127.0.0.1/8 scope host lo
       valid_lft forever preferred_lft forever
    inet6 ::1/128 scope host
       valid_lft forever preferred_lft forever
2: ens33: <BROADCAST,MULTICAST,UP,LOWER_UP> mtu 1500 qdisc pfifo_fast state UP group default qlen 1000
    link/ether 00:0c:29:1a:80:de brd ff:ff:ff:ff:ff:ff
    inet 192.168.254.133/24 brd 192.168.254.255 scope global noprefixroute dynamic ens33
       valid_lft 1365sec preferred_lft 1365sec
    inet6 fe80::78ba:483e:9794:f6c2/64 scope link noprefixroute
       valid_lft forever preferred_lft forever
3: virbr0: <NO-CARRIER,BROADCAST,MULTICAST,UP> mtu 1500 qdisc noqueue state DOWN group default qlen 1000
    link/ether 52:54:00:a2:05:5a brd ff:ff:ff:ff:ff:ff
    inet 192.168.122.1/24 brd 192.168.122.255 scope global virbr0
       valid_lft forever preferred_lft forever
4: virbr0-nic: <BROADCAST,MULTICAST> mtu 1500 qdisc pfifo_fast master virbr0 state DOWN group default qlen 1000
    link/ether 52:54:00:a2:05:5a brd ff:ff:ff:ff:ff:ff
5: docker0: <NO-CARRIER,BROADCAST,MULTICAST,UP> mtu 1500 qdisc noqueue state DOWN group default
    link/ether 02:42:2a:09:31:67 brd ff:ff:ff:ff:ff:ff
    inet 172.17.0.1/16 brd 172.17.255.255 scope global docker0
       valid_lft forever preferred_lft forever
    inet6 fe80::42:2aff:fe09:3167/64 scope link
       valid_lft forever preferred_lft forever
Three networks
Question: how does docker handle container network access?

# Test run a tomcat
[root@localhost tomcat]# docker run -d -P --name tomcat01 tomcat

# View container internal network address
[root@localhost tomcat]# docker exec -it container id ip add

# When the container is found to start, you will get a eth0@if91 ip address, docker assignment!
[root@localhost tomcat]# docker exec -it tomcat01 ip addr
1: lo: <LOOPBACK,UP,LOWER_UP> mtu 65536 qdisc noqueue state UNKNOWN group default qlen 1000
    link/loopback 00:00:00:00:00:00 brd 00:00:00:00:00:00
    inet 127.0.0.1/8 scope host lo
       valid_lft forever preferred_lft forever
36: eth0@if37: <BROADCAST,MULTICAST,UP,LOWER_UP> mtu 1500 qdisc noqueue state UP group default
    link/ether 02:42:ac:11:00:02 brd ff:ff:ff:ff:ff:ff link-netnsid 0
    inet 172.17.0.2/16 brd 172.17.255.255 scope global eth0
       valid_lft forever preferred_lft forever


# reflection? Can linux ping through the container! Can I ping the inside of the container to the outside? sure!
[root@localhost tomcat]# ping 172.17.0.2
PING 172.17.0.2 (172.17.0.2) 56(84) bytes of data.
64 bytes from 172.17.0.2: icmp_seq=1 ttl=64 time=19.5 ms
64 bytes from 172.17.0.2: icmp_seq=2 ttl=64 time=0.105 ms
64 bytes from 172.17.0.2: icmp_seq=3 ttl=64 time=0.051 ms
64 bytes from 172.17.0.2: icmp_seq=4 ttl=64 time=0.071 ms
64 bytes from 172.17.0.2: icmp_seq=5 ttl=64 time=0.124 ms
64 bytes from 172.17.0.2: icmp_seq=6 ttl=64 time=0.052 ms
. . .
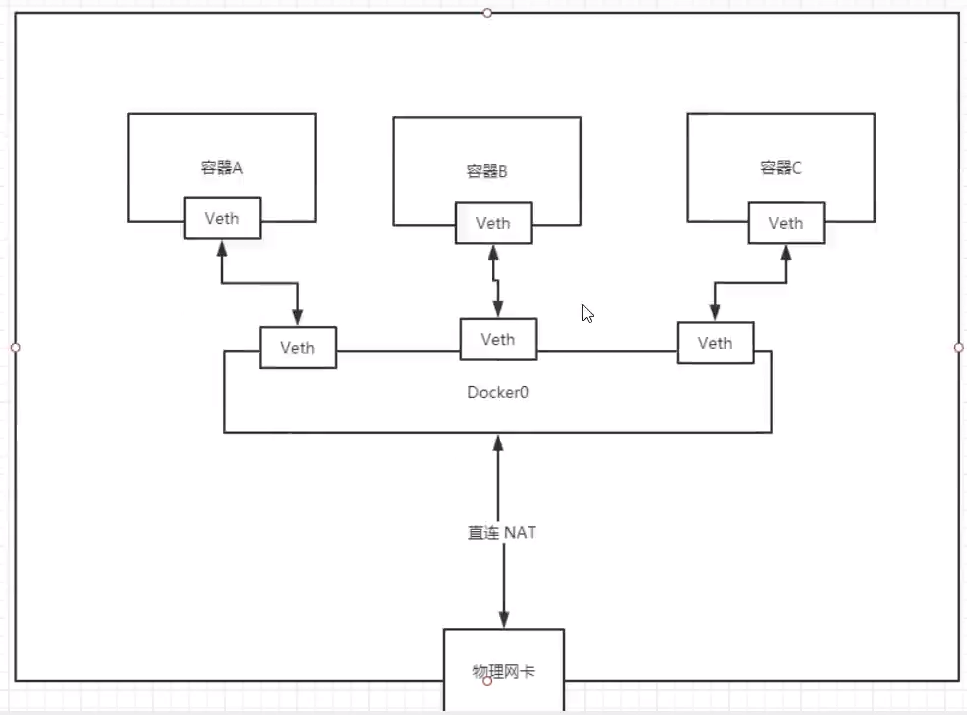
principle
1. Every time we start a docker container, docker will assign an ip to the docker container. As long as we follow docker, there will be a docker0 bridging mode, using Veth pair technology!
https://www.cnblogs.com/bakari/p/10613710.html
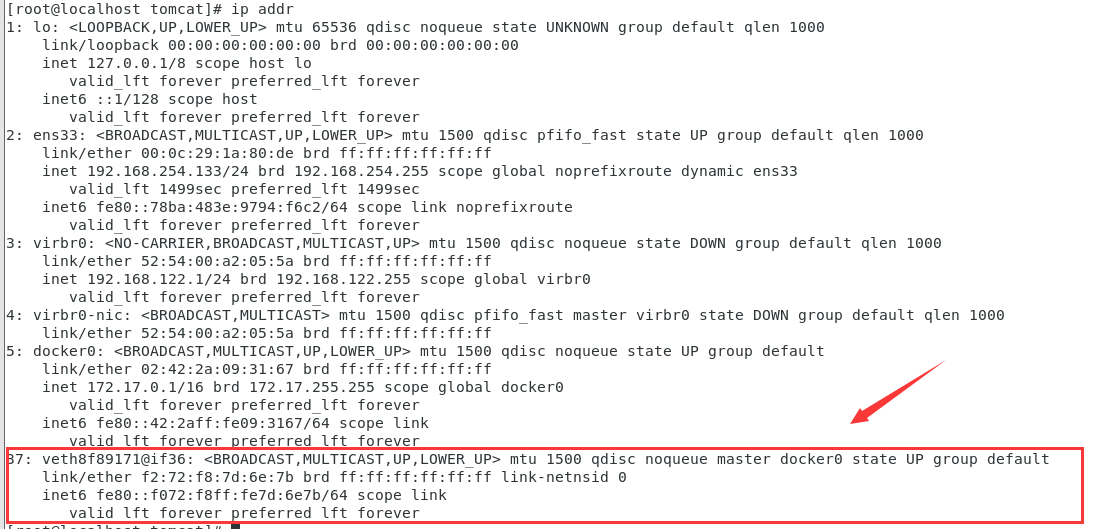
Test ip addr again
# One more network card
[root@localhost tomcat]# ip addr
1: lo: <LOOPBACK,UP,LOWER_UP> mtu 65536 qdisc noqueue state UNKNOWN group default qlen 1000
    link/loopback 00:00:00:00:00:00 brd 00:00:00:00:00:00
    inet 127.0.0.1/8 scope host lo
       valid_lft forever preferred_lft forever
    inet6 ::1/128 scope host
       valid_lft forever preferred_lft forever
2: ens33: <BROADCAST,MULTICAST,UP,LOWER_UP> mtu 1500 qdisc pfifo_fast state UP group default qlen 1000
    link/ether 00:0c:29:1a:80:de brd ff:ff:ff:ff:ff:ff
    inet 192.168.254.133/24 brd 192.168.254.255 scope global noprefixroute dynamic ens33
       valid_lft 1499sec preferred_lft 1499sec
    inet6 fe80::78ba:483e:9794:f6c2/64 scope link noprefixroute
       valid_lft forever preferred_lft forever
3: virbr0: <NO-CARRIER,BROADCAST,MULTICAST,UP> mtu 1500 qdisc noqueue state DOWN group default qlen 1000
    link/ether 52:54:00:a2:05:5a brd ff:ff:ff:ff:ff:ff
    inet 192.168.122.1/24 brd 192.168.122.255 scope global virbr0
       valid_lft forever preferred_lft forever
4: virbr0-nic: <BROADCAST,MULTICAST> mtu 1500 qdisc pfifo_fast master virbr0 state DOWN group default qlen 1000
    link/ether 52:54:00:a2:05:5a brd ff:ff:ff:ff:ff:ff
5: docker0: <BROADCAST,MULTICAST,UP,LOWER_UP> mtu 1500 qdisc noqueue state UP group default
    link/ether 02:42:2a:09:31:67 brd ff:ff:ff:ff:ff:ff
    inet 172.17.0.1/16 brd 172.17.255.255 scope global docker0
       valid_lft forever preferred_lft forever
    inet6 fe80::42:2aff:fe09:3167/64 scope link
       valid_lft forever preferred_lft forever
37: veth8f89171@if36: <BROADCAST,MULTICAST,UP,LOWER_UP> mtu 1500 qdisc noqueue master docker0 state UP group default
    link/ether f2:72:f8:7d:6e:7b brd ff:ff:ff:ff:ff:ff link-netnsid 0
    inet6 fe80::f072:f8ff:fe7d:6e7b/64 scope link
       valid_lft forever preferred_lft forever
2. Start another container test and find another pair of networks
[root@localhost tomcat]# docker run -d -P --name tomcat02 tomcat
781895f439c26dfd5fd489bf1316ab52d0d747d7a5c4f214656ea8ab9bc7d760
[root@localhost tomcat]# ip addr
1: lo: <LOOPBACK,UP,LOWER_UP> mtu 65536 qdisc noqueue state UNKNOWN group default qlen 1000
    link/loopback 00:00:00:00:00:00 brd 00:00:00:00:00:00
    inet 127.0.0.1/8 scope host lo
       valid_lft forever preferred_lft forever
    inet6 ::1/128 scope host
       valid_lft forever preferred_lft forever
2: ens33: <BROADCAST,MULTICAST,UP,LOWER_UP> mtu 1500 qdisc pfifo_fast state UP group default qlen 1000
    link/ether 00:0c:29:1a:80:de brd ff:ff:ff:ff:ff:ff
    inet 192.168.254.133/24 brd 192.168.254.255 scope global noprefixroute dynamic ens33
       valid_lft 1299sec preferred_lft 1299sec
    inet6 fe80::78ba:483e:9794:f6c2/64 scope link noprefixroute
       valid_lft forever preferred_lft forever
3: virbr0: <NO-CARRIER,BROADCAST,MULTICAST,UP> mtu 1500 qdisc noqueue state DOWN group default qlen 1000
    link/ether 52:54:00:a2:05:5a brd ff:ff:ff:ff:ff:ff
    inet 192.168.122.1/24 brd 192.168.122.255 scope global virbr0
       valid_lft forever preferred_lft forever
4: virbr0-nic: <BROADCAST,MULTICAST> mtu 1500 qdisc pfifo_fast master virbr0 state DOWN group default qlen 1000
    link/ether 52:54:00:a2:05:5a brd ff:ff:ff:ff:ff:ff
5: docker0: <BROADCAST,MULTICAST,UP,LOWER_UP> mtu 1500 qdisc noqueue state UP group default
    link/ether 02:42:2a:09:31:67 brd ff:ff:ff:ff:ff:ff
    inet 172.17.0.1/16 brd 172.17.255.255 scope global docker0
       valid_lft forever preferred_lft forever
    inet6 fe80::42:2aff:fe09:3167/64 scope link
       valid_lft forever preferred_lft forever
37: veth8f89171@if36: <BROADCAST,MULTICAST,UP,LOWER_UP> mtu 1500 qdisc noqueue master docker0 state UP group default
    link/ether f2:72:f8:7d:6e:7b brd ff:ff:ff:ff:ff:ff link-netnsid 0
    inet6 fe80::f072:f8ff:fe7d:6e7b/64 scope link
       valid_lft forever preferred_lft forever
39: veth701a9f4@if38: <BROADCAST,MULTICAST,UP,LOWER_UP> mtu 1500 qdisc noqueue master docker0 state UP group default
    link/ether 0a:c9:02:a1:57:a9 brd ff:ff:ff:ff:ff:ff link-netnsid 1
    inet6 fe80::8c9:2ff:fea1:57a9/64 scope link
       valid_lft forever preferred_lft forever
#View tomcat02 container address
[root@localhost tomcat]# docker exec -it tomcat02 ip addr
1: lo: <LOOPBACK,UP,LOWER_UP> mtu 65536 qdisc noqueue state UNKNOWN group default qlen 1000
    link/loopback 00:00:00:00:00:00 brd 00:00:00:00:00:00
    inet 127.0.0.1/8 scope host lo
       valid_lft forever preferred_lft forever
38: eth0@if39: <BROADCAST,MULTICAST,UP,LOWER_UP> mtu 1500 qdisc noqueue state UP group default
    link/ether 02:42:ac:11:00:03 brd ff:ff:ff:ff:ff:ff link-netnsid 0
    inet 172.17.0.3/16 brd 172.17.255.255 scope global eth0
       valid_lft forever preferred_lft forever
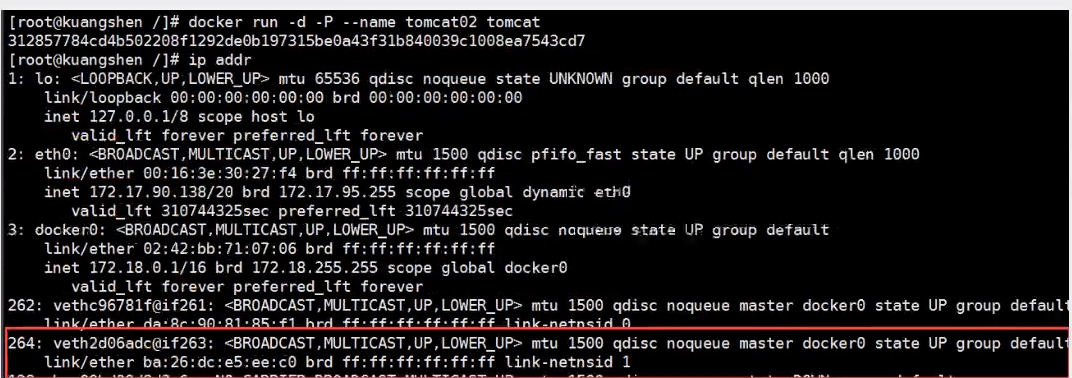
# We found that the network card brought by this container is a pair
# Veth pair is a pair of virtual device interfaces. They all appear in pairs. One end is connected to the protocol and the other end is connected to each other
# Because of this feature, Veth pair acts as a bridge to connect various virtual network devices
# The connection between OpenStac,Docker containers and OVS all use Veth pair technology
3. Let's test whether tomcat01 and tomcat02 can ping
# Get ip 172.17.0.2 of tomcat01
[root@localhost tomcat]# docker exec -it tomcat01 ip addr
550: eth0@if551: <BROADCAST,MULTICAST,UP,LOWER_UP> mtu 1500 qdisc noqueue state UP group default
    link/ether 02:42:ac:11:00:02 brd ff:ff:ff:ff:ff:ff link-netnsid 0
    inet 172.17.0.2/16 brd 172.17.255.255 scope global eth0
       valid_lft forever preferred_lft forever

# Let tomcat02 ping tomcat01
[root@localhost tomcat]# docker exec -it tomcat02 ping 172.17.0.2
PING 172.17.0.2 (172.17.0.2) 56(84) bytes of data.
64 bytes from 172.17.0.2: icmp_seq=1 ttl=64 time=9.07 ms
64 bytes from 172.17.0.2: icmp_seq=2 ttl=64 time=0.145 ms
64 bytes from 172.17.0.2: icmp_seq=3 ttl=64 time=0.153 ms
64 bytes from 172.17.0.2: icmp_seq=4 ttl=64 time=0.104 ms


# Conclusion: containers and containers can ping each other
Network model diagram
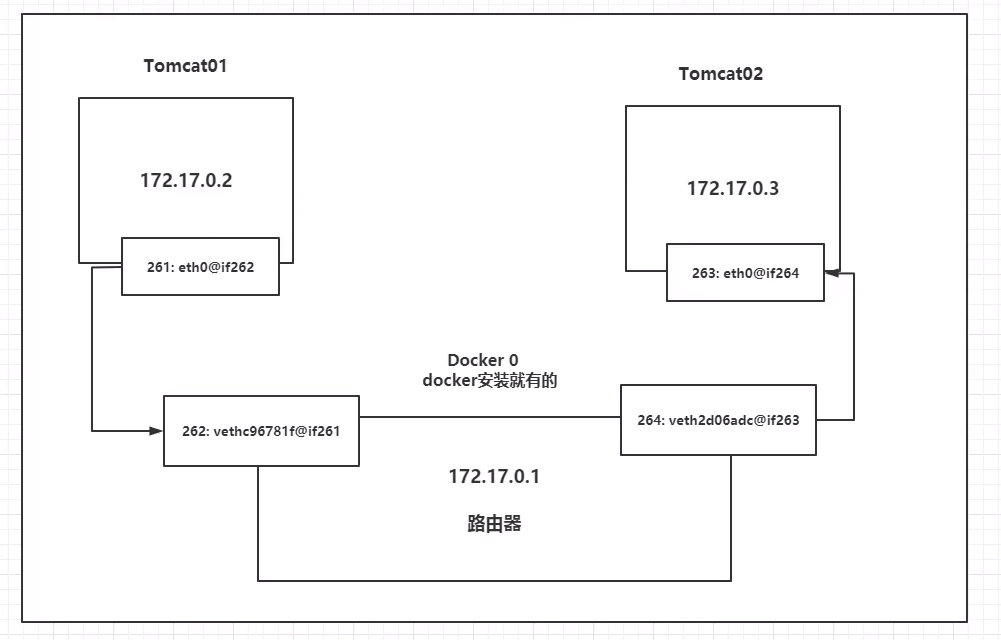
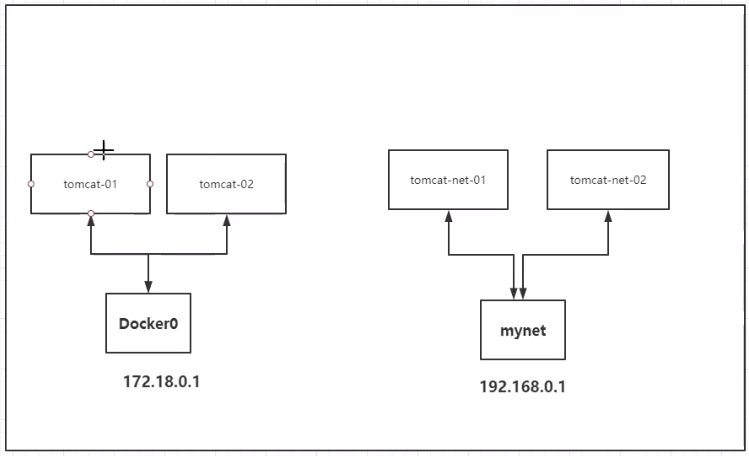
Conclusion: tomcat01 and tomcat02 share one router, docker0.
When all containers do not specify a network, they are routed by docker0. Docker will assign a default available ip to our containers.
Summary
Docker uses the bridge of Linux, and the host is a docker container bridge docker0
All network interfaces in Docker are virtual, and the virtual forwarding efficiency is high (transmitting files through intranet)
As long as the container is deleted, the corresponding bridge pair is gone!
Think about a scenario: we write a micro service, database url=ip: the project does not restart, and the data ip is changed. We hope to deal with this problem and access the container by name?
–link
[root@localhost tomcat]# docker exec -it tomcat02 ping tomca01   # ping failed
ping: tomca01: Name or service not known

# Run a tomcat03 --link tomcat02
[root@localhost tomcat]# docker run -d -P --name tomcat03 --link tomcat02 tomcat
5f9331566980a9e92bc54681caaac14e9fc993f14ad13d98534026c08c0a9aef

# 3 connection 2
# ping tomcat02 with tomcat03
[root@localhost tomcat]# docker exec -it tomcat03 ping tomcat02
PING tomcat02 (172.17.0.3) 56(84) bytes of data.
64 bytes from tomcat02 (172.17.0.3): icmp_seq=1 ttl=64 time=12.6 ms
64 bytes from tomcat02 (172.17.0.3): icmp_seq=2 ttl=64 time=1.07 ms
64 bytes from tomcat02 (172.17.0.3): icmp_seq=3 ttl=64 time=0.365 ms
64 bytes from tomcat02 (172.17.0.3): icmp_seq=4 ttl=64 time=0.185 ms
64 bytes from tomcat02 (172.17.0.3): icmp_seq=5 ttl=64 time=0.169 ms


# 2 connection 3
# Cannot Ping tomcat03 with tomcat02
explore:
# docker network inspect network id is the same as the network segment
[root@localhost tomcat]# docker network ls
NETWORK ID NAME DRIVER SCOPE
4b16ee2d6925 bridge bridge local
eedd07789e82 host host local
48629cdb554a none null local
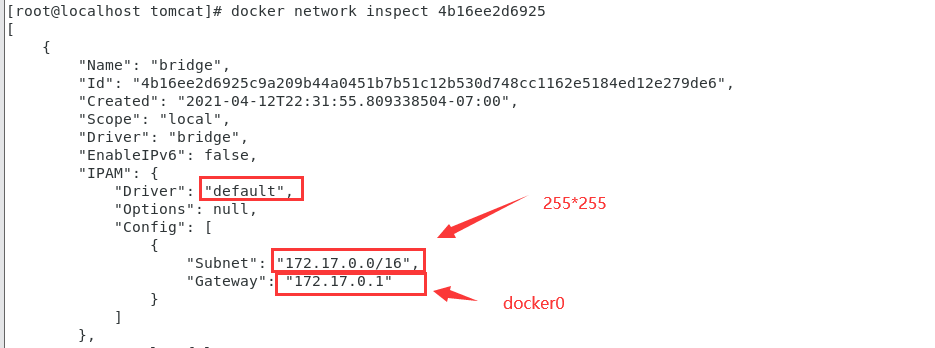
[root@localhost tomcat]# docker network inspect 4b16ee2d6925
[
{
"Name": "bridge",
"Id": "4b16ee2d6925c9a209b44a0451b7b51c12b530d748cc1162e5184ed12e279de6",
"Created": "2021-04-12T22:31:55.809338504-07:00",
"Scope": "local",
"Driver": "bridge",
"EnableIPv6": false,
"IPAM": {
"Driver": "default",
"Options": null,
"Config": [
{
"Subnet": "172.17.0.0/16",
"Gateway": "172.17.0.1"
}
]
},
...
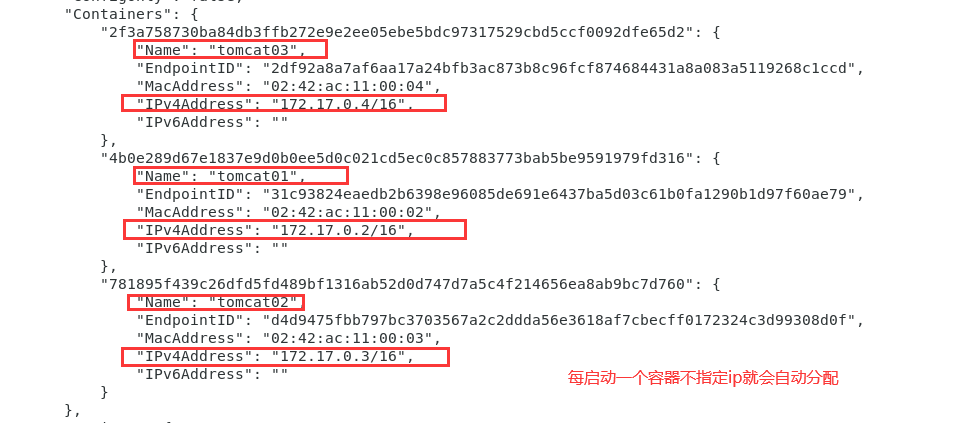
# docker inspect tomcat03

[root@localhost tomcat]# docker inspect tomcat03 | grep tomcat02
                "/tomcat02:/tomcat03/tomcat02"

Check / etc/hosts in tomcat03 and find the configuration of tomcat02
[root@localhost tomcat]# docker exec -it tomcat03 cat /etc/hosts
127.0.0.1	localhost
::1	localhost ip6-localhost ip6-loopback
fe00::0	ip6-localnet
ff00::0	ip6-mcastprefix
ff02::1	ip6-allnodes
ff02::2	ip6-allrouters
172.17.0.3	tomcat02 781895f439c2
172.17.0.4	2f3a758730ba
--The essence of link is to add a mapping in the hosts configuration
It is not recommended to use -- link now when using Docker!
Custom network, not applicable to docker0!
docker0 problem: container name connection access is not supported!
Custom network
docker network
connect     -- Connect a container to a network
create      -- Creates a new network with a name specified by the
disconnect  -- Disconnects a container from a network
inspect     -- Displays detailed information on a network
ls          -- Lists all the networks created by the user
prune       -- Remove all unused networks
rm          -- Deletes one or more networks
View all docker networks
[root@localhost tomcat]# docker network ls
NETWORK ID     NAME      DRIVER    SCOPE
4b16ee2d6925   bridge    bridge    local
eedd07789e82   host      host      local
48629cdb554a   none      null      local
Network mode
Bridge: Bridge docker (by default, you can create it yourself in bridge mode)
none: the network is not configured. Generally, it is not used
Host: share the network with the host
Container: container network connectivity (less used! Very limited)
# The command we started directly -- net bridge, and this is our docker0
# bridge is docker0
[root@localhost tomcat]# docker run -d -P --name tomcat01 tomcat
 Equivalent to => docker run -d -P --name tomcat01 --net bridge tomcat

# docker0, features: by default, the domain name cannot be accessed-- link can get through the connection, but it's very troublesome!
# We can customize a network
[root@localhost tomcat]# docker network create --driver bridge --subnet 192.168.0.0/16 --gateway 192.168.0.1 mynet
9b2a5d2f9fe7f9b9d5c68c20b259fba68e4c510524ade5d0c3afa353a731e92a
[root@localhost tomcat]# docker network ls
NETWORK ID     NAME      DRIVER    SCOPE
4b16ee2d6925   bridge    bridge    local
eedd07789e82   host      host      local
9b2a5d2f9fe7   mynet     bridge    local
48629cdb554a   none      null      local
Create your own network
[root@localhost tomcat]# docker network inspect mynet
[
    {
        "Name": "mynet",
        "Id": "9b2a5d2f9fe7f9b9d5c68c20b259fba68e4c510524ade5d0c3afa353a731e92a",
        "Created": "2021-04-13T22:11:59.671350133-07:00",
        "Scope": "local",
        "Driver": "bridge",
        "EnableIPv6": false,
        "IPAM": {
            "Driver": "default",
            "Options": {},
            "Config": [
                {
                    "Subnet": "192.168.0.0/16",
                    "Gateway": "192.168.0.1"
                }
            ]
        },
        "Internal": false,
        "Attachable": false,
        "Ingress": false,
        "ConfigFrom": {
            "Network": ""
        },
        "ConfigOnly": false,
        "Containers": {},
        "Options": {},
        "Labels": {}
    }
]
Start two tomcat and check the network again
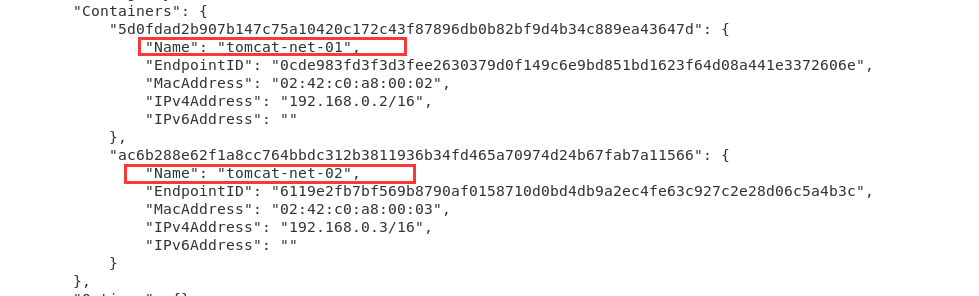
[root@localhost tomcat]# docker run -d -P --name tomcat-net-01 --net mynet tomcat
5d0fdad2b907b147c75a10420c172c43f87896db0b82bf9d4b34c889ea43647d
[root@localhost tomcat]# docker run -d -P --name tomcat-net-02 --net mynet tomcat
ac6b288e62f1a8cc764bbdc312b3811936b34fd465a70974d24b67fab7a11566
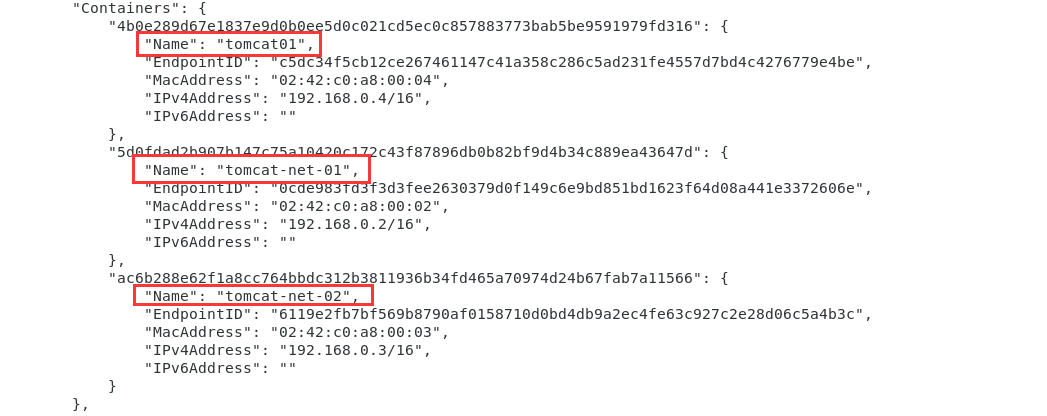
Check your network again
[root@localhost tomcat]# docker network inspect mynet
[
    {
        "Name": "mynet",
        "Id": "9b2a5d2f9fe7f9b9d5c68c20b259fba68e4c510524ade5d0c3afa353a731e92a",
        "Created": "2021-04-13T22:11:59.671350133-07:00",
        "Scope": "local",
        "Driver": "bridge",
        "EnableIPv6": false,
        "IPAM": {
            "Driver": "default",
            "Options": {},
            "Config": [
                {
                    "Subnet": "192.168.0.0/16",
                    "Gateway": "192.168.0.1"
                }
            ]
        },
        "Internal": false,
        "Attachable": false,
        "Ingress": false,
        "ConfigFrom": {
            "Network": ""
        },
        "ConfigOnly": false,
        "Containers": {
            "5d0fdad2b907b147c75a10420c172c43f87896db0b82bf9d4b34c889ea43647d": {
                "Name": "tomcat-net-01",
                "EndpointID": "0cde983fd3f3d3fee2630379d0f149c6e9bd851bd1623f64d08a441e3372606e",
                "MacAddress": "02:42:c0:a8:00:02",
                "IPv4Address": "192.168.0.2/16",
                "IPv6Address": ""
            },
            "ac6b288e62f1a8cc764bbdc312b3811936b34fd465a70974d24b67fab7a11566": {
                "Name": "tomcat-net-02",
                "EndpointID": "6119e2fb7bf569b8790af0158710d0bd4db9a2ec4fe63c927c2e28d06c5a4b3c",
                "MacAddress": "02:42:c0:a8:00:03",
                "IPv4Address": "192.168.0.3/16",
                "IPv6Address": ""
            }
        },
        "Options": {},
        "Labels": {}
    }
]
Test the ping link again
[root@localhost tomcat]# docker exec -it tomcat-net-01 ping 192.168.0.3
PING 192.168.0.3 (192.168.0.3) 56(84) bytes of data.
64 bytes from 192.168.0.3: icmp_seq=1 ttl=64 time=0.177 ms
64 bytes from 192.168.0.3: icmp_seq=2 ttl=64 time=0.071 ms
64 bytes from 192.168.0.3: icmp_seq=3 ttl=64 time=0.084 ms
64 bytes from 192.168.0.3: icmp_seq=4 ttl=64 time=0.080 ms
64 bytes from 192.168.0.3: icmp_seq=5 ttl=64 time=0.089 ms
^C
--- 192.168.0.3 ping statistics ---
5 packets transmitted, 5 received, 0% packet loss, time 20ms
rtt min/avg/max/mdev = 0.071/0.100/0.177/0.039 ms
[root@localhost tomcat]# docker exec -it tomcat-net-01 ping tomcat-net-02
PING tomcat-net-02 (192.168.0.3) 56(84) bytes of data.
64 bytes from tomcat-net-02.mynet (192.168.0.3): icmp_seq=1 ttl=64 time=0.235 ms
64 bytes from tomcat-net-02.mynet (192.168.0.3): icmp_seq=2 ttl=64 time=0.117 ms
64 bytes from tomcat-net-02.mynet (192.168.0.3): icmp_seq=3 ttl=64 time=0.066 ms
64 bytes from tomcat-net-02.mynet (192.168.0.3): icmp_seq=4 ttl=64 time=0.111 ms
^C
--- tomcat-net-02 ping statistics ---
4 packets transmitted, 4 received, 0% packet loss, time 5ms
rtt min/avg/max/mdev = 0.066/0.132/0.235/0.063 ms
We customize the network docker. When we maintain the corresponding relationship, we recommend that we use the network in this way!
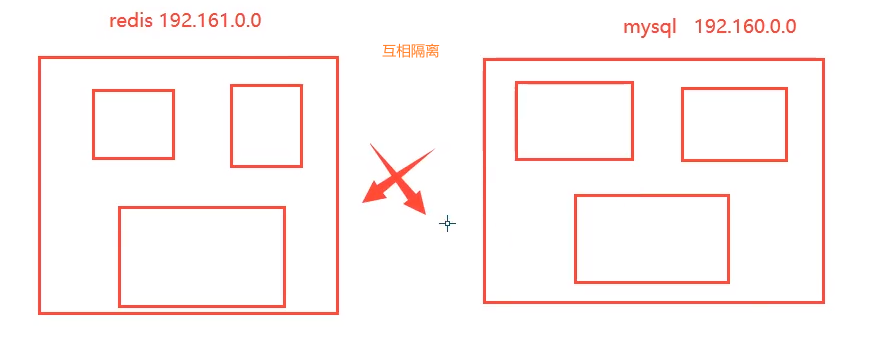
Benefits:
redis - different clusters use different networks to ensure that the cluster is safe and healthy
mysql - different clusters use different networks to ensure that the cluster is safe and healthy
Network connectivity
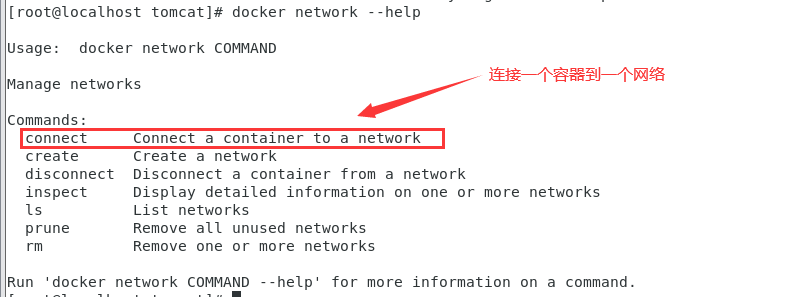
[root@localhost tomcat]# docker ps
CONTAINER ID   IMAGE     COMMAND             CREATED             STATUS             PORTS                     NAMES
ac6b288e62f1   tomcat    "catalina.sh run"   16 minutes ago      Up 16 minutes      0.0.0.0:49156->8080/tcp   tomcat-net-02
5d0fdad2b907   tomcat    "catalina.sh run"   16 minutes ago      Up 16 minutes      0.0.0.0:49155->8080/tcp   tomcat-net-01
2f3a758730ba   tomcat    "catalina.sh run"   About an hour ago   Up About an hour   0.0.0.0:49154->8080/tcp   tomcat03
781895f439c2   tomcat    "catalina.sh run"   About an hour ago   Up About an hour   0.0.0.0:49153->8080/tcp   tomcat02
4b0e289d67e1   tomcat    "catalina.sh run"   2 days ago          Up 2 hours         0.0.0.0:3355->8080/tcp    tomcat01
[root@localhost tomcat]# docker network --help

Usage:  docker network COMMAND

Manage networks

Commands:
  connect     Connect a container to a network
  create      Create a network
  disconnect  Disconnect a container from a network
  inspect     Display detailed information on one or more networks
  ls          List networks
  prune       Remove all unused networks
  rm          Remove one or more networks

Run 'docker network COMMAND --help' for more information on a command.
[root@localhost tomcat]# docker network connect --help

Usage:  docker network connect [OPTIONS] NETWORK CONTAINER

Connect a container to a network

Options:
      --alias strings           Add network-scoped alias for the container
      --driver-opt strings      driver options for the network
      --ip string               IPv4 address (e.g., 172.30.100.104)
      --ip6 string              IPv6 address (e.g., 2001:db8::33)
      --link list               Add link to another container
      --link-local-ip strings   Add a link-local address for the container
Test and get through tomcat01 and mynet
[root@localhost tomcat]# docker network connect mynet tomcat01
[root@localhost tomcat]# docker network inspect mynet
[
    {
        "Name": "mynet",
        "Id": "9b2a5d2f9fe7f9b9d5c68c20b259fba68e4c510524ade5d0c3afa353a731e92a",
        "Created": "2021-04-13T22:11:59.671350133-07:00",
        "Scope": "local",
        "Driver": "bridge",
        "EnableIPv6": false,
        "IPAM": {
            "Driver": "default",
            "Options": {},
            "Config": [
                {
                    "Subnet": "192.168.0.0/16",
                    "Gateway": "192.168.0.1"
                }
            ]
        },
        "Internal": false,
        "Attachable": false,
        "Ingress": false,
        "ConfigFrom": {
            "Network": ""
        },
        "ConfigOnly": false,
        "Containers": {
            "4b0e289d67e1837e9d0b0ee5d0c021cd5ec0c857883773bab5be9591979fd316": {
                "Name": "tomcat01",
                "EndpointID": "c5dc34f5cb12ce267461147c41a358c286c5ad231fe4557d7bd4c4276779e4be",
                "MacAddress": "02:42:c0:a8:00:04",
                "IPv4Address": "192.168.0.4/16",
                "IPv6Address": ""
            },
            "5d0fdad2b907b147c75a10420c172c43f87896db0b82bf9d4b34c889ea43647d": {
                "Name": "tomcat-net-01",
                "EndpointID": "0cde983fd3f3d3fee2630379d0f149c6e9bd851bd1623f64d08a441e3372606e",
                "MacAddress": "02:42:c0:a8:00:02",
                "IPv4Address": "192.168.0.2/16",
                "IPv6Address": ""
            },
            "ac6b288e62f1a8cc764bbdc312b3811936b34fd465a70974d24b67fab7a11566": {
                "Name": "tomcat-net-02",
                "EndpointID": "6119e2fb7bf569b8790af0158710d0bd4db9a2ec4fe63c927c2e28d06c5a4b3c",
                "MacAddress": "02:42:c0:a8:00:03",
                "IPv4Address": "192.168.0.3/16",
                "IPv6Address": ""
            }
        },
        "Options": {},
        "Labels": {}
    }
]
After connecting, put tomcat01 under mynet
One container two ip addresses
Test successful
[root@localhost tomcat]# docker exec -it tomcat01 ping tomcat-net-01
PING tomcat-net-01 (192.168.0.2) 56(84) bytes of data.
64 bytes from tomcat-net-01.mynet (192.168.0.2): icmp_seq=1 ttl=64 time=0.368 ms
64 bytes from tomcat-net-01.mynet (192.168.0.2): icmp_seq=2 ttl=64 time=0.261 ms
64 bytes from tomcat-net-01.mynet (192.168.0.2): icmp_seq=3 ttl=64 time=0.097 ms
64 bytes from tomcat-net-01.mynet (192.168.0.2): icmp_seq=4 ttl=64 time=0.070 ms
tomcat01 has been opened and tomcat02 has not been opened
Conclusion:
If you want to operate others across the network, you need to use docker network connect to connect!
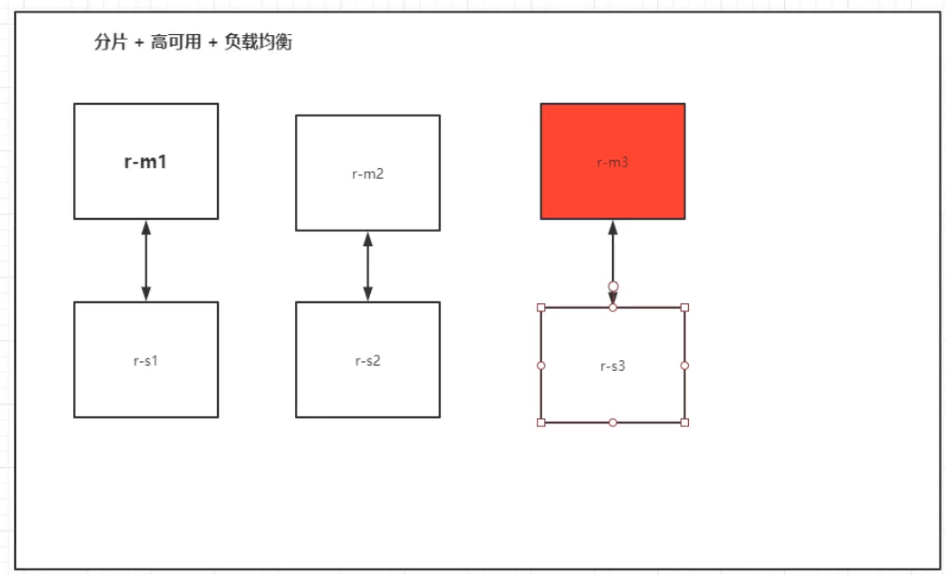
Actual combat: deploy Redis cluster
preparation in advance
Stop all containers first
[root@localhost tomcat]# docker ps
CONTAINER ID   IMAGE     COMMAND             CREATED       STATUS       PORTS                     NAMES
ac6b288e62f1   tomcat    "catalina.sh run"   2 hours ago   Up 2 hours   0.0.0.0:49156->8080/tcp   tomcat-net-02
5d0fdad2b907   tomcat    "catalina.sh run"   2 hours ago   Up 2 hours   0.0.0.0:49155->8080/tcp   tomcat-net-01
2f3a758730ba   tomcat    "catalina.sh run"   3 hours ago   Up 3 hours   0.0.0.0:49154->8080/tcp   tomcat03
781895f439c2   tomcat    "catalina.sh run"   3 hours ago   Up 3 hours   0.0.0.0:49153->8080/tcp   tomcat02
4b0e289d67e1   tomcat    "catalina.sh run"   2 days ago    Up 3 hours   0.0.0.0:3355->8080/tcp    tomcat01
[root@localhost tomcat]# docker rm -f $(docker ps -aq)
ac6b288e62f1
5d0fdad2b907
2f3a758730ba
781895f439c2
cc4db8053534
4d38084a7c0b
b77396e55db3
468db5f02628
8a02b6fddfe3
465894e34af8
8e2660858dca
f8bd9a180286
0be9ef3e0f75
330f5a75c399
a35688cedc66
5b1e64d8bbc0
7589b4d9d9a1
efbb2086dd82
9da019832a38
57700a38b6e2
4d5c745133e4
04c3a127d159
e846cffc9d72
3f00b72dfde0
4b0e289d67e1
ff130a73542d
872a5b63a024
1682649bdcf0
497d37843c8c
e7f19736f3db
56f47d6d2f36
[root@localhost tomcat]# docker images
REPOSITORY             TAG       IMAGE ID       CREATED         SIZE
yanghuihui520/tomcat   1.0       62c96b0fe815   19 hours ago    690MB
huangjialin/tomcat     1.0       62c96b0fe815   19 hours ago    690MB
diytomcat              latest    62c96b0fe815   19 hours ago    690MB
cmd-test               0.1       0e927777d383   22 hours ago    209MB
mysentos               0.1       2315251fefdd   23 hours ago    291MB
huangjialin/centos     1.0       74f0e59c6da4   40 hours ago    209MB
tomcat02.1.0           latest    f5946bde7e99   45 hours ago    672MB
tomcat                 8         926c7fd4777e   3 days ago      533MB
tomcat                 latest    bd431ca8553c   3 days ago      667MB
nginx                  latest    519e12e2a84a   3 days ago      133MB
mysql                  5.7       450379344707   4 days ago      449MB
portainer/portainer    latest    580c0e4e98b0   3 weeks ago     79.1MB
hello-world            latest    d1165f221234   5 weeks ago     13.3kB
centos                 latest    300e315adb2f   4 months ago    209MB
elasticsearch          7.6.2     f29a1ee41030   12 months ago   791MB
[root@localhost tomcat]# docker ps
CONTAINER ID   IMAGE     COMMAND   CREATED   STATUS    PORTS     NAMES
Setting and viewing redis cluster network card
docker network create redis --subnet 172.38.0.0/16
docker network ls
docker network inspect redis
redis node creation and setting
for port in $(seq 1 6);
do
mkdir -p /mydata/redis/node-${port}/conf
touch /mydata/redis/node-${port}/conf/redis.conf
cat << EOF >/mydata/redis/node-${port}/conf/redis.conf
port 6379
bind 0.0.0.0
cluster-enabled yes
cluster-config-file nodes.conf
cluster-node-timeout 5000
cluster-announce-ip 172.38.0.1${port}
cluster-announce-port 6379
cluster-announce-bus-port 16379
appendonly yes
EOF
done
Pull the redis image and start the redis node
# Run six redis through script
for port in $(seq 1 6);\
docker run -p 637${port}:6379 -p 1667${port}:16379 --name redis-${port} \
-v /mydata/redis/node-${port}/data:/data \
-v /mydata/redis/node-${port}/conf/redis.conf:/etc/redis/redis.conf \
-d --net redis --ip 172.38.0.1${port} redis:5.0.9-alpine3.11 redis-server /etc/redis/redis.conf
docker exec -it redis-1 /bin/sh #redis does not have bash by default
redis-cli --cluster create 172.38.0.11:6379 172.38.0.12:6379 172.38.0.13:6379 172.38.0.14:6379 172.38.0.15:6379 172.38.0.16:6379  --cluster-replicas 1
//Template
docker run -p 637${port}:6379 -p 1667${port}:16379 --name redis-${port} \
-v /mydata/redis/node-${port}/data:/data \
-v /mydata/redis/node-${port}/conf/redis.conf:/etc/redis/redis.conf \
-d --net redis --ip 172.38.0.1${port} redis:5.0.9-alpine3.11 redis-server /etc/redis/redis.conf
//Node 1
docker run -p 6371:6379 -p 16371:16379 --name redis-1 \
 -v /mydata/redis/node-1/data:/data \
 -v /mydata/redis/node-1/conf/redis.conf:/etc/redis/redis.conf \
 -d --net redis --ip 172.38.0.11 redis:5.0.9-alpine3.11 redis-server /etc/redis/redis.conf
//Node 2
docker run -p 6372:6379 -p 16372:16379 --name redis-2 \
 -v /mydata/redis/node-2/data:/data \
 -v /mydata/redis/node-2/conf/redis.conf:/etc/redis/redis.conf \
 -d --net redis --ip 172.38.0.12 redis:5.0.9-alpine3.11 redis-server /etc/redis/redis.conf
//Node 3
docker run -p 6373:6379 -p 16373:16379 --name redis-3 \
 -v /mydata/redis/node-3/data:/data \
 -v /mydata/redis/node-3/conf/redis.conf:/etc/redis/redis.conf \
 -d --net redis --ip 172.38.0.13 redis:5.0.9-alpine3.11 redis-server /etc/redis/redis.conf
//Node 4
docker run -p 6374:6379 -p 16374:16379 --name redis-4 \
 -v /mydata/redis/node-4data:/data \
 -v /mydata/redis/node-4/conf/redis.conf:/etc/redis/redis.conf \
 -d --net redis --ip 172.38.0.14 redis:5.0.9-alpine3.11 redis-server /etc/redis/redis.conf
//Node 5
docker run -p 6375:6379 -p 16375:16379 --name redis-5 \
 -v /mydata/redis/node-5/data:/data \
 -v /mydata/redis/node-5/conf/redis.conf:/etc/redis/redis.conf \
 -d --net redis --ip 172.38.0.15 redis:5.0.9-alpine3.11 redis-server /etc/redis/redis.conf
//Node 6
docker run -p 6376:6379 -p 16376:16379 --name redis-6 \
 -v /mydata/redis/node-6/data:/data \
 -v /mydata/redis/node-6/conf/redis.conf:/etc/redis/redis.conf \
 -d --net redis --ip 172.38.0.16 redis:5.0.9-alpine3.11 redis-server /etc/redis/redis.conf
Enter the redis node in interactive mode
docker exec -it redis-1 /bin/sh
Create redis cluster
redis-cli --cluster create 172.38.0.11:6379 172.38.0.12:6379 \
172.38.0.13:6379 172.38.0.14:6379 172.38.0.15:6379 \
172.38.0.16:6379 --cluster-replicas 1
The successful operation interface is as follows: (master-slave replication) the cluster is created successfully
/data # redis-cli --cluster create 172.38.0.11:6379 172.38.0.12:6379 \
> 172.38.0.13:6379 172.38.0.14:6379 172.38.0.15:6379 \
> 172.38.0.16:6379 --cluster-replicas 1
>>> Performing hash slots allocation on 6 nodes...
Master[0] -> Slots 0 - 5460
Master[1] -> Slots 5461 - 10922
Master[2] -> Slots 10923 - 16383
Adding replica 172.38.0.15:6379 to 172.38.0.11:6379
Adding replica 172.38.0.16:6379 to 172.38.0.12:6379
Adding replica 172.38.0.14:6379 to 172.38.0.13:6379
M: af21836f327964924ddfd99eadd0f86c4be2b998 172.38.0.11:6379
   slots:[0-5460] (5461 slots) master
M: b0cf655ea86ff16e2c6f9a82f3d9f1a3d7dc7c62 172.38.0.12:6379
   slots:[5461-10922] (5462 slots) master
M: c040bae27420e3fe503d79cad47816123462262a 172.38.0.13:6379
   slots:[10923-16383] (5461 slots) master
S: 24bf6f3296119d93f82232555784bbdb1a72697e 172.38.0.14:6379
   replicates c040bae27420e3fe503d79cad47816123462262a
S: 20a534198c68dd48b5a533b0ee4b1d447cc6b1f6 172.38.0.15:6379
   replicates af21836f327964924ddfd99eadd0f86c4be2b998
S: 65d83f48f4884e26dc986a60cc03aa33e22dd48a 172.38.0.16:6379
   replicates b0cf655ea86ff16e2c6f9a82f3d9f1a3d7dc7c62
Can I set the above configuration? (type 'yes' to accept): yes
>>> Nodes configuration updated
>>> Assign a different config epoch to each node
>>> Sending CLUSTER MEET messages to join the cluster
Waiting for the cluster to join
...
>>> Performing Cluster Check (using node 172.38.0.11:6379)
M: af21836f327964924ddfd99eadd0f86c4be2b998 172.38.0.11:6379
   slots:[0-5460] (5461 slots) master
   1 additional replica(s)
S: 20a534198c68dd48b5a533b0ee4b1d447cc6b1f6 172.38.0.15:6379
   slots: (0 slots) slave
   replicates af21836f327964924ddfd99eadd0f86c4be2b998
S: 65d83f48f4884e26dc986a60cc03aa33e22dd48a 172.38.0.16:6379
   slots: (0 slots) slave
   replicates b0cf655ea86ff16e2c6f9a82f3d9f1a3d7dc7c62
S: 24bf6f3296119d93f82232555784bbdb1a72697e 172.38.0.14:6379
   slots: (0 slots) slave
   replicates c040bae27420e3fe503d79cad47816123462262a
M: b0cf655ea86ff16e2c6f9a82f3d9f1a3d7dc7c62 172.38.0.12:6379
   slots:[5461-10922] (5462 slots) master
   1 additional replica(s)
M: c040bae27420e3fe503d79cad47816123462262a 172.38.0.13:6379
   slots:[10923-16383] (5461 slots) master
   1 additional replica(s)
[OK] All nodes agree about slots configuration.
>>> Check for open slots...
>>> Check slots coverage...
[OK] All 16384 slots covered.
After the cluster is successfully created, you can further view the cluster configuration and test it
/data # Redis cli - C / / - C indicates a cluster

127.0.0.1:6379> cluster info  //Cluster configuration
cluster_state:ok
cluster_slots_assigned:16384
cluster_slots_ok:16384
cluster_slots_pfail:0
cluster_slots_fail:0
cluster_known_nodes:6
cluster_size:3
cluster_current_epoch:6
cluster_my_epoch:1
cluster_stats_messages_ping_sent:613
cluster_stats_messages_pong_sent:614
cluster_stats_messages_sent:1227
cluster_stats_messages_ping_received:609
cluster_stats_messages_pong_received:613
cluster_stats_messages_meet_received:5
cluster_stats_messages_received:1227

127.0.0.1:6379> cluster nodes //Cluster node information
887c5ded66d075b6d29602f89a6adc7d1471d22c 172.38.0.11:6379@16379 myself,master - 0 1598439359000 1 connected 0-5460
e6b5521d86abc96fe2e51e40be8fbb1f23da9fe7 172.38.0.15:6379@16379 slave 887c5ded66d075b6d29602f89a6adc7d1471d22c 0 1598439359580 5 connected
d75a9db032f13d9484909b2d0d4724f44e3f1c23 172.38.0.14:6379@16379 slave db3caa7ba307a27a8ef30bf0b26ba91bfb89e932 0 1598439358578 4 connected
b6add5e06fd958045f90f29bcbbf219753798ef6 172.38.0.16:6379@16379 slave 7684dfd02929085817de59f334d241e6cbcd1e99 0 1598439358578 6 connected
7684dfd02929085817de59f334d241e6cbcd1e99 172.38.0.12:6379@16379 master - 0 1598439360082 2 connected 5461-10922
db3caa7ba307a27a8ef30bf0b26ba91bfb89e932 172.38.0.13:6379@16379 master - 0 1598439359079 3 connected 10923-16383
Simple test on high availability of redis cluster
127.0.0.1:6379> set msg "I Love YHH"	//Set value
-> Redirected to slot [6257] located at 172.38.0.12:6379
OK
172.38.0.12:6379> get msg	//Value
"I Love YHH"

//New window
//Using docker stop to simulate the downtime of redis host storing msg value
[root@localhost /]# docker ps
CONTAINER ID   IMAGE                    COMMAND                  CREATED          STATUS          PORTS                                              NAMES
430f29b7fdd2   redis:5.0.9-alpine3.11   "docker-entrypoint.s..."   12 minutes ago   Up 12 minutes   0.0.0.0:6376->6379/tcp, 0.0.0.0:16376->16379/tcp   redis-6
343b4d098652   redis:5.0.9-alpine3.11   "docker-entrypoint.s..."   12 minutes ago   Up 12 minutes   0.0.0.0:6375->6379/tcp, 0.0.0.0:16375->16379/tcp   redis-5
f2ce7d2db9ba   redis:5.0.9-alpine3.11   "docker-entrypoint.s..."   12 minutes ago   Up 12 minutes   0.0.0.0:6374->6379/tcp, 0.0.0.0:16374->16379/tcp   redis-4
7411b8f6c7d5   redis:5.0.9-alpine3.11   "docker-entrypoint.s..."   12 minutes ago   Up 12 minutes   0.0.0.0:6373->6379/tcp, 0.0.0.0:16373->16379/tcp   redis-3
b7a12d144758   redis:5.0.9-alpine3.11   "docker-entrypoint.s..."   12 minutes ago   Up 12 minutes   0.0.0.0:6372->6379/tcp, 0.0.0.0:16372->16379/tcp   redis-2
d7ce020b171e   redis:5.0.9-alpine3.11   "docker-entrypoint.s..."   13 minutes ago   Up 13 minutes   0.0.0.0:6371->6379/tcp, 0.0.0.0:16371->16379/tcp   redis-1

[root@localhost /]# docker stop redis-2
redis-2

//Get the message from the cluster interface and try again
172.38.0.12:6379> get msg
Could not connect to Redis at 172.38.0.12:6379: Host is unreachable
(7.10s)
not connected> exit
/data # exit
[root@localhost conf]# docker exec -it redis-1 /bin/sh
/data # redis-cli -c
127.0.0.1:6379> get msg	//At this time, the standby machine returns msg
-> Redirected to slot [6257] located at 172.38.0.16:6379
"I Love YHH"
Node information
172.38.0.16:6379> cluster nodes
c040bae27420e3fe503d79cad47816123462262a 172.38.0.13:6379@16379 master - 0 1618385704146 3 connected 10923-16383
b0cf655ea86ff16e2c6f9a82f3d9f1a3d7dc7c62 172.38.0.12:6379@16379 master,fail - 1618385356051 1618385354000 2 connected
20a534198c68dd48b5a533b0ee4b1d447cc6b1f6 172.38.0.15:6379@16379 slave af21836f327964924ddfd99eadd0f86c4be2b998 0 1618385703038 5 connected
24bf6f3296119d93f82232555784bbdb1a72697e 172.38.0.14:6379@16379 slave c040bae27420e3fe503d79cad47816123462262a 0 1618385703139 4 connected
65d83f48f4884e26dc986a60cc03aa33e22dd48a 172.38.0.16:6379@16379 myself,master - 0 1618385702000 8 connected 5461-10922
af21836f327964924ddfd99eadd0f86c4be2b998 172.38.0.11:6379@16379 master - 0 1618385702000 1 connected 0-5460
docker set up the redis cluster!
After we use docker, all technologies will gradually become simpler!
Actual operation
[root@localhost tomcat]# docker network create redis --subnet 172.38.0.0/16
ab1607a9953d571bc29eb87c58a7a422b742622b79349421fe3b1d5d84d2c309
[root@localhost tomcat]# docker network ls
NETWORK ID     NAME      DRIVER    SCOPE
4b16ee2d6925   bridge    bridge    local
eedd07789e82   host      host      local
9b2a5d2f9fe7   mynet     bridge    local
48629cdb554a   none      null      local
ab1607a9953d   redis     bridge    local
[root@localhost tomcat]# for port in $(seq 1 6);\
> do \
> mkdir -p /mydata/redis/node-${port}/conf
> touch /mydata/redis/node-${port}/conf/redis.conf
> cat << EOF >> /mydata/redis/node-${port}/conf/redis.conf
> port 6379
> bind 0.0.0.0
> cluster-enabled yes
> cluster-config-file nodes.conf
> cluster-node-timeout 5000
> cluster-announce-ip 172.38.0.1${port}
> cluster-announce-port 6379
> cluster-announce-bus-port 16379
> appendonly yes
> EOF
> done
[root@localhost tomcat]# cd /mydata/
[root@localhost mydata]# ls
redis
[root@localhost mydata]# cd redis/
[root@localhost redis]# ls
node-1  node-2  node-3  node-4  node-5  node-6
[root@localhost redis]# cd node-1
[root@localhost node-1]# ls
conf
[root@localhost node-1]# cd conf/
[root@localhost conf]# ls
redis.conf
[root@localhost conf]# cat redis.conf
port 6379
bind 0.0.0.0
cluster-enabled yes
cluster-config-file nodes.conf
cluster-node-timeout 5000
cluster-announce-ip 172.38.0.11
cluster-announce-port 6379
cluster-announce-bus-port 16379
appendonly yes

[root@localhost conf]# docker run -p 6371:6379 -p 16371:16379 --name redis-1 \
>  -v /mydata/redis/node-1/data:/data \
>  -v /mydata/redis/node-1/conf/redis.conf:/etc/redis/redis.conf \
>  -d --net redis --ip 172.38.0.11 redis:5.0.9-alpine3.11 redis-server /etc/redis/redis.conf
Unable to find image 'redis:5.0.9-alpine3.11' locally
5.0.9-alpine3.11: Pulling from library/redis
cbdbe7a5bc2a: Pull complete
dc0373118a0d: Pull complete
cfd369fe6256: Pull complete
3e45770272d9: Pull complete
558de8ea3153: Pull complete
a2c652551612: Pull complete
Digest: sha256:83a3af36d5e57f2901b4783c313720e5fa3ecf0424ba86ad9775e06a9a5e35d0
Status: Downloaded newer image for redis:5.0.9-alpine3.11
d7ce020b171e560c48948a714871f88a39ea8fb2d81aace566990a3174d9dee8
[root@localhost conf]# docker run -p 6372:6379 -p 16372:16379 --name redis-2 \
>  -v /mydata/redis/node-2/data:/data \
>  -v /mydata/redis/node-2/conf/redis.conf:/etc/redis/redis.conf \
>  -d --net redis --ip 172.38.0.12 redis:5.0.9-alpine3.11 redis-server /etc/redis/redis.conf
b7a12d144758968a6124d5ac42bac61264f428a72588e942d4827737d71a64bd
[root@localhost conf]# docker run -p 6373:6379 -p 16373:16379 --name redis-3 \
>  -v /mydata/redis/node-3/data:/data \
>  -v /mydata/redis/node-3/conf/redis.conf:/etc/redis/redis.conf \
>  -d --net redis --ip 172.38.0.13 redis:5.0.9-alpine3.11 redis-server /etc/redis/redis.conf
7411b8f6c7d5ab059941fb2a0a3f82ed5b02fb8f3554082f112e411019424dce
[root@localhost conf]# docker run -p 6374:6379 -p 16374:16379 --name redis-4 \
>  -v /mydata/redis/node-4data:/data \
>  -v /mydata/redis/node-4/conf/redis.conf:/etc/redis/redis.conf \
>  -d --net redis --ip 172.38.0.14 redis:5.0.9-alpine3.11 redis-server /etc/redis/redis.conf
f2ce7d2db9ba756121715672fef55cfd4dfd92574cb1b1798dc91db0ae815ee5
[root@localhost conf]# docker run -p 6375:6379 -p 16375:16379 --name redis-5 \
>  -v /mydata/redis/node-5/data:/data \
>  -v /mydata/redis/node-5/conf/redis.conf:/etc/redis/redis.conf \
>  -d --net redis --ip 172.38.0.15 redis:5.0.9-alpine3.11 redis-server /etc/redis/redis.conf
343b4d0986529851a89d5afb78bc523deb0e7b56d7709e30c4440746cd749211
[root@localhost conf]# docker run -p 6376:6379 -p 16376:16379 --name redis-6 \
>  -v /mydata/redis/node-6/data:/data \
>  -v /mydata/redis/node-6/conf/redis.conf:/etc/redis/redis.conf \
>  -d --net redis --ip 172.38.0.16 redis:5.0.9-alpine3.11 redis-server /etc/redis/redis.conf
430f29b7fdd2ea2e11d08f8c5bbdf9f708b69f7ddcda86f6201acc63e7776746
[root@localhost conf]# docker ps
CONTAINER ID   IMAGE                    COMMAND                  CREATED              STATUS              PORTS                                              NAMES
430f29b7fdd2   redis:5.0.9-alpine3.11   "docker-entrypoint.s..."   About a minute ago   Up About a minute   0.0.0.0:6376->6379/tcp, 0.0.0.0:16376->16379/tcp   redis-6
343b4d098652   redis:5.0.9-alpine3.11   "docker-entrypoint.s..."   About a minute ago   Up About a minute   0.0.0.0:6375->6379/tcp, 0.0.0.0:16375->16379/tcp   redis-5
f2ce7d2db9ba   redis:5.0.9-alpine3.11   "docker-entrypoint.s..."   About a minute ago   Up About a minute   0.0.0.0:6374->6379/tcp, 0.0.0.0:16374->16379/tcp   redis-4
7411b8f6c7d5   redis:5.0.9-alpine3.11   "docker-entrypoint.s..."   About a minute ago   Up About a minute   0.0.0.0:6373->6379/tcp, 0.0.0.0:16373->16379/tcp   redis-3
b7a12d144758   redis:5.0.9-alpine3.11   "docker-entrypoint.s..."   About a minute ago   Up About a minute   0.0.0.0:6372->6379/tcp, 0.0.0.0:16372->16379/tcp   redis-2
d7ce020b171e   redis:5.0.9-alpine3.11   "docker-entrypoint.s..."   2 minutes ago        Up About a minute   0.0.0.0:6371->6379/tcp, 0.0.0.0:16371->16379/tcp   redis-1
[root@localhost conf]# docker exec -it redis-1 /bin/sh
/data # ls
appendonly.aof  nodes.conf
/data # redis-cli --cluster create 172.38.0.11:6379 172.38.0.12:6379 \
> 172.38.0.13:6379 172.38.0.14:6379 172.38.0.15:6379 \
> 172.38.0.16:6379 --cluster-replicas 1
>>> Performing hash slots allocation on 6 nodes...
Master[0] -> Slots 0 - 5460
Master[1] -> Slots 5461 - 10922
Master[2] -> Slots 10923 - 16383
Adding replica 172.38.0.15:6379 to 172.38.0.11:6379
Adding replica 172.38.0.16:6379 to 172.38.0.12:6379
Adding replica 172.38.0.14:6379 to 172.38.0.13:6379
M: af21836f327964924ddfd99eadd0f86c4be2b998 172.38.0.11:6379
   slots:[0-5460] (5461 slots) master
M: b0cf655ea86ff16e2c6f9a82f3d9f1a3d7dc7c62 172.38.0.12:6379
   slots:[5461-10922] (5462 slots) master
M: c040bae27420e3fe503d79cad47816123462262a 172.38.0.13:6379
   slots:[10923-16383] (5461 slots) master
S: 24bf6f3296119d93f82232555784bbdb1a72697e 172.38.0.14:6379
   replicates c040bae27420e3fe503d79cad47816123462262a
S: 20a534198c68dd48b5a533b0ee4b1d447cc6b1f6 172.38.0.15:6379
   replicates af21836f327964924ddfd99eadd0f86c4be2b998
S: 65d83f48f4884e26dc986a60cc03aa33e22dd48a 172.38.0.16:6379
   replicates b0cf655ea86ff16e2c6f9a82f3d9f1a3d7dc7c62
Can I set the above configuration? (type 'yes' to accept): yes
>>> Nodes configuration updated
>>> Assign a different config epoch to each node
>>> Sending CLUSTER MEET messages to join the cluster
Waiting for the cluster to join
...
>>> Performing Cluster Check (using node 172.38.0.11:6379)
M: af21836f327964924ddfd99eadd0f86c4be2b998 172.38.0.11:6379
   slots:[0-5460] (5461 slots) master
   1 additional replica(s)
S: 20a534198c68dd48b5a533b0ee4b1d447cc6b1f6 172.38.0.15:6379
   slots: (0 slots) slave
   replicates af21836f327964924ddfd99eadd0f86c4be2b998
S: 65d83f48f4884e26dc986a60cc03aa33e22dd48a 172.38.0.16:6379
   slots: (0 slots) slave
   replicates b0cf655ea86ff16e2c6f9a82f3d9f1a3d7dc7c62
S: 24bf6f3296119d93f82232555784bbdb1a72697e 172.38.0.14:6379
   slots: (0 slots) slave
   replicates c040bae27420e3fe503d79cad47816123462262a
M: b0cf655ea86ff16e2c6f9a82f3d9f1a3d7dc7c62 172.38.0.12:6379
   slots:[5461-10922] (5462 slots) master
   1 additional replica(s)
M: c040bae27420e3fe503d79cad47816123462262a 172.38.0.13:6379
   slots:[10923-16383] (5461 slots) master
   1 additional replica(s)
[OK] All nodes agree about slots configuration.
>>> Check for open slots...
>>> Check slots coverage...
[OK] All 16384 slots covered.
/data # redis-cli -c
127.0.0.1:6379> cluster info
cluster_state:ok
cluster_slots_assigned:16384
cluster_slots_ok:16384
cluster_slots_pfail:0
cluster_slots_fail:0
cluster_known_nodes:6
cluster_size:3
cluster_current_epoch:6
cluster_my_epoch:1
cluster_stats_messages_ping_sent:382
cluster_stats_messages_pong_sent:382
cluster_stats_messages_sent:764
cluster_stats_messages_ping_received:377
cluster_stats_messages_pong_received:382
cluster_stats_messages_meet_received:5
cluster_stats_messages_received:764
127.0.0.1:6379> cluster nodes
20a534198c68dd48b5a533b0ee4b1d447cc6b1f6 172.38.0.15:6379@16379 slave af21836f327964924ddfd99eadd0f86c4be2b998 0 1618384814088 5 connected
65d83f48f4884e26dc986a60cc03aa33e22dd48a 172.38.0.16:6379@16379 slave b0cf655ea86ff16e2c6f9a82f3d9f1a3d7dc7c62 0 1618384814589 6 connected
af21836f327964924ddfd99eadd0f86c4be2b998 172.38.0.11:6379@16379 myself,master - 0 1618384814000 1 connected 0-5460
24bf6f3296119d93f82232555784bbdb1a72697e 172.38.0.14:6379@16379 slave c040bae27420e3fe503d79cad47816123462262a 0 1618384814000 4 connected
b0cf655ea86ff16e2c6f9a82f3d9f1a3d7dc7c62 172.38.0.12:6379@16379 master - 0 1618384815096 2 connected 5461-10922
c040bae27420e3fe503d79cad47816123462262a 172.38.0.13:6379@16379 master - 0 1618384814589 3 connected 10923-16383

# The following is a brief summary of the high availability test of redis cluster
SpringBoot microservice packaging Docker image
1. Building a SpringBoot project
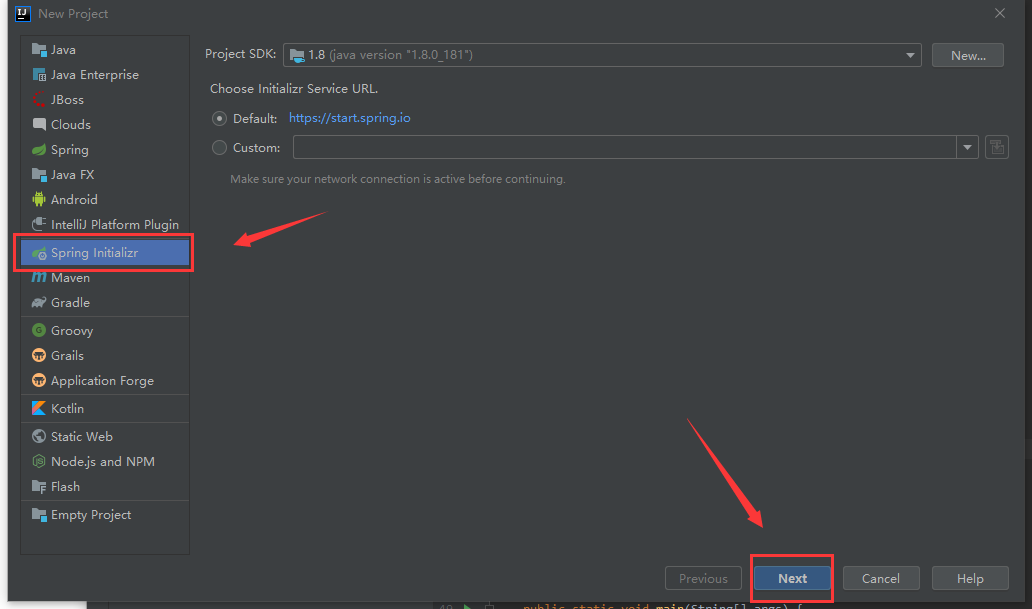
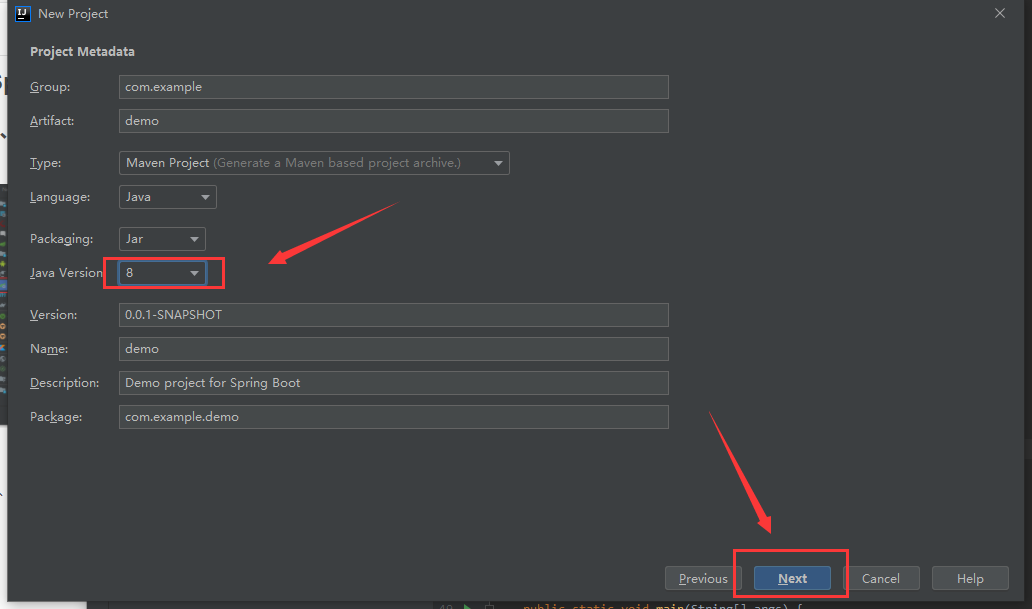
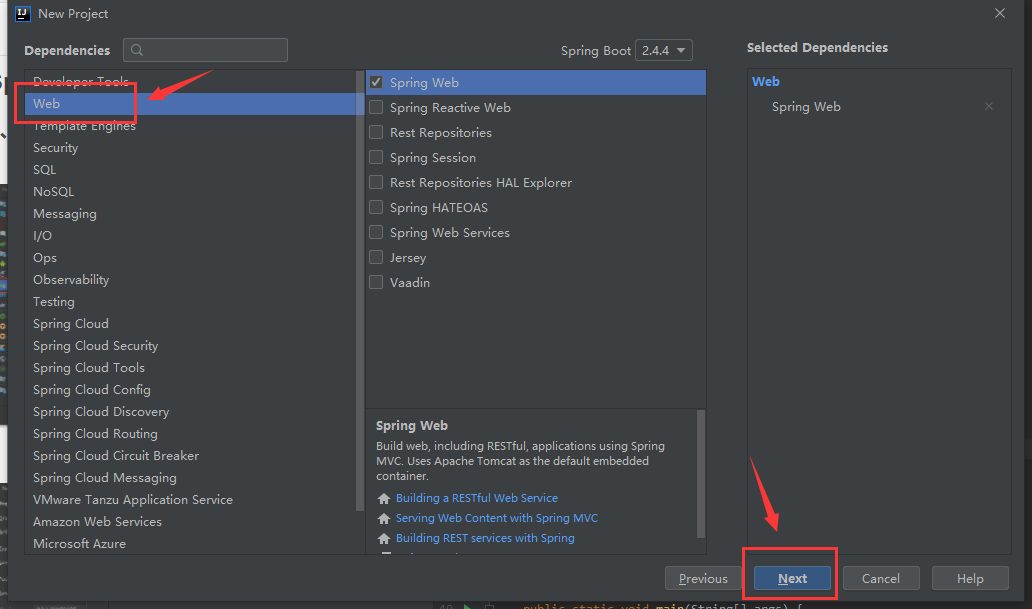
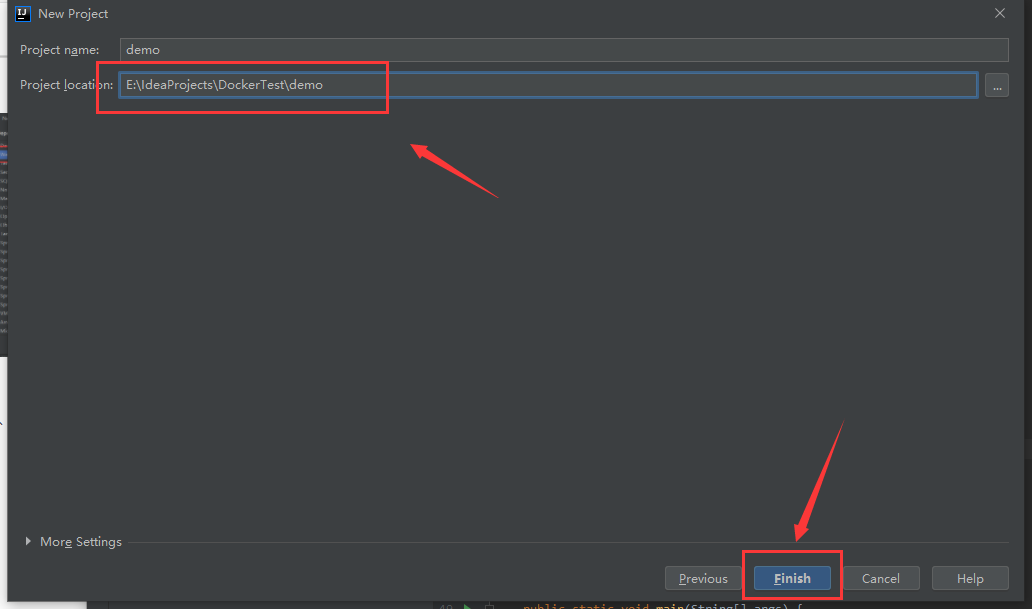
Configuration sporadic
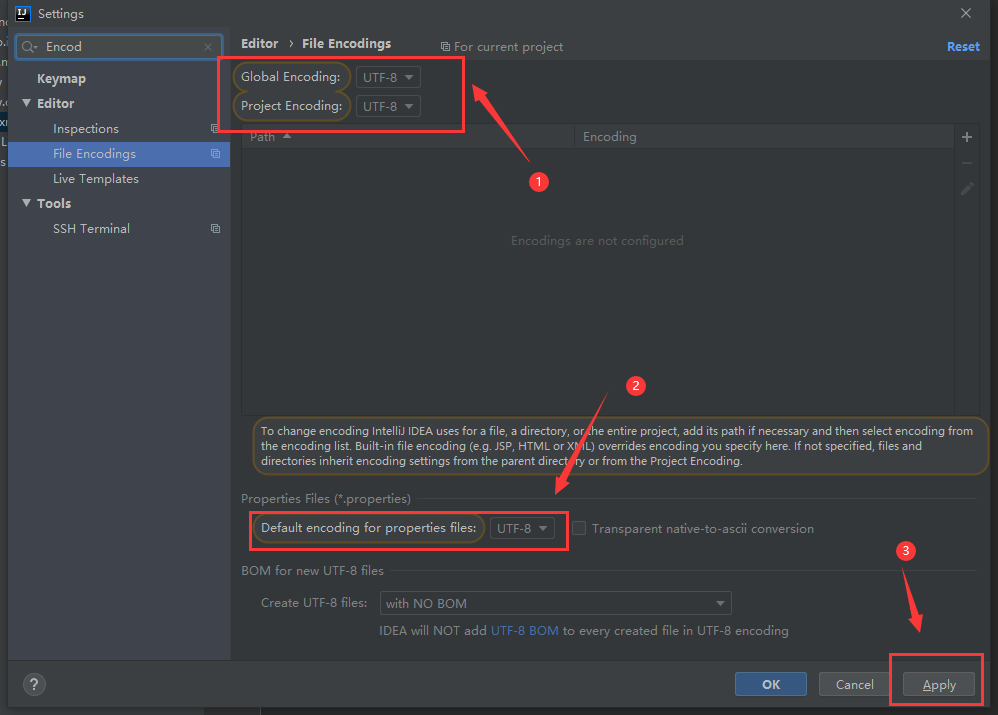
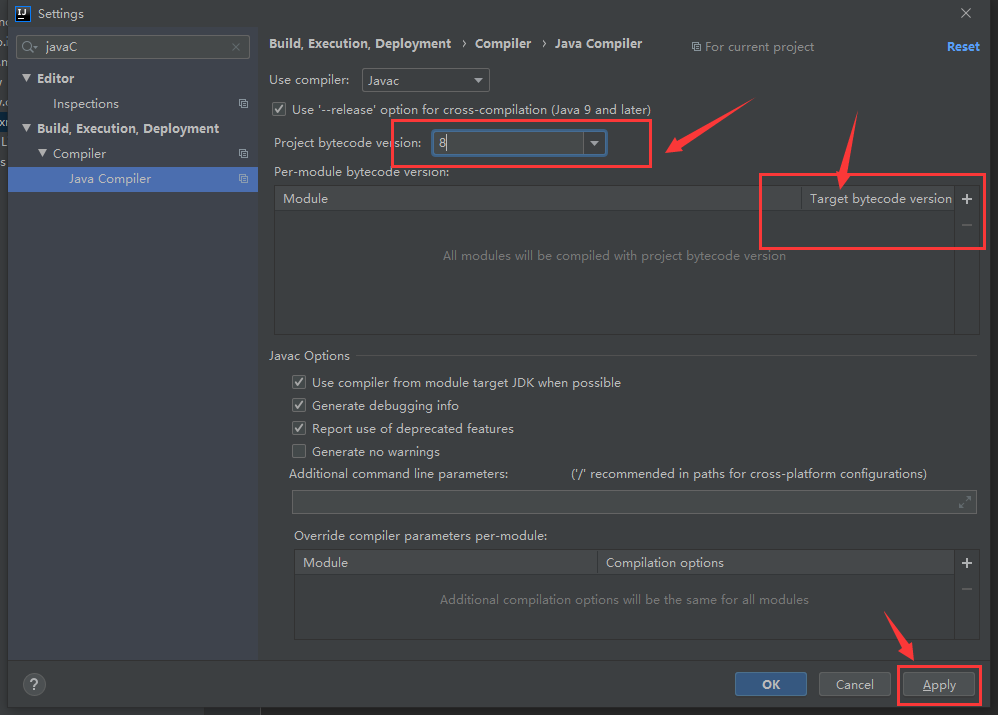
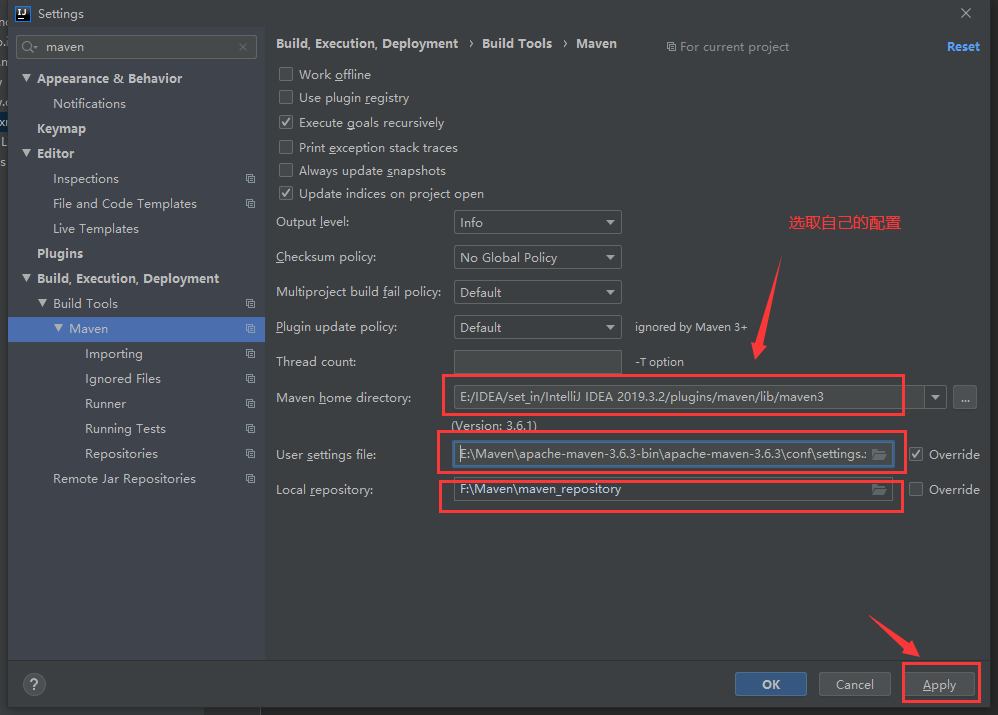
Programming
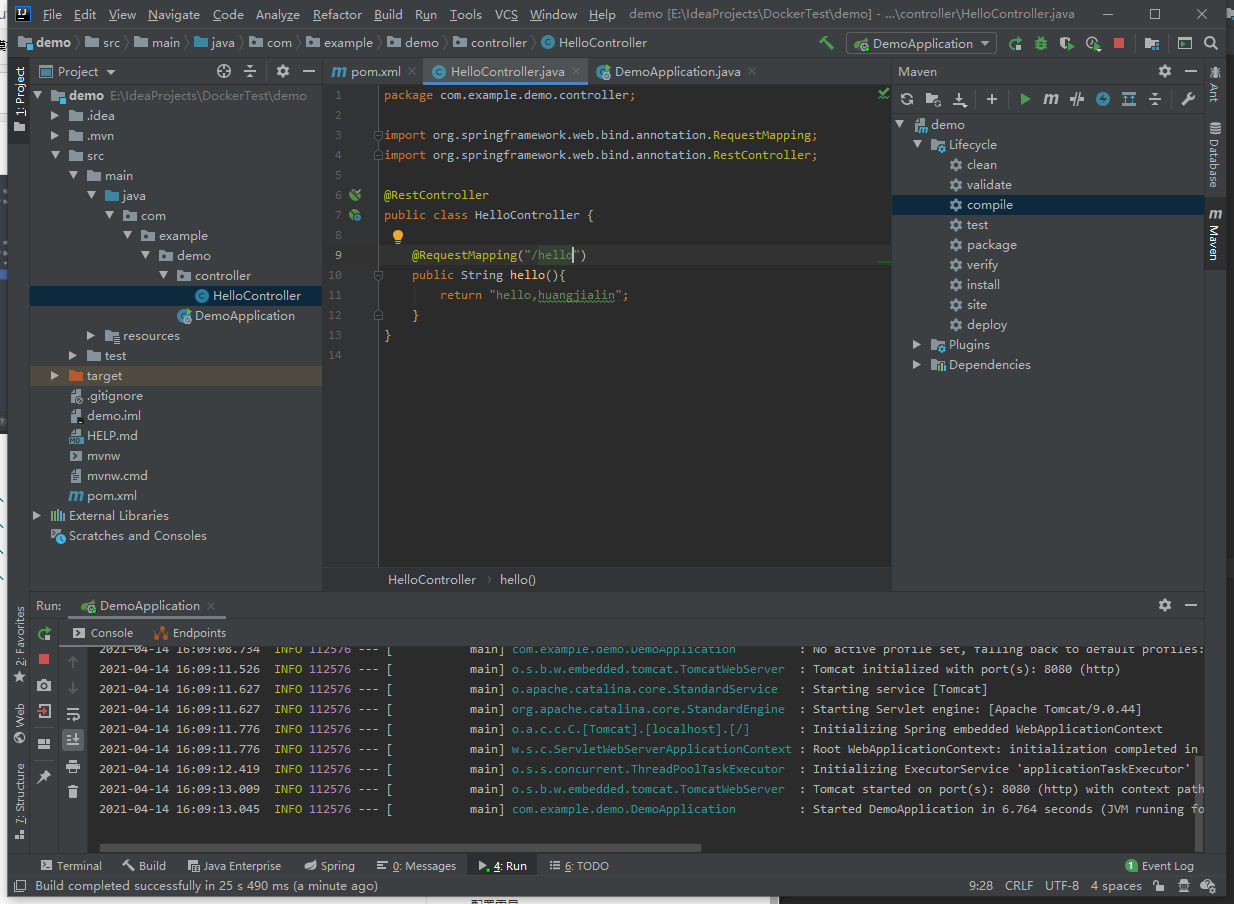
package com.example.demo.controller;

import org.springframework.web.bind.annotation.RequestMapping;
import org.springframework.web.bind.annotation.RestController;

@RestController
public class HelloController {

    @RequestMapping("/hello")
    public String hello(){
        return "hello,huangjialin";
    }
}
Start test
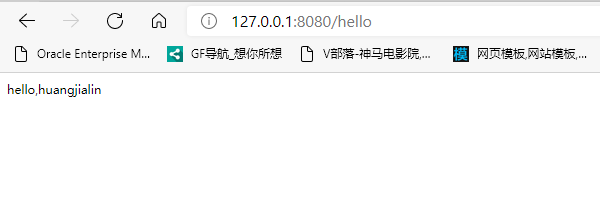
2. Package run
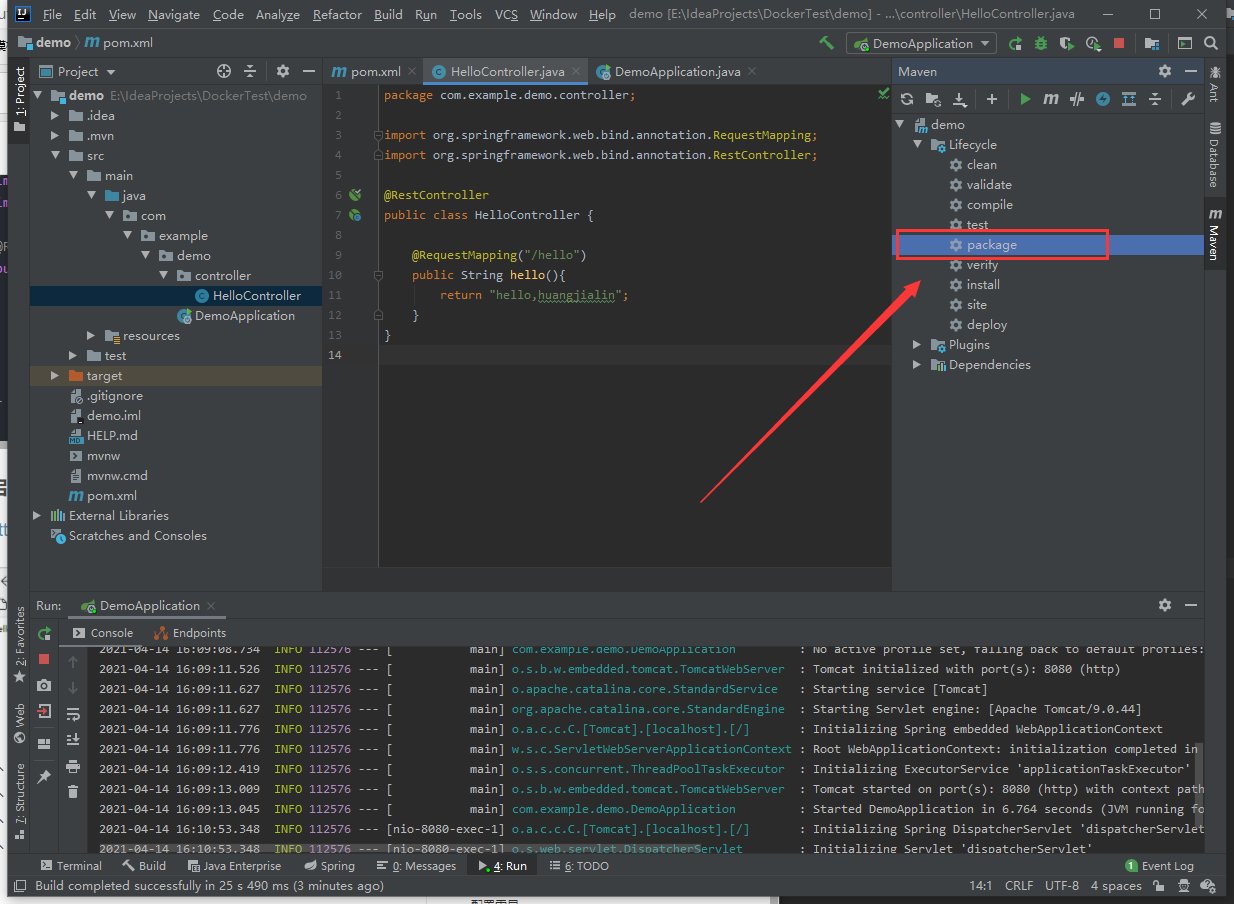
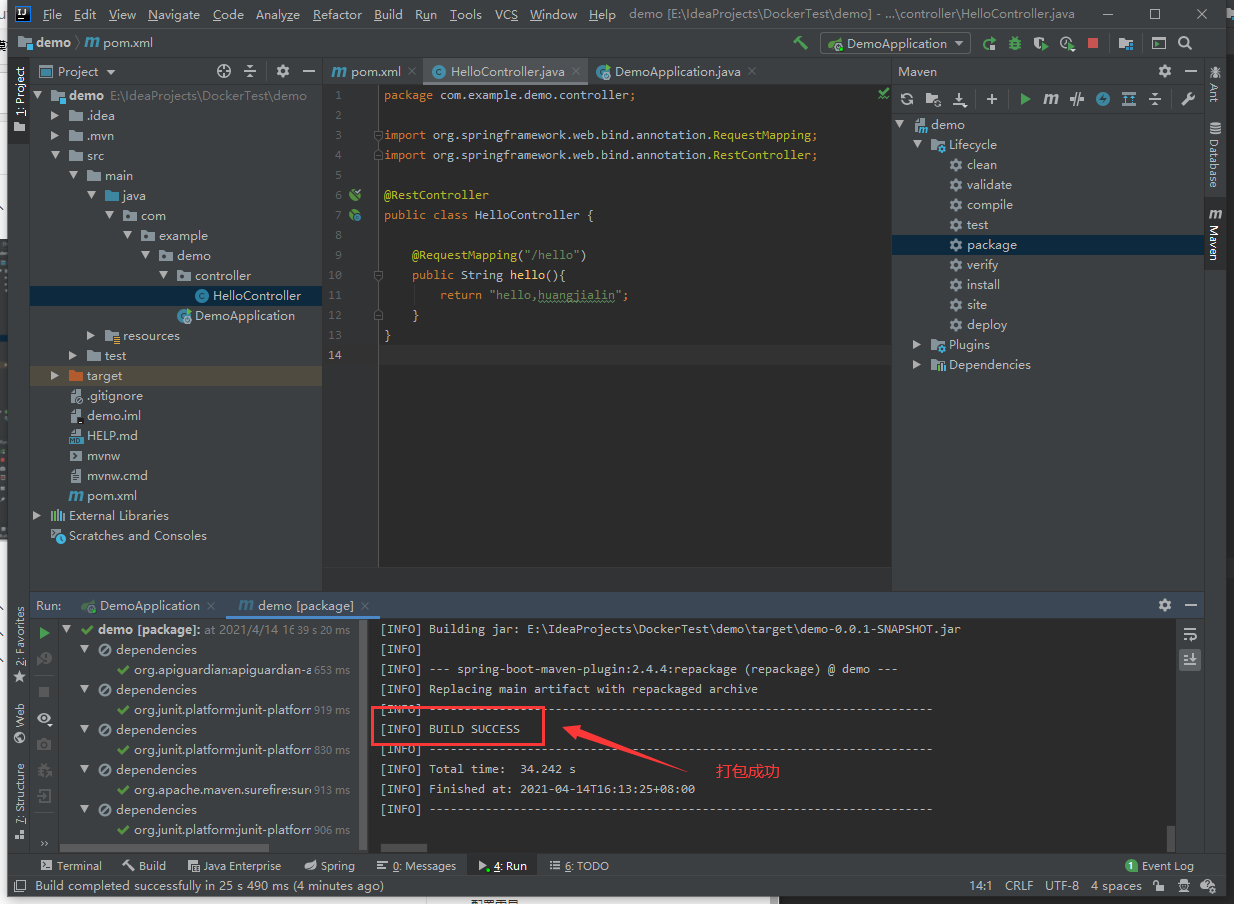
Local test
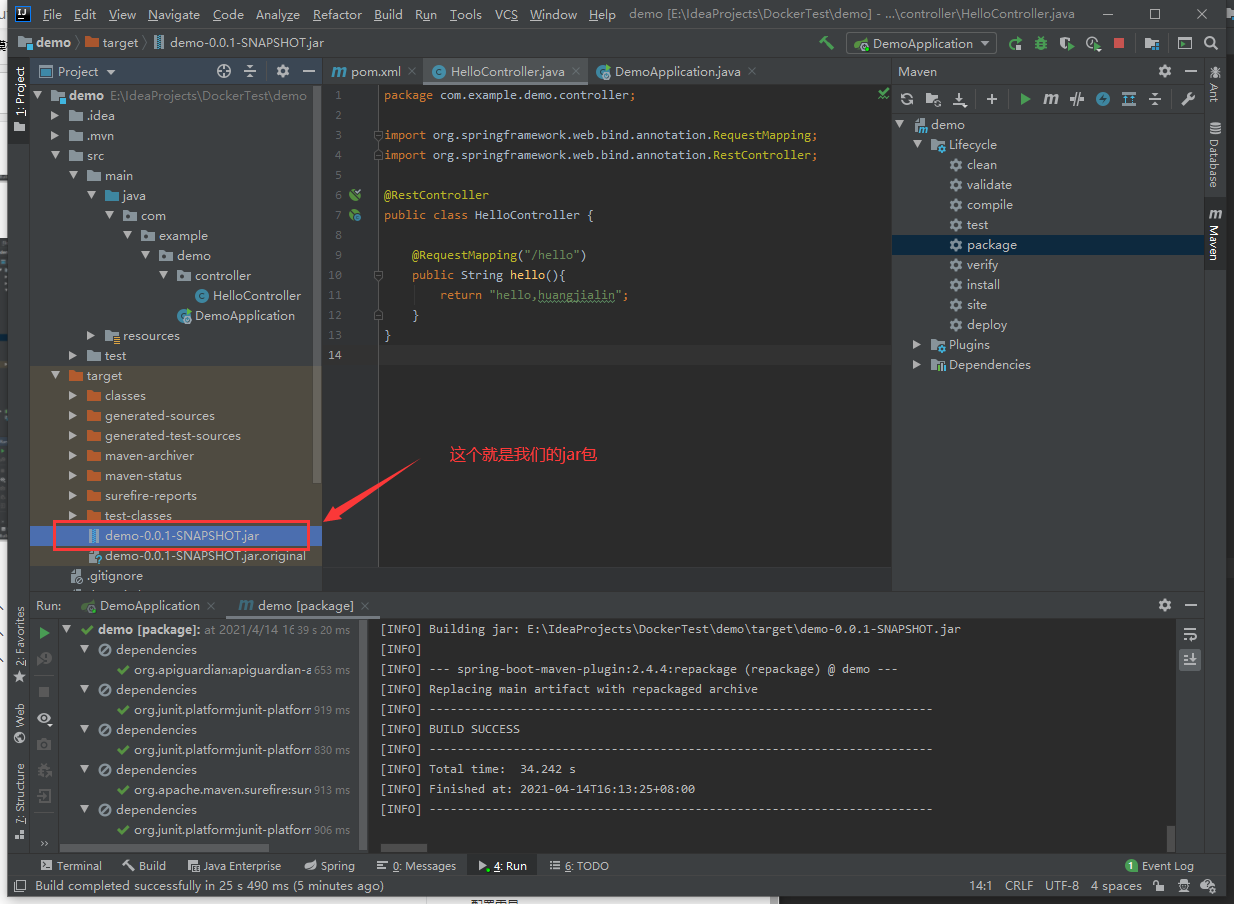
File address found
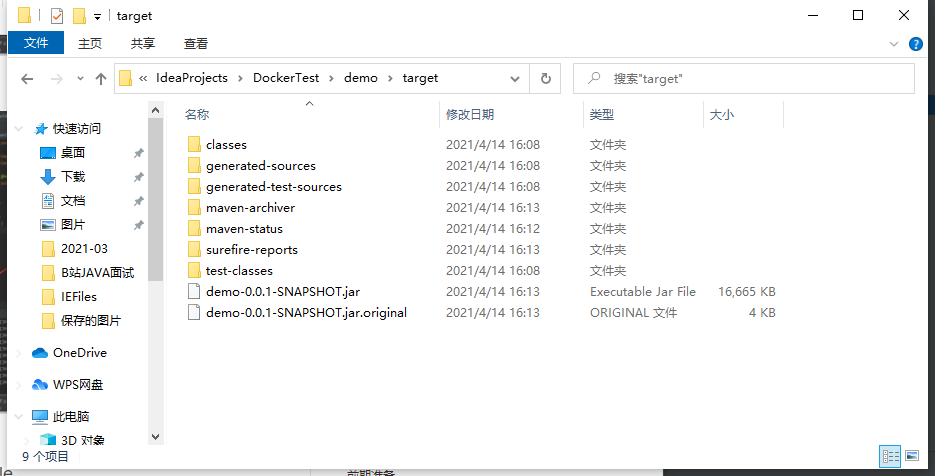
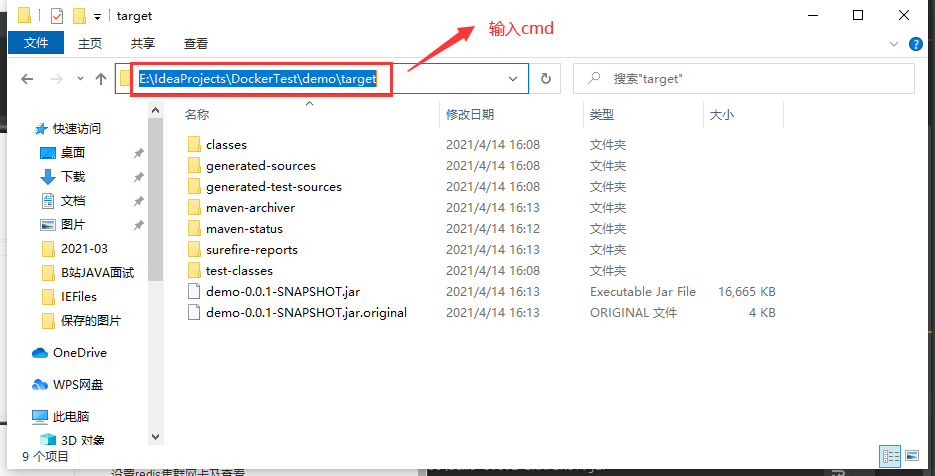
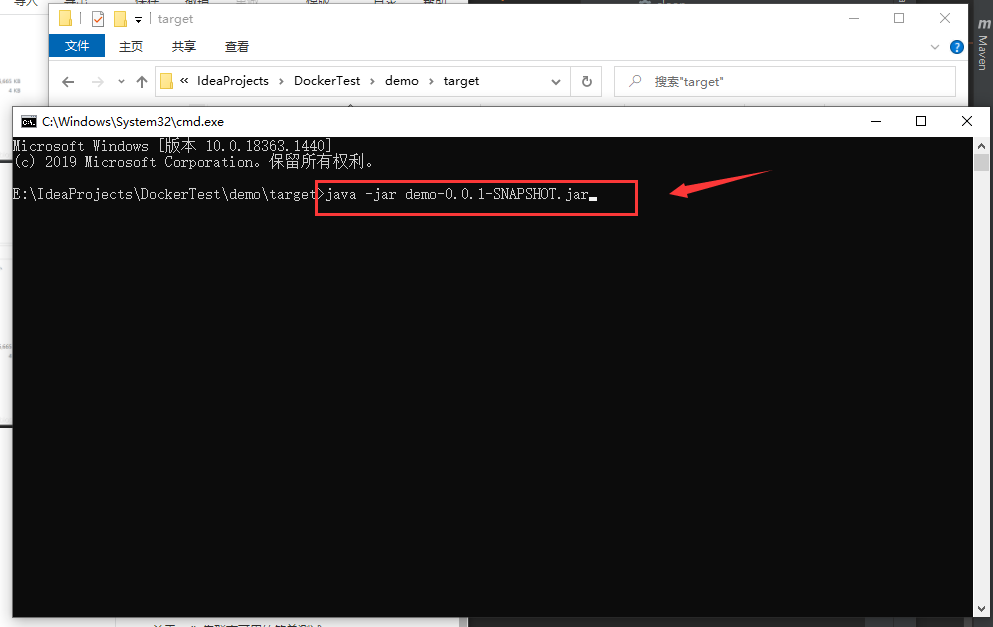
Start successful
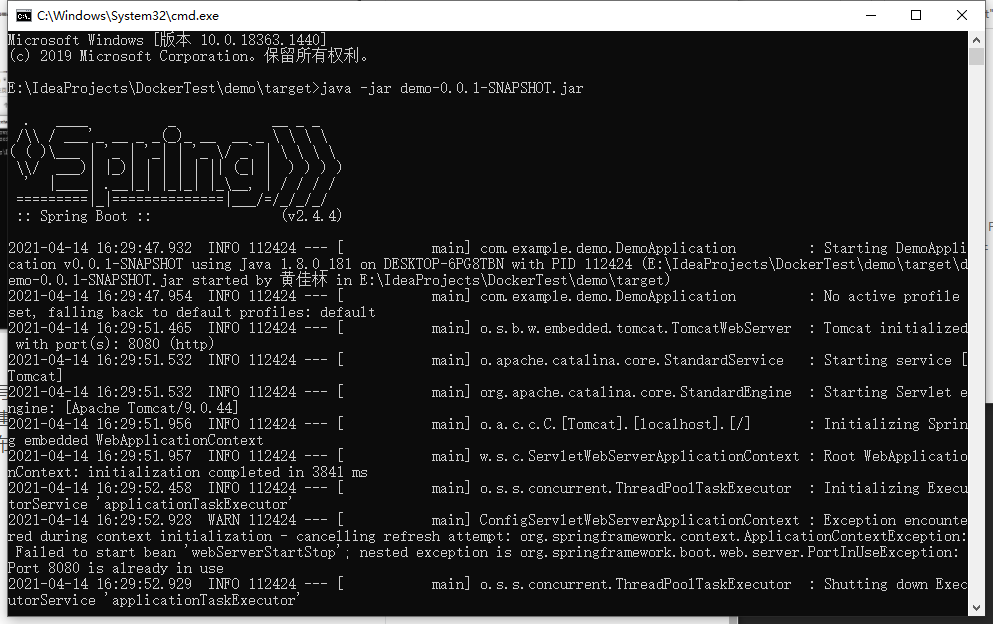
Install plug-ins
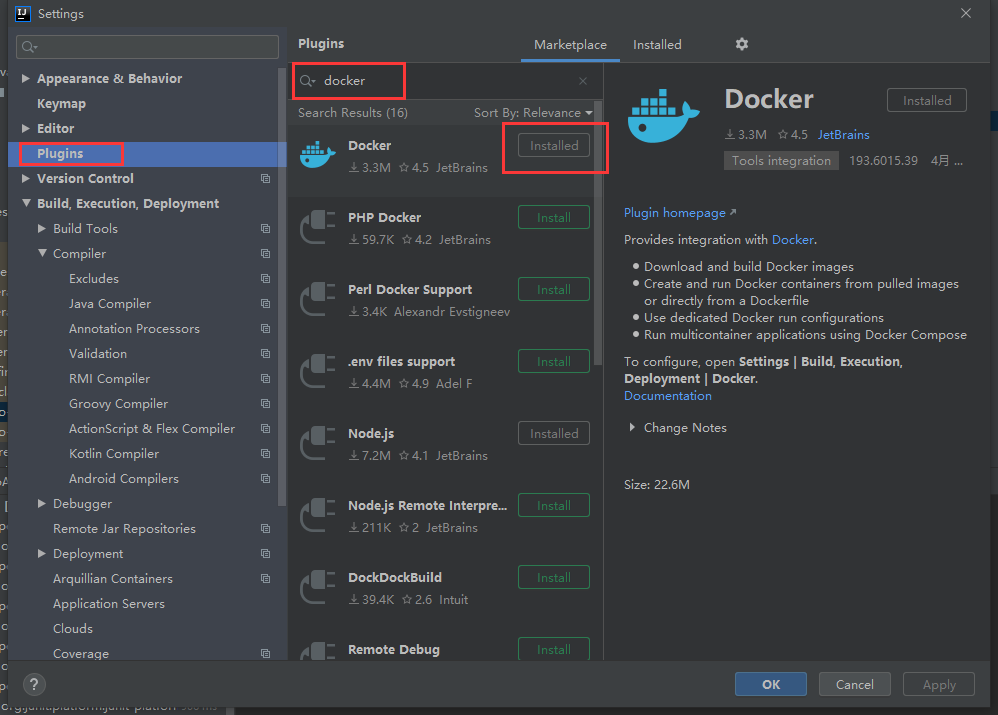
You can also link to a remote warehouse here
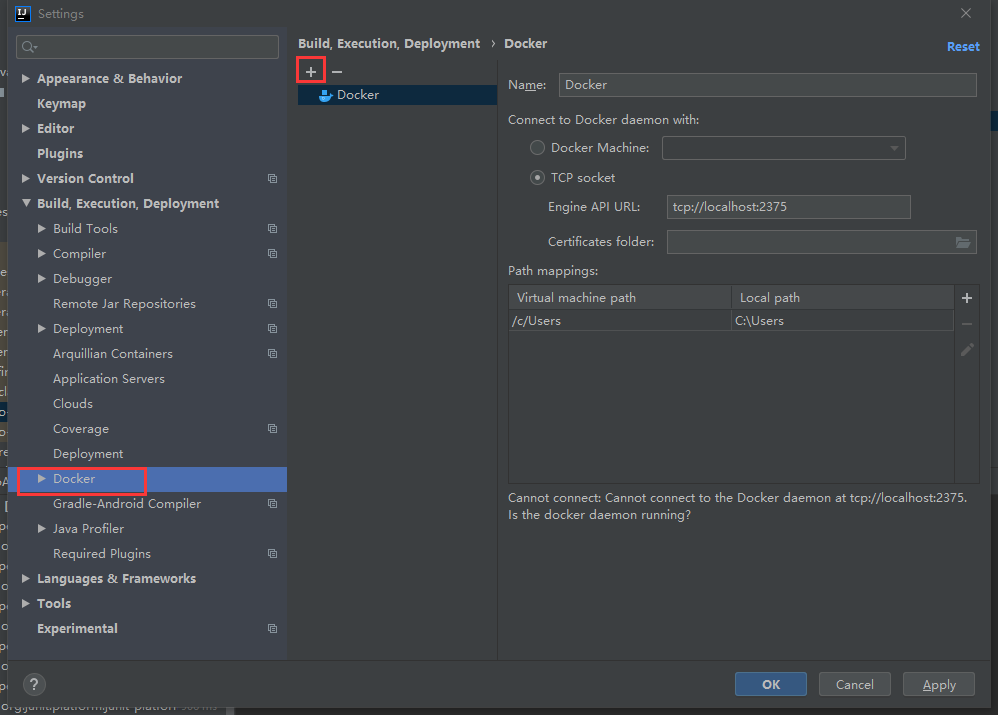
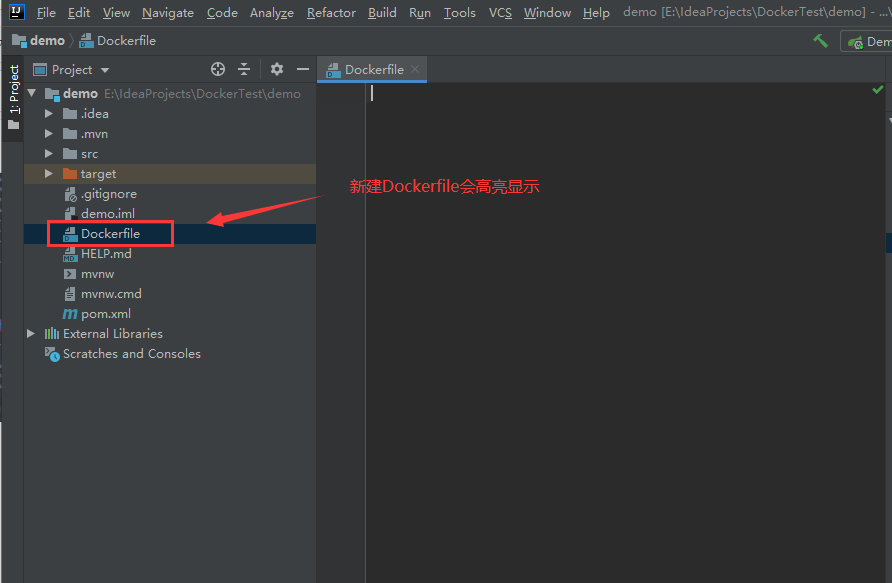
3. Write dockerfile
FROM java:8
COPY *.jar /app.jar
CMD ["--server.port=8080"]
EXPOSE 8080
ENTRYPOINT ["java","-jar","app.jar"]
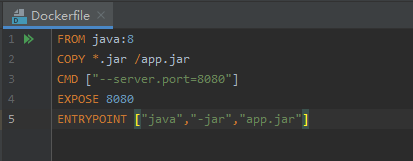
linux operation
Stop all containers
172.38.0.16:6379> exit
/data # exit
[root@localhost conf]# docker rm -f $(docker ps -qa)
430f29b7fdd2
343b4d098652
f2ce7d2db9ba
7411b8f6c7d5
b7a12d144758
d7ce020b171e
[root@localhost conf]#
New directory idea
[root@localhost conf]# cd /home
[root@localhost home]# ls
ceshi  dockerfile  docker-test-volume  huang.java  huangjialin  huang.txt  mylinux  mysql  test.java  testTmp
[root@localhost home]# mkdir idea
[root@localhost home]# ls
ceshi  dockerfile  docker-test-volume  huang.java  huangjialin  huang.txt  idea  mylinux  mysql  test.java  testTmp
[root@localhost home]# cd idea/
[root@localhost idea]# ls
file transfer
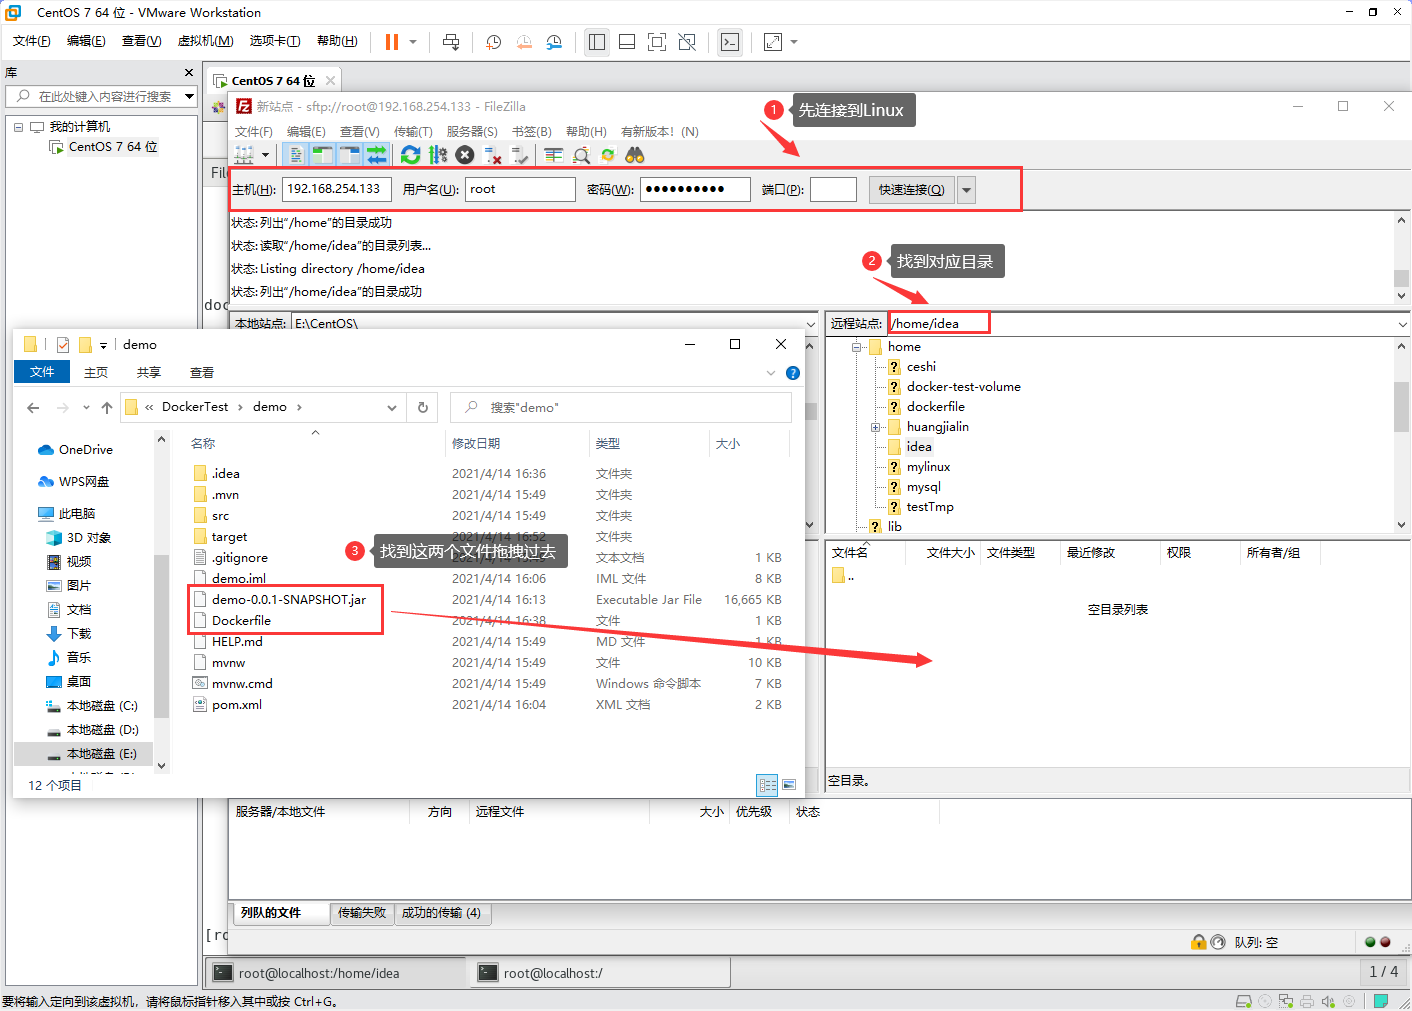
Upload successful
[root@localhost idea]# ls
demo-0.0.1-SNAPSHOT.jar  Dockerfile
[root@localhost idea]# ll
total 16672
-rw-r--r--. 1 root root 17064575 Apr 14 01:54 demo-0.0.1-SNAPSHOT.jar
-rw-r--r--. 1 root root      111 Apr 14 01:54 Dockerfile
4. Build image
[root@localhost idea]# docker build -t huangjialin666 .
Sending build context to Docker daemon  17.07MB
Step 1/5 : FROM java:8
8: Pulling from library/java
5040bd298390: Pull complete
fce5728aad85: Pull complete
76610ec20bf5: Pull complete
60170fec2151: Pull complete
e98f73de8f0d: Pull complete
11f7af24ed9c: Pull complete
49e2d6393f32: Pull complete
bb9cdec9c7f3: Pull complete
Digest: sha256:c1ff613e8ba25833d2e1940da0940c3824f03f802c449f3d1815a66b7f8c0e9d
Status: Downloaded newer image for java:8
 ---> d23bdf5b1b1b
Step 2/5 : COPY *.jar /app.jar
 ---> ca5673d370bc
Step 3/5 : CMD ["--server.port=8080"]
 ---> Running in a62e4ab48902
Removing intermediate container a62e4ab48902
 ---> f341490d9232
Step 4/5 : EXPOSE 8080
 ---> Running in 1fbd25817932
Removing intermediate container 1fbd25817932
 ---> 1aba2bcfb483
Step 5/5 : ENTRYPOINT ["java","-jar","app.jar"]
 ---> Running in 980468eb1893
Removing intermediate container 980468eb1893
 ---> 5285ac7f6cbc
Successfully built 5285ac7f6cbc
Successfully tagged huangjialin666:latest

[root@localhost idea]# docker images
REPOSITORY             TAG                IMAGE ID       CREATED          SIZE
huangjialin666         latest             5285ac7f6cbc   52 seconds ago   660MB
5. Publish run
[root@localhost idea]# docker run -d -P --name huangjialin-springboot-web huangjialin666
7621b33ce6b8d30c7c44362897f11cc4d9cbffc493852ed2adc8190848c56008
[root@localhost idea]# docker ps
CONTAINER ID   IMAGE            COMMAND                  CREATED          STATUS          PORTS                     NAMES
7621b33ce6b8   huangjialin666   "java -jar app.jar -..."   57 seconds ago   Up 49 seconds   0.0.0.0:49157->8080/tcp   huangjialin-springboot-web
[root@localhost idea]# curl 127.0.0.1:49157
{"timestamp":"2021-04-14T09:09:35.052+00:00","status":404,"error":"Not Found","message":"","path":"/"}[root@localhost idea]#
[root@localhost idea]# curl 127.0.0.1:49157/hello
hello,huangjialin[root@localhost idea]#
Test successful
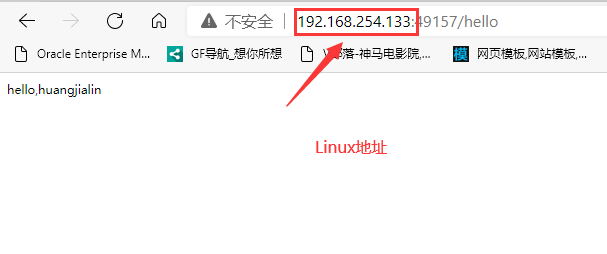
In the future, after we use Docker, we can deliver it to others as an image!