vue summary
VUE Foundation
1, What is vue
The official concept is that Vue (similar to View) is a front-end framework for building user interfaces

- Build user interface
- It is very convenient to fill data into html pages with Vue
- frame
- Framework is a ready-made solution. Programmers can only abide by the specifications of the framework and write their own business functions
- vue to learn is the usage specified in the vue framework!
- Vue's instructions, components (reuse of UI structure), routing, Vuex and Vue component libraries
2, Two features of Vue
-
Data driven view
- Changes in data drive the view to update automatically
- The advantage is: programmers just maintain the data, and the page structure will be vue automatically rendered
-
Bidirectional binding of data
In the web page. form is responsible for collecting data, and ajax is responsible for submitting data
- Changes in JavaScript data will be automatically rendered to the page
- When the data collected by the form on the page changes, it will be automatically obtained by vue and updated to js data
Note: the underlying principle of data-driven View and bidirectional data binding is MVVM (Mode data source, View view and ViewModel are examples of vue)
3, vue instructions
-
Instructions for content rendering
- Disadvantage of the V-text: Instruction: it overwrites the original content inside the element
 <!-- hope Vue Can control the following div,Help us fill in the data div inside -->
  <div id="app">
    <p v-text="username"></p>
    <p v-text="gender">Gender:</p>
  </div>

  <!-- 1. Import Vue Library files, in window The overall situation will be there Vue This constructor -->
  <script src="./lib/vue-2.6.12.js"></script>
  <!-- 2. establish Vue Instance object for -->
  <script>
    // Create an instance object of Vue
    const vm = new Vue({
      // The el attribute is written in a fixed way, indicating which area on the page the current vm instance wants to control, and the received value is a selector
      el: '#app',
      // The data object is the data to be rendered on the page
      data: {
        username: 'zhangsan',
        gender: 'female',
        info: '<h4 style="color: red; font-weight: bold;">Welcome to study vue.js</h4>'
      }
    })
  </script>
The view effect is as follows:

- {{}} difference expression: it is most used in actual development. It is only a placeholder for the content and will not overwrite the original content
 <!-- hope Vue Can control the following div,Help us fill in the data div inside -->
  <div id="app">
    <p>full name:{{username}}</p>
    <p>Gender:{{gender}}</p>
  </div>

  <!-- 1. Import Vue Library files, in window The overall situation will be there Vue This constructor -->
  <script src="./lib/vue-2.6.12.js"></script>
  <!-- 2. establish Vue Instance object for -->
  <script>
    // Create an instance object of Vue
    const vm = new Vue({
      // The el attribute is written in a fixed way, indicating which area on the page the current vm instance wants to control, and the received value is a selector
      el: '#app',
      // The data object is the data to be rendered on the page
      data: {
        username: 'zhangsan',
        gender: 'female',
        info: '<h4 style="color: red; font-weight: bold;">Welcome to study vue.js</h4>'
      }
    })
  </script>
Page effect:

- The function of V-html instruction is to render the string with label into the content of real HTML
 <!-- hope Vue Can control the following div,Help us fill in the data div inside -->
  <div id="app">
    <div v-text="info"></div>
    <div>{{ info }}</div>
    <div v-html="info"></div>
  </div>

  <!-- 1. Import Vue Library files, in window The overall situation will be there Vue This constructor -->
  <script src="./lib/vue-2.6.12.js"></script>
  <!-- 2. establish Vue Instance object for -->
  <script>
    // Create an instance object of Vue
    const vm = new Vue({
      // The el attribute is written in a fixed way, indicating which area on the page the current vm instance wants to control, and the received value is a selector
      el: '#app',
      // The data object is the data to be rendered on the page
      data: {
        username: 'zhangsan',
        gender: 'female',
        info: '<h4 style="color: red; font-weight: bold;">Welcome to study vue.js</h4>'
      }
    })
  </script>
Page effect:

2. Attribute binding instruction
Note: the difference expression can only be used in the content node of an element, not in the attribute node of an element!
- In vue, you can use the v-bind: instruction to dynamically bind values for the attributes of elements,
- The abbreviation is a colon (:) in English
- During binding with V-bind attribute, if the binding content needs to be dynamically spliced, the outside of the string should be wrapped with single quotation marks, such as the following code:
<div :title="'box'+index">This is a div</div>
3. Event binding
- v-on: short for@
- The syntax format is as follows:
<button @click="add">Click the button</button>
<h1>
    {{count}}
</h1>
<script>
	const vm= new Vue({
        //el: the value of is where to mount vue
        el:'#app',
        data: {
        count:3
    },
        methods:{
            add(){
        		//If you want to modify the data in data in the method, you can access it through this
        this.count+=1
    }
        }
    })
</script>
- Application scenario of $event: if the default event object e is overwritten, you can manually pass a $event. For example:
<button @click="add(3,$event)">Click the button</button>
<h1>
    {{count}}
</h1>
<script>
	const vm= new Vue({
        //el: the value of is where to mount vue
        el:'#app',
        data: {
        count:3
    },
        methods:{
            add(n,e){
        		//If you want to modify the data in data in the method, you can access it through this
        this.count+=1
    }
        }
    })
</script>
4. Event modifier
-
.prevent
<!-- Only modifiers -->
<a @click.prevent="xxx">link</a>
-
.stop
<!-- Prevent click event from continuing propagation -->
<button @click.stop="xxx">Button</button>
Note: when using modifiers, order is important; The corresponding code will be generated in the same order. Therefore, using v-on:click.prevent.self will block all clicks, while v-on:click.self.prevent will only block clicks on the element itself.
4.v-model instruction
- Input input box
- type="radio"
- type="checkbox"
- type="tel"
- textarea
- select
5. Conditional rendering page
- The principle of v-show: is to dynamically add or remove the display:none style for elements to display or hide elements
- If you want to frequently switch the display state of elements, the performance of using v-show will be better
- The principle of v-if is to dynamically create or remove elements every time, so as to realize the display or hiding of elements
- If some elements don't need to be prompted by default when you first enter the page, and this element probably doesn't need to be displayed later, the performance of v-if is better at this time
In the actual development, in most cases, without considering the problem of performance, just use v-if directly!!!
There are two ways to use v-if instructions:
- Directly give a Boolean value of true or false
<p v-if="true">cover v-if Controlled elements</p>
- Provide a judgment condition for v-if to control the display and hiding of elements according to whether the judgment result is true or false
<p v-if="type === 'A'">good</p>
4, Listener
1. What is a watch listener
A: the watch listener allows developers to monitor the changes of data and do specific operations for the changes of data
The syntax format is as follows:
const vm=new Vue({
    el:'#app',
    data:{username:''},
    watch:{
        //Listen for changes in username value
        //newVal is the new value after the change, and oldVal is the "old value before the change"
        userName(newVal,oldVal){
            console.log(newVal,oldVal)
        }
    }
})
2. How to use watch to check whether the user name can be used
While listening for changes in the value of username, use axios to initiate Ajax requests to detect whether the current username can be used
<!DOCTYPE html>
<html lang="en">

<head>
  <meta charset="UTF-8">
  <meta name="viewport" content="width=device-width, initial-scale=1.0">
  <title>Document</title>
</head>

<body>
  <div id="app">
    <input type="text" v-model="username">
  </div>
  <script src="./lib/vue-2.6.12.js"></script>
  <script src="./lib/axios.js"></script>
  <script>
    const vm = new Vue({
      el: '#app',
      data: {
        username: ''
      },
      watch: {
        // newVal is the latest value
        async username(newVal) {
          if (newVal === '') return
          // Use axios to initiate a request to determine whether the user name can be used
          const {
            data: res
          } = await axios.get('https://www.escook.cn/api/finduser' + newVal)
          console.log(res)
        }
      }
    })
  </script>
</body>

</html>
3. Auto call listener
By default, the component will not call the watch listener after the initial loading. If you want the watch listener to be called immediately, you need to use the immediate option. The example code is as follows:
<!DOCTYPE html>
<html lang="en">

<head>
  <meta charset="UTF-8">
  <meta name="viewport" content="width=device-width, initial-scale=1.0">
  <title>Document</title>
</head>

<body>
  <div id="app">
    <input type="text" v-model="username">
  </div>
  <script src="./lib/vue-2.6.12.js"></script>
  <script src="./lib/axios.js"></script>
  <script>
    const vm = new Vue({
      el: '#app',
      data: {
        username: ''
      },
      watch: {
        // newVal is the latest value
        async username(newVal) {
          if (newVal === '') return
          // Use axios to initiate a request to determine whether the user name can be used
          const {
            data: res
          } = await axios.get('https://www.escook.cn/api/finduser' + newVal)
          console.log(res)
        }
      // Indicates that the current watch listener is triggered immediately after the page is rendered for the first time
          immediate:true
      }
    })
  </script>
</body>

</html>
4. The listener listens to an object
If the watch listens on an object, if the attribute value in the object changes, it cannot be listened. At this time, we usually use the deep option. The example code is as follows:
<!DOCTYPE html>
<html lang="en">

<head>
  <meta charset="UTF-8">
  <meta name="viewport" content="width=device-width, initial-scale=1.0">
  <title>Document</title>
</head>

<body>
  <div id="app">
    <input type="text" v-model="username">
  </div>
  <script src="./lib/vue-2.6.12.js"></script>
  <script src="./lib/axios.js"></script>
  <script>
    const vm = new Vue({
      el: '#app',
      data: {
        info:{username: 'admin'}
      },
      watch:{
          info:{
              handlet(newVal){
                  console.log(newVal.username)
              },
              deep:true
          }
      }
    })
  </script>
</body>

</html>
5. If a single attribute of the listening object changes
If you only want to listen for changes to a single attribute in an object, you can define a watch listener as follows,
<!DOCTYPE html>
<html lang="en">

<head>
  <meta charset="UTF-8">
  <meta name="viewport" content="width=device-width, initial-scale=1.0">
  <title>Document</title>
</head>

<body>
  <div id="app">
    <input type="text" v-model="username">
  </div>
  <script src="./lib/vue-2.6.12.js"></script>
  <script src="./lib/axios.js"></script>
  <script>
    const vm = new Vue({
      el: '#app',
      data: {
        info:{username: 'admin'}
      },
      watch:{
         'info.username':{
             handler(newVal){
                 console.log(newVal)
             }
         }
      }
    })
  </script>
</body>

</html>
5, Calculation properties
1. Basic usage of calculation attributes
Calculating an attribute refers to obtaining an attribute value after a series of operations. The dynamically calculated attribute value can be used by the template structure or methods method. The example code is as follows:
<!DOCTYPE html>
<html lang="en">

<head>
  <meta charset="UTF-8">
  <meta name="viewport" content="width=device-width, initial-scale=1.0">
  <title>Document</title>
</head>

<body>
  <div id="app">
    <input type="text" v-model="show">
  </div>
  <script src="./lib/vue-2.6.12.js"></script>
  <script src="./lib/axios.js"></script>
  <script>
    const vm = new Vue({
      el: '#app',
      data: {
        r:0,g:0,b:0
      },
      computed:{
          rgb(){return `rgb(${this.r},${this.g},${this.b})`}
      },
        methods:{
            show(){
                console.log(this.rgb)
            }
        }
    })
  </script>
</body>

</html>
2. Characteristics of calculation attributes
① Although a calculated attribute is defined as a method when declared, the essence of a calculated attribute is an attribute
② The calculation attribute will cache the calculation results, and the operation will be restarted only when the data that the calculation attribute depends on changes
6, Vue cli
1. What is a single page application
Single page application (English Name: Single Page Application), referred to as SPA, as the name suggests, refers to that there is only one HTML page in a Web site, and all functions and interactions are completed within the only page.
2. What is Vue cli
A: Vue cli is a standard tool developed by Vue.js. It simplifies the process of programmers creating engineering Vue projects based on webpack. Quoting a sentence from Vue cli's official website: programmers can * * focus on writing applications * * without having to spend days worrying about webpack configuration
Vue cli Chinese official website: https://cli.vuejs.org/zh/
3. Installation and use of Vue cli
Vue cli is a global package on npm. Using the npm install command, the interface can easily install it on your own computer;
npm install -g @vue/cli
Rapid generation of Engineering vue projects based on vue cli:
vue create Name of the project
4. What is the operation process of the project in Vue cli
In an engineering project, Vue needs to do simple things. Render App.vue to the specified area of index.html through main.js, where
- App.vue is used to write the template structure to be rendered
- An el area needs to be reserved in index.html
- main.js yes, App.vue renders to the reserved area of index.html
7, Vue components
1. What is component-based development
Component development refers to encapsulating the reusable UI structure on the page into components according to the idea of encapsulation, so as to facilitate the development and maintenance of the project.
2. Development of components in Vue
Vue is a front-end framework that supports component-based development. Vue specifies that the suffix of the component is:. Vue. The App.vue file I contacted before is essentially a Vue component.
3. Composition of Vue components
Each component is composed of three parts, namely
- temmplate - > template structure of components
- JavaScript behavior of script - > component
- Style - > component style
The template structure must be included in each component, and script behavior and style style are optional components
1). template
vue specifies that the template structure corresponding to each component needs to be defined in the node
<template>
    <!--Of the current component DOM Structure, need to be defined to template Inside of label-->
</template>
be careful:
-
template is a container label provided by vue. It only plays the role of wrapping. It will not be rendered as a real DOM element
-
In Vue2, template can write only one root node
-
In Vue3, multiple root nodes can be written in the template
2). script
vue stipulates that developers can
<script>
 // In the future, component related data is used to store data and methods are used to store methods
 //All need to be defined in the object exported by export default
   export default{
       data(){
           name:'Zhang San'
       },
       methods:{
           //This is a click event
           onAdd(){
               console.log('This is my first study Vue assembly')
           }
       }
   }
</script>
be careful:
vue stipulates that data in vue components must be a function and cannot directly point to a data object. Therefore, when defining the data node in the component, the following method is wrong:
data:{ //In the component, you cannot directly point data to a data object (an error will be reported)
    count:0
}
This will cause multiple component instances to share the same data. If there are other problems, you can view them vue.js official website
3).style
vue specifies that the style node in the component is optional and developers can use it again
<style>
    h1{
        font-size:20px;
    }
</style>
Let style support Less syntax
- stay
<style lang="less">
    h1{
        font-size:20px;
        span{
            color:red;
        }
    }
</style>
4. Relationship between components
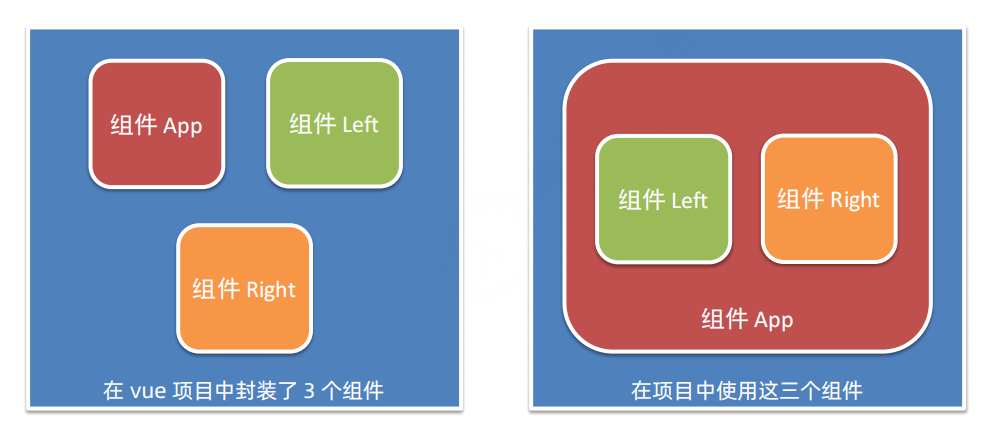
- After the first component is encapsulated, it is independent of each other, and there is no parent-child relationship
- When using components, parent-child relationship and brother relationship are formed according to the nested relationship between them
1. Three steps for using components
- Step 1: use import syntax to import the required components
import Left from '@/components/Left.vue'
- Step 2: use the components node to register components
export default{
    components:{
        Left
    }
}
- Step 3: use the components just registered in the form of labels
be careful:
- Registered in components are private subcomponents. For example, under the components node in component A, component F is registered. At this time, component F can only be used in component A, not in component C
2. Register global components
In the main.js entry file in the vue project, you can register global components through the Vue.components() method. The example code is as follows
//Import components that require global registration
import Count from '@/components/Count.vue'
//Parameter 1. String format, indicating the "registered name" of the component
//Parameter 2. The component that needs to be globally registered
Vue.components('MyCount',Count)
5. Props in components
Props is a user-defined attribute of components. When encapsulating general components, rational use of props can greatly improve the reusability of components. Its syntax format is as follows:
export default {
    //Custom properties for components
    props:{'Custom attribute 1','Custom attribute 2','Other custom attributes'},
    //Private properties of components
    data(){
        return{}
    }
}
1. Read / write of props attributes
In vue, the custom attributes encapsulated in components are read-only, and programmers cannot directly modify the value of props. Otherwise, an error will be reported directly:
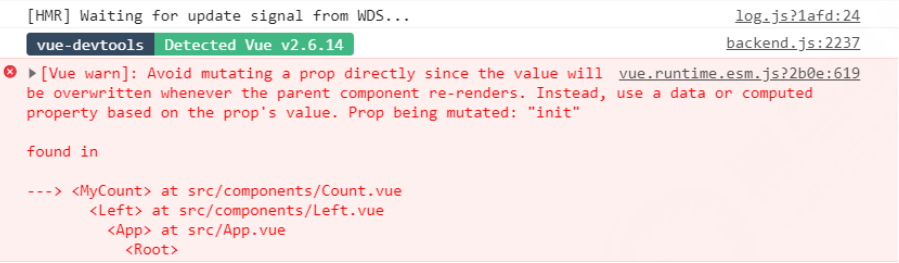
To modify the value of props, you can transfer the value of props to data, because the data in data is readable and writable!!!
export default{
    props:['init'],
    data(){
        return {
            //Save the value of this.init to count
            count:this.init
        }
    }
}
2. Default value of props
When declaring a custom attribute, you can define the default value of the attribute through default. The example code is as follows:
export default{
    props:{
        init:{
            //Use the default attribute to define the default value of the attribute
            default:0
        }
    }
}
3. Value type of props
When declaring a custom attribute, you can define the value type of the attribute through type. The code is as follows
export default{
    props:{
        init:{
            //Use the default attribute to define the default value of the attribute
            default:0

            //Use the type attribute to define the value type of the attribute,
            // If the passed value does not conform to this type, an error will be reported at the terminal
            type:Number
        }
    }
}
4. Required options for props
When declaring a custom attribute, we can set the attribute as a required item through the required option to force the user to pass the value of the attribute. The example code is as follows:
export default{
    props:{
        init:{
            //The value type is Number
            type:Number,
            //Required item validation
            required:true
        }
    }
}
7. Style conflict between components
By default, styles written in. vue components take effect globally, so it is easy to cause style conflicts among multiple components
The root causes of style conflicts between components are:
- In a single page application, the DOM structure of all components is rendered based on the unique index.html page
- The style in each component will affect the DOM elements in the entire index.html page
1) How to solve the problem of component style conflict
Assign a unique custom attribute to each component. When writing a component style, use the attribute selector to control the scope of the style. The example code is as follows:
<template>
	<div class="container">
    	<h3 data-v-0001>Carousel chart component</h3>
    </div>
</template>
<style>
/*Through the brackets "attribute selector", the problem of style conflict between components is not prevented, because the custom attribute assigned to each component is "unique"*/
    .container[data-v-0001]{
        border:1px solid red;
    }
</style>
2) scoped attribute of style node
In order to improve the efficiency and experience of development, vue provides scoped attribute for the style node to prevent style conflicts between components:
<template>
	<div class="container">
    	<h3>Carousel chart component</h3>
    </div>
</template>
<style scoped>
/*style The scped attribute of the node is used to automatically assign a unique "custom attribute" to each component, and automatically apply this custom attribute to the DOM label and style style of the current component to prevent the style conflict of the component*/
    .container{
        border:1px solid red;
    }
</style>
3) , / depp /
If the scoped attribute is added to the style node of the current component, the style of the current component will not be effective for its sub components. If you want some styles to be effective for sub components, you can use the / deep / depth selector
<template>
	<div class="container">
    	<div class="title">
            I'm the title
        </div>
    </div>
</template>
<style scoped  lang="less">
    .title{
        color:blue; /* When / deep / is not added, the format of the generated selector is. title[data-v-052242de]*/
    }
    /deep/ .title{
        color:blue;/* When / deep / is added, the format of the generated selector is [data-v-052242de].title*/
    }
</style>
8, Life cycle
1. Life cycle & life cycle function
Life cycle is the whole phase of a component from creation – > operation – > destruction, emphasizing a time period. Life cycle function: it is a built-in function provided by vue framework, which will be automatically executed in sequence along with the life cycle of components.
Note: life cycle emphasizes time period, and life cycle function emphasizes time point
2. Classification of component life cycle functions
beforeCreate (before creation) before the data observation and initialization events have started
created (after creation) completes data observation, operation of attributes and methods, initialization events, and the $el attribute has not been displayed
beforeMount is called before the mount starts, and the related render function is called for the first time. The instance has completed the following configuration: compile the template and generate html from the data p data and template in data. Note that the html has not been mounted on the page at this time.
Mounted (after loading) is replaced by the newly created vm.$el in El and mounted to an instance. The instance has completed the following configuration: replace the DOM object pointed to by the El attribute with the html content compiled above. Finish rendering the html in the template to the html page. ajax interaction occurs during this process.
beforeUpdate (before update) is called before data update occurs before virtual DOM is re rendered and patched. You can further change the state in this hook without triggering an additional re rendering process.
Updated (update) is invoked after the virtual DOM is re rendered and patched due to data changes. When called, the component DOM has been updated, so you can perform DOM dependent operations. In most cases, however, you should avoid changing the state during this period, as this may result in an infinite loop of updates. The hook is not called during server-side rendering.
beforeDestroy (before destruction) is called before the instance is destroyed. The instance is still fully available.
Destroyed (after destruction) is called after the instance is destroyed. After calling, all event listeners will be removed and all child instances will be destroyed. The hook is not called during server-side rendering.
The following is the flow chart

9, Data sharing between components
1. Relationship between components
In project development, the most common relationships of components are divided into the following two types:
① Paternity
② Brotherhood

2. Data sharing between parent and child components
Pass value from parent to child
User defined properties are required for parent components to share data with child components. The example code is as follows:
Parent component:
<template>
	<Son :msg="message" :user="userInfo"></Son>
</template>

<script>
 export default{
     data:{
         return{
         	message:'hellow Vue.js',
         	userInfo:{name:'75',age:20}
     	}
     }
 }
</script>
Subcomponents:
<template>
	<div>
        <h5>Subcomponents</h5>
        <p>Passed from parent component msg The values are:{{msg}}</p>
         <p>Passed from parent component user The values are:{{user}}</p>
    </div>
</template>
<script>
	export default{
        props:{
            msg:{
                type:String,
                default:''
            },
            user:{
                type:Object,
                default:()=>{}
            }
        }
    }
</script>
Pass value from child to parent
The child component shares data with the parent component using a custom event. The code example is as follows:
Subcomponents
export default {
    data(){
        return {count:0}
    },
    methods:{
       	add(){
            this.count+=1
          //When modifying data. Trigger custom events through $emit()
           this.$emit('numchange',this.count)
        }
    }
}
Parent component:
<template>
	<Son @numchange="getNewCount"></Son>
    <p>
        {{countFromSon}}
    </p>
</template>

<script>
 export default{
     data:{
         return{
         	countFromSon:0
     	}
     },
     methods:{
         getNewCount(val){
             this.countFormSon=val
         }
     }
 }
</script>
Value transfer between sibling components
In vue2, the data sharing scheme between sibling components is EventBus
Brother component a (seller)
import bus from './eventBus.js'
export default{
    data(){
        return{
            msg:'hello Vue.js'
        }
    },
    methods:{
        sendMsg(){
            bus.$emit('share',this.msg)
        }
    }
}
EventBus.js (middleman)
import Vue from 'vue'

//Shared vue instance object
export default new Vue()
Brother component C (buyer)
import bus from './eventBus.js'

export default{
    data(){
        return {
            msgFromLeft:''
        }
    },
    created(){
        bus.$on('share',val=>{
            this.msgFromLeft=val
        })
    }
}
Steps for using EventBus
- Create the eventBus.js module and share an instance object of Vue outward
- At the data sender, call the * * bus.$emit('event name ', data to be sent) * * method to trigger a custom event
- At the data receiver, call the * * bus.$on('event name ', event handler) * * method to register a custom event
10, ref reference
1. What is ref reference
ref is used to assist developers to get Dom elements or components without relying on JQuery.
Each vue component instance contains a r e f s yes as , in noodles Save Store means yes answer of D O M element element or group piece of lead use , Silence recognize feeling condition lower , group piece of refs object, which stores the reference of the corresponding DOM element or component. By default, the reference of the component Refs object, which stores the reference of the corresponding DOM element or component. By default, the refs of the component points to an empty object
<template>
	<div>
        <h3>MyRef assembly</h3>
        <button @click="getRef">obtain $refs quote</button>
    </div>
</template>
<script>
	export default{
        methods:{
            getRef(){
      //this is the instance object of the current component. this.$refs points to an empty object by default
                console.log(this)
            }
        }
    }
</script>
2. Use ref to reference DOM elements
If you want to use ref to reference DOM elements on a page, you can do so as follows:
<!--use ref Property, corresponding to Dom Add reference name-->
<h3 ref="myh3">MyRef assembly</h3>
<button @click="getRef">obtain $refs quote</button>

<script>
export default{
    methods:{
        getRef(){
           //Through the name of this.$refs. Reference, you can get the DOM element reference
            console.log(this.$refs.myh3)
          //Manipulate the DOM element to change the text color to red
            this.$refs.myh3.style.color='red'
+        }
    }
}
</script>
3. Use ref to reference component instances
If you want to use ref to reference the component instance on the page, you can do so as follows:
<!--use ref Property, corresponding to Dom Add reference name-->
<my-counter ref="counterRef"></h3>
<button @click="getRef">obtain $refs quote</button>

<script>
export default{
    methods:{
        getRef(){
           //Through the name of this.$refs. Reference, you can get the DOM element reference
            console.log(this.$refs.counterRef)
          //After referring to the instance of the component, you can fish the methods method on the component

            this.$refs.counterRef.add()
+        }
    }
}
</script>
4. Control the on-demand switching of text boxes and buttons
The Boolean value * * inputVisible * * controls the on-demand switching of text boxes and buttons in the component. The example code is as follows
<template>
	<input type="text" v-if="inputVisible" />
    <button v-else @click="showInput">Exhibition input Input box</button>
</template>
<script>
export default{
    data(){
        return {
            //Controls the on-demand switching of text statements and buttons
            inputVisible:false
        }
    },
    methods:{
        showInput(){
            this.inputVisible=true
        }
    }
}
</script>
5. Let the text box get focus automatically
When the text box is displayed, if you want it to get focus immediately, you can add a ref reference to it and call the function of the native DOM object
The. focus() method is sufficient. The example code is as follows:
<input type="text" v-if="inputVisible" ref="ipt" />
    <button v-else @click="showInput">Exhibition input Input box</button>
<script>
	export default {
        methods:{
            showInput(){
            	this.inputVisible=true
       //Get the DOM reference of the text box and call. Focus to get the focus automatically
                this.refs.ipt.focus()
        }
        }
    }
</script>
6.this.$nextTick(cb) method
The $nextTick(cb) method of the component will delay the cb callback until after the next DOM update cycle. Popular understanding is: components such as
After the DOM update is completed, execute the cb callback function. This ensures that the cb callback function can operate on the latest DOM element.
<input type="text" v-if="inputVisible" ref="ipt" />
    <button v-else @click="showInput">Exhibition input Input box</button>
<script>
	export default {
        methods:{
            showInput(){
            	this.inputVisible=tru+e
//Postpone the operation of the input text box until the next DOM update, otherwise the text box element does not exist on the page at all
               this.$nextTick(()=>{
                    this.refs.ipt.focus()
               })
        }
        }
    }
</script>
11, Dynamic component
1. What is a dynamic component
Dynamic component value refers to dynamically switching the display and hiding of components
2. How to render dynamic components
vue provides built-in * * < component > * * components, which are specially used to realize the rendering of dynamic components. The example code is as follows:
<template>
	<!--2.adopt is Property to dynamically specify the component to render-->
    <component :is="comName"></component>
    <!--3.Click the button to dynamically switch the name of the component-->
    <button @click="comName='left'">display Left assembly</button>
    <button @click="comName='Right'">display Right assembly</button>
</template>

<script>
export default{
    data(){
        //1. Name of the currently rendered component
        return {comName:'Left'}
    }
}
</script>
3. Keep alive
By default, when switching dynamic components, the component state cannot be maintained. At this time, we can use the * * < keep alive > * * component built in Vue to maintain the dynamic component state. The example code is as follows:
<keep-alive>
	<component :is="comName"></component>
</keep-alive>
Life cycle function corresponding to keep alive
When a component is cached, the * * deactivated * * lifecycle function of the component will be triggered automatically.
When a component is activated, the * * activated * * lifecycle function of the component will be triggered automatically
export default{
    created(){console.log('The component was created')},
    destroyed(){console.log('The component was destroyed')},
    activated(){console.log('Left The component is activated')}
	deactivated(){console.log('Left The component is cached')}
}
include attribute of keep alive
The include attribute is used to specify that only * * components with matching names will be cached * *. Multiple component names are separated by commas in English:
<keep-alive include="MyLeft,MyRight">
	<component :is="comName"></component>
</keep-alive>
12, Slot
1. What is a slot
Slot is the ability provided by vue for component encapsulation, which allows developers to define uncertain parts that users want to specify as slots when packaging components

Slots can be considered as placeholders for * * contents reserved for users during component packaging**
2. Basic usage of experience slot
When encapsulating components, you can define slots through elements to reserve content placeholders for users.
Left component
<template>
  <div class="left-container">
    <h3>Left assembly</h3>
    <hr />
    <!-- Declare a slot area -->
    <!-- vue Official regulations: every slot Slots, there must be one name name -->
    <!-- If omitted slot of name Property, there is a default name called default -->
    <slot name="default">
      <h6>This is default Backup content of slot</h6>
    </slot>
  </div>
</template>
App components
<div class="box" style="display: none;">
      <!-- Render Left Components and Right assembly -->
      <Left>
        <template #default>
          <p>This is in Left Component's content area, declared p label</p>
        </template>
      </Left>
    </div>
1) . contents without reserved slots will be discarded
If no slots are reserved when packaging components, any customized content provided by the user will be discarded. The example code is as follows
left component
<template>
  <div class="left-container">
    <h3>Left assembly</h3>
    <hr />
	<h6>This is default Backup content of slot</h6>
  </div>
</template>
App components
<Left>
    <!--Customized content will be discarded directly-->
     <p>This is in Left Component's content area, declared p label</p>
</Left>
2) 2. Backup content
When packaging components, you can provide backup content (default content) for reserved slots. If the user of the component does not provide any content for the slot, the backup content takes effect.
<template>
  <div class="left-container">
    <h3>Left assembly</h3>
    <hr />
	<slot>This line is backup content</slot>
  </div>
</template>
3. Named slot
If you need to reserve multiple slot nodes when packaging components, you need to specify a specific name for each slot. This slot with a specific name is called * * "named slot"**
Left component
<template>
 	<header>
        <!--I want to put the header here-->
    	<slot name="header"></slot>
    </header>
    <main>
    	<!--I want to put the main content here-->
        <slot></slot>
    </main>
    <footer>
    	<!--I want to put the footer here-->
        <slot name="footer"></slot>
    </footer>
</template>
Note: if the slot name is not specified, it will have an implied name called "default".
When providing content to a named slot, we can use the v-slot instruction on an element and provide its name in the form of v-slot parameters.
APP components
<Left>
	<template v-slot:header>
    	<h1>Preface to Tengwang Pavilion</h1>
    </template>
    <template v-slot:default>
        <p>Yuzhang Gujun, Hongdu Xinfu.</p>
    </template>

    <template v-slot:footer>
    	<p>
            Signed by: Wang Bo
        </p>
    </template>
</Left>
1. Short form of named slot
Like v-on and v-bind, v-slot also has abbreviations, that is, replace all the contents before the parameter (v-slot:) with characters #. For example, v-slot:header can be rewritten as * * #header * *:
<Left>
	<template #header>
    	<h1>Preface to Tengwang Pavilion</h1>
    </template>
    <template #default>
        <p>Yuzhang Gujun, Hongdu Xinfu.</p>
    </template>

    <template #footer>
    	<p>
            Signed by: Wang Bo
        </p>
    </template>
</Left>
4. Scope slot
In the process of packaging components, props data can be bound for reserved slots. This kind of slot with props data is called "scope slot". The example code is as follows:
<tbody>
	<!--Below slot Is a scope slot-->
    <slot v-for="item in list" :user="item"></slot>
</tbody>
1) . use scope slot
You can use the form of v-slot: to receive the data provided by the scope slot. The example code is as follows:
App components
<Left>
	<!--Receive data provided by the scope slot-->
    <template v-slot:default="scope">
    	<tr>
        	<!--Use data from the scope slot-->
            <td>{{scope}}</td>
        </tr>
    </template>
</Left>
2) . deconstruct slot Prop
For data objects provided externally by the scope slot, deconstruction assignment can be used to simplify the data receiving process. The example code is as follows:
<Left>
	<!--Receive data provided by the scope slot-->
    <template #default="{user}">
    	<tr>
        	<!--Use data from the scope slot-->
            <td>{{user.id}}</td>
            <td>{{user.name}}</td>
            <td>{{user.state}}</td>
        </tr>
    </template>
</Left>
13, Custom instruction
1. What is a custom instruction
vue officially provides v-text, v-for, v-model, v-if and other commonly used instructions. In addition, vue also allows developers to customize instructions
2. Classification of user-defined instructions
The user-defined instructions in vue are divided into two categories:
- Private custom directive
In each vue component, private custom directives can be declared under the directives node. The example code is as follows:
directives:{
    color:{
        //Set the red text for the HTML element bound to
        bind(el){
            //el in the formal parameter is the 'native DOM object' bound to the secondary instruction
            el.style.color="red"
        }
    }
}
Use custom directives
When using custom instructions, you need to add v-prefix. The example code is as follows:
<!--When declaring a custom instruction, the instruction name is color-->
<!--When using custom instructions, you need to add v-Prefix of instruction-->
<h1 v-color>APP</h1>
Dynamically bind parameter values for custom instructions
When using a custom instruction in the template structure, you can dynamically bind parameter values for the current instruction by means of an equal sign (=):
<!--When using an instruction, dynamically bind parameter values for the current instruction color-->
<h1 v-color="color">APP</h1>
<script>
export default{
    data(){
        return{
            color:'red' //Defines the color value of color

        }
    }
}
</script>
Get the parameter value of the instruction through binding
When declaring a custom instruction, you can receive the parameter value of the instruction through the second parameter in the formal parameter:
directives:{
    color:{
        //Set the red text for the HTML element bound to
        bind(el,binding){
            //el in the formal parameter is the 'native DOM object' bound to the secondary instruction
            el.style.color=binding.value
        }
    }
}
update function
The bind function is called only once: it is called when the instruction is bound to the element for the first time, and the bind function will not be triggered when the DOM is updated. The update function is called every time the DOM is updated. The example code is as follows:
directives:{
    color:{
        //Called the first time the current instruction is bound to an element
        bind(el,binding){
            el.style.color=binding.value
        },
        //Called every time the DOM is updated
        update(el,binding){
            el.style.color=binding.value
        }
    }
}
Function abbreviation
If the logic in the insert and update functions are exactly the same, the custom instruction in object format can be abbreviated to function format:
directives:{
    color(el,binding){
     	el.style.color=binding.value
    }
}
- Global custom directive
Custom instructions for global sharing need to be declared through "Vue.directive()", and the example code is as follows:
main.js
//Parameter 1: string, indicating the name of the global user-defined instruction
// Parameter 2: object used to receive the parameter value of the instruction
Vue.directive('color',function(el,binding){
    el.style.color=binding.value
})
14, Routing
1. What is routing
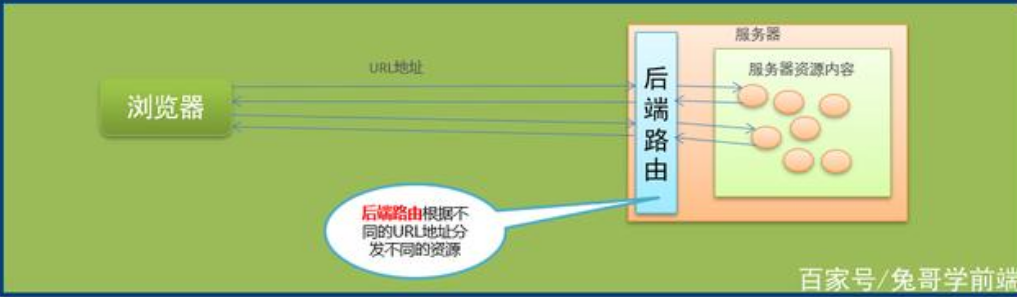
Routing is a broad and abstract concept. The essence of routing is correspondence. In development, there are two kinds of Routing: front-end routing and back-end routing
- Back end routing
Different contents are returned according to different user URL requests, which is essentially the corresponding relationship between the URL request address and the server resources
- Front end routing
Different page contents are displayed according to different user events, which is essentially the corresponding relationship between user events and event handling functions

2. What is SPA (Single Page Application)
SPA (Single Page Application) Single Page Application: there is only one page in the whole website. The change of content is realized through Ajax local update. At the same time, it supports the forward and backward operations of browser address bar
One of the implementation principles of SPA: hash based on URL address (the change of hash will lead to the change of browser's access history, but the change of hash will not trigger a new URL request)
Although the front-end routing is Ajax, and the front-end rendering does not support the browser's forward and backward operations, the front-end rendering can improve the performance compared with the back-end rendering. In the process of implementing SPA, the core technology point is the front-end routing
3. What is front-end routing
Easy to understand concept: the correspondence between Hash address and components.
4. Working mode of front-end routing
① The user clicked the routing link on the page
② This causes the Hash value in the URL address bar to change
③ The front-end route listens for changes to the Hash address
④ The front-end route renders the components corresponding to the current Hash address in the browser

Front end routing refers to the correspondence between Hash addresses and components!
5. Realize simple front-end routing
Step 1: dynamically render components by * * < component > * * tag combined with comName. The example code is as follows:
<template>
  <div class="app-container">
    <h1>App Root component</h1>

    <a href="#/Home "> Home Page</a>
    <a href="#/Movie "> Movie</a>
    <a href="#/About "> about</a>
    <hr />
	<!--adopt is Property to specify the name of the component to display-->
    <component :is="comName"></component>
  </div>
</template>
<script>
export default {
  name: 'App',
  data() {
    return {
      // In the position of the dynamic component, the name of the component to be displayed, and the value must be a string
      comName: 'Home'
    }
  },
  created() {
    // As soon as the current App component is created, it will listen for the onhashchange event of the window object
    window.onhashchange = () => {
      console.log('I got it hash Change of address', location.hash)
      switch (location.hash) {
        case '#/home':
          this.comName = 'Home'
          break
        case '#/movie':
          this.comName = 'Movie'
          break
        case '#/about':
          this.comName = 'About'
          break
      }
    }
  },
}
</script>
6. What is Vue router
**Vue router * * is a routing solution officially provided by vue.js. It can only be used in conjunction with Vue projects and can easily manage the switching of components in SPA projects.
Official document address of Vue Router: https://router.vuejs.org/zh/
7. Installation and configuration steps of Vue router
- Installing Vue router in a project
In the vue2 project, the command to install Vue router is as follows:
## Using npm
npm i vue-router@3.5.3 -S
## Use yarn
yarn add vue-router@3.5.3 -S
- Module to create route
In the * * src source code directory, create a new router/index.js * * routing module, and the initial code is as follows
// 1. Import Vue and Vue router packages
import Vue from 'vue'
import VueRouter from 'vue-router'

// 2. Call Vue.use() function to install vueroter into VUe plug-in
Vue.use(VueRouter)

// 3. Create an instance object of the route
const router =new VueRouter()

// 4. Instance object of outward shared route
export default router
- Import and mount routing module
In the src/main.js entry file, import and mount the routing module. The example code is as follows:
import Vue from 'vue'
import App from './App.vue'
// Import routing module
import router from '@/router'

new Vue({
    render:h=>h(App)
    //Mount routing module
    router:router
}).$mount('#app')
- Declare route links and placeholders
In src/App.vue component, use < router link > and < router View > provided by Vue router to declare routing links and placeholders:
<template>
  <div class="app-container">
    <h1>App2 assembly</h1>

    <!-- For example: -->
    <!-- /movie/2?name=zs&age=20 yes fullPath Value of -->
    <!-- Define routing links -->
    <router-link to="/movie/1">Rocky</router-link>
    <router-link to="/movie/2?name=zs&age=20">Thor</router-link>
    <router-link to="/movie/3">Reconnection</router-link>
    <router-link to="/about">about</router-link>

    <hr />

    <!-- As long as it is installed and configured in the project vue-router,You can use router-view This component is -->
    <!-- Its role is simple: placeholders -->
    <router-view></router-view>
  </div>
</template>
- Declare matching rules for routes
In the src/router/index.js routing module, the matching rules of routes are declared through the routes array. The example code is as follows:
// 1. Import Vue and Vue router packages
import Vue from 'vue'
import VueRouter from 'vue-router'

// Import required components
import Home from '@/components/Home.vue'
import Movie from '@/components/Movie.vue'
import About from '@/components/About.vue'


// 2. Call Vue.use() function to install vueroter into VUe plug-in
Vue.use(VueRouter)

// 3. Create an instance object of the route
const router =new VueRouter({
    //In the routes array, declare the matching rule of the route
    routes:[
        //path indicates the hash < hash > address to match,
        //Component represents the routing component to be displayed
        {path:'/home',component:Home},
        {path:'/movie',component:Movie},
        {path:'/about',component:About}
    ]
})

// 4. Instance object of outward shared route
export default router
8. Common usage of Vue router
- Route redirection
Route redirection refers to forcing the user to jump to address C when accessing address A, so as to display A specific component page. It is convenient to set route redirection by specifying A new route address through the redirect attribute of the routing rule:
// 1. Import Vue and Vue router packages
import Vue from 'vue'
import VueRouter from 'vue-router'

// Import required components
import Home from '@/components/Home.vue'
import Movie from '@/components/Movie.vue'
import About from '@/components/About.vue'


// 2. Call Vue.use() function to install vueroter into VUe plug-in
Vue.use(VueRouter)

// 3. Create an instance object of the route
const router =new VueRouter({
    //In the routes array, declare the matching rule of the route
    routes:[
        //path indicates the hash < hash > address to match,
        //Component represents the routing component to be displayed,
        // When the user accesses / home, he / she jumps to the routing rule corresponding to / home through the redirect attribute
        {path:'/',redirect:'/home'},
        {path:'/home',component:Home},
        {path:'/movie',component:Movie},
        {path:'/about',component:About}
    ]
})

// 4. Instance object of outward shared route
export default router
- Nested Route
The nested display of components through routing is called nested routing.
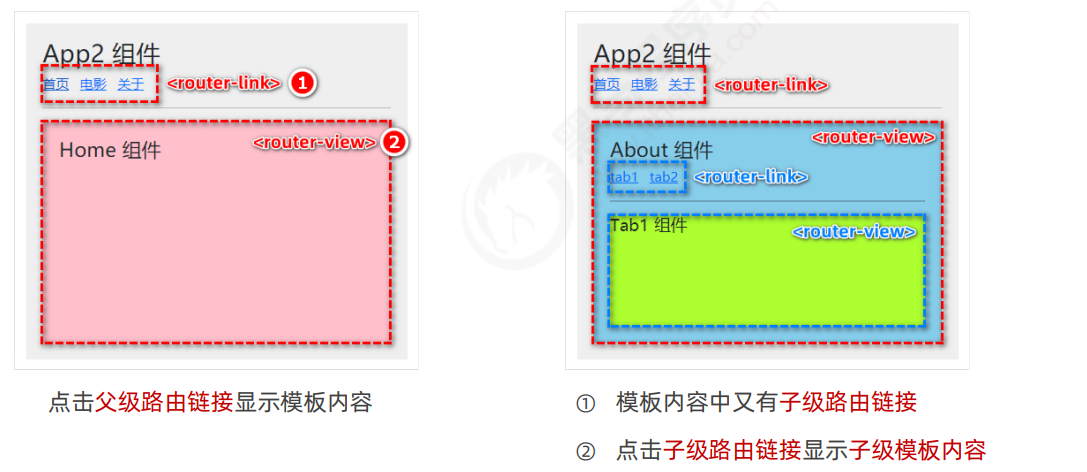
- Declare * * sub route links and placeholders for sub routes**
In the About.vue component, declare the sub route links and sub route placeholders of tab1 and tab2. The example code is as follows:
<template>
  <div class="about-container">
    <h3>About assembly</h3>

    <!-- Child routing link -->
    <router-link to="/about">tab1</router-link>
    <router-link to="/about/tab2">tab2</router-link>

    <hr />

    <!-- Child route placeholder -->
    <router-view></router-view>
  </div>
</template>
Declare the child routing rule through the children attribute
In the src/router/index.js routing module, import the required components and use the children attribute to declare the sub routing rules:
// 1. Import Vue and Vue router packages
import Vue from 'vue'
import VueRouter from 'vue-router'

// Import required components
import Tab1 from '@/components/tabs/Tab1.vue'
import Tab2 from '@/components/tabs/Tab2.vue'


// 2. Call Vue.use() function to install vueroter into VUe plug-in
Vue.use(VueRouter)

// 3. Create an instance object of the route
const router =new VueRouter({
    //In the routes array, declare the matching rule of the route
    routes:[
        //path indicates the hash < hash > address to match,
        //Component represents the routing component to be displayed,
        // When the user accesses / home, he / she jumps to the routing rule corresponding to / home through the redirect attribute
        {path:'/',redirect:'/home'},
        {path:'/home',component:Home},
        {path:'/movie',component:Movie},
        {
      path: '/about',
      component: About,
      // redirect: '/about/tab1',
      children: [
        // Sub routing rule
        // Default sub route: if the path value of a routing rule in the children array is an empty string, the routing rule is called "default sub route"
        { path: '', component: Tab1 },
        { path: 'tab2', component: Tab2 }
      ]
    }
    ]
})

// 4. Instance object of outward shared route
export default router
- Concept of dynamic routing
Dynamic routing refers to defining the variable part of the Hash address as parameter items, so as to improve the reusability of routing rules. In Vue router, the English colon (:) is used to define the parameter items of routing. The example code is as follows:
// You can enable props parameter transmission for routing rules, so as to easily get the value of dynamic parameters
{ path: '/movie/:mid', component: Movie, props: true },
4.2 $route.params parameter object
In the component rendered by dynamic routing, you can use this.$route.params object to access the dynamically matched parameter values
<template>
  <div class="movie-container">
    <!-- this.$route Is the "parameter object" of the route -->
    <!-- this.$router Is the "navigation object" of the route -->
    <h3>Movie assembly --- {{ $route.params.mid }} --- {{ mid }}</h3>

  </div>
</template>
4.3. Receive routing parameters using props
In order to simplify the acquisition of routing parameters, Vue router allows props parameter transmission to be enabled in routing rules. The example code is as follows:
<template>
  <div class="movie-container">
    <!-- this.$route Is the "parameter object" of the route -->
    <!-- this.$router Is the "navigation object" of the route -->
    <h3>Movie assembly --- {{ $route.params.mid }} --- {{ mid }}</h3>
    <button @click="showThis">Print this</button>
    <button @click="goback">back off</button>
    <!-- When using programmed navigation jump in the line, this It must be omitted, or an error will be reported! -->
    <button @click="$router.back()">back back off</button>
    <button @click="$router.forward()">forward forward</button>
  </div>
</template>
<script>
export default {
  name: 'Movie',
  // Receive props data
  props: ['mid'],
  methods: {
    showThis() {
      console.log(this)
    },
    goback() {
      // go(-1) means to step back one layer
      // If the number of layers retreated exceeds the upper limit, stay in place
      this.$router.go(-1)
    }
  }
}
</script>
-
Declarative navigation & programmatic navigation
- In the browser, the way to click the link to realize navigation is called declarative navigation. For example, clicking * * * * link in ordinary web pages and clicking * * * * in vue projects are declarative navigation
- In browser, the way of calling API method to realize navigation is called programming navigation. For example, in ordinary web pages, calling location.href to jump to new pages belongs to programming navigation.
-
Programmatic navigation API in Vue router
- this.$router.push('hash address')
Call this.$router.push() method to jump to the specified hash address to display the corresponding component page. The example code is as follows:
<template>
  <div class="home-container">
    <h3>Home assembly</h3>

    <hr />

    <button @click="gotoLk">adopt push Jump to rocky page</button>
    <button @click="gotoLk2">adopt replace Jump to rocky page</button>
    <router-link to="/main">Visit the background home page</router-link>
  </div>
</template>

<script>
export default {
  name: 'Home',
  methods: {
    gotoLk() {
      // Through the programmatic navigation API, the navigation jumps to the specified page
      this.$router.push('/movie/1')
    }
  }
}
</script>
- this.$router.replace()
Call this.$router.replace() method to jump to the specified hash address to display the corresponding component page.
The difference between push and replace:
⚫ push will add a history
⚫ replace does not add history, but replaces the current history
- this.$router.go()
Call this.$router.go() method to move forward and backward in browsing history. The example code is as follows:
<template>
  <div class="movie-container">

    <button @click="goback">back off</button>
  </div>
</template>
<script>
export default {
  name: 'Movie',
  // Receive props data
  props: ['mid'],
  methods: {
    showThis() {
      console.log(this)
    },
    goback() {
      // go(-1) means to step back one layer
      // If the number of layers retreated exceeds the upper limit, stay in place
      this.$router.go(-1)
    }
  }
}
</script>
Simplified usage of $router.go:
In actual development, generally only one layer of pages will be moved forward and backward. Therefore, Vue router provides the following two convenient methods:
① $router.back(): in history, go back to the previous page
② $router.forward(): in the history, advance to the next page
- Navigation guard
The navigation guard can control the access rights of the route. The schematic diagram is as follows:
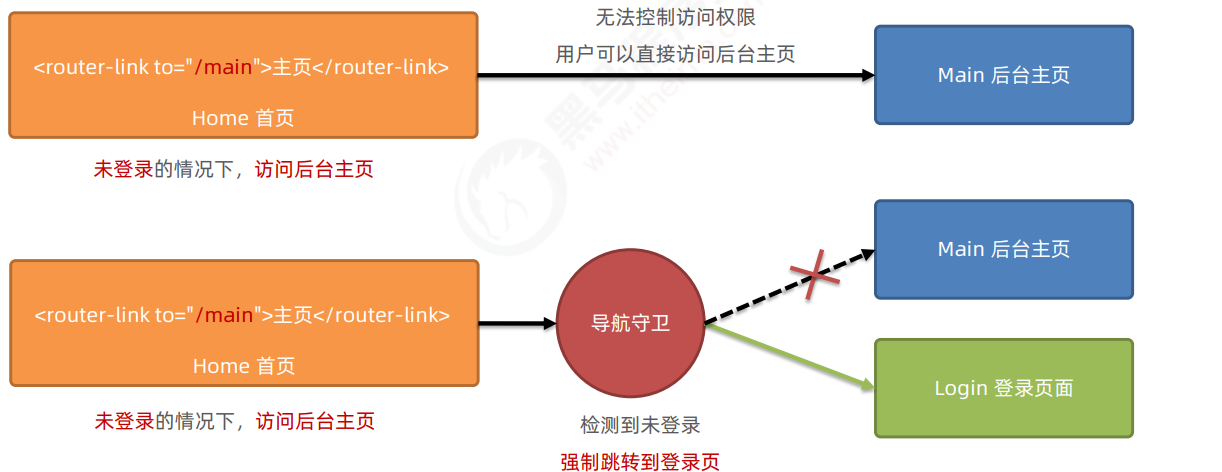
Global front guard
Every time the navigation jump of the route occurs, the global front guard will be triggered. Therefore, in the global front guard, programmers can control the access rights of each route:
// Declare the global pre navigation guard for the router instance object
// As long as a route jump occurs, the function callback function specified before each will be triggered
router.beforeEach(function(to, from, next) {
  // To represents the information object of the route to be accessed
  // from represents the information object of the route to leave
  // The next() function means release
  // analysis:
  // 1. Get the hash address that the user will access
  // 2. Judge whether the hash address is equal to / main.
  // 2.1 if it is equal to / main, it proves that you need to log in before you can access successfully
  // 2.2 if it is not equal to / main, you do not need to log in and release next() directly
  // 3. If the accessed address is / main. You need to read the token value in localStorage
  // 3.1 if there is a token, release it
  // 3.2 if there is no token, it is forced to jump to the / login login page
  if (to.path === '/main') {
    // To access the background home page, you need to determine whether there is a token
    const token = localStorage.getItem('token')
    if (token) {
      next()
    } else {
      // No login, forced jump to login page
      next('/login')
    }
  } else {
    next()
  }
})
Three formal parameters of guard method
The callback function of the global front guard receives three formal parameters in the following format:
const router = new VueRouter({...})

//Global front navigation
router.beforeEach((to,from,next)=>{
    //To is the information object of the route to be accessed
    //from is the information object of the route to leave
    //Next is a function. Calling next() means release and allows this route navigation
})
Three calling methods of next function
Refer to the schematic diagram to analyze the final results of the three call methods of the next function:

The current user has access to the background home page. Direct release: next()
The current user does not have access to the background home page. Force him to jump to the login page: next('/ Login')
The current user does not have access to the background home page, and it is not allowed to jump to the background home page: next(false)
6.4 control the access authority of the background home page
 // 3. If the accessed address is / main. You need to read the token value in localStorage
  // 3.1 if there is a token, release it
  // 3.2 if there is no token, it is forced to jump to the / login login page
  if (to.path === '/main') {
    // To access the background home page, you need to determine whether there is a token
    const token = localStorage.getItem('token')
    if (token) {
      next()
    } else {
      // No login, forced jump to login page
      next('/login')
    }
  } else {
    next()
  }