Before understanding tumbling window, let's have a basic understanding of the "window" when it comes to stream processing or stream computing. In the data flow, there is a source that continuously generates data, which makes it infeasible to calculate the final value.
The "window" defines a set of finite elements on an unbounded flow on which we can apply calculations. This collection can assign elements to Windows based on time, element count, a combination of count and time, or some custom logic. For example:
- Number of orders received per minute (fixed time)
- Average time to complete the last 100 orders (fixed element)
Flow framework vendors implement a variety of types of "window" definitions. Flink has three types
- Tumble window (also known as "scroll window")
- sliding window
- Session window,
This paper will focus on the first one.
TumblingWindow
This window is easy to understand and easy to use. It is a fixed size window, in which the window size can be time (30 seconds, 5 minutes) or count (100 elements).

The 5-minute time window will collect all the elements that arrive in the window and calculate them after 5 minutes. A new window will start every 5 minutes. The count window 100 will collect 100 elements in the window and calculate the value of the window when the 100th element is added. Most importantly, there are no overlapping and duplicate elements between windows. Each element is assigned to only one window If a key is specified, Flink will logically partition the stream and run parallel window operations for each keyed element.
Let's look at an example to better understand them. Here, we use a simple "IntegerGeneratorSource" class as a data source to generate an integer every second (starting from 1). The following code line initializes a local Flink environment and creates a DataStream object.
// Set the flow execution environment
final StreamExecutionEnvironment env = StreamExecutionEnvironment.getExecutionEnvironment();

// add data source
DataStream<String> initStream = env.addSource(new IntegerGenerator());
(1)Tumbling Time window
The following is the code to calculate the rolling time window.
initStream.timeWindowAll(Time.seconds(5))
          .process(new ProcessAllWindowFunction<Integer, Integer, TimeWindow>() {
               @Override
               public void process(Context context, Iterable<Integer> input, Collector<Integer> output) throws Exception {
                   logger.info("Computing sum for {}", input);
                   int sum = 0;
                   for(int i : input){
                       sum += i;
                   }
                   output.collect(sum);
               }
            })
            .print();

env.execute("flink TumblingWindow");
Note: ProcessAllWindowFunction will allow Flink to buffer all elements of a window in memory, and then pass the entire element to the calculation. This is why there is an iteratable < > object as the input parameter of process().
Some log information of running is shown in the figure below:
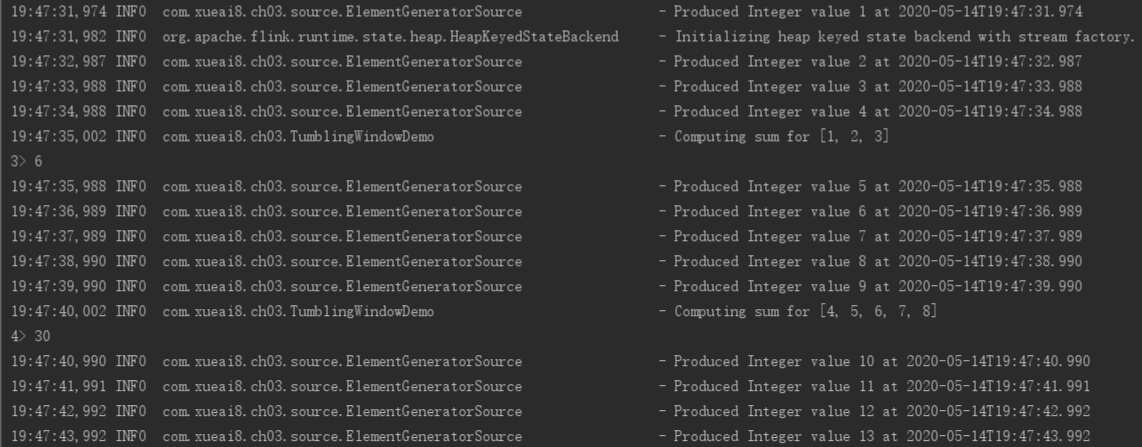
- Three integers are generated before the first window closes. Note that although we say that the window size is 5 seconds, the first window does not run for 5 seconds. The reason is that by default, Flink will round to the nearest clock boundary, which is "19:47:35" in our example . this triggers Flink TriggerWindow to close the current window and pass it to the next step.
- In code The process() method is called on all elements [1, 2, 3], and the result '6' is printed out to the console.
- The new window starts and collects the next set of integers. At "19:47:40" after 5 seconds, the window closes. All collected data is sent to the process. The process prints the received integers and calculates the sum of the numbers in the window = '30'. Then the sum of the integers in the current window is printed to the control console.
(2)Tumbling Count window
The following is the code for calculating the scroll count window. Define a scroll window with four elements (fixed size by count).
initStream.countWindowAll(4)
          .reduce(new ReduceFunction<Integer>() {
               @Override
               public Integer reduce(Integer value1, Integer value2) throws Exception {
                   logger.info("Reducing {} and {}", value1, value2);
                   return value1 + value2;
               }
          }).print();

env.execute("flink TumblingWindow");
Note: ReduceFunction will let Flink perform incremental calculation (rolling update). Compared with ProcessFunction, the memory consumption is very small. The first parameter is the calculated value of the previous window, and the second parameter is the current element allocated to this window.
The log information during execution is as follows:

- In each window, the first two integers are collected first, and then Flink triggers TriggerWindow to call the reduce() method with the first two elements. The calculation result '3' is cached in Flink.
- The data source generated the next integer '3'.
- The reduce() method is called. Please note that the first parameter '3' here is the result from the previous calculation, and the second parameter '3' is the integer currently generated by the data source. The calculation result '6' is cached in Flink.
- The data source generated the next integer '4'.
- The reduce() method is called. The first parameter '6' is the result from the previous calculation, and the second parameter '4' is the integer currently generated by the data source. The calculation result '6' is cached in Flink. Now the calculated value is 10. At this time, Flink has collected 4 integers from the source, so the count condition of this window has been met.
- Because the current window count size has reached, Flink prints the value of 10 (1 + 2 + 3 + 4) for this window.
- A new window starts, waiting for the next two integers from the source.
- reduce() is called with a new set of numbers (now 5 and 6).
- Apply similar logic to the next two numbers and call reduce() accordingly to perform incremental updates.
- When Flink gets four numbers for the current window, it calls print() and outputs 26 (5 + 6 + 7 + 8).
Customize the time offset of the scrolling window
Continue to modify the code on "Tumbling Time window" in the previous section as follows:
initStream.windowAll(TumblingProcessingTimeWindows.of(Time.seconds(5),Time.seconds(2)))
                .process(new ProcessAllWindowFunction<Integer, Integer, TimeWindow>() {
                    @Override
                    public void process(Context context, Iterable<Integer> input, Collector<Integer> output) throws Exception {
                        logger.info("Computing sum for {}", input);
                        int sum = 0;
                        for(int i : input){
                            sum += i;
                        }
                        output.collect(sum);
                    }
                })
                .print();
Note that only the first line has been modified here, replacing "timeWindowAll(Time.seconds(5))" with "windowall (tumbling processing timewindows. Of (time. Seconds (5), time. Seconds (2))" in more detail
timeWindowAll() is a wrapper method. It defaults to windowall (tumbling processingtimewindows. Of (size)), that is, a window with a fixed size by time (this time is the time when the system runs Flink jobs, that is, the processing time).
By default, Flink starts the window at the clock boundary, but using the second parameter of windowAll(), we can customize the clock boundary.
The log information during execution is as follows:
 Flink starts a window to collect integers. However, at "20:12:27", this window closes and triggers the sum calculation of [1]. Then the sum is printed on the console.
Note that if no offset is provided, Flink will close the window at "20:12:25". However, since the offset is 2 seconds, the window ends 2 seconds beyond the clock boundary, i.e. "20:12:27".
Tumbling window use event time
So far, the time used by Flink to execute the job is the default system time, that is, the event processing time. However, in many application scenarios, we want to use the actual time of the event, that is, the time when the event is created in the event source, which is called "Event Time".
In the event time, Flink will group the elements into windows according to the timestamp of the elements themselves, rather than any system clock. See the following example.
First, define a POJO class named "Element" to represent the event type in the data flow.
public class Element {
    public Integer value;
    public Long timestamp;

    public Element(){}

    public Element(Integer value, Long timestamp) {
        this.value = value;
        this.timestamp = timestamp;
    }

    @Override
    public String toString() {
        return "Element{" +
                "value=" + value +
                '}';
    }
}
Next, define a simple data source class "ElementGeneratorSource", which will create an event object of Element type and assign a randomly increasing timestamp (this is to ensure that no Element with matching system time is generated). In a production environment, a timestamp is part of the event itself.
package com.xueai8.ch03.source;

import com.xueai8.ch03.entity.Element;
import org.apache.flink.streaming.api.functions.source.SourceFunction;
import org.slf4j.Logger;
import org.slf4j.LoggerFactory;

import java.time.Instant;
import java.time.LocalDateTime;
import java.time.ZoneId;
import java.util.concurrent.ThreadLocalRandom;

/**
 * Created by www.xueai8.com
 * Custom data source
 */
public class ElementGeneratorSource implements SourceFunction<Element> {

    volatile boolean isRunning = true;
    final Logger logger = LoggerFactory.getLogger(ElementGeneratorSource.class);

    @Override
    public void run( SourceContext<Element> ctx ) throws Exception{
        int counter = 1;

        // 20 seconds after the flick program starts
        long eventStartTime = System.currentTimeMillis() - 20000;

        // Create the first event using the timestamp above
        Element element = new Element(counter++, eventStartTime);

        while( isRunning ){
            logger.info("Produced Element with value {} and timestamp {}", element.value, printTime(element.timestamp));
            ctx.collect( element );

            // Create elements and assign random timestamps so that they are not the same time as the current system clock
            element = new Element(counter++, element.timestamp + ThreadLocalRandom.current().nextLong( 1000, 6000 ));

            Thread.sleep(1000);
        }
    }

    @Override
    public void cancel(){
        isRunning = false;
    }

    // The helper function prints the epoch time in a readable format
    String printTime(long longValue){
        return LocalDateTime.ofInstant(Instant.ofEpochMilli(longValue), ZoneId.systemDefault()).toString();
    }

}
Now, we define a pipeline to process these elements using the tumbling event time window.
package com.xueai8.ch03;

import com.xueai8.ch03.entity.Element;
import com.xueai8.ch03.source.ElementGeneratorSource;
import org.apache.flink.streaming.api.TimeCharacteristic;
import org.apache.flink.streaming.api.datastream.DataStreamSource;
import org.apache.flink.streaming.api.environment.StreamExecutionEnvironment;
import org.apache.flink.streaming.api.functions.timestamps.AscendingTimestampExtractor;
import org.apache.flink.streaming.api.functions.windowing.ProcessAllWindowFunction;
import org.apache.flink.streaming.api.windowing.assigners.TumblingEventTimeWindows;
import org.apache.flink.streaming.api.windowing.time.Time;
import org.apache.flink.streaming.api.windowing.windows.TimeWindow;
import org.apache.flink.util.Collector;
import org.slf4j.Logger;
import org.slf4j.LoggerFactory;

/**
 * Created by www.xueai8.com
 *
 * TumblingWindow: Rollover window (or rollover window)
 * Use Event Time
 */
public class TumblingWindowDemo2 {

    public static void main(String[] args) throws Exception {
        Logger logger = LoggerFactory.getLogger(TumblingWindowDemo2.class);

        // Set the flow execution environment
        final StreamExecutionEnvironment env = StreamExecutionEnvironment.getExecutionEnvironment();

        // Set to EventTime, otherwise it defaults to ProcessTime
        env.setStreamTimeCharacteristic(TimeCharacteristic.EventTime);

        DataStreamSource<Element> elementStream = env.addSource( new ElementGeneratorSource() );

        elementStream
                // Before defining the window, you need to tell Flink how to get the timestamp and watermark of each element it receives
                .assignTimestampsAndWatermarks( new AscendingTimestampExtractor<Element>(){
                    @Override
                    public long extractAscendingTimestamp( Element element ){
                        return element.timestamp;
                    }

                })
                // Define a TumblingEventTimeWindows type window with a size of 10 seconds
                .windowAll(TumblingEventTimeWindows.of(Time.seconds(10)))
                .process(new ProcessAllWindowFunction<Element, Integer ,TimeWindow>(){
                    @Override
                    public void process( Context arg0, Iterable<Element> input, Collector<Integer> output )
                            throws Exception {
                        logger.info( "Computing sum for {}", input );
                        int sum = 0;
                        for(Element e : input) {
                            sum += e.value;
                        }
                        output.collect( sum );

                    }
                })
                .print();

        env.execute();
    }
}
"Ascending timestamp extractor" is a timestamp allocator and watermark generator for streams with monotonically increasing timestamps. Another advantage of using this API provided by Flink is that it will generate watermarks for us. Watermark is a way to let Flink know when to close the current window (the last element belonging to the window has arrived).
In short, the assignTimestampsAndWatermarks() method will allow Flink to know how to read Flink's timestamp from the event / element and, most importantly, how to calculate the watermark.
The log information output during the execution of the above example code is as follows:
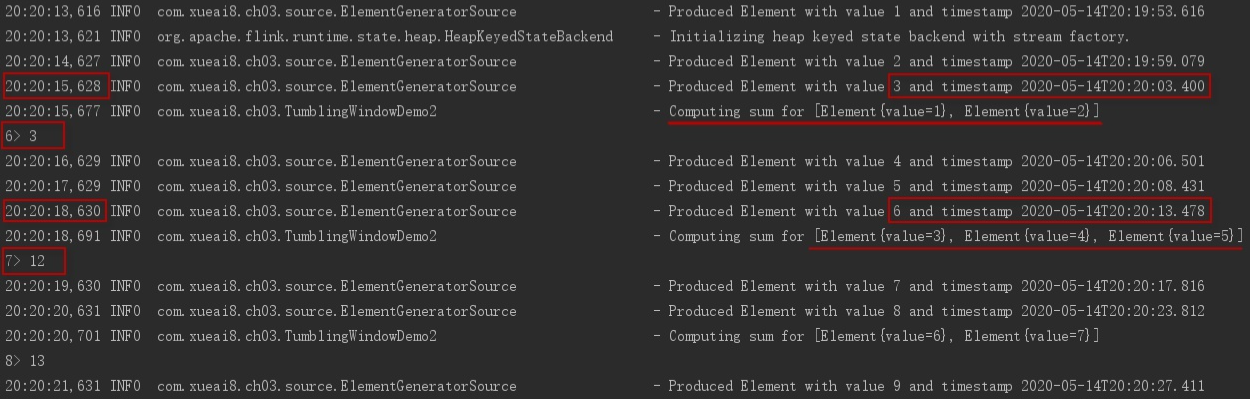 As can be seen from the figure, in the first window, the timestamp of the generated element is different from the system clock (the system clock is printed for each line of log, and the event time is on the far right)
When the third element is generated in "2020-05-14T20:20:03.400", it triggers the current window to close because the watermark has arrived. In a 10 second TimeWindow, the end time will be "2020-05-14T20:20:00.000". Therefore, the current window collects only the first two values.
In the next round of window calculation, the second window will be closed in "2020-05-14T20:20:10.000", which means that the values 3, 4 and 5 in the second window will be collected, because the element "timestamp > = current watermark" with value 6.
Summary
In this article, we looked at two types of tumblr windows (time vs count) and their default behavior. We also saw two window functions, ProcessAllFunction and ReduceFunction, for accumulation and incremental calculation.
In addition, we discussed rewriting the default time clock boundary and how to use the tumbling event time window. We also saw an example of assigning a timestamp to an element.