1, Stand alone installation
1.1 elasticsearch and kibana
There are three ways to install es and kibana: yum, rpm, tar gz
The latter two methods can be used in the Intranet environment when yum needs to open the external network.
1.1.1 es installation
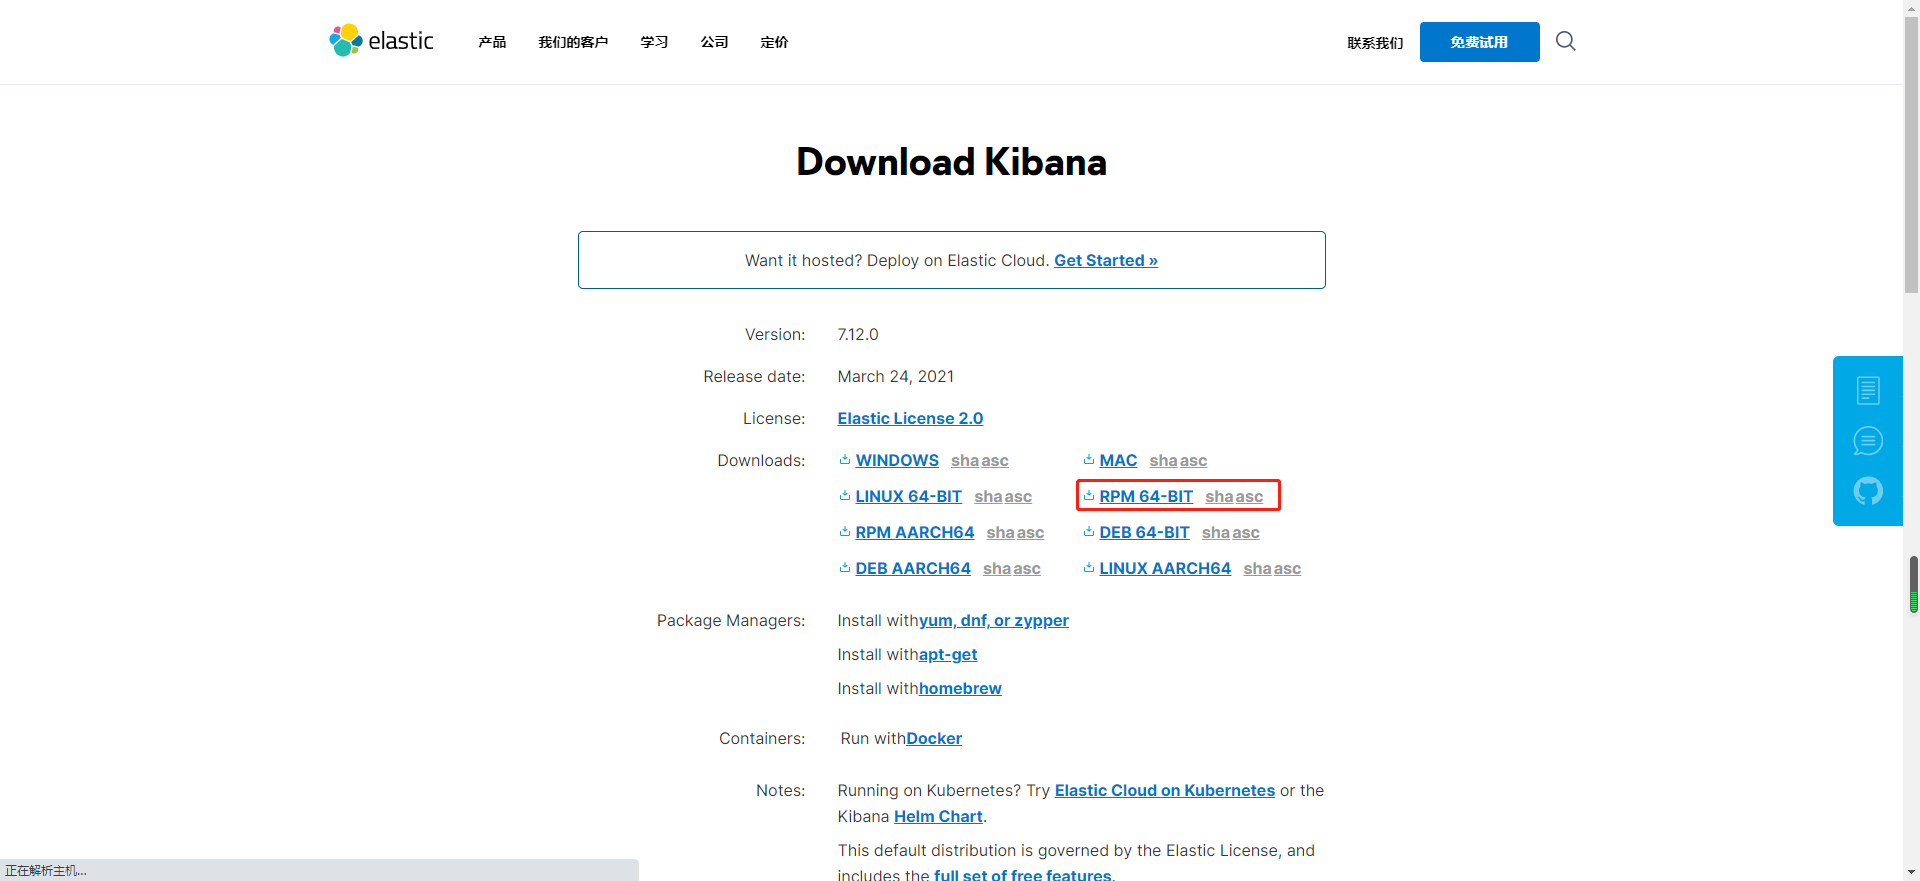
How we install rpm this time:

Download the rpm file and upload it to the server, and install it with the following command:
[root@localhost opt]# rpm --install elasticsearch-7.12.0-x86_64.rpm
Warning: elasticsearch-7.12.0-x86_64.rpm: head V4 RSA/SHA512 Signature, secret key ID d88e42b4: NOKEY
Creating elasticsearch group... OK
Creating elasticsearch user... OK
### NOT starting on installation, please execute the following statements to configure elasticsearch service to start automatically using systemd
 sudo systemctl daemon-reload
 sudo systemctl enable elasticsearch.service
### You can start elasticsearch service by executing
 sudo systemctl start elasticsearch.service
warning: usage of JAVA_HOME is deprecated, use ES_JAVA_HOME
Future versions of Elasticsearch will require Java 11; your Java version from [/usr/lib/jvm/java-1.8.0-openjdk-1.8.0.282.b08-1.el7_9.x86_64/jre] does not meet this requirement. Consider switching to a distribution of Elasticsearch with a bundled JDK. If you are already using a distribution with a bundled JDK, ensure the JAVA_HOME environment variable is not set.
Created elasticsearch keystore in /etc/elasticsearch/elasticsearch.keystore
Use the following command to start es:
systemctl start elasticsearch
Use the following command to view es status:
[root@localhost opt]# systemctl stats elasticsearch
Unknown operation 'stats'.
[root@localhost opt]# systemctl status elasticsearch
● elasticsearch.service - Elasticsearch
   Loaded: loaded (/usr/lib/systemd/system/elasticsearch.service; disabled; vendor preset: disabled)
   Active: active (running) since VI 2021-04-10 16:40:42 CST; 2min 7s ago
     Docs: https://www.elastic.co
 Main PID: 35470 (java)
    Tasks: 56
   Memory: 2.1G
   CGroup: /system.slice/elasticsearch.service
           ├─35470 /usr/share/elasticsearch/jdk/bin/java -Xshare:auto -Des.networkaddress.cache.ttl=60 -Des.networkaddress.cache.negative.ttl=10 -XX:+AlwaysPreTouch -Xss1m -Djava.awt.headless=true -Dfile.encoding=UTF-8 -Djna.nosys=true -XX:-OmitSt...
           └─35769 /usr/share/elasticsearch/modules/x-pack-ml/platform/linux-x86_64/bin/controller

4 October 16:40:23 localhost.localdomain systemd[1]: Starting Elasticsearch...
4 October 16:40:42 localhost.localdomain systemd[1]: Started Elasticsearch.
Use the following command to stop:
systemctl stop elasticsearch
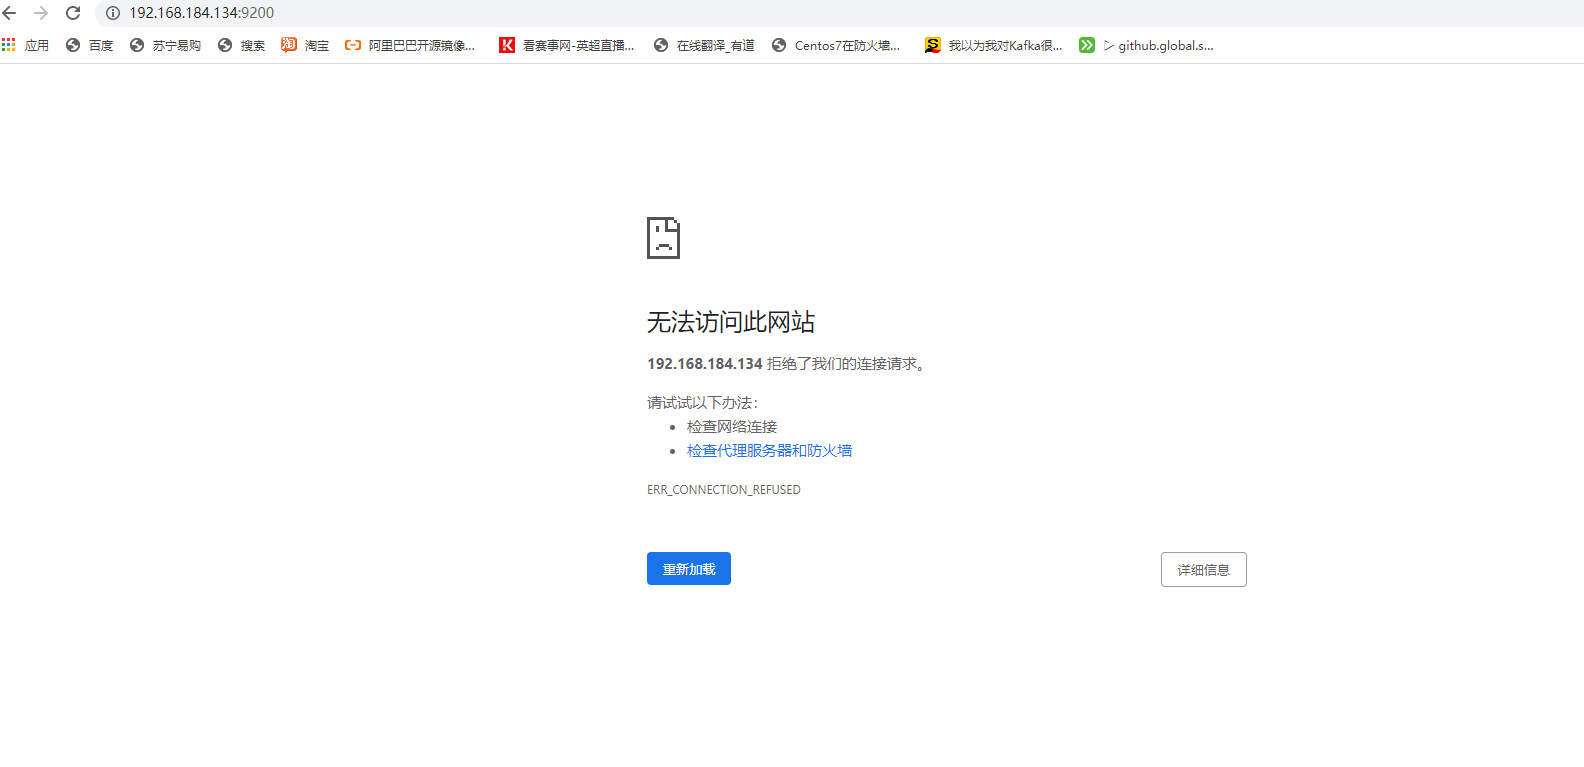
The browser finds that it cannot be accessed. Please note whether the firewall has opened port 9200
[root@localhost opt]# firewall-cmd --list-ports
9092/tcp 2181/tcp 2888/tcp 3888/tcp
Add firewall policy and reload:
[root@localhost opt]# firewall-cmd --zone=public --add-port=9200/tcp --permanent
success
[root@localhost opt]# systemctl reload firewalld
[root@localhost opt]# firewall-cmd --list-ports
9092/tcp 2181/tcp 2888/tcp 3888/tcp 9200/tcp
Browser access discovery still failed:
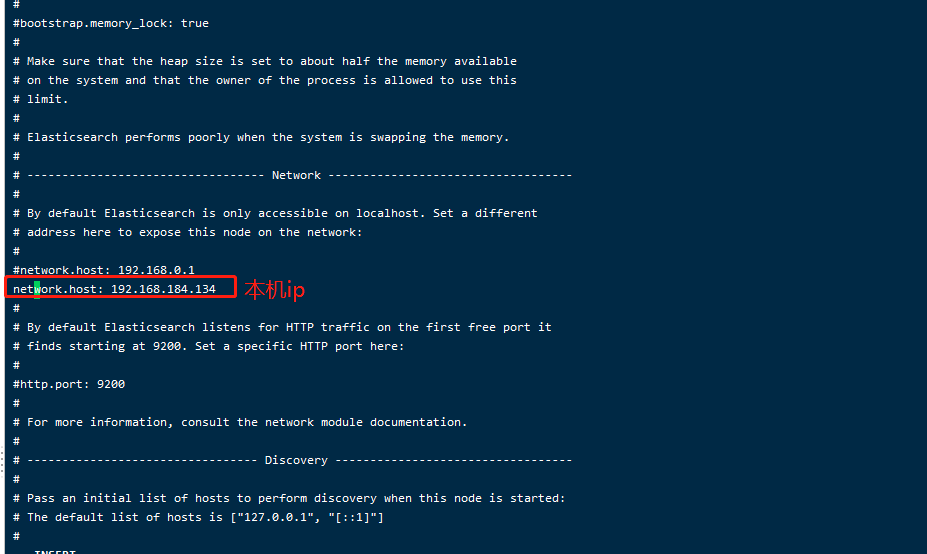
Because you need to open Internet access to es, edit the configuration file:
[root@localhost opt]# vi /etc/elasticsearch/elasticsearch.yml
Restart, found that the startup failed
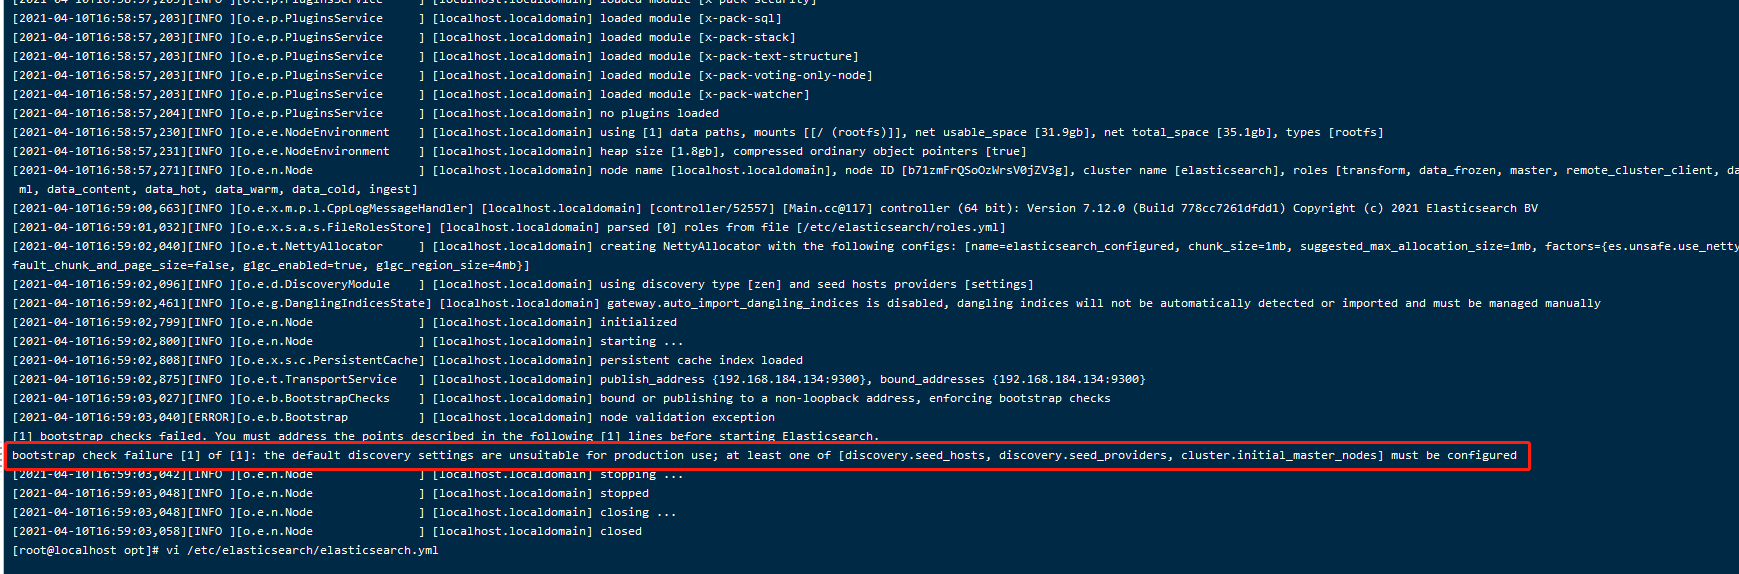
The error is as follows:
bootstrap check failure [1] of [1]: the default discovery settings are unsuitable for production use; at least one of [discovery.seed_hosts, discovery.seed_providers, cluster.initial_master_nodes] must be configured
The main reason is that we do not specify the master node. The service will always look for the master node. We can configure it in the configuration file.
# ---------------------------------- Cluster -----------------------------------
#
# Use a descriptive name for your cluster:
#
cluster.name: my-application

# ------------------------------------ Node ------------------------------------
#
# Use a descriptive name for the node:
#
node.name: node-1

# --------------------------------- Discovery ----------------------------------
#
# Pass an initial list of hosts to perform discovery when this node is started:
# The default list of hosts is ["127.0.0.1", "[::1]"]
#
#discovery.seed_hosts: ["host1", "host2"]
#
# Bootstrap the cluster using an initial set of master-eligible nodes:
#
cluster.initial_master_nodes: ["node-1", "node-2"]
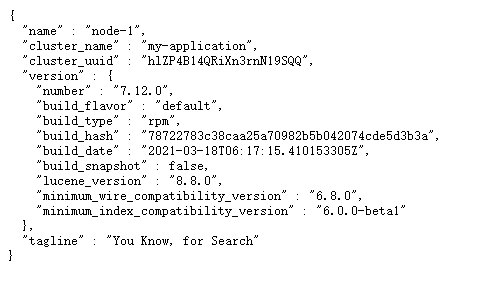
Restart again and access the ip:9200 port through the browser. Finally, you can access it. The return is as follows:
###1.1.2 kibana installation
kibana we also use the rpm installation method:
Upload to the server and install with the following command:
[root@localhost opt]# rpm --install kibana-7.12.0-x86_64.rpm
Warning: kibana-7.12.0-x86_64.rpm: head V4 RSA/SHA512 Signature, secret key ID d88e42b4: NOKEY
Creating kibana group... OK
Creating kibana user... OK
Created Kibana keystore in /etc/kibana/kibana.keystore
Start the service and open the firewall default port 5601:
[root@localhost opt]# systemctl start kibana
[root@localhost opt]# firewall-cmd --zone=public --add-port=5601/tcp --permanent
success
[root@localhost opt]# systemctl reload firewalld
[root@localhost opt]# firewall-cmd --list-ports
9092/tcp 2181/tcp 2888/tcp 3888/tcp 9200/tcp 5601/tcp
Open kibana's Internet access:
vi /etc/kibana/kibana.yml
# Develop Internet access rights
server.host: 192.168.184.134
# Address of es cluster
elasticsearch.hosts: ["http://192.168.184.134:9200","http://192.168.184.135:9200","http://192.168.184.136:9200"]
Restart kibana:
[root@localhost opt]# systemctl restart kibana
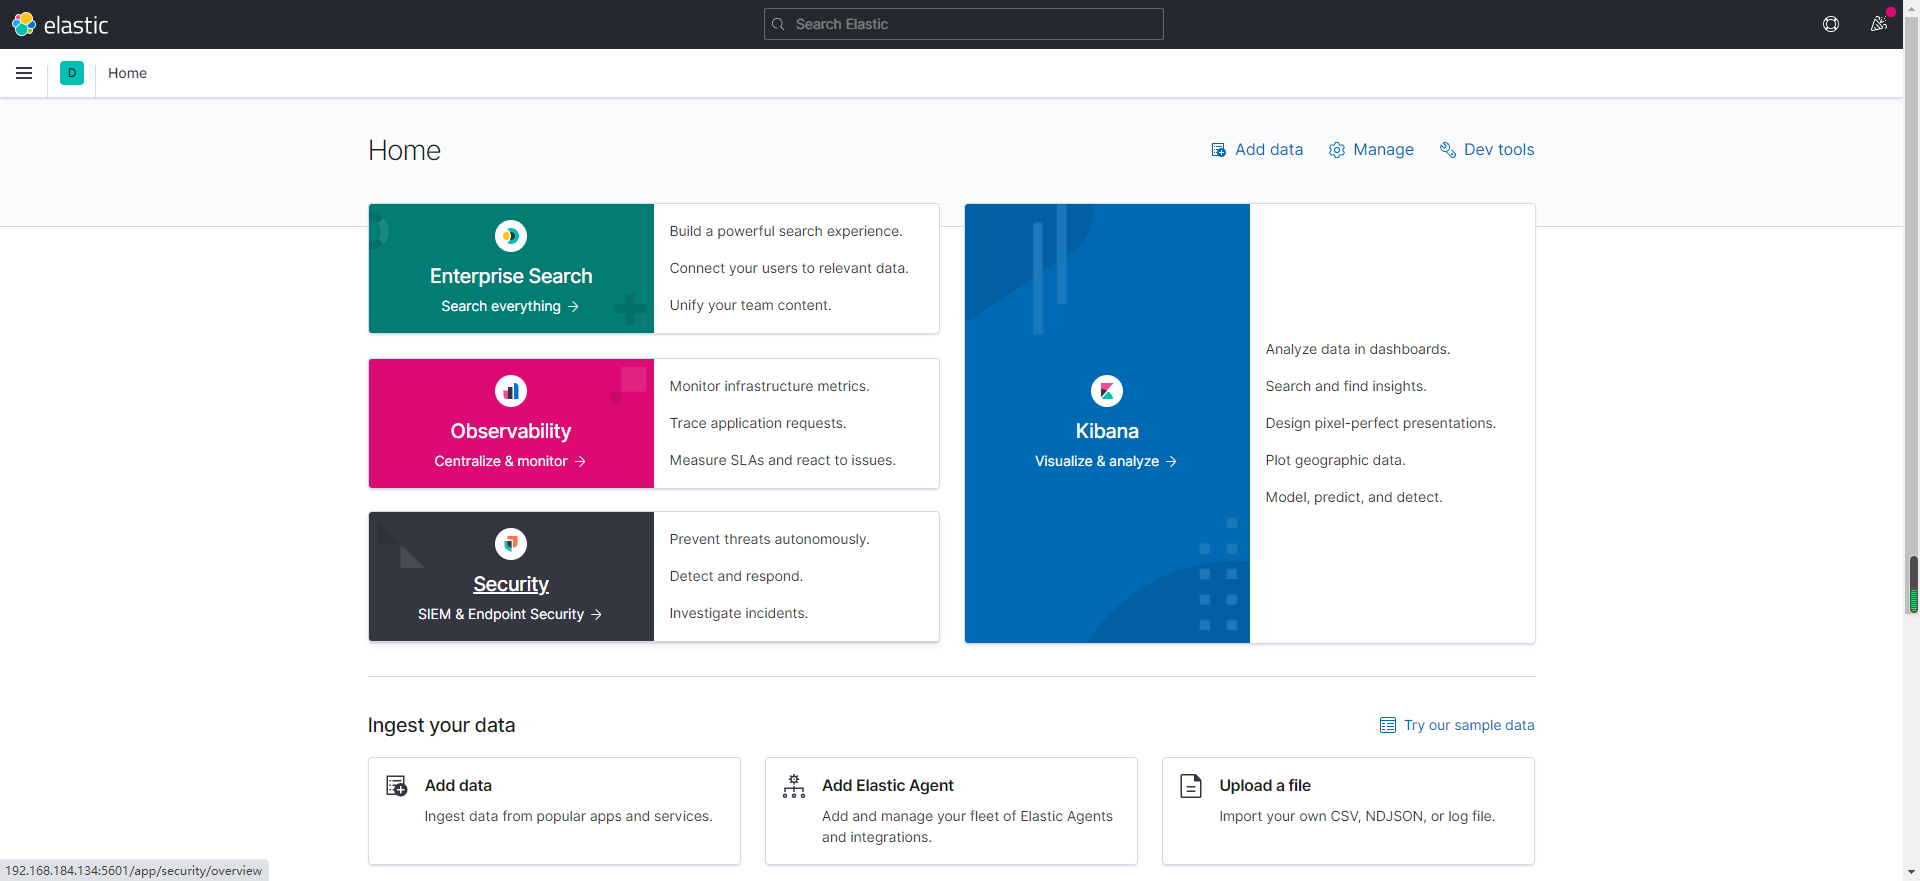
result:
##1.2 ik participle of elasticsearch
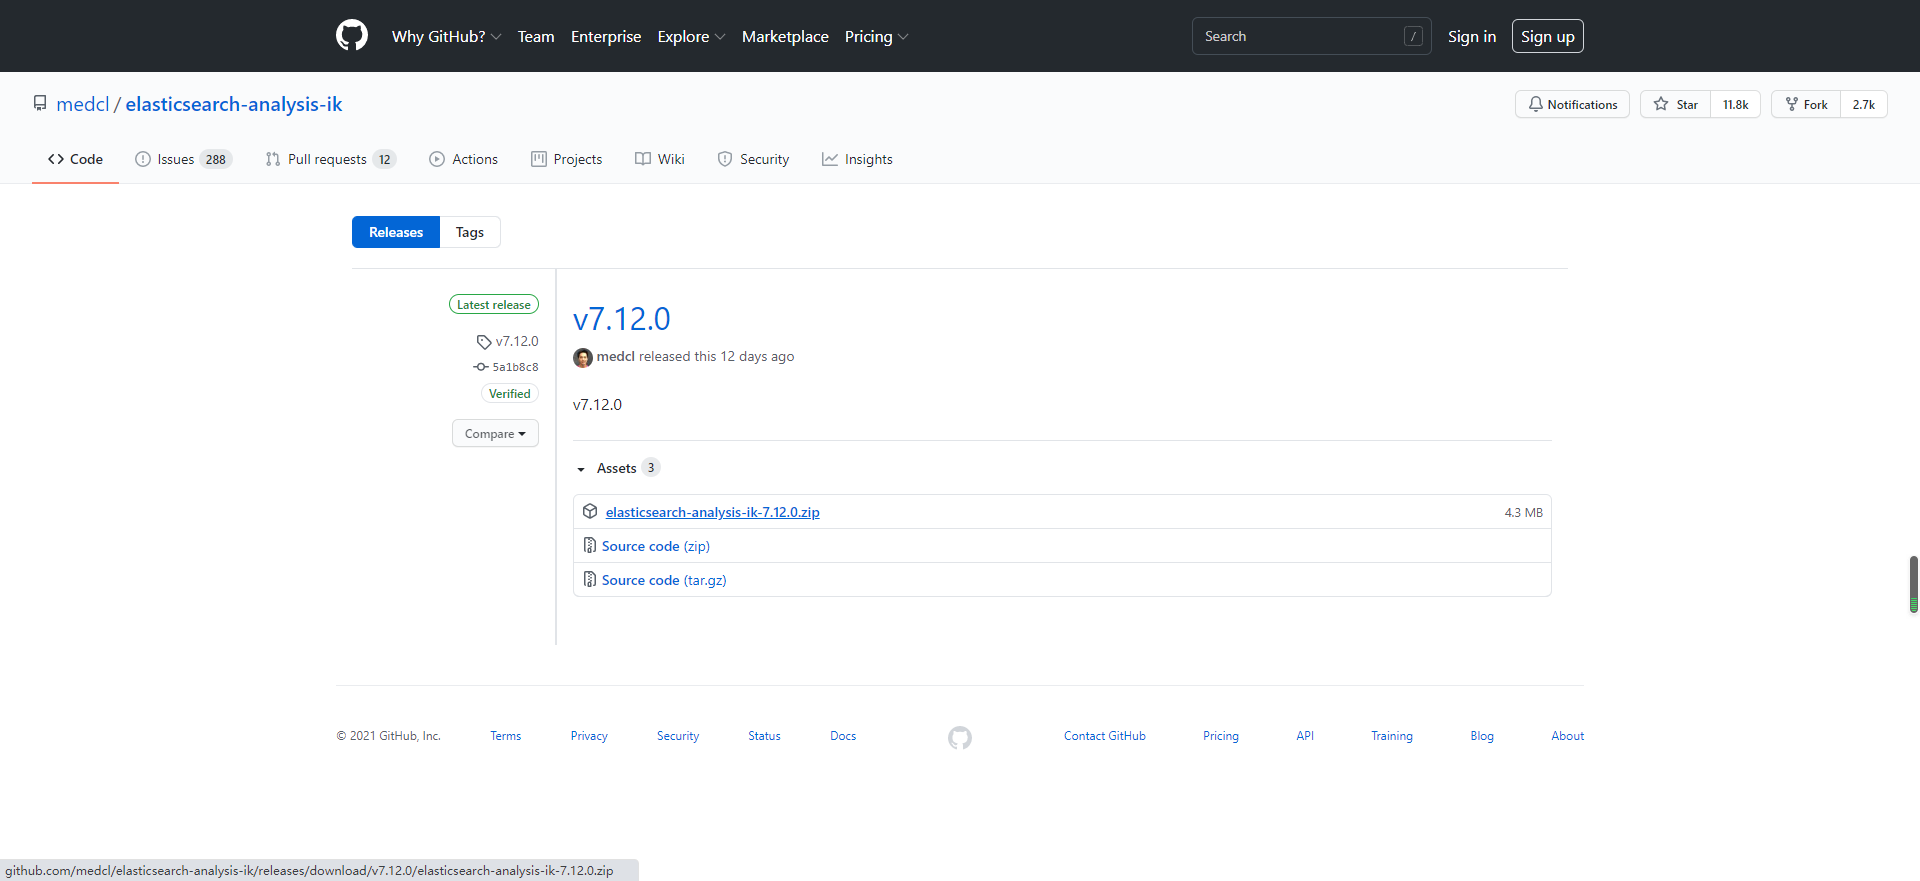
When we use the full-text retrieval function of es, we need to use Chinese word segmentation. Here we choose elastic search-analysis-ik-7.12.0, which is also the corresponding version.
Download on GitHub: https://github.com/medcl/elasticsearch-analysis-ik/releases/tag/v7.12.0
First, enter the installation directory of elasticsearchd:
[root@localhost /]# cd /usr/share/elasticsearch/
[root@localhost elasticsearch]# ll
 Total consumption 560
drwxr-xr-x.  2 root root   4096 4 October 16:39 bin
drwxr-xr-x.  9 root root    107 4 October 16:39 jdk
drwxr-xr-x.  3 root root   4096 4 October 16:39 lib
-rw-r--r--.  1 root root   3860 3 June 18-14:15 LICENSE.txt
drwxr-xr-x. 61 root root   4096 4 October 16:39 modules
-rw-rw-r--.  1 root root 545323 3 June 18-14:19 NOTICE.txt
drwxr-xr-x.  2 root root      6 3 June 18-14:30 plugins
-rw-r--r--.  1 root root   7263 3 June 18-14:14 README.asciidoc
Enter plugins, create an ik directory, enter the ik directory, copy the ik zip package to the current directory, unzip, delete the zip package, and view the current directory. The operations are as follows:
[root@localhost elasticsearch]# cd plugins/
[root@localhost plugins]# mkdir ik
[root@localhost plugins]# cp /opt/elasticsearch-
elasticsearch-7.12.0-x86_64.rpm       elasticsearch-analysis-ik-7.12.0.zip  elasticsearch-head-5.0.0.zip
[root@localhost plugins]# cp /opt/elasticsearch-analysis-ik-7.12.0.zip ./
[root@localhost plugins]# cd ik
[root@localhost ik]# cp /opt/elasticsearch-analysis-ik-7.12.0.zip ./
[root@localhost ik]# ll
 Total consumption 4400
-rw-r--r--. 1 root root 4504461 4 October 17:39 elasticsearch-analysis-ik-7.12.0.zip
[root@localhost ik]# unzip elasticsearch-analysis-ik-7.12.0.zip
Archive:  elasticsearch-analysis-ik-7.12.0.zip
  inflating: elasticsearch-analysis-ik-7.12.0.jar
  inflating: httpclient-4.5.2.jar
  inflating: httpcore-4.4.4.jar
  inflating: commons-logging-1.2.jar
  inflating: commons-codec-1.9.jar
   creating: config/
  inflating: config/main.dic
  inflating: config/quantifier.dic
  inflating: config/extra_single_word_full.dic
  inflating: config/IKAnalyzer.cfg.xml
  inflating: config/surname.dic
  inflating: config/suffix.dic
  inflating: config/stopword.dic
  inflating: config/extra_main.dic
  inflating: config/extra_stopword.dic
  inflating: config/preposition.dic
  inflating: config/extra_single_word_low_freq.dic
  inflating: config/extra_single_word.dic
  inflating: plugin-descriptor.properties
  inflating: plugin-security.policy
[root@localhost ik]# rm -rf elasticsearch-analysis-ik-7.12.0.zip
[root@localhost ik]# ll
 Total consumption 1432
-rw-r--r--. 1 root root 263965 5 June 2018 commons-codec-1.9.jar
-rw-r--r--. 1 root root  61829 5 June 2018 commons-logging-1.2.jar
drwxr-xr-x. 2 root root   4096 12 May 25, 2019 config
-rw-r--r--. 1 root root  54625 3 September 29-23:08 elasticsearch-analysis-ik-7.12.0.jar
-rw-r--r--. 1 root root 736658 5 June 2018 httpclient-4.5.2.jar
-rw-r--r--. 1 root root 326724 5 June 2018 httpcore-4.4.4.jar
-rw-r--r--. 1 root root   1807 3 September 29-23:08 plugin-descriptor.properties
-rw-r--r--. 1 root root    125 3 September 29-23:08 plugin-security.policy
Next restart es:
[root@localhost ik]# systemctl restart elasticsearch
Check the plug-in loading through the log. The cluster configuration is enabled here, so we need to check the cluster log my application log:
[root@localhost elasticsearch]# cat /var/log/elasticsearch/my-application.log
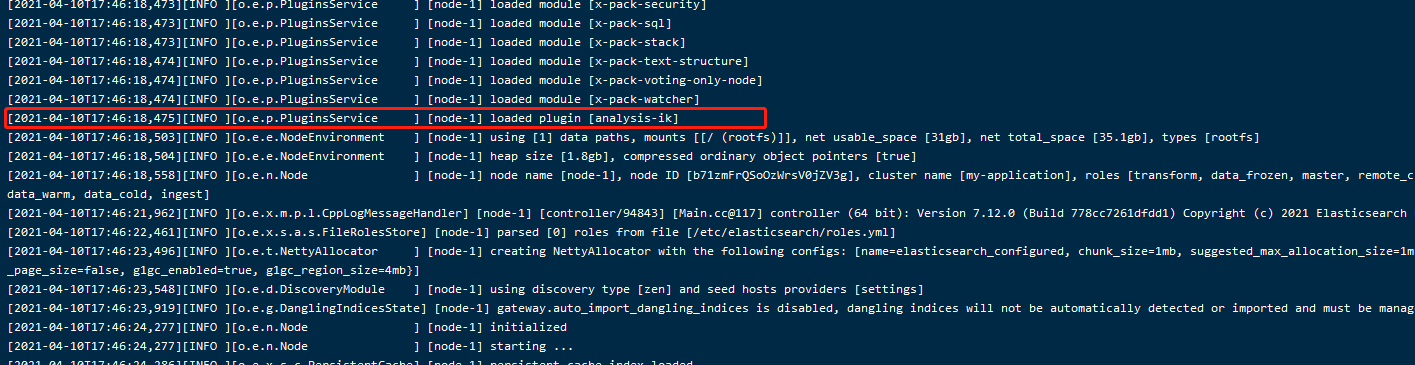
The word breaker has been loaded successfully.
1.3 elasticsearch-head
This plug-in is a front-end project, which mainly monitors the cluster status of es:
Download the source code from GitHub: https://github.com/mobz/elasticsearch-head
If the server can condense git, you can directly clone or download the zip package. This article downloads the zip package directly.
This service is directly installed in windows:
Unzip the file, enter the file, and then use the following command to install the dependency. You need to install node. If not, install it yourself:
npm install
Start:
PS E:\javasoft\es-7.12\elasticsearch-head-5.0.0> npm run start

> elasticsearch-head@0.0.0 start E:\javasoft\es-7.12\elasticsearch-head-5.0.0
> grunt server

Running "connect:server" (connect) task
Waiting forever...
Started connect web server on http://localhost:9100
visit http://localhost:9100
As found above, es is not connected. Here, you need to modify the configuration of es to solve this cross domain problem.
Add the following to the configuration file:
[root@localhost opt]# vi /etc/elasticsearch/elasticsearch.yml

#Additional content
http.cors.enabled: true
http.cors.allow-origin: "*"
Visit the page again and find that the installation is successful:
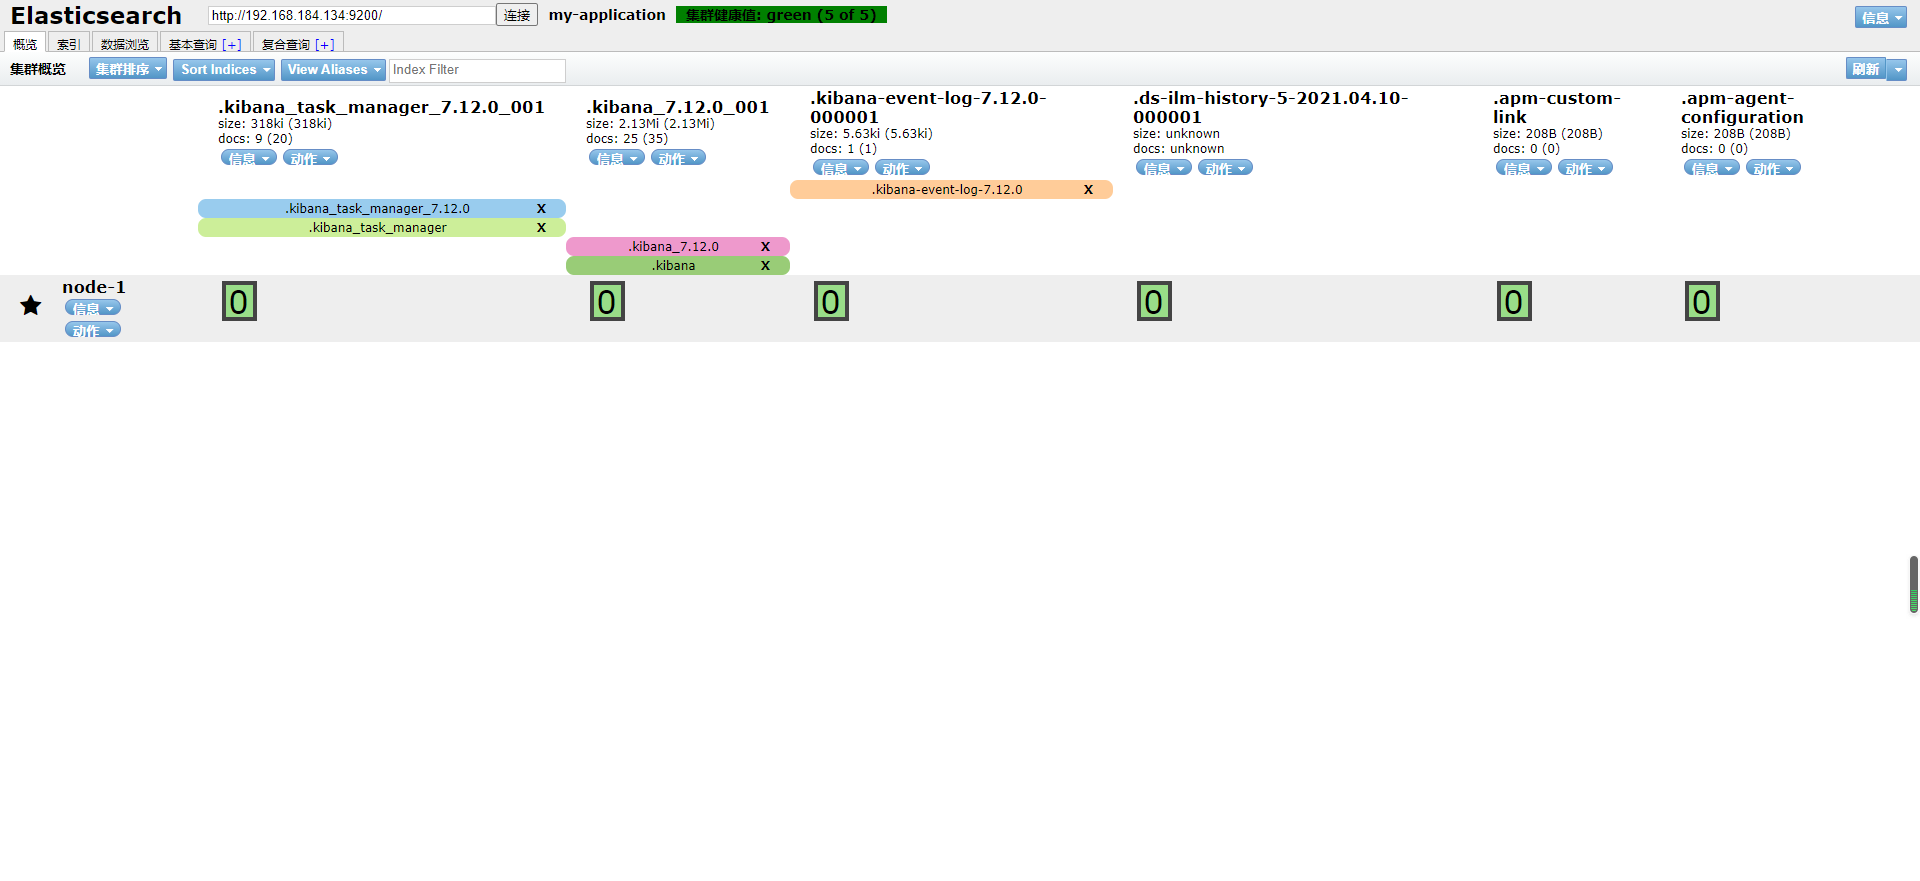
2, Add cluster
In the head above, we can see that there is only one node, and two nodes are added below. The installation method is no different from the previous es installation, and the configuration file is a little different.
2.1 configuration file
We only need to upload es installation files and ik files.
Take a look at the overall cluster configuration file. The redundant comments are deleted:
# ======================== Elasticsearch Configuration =========================
# ---------------------------------- Cluster -----------------------------------
# Cluster name
cluster.name: my-application
#
# ------------------------------------ Node ------------------------------------
# The name of the current node
node.name: node-0
# ----------------------------------- Paths ------------------------------------
# Data storage path
path.data: /var/lib/elasticsearch
# log file path
path.logs: /var/log/elasticsearch
# ---------------------------------- Network -----------------------------------
#Open Internet access
network.host: 192.168.184.134
# Host access port
http.port: 9200
# --------------------------------- Discovery ----------------------------------
# es7. For the configuration added after X, write the device address of the candidate master node. After the service is started, it can be selected as the master node
# After es7, discover is not required zen. ping. unicast. For the parameter hosts, use discovery seed_ Hosts replacement
discovery.seed_hosts: ["192.168.184.134", "192.168.184.135","192.168.184.136"]
#
## es7.x. This configuration is required to elect a master when initializing a new cluster
cluster.initial_master_nodes: ["node-0","node-1","node-2"]

#Can the current node become the master node
node.master: true

# Whether the current node is used to store data. Yes: true, No: false
node.data: true

# Whether cross domain is supported: true. This configuration is required when using the head plug-in
http.cors.enabled: true

# "*" indicates that all domain names are supported
http.cors.allow-origin: "*"
be careful:
In the process of configuring the cluster, please clear the data of each node before restarting each node, otherwise the startup will fail.
Note that kibana should also be restarted.
2.2 es head configuration
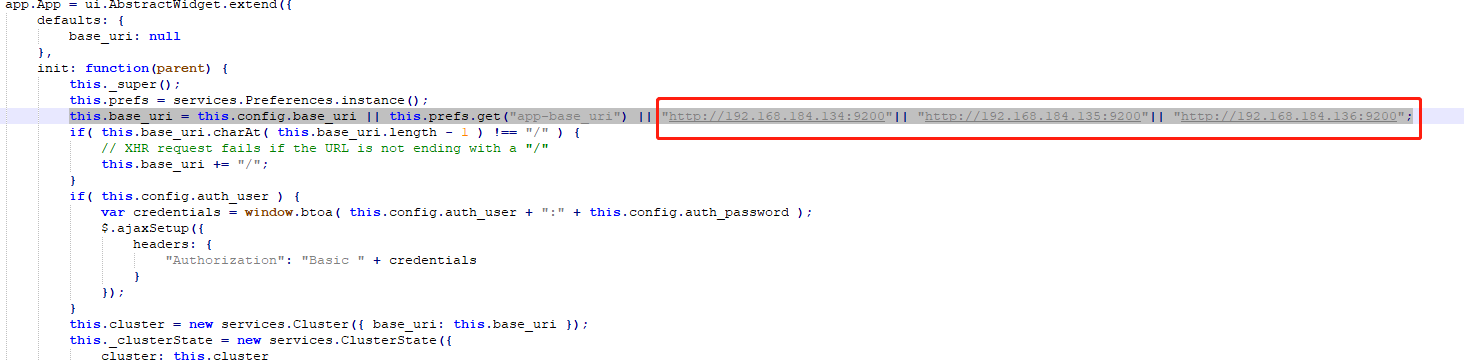
Modify elasticsearch-head-5.0.0_site\app.js configuration
Replace the original localhost with any ip port of the cluster. I have three
Modify gruntfile JS file, add hostname
		connect: {
			server: {
				options: {
					port: 9100,
					hostname: '0.0.0.0',
					base: '.',
					keepalive: true
				}
			}
		}
Check localhost:9100 after startup
2.3 use kibana to check the status of es
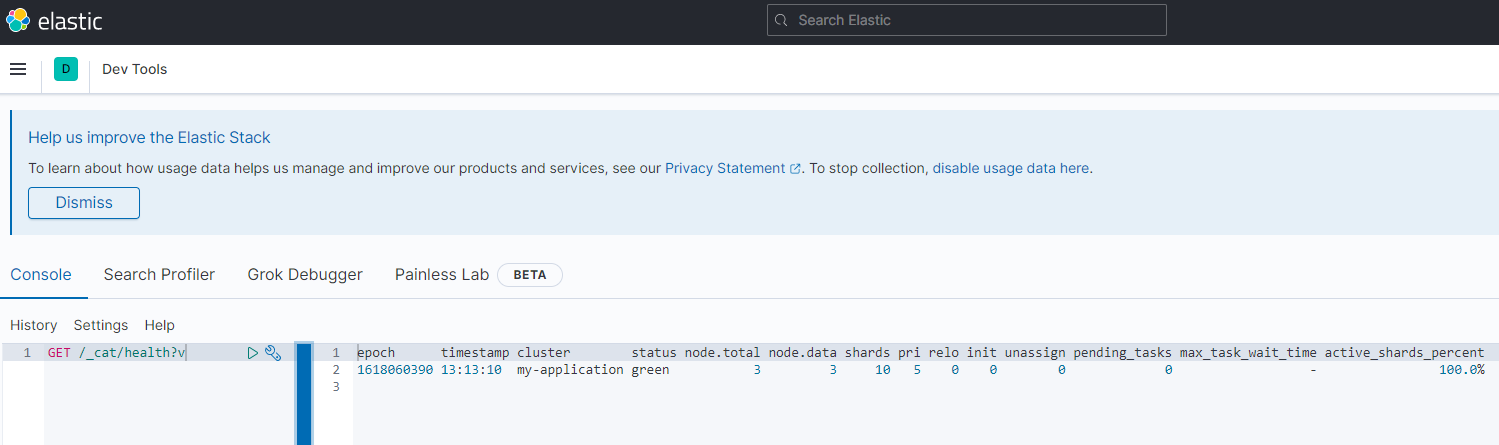
View cluster health status:
GET /_cat/health?v
Create index test, three slices and one backup:
PUT /test/
{
  "settings":{
    "index":{
      "number_of_shards" : "3",
      "number_of_replicas" : "1"
    }
  }
}
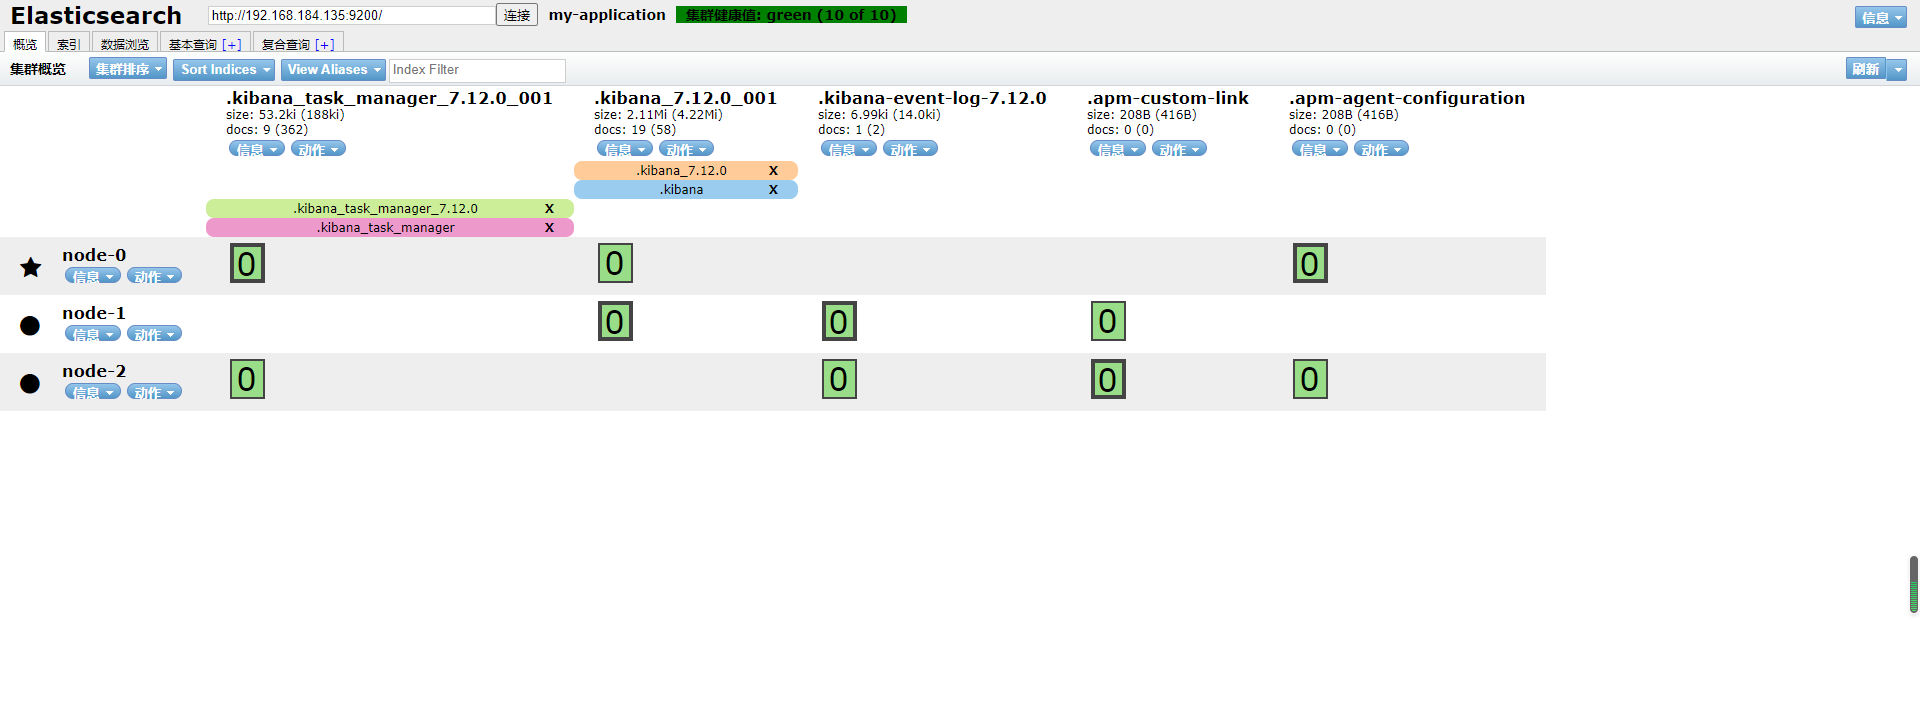
View head:
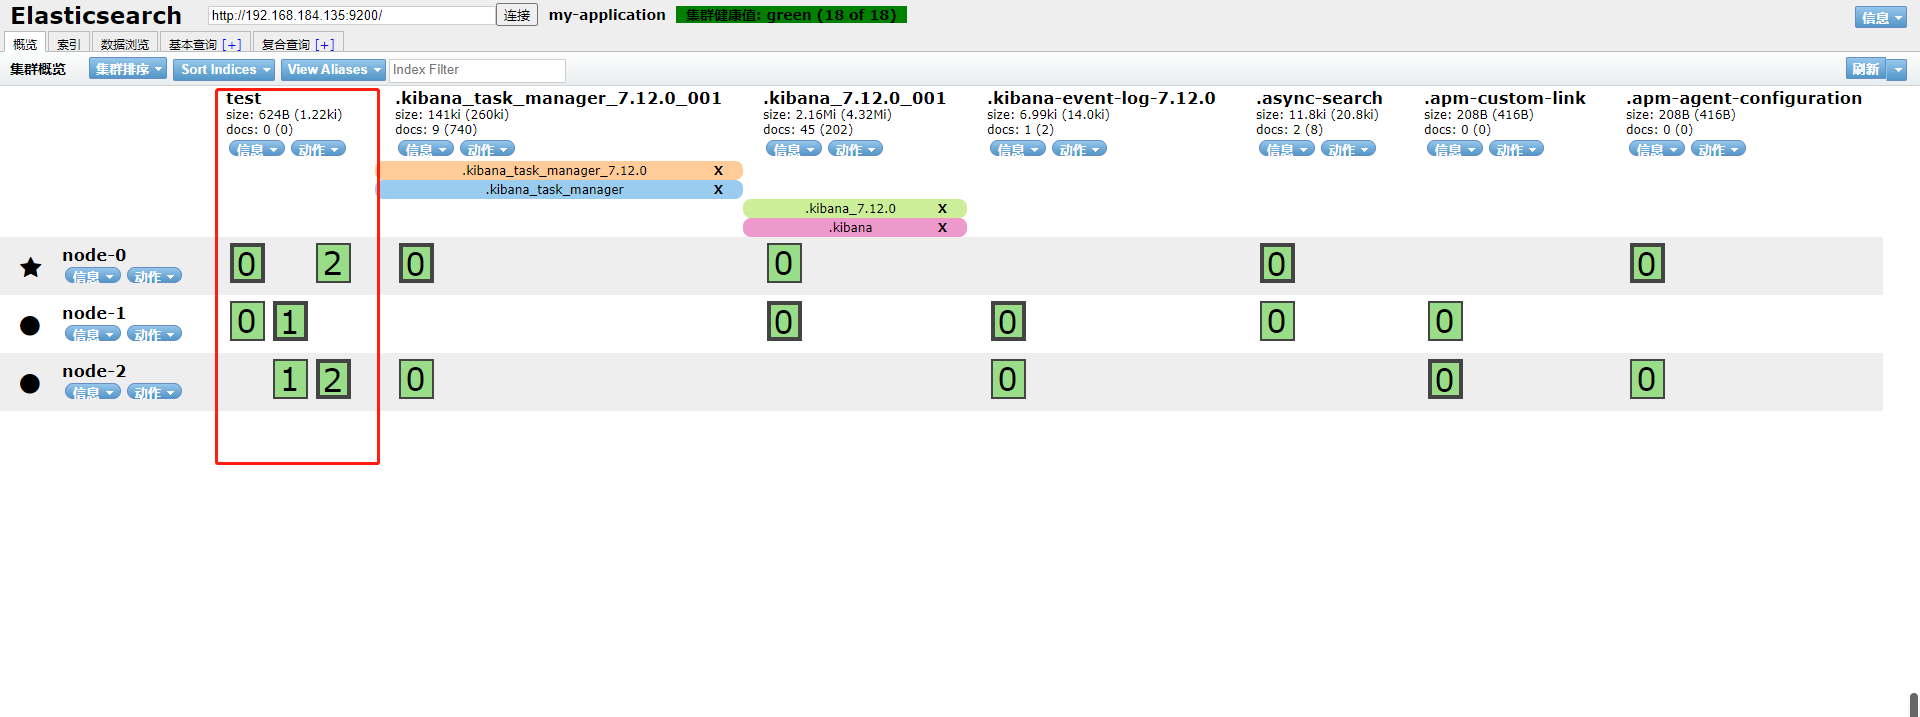
So far, the cluster has been built successfully.