preface
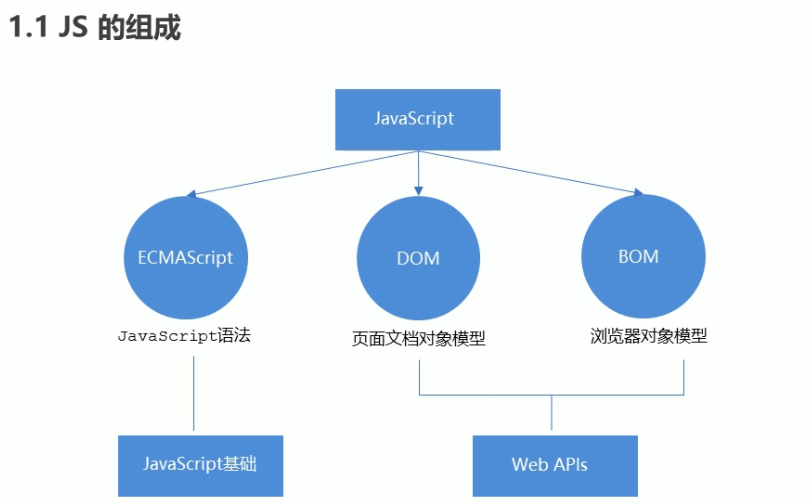
1.1 composition of JS
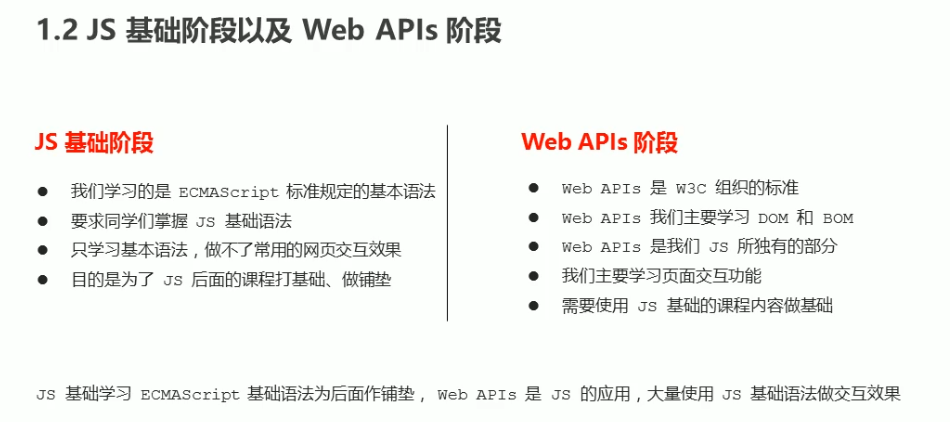
1.2 JS foundation stage and Web APIs stage
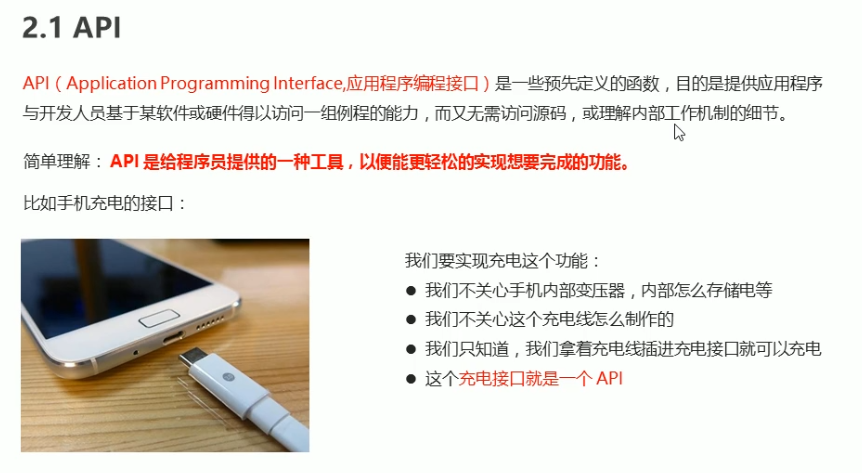
2.1 API
2.2 Web API
2.3 API and Web API summary
1, DOM
1. Introduction to DOM
1.1. What is DOM
Document Object Model (DOM) is a standard programming interface recommended by W3C organization to deal with extensible markup language (HTML or XML)
W3C has defined a series of DOM interfaces, which can change the content, structure and style of web pages.
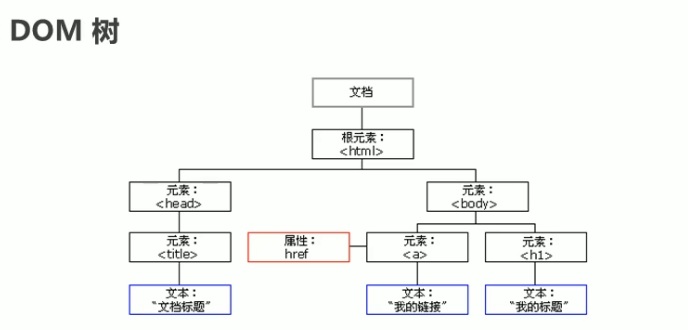
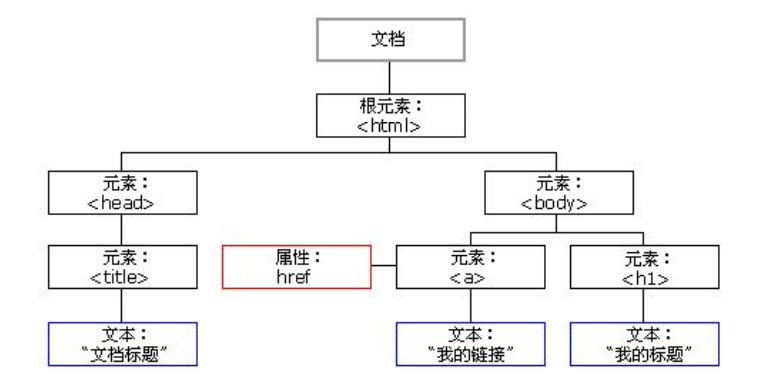
1.2 DOM tree
-
Document: a page is a document, which is represented by doucument in DOM
-
Element: all tags in the page are elements, which are represented by element in DOM
-
Node: all contents in a web page are nodes (labels, attributes, text, comments, etc.), which are represented by node in DOM
DOM treats all of the above as objects
2. Get element
2.1. How to get page elements
DOM is mainly used to manipulate elements in our actual development.
How do we get the elements in the page?
There are several ways to get the elements in the page:
-
Get by ID
-
Get by tag name
-
Get through the new method in HTML5
-
Special element acquisition
2.2. Obtain by ID
Use the getElementByld() method to get the element object with ID
doucument.getElementByld('id name')Use console Dir () can print the element object we get and better view the attributes and methods in the object.
Example
<div id="time">2019-9-9</div>
<script>
    // 1. Because our document page is loaded from top to bottom, there must be a label first, so the script is written under the label
    // 2.get the element by through the hump naming method
    // 3. The parameter id is a case sensitive string
    // 4. An element object is returned
    var timer = document.getElementById('time');
    console.log(timer);
    // 5. console.dir prints our element object to better view the properties and methods inside
    console.dir(timer);
</script>
2.3. Obtain according to the tag name
1. Get the collection of objects with the specified tag name
Based on the tag name, use the getElementsByTagName() method to return a collection of objects with the specified tag name
doucument.getElementsByTagName('Tag name');be careful:
-
Because the result is a collection of objects, we need to traverse if we want to operate the elements inside
-
The resulting element object is dynamic
-
What is returned is the collection of obtained element objects, which are stored in the form of pseudo array
-
If the element cannot be obtained, an empty pseudo array is returned (because the object cannot be obtained)
Example:
<ul>
    <li>I've been waiting for you for a long time</li>
    <li>I've been waiting for you for a long time</li>
    <li>I've been waiting for you for a long time</li>
    <li>I've been waiting for you for a long time</li>
    <li>I've been waiting for you for a long time</li>
</ul>
<script>
    // 1. The returned is the collection of obtained element objects, which is stored in the form of pseudo array
    var lis = document.getElementsByTagName('li');
    console.log(lis);
    console.log(lis[0]);
    // 2. Print in sequence and traverse
    for (var i = 0; i < lis.length; i++) {
        console.log(lis[i]);
    }
    // 3. If there is only one li in the page, the return is still in the form of pseudo array
    // 4. If there is no such element in the page, an empty pseudo array is returned
</script>
2. Get all child elements with specified tag names inside an element (parent element)
You can also get all the child elements with specified tag names inside an element (parent element) according to the tag name, excluding the parent element itself
element.getElementsByTagName('Tag name')

ol.getElementsByTagName('li');
Note: the parent element must be a single object (which element object must be specified), and the parent element itself is not included in the acquisition
<ol id="ol">
    <li>Rare words</li>
    <li>Rare words</li>
    <li>Rare words</li>
    <li>Rare words</li>
</ol>
<script>
// 5. element.getElementsByTagName('tag name '); The parent element must be the specified single element
// var ol = document.getElementsByTagName('ol'); // [ol]
// console.log(ol[0].getElementsByTagName('li'));
//element.getElementsByTagName('tag name '); The parent element must be the specified single element
var ol = document.getElementById('ol');
console.log(ol.getElementsByTagName('li'));
</script>2.4. Obtained through H5 new method
①getElementsByClassName
Returns the collection of element objects according to the class name
-
document.getElementsByClassName('class name ')
document.getElementsByClassName('Class name'); ②document.querySelector
Returns the first element object according to the specified selector
document.querySelector('selector');
// Remember that the selector inside needs to be signed
// Class selector box
// id selector #nav
var firstBox = document.querySelector('.box');③document.querySelectorAll
Returns all element objects according to the specified selector
document.querySelectorAll('selector');be careful:
querySelector and querySelectorAll The selector inside needs to be signed,such as:
document.querySelector('#nav');
④ Examples
<body>

    <div class="box">Box 1</div>
    <div class="box">Box 2</div>
    <div id="nav">
        <ul>
            <li>home page</li>
            <li>product</li>
        </ul>
    </div>
    <script>
        // 1. getElementsByClassName obtains some element collections according to the class name
        var boxs = document.getElementsByClassName('box');
        console.log(boxs);
        // 2. querySelector returns the first element object of the specified selector. Remember that the selector in it needs to be signed box  #nav
        var firstBox = document.querySelector('.box');
        console.log(firstBox);
        var nav = document.querySelector('#nav');
        console.log(nav);
        var li = document.querySelector('li');
        console.log(li);
        // 3. querySelectorAll() returns the collection of all element objects of the specified selector
        var allBox = document.querySelectorAll('.box');
        console.log(allBox);
        var lis = document.querySelectorAll('li');
        console.log(lis);
    </script>

</body>
2.5. Obtaining special elements
① Get body element
Returns the body element object
document.body;
② Get html element
Returns the html element object
document.documentElement;
3. Event basis
3.1 event overview
JavaScript enables us to create dynamic pages, and events are behaviors that can be detected by JavaScript.
Simple understanding: trigger response mechanism.
Each element in the web page can generate some events that can trigger JavaScript. For example, we can generate an event when the user clicks a button, and then perform some operations.
3.2 three elements of events
-
Event source (who)
-
Event type (what event)
-
Event handler (what to do)
<button id="btn">Tang Bohu</button>
<script>
    // Click a button to pop up a dialog box
    // 1. An event is an event handler that consists of three parts: an event source, an event type, and an event handler
    //(1) Event source the object whose button the event is triggered
    var btn = document.getElementById('btn');
    //(2) How do event types trigger events, such as onclick, mouse over or keyboard down
    //(3) The event handler is completed by a function assignment
    btn.onclick = function() {
        alert('Point Qiuxiang');
    }
</script>
3.3. Steps to execute the event
-
Get event source
-
Registration event (binding event)
-
Add event handler (in the form of function assignment)
<div>123</div>
<script>
    // Perform event steps
    // Click the div console output, and I'm selected
    // 1. Get event source
    var div = document.querySelector('div');
    // 2. Binding event registration event
    // div.onclick
    // 3. Add event handler
    div.onclick = function() {
        console.log('I was chosen');
    }
</script>
3.4 mouse events
| Mouse event | Trigger condition |
|---|---|
| onclick | Click the left mouse button to trigger |
| onmouseover | Mouse over trigger |
| onmouseout | Mouse away trigger |
| onfocus | Get mouse focus trigger |
| onblur | Loss of mouse focus trigger |
| onmousemove | Mouse movement trigger |
| onmouseup | Mouse bounce trigger |
| onmousedown | Mouse press trigger |
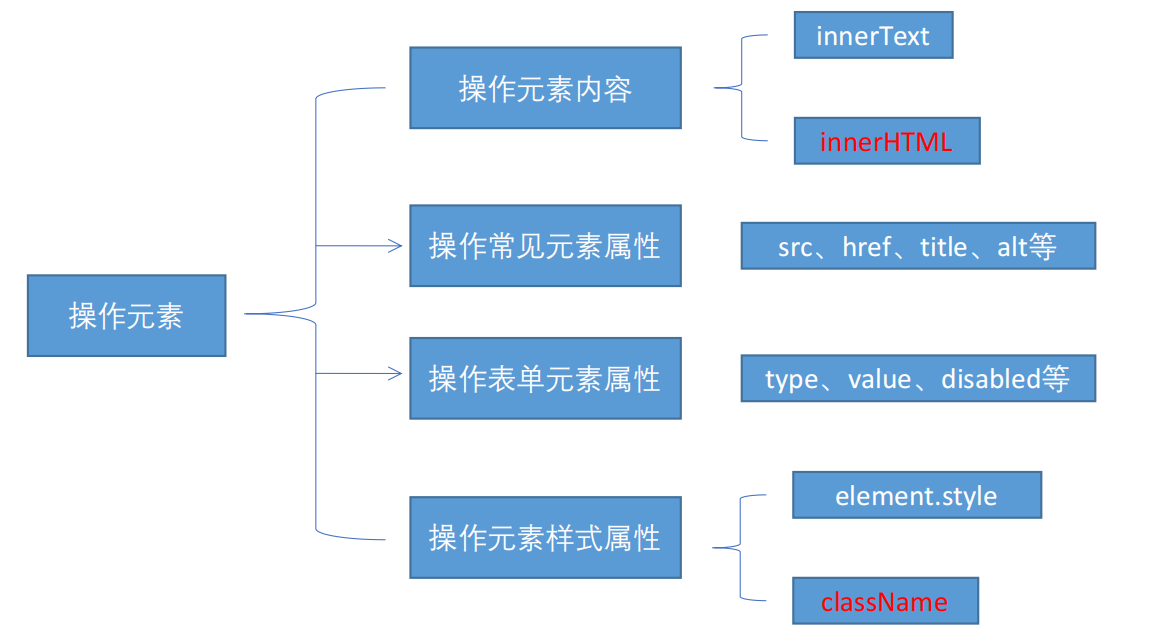
4. Operation element
The DOM operation of JavaScript can change the content, structure and style of web pages. We can use DOM operation elements to change the content and attributes of elements. Note that the following are attributes
4.1. Change element content
1.element.innerText
The content from the start position to the end position, but it removes html tags, as well as spaces and line breaks.
element.innerText
Example: get the current time and display it on the page
<button>Displays the current system time</button>
<div>At a certain time</div>
<p>1123</p>
<script>
    // When we click the button, the text in div will change
    // 1. Get element
    var btn = document.querySelector('button');
    var div = document.querySelector('div');
    // 2. Registration event
    btn.onclick = function() {
        // div.innerText = '2019-6-6';
        div.innerHTML = getDate();
    }

    function getDate() {
        var date = new Date();
        // Let's write a Wednesday, May 1, 2019
        var year = date.getFullYear();
        var month = date.getMonth() + 1;
        var dates = date.getDate();
        var arr = ['Sunday', 'Monday', 'Tuesday', 'Wednesday', 'Thursday', 'Friday', 'Saturday'];
        var day = date.getDay();
        return 'Today is:' + year + 'year' + month + 'month' + dates + 'day ' + arr[day];
    }
    // We don't need to add events to the element
    var p = document.querySelector('p');
    p.innerHTML = getDate();
</script>
2.element.innerHTML
All content from the start position to the end position, including HTML tags, while leaving spaces and line breaks
element.innerHTML
3. Difference between innerText and innerHTML
<div></div>
<p>
    I am writing
    <span>123</span>
</p>
<script>
    // The difference between innerText and innerHTML
    // 1. innerText does not recognize html tags. Non standard removal of spaces and line breaks
    var div = document.querySelector('div');
    // Div.innertext = '< strong > today is: < / strong > 2019';
    // 2. innerHTML recognizes html tags. W3C standard retains spaces and line breaks
    div.innerHTML = '<strong>Today is:</strong> 2019';
    // These two attributes are readable and writable, and you can get the contents of the element
    var p = document.querySelector('p');
    console.log(p.innerText);
    console.log(p.innerHTML);
</script> 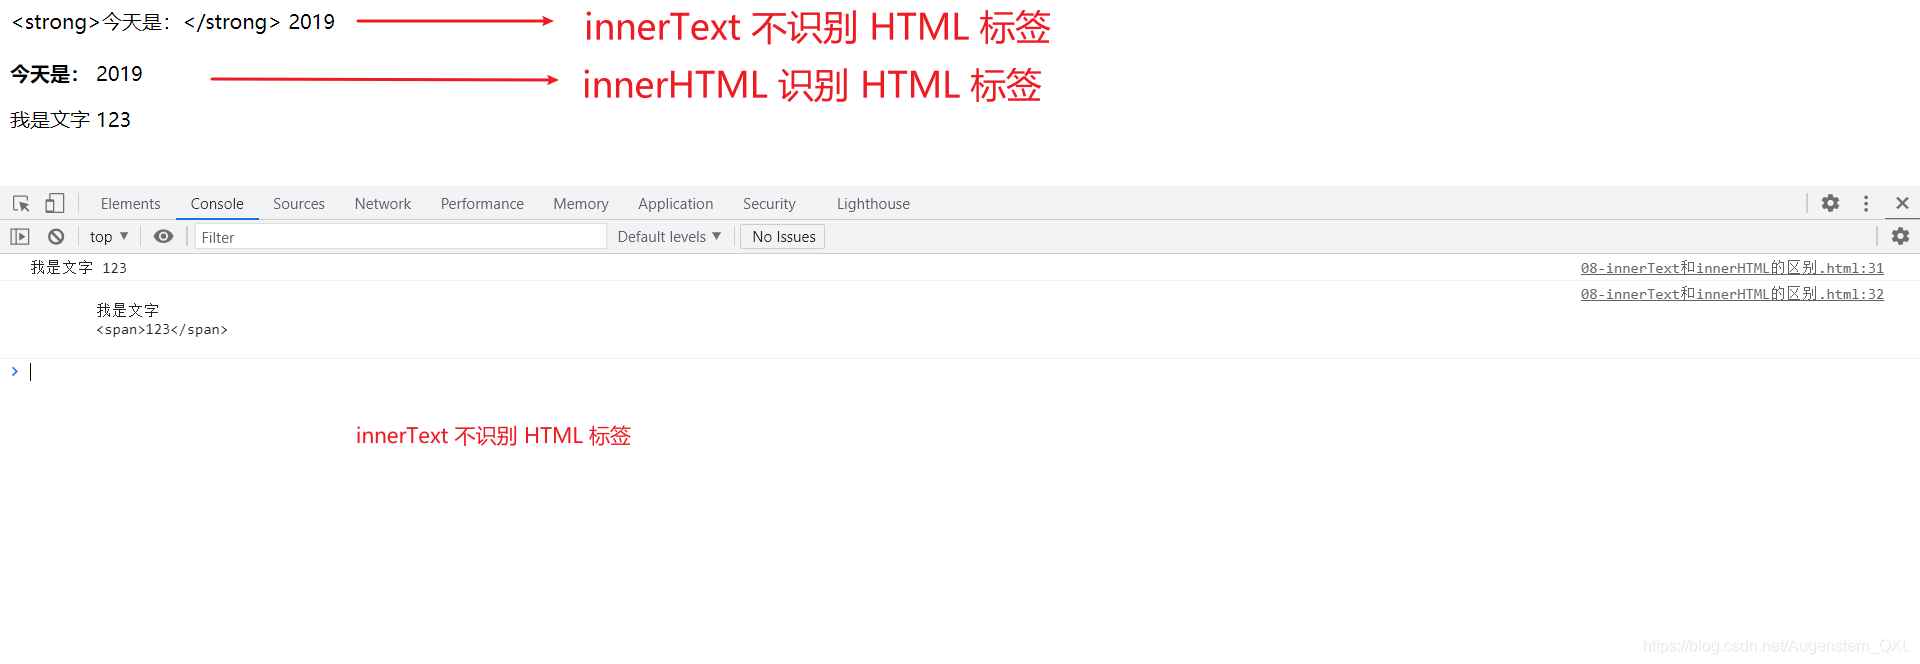
4.2. Change element attributes
1. innerText and innerHTML change element content
src,href,id,alt,title
<button id="ldh">Lau Andy</button>
<button id="zxy">Xue You Zhang</button> <br>
<img src="images/ldh.jpg" alt="" title="Lau Andy">

<script>
    // Modify element attribute src
    // 1. Get element
    var ldh = document.getElementById('ldh');
    var zxy = document.getElementById('zxy');
    var img = document.querySelector('img');
    // 2. Register event handlers
    zxy.onclick = function() {
        img.src = 'images/zxy.jpg';
        img.title = 'Zhang Xueyou Smecta';
    }
    ldh.onclick = function() {
        img.src = 'images/ldh.jpg';
        img.title = 'Lau Andy';
    }
</script>
2. Cases: greet time-sharing and display different picture cases
<img src="images/s.gif" alt="">
<div>Good morning</div>
<script>
    // It is determined according to different time of the system, so the date built-in object is required
    // Use multi branch statements to set different pictures
    // If you need a picture and modify the picture according to time, you need to use the src attribute of the operation element
    // You need a div element to display different greetings. You can modify the content of the element
    // 1. Get element
    var img = document.querySelector('img');
    var div = document.querySelector('div');
    // 2. Get the current hours
    var date = new Date();
    var h = date.getHours();
    // 3. Judge the number of hours and change the picture and text information
    if (h < 12) {
        img.src = 'images/s.gif';
        div.innerHTML = 'Good morning, dear. Write the code well';
    } else if (h < 18) {
        img.src = 'images/x.gif';
        div.innerHTML = 'Good afternoon, dear. Write the code well';
    } else {
        img.src = 'images/w.gif';
        div.innerHTML = 'Good evening, dear. Write the code well';

    }
</script>
4.3 attribute operation of form elements
1. Using DOM, you can operate the attributes of the following form elements:
type,value,checked,selected,disabled
<button>Button</button>
<input type="text" value="Input content">
<script>
    // 1. Get element
    var btn = document.querySelector('button');
    var input = document.querySelector('input');
    // 2. Register event handlers
    btn.onclick = function() {
        // input.innerHTML = 'clicked'; This is an ordinary box, such as the content in the div tag
        // The value text content in the form is modified through value
        input.value = 'It was clicked';
        // If you want a form to be disabled, you can no longer click disabled. We want this button to be disabled
        // btn.disabled = true;
        this.disabled = true;
        // this refers to the caller btn of the event function
    }
</script>
2. Case: imitating JD to display and hide passwords
Click the button to switch the password box to a text box, and you can view the password plaintext.
① Core idea: click the eye button and change the password box type to text box to see the password inside
② One button has two states. Click once to switch to the text box, and continue to click once to switch to the password box
③ Algorithm: use a flag variable to judge the value of flag. If it is 1, switch to text box, and set flag to 0, such as
If it is 0, switch to the password box and set the flag to 1
4.4. Change style attributes
We can modify the size, color, position and other styles of elements through JS.
1. In line style operation
// element.style
div.style.backgroundColor = 'pink';
div.style.width = '250px';
be careful:
1. The style in JS adopts hump naming method, such as fontSize and backgroundColor
2. JS modifies the style operation, which produces in-line styles with high CSS weight
<div></div>
<script>
    // 1. Get element
    var div = document.querySelector('div');
    // 2. Register event handlers
    div.onclick = function() {
        // The attributes in div.style adopt hump naming method
        this.style.backgroundColor = 'purple';
        this.style.width = '250px';
    }
1. Case: close Taobao QR code
When the mouse clicks the QR code close button, the whole QR code will be closed.
① Core idea: use the style to display and hide. display:none hides the elements. display:block displays the elements
② Click the button to hide the QR code box
var btn = document.querySelector('.close-btn');
var box = document.querySelector('.box');
// 2. Register event handler
btn.onclick = function() {
box.style.display = 'none';
2. Case: background of circular sprite diagram
You can use the for loop to set the sprite background of a set of elements
① First, the sprite pictures are arranged regularly
② Core idea: use the for loop to modify the background position of the sprite image
③ The rest is to test your math skills
④ Let the i index number * 44 in the loop be the y coordinate of each picture
var lis = document.querySelectorAll('li');
for (var i = 0; i < lis.length; i++) {
// Multiplying the index number by 44 is the background y coordinate of each li, and index is our y coordinate
var index = i * 44;
lis[i].style.backgroundPosition = '0 -' + index + 'px';
}
3. Case: display and hide text box content
When the mouse clicks the text box, the default text inside is hidden. When the mouse leaves the text box, the text inside is displayed.
① First of all, the form needs two new events to get the focus onfocus and lose the focus onblur
② If you get the focus, judge whether the content in the form is the default text. If it is the default text, clear the form content
③ If the focus is lost, judge whether the form content is empty. If it is empty, the form content will be changed to the default text
<style>
    input {
        color: #999;
    }
</style>
<input type="text" value="mobile phone">
<script>
    // 1. Get element
    var text = document.querySelector('input');
    // 2. Register the event to get the focus event onfocus
    text.onfocus = function() {
            // console.log('got focus');
            if (this.value === 'mobile phone') {
                this.value = '';
            }
            // To get focus, you need to turn the text color in the text box black
            this.style.color = '#333';
        }
        // 3. Registration event lost focus event onblur
    text.onblur = function() {
        // console.log('lost focus');
        if (this.value === '') {
            this.value = 'mobile phone';
        }
        // To lose focus, you need to lighten the text color in the text box
        this.style.color = '#999';
    }
</script>
2. Class name style operation
// element.className
be careful:
-
If the style is modified more, you can change the element style by operating the class name.
-
Class is a reserved word, so className is used to manipulate the element class name attribute
-
className will directly change the class name of the element and overwrite the original class name.
<div class="first">text</div>
<script>
    // 1. Use element Style gets and modifies the element style. It is used when there are few styles or simple functions
    var test = document.querySelector('div');
    test.onclick = function() {
        // this.style.backgroundColor = 'purple';
        // this.style.color = '#fff';
        // this.style.fontSize = '25px';
        // this.style.marginTop = '100px';
        // Let's change the class name of the current element to change

       // 2. We can change the style of an element by modifying its className, which is suitable for situations with many styles or complex functions

       // 3. If you want to keep the original class name, we can do this multiple class name selector
       // this.className = 'change';
          this.className = 'first change';
       }
</script>
1. Case: error message in password box format (valuable)
If the user leaves the password box and the number entered is not 6 ~ 16, an error message will be prompted; otherwise, the user will be prompted to enter the correct information
① The first event to judge is that the form loses focus onblur
② If the input is correct, the correct information will be prompted. The color is green and the small icon changes
③ If the input is not 6 to 16 bits, the error message color will be red and the small icon will change
④ Because there are many changes in the style, we use className to modify the style
4.5 summary of operation elements
Operation elements are the core content of DOM
task
-
Show hidden content of century Jiayuan user name
-
JD closes advertising (just hide it directly)
-
Sina drop-down menu (microblog)
-
Switch light case (see material)
4.6. Exclusivity
If there is the same group of elements, we need to use the exclusive idea algorithm of loop if we want an element to implement a certain style:
-
Clear all elements (kill others)
-
Style the current element (leave me alone)
-
Note that the order cannot be reversed. Kill others first, and then set yourself
<button>Button 1</button>
<button>Button 2</button>
<button>Button 3</button>
<button>Button 4</button>
<button>Button 5</button>
<script>
    // 1. Get all button elements
    var btns = document.getElementsByTagName('button');
    // btns gets every element in the pseudo array btns[i]
    for (var i = 0; i < btns.length; i++) {
        btns[i].onclick = function() {
            // (1) Let's remove all the button background colors and kill everyone
            for (var i = 0; i < btns.length; i++) {
                btns[i].style.backgroundColor = '';
            }
            // (2) Then let the current element background color be pink, leaving me
            this.style.backgroundColor = 'pink';
    }
}
//2. First exclude others, and then set your own style. This idea of excluding others becomes exclusive
</script>
1. Case: Baidu skin change
① This case exercise is to register events for a set of elements
② Register click events for 4 small pictures using circular registration
③ When we click on this picture, let's change the background of the page to the current picture
④ Core algorithm: take the src path of the current picture and give it to the body as the background
// 1. Get element
var imgs = document.querySelector('.baidu').querySelectorAll('img');
// 2. Circular registration event
for (var i = 0; i < imgs.length; i++) {
imgs[i].onclick = function() {
document.body.style.backgroundImage = 'url(' + this.src + ')';
}}
2. Case: table interlaced discoloration
① Using a new mouse event, the mouse passes through onmouseover and leaves onmouseout
② Core idea: when the mouse passes through the tr line, the current line changes the background color, and when the mouse leaves, the current background color is removed
③ Note: the first line (the line in thead) does not need to change color, so we get the line in tbody
3. Cases: select all cases in the form cancel selecting all cases
Business requirements:
-
Click the select all check box above, and all the check boxes below are selected (select all)
-
Click the select all check box again, and all the check boxes below will not be selected (deselect all)
-
If all the check boxes below are selected, the select all button above is automatically selected
-
If one of the check boxes below is not selected, the select all button above will not be selected
-
All check boxes are initially unchecked by default
case analysis
① Select all and deselect all: let the checked attribute (selected status) of all the check boxes below follow the select all button
② All the check boxes below need to be selected, and all the above can be selected. Practice: bind click events to all the check boxes below, and click each time
To cycle through all the check boxes below, check whether there is one that is not selected. If there is one that is not selected, select all above and uncheck it.
③ You can set a variable to control whether select all is selected
4.7 user defined attribute operation
1. Get attribute value
element. Property gets the property value.
element.getAttribute('attribute ');
difference:
element. Property to get the built-in attribute value (the attribute of the element itself)
element.getAttribute('attribute '); Mainly get custom attributes (standard) our programmers' custom attributes
2. Set attribute value
element. Attribute = 'value' sets the built-in attribute value.
element.setAttribute('attribute ',' value ');
difference:
element. Property sets the built-in property value
element.setAttribute('attribute '); Mainly set custom properties (standard)
3. Remove attributes
element.removeAttribute('attribute ');
<div id="demo" index="1" class="nav"></div>
<script>
    var div = document.querySelector('div');
    // 1. Get the attribute value of the element
    // (1) element. attribute
    console.log(div.id);
    //(2) element.getAttribute('attribute ') get the meaning of getting attribute attribute. The attribute added by our programmers is called user-defined attribute index
    console.log(div.getAttribute('id'));
    console.log(div.getAttribute('index'));
    // 2. Set element attribute value
    // (1) element. Attribute = 'value'
    div.id = 'test';
    div.className = 'navs';
    // (2) element.setAttribute('attribute ',' value '); Mainly for custom attributes
    div.setAttribute('index', 2);
    div.setAttribute('class', 'footer'); // Class is special. It says class, not className
    // 3 remove the attribute removeattribute (attribute)
    div.removeAttribute('index');
</script>
3. Case: tab column switching (key cases)
When the mouse clicks the corresponding tab above, the following content changes
case analysis
① The Tab bar switch has two large modules
② On the module tab, click a, the current background color will be red, and the rest will remain unchanged (exclusive thought) to modify the class
How to name
③ The contents of the following modules will change with the tabs above. Therefore, the following module changes are written in the click event.
④ Rule: the display contents of the following modules correspond to the tabs above one by one.
⑤ Core idea: give the tab above_ Add custom attributes to all small li in the list, and the attribute values are numbered from 0.
⑥ When we click tab_ A small li in the list, let the tab_ The contents corresponding to the serial number in con are displayed, and the rest are hidden (exclusive)
Thoughts)
4.8 H5 custom attributes
Custom attribute purpose: to save and use data. Some data can be saved to the page instead of the database.
The custom attribute is obtained through getAttribute('attribute ').
However, some custom attributes are easy to cause ambiguity, and it is not easy to judge whether they are built-in attributes or custom attributes of elements.
H5 adds custom attributes to us
1. Set H5 custom attribute
H5 specifies that the beginning of the custom attribute data - is used as the attribute name and assigned a value.
For example, < div data index = "1" > < / div >
Or use JS settings
element.setAttribute('data-index', 2)
2. Get H5 custom attribute
-
Get compatibility element getAttribute(‘data-index’);
-
H5 new element dataset. Index or element Dataset ['index'] ie 11 started to support
5. Node operation
5.1 why learn node operations
There are two ways to get elements:
| 1. Use the method provided by DOM to obtain elements | 2. Obtain elements by using node hierarchy |
|---|---|
| document.getElementById() | Using parent-child sibling node relationship to obtain elements |
| document.getElementsByTagName() | Strong logic, but poor compatibility |
| document.querySelector et al | |
| The logic is not strong and cumbersome |
Both methods can obtain element nodes, which we will use later, but the node operation is simpler
Generally, a node has at least three basic attributes
5.2 node overview
All contents in a web page are nodes (labels, attributes, text, comments, etc.), and nodes are represented by nodes in DOM.
All nodes in the HTML DOM tree can be accessed through JavaScript, and all HTML elements (nodes) can be modified, created or deleted.
Generally, a node has at least three basic attributes: nodeType, nodeName, and nodeValue.
Element node: nodeType is 1
Attribute node: nodeType is 2
Text node: nodeType is 3 (text node includes text, space, line feed, etc.)
In our actual development, node operations mainly operate on element nodes
5.3 node level
Using DOM tree, nodes can be divided into different hierarchical relationships, commonly parent-child brother hierarchical relationships.
1. Parent node
node.parentNode
-
The parentNode property can return the parent node of a node. Note that it is the nearest parent node
-
Returns null if the specified node has no parent node
<div class="demo">
    <div class="box">
        <span class="erweima">×</span>
    </div>
</div>
<script>
// 1. Parent node
var erweima = document.querySelector('.erweima');
// var box = document.querySelector('.box');
// The result is the parent node closest to the element (parent). If the parent node cannot be found, it will return null
console.log(erweima.parentNode);
</script>2. Child nodes
parentNode.childNodes(standard)
-
parentNode.childNodes returns a collection of child nodes containing the specified node, which is a collection of immediate updates
-
The return value contains all child nodes, including element nodes, text nodes, etc
-
If you only want to get the element nodes inside, you need to deal with them specially. Therefore, we generally do not advocate the use of childNodes
	var ul = document. querySelector('ul');
	for(var i = 0; i < ul.childNodes.length;i++) {
	if (ul.childNodes[i].nodeType == 1) {
	 // ul.childNodes[i] is an element node
	 console.log(ul.childNodes[i]);
	}
	}
parentNode.children(Nonstandard)
-
parentNode.children is a read-only attribute that returns all child element nodes
-
It only returns child element nodes, and other nodes do not return (this is what we focus on)
-
Although children is a non-standard, it is supported by various browsers, so we can use it safely
<script>
    // DOM provides methods (API s) to get
    var ul = document.querySelector('ul');
    var lis = ul.querySelectorAll('li');
    // 1. Child nodes all child nodes include element nodes, text nodes, etc
    console.log(ul.childNodes);
    console.log(ul.childNodes[0].nodeType);
    console.log(ul.childNodes[1].nodeType);
    // 2. It is also common for children to obtain all child element nodes in our actual development
    console.log(ul.children);
</script>
2.1. The first child node and the last child node
parentNode.firstChild
-
firstChild returns the first child node. If it cannot be found, it returns null
-
Similarly, it contains all nodes
parentNode.lastChild
-
lastChild returns the last child node. If it cannot be found, it returns null
-
Similarly, it contains all nodes
2.2. The first element child node and the last element child node (compatibility)
parentNode.firstElementChild
-
firstElementChild returns the first child node. If it cannot be found, it returns null
-
There is a compatibility problem. Only IE9 and above are supported
parentNode.lastElementChild
-
lastElementChild returns the last child node. If it cannot be found, it returns null
-
There is a compatibility problem. Only IE9 and above are supported
5.3. 5. Solution
In the actual development, firstChild and lastChild contain other nodes, which is inconvenient to operate, and firstElementChild and lastElementChild have compatibility problems, so how do we get the first child element node or the last child element node?
Solution
If you want the first child element node, you can use parentnode chilren[0]
If you want the last child element node, you can use
//The number of array elements minus 1 is the index number of the last element
parentNode.chilren[parentNode.chilren.length - 1]
Example:
<ol>
    <li>I am li1</li>
    <li>I am li2</li>
    <li>I am li3</li>
    <li>I am li4</li>
</ol>
<script>
    var ol = document.querySelector('ol');
    // 1.firstChild gets the of the first child node, including text node and element node
    console.log(ol.firstChild);
    // The text node #text (the first line feed node) is returned

    console.log(ol.lastChild);
    // The text node #text (the last line feed node) is returned
    // 2. firstElementChild returns the first child element node
    console.log(ol.firstElementChild);
    // <li>I'm Li1</li>

    // The second method has compatibility problems and needs to be supported by IE9 or above
    // 3. In actual development, there is no compatibility problem and the first child element is returned
    console.log(ol.children[0]);
    // <li>I'm Li1</li>
    console.log(ol.children[3]);
    // <li>I'm LI4</li>
    // This is written when the number of li is not unique and the last node needs to be obtained
    console.log(ol.children[ol.children.length - 1]);
</script>
2.3. Case: drop-down menu
case analysis
① The li in the navigation bar must have a mouse passing effect, so you need to register mouse events circularly
② Core principle: when the mouse passes the second child in li, ul is displayed, and when the mouse leaves, ul is hidden
Implementation code
var nav = document.querySelector('.nav');
var lis = nav.children; // Get 4 small li
for (var i = 0; i < lis.length; i++) {
lis[i].onmouseover = function() {
this.children[1].style.display = 'block';
}
lis[i].onmouseout = function() {
this.children[1].style.display = 'none';
}
}
3. Brother node
3.1. Next sibling node
node.nextSibling
-
nextSibling returns the next sibling element node of the current element. If it cannot be found, it returns null
-
Similarly, it contains all nodes
3.2. Previous sibling node
node.previousSibling
-
previousSibling returns the previous sibling element node of the current element. If it cannot be found, it returns null
-
Similarly, it contains all nodes
3.3. Next sibling element node (compatibility)
node.nextElementSibling
-
Nextlementsibling returns the next sibling element node of the current element. If it cannot be found, it returns null
-
IE9 only supports compatibility problems
3.4. Previous sibling element node (compatibility)
node.previousElementSibling
-
previousElementSibling returns the previous sibling element node of the current element. If it cannot be found, it returns null
-
IE9 only supports compatibility problems
3.5. How to solve the compatibility problem?
A: encapsulate a compatible function yourself
function getNextElementSibling(element) {
    var el = element;
    while(el = el.nextSibling) {
        if(el.nodeType === 1){
            return el;
        }
    }
    return null;
}
5.4 creating nodes
1. Create node
document.createElement('tagName');
document. The createElement () method creates the HTML element specified by tagName
 Because these elements did not exist and were generated dynamically according to our requirements, we also call them dynamic creation element nodes
2. Add node
node.appendChild(child)
node. The appendChild () method adds a node to the end of the child node list of the specified parent node. Similar to the after pseudo element in CSS.
node.insertBefore(child, specify element)
node. The insertBefore () method adds a node before the specified child node of the parent node. Similar to the before pseudo element in CSS.
Example:
   <ul>
        <li>123</li>
    </ul>
<script>
// 1. Create node element node
var li = document.createElement('li');
// 2. Add node AppendChild (child) node the parent child is the child, followed by additional elements, similar to the push in the array
// Get your father first
var ul = document.querySelector('ul');
ul.appendChild(li);
// 3. Add node InsertBefore (child, specifies the element);
var lili = document.createElement('li');
ul.insertBefore(lili, ul.children[0]);
// 4. We want to add a new element to the page in two steps: 1 Create element 2 Add element
</script>3. Case: case of simple version posting message
case analysis
① Core idea: after clicking the button, you can dynamically create a li and add it to the ul.
② While creating li, pass the value in the text field through li InnerHTML assigned to li
③ If you want to display a new message later, use appendChild. If you want to display it earlier, use insertBefore
<textarea name="" id=""></textarea>
<button>release</button>
<ul>

</ul>
<script>
    // 1. Get element
    var btn = document.querySelector('button');
    var text = document.querySelector('textarea');
    var ul = document.querySelector('ul');
    // 2. Registration event
    btn.onclick = function() {
        if (text.value == '') {
            alert('You have not entered anything');
            return false;
        } else {
            // console.log(text.value);
            // (1) Create element
            var li = document.createElement('li');
            // There must be li before assignment
            li.innerHTML = text.value;
            // (2) Add element
            // ul.appendChild(li);
            ul.insertBefore(li, ul.children[0]);
        }
    }
</script>
5.5 deleting nodes
node.removeChild(child)
node. The removechild () method deletes a child node from the DOM and returns the deleted node.
Example:
<button>delete</button>
<ul>
    <li>Xiong Da</li>
    <li>Xiong er</li>
    <li>Bald head strength</li>
</ul>
<script>
    // 1. Get element
    var ul = document.querySelector('ul');
    var btn = document.querySelector('button');
    // 2. Delete the element node removeChild(child)
    // ul.removeChild(ul.children[0]);
    // 3. Click the button to delete the children in turn
    btn.onclick = function() {
        if (ul.children.length == 0) {
            this.disabled = true;
        } else {
            ul.removeChild(ul.children[0]);
        }
    }
</script>
Case: delete message case
case analysis
① When we assign the value in the text field to li, we add a deleted link
② We need to get all the links. When we click the current link, we delete the li where the current link is located
③ To prevent link jump, you need to add javascript:void(0); Or javascript:;
5.6 replication node (clone node)
node.cloneNode()
-
node. The cloneNode () method returns a copy of the node that called the method. Also known as clone node / copy node
be careful:
-
If the parenthesis parameter is empty or false, it is a shallow copy, that is, only the replication node itself is cloned, and the child nodes inside are not cloned
-
If the parenthesis parameter is true, it is a deep copy, and the node itself and all its child nodes will be copied
Example:
<ul>
    <li>1111</li>
    <li>2</li>
    <li>3</li>
</ul>
<script>
    var ul = document.querySelector('ul');
    // 1. node.cloneNode();  If the bracket is empty or false inside, the shallow copy only copies the label and does not copy the content inside
    // 2. node.cloneNode(true);  The parenthesis is true. Copy the contents of the deep copy label
    var lili = ul.children[0].cloneNode(true);
    ul.appendChild(lili);
</script>
Case: dynamically generating tables (key points)
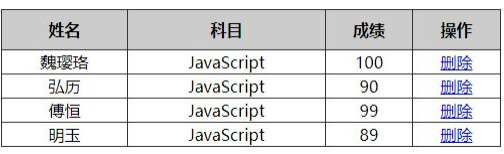
case analysis
① Because the student data inside is dynamic, we need js to generate dynamically. Here we simulate the data and define it ourselves
data Data is stored as objects.
② All data is placed in the rows in tbody.
③ Because there are many rows, we need to create multiple rows (corresponding to how many people) in a loop
④ There are many cells in each row (corresponding to the data in it). We continue to create multiple cells by using the cycle,
And store the data in it (double for loop)
⑤ The last column of cells is deleted, and separate cells need to be created.
⑥ Finally, add or delete. Click Delete to delete the current row.
5.7 differences among three dynamic creation elements (interview questions)
Differences between three dynamic creation elements
doucument.write()
element.innerHTML
document.createElement()
difference:
1. document.write() Is a content stream that writes content directly to the page, but when the document stream is completed, it will cause all pages to be redrawn
2. innerHTML Is to write content to a DOM Node, which will not cause all pages to redraw
3. innerHTML It is more efficient to create multiple elements (do not splice strings, adopt array splicing), and the structure is slightly complex
4. createElement() Creating multiple elements is a little less efficient, but the structure is clearer
 Summary: under different browsers, innerHTML More efficient than creatElement high
<div class="innner"></div>
<div class="create"></div>
<script>
    // 2. innerHTML create element
    var inner = document.querySelector('.inner');
    // 2.1 string splicing method for innerHTML
    for (var i = 0; i <= 100; i++) {
        inner.innerHTML = '<a href="#"> Baidu < / a > ';
    }
    // 2.2 innerHTML is spliced in the form of array
    var arr = [];
    for (var i = 0; i <= 100; i++) {
        arr.push('<a href="#"> Baidu < / a >);
    }
    inner.innerHTML = arr.join('');

    // 3.document.createElement() creates an element
    var create = document.querySelector('.create');
    var a = document.createElement('a');
    create.appendChild(a);
</script>
6. DOM core
For DOM operations, we mainly focus on the operations of child elements, mainly including
-
establish
-
increase
-
Delete
-
change
-
check
-
Attribute operation
-
Time operation
6.1. Create
document.write
innerHTML
createElement
6.2. Increase
appendChild
insertBefore
6.3 delete
removeChild
6.4 modification
Major modifications dom Element properties of, dom Element content, attribute, form value, etc

Modify element attributes: src,href,title etc.
Modify common element content: innerHTML,innerText
 Modify form elements: value,type,disabled
 Modify element style: style,className
6.5 inspection
Mainly get query dom Element of

DOM Provided API method: getElementById,getElementsByTagName (Old usage, not recommended)
H5 New methods provided: querySelector,querySelectorAll (promote)
Get element with node operation: parent(parentNode),son(children),Brother(previousElementSibling,nextElementSibling) promote
6.6. Attribute operation
-
Mainly for custom attributes
-
setAttribute: sets the attribute value of dom
-
getAttribute: get the attribute value of dom
-
removeAttribute: removes an attribute
6.7 event operation
Register the event for the element and take the event source Event type = event handler
7. Event advanced
7.1. Registration event (binding event)
1 registration event overview
Adding an event to an element is called a registration event or a binding event.
There are two ways to register events: traditional method and method listening registration method
| Traditional registration method | Method listening registration method |
|---|---|
| Use the event onclick starting with on | w3c standard recommendation |
| <button onclick = "alert("hi")"></button> | addEventListener(), which is a method |
| btn.onclick = function() {} | Ie before IE9 does not support this method. attachEvent() can be used instead |
| Features: uniqueness of registration events | Features: multiple listeners can be registered for the same element and event |
| Only one handler can be set for the same element and event. The last registered handler will overwrite the previously registered handler | Execute in order of registration |
2. Addeventlistener event listening method
-
eventTarget. The addeventlistener() method registers the specified listener with the EventTarget (target object)
-
When the object triggers the specified event, the event handler function is executed
eventTarget.addEventListener(type,listener[,useCapture])
The method receives three parameters:
-
Type: event type string, such as click and mouseover. Note that there is no on here
-
listener: event handling function, which will be called when an event occurs
-
useCapture: optional parameter. It is a Boolean value. The default value is false. After learning the DOM event flow, we will learn further
Example:
<button>Traditional registration events</button>
<button>Method listens for registration events</button>
<button>ie9 attachEvent</button>
<script>
    var btns = document.querySelectorAll('button');
    // 1. Traditional registration events
    btns[0].onclick = function() {
        alert('hi');
    }
    btns[0].onclick = function() {
            alert('hao a u');
        }
        // 2. Event listener registers the event addEventListener
        // (1) The event type inside is a string, so it is quoted without on
        // (2) Multiple listeners (event handlers) can be added to the same element and the same event
    btns[1].addEventListener('click', function() {
        alert(22);
    })
    btns[1].addEventListener('click', function() {
            alert(33);
        })
        // 3. attachEvent ie9 previous versions support
    btns[2].attachEvent('onclick', function() {
        alert(11);
    })
</script>
3. Attachevent event listening method (understand)
-
eventTarget. The attachevent() method registers the specified listener with the EventTarget (target object)
-
When the object triggers the specified event, the specified callback function will be executed
eventTarget.attachEvent(eventNameWithOn,callback)
The method receives two parameters:
-
eventNameWithOn: event type string, such as onclick and onmouseover, with on
-
Callback: event handling function. When the target triggers an event, the callback function is called
-
Previous versions of ie9 support
4 registered event compatibility solution
Principle of compatibility processing: first take care of most browsers, and then deal with special browsers
 function addEventListener(element, eventName, fn) {
 // Judge whether the current browser supports the addEventListener method
 if (element.addEventListener) {
 element.addEventListener(eventName, fn); // The third parameter defaults to false
 } else if (element.attachEvent) {
 element.attachEvent('on' + eventName, fn);
 } else {
 // Equivalent to element onclick = fn;
 element['on' + eventName] = fn;
 }
7.2. Delete event (unbind event)
1. removeEventListener delete event mode
eventTarget.removeEventListener(type,listener[,useCapture]);
The method receives three parameters:
-
Type: event type string, such as click and mouseover. Note that there is no on here
-
listener: event handling function, which will be called when an event occurs
-
useCapture: optional parameter. It is a Boolean value. The default value is false. After learning the DOM event flow, we will learn further
2. detachEvent delete event mode (compatible)
eventTarget.detachEvent(eventNameWithOn,callback);
The method receives two parameters:
-
eventNameWithOn: event type string, such as onclick and onmouseover, with on
-
Callback: event handling function. When the target triggers an event, the callback function is called
-
Previous versions of ie9 support
3. Traditional event deletion method
eventTarget.onclick = null;
Example of event deletion:
<div>1</div>
<div>2</div>
<div>3</div>
<script>
    var divs = document.querySelectorAll('div');
    divs[0].onclick = function() {
        alert(11);
        // 1. Delete events in traditional way
        divs[0].onclick = null;
    }
    // 2.removeEventListener delete event
    divs[1].addEventListener('click',fn);   //fn inside does not need to be called with parentheses

    function fn(){
        alert(22);
        divs[1].removeEventListener('click',fn);
    }
    // 3. Delete event method in IE9
    divs[2].attachEvent('onclick',fn1);
    function fn1() {
        alert(33);
        divs[2].detachEvent('onclick',fn1);
    }
</script>
4. Remove event compatibility solution
function removeEventListener(element, eventName, fn) {
// Judge whether the current browser supports the removeEventListener method
if (element.removeEventListener) {
element.removeEventListener(eventName, fn); // The third parameter defaults to false
} else if (element.detachEvent) {
element.detachEvent('on' + eventName, fn);
} else {
element['on' + eventName] = null;
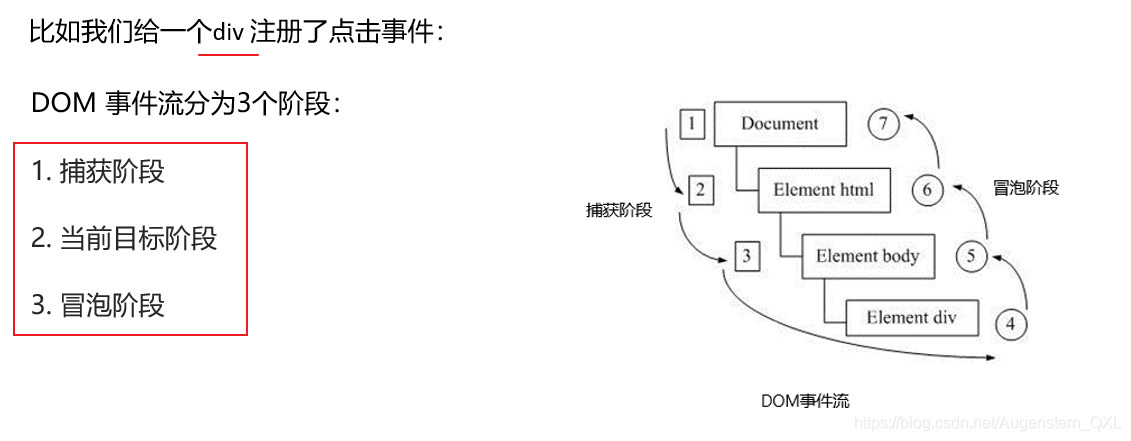
} 7.3 DOM event flow
-
Event flow describes the order in which events are received from the page
-
When an event occurs, it will propagate between element nodes in a specific order. This propagation process is DOM event flow
-
Event bubbling: IE first proposed that an event is received by the most specific element at the beginning, and then propagated level by level to the top node of DOM.
-
Event capture: Netscape was first proposed. It starts from the top-level node of DOM, and then propagates level by level down to the process of receiving the most specific elements.
Deepen understanding:
When we throw a stone into the water, first it will have a descent process, which can be understood as the capture process from the top to the most specific element (target point) of the event; then it will produce bubbles and float to the water surface after the lowest point (most specific element). This process is equivalent to event bubbling.
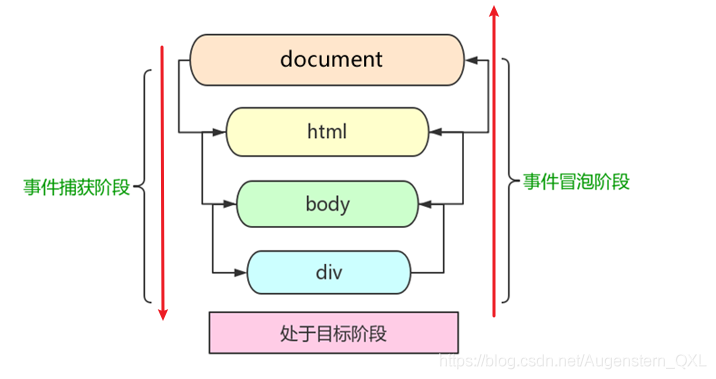
1. Capture phase
-
document -> html -> body -> father -> son
Two boxes are nested, one parent box and one child box. Our requirement is to pop up father when clicking the parent box and son when clicking the child box
    <div class="father">
        <div class="son">son Box</div>
    </div>
    <script>
        // dom event flow has three stages
        // 1. Only one stage of capture or bubbling can be executed in JS code.
        // 2. onclick and attachEvent (ie) can only get the bubbling stage.
        // 3. In the capture phase, if the third parameter of addEventListener is true, it is in the capture phase document - > HTML - > body - > father - > son
        var son = document.querySelector('.son');
        son.addEventListener('click', function() {
             alert('son');
        }, true);
        var father = document.querySelector('.father');
        father.addEventListener('click', function() {
            alert('father');
        }, true);
    </script>
However, due to the influence of DOM flow, when we click the sub box, father will pop up first, and then son
This is because the capture phase starts at the top node of the DOM and then propagates down to the most specific element
document -> html -> body -> father -> son Look first document Events, no; Look again html Events, no; Look again body Events, no; Look again father If there is an event, execute it first; Look again son Event before execution.
2. Bubbling stage
-
son -> father ->body -> html -> document
son box
When we click the sub box, son, father and document will pop up
This is because the bubbling phase is received by the most specific element at the beginning, and then propagates up to the top node of the DOM level by level
-
son -> father ->body -> html -> document
3. Summary
-
Only one of the capture or bubble phases can be executed in JS code
-
onclick and attachEvent can only get the bubbling phase
-
addEventListener(type,listener[,useCapture]) if the third parameter is true, it means to call the event handler in the event capture phase; If it is false (the default is false if it is not written), it means that the event handler is called in the event bubbling phase
-
In actual development, we seldom use event capture, and we pay more attention to event bubbling.
-
Some events do not bubble, such as onblur, onfocus, onmousenter, onmousesave
7.4 event object
1 what is an event object
 eventTarget.onclick = function(event) {}
 eventTarget.addEventListener('click', function(event) {})
 // This event is the event object. We also like to write it as e or evt
Official explanation: the event object represents the state of the event, such as the state of the keyboard keys, the position of the mouse, and the state of the mouse buttons.
Simple understanding: after an event occurs, the collection of a series of information data related to the event is put into this object, which is the event object
event, which has many properties and methods.
For example:
-
Who bound this event.
-
If the mouse triggers an event, you will get the relevant information of the mouse, such as the mouse position.
-
If the keyboard triggers an event, you will get the relevant information of the keyboard, such as which key you pressed.
2. Usage syntax of event object
 eventTarget.onclick = function(event) {
 // This event is the event object. We also like to write it as e or evt
 }
 eventTarget.addEventListener('click', function(event) {
 // This event is the event object. We also like to write it as e or evt
 })
3. Compatibility scheme of event object
There is a compatibility problem with the acquisition of the event object itself:
-
In the standard browser, the parameters passed by the browser to the method can be obtained by defining the formal parameter e.
-
In IE6~8, the browser does not pass parameters to the method. If necessary, it needs to go to window Get lookup in event.
solve:
e = e || window.event;
4 common properties and methods of event objects
| Event object property method | explain |
|---|---|
| e.target | Returns the object standard that triggered the event |
| e.srcElement | Returns the object that triggered the event. Non standard ie6-8 use |
| e.type | Return the type of event, such as click mouseover without on |
| e.cancelBubble | This attribute prevents bubbling, non-standard, ie6-8 use |
| e.returnValue | This property prevents default behavior from being nonstandard, ie6-8 using |
| e.preventDefault() | This method prevents default behavior criteria, such as not allowing links to jump |
| e.stopPropagation() | Standard for preventing bubbling |
1.e. The difference between target and this
-
This is the event bound element and the caller of this function (the event bound element)
-
e.target is the element triggered by the event.
Difference: if e.target clicks the element, it will return the element. If this element is bound to the click event, then who will be returned
Understand: it has a very similar attribute to this. currentTarget ie678 doesn't know
        //compatibility
        div.onclick = function(e) {
            e = e || window.event;
            var target = e.target || e.srcElement;
            console.log(target);
2.e.type returns the event type
        var div = document.querySelector('div');
        div.addEventListener('click', fn);
        div.addEventListener('mouseover', fn);
        div.addEventListener('mouseout', fn);

        function fn(e) {
            console.log(e.type);
        }
3. Event object block default behavior (e.preventdefault)
Block the default behavior (event) so that the link does not jump or the submit button does not submit
        var a = document.querySelector('a');
        a.addEventListener('click', function(e) {
                e.preventDefault(); //  dom standard writing
            })
// Traditional registration method
a.onclick = function(e) {
// Normal browser e.preventDefault(); method
// e.preventDefault();
// Lower browser ie678 returnValue property
// e.returnValue;
// We can also use return false to prevent the default behavior. There is no compatibility problem. The code behind return is not executed, and it is only limited to the traditional registration method
return false;
alert(11);
}4. Prevent the event from bubbling (key points of job interview)
1 two ways to prevent event bubbling
Event bubbling: it is initially received by the most specific element, and then propagated up to the top node of the DOM level by level.
The characteristics of event bubbling will bring both disadvantages and benefits, which we need to master flexibly.
Prevent event bubbling
Standard writing method: use the stopPropagation() method in the event object
e.stopPropagation() // Stop stop Propagation
Nonstandard writing: IE 6-8 uses the cancelBubble attribute of the event object
e.cancelBubble = true; // Non standard cancel bubble
2 compatibility solution to prevent event bubbling
 if(e && e.stopPropagation){
 e.stopPropagation();
 }else{
 window.event.cancelBubble = true;
 }
7.5. Key points of event entrustment (agency, appointment) interview!!
The characteristics of event bubbling will bring both disadvantages and benefits, which we need to master flexibly.
Event delegation
Event delegation is also called event proxy, which is called event delegation in jQuery.
Principle of event delegation
//Key interview answers
 Instead of setting the event listener for each child node separately, the event listener is set on its parent node, and then the bubble principle is used to affect the setting of each child node.
Role of event delegation
We only operated the DOM once, which improved the performance of the program.
Example:
Clicking each li will pop up a dialog box. In the past, it was very hard to register events for each li, and the more times you access the DOM, the longer the interaction readiness time of the whole page.
<ul>
    <li>Do you know, I should have a bullet box in hand!</li>
    <li>Do you know, I should have a bullet box in hand!</li>
    <li>Do you know, I should have a bullet box in hand!</li>
    <li>Do you know, I should have a bullet box in hand!</li>
    <li>Do you know, I should have a bullet box in hand!</li>
</ul>
<script>
    // The core principle of event delegation: add a listener to the parent node and use event bubbling to affect each child node
    var ul = document.querySelector('ul');
    ul.addEventListener('click', function(e) {
        // alert('Do you know, click I should have a bullet frame in hand! ');
        // e.target this can get the object we click
        e.target.style.backgroundColor = 'pink';
        // The backgroundColor color in the style of the person who orders will be changed to pink
    })
</script>
The above case: register the click event for ul, and then use the target of the event object to find the currently clicked li. Because clicking li, the event will bubble on ul. If ul has a registered event, the event listener will be triggered.
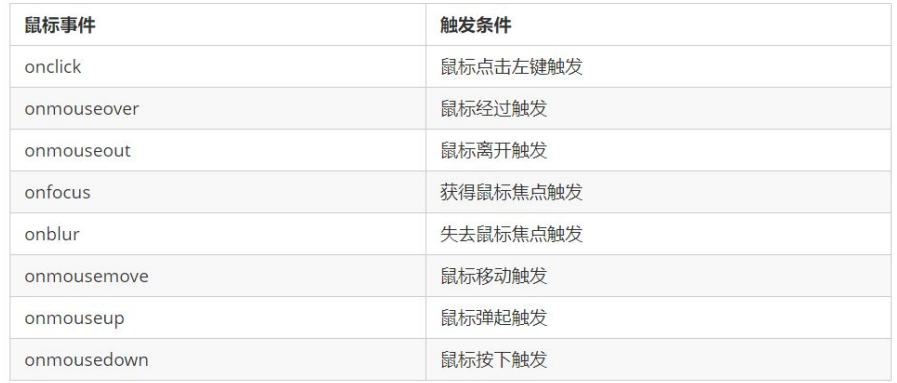
7.6 common mouse events
| Mouse event | Trigger condition |
|---|---|
| onclick | Click the left mouse button to trigger |
| onmouseover | Mouse over trigger |
| onmouseout | Mouse away trigger |
| onfocus | Get mouse focus trigger |
| onblur | Loss of mouse focus trigger |
| onmousemove | Mouse movement trigger |
| onmouseup | Mouse bounce trigger |
| onmousedown | Mouse press trigger |
1. Disable right mouse button and mouse selection
-
contextmenu mainly controls when the context menu should be displayed. It is mainly used by programmers to cancel the default context menu
document.addEventListener('contextmenu', function(e) {
e.preventDefault();
})- selectstart disables mouse selection
 document.addEventListener('selectstart', function(e) {
 e.preventDefault();
 })
Example:
<h1>I am a text that I don't want to share</h1>
<script>
    // 1. contextmenu we can disable the right-click menu
    document.addEventListener('contextmenu', function(e) {
            e.preventDefault(); // Block default behavior
        })
        // 2. The text selectstart cannot be selected
    document.addEventListener('selectstart', function(e) {
        e.preventDefault();
    })
</script>
2. Mouse event object
-
Event object represents the state of an event and a collection of a series of information related to the event
-
At this stage, we mainly use mouse event object MouseEvent and keyboard event object KeyboardEvent.
| Mouse event object | explain |
|---|---|
| e.clientX | Returns the X coordinate of the mouse relative to the viewable area of the browser window |
| e.clientY | Returns the Y coordinate of the mouse relative to the viewable area of the browser window |
| e.pageX (key) | Return the X coordinate of the mouse relative to the document page IE9 + support |
| e.pageY (key) | Return the Y coordinate of the mouse relative to the document page IE9 + support |
| e.screenX | Returns the X coordinate of the mouse relative to the computer screen |
| e.screenY | Returns the Y coordinate of the mouse relative to the computer screen |
    <script>
        // Mouse event object MouseEvent
        document.addEventListener('click', function(e) {
            // 1. x and y coordinates of the client mouse in the visual area
            console.log(e.clientX);
            console.log(e.clientY);
            console.log('---------------------');

            // 2. The page mouse is on the x and y coordinates of the page document
            console.log(e.pageX);
            console.log(e.pageY);
            console.log('---------------------');

            // 3. screen the x and y coordinates of the mouse on the computer screen
            console.log(e.screenX);
            console.log(e.screenY);
        })
    </script>
Case: Angel following mouse
The angel image has been moving with the mouse
case analysis
① The mouse moves continuously. Use the mouse to move the event: mousemove
② Move in the page and register the event for document
③ The picture should move a distance without occupying a position. We can use absolute positioning
④ Core principle: each time the mouse moves, we will get the latest mouse coordinates, and take the x and y coordinates as the coordinates of the picture
The top and left values move the picture
Implementation code
var pic = document.querySelector('img');
document.addEventListener('mousemove', function(e) {
var x = e.pageX;
var y = e.pageY;
pic.style.top = y - 40 + 'px';
pic.style.left = x - 50 + 'px';
})
7.7 common keyboard events
Events can be triggered not only with the mouse, but also with the keyboard.
1 common keyboard events
| Keyboard events | Trigger condition |
|---|---|
| onkeyup | Triggered when a keyboard key is released |
| onkeydown | Triggered when a keyboard key is pressed |
| onkeypress | Triggered when a keyboard key is pressed, but it does not recognize function keys, such as ctrl shift arrow, etc |
-
If you use addEventListener, you do not need to add on
document.addEventListener('keyup', function() {
    console.log('I bounced up');
})-
The difference between onkeypress and the previous two is that it does not recognize function keys, such as left and right arrows, shift, etc
//2. When the Keydown key is pressed, it triggers a function key that can be recognized, such as ctrl shift Left and right arrows document.addEventListener('keydown', function() { console.log('I pressed down'); }) //3. When the keypress key is pressed, the unrecognized function key is triggered, such as the left and right arrows of ctrl shift document.addEventListener('keypress', function() { console.log('I pressed press'); }) -
The execution order of the three events is: keydown – keypress – keyup
2 keyboard event object
| Keyboard event object properties | explain |
|---|---|
| keyCode | Returns the ASCII value of the key value |
-
onkeydown and onkeyup are case insensitive, and onkeypress is case sensitive.
-
In our actual development, we use keydown and keyup more, which can identify all keys (including function keys)
-
Keypress does not recognize function keys, but the keyCode attribute is case sensitive and returns different ASCII values
document.addEventListener('keyup', function(e) {
    // console.log(e);
    console.log('up:' + e.keyCode);
    // We can use the ASCII code value returned by keycode to judge which key the user pressed
    if (e.keyCode === 65) {
        alert('You pressed a key');
    } else {
        alert('You did not press a key')
    }

})
Case: simulate Jingdong key input content
When we press the s key, the cursor is positioned in the search box
case analysis
① Core idea: check whether the user has pressed the s key. If the user presses the s key, the cursor will be positioned in the search box
② Use the keyCode in the keyboard event object to judge whether the user pressed the s key
③ Search box to get focus: use the focus() method in js
Implementation code
var search = document.querySelector('input');
document.addEventListener('keyup', function(e) {
// console.log(e.keyCode);
if (e.keyCode === 83) {
search.focus();
}
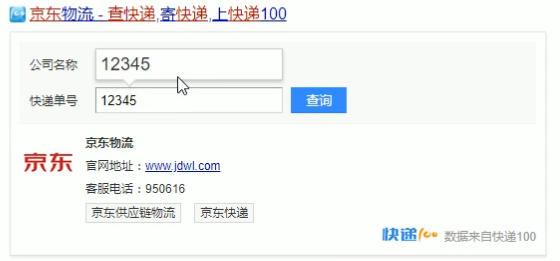
})Case: simulate JD express order No. query
Requirement: when we enter content in the text box, the large font content will be automatically displayed on the text box.
case analysis
① When the express order number is entered, the large font box (con) above displays (the text in this box)
② At the same time, get the value in the express order number and assign it to the con box (innerText) as the content
③ If the content in the express order number is empty, the large font box (con) box is hidden
④ Note: the characteristics of keydown and keypress in the text box: when their two events are triggered, the text is still displayed
Does not fall into the text box.
⑤ When the keyup event is triggered, the text has already fallen into the text box
⑥ When we lose focus, we hide the con box
⑦ When we get the focus and the content of the text box is not empty, the con box is displayed
2, BOM
1. BOM overview
1.1 what is BOM
BOM = Browser Object Model 👉 Browser object model
It provides an object that interacts with the browser window independently of the content, and its core object is window
BOM consists of a series of related objects, and each object provides many methods and attributes
BOM lacks standards. The standardization organization of JavaScript syntax is ECMA, and the standardization organization of DOM is W3C. BOM was originally a part of Netscape browser standards
| DOM | BOM |
|---|---|
| Document object model | Browser object model |
| DOM treats a document as an object | Treat the browser as an object |
| The top-level object of DOM is document | The top-level object of BOM is window |
| DOM mainly learns how to manipulate page elements | BOM learns some objects that interact with the browser window |
| DOM is the W3C Standard Specification | BOM is defined by browser manufacturers on their respective browsers, with poor compatibility |
1.2 composition of BOM
BOM is larger than DOM, which contains dom.
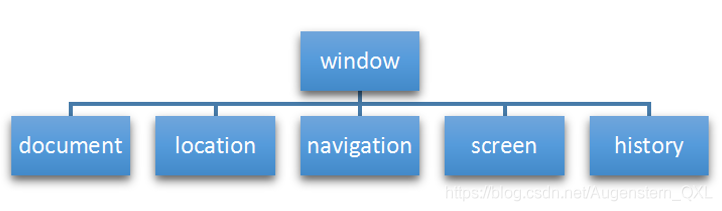
window object is the top-level object of browser, which has dual roles.
-
It is an interface for JS to access the browser window.
-
It is a global object. Variables and functions defined in the global scope will become properties and methods of window objects.
You can omit window when calling. The dialog boxes learned earlier belong to window object methods, such as alert(), prompt(), etc.
Note: a special attribute under window is window name
// Variables defined in the global scope become properties of window objects
var num = 10;
console.log(window.num);
// 10

// Functions defined in the global scope become methods of window objects
function fn() {
    console.log(11);
}
console.fn();
// 11

var name = 10;  //Do not use this name variable. There is a special attribute window under window name
console.log(window.num);
2. Common events of window objects
2.1 window loading events
window.onload = function(){}
perhaps
window.addEventListener("load",function(){});
window.onload is a window (page) loading event. When the document content is completely loaded, this event will be triggered (including images, script files, CSS files, etc.), and the processing function will be called.
be careful:
-
With window Onload can write the JS code above the page elements, because onload is to execute the processing function after all the page contents are loaded.
-
window.onload the traditional registration event method can only be written once. If there are multiple events, the last window will be used Onload shall prevail.
-
If you use addEventListener, there are no restrictions
document.addEventListener('DOMContentLoaded',function(){})When the DOMContentLoaded event is triggered, only when the DOM is loaded, excluding style sheets, pictures, flash, etc.
Ie9 and above are supported
If there are many pictures on the page, it may take a long time from user access to onload trigger, and the interaction effect cannot be realized, which will inevitably affect the user experience. At this time, DOMContentLoaded event is more appropriate.
2.1. 1. The difference between load and DOMContentLoaded
-
load and other page contents are all loaded, including page dom elements, pictures, flash, css, etc
-
DOMContentLoaded means that after the DOM is loaded, it can be executed without pictures, flash css, etc. the loading speed is faster than load
window.addEventListener('load', function() {
    alert(22);
})
document.addEventListener('DOMContentLoaded', function() {
        alert(33);
    })
    // load and other page contents are all loaded, including page dom elements, pictures, flash CSS, etc
    // DOMContentLoaded means that the DOM can be loaded without pictures, false CSS, etc. the loading speed is faster than load
2.2. Window resizing event
window.onresize = function(){}
window.addEventListener("resize",function(){});
window.onresize is a handler function called when the window resizing load event is triggered.
be careful:
-
This event is triggered whenever the window size changes in pixels.
-
We often use this event to complete responsive layout. window.innerWidth the width of the current screen
<script>
    window.addEventListener('load', function() {
        var div = document.querySelector('div');
        window.addEventListener('resize', function() {
            console.log(window.innerWidth);
            console.log('Changed');
            if (window.innerWidth <= 800) {
                div.style.display = 'none';
            } else {
                div.style.display = 'block';
            }

        })
    })
</script>
3. Timer
3.1 two timers
The window object provides us with two timers
-
setTimeout()
-
setInterval()
3.2. SetTimeout
window.setTimeout(Call function, [Milliseconds of delay]);
The setTimeout() method is used to set a timer that executes the calling function after the timer expires.
be careful:
-
window can be omitted.
-
This calling function can directly write the function, or write the function name, or take the form of string 'function name ()'. The third is not recommended
-
The number of milliseconds to delay is omitted. The default is 0. If writing, it must be milliseconds.
-
Because there may be many timers, we often assign an identifier to the timer.
<script>
    // 1. setTimeout
    // Syntax specification: window SetTimeout (calling function, delay time);
    // 1. This window can be omitted when calling
    // 2. The delay time unit is milliseconds, but it can be omitted. If omitted, the default is 0
    // 3. The calling function can directly write the function and the function name. There is also a writing method 'function name ()'
    // 4. There may be many timers in the page. We often add identifiers (names) to timers
    // setTimeout(function() {
    //     console.log('time is up ');
    // }, 2000);
    function callback() {
        console.log('It exploded');

    }
    var timer1 = setTimeout(callback, 3000);
    var timer2 = setTimeout(callback, 5000);
    // setTimeout('callback()', 3000); //  We don't advocate this way of writing
</script>
Callback function
The calling function setTimeout() is also called callback
Ordinary functions are called directly in code order.
This function needs to wait until the time is up, so it is called a callback function.
Simple understanding: callback means calling back. After the last thing is done, call this function again later.
We talked about element Onclick = function() {} or element addEventListener(“click”, fn); The function inside is also a callback function.
Case: advertisement automatically closed after 5 seconds
case analysis
① Core idea: hide the advertisement after 5 seconds
② Set timeout with timer
<img src="images/ad.jpg" alt="" class="ad">
<script>
    var ad = document.querySelector('.ad');
    setTimeout(function() {
        ad.style.display = 'none';
    }, 5000);
</script>
3.3 stop the setTimeout timer
window.clearTimeout(timeoutID)
The clearTimeout() method cancels the timer previously established by calling setTimeout().
be careful:
-
window can be omitted.
-
The parameter inside is the identifier of the timer.
<button>Click stop timer</button>

<script>
    var btn = document.querySelector('button');
    var timer = setTimeout(function() {
        console.log('It exploded');
    }, 5000);
    btn.addEventListener('click', function() {
        clearTimeout(timer);
    })
</script>
3.4. setInterval() timer
window.setInterval(Callback function, [Number of milliseconds between]);
The setInterval() method calls a function repeatedly, and calls the callback function every other time.
be careful:
-
window can be omitted.
-
This calling function can directly write the function, or write the function name, or take the form of string 'function name ()'.
-
The number of milliseconds of the interval is omitted. The default is 0. If it is written, it must be milliseconds, which means that this function is called automatically every milliseconds.
-
Because there may be many timers, we often assign an identifier to the timer.
-
The first execution is also executed after milliseconds, and then every milliseconds.
// 1. setInterval
// Syntax specification: window Setinterval (calling function, delay time);
setInterval(function() {
    console.log('Continue output');

}, 1000);
// 2. When the setTimeout delay time is up, call the callback function and call it only once to end the timer
// 3. setInterval calls the callback function every time after this delay time. It will be called many times and called repeatedly
Case: Countdown
case analysis
① This countdown is constantly changing, so a timer is required to automatically change (setInterval)
② Three black boxes store hours, minutes and seconds respectively
③ Three black boxes are put into the calculated hours, minutes and seconds using innerHTML
④ The first execution is also in milliseconds, so the page just refreshed will have blank space
⑤ It's best to encapsulate the function, so that you can call this function once to prevent the blank problem when you refresh the page at the beginning
<div>
    <span class="hour">1</span>
    <span class="minute">2</span>
    <span class="second">3</span>
</div>
<script>
    // 1. Get element
    var hour = document.querySelector('.hour'); // Hour black box
    var minute = document.querySelector('.minute'); // Minute black box
    var second = document.querySelector('.second'); // Black box for seconds
    var inputTime = +new Date('2019-5-1 18:00:00'); // Returns the total number of milliseconds of user input time
    countDown(); // We first call this function once to prevent blank pages from being refreshed for the first time
    // 2. Turn on the timer
    setInterval(countDown, 1000);

    function countDown() {
        var nowTime = +new Date(); // Returns the total number of milliseconds of the current time
        var times = (inputTime - nowTime) / 1000; // times is the total number of seconds remaining
        var h = parseInt(times / 60 / 60 % 24); //Time
        h = h < 10 ? '0' + h : h;
        hour.innerHTML = h; // Give the remaining hours to the black box
        var m = parseInt(times / 60 % 60); // branch
        m = m < 10 ? '0' + m : m;
        minute.innerHTML = m;
        var s = parseInt(times % 60); // Current seconds
        s = s < 10 ? '0' + s : s;
        second.innerHTML = s;
    }
</script>
3.5 stop setInterval() timer
window.clearInterval(intervalID);
The clearInterval() method cancels the timer previously established by calling setInterval().
be careful:
-
window can be omitted.
-
The parameter inside is the identifier of the timer.
<button class="begin">Turn on the timer</button>
<button class="stop">Stop Timer </button>

<script>
    var begin = document.querySelector('.begin');
    var stop = document.querySelector('.stop');
    var timer = null; // The global variable null is an empty object
    begin.addEventListener('click', function() {
        timer = setInterval(function() {
            console.log('ni hao ma');
            }, 1000);
        })
        stop.addEventListener('click', function() {
            clearInterval(timer);
        })
</script>
Case: sending SMS
After clicking the button, the button cannot be clicked again within 60 seconds to prevent repeated SMS sending
case analysis
① After the button is clicked, disabled will be disabled and set to true
② At the same time, the content in the button will change. Note that the content in the button is modified through innerHTML
③ The number of seconds varies, so a timer is needed
④ Define a variable that is decremented in the timer
⑤ If the variable is 0, it means that the time is up, we need to stop the timer and restore the initial state of the button
    phone number: <input type="number"> <button>send out</button>
    <script>
   var btn = document.querySelector('button');
    var time = 3; // Define the number of seconds left
    btn.addEventListener('click', function() {
        btn.disabled = true;
        var timer = setInterval(function() {
            if (time == 0) {
                // Clear timer and reset button
                clearInterval(timer);
                btn.disabled = false;
                btn.innerHTML = 'send out';
            } else {
                btn.innerHTML = 'Remaining' + time + 'second';
                time--;
            }
        }, 1000);
    })
   </script>
3.6 this
The point of this cannot be determined when the function is defined. Only when the function is executed can we determine who this points to. Generally, this finally points to the object that calls it
At this stage, let's first understand some of this points
-
In the global scope or ordinary function, this points to the global object window (note that this in the timer points to the window)
-
Who calls this in the method call
3. this in the constructor points to the instance of the constructor
 <button>click</button>

 <script>
     // This points to the problem. Generally, the final point of this is the object that calls it
     // 1. In the global scope or ordinary function, this points to the global object window (note that this in the timer points to the window)
     console.log(this);
     function fn() {
         console.log(this);
     }
     window.fn();
     window.setTimeout(function() {
         console.log(this);
     }, 1000);
     // 2. In method calls, who calls this points to whom
     var o = {
         sayHi: function() {
             console.log(this); // This points to o this object
         }
     }
     o.sayHi();
     var btn = document.querySelector('button');
     // btn.onclick = function() {
     //     console.log(this); // this refers to the btn button object
     // }
     btn.addEventListener('click', function() {
             console.log(this); // this refers to the btn button object
         })
         // 3. this in the constructor points to the instance of the constructor
     function Fun() {
         console.log(this); // this points to the fun instance object
     }
     var fun = new Fun();
 </script>
4. JS implementation mechanism
4.1 JS is a single thread
A major feature of JavaScript language is single thread, that is, you can only do one thing at a time. This is due to the mission of the birth of JavaScript, a scripting language - Javascript was born to deal with user interaction in pages and operate dom. For example, we can't add and delete a DOM element at the same time. You should add before deleting.
Single thread means that all tasks need to be queued, and the next task will be executed only after the previous task is completed. The problem caused by this is that if JS is executed for a long time, the rendering of the page will be inconsistent, resulting in the feeling of page rendering loading blocking.
4.2 synchronous and asynchronous
What is the result of the execution of the following code?
 console.log(1);
 setTimeout(function () {
 console.log(3);
 }, 1000);
 console.log(2);
In order to solve this problem, using the computing power of multi-core CPU, HTML5 proposes the Web Worker standard, which allows JavaScript scripts to create
Create multiple threads. Thus, synchronization and asynchrony appear in JS.
synchronization
Execute the next task after the previous task is completed. The execution order of the program is consistent and synchronized with the arrangement order of the tasks. For example, the synchronous method of Cooking: we have to boil water and cook. When the water boils (10 minutes later), we can cut and fry vegetables.
asynchronous
When you do something, because it will take a long time, you can deal with other things while doing it. For example, do
In the asynchronous practice of rice, we use this 10 minutes to cut and fry vegetables while boiling water.
Their essential difference: the execution order of each process on this pipeline is different.
4.3 synchronous and asynchronous tasks
So what is the result of the following code execution?
console.log(1);
 setTimeout(function () {
 console.log(3);
 }, 0);
 console.log(2);
Synchronization task
Synchronization tasks are executed on the main thread to form an execution stack.
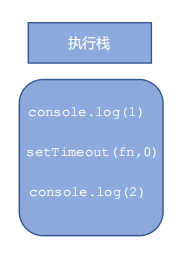
Asynchronous task
The asynchrony of JS is realized through callback function.
Generally speaking, there are three types of asynchronous tasks:
1. Common events, such as click, resize, etc
2. Resource loading, such as load, error, etc
3. Timer, including setInterval, setTimeout, etc
Asynchronous task related callback functions are added to the task queue (also known as message queue).
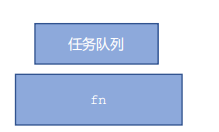
4.4 JS execution mechanism
-
Execute the synchronization task in the stack first.
-
The asynchronous task (callback function) is put into the task queue.
-
Once all the synchronous tasks in the execution stack are executed, the system will read the asynchronous tasks in the task queue in order, so the read asynchronous tasks end the waiting state, enter the execution stack and start execution.
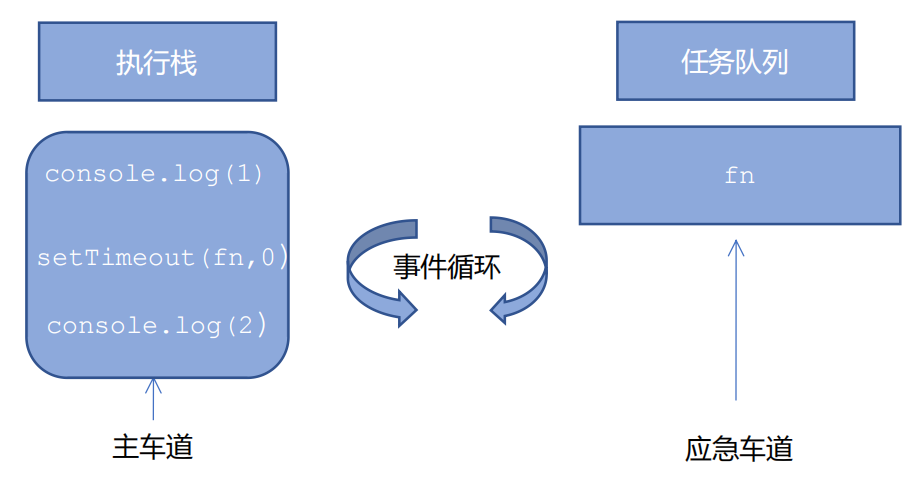
4.5 JS execution mechanism - event loop
 console.log(1);
 document.onclick = function() {
 console.log('click');
 }
 console.log(2);
 setTimeout(function() {
 console.log(3)
 }, 3000)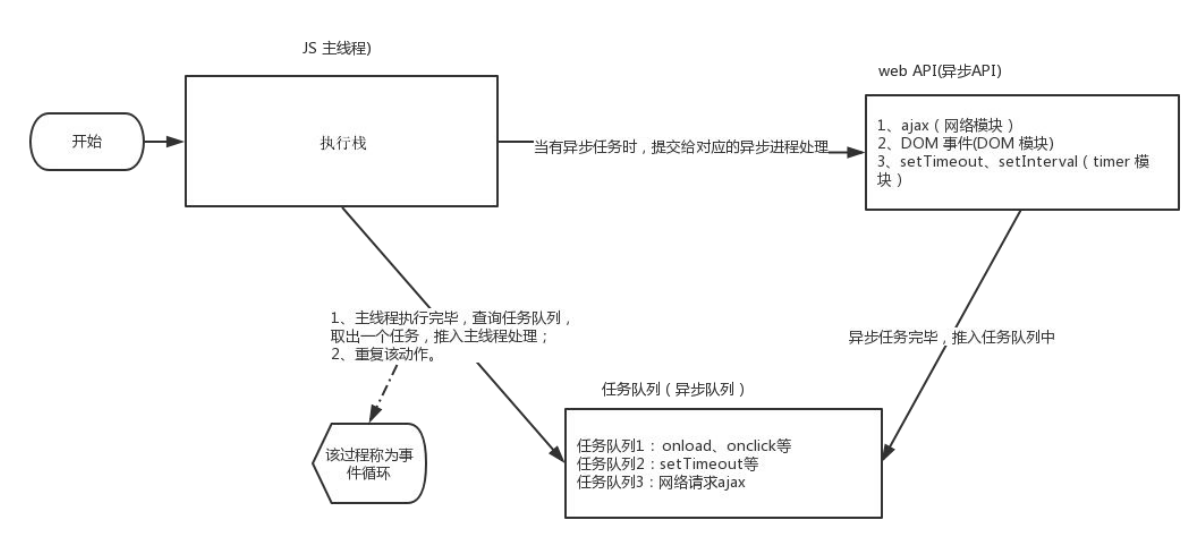
Because the main thread repeatedly obtains, executes, re obtains and re executes tasks, this mechanism is called event loop.
5. location object
5.1 what is a location object
The window object provides us with a location property to get or set the URL of the form, and can be used to parse the URL. Because this property returns an object, we also call this property location object.
5.2 URL
Uniform resource locator (URL) is the address of standard resources on the Internet. Every file on the Internet has a unique URL, which contains information indicating the location of the file and what the browser should do with it.
The general syntax format of URL is:
protocol://host[:port]/path/[?query]#fragment
 http://www.itcast.cn/index.html?name=andy&age=18#link
| form | explain |
|---|---|
| protocol | Common communication protocols include http,ftp,maito, etc |
| host | Host (domain name) www.itheima.com |
| port | Port number, optional |
| path | A string whose path is separated by zero or more '/' symbols |
| query | Parameters are in the form of key value pairs separated by the & symbol |
| fragment | The content # after the clip is common in link anchors |
5.3 properties of location object
| location object properties | Return value |
|---|---|
| location.href | Gets or sets the entire URL |
| location.host | Return host (domain name) www.baidu.com |
| location.port | Returns the port number. If not written, returns an empty string |
| location.pathname | Return path |
| location.search | Return parameters |
| location.hash | Returning the content # after the clip is common in link anchors |
Important to remember: href and search
Case: automatically jump to the page after 5 seconds
case analysis
① Use the timer to do the countdown effect
② When it's time, jump to the page. Use location href
<button>click</button>
<div></div>
<script>
    var btn = document.querySelector('button');
    var div = document.querySelector('div');
    btn.addEventListener('click', function() {
        // console.log(location.href);
        location.href = 'http://www.itcast.cn';
    })
    var timer = 5;
    setInterval(function() {
        if (timer == 0) {
            location.href = 'http://www.itcast.cn';
        } else {
            div.innerHTML = 'You will be' + timer + 'Jump to the home page in seconds';
            timer--;
        }
    }, 1000);
</script>
Case: get URL parameter data
Mainly practice the transmission of data in different pages.
case analysis
① The first login page contains the submission form, and the action is submitted to the index HTML page
② For the second page, you can use the parameters of the first page, so as to realize the transmission effect between different pages of data
③ The second page can use the data of the first page by using the location in the URL Search parameter
④ In the second page, you need to extract this parameter.
⑤ The first step is to remove? Using substr
⑥ The second step uses the = sign to split the key and the value split('=')
⑦ The first array is the key and the second array is the value
We simply write a login box, click login and jump to index html
<body>
    <form action="index.html">
        user name: <input type="text" name="uname">
        <input type="submit" value="Sign in">
    </form>
</body>
Next we write index html
<body>
    <div></div>
    <script>
        console.log(location.search); // ?uname=andy
        // 1. First remove? substr('starting position ', intercepting several characters);
        var params = location.search.substr(1); // uname=andy
        console.log(params);
        // 2. Use = to divide the string into an array split('=');
        var arr = params.split('=');
        console.log(arr); // ["uname", "ANDY"]
        var div = document.querySelector('div');
        // 3. Write data into div
        div.innerHTML = arr[1] + 'Welcome';
    </script>
</body>
So we can get the URL parameters on the path
5.4 method of location object
| location object method | Return value |
|---|---|
| location.assign() | Like href, you can jump to a page (also known as a redirect page) |
| location.replace() | Replace the current page, because the history is not recorded, you cannot go back to the page |
| location.reload() | Reloading the page is equivalent to the refresh button or f5. If the parameter is true, forced refresh ctrl+f5 |
<body>
    <button>click</button>
    <script>
        var btn = document.querySelector('button');
        btn.addEventListener('click', function() {
            // Record browsing history, so you can realize the back function
            // location.assign('http://www.itcast.cn');
            // The browsing history is not recorded, so the back function cannot be realized
            // location.replace('http://www.itcast.cn');
            location.reload(true);
        })
    </script>
</body>
6. navigator object (understand that it is generally done by the server)
-
The navigator object contains information about the browser and has many properties
-
We often use userAgent, which can return the value of the user agent header sent by the client to the server
The following front-end code can judge which terminal the user uses to open the page. If it is opened by PC, we will jump to the page on PC. if it is opened by mobile phone, we will jump to the page on mobile phone
if((navigator.userAgent.match(/(phone|pad|pod|iPhone|iPod|ios|iPad|Android|Mobile|BlackBerry|IEMobile|MQQBrowser|JUC|Fennec|wOSBrowser|BrowserNG|WebOS|Symbian|Windows Phone)/i))) {
    window.location.href = "";     //mobile phone
 } else {
    window.location.href = "";     //computer
 }
7. history object
-
The window object provides us with a history object to interact with the browser history
-
This object contains the URL that the user (in the browser window) has visited.
| history object method | effect |
|---|---|
| back() | Can reverse function |
| forward() | Forward function |
| Go (parameter) | Forward and backward function, if the parameter is 1 forward 1 page, if it is - 1 backward 1 page |
<body>
    <a href="list.html">Click me to go to the list page</a>
    <button>forward</button>
    <script>
        var btn = document.querySelector('button');
        btn.addEventListener('click', function() {
            // history.forward();
            history.go(1); //One step forward
        })
    </script>
</body>
history objects are rarely used in actual development, but they will be seen in some OA office systems.