Simple Vue Program
Create a new html file in vscode and enter html5 code for quick generation:
<!DOCTYPE html>
<html lang="en">
<head>
    <meta charset="UTF-8">
    <meta name="viewport" content="width=device-width, initial-scale=1.0">
    <title>Document</title>
</head>
<body>

</body>
</html>
Add vue-related code to see the results of a two-way binding:
<!DOCTYPE html>
<html lang="en">

<head>
    <meta charset="UTF-8">
    <meta name="viewport" content="width=device-width, initial-scale=1.0">
    <meta http-equiv="X-UA-Compatible" content="ie=edge">
    <title>Document</title>
</head>

<body>
    <div id="app">
        {{message}} {{message + message}}
        <div :id="message"></div>
        <ul>
            <li v-for="item in list">
                <span v-if="!item.del">{{item.title}}</span>
                <span v-else style="text-decoration: line-through">{{item.title}}</span>
                <button v-show="!item.del">delete</button>
            </li>
        </ul>
    </div>
    <script src="https://cdn.jsdelivr.net/npm/vue/dist/vue.js"></script>
    <script>
        var vm = new Vue({
            el: '#app',
            data: {
                message: 'hello world',
                list: [{
                    title: 'Course 1',
                    del: false
                }, {
                    title: 'Course 2',
                    del: true
                }],
            }
        })
    </script>
</body>

</html>
assembly
To build large applications with small, independent, and reusable modules, we introduced the concept of components. To see the first abstraction of components based on the above, we extracted the todo-list and todo-item components:
<!DOCTYPE html>
<html lang="en">

<head>
    <meta charset="UTF-8">
    <meta name="viewport" content="width=device-width, initial-scale=1.0">
    <meta http-equiv="X-UA-Compatible" content="ie=edge">
    <title>Document</title>
</head>

<body>
    <div id="app">
        {{message}} {{message + message}}
        <div :id="message"></div>
        <!-- <ul>
            <todo-item v-for="item in list" :title="item.title" :del="item.del"></todo-item>
        </ul> -->
        <todo-list></todo-list>
    </div>
    <script src="https://cdn.jsdelivr.net/npm/vue/dist/vue.js"></script>
    <script>
        Vue.component('todo-item', {
            props: {
                title: String,
                del: {
                    type: Boolean,
                    default: false,
                },
            },
            template: `
            <li>
                <span v-if="!del">{{title}}</span>
                <span v-else style="text-decoration: line-through">{{title}}</span>
                <button v-show="!del">delete</button>
            </li>
          `,
            data: function() {
                return {}
            },
            methods: {

            },
        })
        Vue.component('todo-list', {
            template: `
            <ul>
              <todo-item v-for="item in list" :title="item.title" :del="item.del"></todo-item>
            </ul>
          `,
            data: function() {
                return {
                    list: [{
                        title: 'Course 1',
                        del: false
                    }, {
                        title: 'Course 2',
                        del: true
                    }],
                }
            }
        })
        var vm = new Vue({
            el: '#app',
            data: {
                message: 'hello world',

            }
        })
    </script>
</body>

</html>
Event
@click is the way to bind native components, @delete is the way to bind custom components. We throw an event in handleClick through this.$emit('delete', this.title), and we get the corresponding parameters in handelDelete.
<!DOCTYPE html>
<html lang="en">

<head>
    <meta charset="UTF-8">
    <meta name="viewport" content="width=device-width, initial-scale=1.0">
    <meta http-equiv="X-UA-Compatible" content="ie=edge">
    <title>Document</title>
</head>

<body>
    <div id="app">
        {{message}} {{message + message}}
        <div :id="message"></div>
        <!-- <ul>
            <todo-item v-for="item in list" :title="item.title" :del="item.del"></todo-item>
        </ul> -->
        <todo-list></todo-list>
    </div>
    <script src="https://cdn.jsdelivr.net/npm/vue/dist/vue.js"></script>
    <script>
        Vue.component('todo-item', {
            props: {
                title: String,
                del: {
                    type: Boolean,
                    default: false,
                },
            },
            template: `
            <li>
                <span v-if="!del">{{title}}</span>
                <span v-else style="text-decoration: line-through">{{title}}</span>
                <button v-show="!del" @click="handleClick">delete</button>
            </li>
          `,
            data: function() {
                return {}
            },
            methods: {
                handleClick(e) {
                    console.log('Click the Delete button')
                    this.$emit('delete', this.title)
                }
            },
        })
        Vue.component('todo-list', {
            template: `
            <ul>
              <todo-item @delete="handleDelete" v-for="item in list" :title="item.title" :del="item.del"></todo-item>
            </ul>
          `,
            data: function() {
                return {
                    list: [{
                        title: 'Course 1',
                        del: false
                    }, {
                        title: 'Course 2',
                        del: true
                    }],
                }
            },
            methods: {
                handleDelete(val) {
                    console.log('handleDelete', val)
                }
            }
        })
        var vm = new Vue({
            el: '#app',
            data: {
                message: 'hello world',

            }
        })
    </script>
</body>
</html>
Methods such as bubble can also be implemented in vue with modifiers.
slot
In the code above, our todo-item is written directly inside the todo-list, which is not reasonable. We want to pass in the todo-list so that we can render it automatically.
But when we take the todo-item out of the todo-list, only the ul tag is left in the todo-list, where should the todo-item be placed? On this basis, the concept of slot is introduced.
Slots are classified as anonymous, named, and scoped. In scoped slots, template binds: value = "value", and the parent component gets the value through v-slot:pre-icon="{value}".
<!DOCTYPE html>
<html lang="en">

<head>
    <meta charset="UTF-8">
    <meta name="viewport" content="width=device-width, initial-scale=1.0">
    <meta http-equiv="X-UA-Compatible" content="ie=edge">
    <title>Document</title>
</head>

<body>
    <div id="app">
        {{message}} {{message + message}}
        <div :id="message"></div>
        <!-- <ul>
            <todo-item v-for="item in list" :title="item.title" :del="item.del"></todo-item>
        </ul> -->
        <todo-list>
            <todo-item @delete="handleDelete" v-for="item in list" :title="item.title" :del="item.del">
                <template v-slot:pre-icon="{value}">
                    <span>Front Icon {{value}}</span>
                </template>

            </todo-item>
        </todo-list>
    </div>
    <script src="https://cdn.jsdelivr.net/npm/vue/dist/vue.js"></script>
    <script>
        Vue.component('todo-item', {
            props: {
                title: String,
                del: {
                    type: Boolean,
                    default: false,
                },
            },
            template: `
            <li>
                <slot name="pre-icon" :value="value"></slot>
                <span v-if="!del">{{title}}</span>
                <span v-else style="text-decoration: line-through">{{title}}</span>
                <slot name="suf-icon">😄</slot>
                <button v-show="!del" @click="handleClick">delete</button>
            </li>
          `,
            data: function() {
                return {
                    value: Math.random()
                }
            },
            methods: {
                handleClick(e) {
                    console.log('Click the Delete button')
                    this.$emit('delete', this.title)
                }
            },
        })
        Vue.component('todo-list', {
            template: `
            <ul>
              <slot></slot>
            </ul>
          `,
            data: function() {
                return {

                }
            },
        })
        var vm = new Vue({
            el: '#app',
            data: {
                message: 'hello world',
                list: [{
                    title: 'Course 1',
                    del: false
                }, {
                    title: 'Course 2',
                    del: true
                }],
            },
            methods: {
                handleDelete(val) {
                    console.log('handleDelete', val)
                }
            }
        })
    </script>
</body>

</html>
Binding in both directions
As we all know, Vue implements bi-directional binding. When our data changes, our views update synchronously, and when our views update, our data also updates. In Vue, bi-directional binding is implemented through v-model.
The essence of v-model is just grammatical sugar, it is essentially a short form of value and input.
So vue's two-way binding is actually a single data stream.
Note: v-model internally uses different attributes for different input elements and throws different events, such as text and textarea using value attributes and input events, checkbox and radio using checked and change d events, etc.
Component updates:
We all know that vue is data driven and our view changes only when the data changes. So any direct modification of the dom is wrong.
Data source:
Attributes from parent elements
State data from the component itself
From Status Manager, vuex, Vue.observable
State data and property props
Data of the component itself in state
Data from parent component when attributes
A change in state does not necessarily trigger an update
Property changes do not necessarily trigger updates
Responsive updates to vue
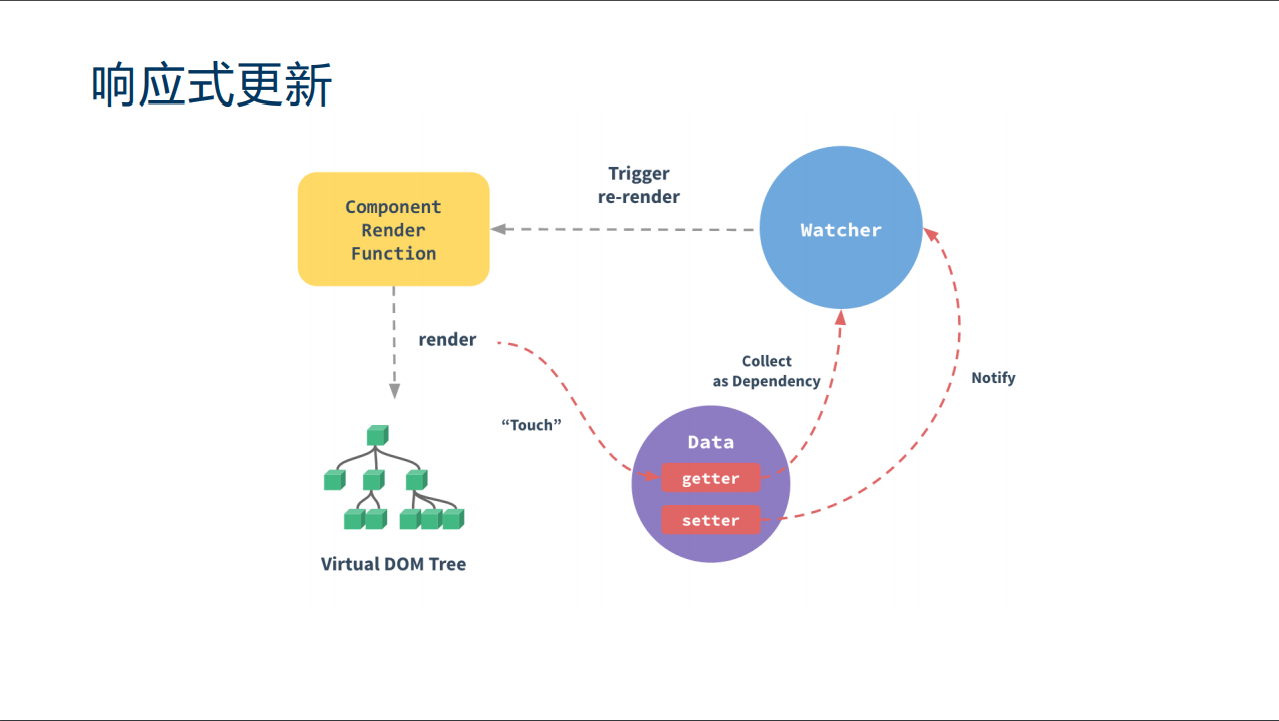
When vue is instantiated, we do some getter and setter transformations of the data below the data. When render, we watcher the data from render. Only the data from watcher triggers component updates when it changes.
Compute properties and listeners
computed attribute
- Reduce computing logic in templates
- Data Cache
- Dependent on fixed data types (responsive data)
Take a look at the example code:
<template>
  <div>
    <p>Reversed message1: "{{ reversedMessage1 }}"</p>
    <p>Reversed message2: "{{ reversedMessage2() }}"</p>
    <p>{{ now }}</p>
    <button @click="() => $forceUpdate()">forceUpdate</button>
    <br />
    <input v-model="message" />
  </div>
</template>
<script>
export default {
  data() {
    return {
      message: "hello vue"
    };
  },
  computed: {
    // getter for calculating attributes
    reversedMessage1: function() {
      console.log("implement reversedMessage1");
      return this.message
        .split("")
        .reverse()
        .join("");
    },
    now: function() {
      return Date.now();
    }
  },
  methods: {
    reversedMessage2: function() {
      console.log("implement reversedMessage2");
      return this.message
        .split("")
        .reverse()
        .join("");
    }
  }
};
</script>
We refresh the data by this.$forceUpdate(), and when we click the button, we see that only the reversedMessage2 method has been called.
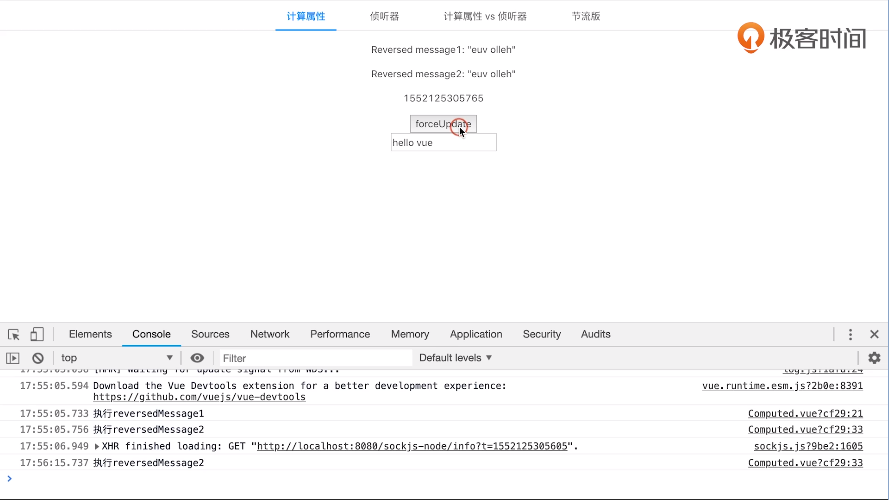

When we enter data in the input box, reversedMessage1 and reversedMessage2 are executed simultaneously.
Listener watch
- More flexibility and versatility
- Any logic such as function throttling, ajax fetching data asynchronously, or even manipulating DOM can be performed in a watch
<template>
  <div>
    {{ $data }}
    <br />
    <button @click="() => (a += 1)">a+1</button>
  </div>
</template>
<script>
export default {
  data: function() {
    return {
      a: 1,
      b: { c: 2, d: 3 },
      e: {
        f: {
          g: 4
        }
      },
      h: []
    };
  },
  watch: {
    a: function(val, oldVal) {
      this.b.c += 1;
      console.log("new: %s, old: %s", val, oldVal);
    },
    "b.c": function(val, oldVal) {
      this.b.d += 1;
      console.log("new: %s, old: %s", val, oldVal);
    },
    "b.d": function(val, oldVal) {
      this.e.f.g += 1;
      console.log("new: %s, old: %s", val, oldVal);
    },
    e: {
      handler: function(val, oldVal) {
        this.h.push("😄");
        console.log("new: %s, old: %s", val, oldVal);
      },
      deep: true
    },
    h(val, oldVal) {
      console.log("new: %s, old: %s", val, oldVal);
    }
  }
};
</script>
This refers to the concept of nested listening. Note that if deep is set to false in e, changing e values in b.d listening does not involve triggering handler events for E.
computed vs watch
- computed can do it, watch can do it, and vice versa
-
Compd is better at monitoring changes in multiple data than watch writing.
-
computed does not support asynchronous, watch supports asynchronous
instructions
vue provides 14 built-in instructions:

v-cloack does not work on the current single file page
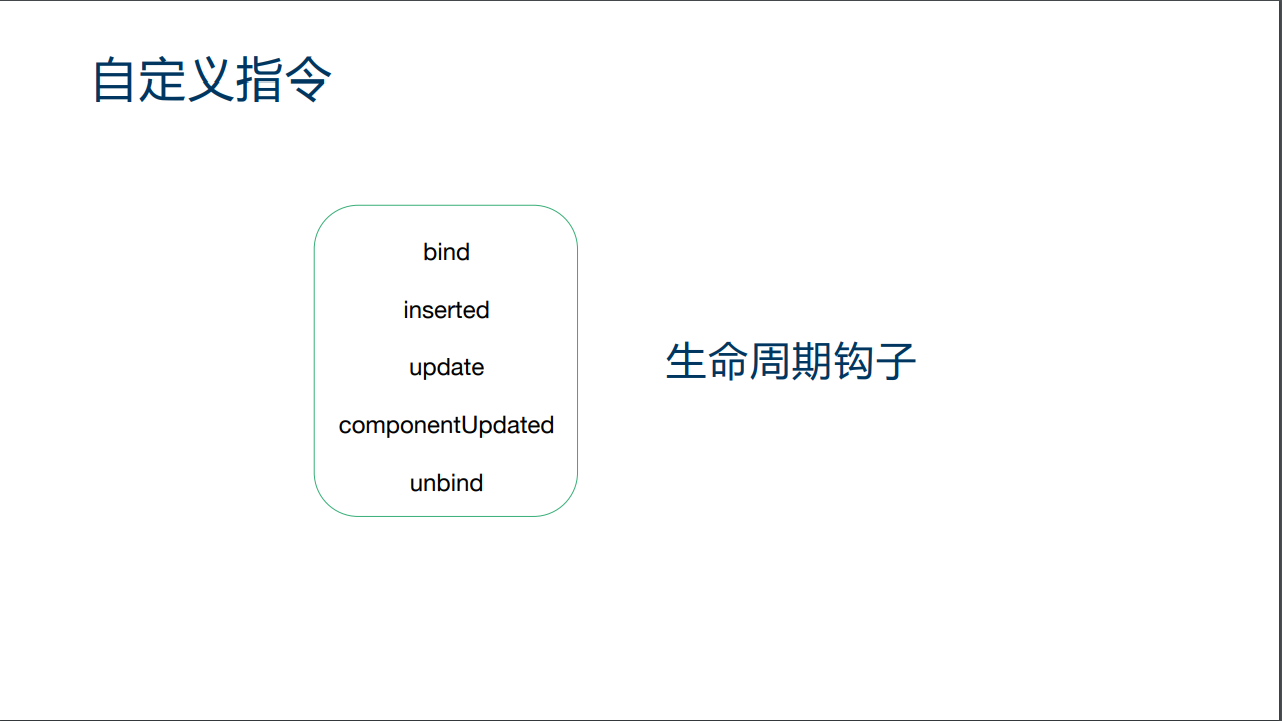
Custom directives:
 Example:
<template>
  <div>
    <button @click="show = !show">
      Destroy
    </button>
    <button v-if="show" v-append-text="`hello ${number}`" @click="number++">
      Button
    </button>
  </div>
</template>
<script>
export default {
  directives: {
    appendText: {
      bind() {
        console.log("bind");
      },
      inserted(el, binding) {
        el.appendChild(document.createTextNode(binding.value));
        console.log("inserted", el, binding);
      },
      update() {
        console.log("update");
      },
      componentUpdated(el, binding) {
        el.removeChild(el.childNodes[el.childNodes.length - 1]);
        el.appendChild(document.createTextNode(binding.value));
        console.log("componentUpdated");
      },
      unbind() {
        console.log("unbind");
      }
    }
  },
  data() {
    return {
      number: 1,
      show: true
    };
  }
};
</script>
The ppend-text directive implements the following instructions for inserting content after the current node text content:
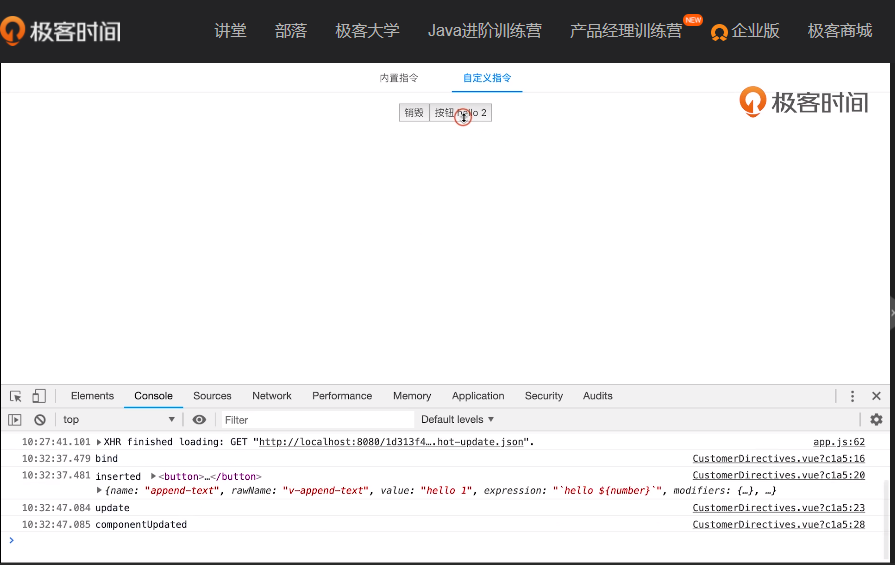
Initialize triggers bind and insert, and click the button to trigger update and componentUpdated.