brief introduction
The Linux kernel was originally written by Finnish Linus Torvalds as a hobby when he was studying at the University of Helsinki.
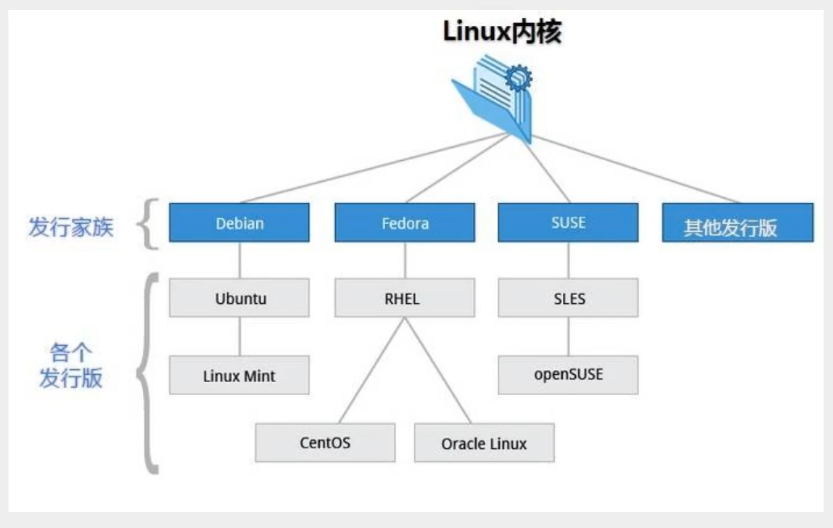
Linux is a UNIX like operating system that is free to use and spread. It is a multi-user, multi task, multi thread and multi CPU operating system based on POSIX (portable operating system interface) and UNIX.
Linux can run the main UNIX tools, software, applications and network protocols. It supports 32-bit and 64 bit hardware. Linux inherits the design idea of UNIX with network as the core. It is a multi-user network operating system with stable performance.
Power on
Boot will start many programs. They are called "service s" in Windows and "daemon s" in Linux.
Login method:
- Command line login
- ssh login
- Graphical interface login
The account with the highest authority is root, which can operate everything
Shut down
sync  #Synchronize the data to the hard disk to prevent data loss after shutdown

shutdown

shutdown -h  10 # Turn it off in ten minutes
shutdown -h  now # Turn it off immediately
shutdown -h  20:56 # Shutdown at specified time

reboot # restart

halt # Shutting down the system is equivalent to shutdown -h now and poweroff
System directory structure
1. Everything is a document
2. The root directory is "/", and all files are mounted under this node
The following is an explanation of these directories:
-
/bin:
bin is the abbreviation of Binaries. This directory stores the most frequently used commands. -
/boot: (don't move)
Here are some core files used when starting Linux, including some connection files and image files. -
/dev :
dev is the abbreviation of device. The external devices of Linux are stored in this directory. The way to access devices and files in Linux is the same. -
/etc:
Etc is the abbreviation of etcetera (etc.), which is used to store all configuration files and subdirectories required for system management. -
/home:
The user's home directory. In Linux, each user has its own directory. Generally, the directory name is named after the user's account -
/lib: (don't move)
lib is the abbreviation of library. This directory stores the most basic dynamic connection shared library of the system, which is similar to the DLL file in Windows. Almost all applications need these shared libraries. -
/lost+found:
This directory is generally empty. When the system shuts down illegally, some files are stored here. -
/media:
The Linux system will automatically identify some devices, such as U SB flash disk, optical drive, etc. when identified, Linux will mount the identified devices to this directory. -
/mnt:
The system provides this directory to allow users to temporarily mount other file systems. We can mount the optical drive on / mnt /, and then enter this directory to view the contents of the optical drive. -
/opt:
opt is an abbreviation for optional, which is the directory where additional software is installed for the host. For example, if you install an ORACLE database, you can put it in this directory. The default is empty. -
/proc:
Proc is the abbreviation of processes, / proc is a pseudo file system (i.e. virtual file system), which stores a series of special files of the current kernel running state. This directory is a virtual directory, which is the mapping of system memory. We can access this directory directly to obtain system information.
The contents of this directory are not on the hard disk, but in the memory. We can also directly modify some files in it. For example, we can mask the ping command of the host through the following command to prevent others from Ping your machine:echo 1 > /proc/sys/net/ipv4/icmp_echo_ignore_all
-
/root:
This directory is the user home directory of the system administrator, also known as the super authority. -
/sbin:
s means Super User, which is the abbreviation of Super User binaries. Here is the system management program used by the system administrator. -
/selinux:
This directory is unique to Redhat/CentOS. selinux is a security mechanism similar to windows firewall, but this mechanism is more complex. This directory is used to store selinux related files. -
/srv:
This directory stores some data to be extracted after the service is started. -
/sys:
This is Linux 2 A big change in the 6 kernel. A new file system sysfs in the 2.6 kernel is installed in this directory.
sysfs file system integrates the information of the following three file systems: proc file system for process information, devfs file system for device and devpts file system for pseudo terminal.
The file system is an intuitive reflection of the kernel device tree.
When a kernel object is created, the corresponding files and directories are also created in the kernel object subsystem.
-
/tmp:
tmp is the abbreviation of temporary. This directory is used to store some temporary files. -
/usr:
usr is the abbreviation of UNIX shared resources. It is a very important directory. Many applications and files of users are placed in this directory, which is similar to the program files directory under windows. -
/usr/bin:
Applications used by system users. -
/usr/sbin:
Super users use more advanced management programs and system daemons. -
/usr/src:
The default placement directory of kernel source code. -
/var:
var is the abbreviation of variable. There are constantly expanding things stored in this directory. We are used to putting those directories that are often modified under this directory. Including various log files. -
/run:
Is a temporary file system that stores information since the system was started. When the system restarts, the files in this directory should be deleted or cleared. If you have a / var/run directory on your system, you should make it point to run. -
/www: storage server website related resources, environment and projects (created by pagoda?)
command
quick:
Tab quickly supplement the names of existing directories and files on the current page
Ctrl+C force exit current command
Ctrl+Z recall command
clear # eliminate
tar -zxvf xxx.tar  # j
Directory management
mkdir Directory name  # Create directory
mkdir -p test1/test2/test3  # Create hierarchy directory

rmdir xx # Remove directory (only empty folder)
rmdir -p test1/test2  #  Force deletion

cp  File destination address   # Duplicate copies will ask for overwrite / discard
rm remove files or directories
rm -f   #  Ignore nonexistent files without warning and force deletion
rm -r	#	Recursively delete directory
rm -i	#	Interactive ask whether to delete
mv move file / rename
 -f #force
 -u # Replace only files that have been updated
mv File address  # move
mv File name 1 file name 2  #rename
Switch cd
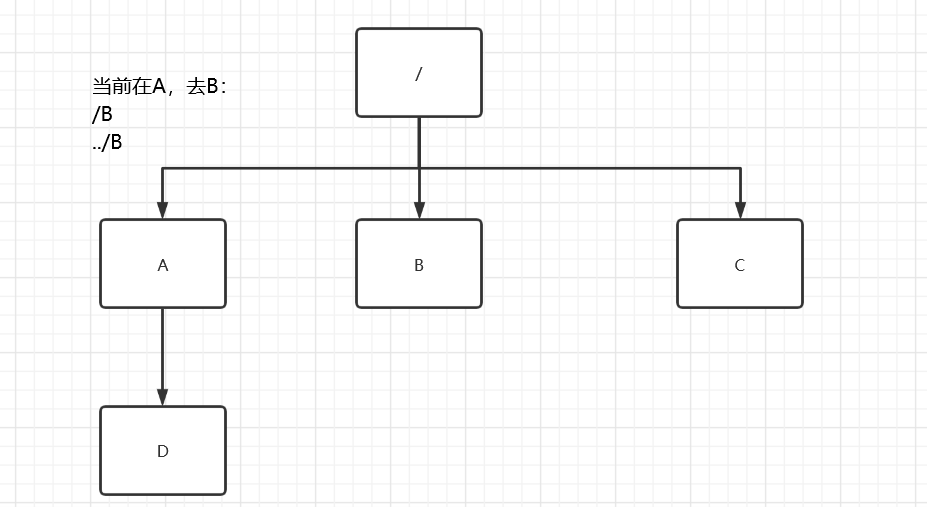
Absolute road force starts with / and relative path/ route
At A, go to D:
cd D
cd ./D
cd /A/D
cd ../A/D
cd     # Switch directory naming
cd ..  # Return to the previous level
./     # current directory
cd ~   # Return to the current user directory
List directories: ls
ls
ls -a		#View all files, including hidden files
ls -l		#List all files, including file attributes and permissions. There are no hidden files
ls -al		# combination
Displays the current path pwd
pwd
Basic properties
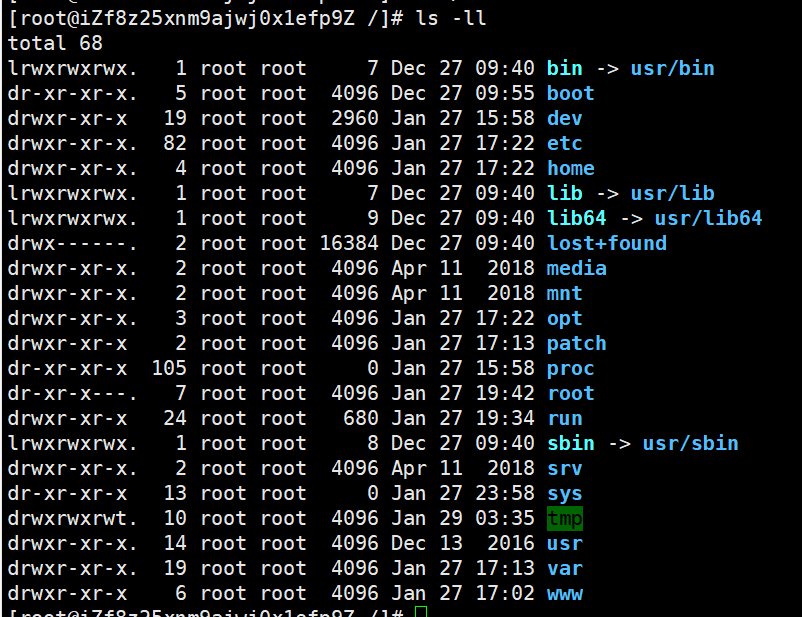
First character:
- [d] : Directory
- [-]: document
- [l] : linked documents
- [b] : interface device available for storage in the device file (random access device)
- [c] : interface device available for storage in the device file (random access device)
Next, take three characters as a group, all of which are the combination of [rwx]: [r] is readable, [w] is writable, and [x] is executable. If there is no, it will be replaced by [-]

-
Owner: who created it
-
Belonging group: which user group does it belong to
Modify basic properties
1. chgrp: change the file group
chgrp -R Group name file name
-R: recursively change the file group, that is, when changing the group of a directory file, if the - R parameter is added, the group of all files in the directory will be changed.
2. chown: change the owner of the file or the group at the same time
chown -R Owner name file name
chown -R Subject name : Group name file name
3. chmod: change 9 attributes of the file
chmod -R xyz File or directory
r:4		w:2		x:1
 Read write non executable: rw- 	6
 Readable, writable and executable:	 rwx     7

chmod 777 file name
File content viewing
-
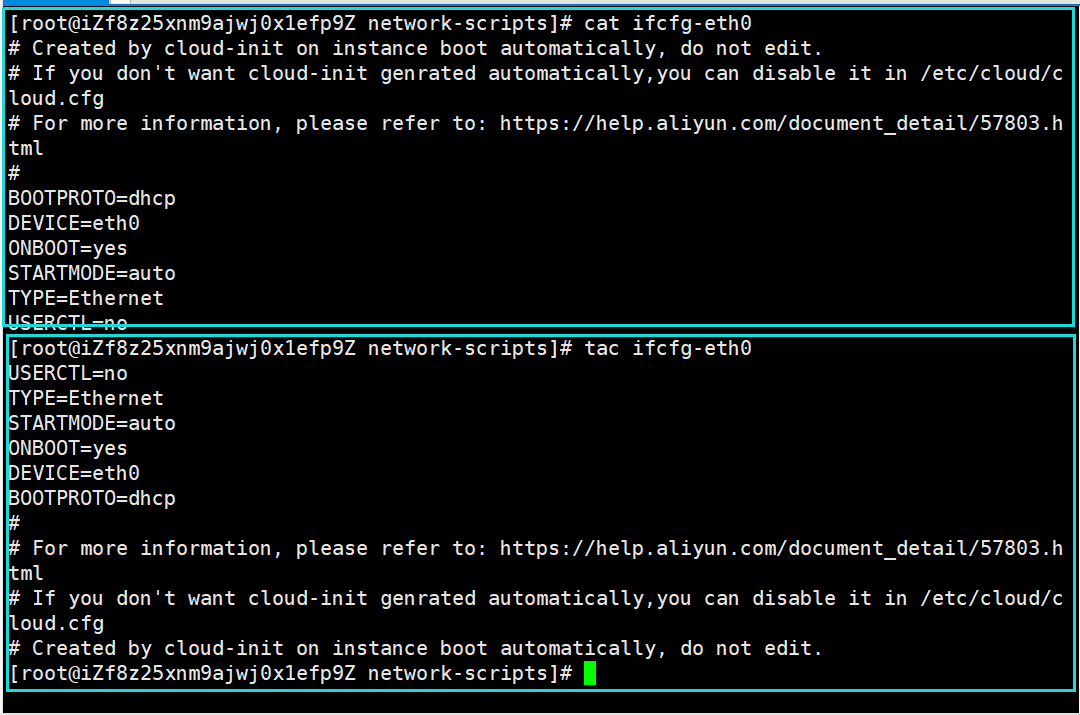
cat: displays the contents of the file from the first line
-
tac: display from the last line
-
nl: output the line number on the way during display

-
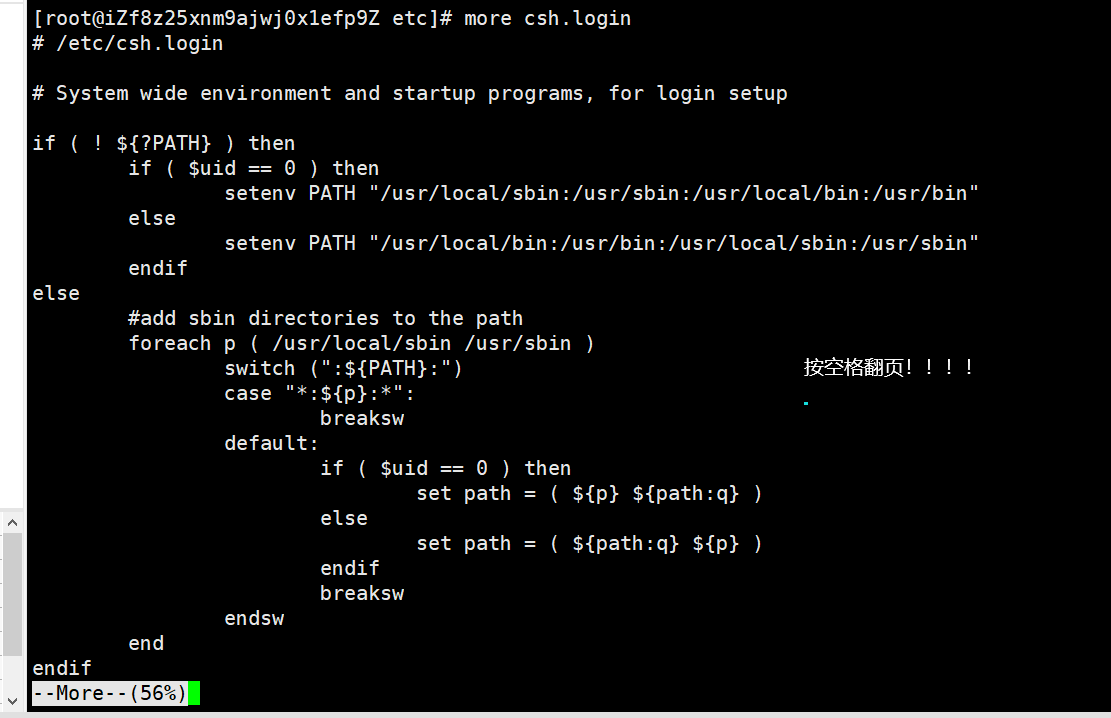
more: display the contents of the file page by page, turn the page with blank space, press enter to look down on one line, and: f displays the current line number
-
less: similar to more, you can turn the page forward, space, up and down, enter the next line, end with [q], [/] search down, and [?] Up search and [n/N] combined search jump up and down
-
head: just look at the first few lines

-
Tail: just look at the tail
ifconfig: View network configuration
link
Hard link: similar to copy, the source file is deleted, and the hard link can be accessed. It can be used for the security protection of important files
Soft connection: similar to Window shortcut,
Create links:
ln Source file link  # Hard link
ln -s Source file link  # Soft link
touch create file command
echo enter a string into the file
[root@iZf8z25xnm9ajwj0x1efp9Z home]# ls
redis  www
[root@iZf8z25xnm9ajwj0x1efp9Z home]# touch test1
[root@iZf8z25xnm9ajwj0x1efp9Z home]# ls
redis  test1  www
[root@iZf8z25xnm9ajwj0x1efp9Z home]# ln test1 t2
[root@iZf8z25xnm9ajwj0x1efp9Z home]# ls
redis  t2  test1  www
[root@iZf8z25xnm9ajwj0x1efp9Z home]# ln -s test1 t3
[root@iZf8z25xnm9ajwj0x1efp9Z home]# ls
redis  t2  t3  test1  www
[root@iZf8z25xnm9ajwj0x1efp9Z home]# ls -l
total 8
drwx------ 2 redis redis 4096 Jan 27 17:22 redis
-rw-r--r-- 2 root  root     0 Jan 29 13:58 t2
lrwxrwxrwx 1 root  root     5 Jan 29 13:59 t3 -> test1
-rw-r--r-- 2 root  root     0 Jan 29 13:58 test1
drwx------ 3 www   www   4096 Jan 27 17:21 www
[root@iZf8z25xnm9ajwj0x1efp9Z home]# echo "hello world" >>test1
[root@iZf8z25xnm9ajwj0x1efp9Z home]# cat test1
hello world
[root@iZf8z25xnm9ajwj0x1efp9Z home]# cat t2
hello world
[root@iZf8z25xnm9ajwj0x1efp9Z home]# cat t3
hello world
[root@iZf8z25xnm9ajwj0x1efp9Z home]#
Delete test:
[root@iZf8z25xnm9ajwj0x1efp9Z home]# rm -rf test1
[root@iZf8z25xnm9ajwj0x1efp9Z home]# ls
redis  t2  t3  www
[root@iZf8z25xnm9ajwj0x1efp9Z home]# cat t2
hello world
[root@iZf8z25xnm9ajwj0x1efp9Z home]# cat t3
cat: t3: No such file or directory
[root@iZf8z25xnm9ajwj0x1efp9Z home]#
Vim editor
Basically, viwvim is divided into three modes: command mode, lnsert mode and Lastline mode. The functions of these three models are:
vim file # If it exists, open editing; if it does not exist, create a new one
Command mode
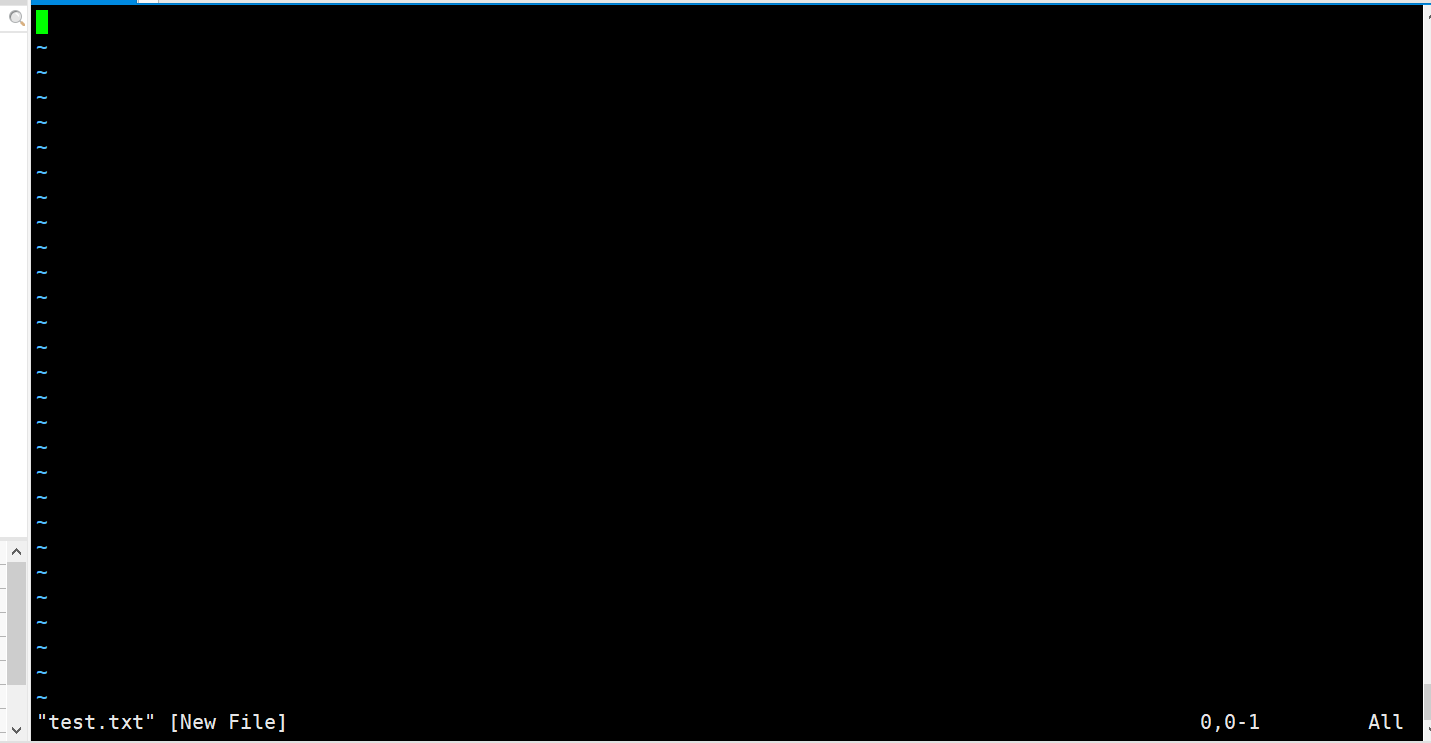
Enter VIM test Txt is in command mode when you first enter:
- Enter [i, a, o] to enter the input mode
- Enter [x] to delete the character of the cursor
- Enter [:] to switch to the bottom line command mode
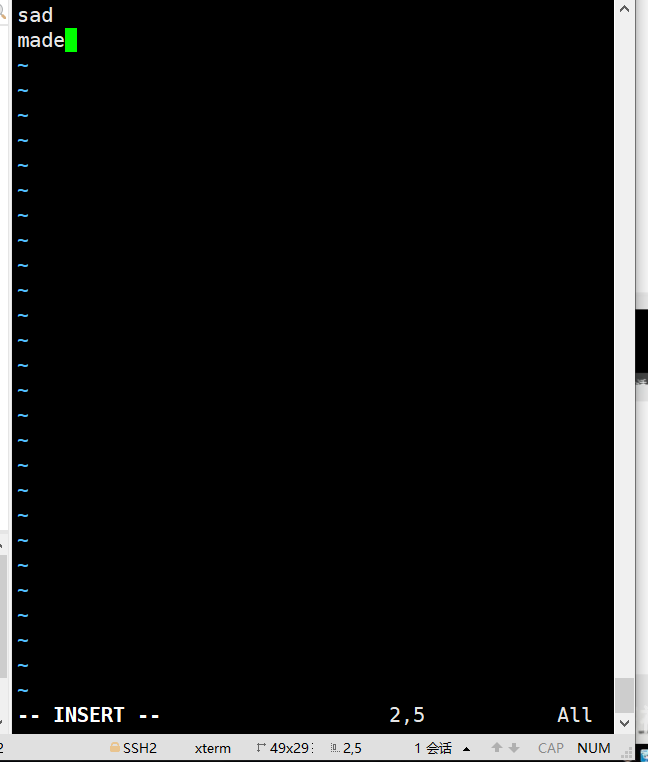
Input mode
- [esc] exit the input mode and switch to the command mode
- Normal input
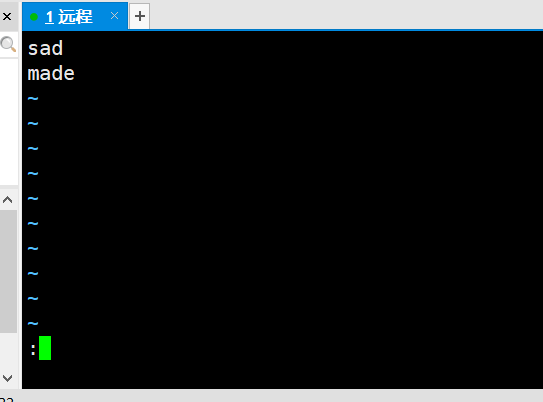
last line node
- [q] Exit program
- [w] Preserve
- [wq]
- [set nu] display line number
Command mode - cursor movement
| h or left arrow key (←) | Move the cursor one character to the left |
|---|---|
| j or down arrow key (↓) | Move the cursor down one character |
| k or up arrow key (↑) | Move the cursor up one character |
| l or right arrow key (→) | Move the cursor one character to the right |
| [Ctrl] + [f] | The screen "down" moves one page, which is equivalent to the [Page Down] button (common) |
| [Ctrl] + [b] | The screen "up" moves one page, which is equivalent to the [Page Up] button (common) |
| [Ctrl] + [d] | The screen "moves down" by half a page |
| [Ctrl] + [u] | The screen "up" moves half a page |
| + | The cursor moves to the next line that is not a space character |
| - | Move the cursor to the previous line that is not a space character |
| n< space> | That n means "number", for example, 20. Press the number and then the space bar, and the cursor will move n characters of this line to the right. |
| 0 or function key [Home] | This is the number "0": move to the first character of this line (commonly used) |
| $or function key [End] | Move to the last character of this line (common) |
| H | Move the cursor to the first character of the top line of the screen |
| M | Move the cursor to the first character of the line in the center of the screen |
| L | Move the cursor to the first character of the line at the bottom of the screen |
| G | Move to the last line of this file (common) |
| nG | N is a number. Move to line n of this file. For example, 20G will be moved to the 20th line of the file (can cooperate with: set nu) |
| gg | Move to the first line of this file, which is equivalent to 1G! (common) |
| n< Enter> | N is a number. Move the cursor down n lines (common) |
Command mode - Search
| Search replace | |
|---|---|
| /word | Look under the cursor for a string named word. For example, to search for the string vbird in the file, enter / vbird! (common) |
| ?word | Look for a string named word above the cursor. |
| n | This n is an English button. Represents the action of repeating the previous search. For example, if we just executed / vbird to search down the string vbird, then pressing n will continue to search down the next string named vbird. If yes? Vbird, then press n to continue searching for the string named vbird! |
| N | This n is an English key. Contrary to N, the previous search action is performed for "reverse". For example, after / vbird, pressing n means "up" to search vbird. |
Command mode - copy paste
| Delete, copy and paste | |
|---|---|
| x, X | In a line of words, X is to delete a character backward (equivalent to [del] key), and X is to delete a character forward (equivalent to [backspace], i.e. backspace key) (common) |
| nx | N is a number, and n characters are deleted successively. For example, I want to delete 10 consecutive characters, "10x". |
| dd | Delete the entire row where the cursor is located (common) |
| ndd | N is a number. Delete the downward n lines where the cursor is located. For example, 20dd deletes 20 lines (common) |
| d1G | Delete all data from the cursor to the first row |
| dG | Delete all data from the cursor to the last line |
| d$ | Delete the cursor to the last character of the line |
| d0 | That is number 0. Delete cursor to first character of the line |
| yy | Copy the line where the cursor is located (common) |
| nyy | N is a number. Copy the down n lines where the cursor is located. For example, 20yy copies 20 lines (common) |
| y1G | Copy all data from the row where the cursor is located to the first row |
| yG | Copy all data from the row where the cursor is located to the last row |
| y0 | Copy the character of the cursor to all data at the beginning of the line |
| y$ | Copy the character of the cursor to all data at the end of the line |
| p, P | P is to paste the copied data on the next line under the cursor, and P is to paste on the cursor! For example, I currently have the cursor on line 20 and have copied 10 lines of data. After pressing P, the 10 lines of data will be pasted after the original 20 lines, that is, from 21 lines. But what if you press p? Then the original line 20 will be pushed to line 30. (common) |
| J | Combine the data of the cursor line and the next line into the same line |
| c | Delete multiple data repeatedly, for example, delete 10 rows down, [10cj] |
| u | Restore the previous action. (common) |
| [Ctrl]+r | Redo the last action. (common) |
Account management
useradd
useradd -Option user name
- -m: Automatically create this user's home directory / home / user name
- -G: assign a group to the user, followed by the group name
userdel
userdel -Option user name
- -r when deleting a user, delete his directory page as well
usermod modify user
usermod -d User group(/home/www) user name # Modify the group to which the user belongs
su switching users
[root@iZf8z25xnm9ajwj0x1efp9Z home]# useradd -m yzxtest
[root@iZf8z25xnm9ajwj0x1efp9Z home]# ls
redis  test.txt  www  yzxtest
[root@iZf8z25xnm9ajwj0x1efp9Z home]# su yzxtest
[yzxtest@iZf8z25xnm9ajwj0x1efp9Z home]$
[yzxtest@hostname0yang root]$ exit
exit
[root@hostname0yang ~]#
Ordinary users are $symbols, # are super users
passwd password configuration
Note that Liunx will not be displayed when entering the password
root user:
[root@hostname0yang home]# passwd yzxtest  # Modify yzxtest user's face code
Changing password for user yzxtest.
New password:
BAD PASSWORD: The password is shorter than 8 characters
Retype new password:
passwd: all authentication tokens updated successfully.
[root@hostname0yang home]#
Ordinary users:
[yzxtest@hostname0yang ~]$ passwd   # Change Password
Changing password for user yzxtest.
Changing password for yzxtest.
(current) UNIX password: # Enter the current secret here
New password: #Enter new password
BAD PASSWORD: The password is the same as the old one  # The new password is the same as the original password. reject
New password: #Enter new password
Retype new password: #Enter the new password again
passwd: all authentication tokens updated successfully.  # success
[yzxtest@hostname0yang ~]$
Lock account
After locking, the account is frozen and cannot log in to the system
passwd -l user name
passwd -d user name  # Clear password while freezing
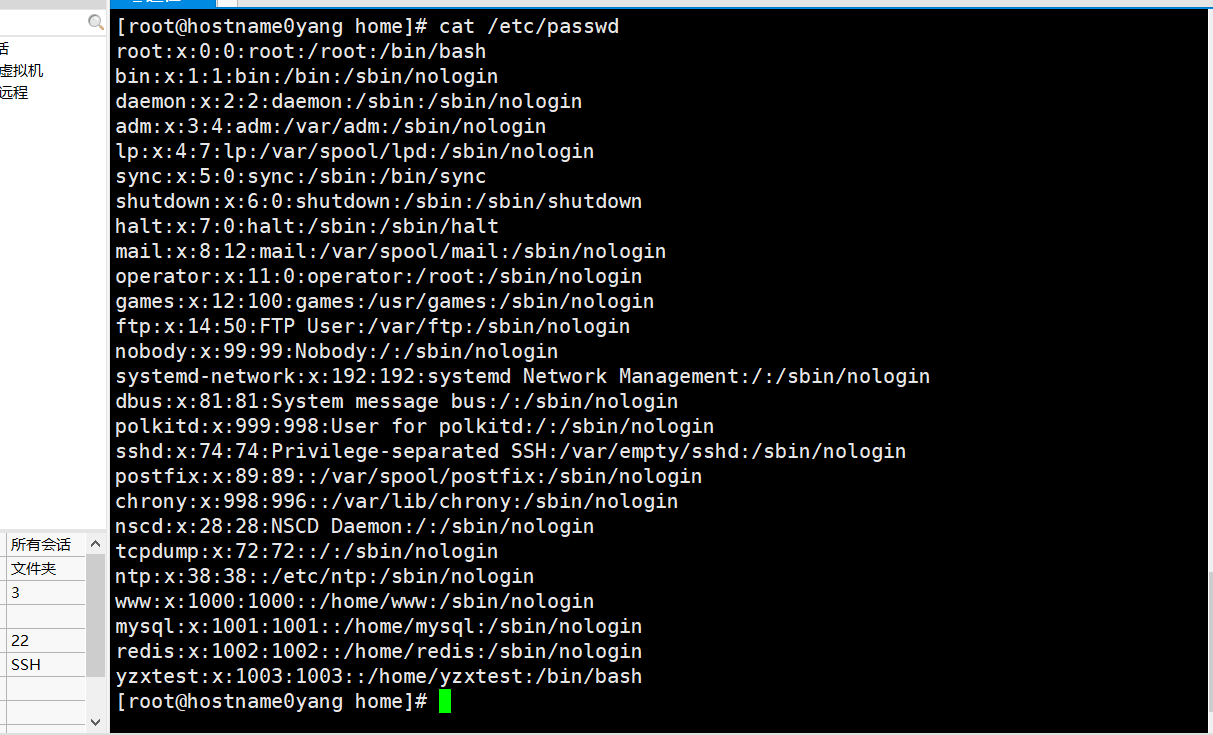
Extension: file / etc/passwd
user name:Password(Password, invisible):User identification number:Group identification number:Annotative description:home directory:Sign in shell
Login password: the real password is encrypted and placed in the / etc/shadow file to ensure security
Modify host name
hostname name # Update after restart
User group management
Each user has a user group. The system can centrally manage all users in a user group (development, testing, operation and maintenance, root). Different Linux systems have different regulations on user groups. For example, users under Linux belong to a user group with the same name. This user group is created at the same time when creating users.
The management of user groups involves the addition, deletion and modification of user groups. The addition, deletion and modification of groups are actually updates to / etc/group files.
Create a user group
[root@hostname0yang home]# groupadd group1  # establish
[root@hostname0yang home]# cat /etc/group	#see
root:x:0:
bin:x:1:
daemon:x:2:
... #Omitted here
yzxtest:x:1003:
group1:x:1004:
[root@hostname0yang home]#
groupadd -g 5200 group1 # Specify the id, and increase by 1 if not specified
Delete user group
groupdel Group name
Modify permission information of user group
groupmod -g new id -n New name group name
Switch user groups
$ newgrp Group name
Disk management
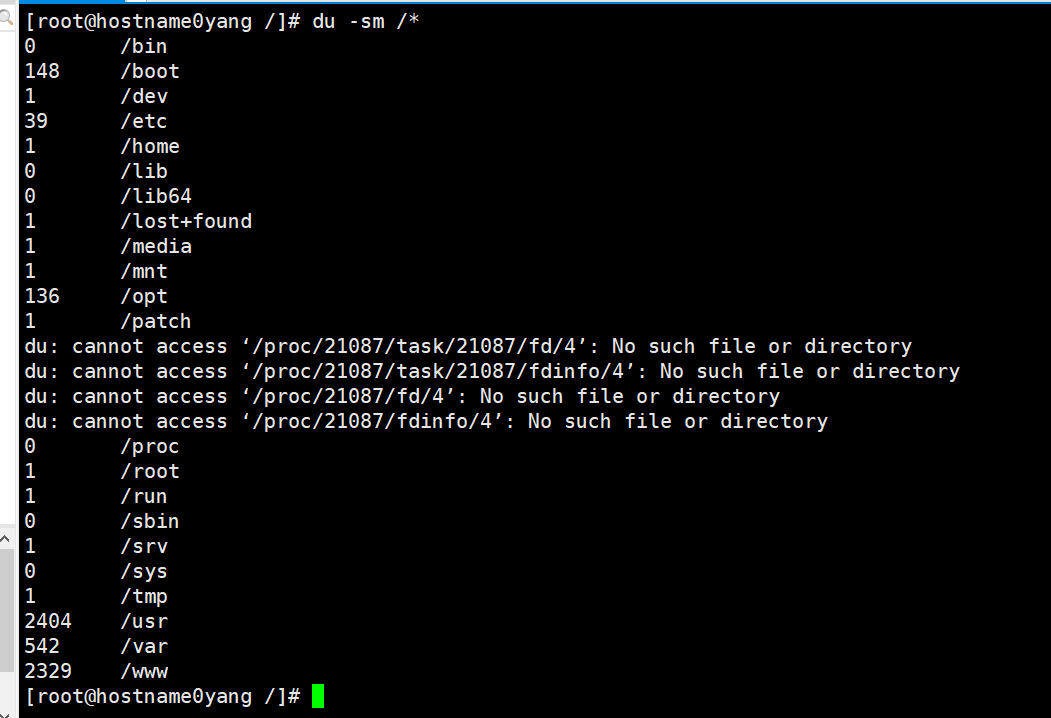
df (list the overall disk usage of the file system) Du (detect the disk space usage)
- [- h] use K, M and G abbreviations for size

Detect the size of each directory under the root directory
Mac or want to use Linux to mount some of our local disks or files!
mount: mount

Uninstall: umount
umount -f Mount location # -f forced unloading
Process management
ps view the information of various processes being executed in the current system
- [- a] display all the process information of the current terminal
- [- u] display the process with the user's information
- [- x] displays the parameters of the background running process
ps -aux|grep mysql # Query about mysql related processes

# |In Liunx, it refers to the pipe symbol, and A|B refers to the result of A's execution as the parameter of B
# grep lookup response string

- [- ef] query the information of the parent process
ps -ef|grep mysql

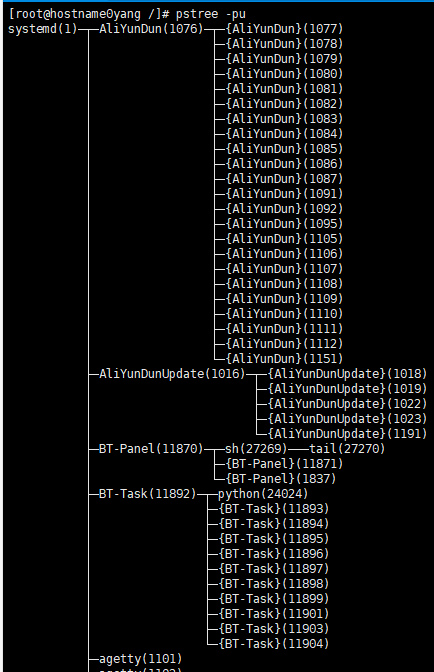
pstree -pu
    -p  Show parent id
    -u  Show user groups
Kill kill process
kill -9 Process id #
Environmental installation
There are three ways to install: rpm, decompression and yum online installation
JDK installation
Find the RPM of the jdk. If there is no rpm, download it and transfer it with Xftp
rpm -ivh xxx.rpm  #install

rpm -qa|grep jdk # Query information

rpm -e --nodeps The information above  # Uninstall environment
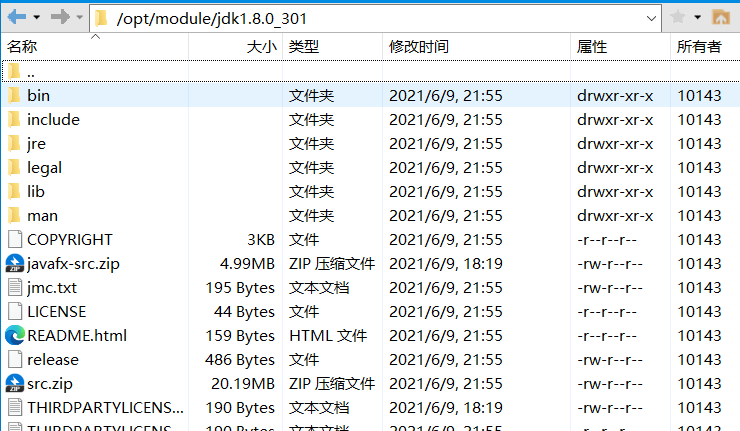
Configure environment variable / etc/profile
export JAVA_HOME=/opt/module/jdk1.8.0_301
export JRE_HOME=${JAVA_HOME}/jre
export CLASSPATH=.:${JAVA_HOME}/lib:${JRE_HOME}/lib
export PATH=${JAVA_HOME}/bin:$PATH
source /etc/profile # Refresh to make configuration effective
testing
[root@hostname0yang /]# java -version
java version "1.8.0_301"
Java(TM) SE Runtime Environment (build 1.8.0_301-b09)
Java HotSpot(TM) 64-Bit Server VM (build 25.301-b09, mixed mode)
[root@hostname0yang /]#
release
#Open firewall port
firewall -cmd --zone=public --add-port=xxx/tcp --permanent
#service iptables restart
systemctl restart firewalld.service
#View open ports
firewall-cmd --list-ports
Tomcat
slightly
Docker
Install online using yum
yum -y install yum source