SpringMVC
First of all, let's learn about the classic MVC mode. The full name of MVC is Model View Controller. M refers to business model and data model, V refers to user interface and C refers to controller. The purpose of using MVC is to separate the implementation codes of M and V, so that the same program can use different expressions. Spring MVC is a successor product of spring framework.
Spring MVC is a module of the spring framework. Spring MVC and spring do not need to be unified through the middle integration layer. They have been integrated into Spring Web Flow. Spring MVC is a web framework based on MVC, which is convenient for data transmission at the front and back ends. Spring MVC has a controller that receives external requests, parses parameters and passes them to the service layer.
MyBatis solves the coupling between java code and sql statements and replaces the data persistence layer; Spring solves the coupling between the business layer and other layers and optimizes the service layer; Spring MVC solves the coupling between java code and servlet and replaces servlet. Spring MVC is still servlet in essence and realizes the decoupling of servlet.
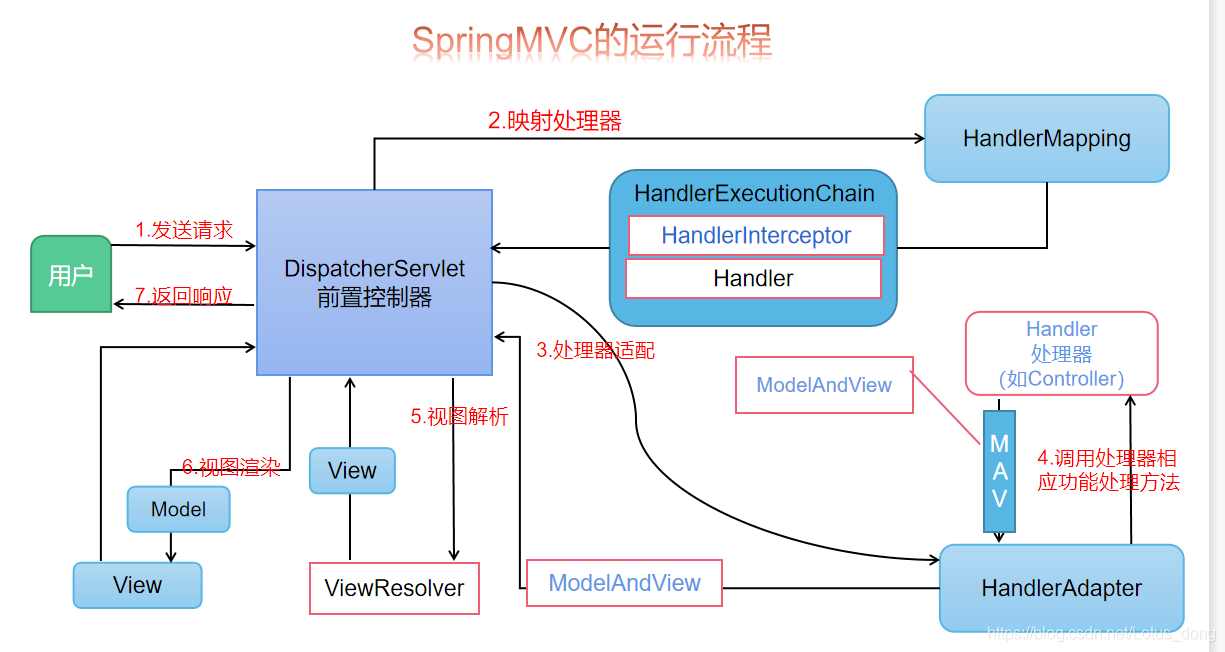
Spring MVC running process
We're using Servlet To complete web When the project, we passed Servlet To handle the data interaction between user pages and databases, all of us at that time Servlet We need to write the layer code ourselves, and there will be a lot of "duplicate" code, which seriously reduces the efficiency of our development and makes us unable to focus on business, SpringMVC It can solve this problem for us.
-
The user sends a request to the server, which is captured by the Spring front-end controller DispatcherServlet;
-
The front Controller DispatcherServlet calls the mapping processor HandlerMapping after receiving the request. Processor handlermapping finds the processor Handler (i.e. Controller) that handles the request according to the url of the request, and returns the processor Handler to the front-end Controller dispatcherservlet.
-
Dispatcher servlet selects an appropriate Handler adapter according to the obtained Handler. In the process of filling in the parameters of the Handler, Spring will do some additional work according to the configuration:
(1) Httpmessageconverter: converts request messages (such as Json, xml and other data) into an object and converts the object into a specified response message.
(2) Data conversion: perform data conversion on the request message. Such as converting String to Integer, Double, etc.
(3) Data format: format the request message. Such as converting a string to a formatted number or a formatted date, and so on.
(4) Data verification: verify the validity of data (length, format, etc.), and store the verification results in BindingResult or Error.
-
After the Handler controller is executed, it will return a ModelAndView object to the DispatcherServlet.
-
According to the returned ModelAndView, select a suitable ViewResolver view parser (which must be a view parser registered in Spring) and return it to the unpackerservlet;
-
ViewResolver combines Model and View to render the View;
-
Respond the rendered result to the client.
Spring MVC environment construction
Tomcat needs to be configured in advance for web development
- Pour in the relevant jar s of spring MVC
<!--SpringMVC Dependent jar package-->
<dependency>
    <groupId>org.springframework</groupId>
    <artifactId>spring-webmvc</artifactId>
    <version>5.2.2.RELEASE</version>
</dependency>

<!--plus servlet-->
<!-- https://mvnrepository.com/artifact/javax.servlet/javax.servlet-api -->
<dependency>
    <groupId>javax.servlet</groupId>
    <artifactId>javax.servlet-api</artifactId>
    <version>4.0.0</version>
    <scope>provided</scope>
</dependency>
If you use the el expression of jsp, you also need to import the jar package of jstl
<!-- https://mvnrepository.com/artifact/javax.servlet/jstl -->
<dependency>
    <groupId>javax.servlet</groupId>
    <artifactId>jstl</artifactId>
    <version>1.2</version>
</dependency>
- Configure DispatcherServlet
Dispatcher Servlet is inherited from HttpServlet. So it is a standard Servlet, so we need it on the web XML file so that it loads the Spring configuration file at startup.
On the web Configuration in XML file:
	<!--to configure spring Distribution of core requests DisPatcherServlet-->
    <servlet>
        <servlet-name>springMVC</servlet-name>
        <servlet-class>org.springframework.web.servlet.DispatcherServlet</servlet-class>
        <init-param>
            <!--hold Spring Give your profile to contextConfogLocation-->
            <param-name>contextConfigLocation</param-name>
            <param-value>classpath:spring.xml</param-value>
        </init-param>
        <!--Initialize when the server starts DispatcherServlet And start spring-->
        <load-on-startup>0</load-on-startup>
    </servlet>
    <!--
        Request mapping
        All requests will enter DispatcherServlet(Dispenser)
    -->
    <servlet-mapping>
        <servlet-name>springMVC</servlet-name>
        <url-pattern>/</url-pattern>
    </servlet-mapping>
- Open spring MVC annotation
<!--open spring Annotation scanning-->
<context:component-scan base-package="com.cwd.ssm"></context:component-scan>

<!--open SpringMVC Annotation function-->
<mvc:annotation-driven></mvc:annotation-driven>
-
Configure view parser
In spring Configure view parser in XML file
<!--Configure view parser-->
<bean class="org.springframework.web.servlet.view.InternalResourceViewResolver">
    <property name="viewClass" value="org.springframework.web.servlet.view.JstlView"></property>
    <!--Of all view interfaces returned by the controller prefix(Prefix) must be value-->
    <property name="prefix" value="/WEB-INF/pages/"></property>
    <!--Of all view interfaces returned by the controller suffix(Suffix) must be value-->
    <property name="suffix" value=".jsp"></property>
</bean>
- Construction of controller class
We use the @ Controller annotation tag to mark the Controller object of spring MVC, that is, the Controller class. At the same time, we should also use the RequestMapping annotation to mark the request address mapping, which can be used on classes or methods.
import org.springframework.stereotype.Controller;
import org.springframework.web.bind.annotation.*;
import org.springframework.web.servlet.ModelAndView;

import javax.servlet.http.HttpServletRequest;
import javax.servlet.http.HttpSession;


@Controller//After scanning this class, it will be handed over to IOC for management. It is used to create objects. By default, it is a single instance. In the case of multithreading, the thread is not safe
@RequestMapping(path = "/user")//Specify a mapped address. The attribute is the same as value or path. You can specify multiple addresses,
public class UserController {

    @RequestMapping(path = "/toLogin")//Specify request method
    public ModelAndView toLogin() {
        System.out.println("toLogin");
        ModelAndView mv = new ModelAndView("login");;
        return mv;
    }

}
At this time, when we want to access the toLogin () method, the path is / user/toLogin
Use of spring MVC
Request forwarding
By default, spring MVC uses the request forwarding method when responding. The return value can be ModelAndView. If the return value of the controller processing method is ModelAndView, it contains both view information and Model data information. If you return String, you can encapsulate the data into a Model object and directly return the view name in String format.
When the return value is ModelAndView, the corresponding data settings are:
(1) add model data: addObject (String attributeName, Object attributeValue)
(2) set view: void setViewName (String viewName)
//Return to ModelAndView
@GetMapping(path = "/toAddUser")
 public ModelAndView toAddUser(HttpSession session) {
     TUser user = (TUser) session.getAttribute("user");
     Integer communityId = user.getId();
     ModelAndView mv = new ModelAndView("userManage/addUser");
     List<TDept> depts = deptService.toDeptList(communityId);
     mv.addObject("depts", depts);
     return mv;
 }

//Return String
@GetMapping(path = "/toUpdate")
public String toUpdateUser(HttpServletRequest request, String id) {
    User user = userService.toUpdateUser(id);
    request.setAttribute("user", user);
    List<Role> roles = userService.findRoles();
    request.setAttribute("roles", roles);
    return "updateUser";
}
View resolution
We often return a ModelAndView in the controller. The DisPatcherServlet uses the view parser to resolve the viewName to / JSP / viewName The view parser commonly used in jsp: InternalResourceViewResolver. In fact, the work of InternalResourceViewResolver is very simple: prefix the logical name of the view and suffix it; The front-end controller finally forwards it to / JSP / viewName jsp.
Configure view parser
<!--view resolver -->
<bean class="org.springframework.web.servlet.view.InternalResourceViewResolver">
    <property name="viewClass" value="org.springframework.web.servlet.view.JstlView"></property>
    <property name="prefix" value="/jsp/"></property>
    <property name="suffix" value=".jsp"></property>
</bean>
Receive request
@Controller
After the automatically scanned basepackage is specified in the Spring configuration, Spring will scan these packages and the classes identified by @ Controller in the sub packages, and then add the classes to the Spring IOC container to inject dependencies. It should be noted that this bean is a singleton in the Spring IOC container. Each time a request comes, the same bean object is used.
@RequestMapping
The function of this tag is to match the request. If it matches, the modified method will be executed. Here, you need to pay attention to two attributes: value/path and method. Value is the alias of path, which refers to the requested path. The type is a String [], that is, it can match multiple request paths. Method refers to the requested method, such as GET and POST.
The marked method of @ RequestMapping will be executed only when the current request matches the attributes specified on @ RequestMapping. It is assumed that the context path of the application is“ http://localhost:9090/ ", then the path requested by @ RequestMapping (path =" / user ") is" http://localhost:9090/user ", there are no restrictions on the request method, which can be either GET or POST.
@ RequestMapping (path = "/ user", method = RequestMethod.GET) the path of the request is“ http://localhost:9090/user ", the request method can only be GET. It is equivalent to GETMapping (path =" / user "). Similarly, @ RequestMapping (path =" / user ", method = RequestMethod.POST) is also equivalent to POSTMapping (path =" / user ").
Get request data
The purpose of our processor method is to process the data submitted by the client, which is submitted according to the message format of HTTP protocol. Let's take a look at the common messages submitted by HTTP POST to understand the corresponding relationship between each part of the message and the processor method parameters:
(1) request method: corresponds to the method in @ ReuqestMapping.
(2) request URI: the first part is the project root path, and the latter part corresponds to the value/path in @ RequestMapping.
(3) request header: for example, @ RequestHeader ("user agent") is used to obtain the value in user agent.
(4) request parameters: for example, to obtain the value of the name parameter, use @ RequestParam ("name") to obtain it.
@Controller
@RequestMapping("/students")
public class StudentController {
	@RequestMapping(value="/create",method=RequestMethod.POST)
	public String create( @RequestParam("name") String name,
						  @RequestParam("age") Integer age,
						  @RequestHeader("User-Agent") String userAgent){
		return null;
    }
}
The parameter value can be obtained according to the above code, but if the name of the request parameter is the same as that in the processor, we can choose to omit the @ RequestParam binding, such as:
@Controller
@RequestMapping("/students")
public class StudentController {
	@RequestMapping(value="/create",method=RequestMethod.POST)
	public String create( String name, Integer age,
						  @RequestHeader("User-Agent") String userAgent){
		return null;
    }
HttpServletRequest, HttpSession, HttpServletResponse and other objects can also be directly built in the parameter list.
redirect
The value of the string type returned by the controller method will be treated as the logical view name. If the returned string is prefixed with redirect:, spring MVC will deal with them in a special way: treat redirect: as an indicator and the other strings as URL s. For example, return "redirect:/page/student/update.jsp";
Filter static resource files
<!--Release filter static resource file request-->
<mvc:default-servlet-handler/>
When the URL of DispatcherServlet is configured as /, we need to Add this configuration to the XML file to access static resources. For example jpg,. js,. css files with suffix names. Without this configuration, our Web page cannot introduce static file resources, which will lead to the loss of Web page elements. Once configured, an org. Org will be defined in the context of spring MVC springframework. Web. Servlet. resource. Defaultservlethttprequesthandler, which can screen URLs entering the DispatcherServlet. If it is a static resource request, the request will be transferred to the default Servlet of the Web application server for processing. If it is not a static resource request, it will continue to be processed by the DispatcherServlet.
Chinese garbled code processing
When we submit the request, if we input Chinese, it will produce garbled code. The solution is to add a filter and set the encoding set for the request object. Spring MVC provides us with this filter, which only needs to be in the web Once configured in XML:
<!--springMVC Coding filter-->
<filter>
    <filter-name>encodingFilter</filter-name>
    <filter-class>org.springframework.web.filter.CharacterEncodingFilter</filter-class>
    <init-param>
        <param-name>encoding</param-name>
        <param-value>UTF-8</param-value>
    </init-param>
</filter>
<filter-mapping>
    <filter-name>encodingFilter</filter-name>
    <url-pattern>/*</url-pattern>
</filter-mapping>
Ajax returns json
The @ responseBody annotation is used to convert the object returned by the controller method into the specified format through an appropriate converter and write it to the body of the response object. It is usually used to return JSON data to asynchronous requests. It should be noted that after using this annotation, you will not go to the view processor, but directly write the data to the input stream. Its effect is equivalent to outputting the data in the specified format through the response object.
Add jackson's jar package
<!--add to json relevant jar package jackson take java Object to json format-->
<dependency>
    <groupId>com.fasterxml.jackson.core</groupId>
    <artifactId>jackson-databind</artifactId>
    <version>2.9.1</version>
</dependency>
 @ResponseBody
 @RequestMapping(path = "/checkAccount")
 public Integer checkAccount(String account) {
     User user = userService.checkAccount(account);
     if (user != null) {
     	return 1;
     } else {
     	return 0;
     }
 }
 //You can also directly return an object or a collection of objects, and jackson will automatically convert it to JSON format
File upload
- First, we need to import the jar files required for file upload and download
<!--upload/Must rely on when downloading files apache Provided jar package-->
<dependency>
    <groupId>commons-fileupload</groupId>
    <artifactId>commons-fileupload</artifactId>
    <version>1.3.1</version>
</dependency>
- Configuration file parser, in spring MVC XML file
<!--
    file parser
    maxUploadSize:Maximum number of uploads encoded
-->
<bean id="multipartResolver" class="org.springframework.web.multipart.commons.CommonsMultipartResolver">
    <property name="defaultEncoding" value="utf-8"></property>
    <property name="maxUploadSize" value="10485760"></property>
</bean>
- Set form properties for file upload
(1)method="post"
(2) enctype = "multipart / form data" when submitting file data in binary form, it cannot be received normally in the controller. The spring framework can combine the file upload component of apache to encapsulate the binary data, so that we can receive the desired data in the controller.
(3) accept=".jpg,.png" restrict suffixes when selecting files.
<form action="upLoad" method="post" enctype="multipart/form-data" target="_top">
<table>
<tr>
<td>describe </td>
<td>
<input type="text" name="desc" value="">
</td>
</tr>
<tr>
<td>head portrait </td>
<td>
<input type="file" name="fileName" accept=".jpg,.png" value="">
</td>
</tr>
<tr align="center">
<td colspan="2">
<input type="submit" value="upload">
</td>
</tr>
</table>
</form>
- Set controller class label
/*
    Upload file (image)
    CommonsMultipartFile Receive the binary file transmitted by the client, and upload the stream parsed by the file upload component of spring MVC and apache
*/
@PostMapping(path = "/upLoad")
public String upLoad(@RequestParam("fileName") CommonsMultipartFile file,
String desc,
HttpSession session) {
    try {
        User user = (User) session.getAttribute("user");
        file.getName();//File name set by the front end, such as fileName
        //Get the original file name, such as Libai jpg
        String OriginalFilename = file.getOriginalFilename();
        //Get file type
        String FileType = file.getContentType();
        //Get input stream object
        InputStream FileStream = file.getInputStream();
    } catch (Exception e) {
        e.printStackTrace();
        return null;
    }
}
Interceptor
Spring MVC defines the interceptor interface HandlerInterceptor, which defines three methods. When calling these three methods, they are completed within the spring MVC framework. When calling these three methods, their parameter values are also passed in from within the framework. The interceptor is mainly for the request to enter the Controller.
- boolean preHandle
The preprocessing method implements the preprocessing of the processor method, that is, the method will be executed before the processor method is executed, which is equivalent to intercepting the processor method. The framework will pass the request and response object to the method, and the third parameter is the intercepted processor method. If the preHandle method returns true, it means to continue the process. If it returns false, it means to interrupt the process. It will not continue to call other interceptors or processor methods. At this time, it needs to respond through response.
- void postHandle
The post-processing method realizes the post-processing of the processor method, that is, after the processor method is called, but before rendering the view, the method is called. At this time, we can process the model data or the view through modelAndView (model and view object).
- afterCompletion
The whole request is processed, and the method is executed when the view rendering is completed.
public class TestInterceptor implements HandlerInterceptor {
    /*
        The request is executed before it reaches the controller
    */
    @Override
    public boolean preHandle(HttpServletRequest request, HttpServletResponse response, Object handler) throws Exception {
        System.out.println("Previous execution");
        return false;
    }

    /*
        Execute after controller method execution
    */
    @Override
    public void postHandle(HttpServletRequest request, HttpServletResponse response, Object handler, ModelAndView modelAndView) throws Exception {
        System.out.println("Execute after controller method execution");
    }

    /*
        Execute after the end of the entire request
    */
    @Override
    public void afterCompletion(HttpServletRequest request, HttpServletResponse response, Object handler, Exception ex) throws Exception {
        System.out.println("Execute after request");
    }
}
In spring Register interceptors in XML
<!--Configuring Interceptors -->
<mvc:interceptors>
    <mvc:interceptor>
        <!--Method of entering interceptor-->
        <mvc:mapping path="/**"/>
        <!--Address excluding release-->
        <mvc:exclude-mapping path="/user/toLogin"/>
        <mvc:exclude-mapping path="/user/login"/>
        <mvc:exclude-mapping path="/static/**"/>
        <bean id="islogin" class="com.cwd.ssm.util.TestInterceptor"></bean>
    </mvc:interceptor>
</mvc:interceptors>
monitor
Servlet listener is a special class defined in the servlet specification. It is used to listen to the creation and destruction events of domain objects such as ServletContext, HttpSession and ServletRequest, as well as the event of property modification in these domain objects.
Listener classification
- Classification by listening object
(1) Used to listen for application objects (ServletContext)
(2) Used to listen to user session object (HttpSession)
(3) Object used to listen for request messages (ServletRequest)
- Classification by listening event
(1) An event listener that listens to the creation and destruction of objects.
(2) The listener that listens to the change (addition, modification, deletion) of object properties.
listener interface
The listener interface is defined in the Servlet API to listen to different event types.
- ServletContextListener: context listener;
- ServletContextAttribute: context attribute listener;
- ServletRequestListener: request listener;
- ServletRequestAttributeListener: request attribute listener;
- HttpSessionListener: session listener;
- HttpSessionAttribute: session attribute listener
Configure listener class
Create a listener class and implement the listener interface on the web Configure the listener class in the XML file.
<listener>
	<listener-class>Full class name of listener class</listener-class>
</listener>
example
- Listener class
import javax.servlet.ServletContext;
import javax.servlet.ServletContextEvent;
import javax.servlet.ServletContextListener;

public class ObjectListener implements ServletContextListener {

    @Override
    public void contextInitialized(ServletContextEvent sce) {
        ServletContext context = sce.getServletContext();
        context.setAttribute("path", context.getContextPath());
    }
}
- Configure listener class
<!--Configure listener-->
<listener>
	<listener-class>com.cwd.ssm.util.ObjectListener</listener-class>
</listener>
Spring MVC integrates all MyBatis – ssm configuration files
I separated the configuration files of the three frameworks and finally poured them into spring XML files for integration
- Import Spring, Spring MVC and MyBatis configuration files
<dependencies>
    <!--springMVC-->
    <dependency>
        <groupId>org.springframework</groupId>
        <artifactId>spring-webmvc</artifactId>
        <version>5.2.2.RELEASE</version>
    </dependency>

    <!-- https://mvnrepository.com/artifact/javax.servlet/jstl -->
    <dependency>
        <groupId>javax.servlet</groupId>
        <artifactId>jstl</artifactId>
        <version>1.2</version>
    </dependency>

    <!-- https://mvnrepository.com/artifact/javax.servlet/javax.servlet-api -->
    <dependency>
        <groupId>javax.servlet</groupId>
        <artifactId>javax.servlet-api</artifactId>
        <version>4.0.1</version>
        <scope>provided</scope>
    </dependency>

    <!-- mysql-connector-java -->
    <dependency>
        <groupId>mysql</groupId>
        <artifactId>mysql-connector-java</artifactId>
        <version>8.0.16</version>
    </dependency>

    <!-- spring-jdbc -->
    <dependency>
        <groupId>org.springframework</groupId>
        <artifactId>spring-jdbc</artifactId>
        <version>5.2.2.RELEASE</version>
    </dependency>

    <!-- Ali data source Druid-->
    <dependency>
        <groupId>com.alibaba</groupId>
        <artifactId>druid</artifactId>
        <version>1.1.10</version>
    </dependency>

    <!--spring-aspects-->
    <dependency>
        <groupId>org.springframework</groupId>
        <artifactId>spring-aspects</artifactId>
        <version>5.2.2.RELEASE</version>
    </dependency>


    <!-- https://mvnrepository.com/artifact/junit/junit -->
    <dependency>
        <groupId>junit</groupId>
        <artifactId>junit</artifactId>
        <version>4.12</version>
        <scope>provided</scope>
    </dependency>

    <!-- https://mvnrepository.com/artifact/log4j/log4j -->
    <dependency>
        <groupId>log4j</groupId>
        <artifactId>log4j</artifactId>
        <version>1.2.17</version>
    </dependency>

    <!--mybatis-->
    <dependency>
        <groupId>org.mybatis</groupId>
        <artifactId>mybatis</artifactId>
        <version>3.4.2</version>
    </dependency>

    <!--spring-mybatis-->
    <dependency>
        <groupId>org.mybatis</groupId>
        <artifactId>mybatis-spring</artifactId>
        <version>1.3.1</version>
    </dependency>

    <!--add to json relevant jar package jackson take java Object to json format-->
    <dependency>
        <groupId>com.fasterxml.jackson.core</groupId>
        <artifactId>jackson-databind</artifactId>
        <version>2.9.1</version>
    </dependency>

    <!--upload/Must rely on when downloading files apache Provided jar package-->
    <dependency>
        <groupId>commons-fileupload</groupId>
        <artifactId>commons-fileupload</artifactId>
        <version>1.3.1</version>
    </dependency>
    <dependency>
        <groupId>org.projectlombok</groupId>
        <artifactId>lombok</artifactId>
        <version>RELEASE</version>
        <scope>compile</scope>
    </dependency>
    <dependency>
        <groupId>org.projectlombok</groupId>
        <artifactId>lombok</artifactId>
        <version>RELEASE</version>
        <scope>compile</scope>
    </dependency>
</dependencies>
- SpringMVC.xml and web XML file
web.xml
<?xml version="1.0" encoding="UTF-8"?>
<web-app xmlns="http://xmlns.jcp.org/xml/ns/javaee"
         xmlns:xsi="http://www.w3.org/2001/XMLSchema-instance"
         xsi:schemaLocation="http://xmlns.jcp.org/xml/ns/javaee http://xmlns.jcp.org/xml/ns/javaee/web-app_4_0.xsd"
         version="4.0">

    <!--to configure spring Distribution of core requests DisPatcherServlet-->
    <servlet>
        <servlet-name>springMVC</servlet-name>
        <servlet-class>org.springframework.web.servlet.DispatcherServlet</servlet-class>
        <init-param>
            <!--hold Spring Give your profile to contextConfogLocation-->
            <param-name>contextConfigLocation</param-name>
            <param-value>classpath:spring.xml</param-value>
        </init-param>
        <!--Initialize when the server starts DispatcherServlet And start spring-->
        <load-on-startup>0</load-on-startup>
    </servlet>
    <!--
        Request mapping
        All requests will enter DispatcherServlet(Dispenser)
    -->
    <servlet-mapping>
        <servlet-name>springMVC</servlet-name>
        <url-pattern>/</url-pattern>
    </servlet-mapping>

    <!--springMVC Coding filter-->
    <filter>
        <filter-name>encodingFilter</filter-name>
        <filter-class>org.springframework.web.filter.CharacterEncodingFilter</filter-class>
        <init-param>
            <param-name>encoding</param-name>
            <param-value>UTF-8</param-value>
        </init-param>
    </filter>
    <filter-mapping>
        <filter-name>encodingFilter</filter-name>
        <url-pattern>/*</url-pattern>
    </filter-mapping>

    <welcome-file-list>
        <welcome-file>/user/toLogin</welcome-file>
    </welcome-file-list>

    <!--Configure listener-->
    <listener>
        <listener-class>com.cwd.ssm.util.ObjectListener</listener-class>
    </listener>
</web-app>
SpringMVC.xml
<?xml version="1.0" encoding="UTF-8"?>
<beans xmlns="http://www.springframework.org/schema/beans"
       xmlns:xsi="http://www.w3.org/2001/XMLSchema-instance"
       xmlns:context="http://www.springframework.org/schema/context"
       xmlns:mvc="http://www.springframework.org/schema/mvc"
       xsi:schemaLocation="http://www.springframework.org/schema/beans
        https://www.springframework.org/schema/beans/spring-beans.xsd
        http://www.springframework.org/schema/mvc
        http://www.springframework.org/schema/mvc/spring-mvc.xsd
        http://www.springframework.org/schema/context
        http://www.springframework.org/schema/context/spring-context.xsd">


     <!--open springMVC Annotation function-->
     <mvc:annotation-driven></mvc:annotation-driven>

     <!--view resolver -->
    <bean class="org.springframework.web.servlet.view.InternalResourceViewResolver">
         <property name="viewClass" value="org.springframework.web.servlet.view.JstlView"></property>
         <property name="prefix" value="/WEB-INF/pages/"></property>
         <property name="suffix" value=".jsp"></property>
    </bean>

    <!--Release filter static resource file request-->
    <mvc:default-servlet-handler/>

    <!--
    file parser
    maxUploadSize:Maximum number of uploads encoded
    -->
    <bean id="multipartResolver" class="org.springframework.web.multipart.commons.CommonsMultipartResolver">
        <property name="defaultEncoding" value="utf-8"></property>
        <property name="maxUploadSize" value="10485760"></property>
    </bean>

    <!--Configuring Interceptors -->
    <mvc:interceptors>
        <mvc:interceptor>
            <!--Method of entering interceptor-->
            <mvc:mapping path="/**"/>
            <!--Address excluding release-->
            <mvc:exclude-mapping path="/user/toLogin"/>
            <mvc:exclude-mapping path="/user/login"/>
            <mvc:exclude-mapping path="/static/**"/>
            <bean id="islogin" class="com.cwd.ssm.util.IsLoginInterceptor"></bean>
        </mvc:interceptor>
    </mvc:interceptors>
</beans>
- MyBatisConfig.xml file (global configuration file), DB XML file (database source configuration file), mybatis XML file
MyBatisConfig.xml file (global configuration file)
<?xml version="1.0" encoding="UTF-8" ?>
<!DOCTYPE configuration
    PUBLIC "-//mybatis.org//DTD Config 3.0//EN"
    "http://mybatis.org/dtd/mybatis-3-config.dtd">

<configuration>

  <!--Global settings-->
  <settings>
    <setting name="logImpl" value="LOG4J"/>
    <!--Hump naming mapping-->
    <setting name="mapUnderscoreToCamelCase" value="true"/>
    <!--Enable global lazy loading-->
    <setting name="lazyLoadingEnabled" value="true"/>
  </settings>

  <!--by java Type setting alias-->
  <typeAliases>
    <package name="com.cwd.ssm.bean"/>
  </typeAliases>

</configuration>
db.xml file (database source configuration file)
<?xml version="1.0" encoding="UTF-8"?>
<beans xmlns="http://www.springframework.org/schema/beans"
       xmlns:xsi="http://www.w3.org/2001/XMLSchema-instance"
       xmlns:context="http://www.springframework.org/schema/context"
       xmlns:aop="http://www.springframework.org/schema/aop"
       xmlns:tx="http://www.springframework.org/schema/tx"
       xsi:schemaLocation="http://www.springframework.org/schema/beans
        https://www.springframework.org/schema/beans/spring-beans.xsd
        http://www.springframework.org/schema/context
        http://www.springframework.org/schema/context/spring-context.xsd
        http://www.springframework.org/schema/tx
        http://www.springframework.org/schema/tx/spring-tx.xsd">

    <!--
    1.Links to management databases
    to configure DruidDataSource hand spring Container management,spring Manage database links(data source)
    -->
    <bean id="dataSource" class="com.alibaba.druid.pool.DruidDataSource">
        <property name="url" value="${url}"></property>
        <property name="driverClassName" value="${driver}"></property>
        <property name="username" value="${uname}"></property>
        <property name="password" value="${passwd}start"></property>
    </bean>

    <!--
    2.Configure transaction management class
    -->
    <bean id="dataSourceTransactionManager" class="org.springframework.jdbc.datasource.DataSourceTransactionManager">
        <property name="dataSource" ref="dataSource"></property>
    </bean>

    <!--
    3.Start annotation transaction management
    -->
    <tx:annotation-driven transaction-manager="dataSourceTransactionManager"></tx:annotation-driven>

</beans>
MyBatis.xml file
<?xml version="1.0" encoding="UTF-8"?>
<beans xmlns="http://www.springframework.org/schema/beans"
       xmlns:xsi="http://www.w3.org/2001/XMLSchema-instance"
       xsi:schemaLocation="http://www.springframework.org/schema/beans
        https://www.springframework.org/schema/beans/spring-beans.xsd">

    <!--Database connection management-->
    <import resource="db.xml"></import>

    <!--spring Administration SqlSessionFactory-->
    <bean id="sqlSessionFactory" class="org.mybatis.spring.SqlSessionFactoryBean">
        <property name="dataSource" ref="dataSource"></property>
        <!--Import mybatis configuration file-->
        <property name="configLocation" value="classpath:mybatisConfig.xml"></property>
        <!--Scan all mapping files-->
        <property name="mapperLocations" value="classpath:mapper/*Mapper.xml"> </property>
    </bean>

    <!--scanning dao All interfaces in the package and generate the proxy object of the interface-->
    <bean id="mapperFactory" class="org.mybatis.spring.mapper.MapperScannerConfigurer">
        <property name="basePackage" value="com.cwd.ssm.dao"></property>
        <property name="sqlSessionFactoryBeanName" value="sqlSessionFactory"> </property>
    </bean>

</beans>
- spring.xml files for integration
<?xml version="1.0" encoding="UTF-8"?>
<beans xmlns="http://www.springframework.org/schema/beans"
       xmlns:xsi="http://www.w3.org/2001/XMLSchema-instance"
       xmlns:context="http://www.springframework.org/schema/context"
       xmlns:mvc="http://www.springframework.org/schema/mvc"
       xsi:schemaLocation="http://www.springframework.org/schema/beans
        https://www.springframework.org/schema/beans/spring-beans.xsd
        http://www.springframework.org/schema/mvc
        http://www.springframework.org/schema/mvc/spring-mvc.xsd
        http://www.springframework.org/schema/context
        http://www.springframework.org/schema/context/spring-context.xsd">

     <!--open spring Annotation scanning-->
     <context:component-scan base-package="com.cwd.ssm"></context:component-scan>

     <!--Import SpringMVC-->
     <import resource="springMVC.xml"></import>

     <!--Import MyBatis-->
     <import resource="mybatis.xml"></import>

</beans>