SpringBoot
SpringBoot has all the advantages of spring, such as open source, lightweight, non intrusive and so on. Spring's own inversion of control (IOC) and aspect oriented (AOP) programming are also the characteristics of SpringBoot. However, spring itself has unavoidable disadvantages. First, it is the heavyweight configuration. Various xml configuration files are like an old lady's foot binding. Secondly, the dependency management of the project is also a rare problem. When building the environment, you need to import a large number of Library coordinates, and analyze the dependencies related to the import. Once there is an error, there will be various incompatible problems. SpringBoot is to improve and optimize the shortcomings of spring.
Overview of SpringBoot
SpringBoot is a framework developed on the basis of Spring framework provided by Privotal team. Its design purpose is to simplify the initial construction and development process of application. SpringBoot is not a solution to replace Spring, but a tool closely combined with the Spring framework to improve the Spring developer experience. It does not provide the core features and extension functions of the Spring framework.
Features of SpringBoot
-
Create a stand-alone Spring application.
-
tomcat, jetty and undertow servers are directly embedded inside.
-
A fixed "starter" configuration is provided to simplify the build configuration.
-
It is highly possible to automatically configure spring and third-party libraries.
-
It provides product level functions, such as safety indicators, operation status detection and external configuration.
-
Absolutely no code will be generated and no xml configuration is required.
The core functions of SpringBoot
-
Start dependence
Start dependency is to package the coordinates with certain functions and provide some default functions.
-
Auto configuration
The automatic configuration of SpringBoot takes many factors into account in the running process to decide which Spring configuration should be used and which should not be used. This process is done automatically by Spring.
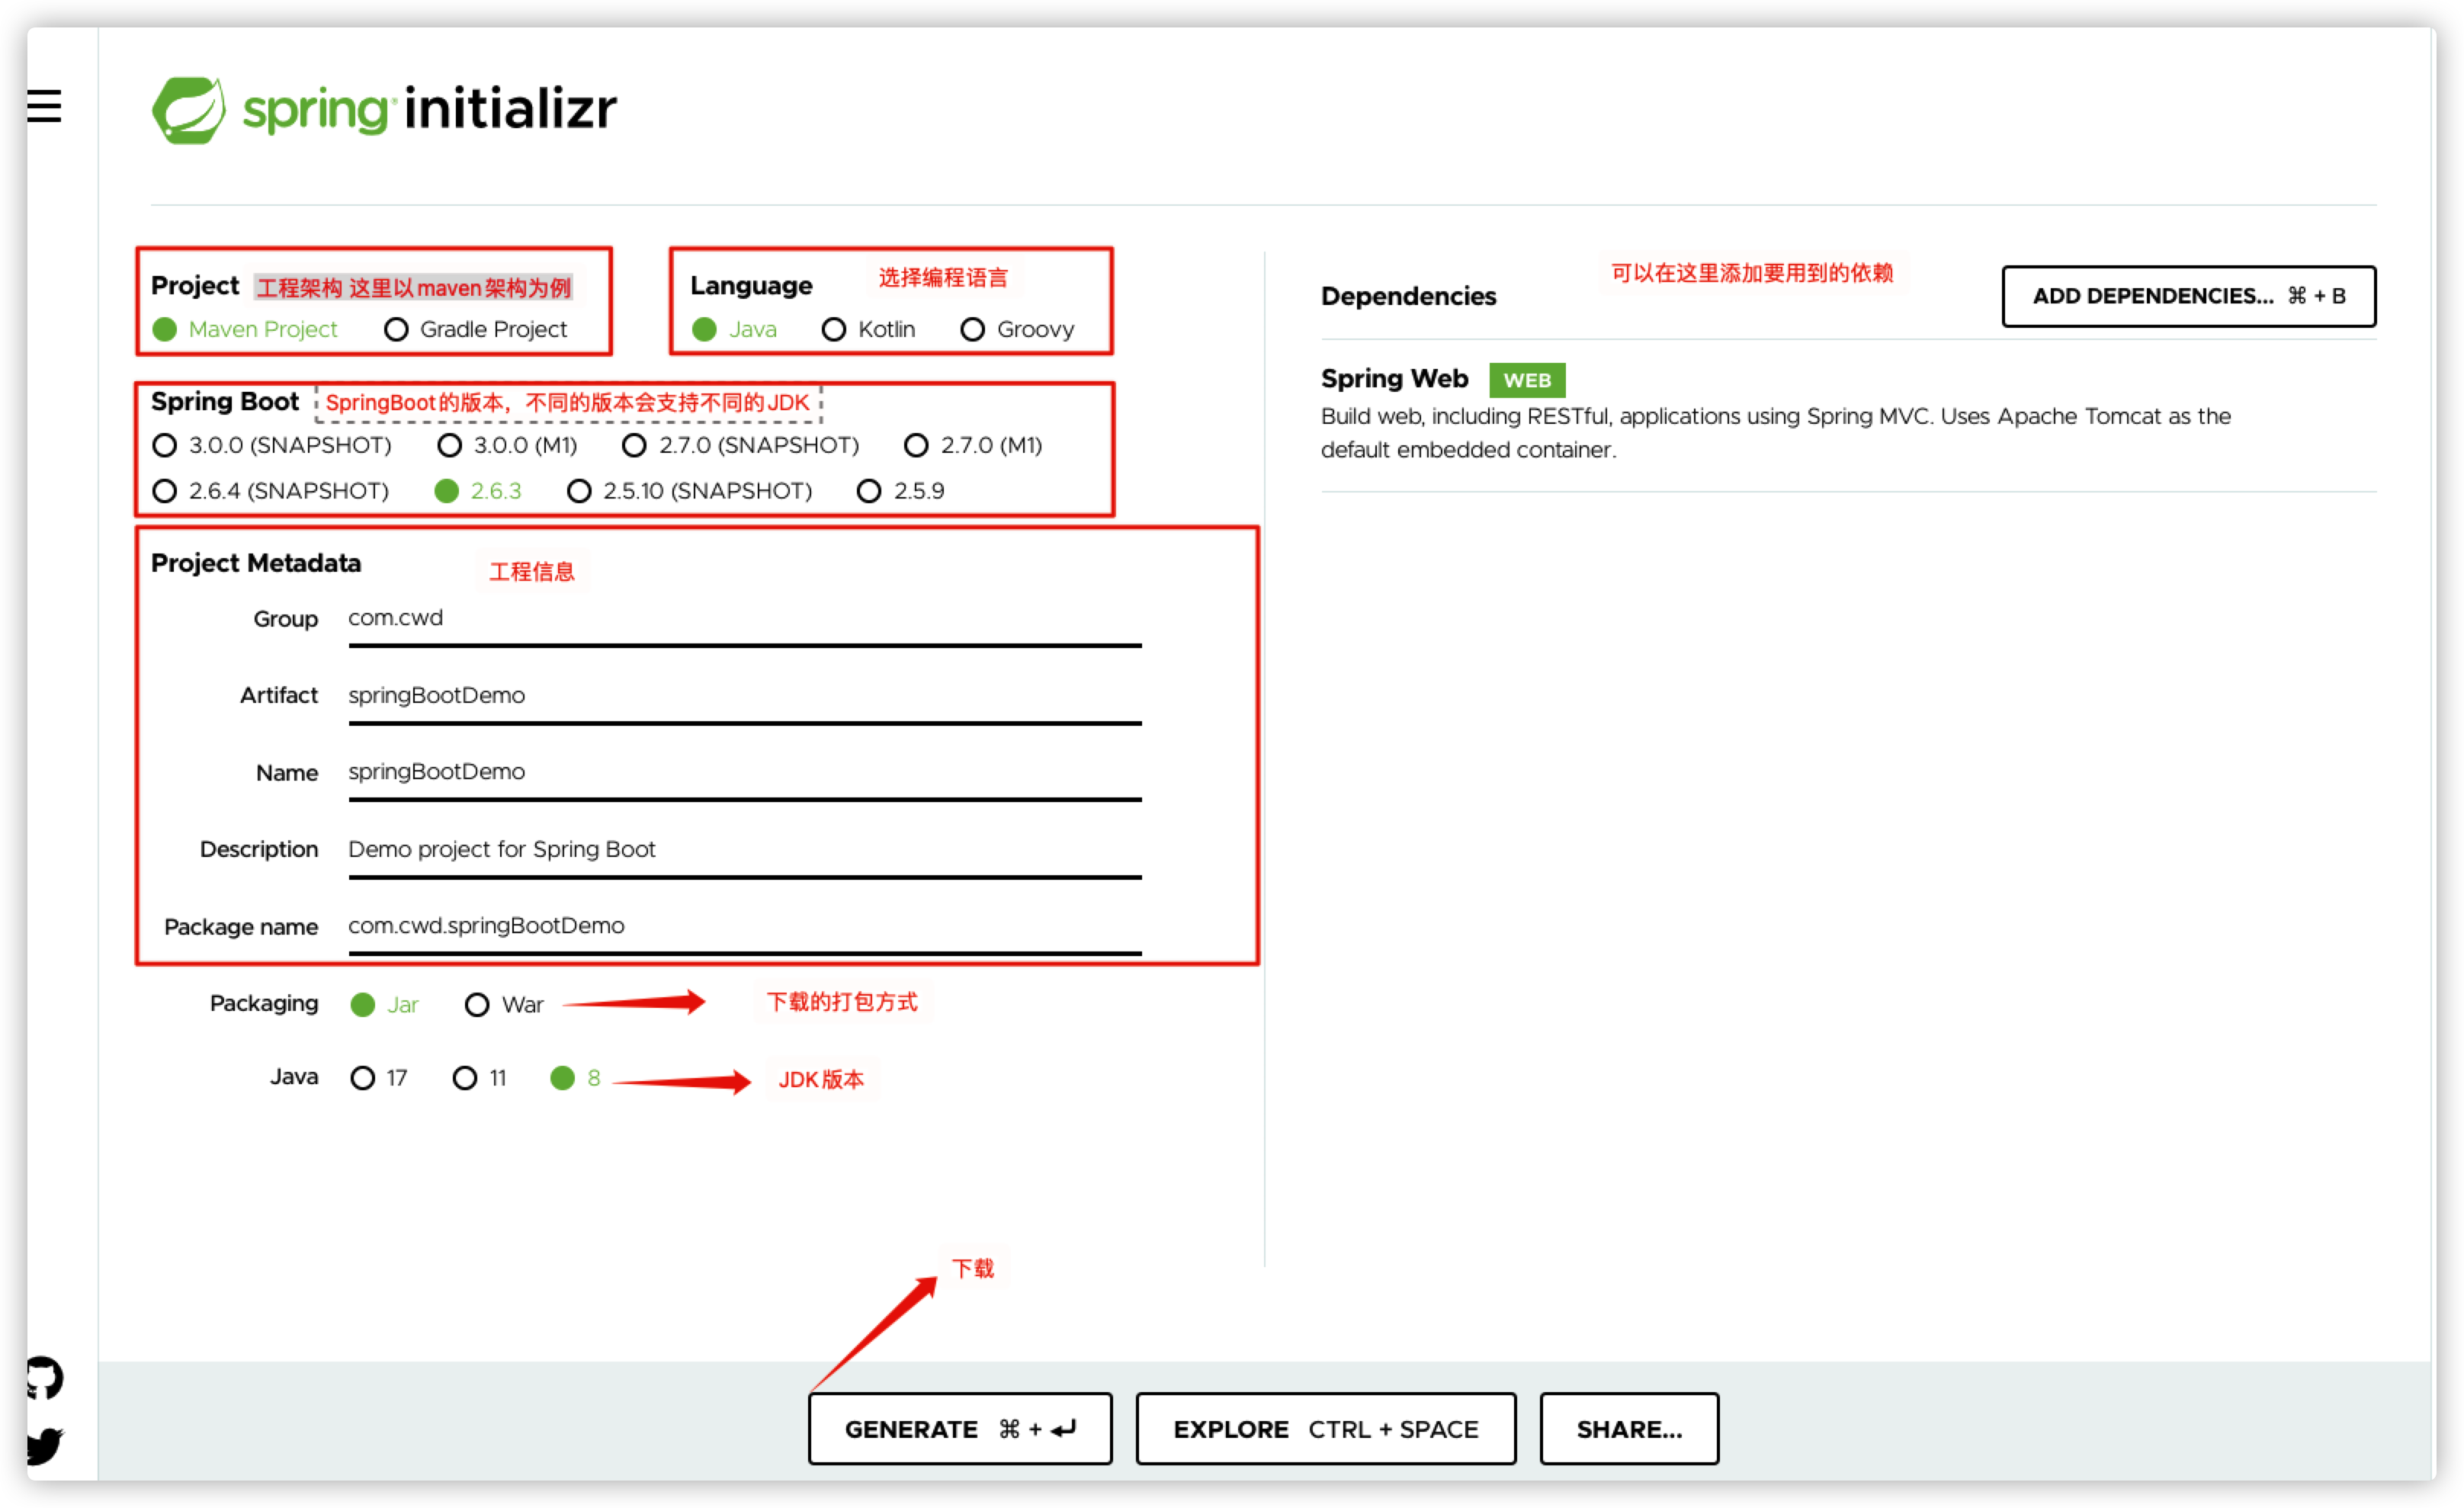
Construction of SpringBoot environment
Different development tools use different methods to build SpringBoot. Here we use the official website configuration generation method. We can configure it on the official website, download it, decompress it and import it into our development tool.
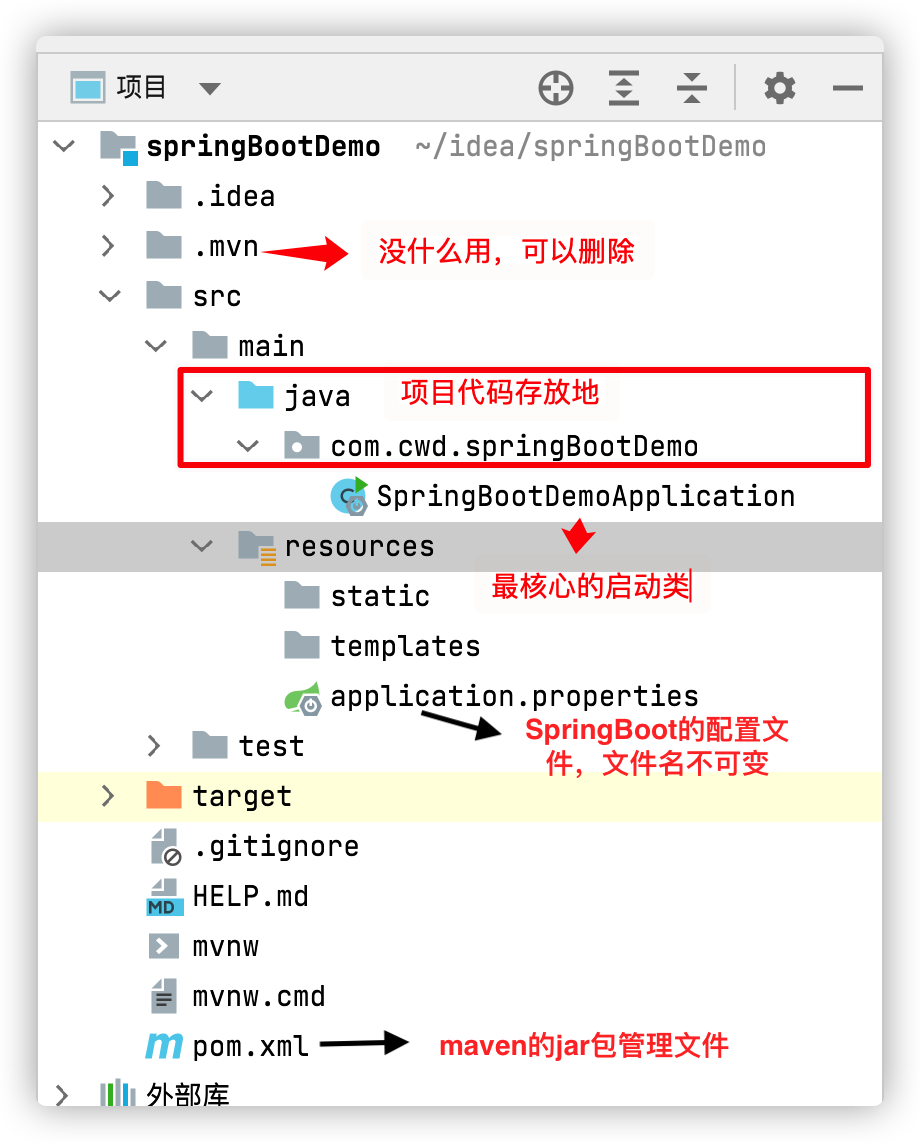
When we import the extracted project file into the IDE, we can see the project structure:
After integrating web components, SpringBoot has built-in tomcat server. A SpringBoot application is equivalent to an independent service. You can use the main method in the startup class to start the SpringBoot program.
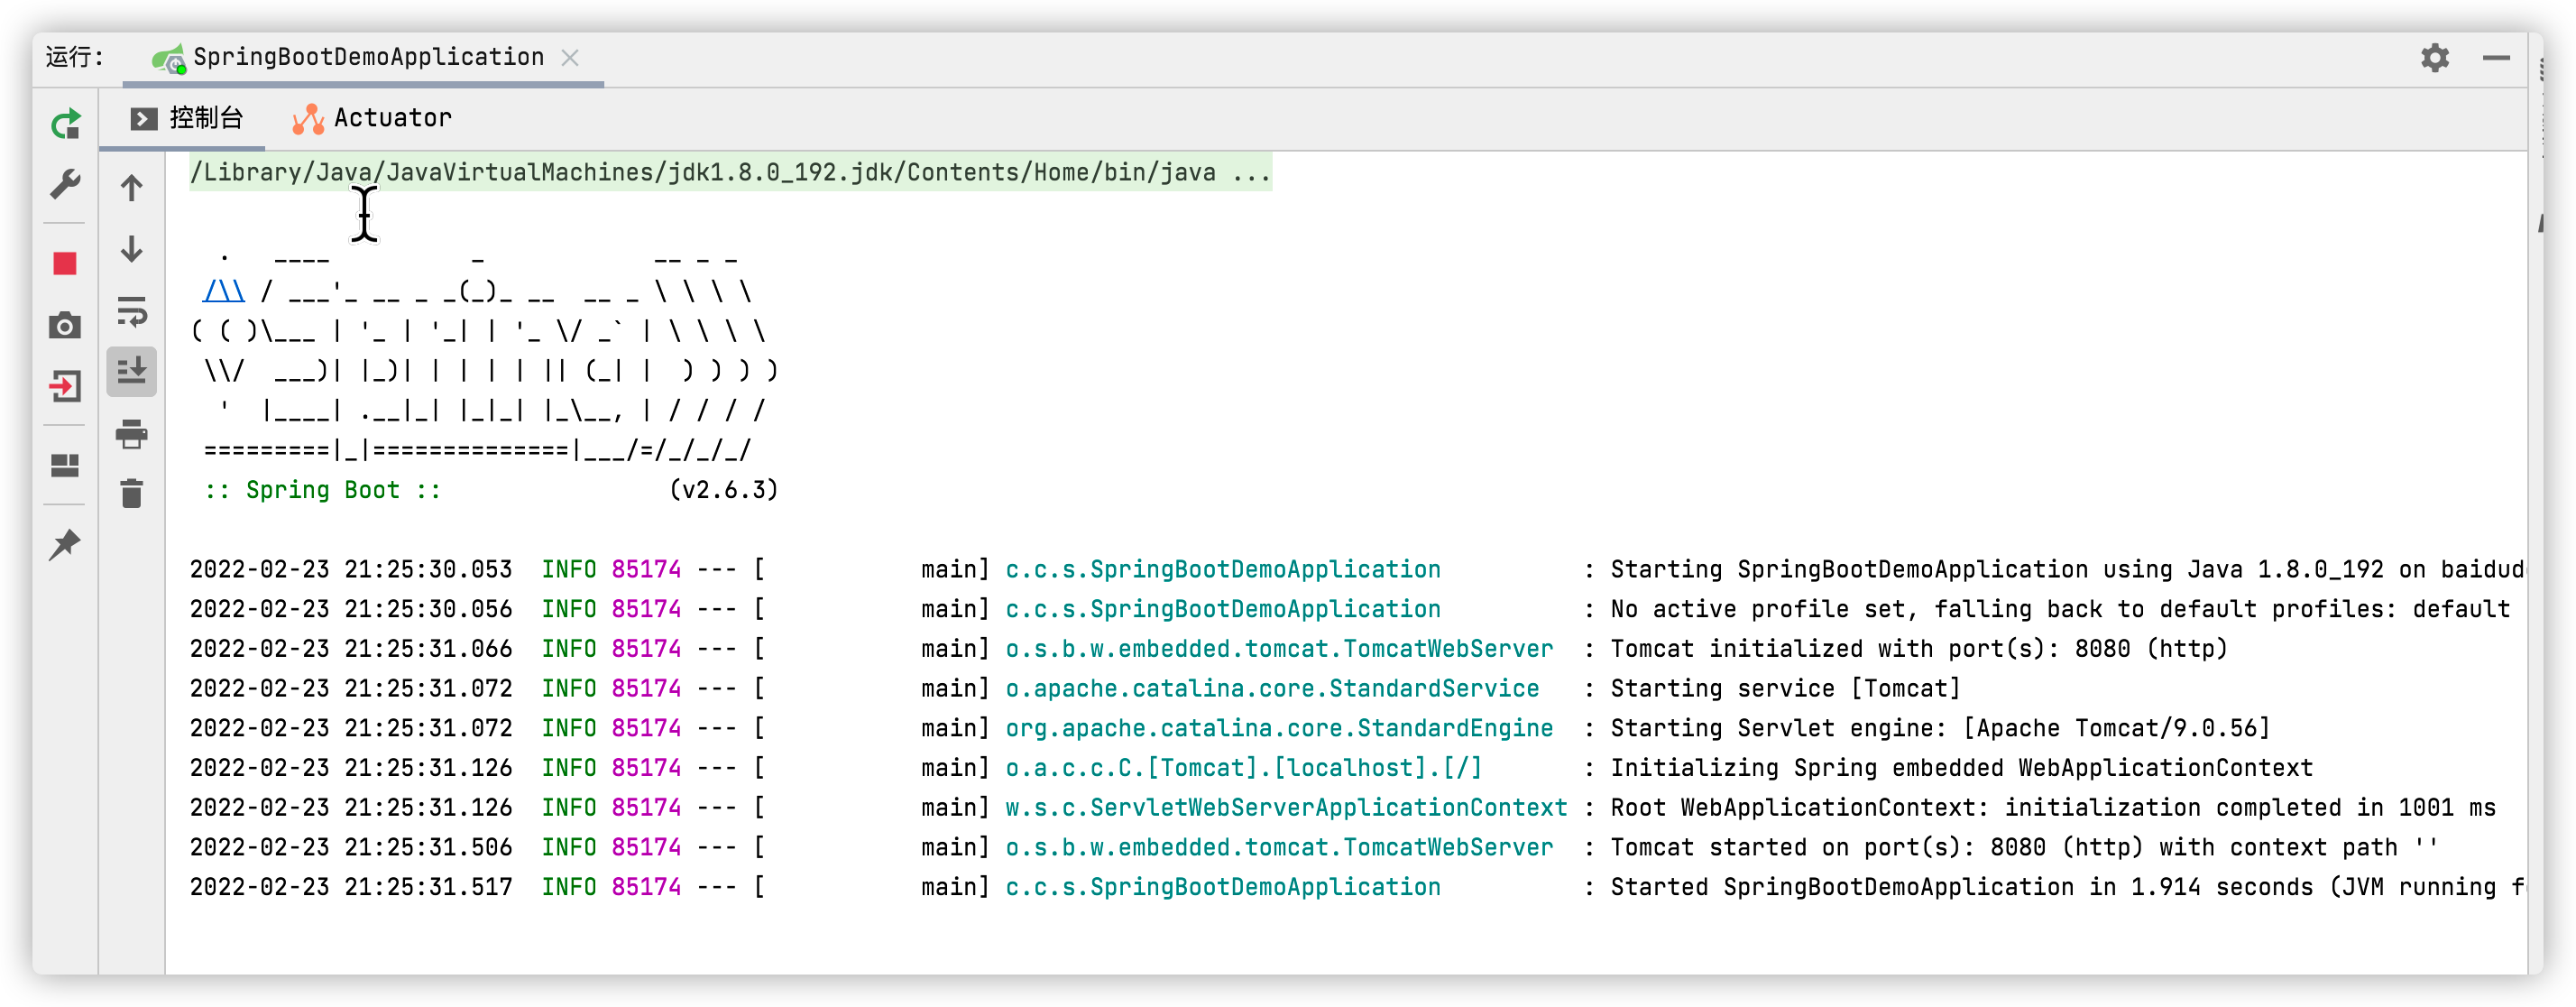
So far, a SpringBoot project has been built.
SpringBoot core configuration file
SpringBoot uses a global configuration file application properties (the file name is fixed and cannot be changed), or the format can be modified to application yml
properties and yml files have different syntax rules.
applictaion.properties
The format and syntax structure of the attribute file are in the form of key value pairs. as
#Configure built-in server port number
server.port = 9898
application.yml
yml format is a file of YAML language. It takes data as the center and represents logical relations with indentation, which is similar to python. as
#Configure built-in server port number
server:
	port: 9898
Basic syntax of yml
Syntax structure key: (space) value
Indicates a pair of key value pairs (spaces must not be omitted). The indentation of spaces controls the hierarchical relationship, as long as the column data aligned on the left is at the same level. If the value is a string, double quotation marks or single quotation marks are not required by default. as
stu:
	name: Zhang San
	age: 18
	class: Class two
There are many other ways to write the contents of yml files. Here are some cases:
- Normal value
stu:
	name: Zhang San
	age: 18
	class: Class two
or
stu: {name: Zhang San,age: 18,class: Class two}
- array
color:
	-yellow
	-black
	-red
or
color: [yellow,black,red]
Use of SpringBoot
SpringBoot is used to simplify the Spring framework. Therefore, different from the way Spring is used, SpringBoot has its own way of use.
SpringBoot annotation
Annotation is a powerful and efficient tool provided by the framework. We can indicate the specific operation we want to carry out through specific annotations. The strength of the framework is to express the complex processing code with small annotations, so that we can complete a series of actions through only one annotation.
@SpringBootApplication
import org.springframework.boot.SpringApplication;
import org.springframework.boot.autoconfigure.SpringBootApplication;

@SpringBootApplication
public class SpringBootDemoApplication {

   public static void main(String[] args) {
      SpringApplication.run(SpringBootDemoApplication.class, args);
   }

}
This annotation is the core annotation of SpringBoot on the startup class. It identifies that this is a SpringBoot application, which is used to open the functions of SpringBoot. In fact, this annotation is a combination of @ SpringBootConfiguration, @ EnableAutoConfiguration and @ ComponentScan. Since the three annotations are generally used together, SpringBoot provides such a unified annotation.
import java.lang.annotation.Documented;
import java.lang.annotation.ElementType;
import java.lang.annotation.Inherited;
import java.lang.annotation.Retention;
import java.lang.annotation.RetentionPolicy;
import java.lang.annotation.Target;

import org.springframework.beans.factory.support.BeanNameGenerator;
import org.springframework.boot.SpringApplication;
import org.springframework.boot.SpringBootConfiguration;
import org.springframework.boot.context.TypeExcludeFilter;
import org.springframework.context.annotation.AnnotationBeanNameGenerator;
import org.springframework.context.annotation.Bean;
import org.springframework.context.annotation.ComponentScan;
import org.springframework.context.annotation.ComponentScan.Filter;
import org.springframework.context.annotation.Configuration;
import org.springframework.context.annotation.FilterType;
import org.springframework.core.annotation.AliasFor;
import org.springframework.data.repository.Repository;

/**
 * Indicates a {@link Configuration configuration} class that declares one or more
 * {@link Bean @Bean} methods and also triggers {@link EnableAutoConfiguration
 * auto-configuration} and {@link ComponentScan component scanning}. This is a convenience
 * annotation that is equivalent to declaring {@code @Configuration},
 * {@code @EnableAutoConfiguration} and {@code @ComponentScan}.
 *
 * @author Phillip Webb
 * @author Stephane Nicoll
 * @author Andy Wilkinson
 * @since 1.2.0
 */
@Target(ElementType.TYPE)
@Retention(RetentionPolicy.RUNTIME)
@Documented
@Inherited
@SpringBootConfiguration
@EnableAutoConfiguration
@ComponentScan(excludeFilters = { @Filter(type = FilterType.CUSTOM, classes = TypeExcludeFilter.class),
      @Filter(type = FilterType.CUSTOM, classes = AutoConfigurationExcludeFilter.class) })
public @interface SpringBootApplication {

   /**
    * Exclude specific auto-configuration classes such that they will never be applied.
    * @return the classes to exclude
    */
   @AliasFor(annotation = EnableAutoConfiguration.class)
   Class<?>[] exclude() default {};

   /**
    * Exclude specific auto-configuration class names such that they will never be
    * applied.
    * @return the class names to exclude
    * @since 1.3.0
    */
   @AliasFor(annotation = EnableAutoConfiguration.class)
   String[] excludeName() default {};
Part of the code intercepted above is seen in the @ SpringBootApplication annotation.
@SpringBootConfiguration
This is a class level annotation in SpringBoot, indicating that this class provides application level configuration. Generally, classes with main () method are most suitable for this annotation@ SpringBootApplication automatically inherits this annotation.
@EnableAutoConfiguration
Allow SpringBoot to automatically configure annotations. After opening this annotation, SpringBoot can configure springbeans according to the packages or classes under the current classpath. For example, the jar package MyBatis exists in the current classpath, and the MybatisAutoConfiguration annotation can configure each spring bean of MyBatis according to relevant parameters.
@ComponentScan
The Component scans the annotation and asks SpringBoot to scan the class marked with @ Configuration and add it to the program context@ The ComponentScan annotation will assemble the classes identified with @ Controller, @ Service, @ repository and @ Component annotations into the Spring container by default.
@Configuration
It is used to define the Configuration class and point out that this class is the information source of Bean Configuration. It is equivalent to the traditional xml Configuration file and is generally added to the main class. If some third-party libraries need to use xml files, the @ Configuration class is generally still used as the main class of the project.
import com.alibaba.druid.support.http.StatViewServlet;
import com.alibaba.druid.support.http.WebStatFilter;
import org.springframework.boot.context.properties.ConfigurationProperties;

import org.springframework.boot.web.servlet.FilterRegistrationBean;
import org.springframework.boot.web.servlet.ServletRegistrationBean;
import org.springframework.context.annotation.Bean;
import org.springframework.context.annotation.Configuration;

import com.alibaba.druid.pool.DruidDataSource;

//Configure Druid data source
@Configuration
public class DruidDataSourceConfig {

	@Bean
	@ConfigurationProperties(prefix = "spring.datasource")
	public DataSource druid() {
		return new DruidDataSource();
	}
}
@Bean
It is equivalent to the in the XML file. Put it on the method, indicating that the method will return a bean and hand it over to Spring for management.
@ConfigurationProperties
You can map the value assigned to the Person attribute in the configuration file to this component.
- You need to import related jar s first
<dependency>
    <groupId>org.springframework.boot</groupId>
    <artifactId>spring-boot-configuration-processor</artifactId>
    <optional>true</optional>
</dependency>
- We add a new attribute to the application configuration file
user1:
	name: jim
	age: 18
- Create a new entity class and inject it with tags
package com.cwd.SpringBootDemo.bean;

import org.springframework.boot.context.properties.ConfigurationProperties;
import org.springframework.stereotype.Component;

@Component
@ConfigurationProperties(prefix = "user1")
public class User {

    private String name;
    private Integer age;

    public String getName() {
        return name;
    }

    public void setName(String name) {
        this.name = name;
    }

    public Integer getAge() {
        return age;
    }

    public void setAge(Integer age) {
        this.age = age;
    }

    @Override
    public String toString() {
        return "User{" +
                "name='" + name + '\'' +
                ", age=" + age +
                '}';
    }
}
SpringBoot integrated JDBC
When accessing the database, we always need to configure a data source first. The data source is the abstraction of the database and the interactive operation of the database. It encapsulates the location information, verification information and the operation of establishing and closing the connection of the target source. The data source can be regarded as a component in the program. It abstracts the traditional operations such as writing configuration information and obtaining connections in the code into a specification or interface. Let's take MySQL database as an example:
- In POM The MySQL driver package is introduced into the XML file
<!-- mysql-connector-java mysql Driver package -->
<dependency>
    <groupId>mysql</groupId>
    <artifactId>mysql-connector-java</artifactId>
    <version>8.0.16</version>
</dependency>
- In POM JDBC is introduced into XML file to support database connection
<dependency>
    <groupId>org.springframework.boot</groupId>
    <artifactId>spring-boot-starter-jdbc</artifactId>
</dependency>
- Configure the data source datasource in the application without configuring other database source management. It will automatically use the database source provided by JDBC for management, that is, use JdbcTemplate to operate the database. Here, it has been handed over to Spring for unified management. It can be used in the class by injecting @ Autowired directly.
#spring configuration
#Configure the database and configure the database source. The database source management provided by JDBC is used by default
spring:
  datasource:
    #Database address
    url: jdbc:mysql://127.0.0.1:3306/mybatis_db?characterEncoding=utf-8&useSSL=false&serverTimezone=Asia/Shanghai
    #Database user name
    username: root
    #Database password
    password: root
    #Database load class
    driver-class-name: com.mysql.cj.jdbc.Driver
- use
@Service
@Transactional
public class HelloService {
    @Autowired
    JdbcTemplate jdbcTemplate;

    public User findUserById(Integer id) {
        User user = new User();
        jdbcTemplate.query("select name,age from t_user where  id = ?",
                new Object[]{id}, new RowCallbackHandler() {
                    public void processRow(ResultSet rs) throws SQLException {
                        user.setName(rs.getString("name"));
                        user.setAge(rs.getInt("age"));
                    }
                });
        return user;
    }
}
Integrated Druid data source
When we use other better data source management, we will no longer use the data source management provided by JDBC.
- Import the jar of druid data source
#spring configuration
#Configure the database and configure the database source. The database source management provided by JDBC is used by default
spring:
  datasource:
    #Database address
    url: jdbc:mysql://127.0.0.1:3306/mybatis_db?characterEncoding=utf-8&useSSL=false&serverTimezone=Asia/Shanghai
    #Database user name
    username: root
    #Database password
    password: root
    #Database load class
    driver-class-name: com.mysql.cj.jdbc.Driver
    #Register druid database link pool
    type: com.alibaba.druid.pool.DruidDataSource
    #Number of physical connections established during initialization
    initialSize: 5
    #Minimum number of connection pools
    minIdle: 1
    #Maximum number of connection pools
    maxActive: 20
    #Enable Sql monitoring
    filters: stat
- To host the druid data source to the DataSource, we need to use java code to complete this operation, which is equivalent to the following configuration in the xml file
<!--to configure DruidDataSource hand spring Container management,spring Manage database links(data source)-->
<bean id="dataSource" class="com.alibaba.druid.pool.DruidDataSource">
    <property name="url" value="jdbc:mysql://127.0.0.1:3306/mybatis_db?characterEncoding=utf-8&useSSL=false&serverTimezone=Asia/Shanghai"></property>
    <property name="driverClassName" value="com.mysql.cj.jdbc.Driver"></property>
    <property name="username" value="root"></property>
    <property name="password" value="root"></property>
</bean>
import com.alibaba.druid.support.http.StatViewServlet;
import com.alibaba.druid.support.http.WebStatFilter;
import org.springframework.boot.context.properties.ConfigurationProperties;

import org.springframework.boot.web.servlet.FilterRegistrationBean;
import org.springframework.boot.web.servlet.ServletRegistrationBean;
import org.springframework.context.annotation.Bean;
import org.springframework.context.annotation.Configuration;

import com.alibaba.druid.pool.DruidDataSource;

//Configure Druid data source
@Configuration
public class DruidDataSourceConfig {

	@Bean
	@ConfigurationProperties(prefix = "spring.datasource")
	public DataSource druid() {
		return new DruidDataSource();
	}
}
SQL monitoring
To use Sql monitoring, you need to write the following code in the DruidDataSourceConfig class, that is, the class that configures the druid data source:
import com.alibaba.druid.pool.DruidDataSource;
import com.alibaba.druid.support.http.StatViewServlet;
import com.alibaba.druid.support.http.WebStatFilter;
import org.springframework.boot.context.properties.ConfigurationProperties;
import org.springframework.boot.web.servlet.FilterRegistrationBean;
import org.springframework.boot.web.servlet.ServletRegistrationBean;
import org.springframework.context.annotation.Bean;
import org.springframework.context.annotation.Configuration;

import javax.sql.DataSource;


@Configuration
public class DruidDataSourceConfig {

	@Bean
	@ConfigurationProperties(prefix = "spring.datasource")
	public DataSource druid() {
		return new DruidDataSource();
	}

	@Bean
	public ServletRegistrationBean druidStatViewServlet() {
		//The ServletRegistrationBean provides classes for registration
		ServletRegistrationBean servletRegistrationBean =
				new ServletRegistrationBean(new StatViewServlet(), "/druid/*");
		//Add initialization parameter: initParams
		//White list:
		servletRegistrationBean.addInitParameter("allow", "127.0.0.1");
		//IP blacklist (deny takes precedence over allow when both exist)
		//If deny is satisfied, prompt: sorry, you are not allowed to view this page
		servletRegistrationBean.addInitParameter("deny", "192.168.1.73");
		//Login to view the account and password of the information
		servletRegistrationBean.addInitParameter("loginUsername", "admin");
		servletRegistrationBean.addInitParameter("loginPassword", "123456");
		servletRegistrationBean.addInitParameter("resetEnable", "false");
		return servletRegistrationBean;
	}


	@Bean
	public FilterRegistrationBean druidStatFilter() {
		FilterRegistrationBean filterRegistrationBean =
				new FilterRegistrationBean(new WebStatFilter());
		//Add filter rule
		filterRegistrationBean.addUrlPatterns("/*");
		//Add format information to ignore
		filterRegistrationBean.addInitParameter("exclusions", "*.js,*.gif," +
				"*.jpg,*.png, *.css,*.ico,/druid/*");
		return filterRegistrationBean;

	}

}
If we don't choose to integrate the web when creating the project, we also need to use POM XML file
<dependency>
	<groupId>org.springframework.boot</groupId>
	<artifactId>spring-boot-starter-web</artifactId>
</dependency>
When we finish these operations, we can enter http://localhost: Port number / Druid / login HTML, enter our configured account (admin) and password (123456) in the class to log in and view the sql records of operating the database in the web page.
SpringBoot integrates MyBatis
- First, we need to integrate MyBatis related jar s on the basis of SpringBoot
<dependency>
    <groupId>org.mybatis.spring.boot</groupId>
    <artifactId>mybatis-spring-boot-starter</artifactId>
    <version>2.1.4</version>
</dependency>
- Configure the data source information in the application file
#MyBtais configuration
mybatis:
  type-aliases-package: com.cwd.springboot.bean #Enable alias scanning
  mapper-locations: classpath:mapper/*Mapper.xml
  configuration:
    map-underscore-to-camel-case: true #Turn on hump switching
    cache-enabled: true #Enable L2 cache
Then we can use MyBatis, a query case:
(1) create a t_user table
CREATE TABLE `t_user` (
  `id` int NOT NULL AUTO_INCREMENT,
  `name` varchar(10) DEFAULT NULL,
  `age` int DEFAULT NULL,
  `birthday` date DEFAULT NULL,
  PRIMARY KEY (`id`)
) ENGINE=InnoDB AUTO_INCREMENT=21 DEFAULT CHARSET=utf8
(2) create an entity class of User and add relevant annotations
import org.apache.ibatis.type.Alias;
import org.springframework.stereotype.Component;
import java.util.Date;

@Component
@Alias("User")
public class User {
    private Integer id;
    private String name;
    private Integer age;
    private Date birthday;

    public Integer getId() {
        return id;
    }

    public void setId(Integer id) {
        this.id = id;
    }

    public String getName() {
        return name;
    }

    public void setName(String name) {
        this.name = name;
    }

    public Integer getAge() {
        return age;
    }

    public void setAge(Integer age) {
        this.age = age;
    }

    public Date getBirthday() {
        return birthday;
    }

    public void setBirthday(Date birthday) {
        this.birthday = birthday;
    }

    @Override
    public String toString() {
        return "User{" +
                "id=" + id +
                ", name='" + name + '\'' +
                ", age=" + age +
                ", birthday=" + birthday +
                '}';
    }
}
(3) create dao/mapper interface of query and sql mapping file
import com.cwd.SpringBootDemo.bean.User;
import org.springframework.stereotype.Repository;

@Repository
public interface UserDao {
    User findUserById(int id);
}
<?xml version="1.0" encoding="UTF-8"?>
<!DOCTYPE mapper
        PUBLIC "-//mybatis.org//DTD Mapper 3.0//EN"
        "http://mybatis.org/dtd/mybatis-3-mapper.dtd">

<!-- mapper: Root element namespace:Interface storage path class path-->
<mapper namespace="com.cwd.SpringBootDemo.dao.UserDao">

    <select id="findUserById" resultType="com.cwd.SpringBootDemo.bean.User">
        select name,age,birthday from t_user where id = #{id}
    </select>
</mapper>
(4) add a @ MapperScan annotation on the main class (SpringBoot startup class), which is used to specify the package where the interface to become the implementation class is located, and then all interfaces under the package will generate corresponding implementation classes after compilation.
import org.mybatis.spring.annotation.MapperScan;
import org.springframework.boot.SpringApplication;
import org.springframework.boot.autoconfigure.SpringBootApplication;

@SpringBootApplication
@MapperScan("com.cwd.SpringBootDemo.dao")
public class SpringBootDemoApplication {

	public static void main(String[] args) {
		SpringApplication.run(SpringBootDemoApplication.class, args);
	}

}
(5) create the service layer of the calling interface
import com.cwd.SpringBootDemo.bean.User;
import com.cwd.SpringBootDemo.dao.UserDao;
import org.springframework.beans.factory.annotation.Autowired;
import org.springframework.stereotype.Service;

@Service
@Transactional/*Turn on transaction management*/
public class UserService {
    @Autowired
    UserDao userDao;

    public User findUserById(int id) {
        return userDao.findUserById(id);
    }
}
(6) Testing
import com.cwd.SpringBootDemo.service.UserService;
import org.junit.jupiter.api.Test;
import org.springframework.beans.factory.annotation.Autowired;
import org.springframework.boot.test.context.SpringBootTest;

@SpringBootTest
class SpringBootDemoApplicationTests {

	@Autowired
	UserService userService;

	@Test
	void contextLoads() {
		System.out.println(userService.findUserById(3));
	}

}
Log printing
Add the log configuration in the application file
#Log printing
logging:
  level:
    com.cwd.SpringBootDemo.dao: trace  #Level only prints interface related logs of operation data
  file:
    name: E:\\log\\log.log #Log storage location
Simple construction of mybatis plus
For the detailed study of MyBtais plus, it is better to rely on the official documents for the MyBatis plus official website. Here we only complete a simple construction. We still use the above MyBtais classes and tables. Everything in MyBtais doesn't need to be moved. Of course, MyBatis plus contains everything in MyBatis.
- Import the jar related to mybatis plus.
<dependency>
   <groupId>com.baomidou</groupId>
   <artifactId>mybatis-plus-boot-starter</artifactId>
   <version>3.4.1</version>
</dependency>
- Use dao interface class to inherit BaseMapper. Generics are entity classes.
@Repository
public interface UserDao extends BaseMapper<User> {

}
- If the table name to be operated is inconsistent with the class name, we need to solve it through @ TableName annotation
@Component
@Alias("User")
@TableName("t_user")
public class User{

}
- Call the interface class. Mybatis plus encapsulates many sql statements that operate the database. Basically, they are single table operations, which can be called directly.
@Service
@Transactional/*Turn on transaction management*/
public class UserService {
    @Autowired
    UserDao userDao;

    public List<User> findUser() {
        return userDao.selectList(null);
    }
}
- test
@SpringBootTest
class SpringBootDemoApplicationTests {

	@Autowired
	UserService userService;

	@Test
	void contextLoads() {
		System.out.println(userService.findUser());
	}

}