1, Writing ideas
GPIO is like I2C and UART. To use a pin, you need to configure the pin as GPIO function. This requires the Pinctrl subsystem, which only needs to be specified in the device tree.
- You don't need to do anything on the driver code. GPIO itself needs to determine the pin, which also needs to be specified in the device tree.
- The device tree node is converted to platform by the kernel_ device.
- Correspondingly, a platform should be registered in the driver code_ Driver, in the probe function: obtain the pin and register the file_operations.
- In file_ In operation: set the direction and read / write value.
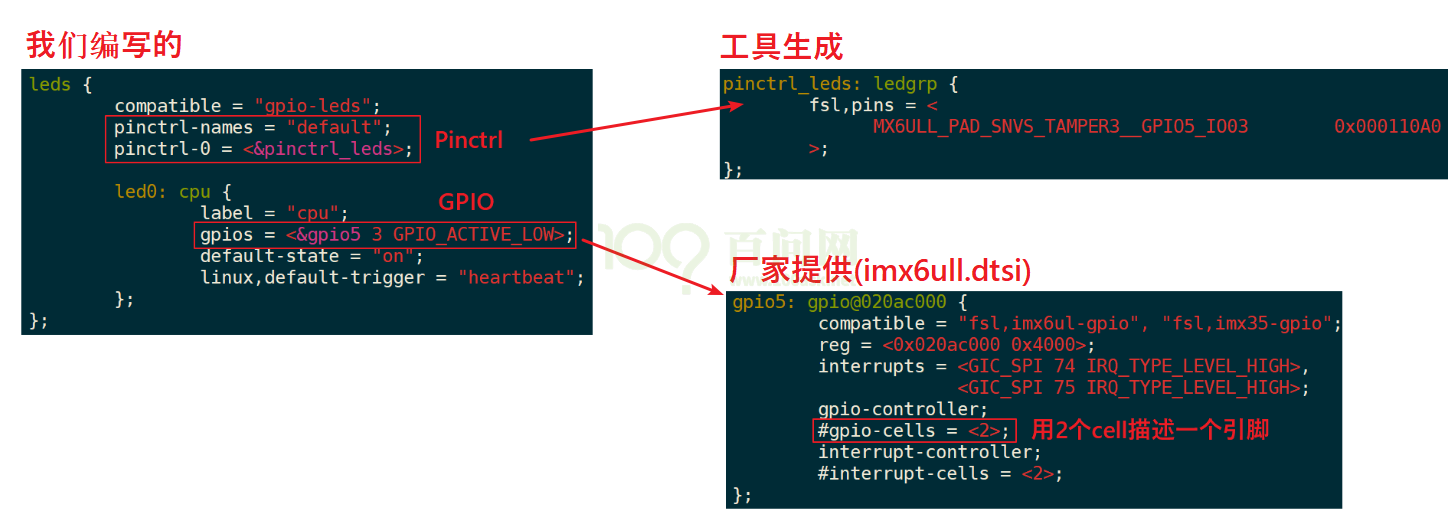
- You need to specify pinctrl-names and pinctrl-0. What state needs to be configured and which pins need to be used.
- Then, under pinctrl ler, create a child node and configure some pins to corresponding functions. Chip companies generally have ready-made configuration methods. Such as tools, documents, equipment tree use examples, Baidu search
- Although the pin is set, tell the GPIO subsystem to use this pin. Generally XXX gpios = < XXX pin >;
For example, XXX gpios = < &gpio5 0 GPIO_ ACTIVE_ HIGH>; Generally, the supporting attributes include #gpio-cells = < 2 >; Describe the pin with 2 integers. - Finally, add a compatible attribute to hook with the driver
Reasons for specifying both a pin in GPIO and a pin in pincontroller:
Now configure the pin in the pinctroller system as GPIO, and then specify which pin to use in the GPIO subsystem.
In this way, the coupling is relatively low, and the kernel driver will not be affected due to a small change of pinctroller.
2, Add Pinctrl information to the device tree
- Some chip companies will provide equipment tree generation tools to automatically generate child nodes.
- Some chip functions are documents, which can be configured to the desired parameters according to the documents. References are generally in the Documentation\devicetree\bindings\pinctrl directory.
- If there is no document, you can only refer to the use of the device tree in the source code. The source code is generally in the arch/arm/boot/dts directory.
- Or use Baidu for search reference.
The general pinctrl child node style is as follows:
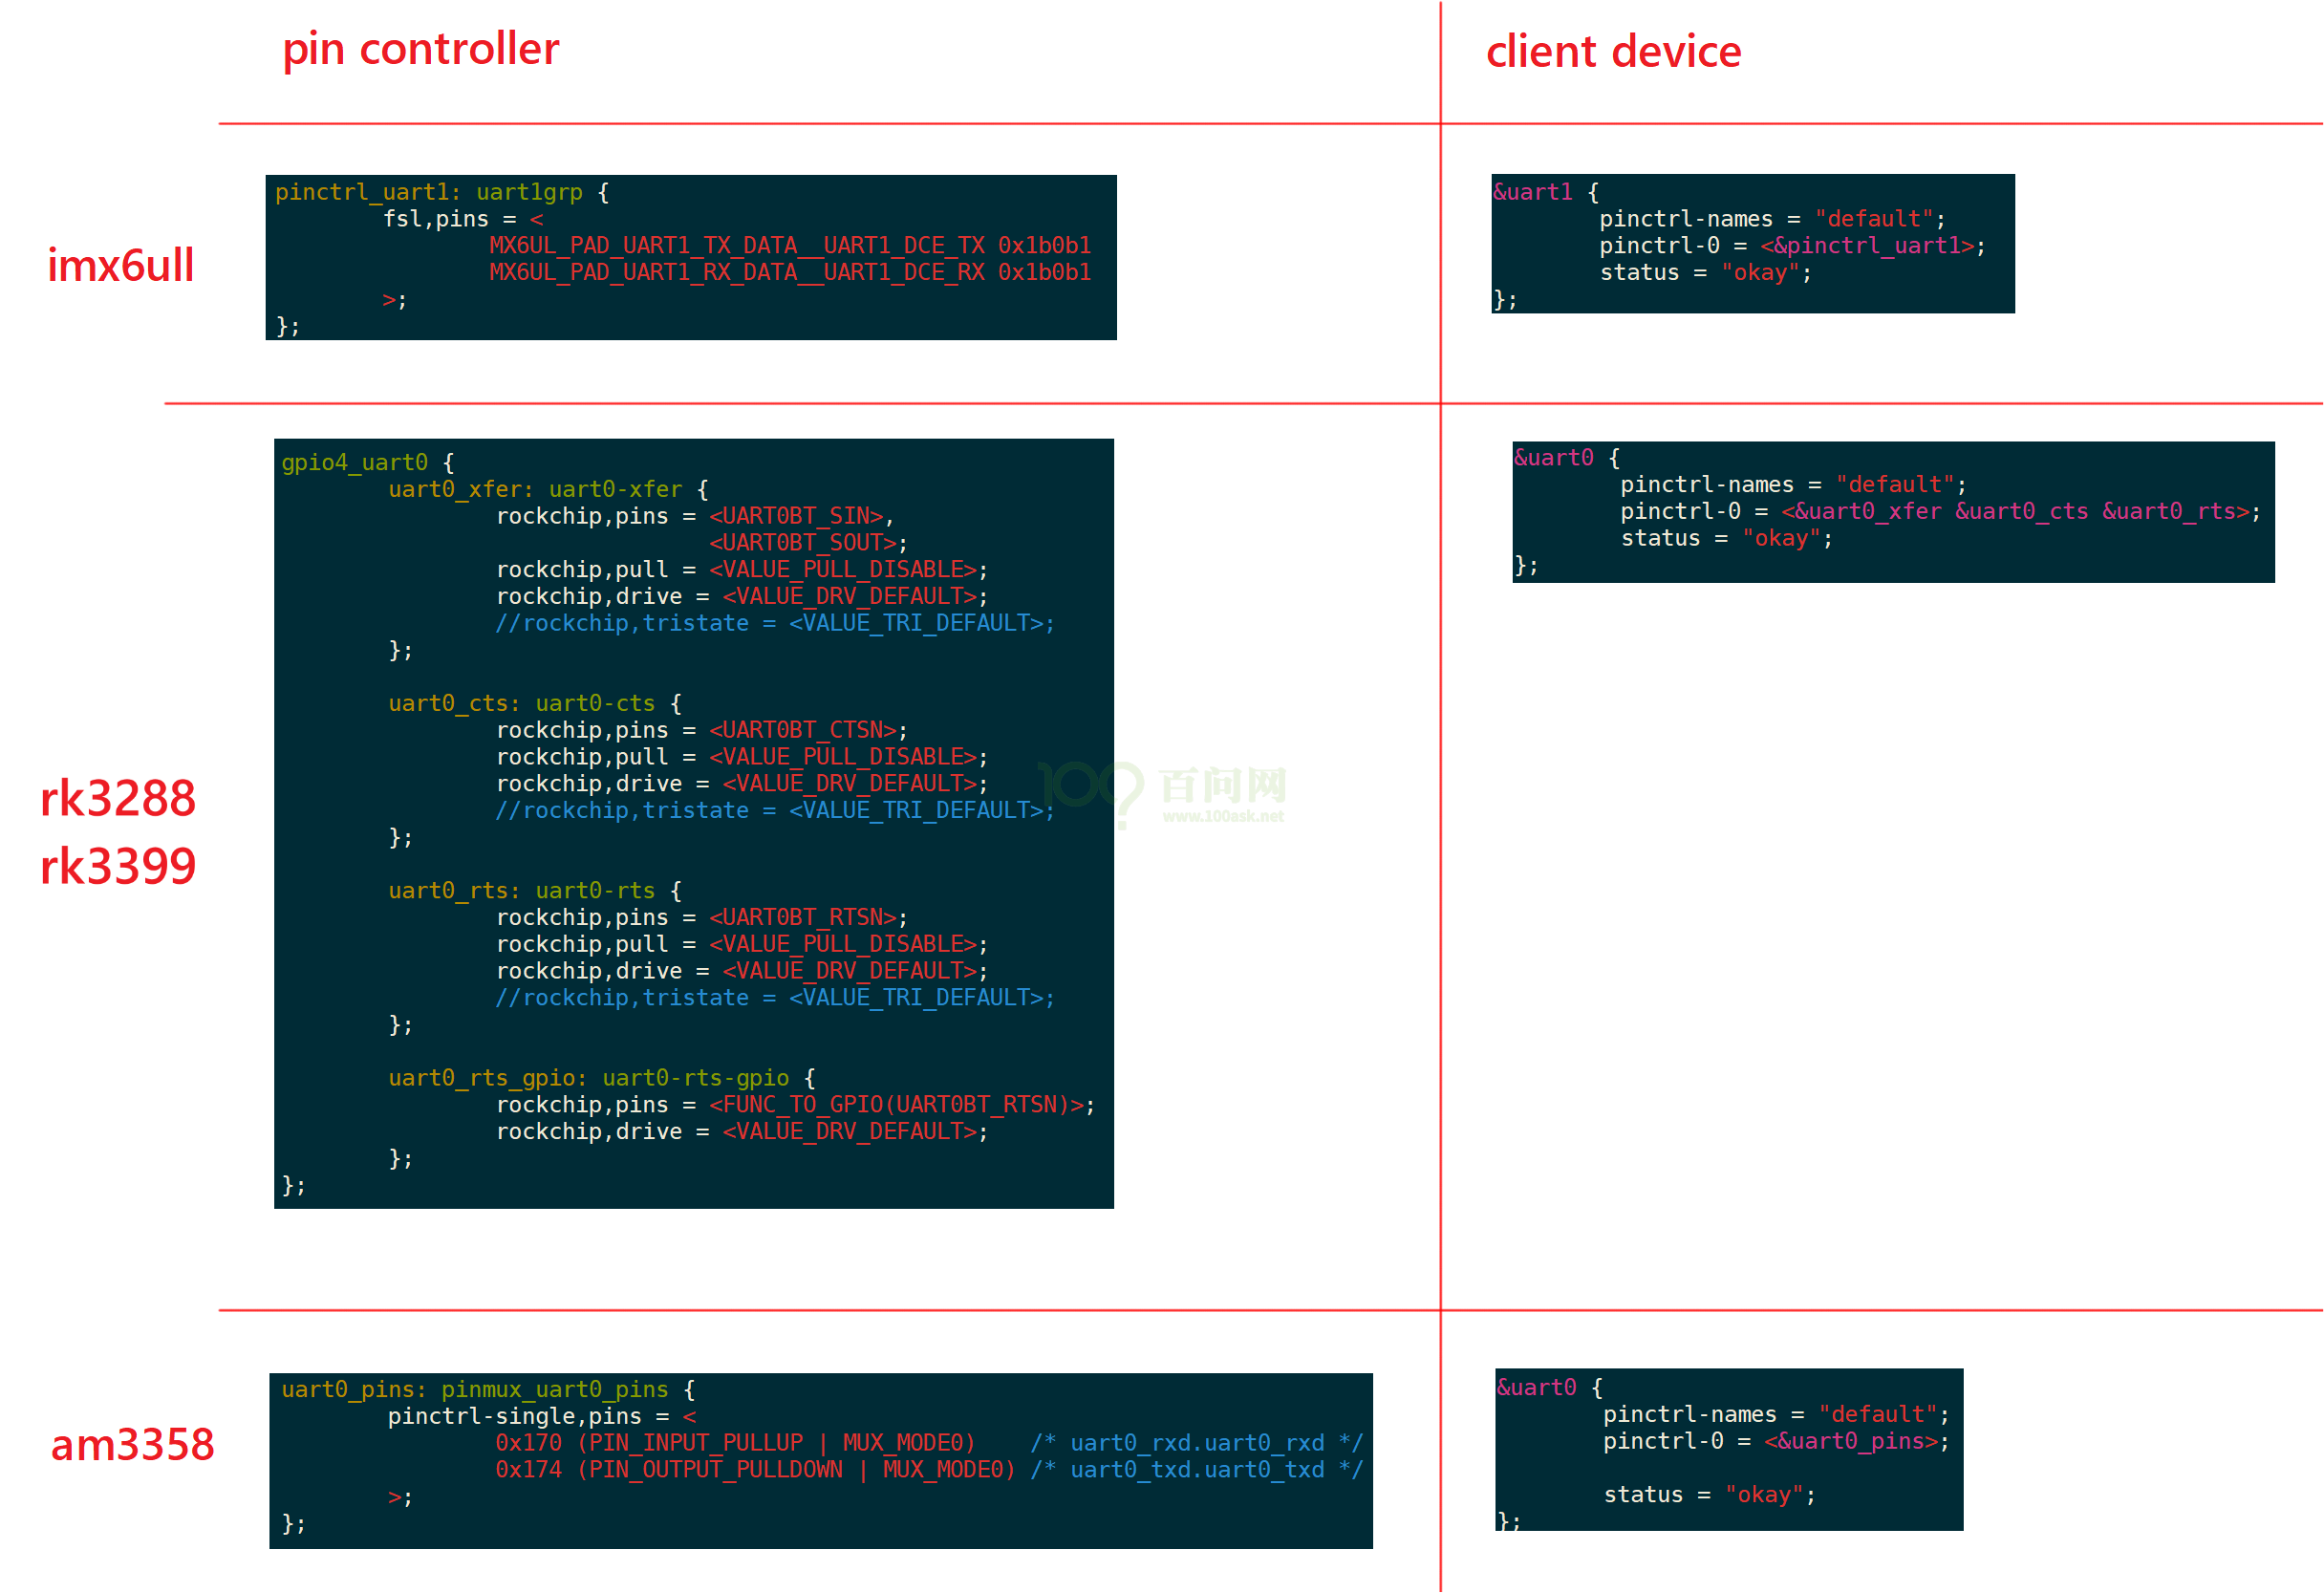
Set the child node in pinctrl L, and set the pin attributes in the child node, such as GPIO
Then, in the client device node, add pinctrl-names and pinctrl-0 to specify the status and pins to be configured.
3, Add GPIO information to the device tree
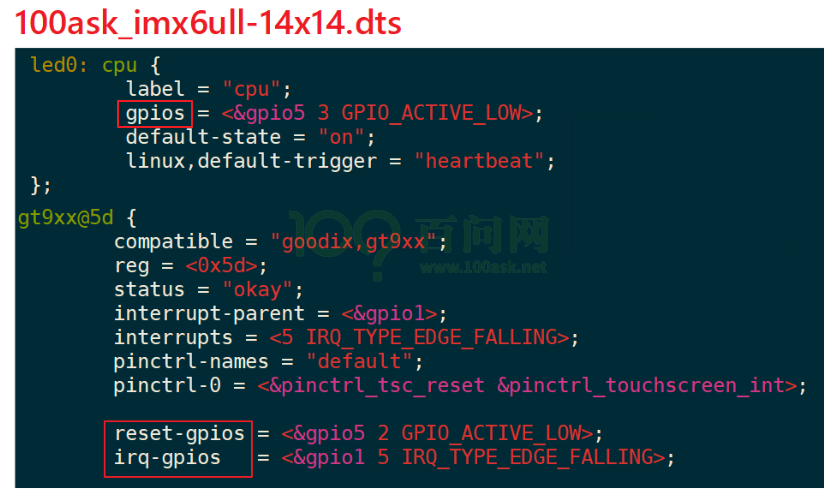
To add GPIO information to the device tree, first check the circuit schematic to determine the pins used, and then specify in the device tree:
Add the [name]-gpios attribute to specify which pin in which GPIO Controller is used, including some Flag information. Such as GPIO_ACTIVE_LOW, etc. There is also a #gpio-cell attribute to specify how many cells are required to describe a pin.
Examples are as follows:
4, Programming example
Idea:
- Define and register a platform_driver
- In the probe function
- According to platform_ The device tree information of device determines GPIO: gpiod_get
- Define and register a file_operations structure
- In file_operations uses the functions of the GPIO subsystem to operate GPIO
gpiod_direction_output,gpiod_set_value
#include <linux/module.h>
#include <linux/kernel.h>
#include <linux/fs.h>
#include <linux/errno.h>
#include <linux/major.h>
#include <linux/init.h>
#include <linux/device.h>
#include <linux/miscdevice.h>
#include <linux/uaccess.h>
#include <linux/gpio/consumer.h>
#include <linux/of.h>
#include <linux/platform_device.h>


static int major = 0;
static struct class *led_class;
struct gpio_desc *led_gpio;

static int led_drv_open(struct inode *node, struct file *file)
{
	printk("%s %s line %d\n", __FILE__, __FUNCTION__, __LINE__);
	/* Initialize to output according to descriptor */
	gpiod_direction_output(led_gpio, 0);
	return 0;
}

static ssize_t led_drv_read(struct file *file, char __user *buf, size_t size, loff_t *offset)
{
	printk("%s %s line %d\n", __FILE__, __FUNCTION__, __LINE__);
	return 0;
}

static ssize_t led_drv_write(struct file *file, const char __user *buf, size_t size, loff_t *offset)
{
	int err;
	char status;

	printk("%s %s line %d\n", __FILE__, __FUNCTION__, __LINE__);
	err = copy_from_user(&status, buf, 1);
	printk("write status:%x \n", status);

	/* Gets the value of the output from the user */
	gpiod_set_value(led_gpio, status);

	return 1;
}

static int led_drv_close(struct inode *node, struct file *file)
{
	printk("%s %s line %d\n", __FILE__, __FUNCTION__, __LINE__);
	return 0;
}


static struct file_operations led_drv = {
	.owner = THIS_MODULE,
	.open = led_drv_open,
	.read = led_drv_read,
	.write = led_drv_write,
	.release = led_drv_close,
};


static const struct of_device_id myleds[] = {
	{ .compatible = "myled,led_drv"},
	{ },
};


static int chip_demoo_gpio_probe(struct platform_device *pdev)
{
	led_gpio = gpiod_get(&pdev->dev, "myled", 0);
	if(IS_ERR(led_gpio)) {
		dev_err(&pdev->dev, "Failed to get GPIO for led\n");
		return PTR_ERR(led_gpio);
	}

	major = register_chrdev(0, "myled", &led_drv);
	led_class = class_create(THIS_MODULE, "led_class");
	if(IS_ERR(led_class)) {
		unregister_chrdev(major, "myled");
		gpiod_put(led_gpio);
		printk(KERN_WARNING "class create failed\n");
		return PTR_ERR(led_class);
	}

	device_create(led_class, NULL, MKDEV(major, 0), NULL, "myled%d", 0);

	return 0;
}

static int chip_demoo_gpio_remove(struct platform_device *pdev)
{
	device_destroy(led_class, MKDEV(major, 0));
	class_destroy(led_class);
	unregister_chrdev(major, "myled");
	gpiod_put(led_gpio);
	return 0;
}

static struct platform_driver chip_demoo_gpio_driver = {
	.probe    = chip_demoo_gpio_probe,
	.remove   = chip_demoo_gpio_remove,
	.driver   = {
		.name = "myled",
		.of_match_table = myleds,
	},
};

static int __init led_drv_init(void)
{
	int err;
	err = platform_driver_register(&chip_demoo_gpio_driver);

	printk("%s %sled_drv_init\n", __FILE__, __FUNCTION__);
	return 0;
}

static void __exit led_drv_exit(void)
{
	printk("%s %sled_drv_exit\n", __FILE__, __FUNCTION__);

	platform_driver_unregister(&chip_demoo_gpio_driver);
}

module_init(led_drv_init);
module_exit(led_drv_exit);
MODULE_LICENSE("GPL");
MODULE_AUTHOR("chen");
Device tree configuration:
/{
    myled {
        compatible = "myled,led_drv";
        label = "myled:yellow:user";
        myled-gpio = <&gpio8 2 GPIO_ACTIVE_LOW>;
        pinctrl-names = "default";
        pinctrl-0 = <&my_led>;
    };

&pinctrl {
    myled {
        my_led: my-led {
            rockchip,pins = <8 2 RK_FUNC_GPIO &pcfg_pull_none>;
        };
    };
};

}
On rk3288, the yellow light can be operated