Modify Android startup icon and name
First, we need to replace the default startup icon for Android projects.There is a special directory named res in the FlappyBird-android project.This directory contains resource files specific to Android projects.
Expand the res directory to see four folders prefixed with drawable:
Drawable-ldpi (low resolution display)
Drawable-mdpi (medium resolution display)
Drawable-hdpi (high resolution display)
Drawable-xdpi (very high resolution display)
These files are used by Android apps to support devices with different sizes of displays and Android uses content based on the screen density of the display.For simplicity, we ignore the difference in device resolution, so here we create a public drawable folder.This allows Android to use the resources in that folder on any resolution device.
The following screenshot is the default startup icon ic_launcher.png for this Android project, which is the Android application startup icon we are currently using:

The following icons are the startup icons we will use:

Name the icon file ic_launcher.png and copy it into the drawable folder.Since we have not changed the name of the startup icon, the project will start without changing anything.Conversely, if you rename the name of the startup icon, don't forget to modify the reference to it in the AndroidManifest.xml file.The AndroidManifest.xml file references the startup icon as follows:
Next we go Open res/value/string.xml file for android project And modify it as follows:<application android:icon="@drawable/ic_launcher" .../>
Create Texture Set<?xml version="1.0" encoding="utf-8"?> <resources> <string name="app_name">Flappy Bird</string> </resources>
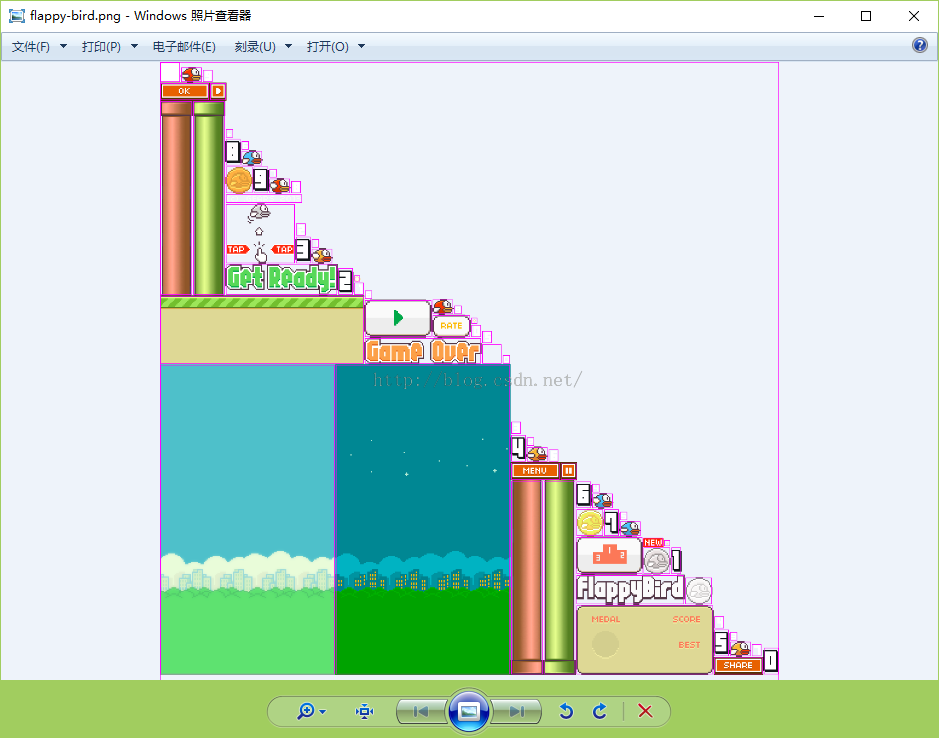
The following screenshot shows all the picture resource files used in this project:

- Unzip the extensions/tools/gdx-tools.jar file in the libgdx-1.2.0.zip compressed file.
- Cut the gdx-tools.jar file into the FlappyBird-desktop/libs subfolder.Next, you must add the extension to Build Path.
- In Eclipse, right-click the FlappyBird-desktop project and navigate to Build Path|Configure Build Path|Libraries.
- Then click the Add JARs button to open the JAR selection window.
- In the list of windows, find the libs subfolder of the FlappyBird-desktop project.
- Finally, select the newly added gdx-tools.jar extension file and click the OK button to confirm the selection.
- Create the assets-ray folder for the FlappyBird-desktop project.Then add a assets-raw/images subfolder.Copy all picture resources to this folder.
-
Next, open Main.java, the startup class for the FlappyBird-desktop project, and add the following two lines of code:
import com.badlogic.gdx.tools.texturepacker.TexturePacker; import com.badlogic.gdx.tools.texturepacker.TexturePacker.Settings; -
Then add the following code to the Main class:
package com.art.zok.flappybird;

import com.badlogic.gdx.backends.lwjgl.LwjglApplication;
import com.badlogic.gdx.backends.lwjgl.LwjglApplicationConfiguration;
import com.badlogic.gdx.tools.texturepacker.TexturePacker;
import com.badlogic.gdx.tools.texturepacker.TexturePacker.Settings;


public class Main {
	private static boolean rebuildAtlas = true;
	private static boolean drawDebugOutline = true;

	public static void main(String[] args) {
		if(rebuildAtlas) {
			Settings settings = new Settings();
			settings.maxWidth = 1024;
			settings.maxHeight = 1024;
			settings.duplicatePadding = false;
			settings.debug = drawDebugOutline;
			TexturePacker.process(settings, "assets-raw/images",
					"../FlappyBird-android/assets/images",
					"flappy-bird.pack");
		}
		LwjglApplicationConfiguration cfg = new LwjglApplicationConfiguration();
		cfg.title = "FlappyBird";
		cfg.width = 480;
		cfg.height = 800;
		cfg.resizable = false;
		new LwjglApplication(new FlappyBirdMain(), cfg);
	}
}
Next, create the Assets class and add the following code:package com.art.zok.flappybird.util; public class Constants { // Viewport width is 20 meters public static final float VIEWPORT_WIDTH = 50f; // Viewport height is 20 meters public static final float VIEWPORT_HEIGHT = 50f; // Texture Set Description File Path public static final String TEXTURE_ATLAS_OBJECTS = "images/flappy-bird.pack"; }
package com.art.zok.flappybird.game;

import com.art.zok.flappybird.util.Constants;
import com.badlogic.gdx.Gdx;
import com.badlogic.gdx.assets.AssetDescriptor;
import com.badlogic.gdx.assets.AssetErrorListener;
import com.badlogic.gdx.assets.AssetManager;
import com.badlogic.gdx.audio.Sound;
import com.badlogic.gdx.graphics.Texture.TextureFilter;
import com.badlogic.gdx.graphics.g2d.BitmapFont;
import com.badlogic.gdx.graphics.g2d.TextureAtlas;
import com.badlogic.gdx.graphics.g2d.TextureAtlas.AtlasRegion;
import com.badlogic.gdx.utils.Array;
import com.badlogic.gdx.utils.Disposable;


public class Assets implements Disposable, AssetErrorListener {
	public static final String TAG = Assets.class.getName();

	public static final Assets instance = new Assets();

	private AssetManager assetManager;

	// Singleton classes: Prevent instantiation in other classes
	private Assets () {}

	public void init (AssetManager assetManager) {
		this.assetManager = assetManager;

		// Set Error Handling Object Handle for Resource Manager
		assetManager.setErrorListener(this);

		// Load Texture Set
		assetManager.load(Constants.TEXTURE_ATLAS_OBJECTS, TextureAtlas.class);
		// Start loading resources until complete
		assetManager.finishLoading();

                // Print resource information
		Gdx.app.debug(TAG, "# of assets loaded: " + assetManager.getAssetNames().size);
		for(String a : assetManager.getAssetNames()) {
			Gdx.app.debug(TAG, "asset: " + a);
		}
	}

	@Override
	@SuppressWarnings("rawtypes")
	public void error(AssetDescriptor asset, Throwable throwable) {
		Gdx.app.debug(TAG, "Couldn't load asset '" + asset.fileName + "'", (Exception)throwable);
	}

	@Override
	public void dispose () {
		assetManager.dispose();
	}
}
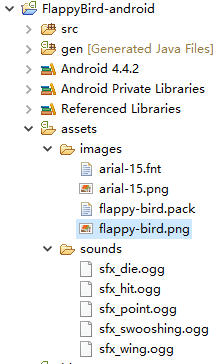
Here we've added sound and font resources, and finally Android's assets folder directory is as follows:package com.art.zok.flappybird.game; import com.art.zok.flappybird.util.Constants; import com.badlogic.gdx.Gdx; import com.badlogic.gdx.assets.AssetDescriptor; import com.badlogic.gdx.assets.AssetErrorListener; import com.badlogic.gdx.assets.AssetManager; import com.badlogic.gdx.audio.Sound; import com.badlogic.gdx.graphics.Texture.TextureFilter; import com.badlogic.gdx.graphics.g2d.BitmapFont; import com.badlogic.gdx.graphics.g2d.TextureAtlas; import com.badlogic.gdx.graphics.g2d.TextureAtlas.AtlasRegion; import com.badlogic.gdx.utils.Array; import com.badlogic.gdx.utils.Disposable; public class Assets implements Disposable, AssetErrorListener { public static final String TAG = Assets.class.getName(); public static final Assets instance = new Assets(); TextureAtlas atlas; private AssetManager assetManager; public AssetFonts fonts; public AssetBird bird; public AssetPipe pipe; public AssetLand land; public AssetUI assetUI; public AssetNumber number; public AssetSounds sounds; public AssetDecoration decoration; // Singleton classes: Prevent instantiation in other classes private Assets () {} public void init (AssetManager assetManager) { this.assetManager = assetManager; // Set Error Handling Object Handle for Resource Manager assetManager.setErrorListener(this); // Load Texture Set assetManager.load(Constants.TEXTURE_ATLAS_OBJECTS, TextureAtlas.class); // Load sound file assetManager.load("sounds/sfx_die.ogg", Sound.class); assetManager.load("sounds/sfx_hit.ogg", Sound.class); assetManager.load("sounds/sfx_point.ogg", Sound.class); assetManager.load("sounds/sfx_swooshing.ogg", Sound.class); assetManager.load("sounds/sfx_wing.ogg", Sound.class); assetManager.finishLoading(); // Print resource information Gdx.app.debug(TAG, "# of assets loaded: " + assetManager.getAssetNames().size); for(String a : assetManager.getAssetNames()) { Gdx.app.debug(TAG, "asset: " + a); } atlas = assetManager.get(Constants.TEXTURE_ATLAS_OBJECTS, TextureAtlas.class); fonts = new AssetFonts(); bird = new AssetBird(atlas); pipe = new AssetPipe(atlas); land = new AssetLand(atlas); number = new AssetNumber(atlas); assetUI = new AssetUI(atlas); sounds = new AssetSounds(assetManager); decoration = new AssetDecoration(atlas); } @Override @SuppressWarnings("rawtypes") public void error(AssetDescriptor asset, Throwable throwable) { Gdx.app.debug(TAG, "Couldn't load asset '" + asset.fileName + "'", (Exception)throwable); } @Override public void dispose () { assetManager.dispose(); } public class AssetBird { public final Array<AtlasRegion> bird0; public final Array<AtlasRegion> bird1; public final Array<AtlasRegion> bird2; public AssetBird (TextureAtlas atlas) { bird0 = atlas.findRegions("bird0"); bird1 = atlas.findRegions("bird1"); bird2 = atlas.findRegions("bird2"); } } public class AssetPipe { public final AtlasRegion pipeUpGreen; public final AtlasRegion pipeUpBrown; public final AtlasRegion pipeDownGreen; public final AtlasRegion pipeDownBrown; public AssetPipe (TextureAtlas atlas) { pipeUpGreen = atlas.findRegion("pipe_up"); pipeDownGreen = atlas.findRegion("pipe_down"); pipeUpBrown = atlas.findRegion("pipe2_up"); pipeDownBrown = atlas.findRegion("pipe2_down"); } } public class AssetLand { public final AtlasRegion land; public AssetLand (TextureAtlas atlas) { land = atlas.findRegion("land"); } } public class AssetNumber { public final Array<AtlasRegion> numbers_score; public final Array<AtlasRegion> numbers_context; public final Array<AtlasRegion> numbers_font; public AssetNumber(TextureAtlas atlas) { numbers_score = atlas.findRegions("number_score"); numbers_context = atlas.findRegions("number_context"); numbers_font = atlas.findRegions("font"); } } public class AssetUI { public final AtlasRegion textGameOver; public final AtlasRegion scorePanel; public final AtlasRegion buttonMenu; public final AtlasRegion buttonOk; public final AtlasRegion buttonPause; public final AtlasRegion buttonPlay; public final AtlasRegion buttonRate; public final AtlasRegion buttonResume; public final AtlasRegion buttonScore; public final AtlasRegion buttonShare; public final AtlasRegion tutorial; public final AtlasRegion textReady; public final AtlasRegion textTitle; public final AtlasRegion copyRight; public final Array<AtlasRegion> medals; public AssetUI(TextureAtlas atlas) { textGameOver = atlas.findRegion("text_game_over"); scorePanel = atlas.findRegion("score_panel"); buttonMenu = atlas.findRegion("button_menu"); buttonOk = atlas.findRegion("button_ok"); buttonPause = atlas.findRegion("button_pause"); buttonPlay = atlas.findRegion("button_play"); buttonRate = atlas.findRegion("button_rate"); buttonResume = atlas.findRegion("button_resume"); buttonScore = atlas.findRegion("button_score"); buttonShare = atlas.findRegion("button_share"); tutorial = atlas.findRegion("tutorial"); medals = atlas.findRegions("medals"); textReady = atlas.findRegion("text_ready"); textTitle = atlas.findRegion("title"); copyRight = atlas.findRegion("brand_copyright"); } } public class AssetSounds { public final Sound die; public final Sound hit; public final Sound point; public final Sound swooshing; public final Sound wing; public AssetSounds(AssetManager am) { die = am.get("sounds/sfx_die.ogg", Sound.class); hit = am.get("sounds/sfx_hit.ogg", Sound.class); point = am.get("sounds/sfx_point.ogg", Sound.class); swooshing = am.get("sounds/sfx_swooshing.ogg", Sound.class); wing = am.get("sounds/sfx_wing.ogg", Sound.class); } } public class AssetDecoration { public final Array<AtlasRegion> bg; public final AtlasRegion white; public AssetDecoration (TextureAtlas atlas) { bg = new Array<AtlasRegion>(); bg.add(atlas.findRegion("bg_day")); bg.add(atlas.findRegion("bg_night")); white = atlas.findRegion("white"); } } public class AssetFonts { public final BitmapFont defaultSmall; public final BitmapFont defaultNormal; public final BitmapFont defaultBig; public AssetFonts() { // Create three fonts using a libgdx 15px bitmap font file defaultSmall = new BitmapFont( Gdx.files.internal("images/arial-15.fnt"), true); defaultNormal = new BitmapFont( Gdx.files.internal("images/arial-15.fnt"), true); defaultBig = new BitmapFont( Gdx.files.internal("images/arial-15.fnt"), true); // Set font size defaultSmall.setScale(0.75f); defaultNormal.setScale(1.0f); defaultBig.setScale(2.0f); // Set font filtering mode to linear smoothing defaultSmall.getRegion().getTexture().setFilter( TextureFilter.Linear, TextureFilter.Linear); defaultNormal.getRegion().getTexture().setFilter( TextureFilter.Linear, TextureFilter.Linear); defaultBig.getRegion().getTexture().setFilter( TextureFilter.Linear, TextureFilter.Linear); } } }
- AssetManager.get(): This method requires two parameters, the first is the full path name of the resource to be obtained, and the second is the class object of the resource type.
- TextureAtlas.findRegions(): This method returns a sequence of textual regions, requiring only a string parameter that must be a series of file names with the same prefix.For example, if our resource contains three pictures, bird0_0.png, bird0_1.png, and bird0_2.png, then bird0 is the parameter of this function, and the method then returns an Array<AtlasRegion>instance with three texture domains in the list.
- TextureAtlas.findRegion(): This party requires a resource name without a file extension as an argument, and the result returns an AtlasRegion object.
- Texture.setFilter(): This method sets the filtering mode for textures with enlargement and reduction, respectively. TextureFilter.Linear stands for smooth filtering, which eliminates aliasing.
public AssetBird bird;
public AssetPipe pipe;
public AssetLand land;
public AssetUI assetUI;
public AssetNumber number;
public AssetSounds sounds;
public AssetDecoration decoration;
Each member variable is then instantiated in the init() method, and then we can access the fonts directly from Assets.instance.fonts.defaultSmall anywhere else, as well as other resources.
Reprinted at: https://my.oschina.net/u/2432369/blog/610413