Yesterday, the springboot+vue project was deployed on Linux. It is necessary to make a summary.
mysql installation
View the download address of each version of MySQL:
https://downloads.mysql.com/archives/community/
MySQL 5.6.45 download address is
https://cdn.mysql.com/archives/mysql-5.6/mysql-5.6.45-linux-glibc2.12-x86_64.tar.gz
- Check whether MySQL is installed
rpm -qa | grep mysql
- Download the mysql installation package to the / usr/local / directory
[root@freely ~]# cd /usr/local/
[root@freely local]# wget https://cdn.mysql.com/archives/mysql-5.6/mysql-5.6.45-linux-glibc2.12-x86_64.tar.gz
- Unzip and delete the original compressed package, and then rename it to mysql
[root@freely local]# tar -zxvf mysql-5.6.45-linux-glibc2.12-x86_64.tar.gz
[root@freely local]# rm -rf mysql-5.6.45-linux-glibc2.12-x86_64.tar.gz
[root@freely local]# mv mysql-5.6.45-linux-glibc2.12-x86_64/ mysql
- See if you have the / var/lib/mysql directory. If not, create it and grant permissions
This problem is very strange. Referring to other installation tutorials, I found that there is no such step, but I did not have this file during the actual installation, so that the initialization failed and an error was reported:
mysqld_safe Directory '/var/lib/mysql' for UNIX socket file don't exists.
mkdir   /var/lib/mysql

chmod 777  /var/lib/mysql
- In the / usr/local / directory, there is a mysql folder. Then start the mysql user group and mysql users. After adding, use groups mysql to check whether the addition is successful
[root@freely local]# groupadd mysql
[root@freely local]# useradd -r -g mysql mysql
[root@freely local]# groups mysql
- Modify the mysql directory owner to the newly established mysql user
[root@freely local]# cd mysql/
[root@freely mysql]# chown -R mysql:mysql ./
- MySQL initialization
[root@freely mysql]# ./scripts/mysql_install_db --user=mysql --basedir=/usr/local/mysql --datadir=/usr/local/mysql/data
If an error is reported: please install the following Perl modules before executing/ scripts/mysql_ install_…
Perform initialization again after executing the following statement
yum -y install autoconf
- Modify the mysql directory owner to root user, and modify the data directory owner to mysql
[root@freely mysql]# chown -R root:root ./ && chown -R mysql:mysql data
- mysql start
./support-files/mysql.server start
If an error is reported: The server quit without updating PID file
Set this line under mysql configuration file [mysqld]:
datadir = /usr/local/mysql/data
- Sign in
mysql -uroot -h 127.0.0.1 -p
Password direct enter
If an error is reported: - bash: mysql: command not found, execute the following command and then log in
ln -s /usr/local/mysql/bin/mysql /usr/bin
Where / usr/local/mysql is the installation path of mysql
- Change Password
set password for root@localhost = password('123456');
Installation is complete.
If the installation is on the server:
- After logging in linux, the remote login permission is refreshed successfully
mysql> grant all privileges on *.* to root@'%' identified by '123456';
mysql> flush privileges;
Open port 3306 in the server console – > network security group – > configuration rules.
Use Navicat to connect successfully.
JDK installation
download https://www.oracle.com/technetwork/java/javase/downloads/jdk8-downloads-2133151.html
Unzip to / usr/local/java
tar -xvf jdk-8u202-linux-x64.tar.gz
Edit profile
vi /etc/profile
Add at the end of the file
export JAVA_HOME=/usr/java/jdk1.8.0_11 (remember to change to your own directory path)
export CLASSPATH=.:
J
A
V
A
H
O
M
E
/
l
i
b
/
d
t
.
j
a
r
:
JAVA_HOME/lib/dt.jar:
JAVAHOME/lib/dt.jar:JAVA_HOME/lib/tools.jar
export PATH=
P
A
T
H
:
PATH:
PATH:JAVA_HOME/bin
ESC : wq! // Save and exit
source /etc/profile / / make the configuration effective
Check whether the installation is successful
java -version
The installation is complete when the version number appears.
node.js installation
New directory / usr/local/nodejs
Download and unzip
wget https://nodejs.org/dist/v10.15.3/node-v10.15.3-linux-x64.tar.xz
tar -xvf node-v10.15.3-linux-x64.tar.xz
Rename the extracted folder to node
mv node-v10.15.3-linux-x64 node
Enter the bin of the decompression directory and check whether the installation is successful
./node -v
Configure the soft connection so that the node command can be used globally
– map the node source file to the node file under usr/bin
ln -s /usr/local/node/bin/node /usr/bin/node
Mapping npm
ln -s /usr/local/node/bin/npm /usr/bin/npm
Configure node file installation path
cd /usr/local/node / path:
mkdir node_global

mkdir node_cache

npm config set prefix "node_global"
npm config set cache "node_cache"
When you think npm is slow, you can install cnpm
npm install cnpm -g --registry=https://registry.npm.taobao.org
If you use cnpm globally, you should also remember to configure a soft connection
If you use vue scaffold, you can install it with the following command
npm install -g @vue/cli
nginx installation
1. Install dependent packages
yum -y install gcc zlib zlib-devel pcre-devel openssl openssl-devel
2. Download and unzip the installation package
Create a folder
cd /usr/local
mkdir nginx
cd nginx
//Download and unzip the tar package
wget http://nginx.org/download/nginx-1.13.7.tar.gz
tar -xvf nginx-1.13.7.tar.gz
3. Install nginx
cd /usr/local/nginx
cd nginx-1.13.7
//Execute command
./configure
//Execute the make command
make
//Execute the make install command
make install
4. Configure nginx conf
Open profile
vi /usr/local/nginx/conf/nginx.conf
Change the port number to 8089, because apeache may occupy port 80. Try not to modify the apeache port. We choose to modify the nginx port.
Change localhost to your server ip address.
5. Start nginx
/usr/local/nginx/sbin/nginx -s reload
If an error is reported:
nginx: [error] open() "/usr/local/nginx/logs/nginx.pid" failed
Then run:
/usr/local/nginx/sbin/nginx -c /usr/local/nginx/conf/nginx.conf
Just start it again
Check whether the nginx process is started:
ps -ef | grep nginx
Then visit the ip to see the nginx interface.
Deploy vue project
- Edit Nginx profile
vi /usr/local/nginx/conf/nginx.conf
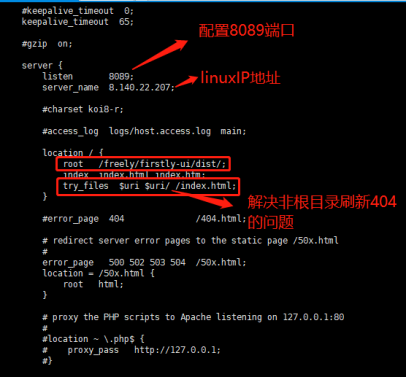
It's done.
