The experimental environment:
A GNS3
A Linux System for Centos7
A server 2016 server
Two PC s
The purpose of the experiment is:
Build a DHCP service to automatically assign IP addresses to two PC s
Setting up a DNS Resolution Server to Resolve Domain Names
Build a web server to provide two websites
Realize the interconnection of the whole environment
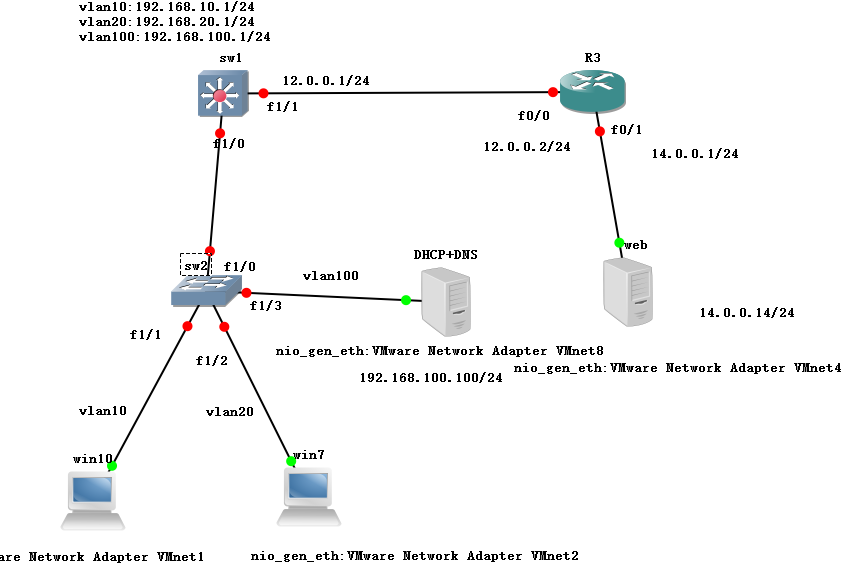
(1) Build the project framework in gns3
sw2 (Layer 2 Switch) Interface:
f1/1 vmnet1 network card connected to win10 is vlan10
f1/2 vmnet2 network card connected to win7 is vlan20
vmnet8 network card connecting dhcp+dns with f1/3 is vlan100
f1/0 interface connecting sw1
sw1 (Layer 3 Switch) Interface:
f1/0 interface connecting sw2
f0/0 Interface of f1/1 Connecting R3 Router
R3 (Router) Interface:
f1/1 interface of f0/0 connecting SW 1
f0/1 Connect to web Server
DHCP+DNS Server Fixed IP Address: 192.168.100.100/24
Fixed IP address of WEB server: 14.0.0.14/24
The gateway of f0/1 interface of R3 is 14.0.0.1/24. The gateway of f0/0 interface is 12.0.0.2/24.
The gateway of f1/1 interface of sw1 three-layer switching is 12.0.0.1/24
All open after completion of the building
(2) Double-click to open sw2 Layer 2 Switch, configure vlan and port
f1/1 is vlan10
f1/2 is vlan20
f1/3 is vlan100
f1/0 is trunk link
sw2#Con t. Enter Global Mode
sw2(config)#vlan 10, 20, 100 Create three VLANs
sw2(config-vlan)#ex
sw2(config)#int f1/1. Set f1/1 interface mode to put the interface in vlan10
sw2(config-if)#sw mod acc
sw2(config-if)#sw acc vlan 10
sw2(config-if)#int f1/2 Setting f1/2 Interface Mode to Place Interface in vlan20
sw2(config-if)#sw mod acc
sw2(config-if)#sw acc vlan 20
sw2(config-if)#int f1/3 Set f1/3 interface mode to put interface in VLAN 100
sw2(config-if)#sw mod acc
sw2(config-if)#sw acc vlan 100
sw2(config-if)#int f1/0 Set f1/0 as trunk link mode
sw2(config-if)#sw mod trunk
sw2(config-if)#sw tr encap dot
sw2(config-if)#ex
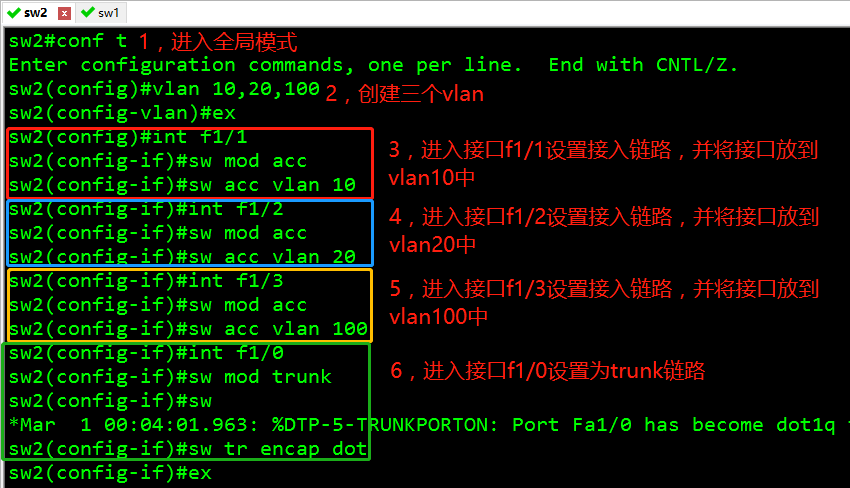
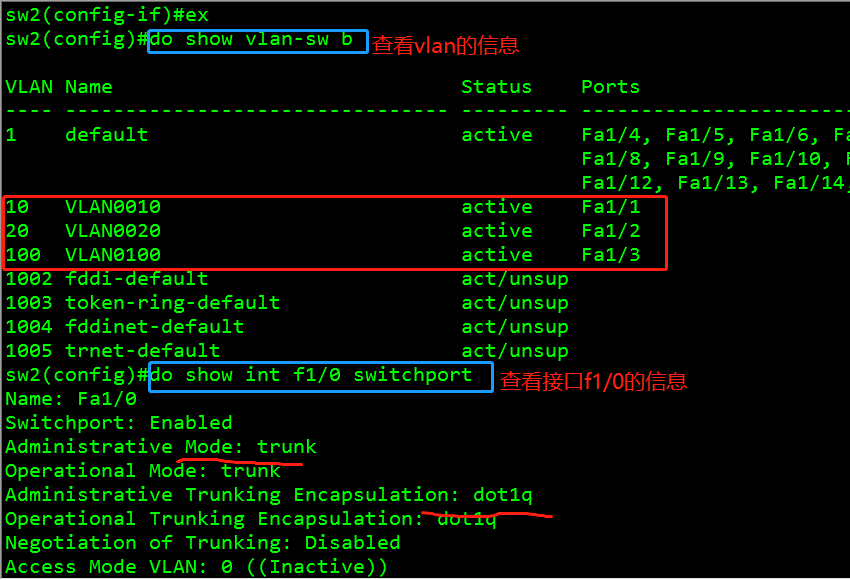
sw2(config)#do show vlan-sw. b. View VLAN information
...
sw2(config)#do show int f1/0 switch port View f1/0 interface information
sw2(config)#no ip routing closes the routing function of Layer 2 switch

(3) Double-click to open the gateway and vlan of sw1 to set up Layer 3 Switch
Create three VLAN 10, 20, 100
Set f1/0 interface to trunk link
Setting the gateway subnet mask of VLAN 10 192.168.10.1 255.255.255.0
Setting up VLAN 20 gateway subnet mask 192.168.20.1 255.255.255.0
Setting up VLAN 100 gateway subnet mask 192.168.100.1 255.255.255.0
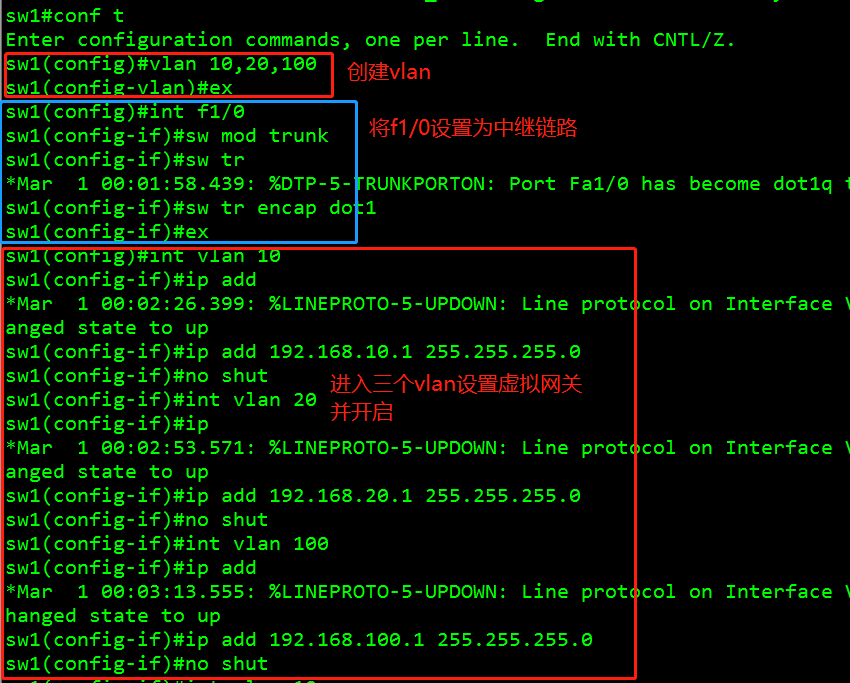
1. Create vlan and set interface f1/0 as relay link, and enter vlan to set up corresponding virtual gateway and open it.
sw1(config)#vlan 10, 20, 100 Create three VLANs
sw1(config-vlan)#Exit
sw1(config)#int f1/0 Access Interface f1/0
sw1(config-if)#switch mod trunk is set to trunk link
sw1(config-if)#switch trunk encapsulation dot1q
sw1(config-if)#Exit
sw1(config)#int vlan 10 * Enter vlan 10
sw1(config-if)#ip add 192.168.10.1 255.255.255.0 Set up the gateway and subnet mask of VLAN 10
sw1(config-if)#no shut Open vlan10
sw1(config-if)#ex
sw1(config)#int vlan 20. Set vlan 20
sw1(config-if)#ip add 192.168.20.1 255.255.255.0
sw1(config-if)#no shut
sw1(config-if)#ex
sw1(config)#int vlan 100. Set vlan 100
sw1(config-if)#ip add 192.168.100.1 255.255.255.0
sw1(config-if)#no shut
2. Configure dhcp relay service
sw1#conf. t. Enter global mode
sw1(config)#int vlan 10. Setting up DHCP relay in gateway
sw1(config-if)#ip helper-address 192.168.100.100
sw1(config-if)#no shut
sw1(config-if)#ex
sw1(config)#int vlan 20
sw1(config-if)#ip helper-address 192.168.100.100
sw1(config-if)#no shut
sw1(config-if)#ex
sw1(config)#int vlan 100
sw1(config-if)#ip helper-address 192.168.100.100
sw1(config-if)#no shut

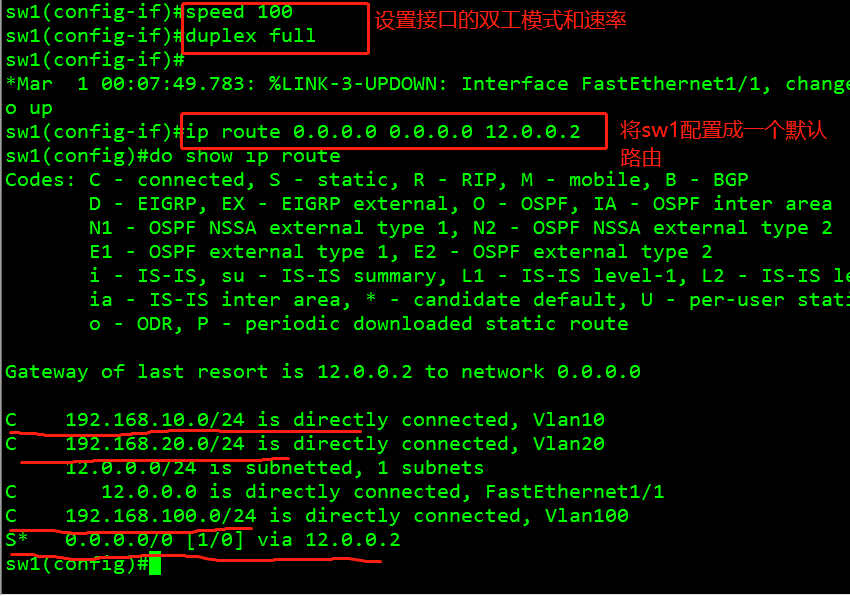
3. Set the three-tier port of interface f1/1, configure address, set duplex mode and speed, and configure sw1 as a default route
sw1#conf. t. Enter global mode
sw1(config)#int f1/1 Setting IP of Interface
sw1(config-if)#no switchport
sw1(config-if)#ip add 12.0.0.1 255.255.255.0
sw1(config-if)#speed 100 Setting Rate
sw1(config-if)#Duplex full setting duplex mode
sw1(config)ip route 0.0.0.0 0.0.0.0 12.0.0.2  Configuration for default routing

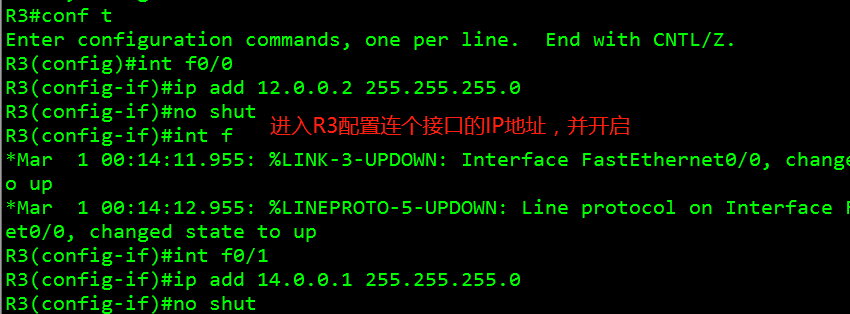
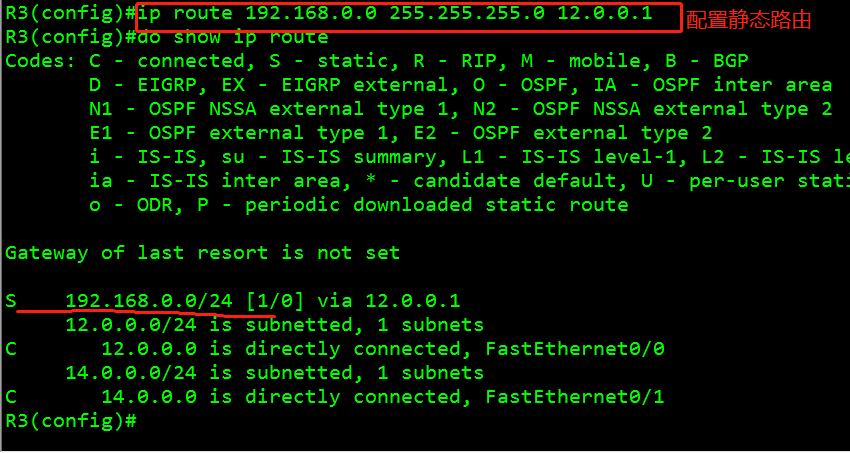
(4) Double-click to enter R3 router settings, configure interface addresses, and set R3 router as static routing
sw1#conf. t. Enter global mode
sw1(config)#ip route 192.168.0.0.0 255.255.255.0 12.0.0.1 Set up a static route
(5) Install DHCP service on Linux system with vmnet8 of NAT network mode first
1. Download dhcp service and DNS service using yum warehouse
[root@localhost~]# yum install dhcp-y install DHCP service
[root@localhost~]# yum install bind-y] Install DNS Service


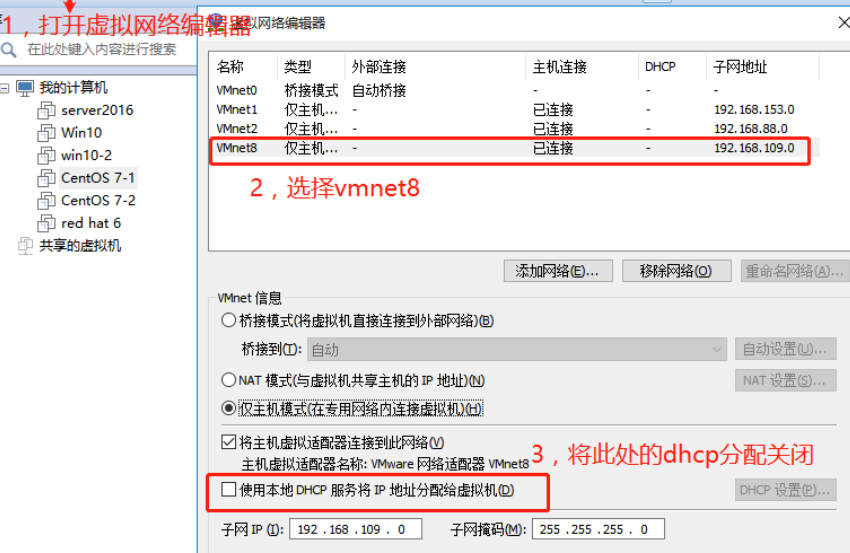
2. After installation, switch vmnet1, 2, 8 to host-only mode. Modify vmnet8 to host-only mode in the network virtual editor on the virtual machine and shut down the local dhcp automatic allocation.
(6) Configuring the dhcp server of Linux system
First, change the ip of the Linux system to a static address
[root@localhost~] # vim/etc/sysconfig/network-scripts/ifcfg-ens33] Set the network card information of ens33 to set a static IP address
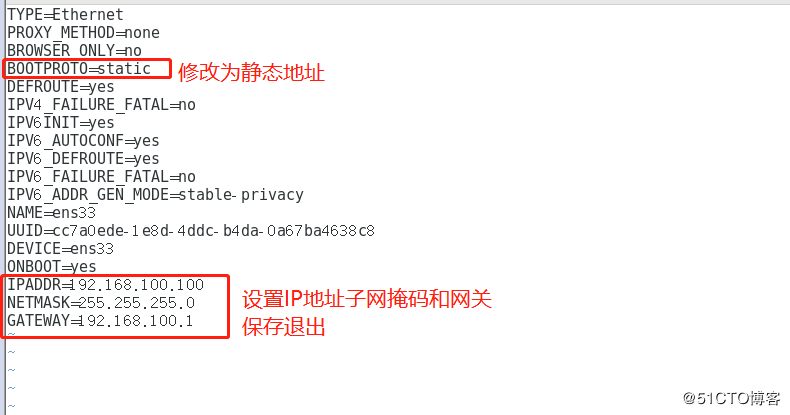
[root@localhost~]# system CTL restart network.service] Restart network services
[root@localhost~]# ifconfig] View the current network card information

2. Copy a template of the dhcp configuration file to the / etc directory
[root@localhost~] cp/usr/share/doc/dhcp-4.2.5/dhcpd.conf.example/etc/dhcp/dhcpd.conf] Copy a DHCP configuration file template to etc
[root@localhost~]# vim/etc/dhcp/dhcpd.conf] Set the DHCP configuration file
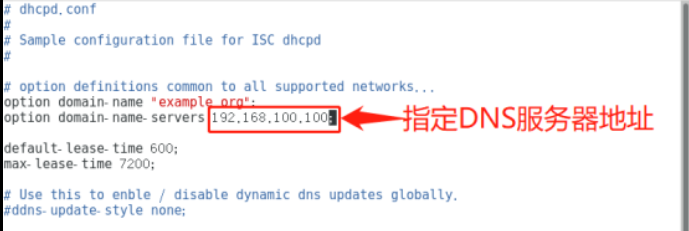
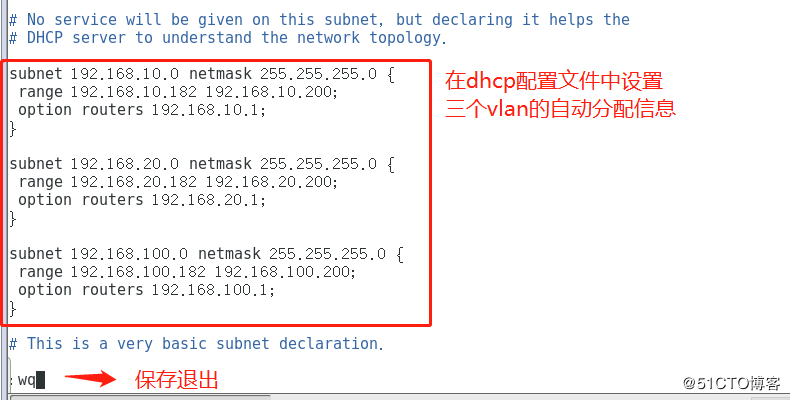
[root@localhost ~]# system CTL start dhcpd * Open dhcp service
[root@localhost~]# system CTL status dhcpd] View dhcp service status information

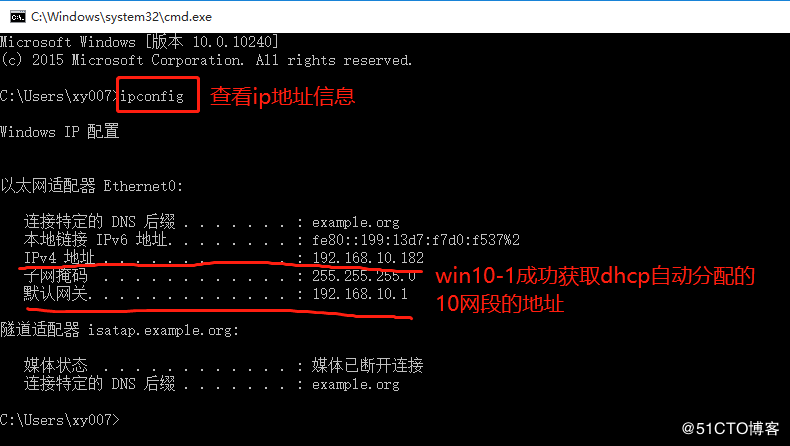
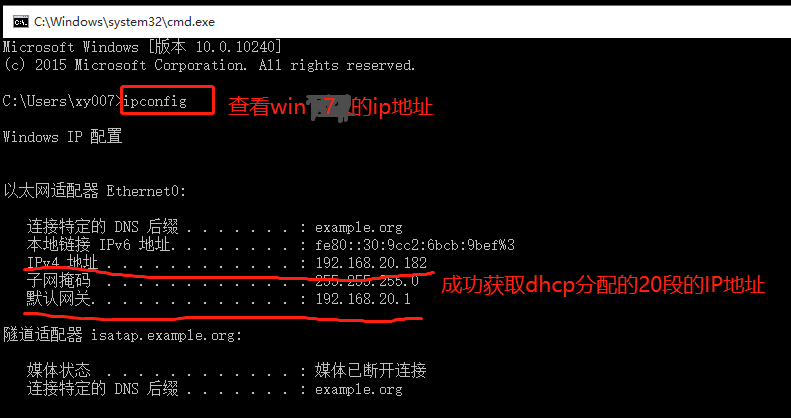
(7) Getting DHCP automatically assigned addresses in win10 and win7 clients
1. Open the network of two clients and change to automatically get IP addresses
2. Open the cmd command, enter the command ipconfig, view the ip address, and get it successfully.
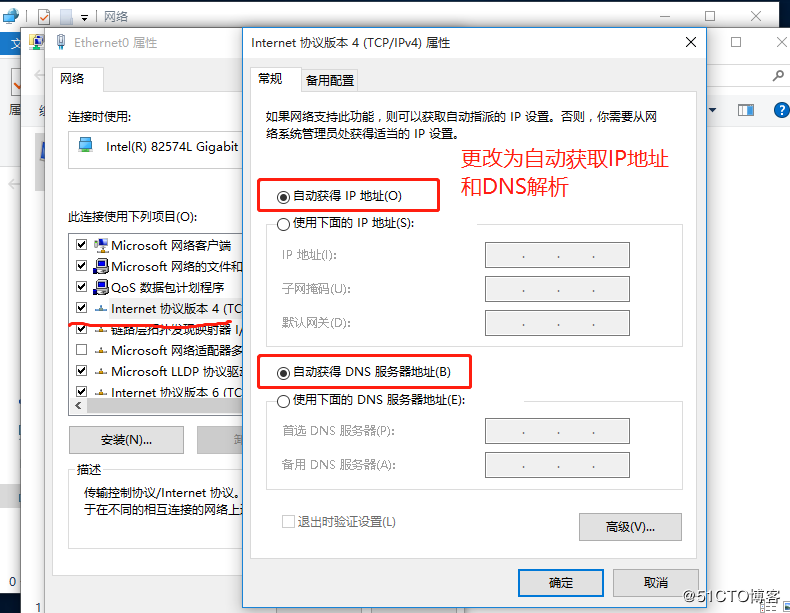
(8) Configuration files for DNS
1. Configure the global configuration file
[root@localhost~]# rpm-qc bind] View software configuration file information
[root@localhost~]# vim/etc/named.conf] Go into the main file for configuration
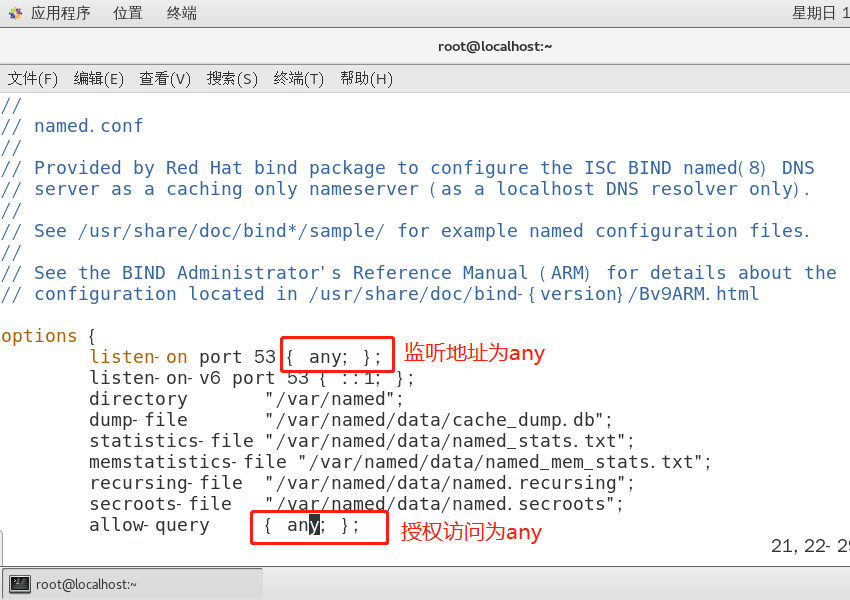
2. Enter the area "vim/etc/named.rfc1912.zones configuration file"
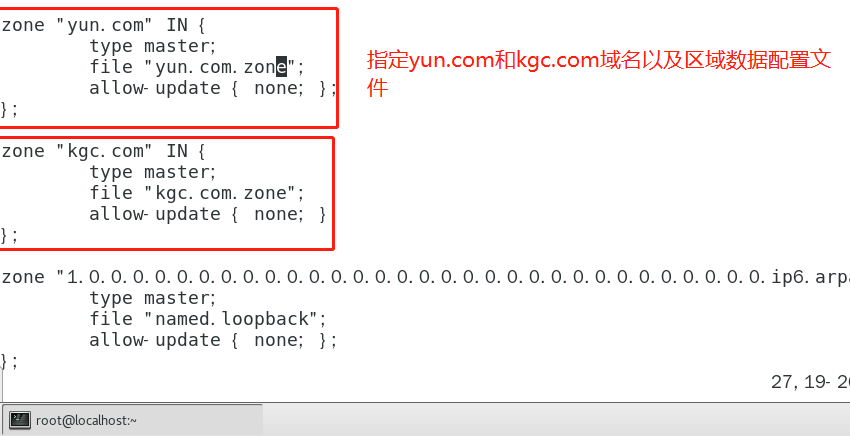
3. Configuration data configuration file (kgc.com.zone yun.com.zone)
[root@localhost ~]#Switch directory to / var/named
[root@localhost named]#cp-p named.localhost kgc.com.zone The replication template is kgc.com.zone
[root@localhost named]#Configuration of vim kgc.com.zone
[root@localhost named]#cp-p kgc.com.zone yun.com.zone Copy a kgc.com.zone as the cloud data configuration file
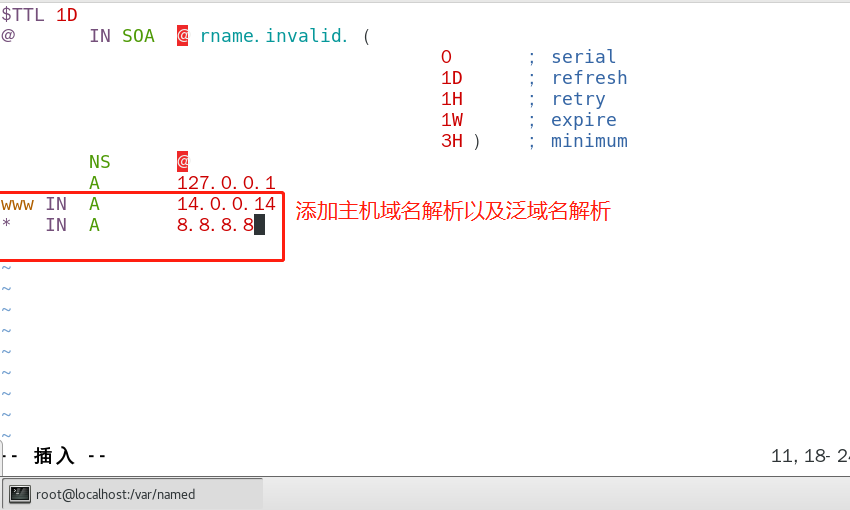
4. Close the firewall and start the dns parsing service

5. Use parsing on the client to see if the parsing is successful
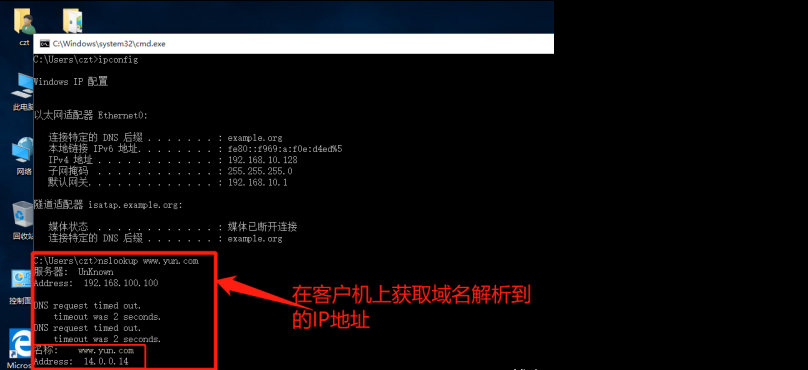
(9) Build two websites kgc.com yun.com on server 2016
1. Set the server server server address and gateway to 14.0.0.14 and 14.0.0.1
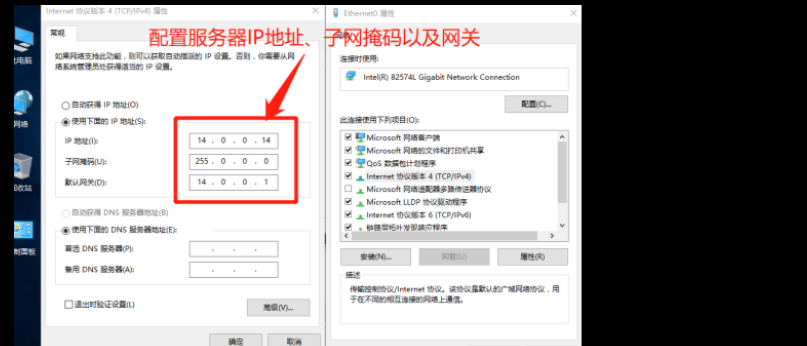
2. Install web server
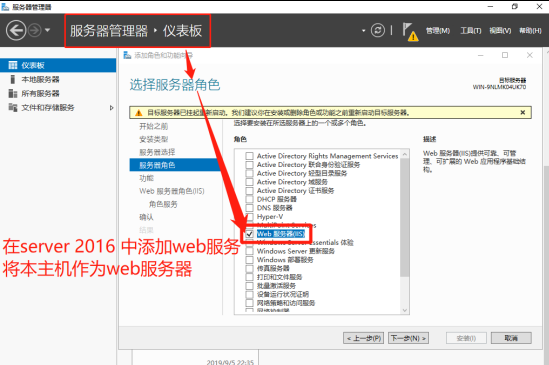
3. Create two websites and edit their content
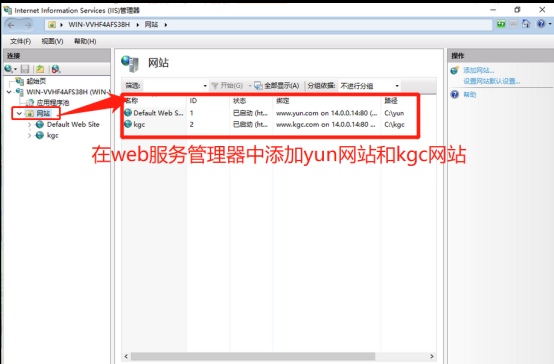
4. Use win7 or win10 to access the website created by the server to see if it can be accessed through domain name resolution.

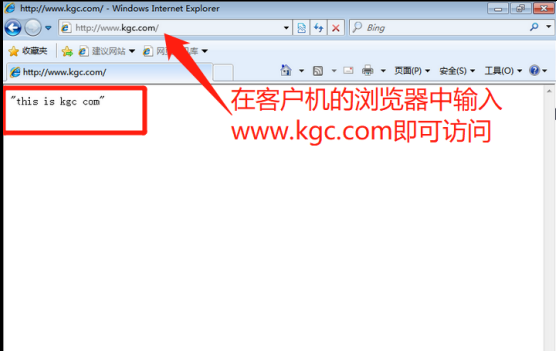
(10) Use the client to Ping the web server to see if it can interconnect the whole network.
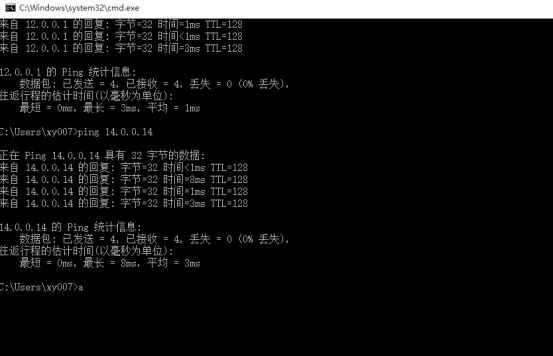
Successful experiment
Thank you for reading!!!