1. For the installation of bind 9, it is assumed that bind 9 has been installed through apt get
2. Enter the directory / etc/bind
3. Create a zone record file (similar to db.xxx): Here I create db.testlyhh.com
4. Edit the named.conf.default-zones file and add the following:
5. Edit our region record file db.testlyhh.com as follows:
- zone "testlyhh.com" {
- type master;
- file "/etc/bind/db.testlyhh.com"; #Indicates the location of the zone record file
- };
[before that, we should first popularize a little knowledge: the complete domain name of www.baidu.com should be like this, www.baidu.com. Finally, another small dot stands for the root domain name:
baidu.com. Represents the domain
WWW is actually a host in baidu.com. Domain. Its name is www
So the following configuration aaa, bbb and ccc are all hosts. We have specified the alias of ccc host, which is also called bbb
For details, please refer to the above: DNS resolution process
]
6. Edit the file named.conf.options to provide dns services for other machines in the LAN (modify the listen on statement of option):
- $TTL 604800
- @ IN SOA testlyhh.com. root.localhost. (
- 1 ; Serial
- 604800 ; Refresh
- 86400 ; Retry
- 2419200 ; Expire
- 604800 ) ; Negative Cache TTL
- ;
- @ IN NS localhost.
- testlyhh.com IN NS 192.168.1.108
- aaa IN A 192.168.1.108
- bbb IN A 192.168.1.108
- ccc IN CNAME bbb
After configuration, restart the service:
- //acl "trusted" {
- // 127.0.0.1; # ns1 - can be set to localhost
- // 192.168.1.108; # ns2
- //};
- options {
- directory "/var/cache/bind";
- //Recursion yes; enable recursion addressing
- //Allow recursion {trusted;}; ා allow "trusted" list to recursively address
- listen-on port 53 {127.0.0.1;192.168.1.108; }; #Fill in the intranet IP address of ns1 here. Monitor on Intranet only
- allow-transfer { none; }; #zone transfer is disabled by default
- // If there is a firewall between you and nameservers you want
- // to talk to, you may need to fix the firewall to allow multiple
- // ports to talk. See http://www.kb.cert.org/vuls/id/800113
- // If your ISP provided one or more IP addresses for stable
- // nameservers, you probably want to use them as forwarders.
- // Uncomment the following block, and insert the addresses replacing
- // the all-0's placeholder.
- // forwarders {
- // 0.0.0.0;
- // };
- //========================================================================
- // If BIND logs error messages about the root key being expired,
- // you will need to update your keys. See https://www.isc.org/bind-keys
- //========================================================================
- dnssec-validation auto;
- auth-nxdomain no; # conform to RFC1035
- listen-on-v6 { any; };
- };
Show me the contents of my / etc/bind Directory:
- service bind9 restart

7. Next, let's see if the DNS configuration is effective. First, indicate our bind9 server address on the ubuntu local machine:
You need to edit the file / etc/resolv.conf, and add a line before the beginning of nameserver to indicate the domain name:
- # Dynamic resolv.conf(5) file for glibc resolver(3) generated by resolvconf(8)
- # DO NOT EDIT THIS FILE BY HAND -- YOUR CHANGES WILL BE OVERWRITTEN
- nameserver 192.168.1.108
- #nameserver 127.0.1.1
- search DHCP HOST
Next, ping aaa.testlyhh.com:
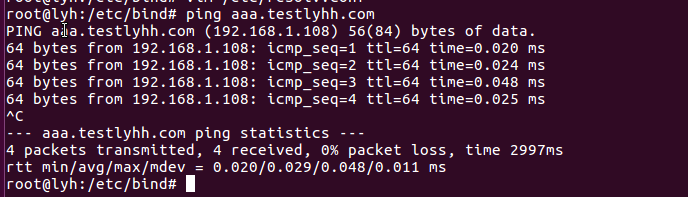
Configuration of this domain name succeeded.
Reprinted at: http://blog.csdn.net/lyhDream/article/details/77620932