1, pod life cycle
- A Pod can contain multiple containers in which applications run. At the same time, a Pod can also have one or more containers
Multiple Init containers started before the application container. - The Init container is very similar to an ordinary container, except for the following two points:
- They always run to completion.
- Init containers do not support Readiness because they must run before the Pod is ready.
Each Init container must run successfully before the next one can run.
- If the Init container of the Pod fails, Kubernetes will restart the Pod continuously until the Init container is full
Until the device succeeds. However, if the restart policy value corresponding to Pod is Never, it will not restart
Start.
What can the Init container do?
• the Init container can contain some utilities or personalizations that do not exist in the application container during installation
code.
• the Init container can safely run these tools to avoid the security of application images caused by these tools
Lower.
• the creator and deployer of the application image can work independently without the need to jointly build one
Separate application images.
• the Init container can run in a file system view different from the application container in the Pod. Therefore, the Init container
Can have access to Secrets, but the application container cannot.
• since the Init container must run before the application container starts, the Init container provides a
A mechanism to block or delay the start of the application container until a set of prerequisites are met. Once before
If the conditions are met, all application containers in the Pod will start in parallel.
example
Create init YML file, init The configuration in yaml is applied to pod
vim init.yml

apiVersion: v1
kind: Pod
metadata:
  name: myapp-pod
  labels:
    app: myapp
spec:
  containers:
  - name: myapp-container
    image: busyboxplus
    command: ['sh', '-c', 'echo The app is running! && sleep 3600']
  initContainers:
  - name: init-myservice
    image: busyboxplus
    command: ['sh', '-c', "until nslookup myservice.default.svc.cluster.local; do echo waiting for myservice; sleep 2; done"]
  - name: init-mydb
    image: busyboxplus
    command: ['sh', '-c', "until nslookup mydb.default.svc.cluster.local; do echo waiting for mydb; sleep 2; done"]

kubectl apply -f init.yaml
Show running pod s

Join service
vim init.yml

apiVersion: v1
kind: Pod
metadata:
  name: myapp-pod
  labels:
    app: myapp
spec:
  containers:
  - name: myapp-container
    image: busyboxplus
    command: ['sh', '-c', 'echo The app is running! && sleep 3600']
  initContainers:
  - name: init-myservice
    image: busyboxplus
    command: ['sh', '-c', "until nslookup myservice.default.svc.cluster.local; do echo waiting for myservice; sleep 2; done"]
  - name: init-mydb
    image: busyboxplus
    command: ['sh', '-c', "until nslookup mydb.default.svc.cluster.local; do echo waiting for mydb; sleep 2; done"]

---
apiVersion: v1
kind: Service
metadata:
  name: myservice
spec:
  ports:
  - protocol: TCP
    port: 80
    targetPort: 9376
---
apiVersion: v1
kind: Service
metadata:
  name: mydb
spec:
  ports:
  - protocol: TCP
    port: 80
    targetPort: 9377
Set init The configuration in yaml is applied to the pod, displayed and initialized
kubectl apply -f init.yaml
kubectl get pod

Delete pod
2, Probe
Introduction:
The probe is a periodic diagnosis of the container performed by kubelet:
• ExecAction: execute the specified command in the container. If the command code is 0, it will be returned
For successful diagnosis.
• TCPSocketAction: TCP checks the IP address of the container on the specified port. If
If the port is open, the diagnosis is considered successful.
• HTTPGetAction: execute HTTP on the IP address of the container on the specified port and path
Get request. If the status code of the response is greater than or equal to 200 and less than 400, the diagnosis is considered
successful.
Each probe will obtain one of the following three results:
• success: the container passed the diagnosis.
• failed: the container failed the diagnosis.
• unknown: the diagnosis failed, so no action will be taken.
Kubelet can choose whether to execute and respond to three probes running on the container:
• livenessProbe: indicates whether the container is running. If the survival probe fails, kubelet
Will kill the container and the container will be affected by its restart policy. If the container does not provide survivability
Needle, the default status is Success.
• readinessProbe: indicates whether the container is ready for service requests. If the ready probe fails, the end
The point controller will delete the IP address of the Pod from the endpoints of all services matching the Pod.
The ready state before the initial delay defaults to Failure. If the container does not provide a ready probe, default
Recognize the status as Success.
• startupProbe: indicates whether the application in the container has been started. If a start probe is provided
(startup probe), all other probes are disabled until it succeeds. If the probe is started
If it fails, kubelet will kill the container, and the container will restart according to its restart policy. If the container does not
If start detection is provided, the default status is Success.
Restart strategy
• there is a restartPolicy field in PodSpec, and the possible values are Always, OnFailure and
Never. The default is Always.
Pod's life
• generally, Pod will not disappear until they are artificially destroyed, which may be a person or controller.
• it is recommended to create an appropriate controller to create the Pod instead of creating the Pod yourself. Because alone
Pod can not recover automatically in case of machine failure, but the controller can.
• three available controllers:
• use job to run Pod that is expected to terminate, such as batch calculation. Job is only applicable to restart policy
Pod with OnFailure or Never.
• use ReplicationController, ReplicaSet, and for pods that are not expected to terminate
Deployment, such as a Web server. ReplicationController is only available with
There is a Pod with restartPolicy of Always.
• provide machine specific system services and run a Pod for each machine using the DaemonSet.
Example 1: livenessProbe survival probe
Establish pod and yaml (pod.yml can also be used) documents
apiVersion: v1
kind: Pod
metadata:
  name: pod-example
spec:
#  hostNetwork: true
#  nodeName: server4
  #imagePullSecrets:
  containers:
  - name: myapp
    image: myapp:v1
    imagePullPolicy: IfNotPresent
    resources:
      requests:
        cpu: "100m"
        memory: "50Mi"
      limits:
        cpu: "200m"
        memory: "100Mi"
    ports:
      - containerPort: 80
        hostPort: 80
    livenessProbe:
      tcpSocket:
        port: 80
      initialDelaySeconds: 1
      periodSeconds: 3
      timeoutSeconds: 1
First set the retrieved port LivenessProbe Port to 8080
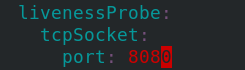
Run and view the pod
kubectl apply -f pod.yaml
kubectl get pod -w
Because the port is open at 80, it is not detected that port 8080 is open, so the pod will be restarted all the time, the container will be deleted, and the configuration port will be changed to 80

Rerun pod,yaml, and display as running

Example 2: readinessProbe example of ready probe (with svc)
apiVersion: v1
kind: Pod
metadata:
  name: pod-example
spec:
#  hostNetwork: true
#  nodeName: server4
  #imagePullSecrets:
  containers:
  - name: myapp
    image: myapp:v1
    imagePullPolicy: IfNotPresent
    resources:
      requests:
        cpu: "100m"
        memory: "50Mi"
      limits:
        cpu: "200m"
        memory: "100Mi"
    ports:
      - containerPort: 80
        hostPort: 80
#  - name: busybox
#    image: busybox:latest
#    imagePullPolicy: IfNotPresent
#    tty: true
#    stdin: true
    livenessProbe:
      tcpSocket:
        port: 80
    readinessProbe:
      httpGet:
        path: /test.html
        port: 80
      initialDelaySeconds: 1
      periodSeconds: 3
      timeoutSeconds: 1
Run pod Yaml file and view it. status is not in ready state

At this point, we are in the resource list pod Add labels to yaml
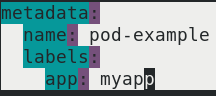
Reset init The configuration in yaml is applied to pod

Create an SVC In yaml resource list, the tag of service selection is the tag of pod example above
vim svc.yaml

apiVersion: v1
kind: Service
metadata:
  name: mysvc
spec:
  ports:
  - protocol: TCP
    port: 80
    targetPort: 80
  selector:
    app: myapp
Reset SVC The configuration in yaml is applied to the service

Describe service
kubectl describe svc mysvc
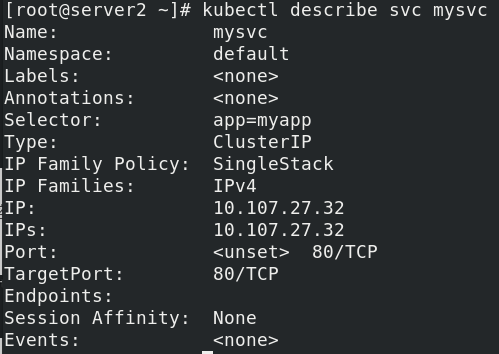
Enter the container and create test HTML satisfies the above ready state probe
kubectl exec pod-example -i -t -- sh
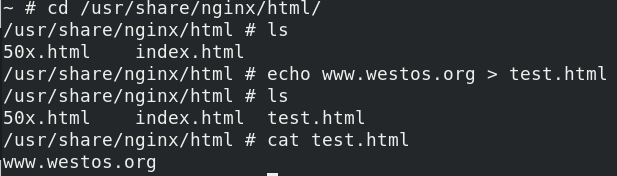
ctrl+d returns, and you can see that pod example is ready

mysvc's endpoints also have the ip of pod example
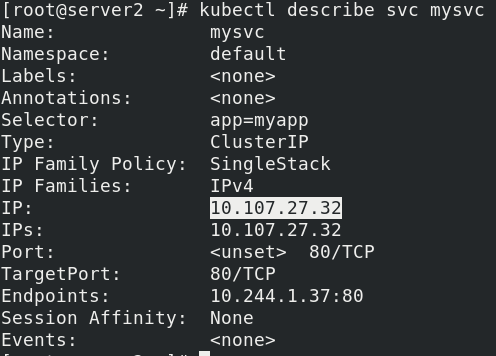
Visit curl 10.107.27.32/test.com html

3, Controller
Pod classification:
• autonomous Pod: the pod will not be created after exiting
• Pod managed by the controller: maintain the number of copies of the Pod throughout the life cycle of the controller
Controller type:
• Replication Controller and ReplicaSet
• Deployment
• DaemonSet
• StatefulSet
• Job
• CronJob
• full name of HPA: Horizontal Pod Autoscaler
Replication Controller and ReplicaSet
• ReplicaSet is the next generation of Replication Controller, which is officially recommended.
• the only difference between ReplicaSet and Replication Controller is selector support, ReplicaSet
Support new set based selector requirements.
• ReplicaSet ensures that a specified number of Pod replicas are running at any time.
• although ReplicaSets can be used independently, today it is mainly used by Deployments to coordinate Pod creation
Create, delete and update mechanisms.
Deployment
• Deployment provides a declarative definition method for Pod and ReplicaSet.
• typical application scenarios:
- Used to create Pod and ReplicaSet
- Rolling update and rollback
- Expansion and contraction
- Pause and resume
DaemonSet
• the daemon set ensures that a copy of a Pod is running on all (or some) nodes. When there is a festival
When you click to join the cluster, you will also add a Pod for them. When a node is removed from the cluster, these
Pod will also be recycled. Deleting a DaemonSet will delete all pods it creates.
• typical usage of daemset:
• run the clustered storage DaemonSet on each node, such as glusterd, ceph.
• run the log collection DaemonSet on each node, such as fluent D and logstash.
• run monitoring DaemonSet on each node, such as Prometheus Node
Exporter, zabbix agent, etc
• a simple usage is to start a daemon set on all nodes, which will be used as each node
Type of daemon.
• a slightly more complex usage is to use multiple daemonsets for each daemon type separately,
However, it has different flags, and has different memory and CPU requirements for different hardware types.
Instance 1: ReplicaSet
The purpose of ReplicaSet is to maintain a stable set of Pod replicas that are running at any time. Therefore, it is usually used to ensure the availability of a given number of identical pods.
vim rs.yaml

apiVersion: apps/v1
kind: ReplicaSet
metadata:
  name: replicaset-example
spec:
  replicas: 3
  selector:
    matchLabels:
      app: myapp
  template:
    metadata:
      labels:
        app: myapp
    spec:
      containers:
      - name: myapp
        image: myapp:v1
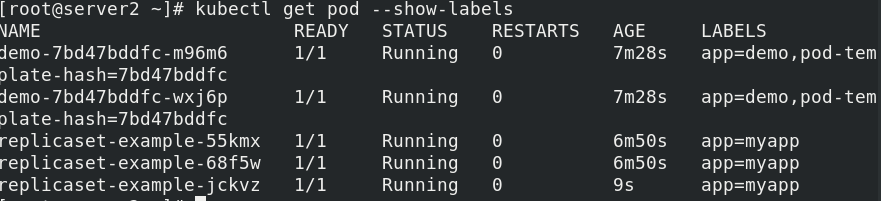
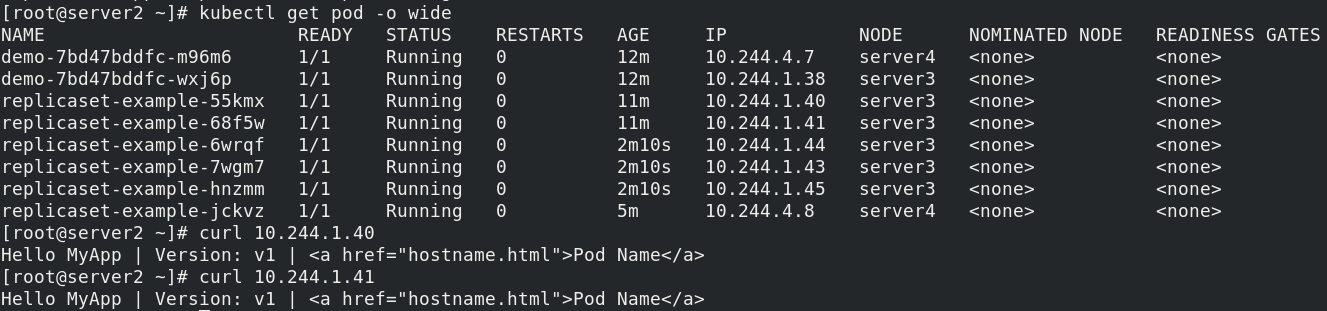
Run rs.yaml to view the display label

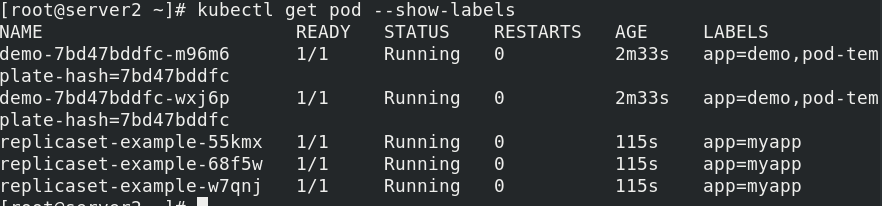
Change the label of one of the containers
kubectl label pod replicaset-example-w7qnj app=nginx --overwrite
Delete a pod with app=myapp and app=nginx. You can see the deletion, but the container with app=nginx has not been created
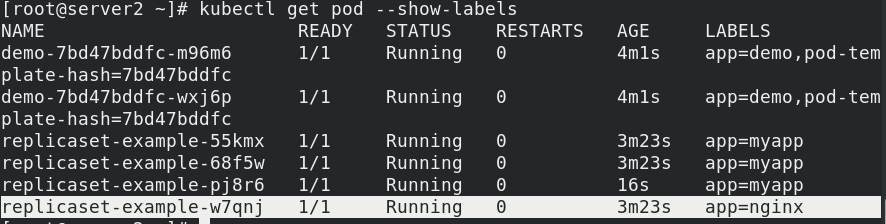
Specify the number of copies, from 3 to 6
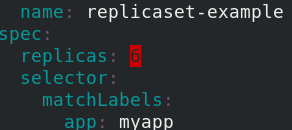
Reapplying the configuration to the pod, you can see that three more copies have been generated
If you change the version from v1 to v2

After closing, re apply the configuration to the Pod and query the replica ip. It can be seen that ReplicaSet ensures that a specified number of Pod replicas are running at any time without updating your version
Example 2: Deployment example
vim deployment.yaml

apiVersion: apps/v1
kind: Deployment
metadata:
  name: deployment
  labels:
    app: myapp
spec:
  replicas: 3
  selector:
    matchLabels:
      app: myapp
  template:
    metadata:
      labels:
        app: myapp
    spec:
      containers:
      - name: myapp
        image: myapp:v1
Running and viewing, we can see that Deployment is a more advanced concept. It manages ReplicaSet and provides declarative updates and many other useful functions to Pod

Modify the version myapp:v2. After closing, re apply the configuration to the pod and query the replica ip
Example 3: DaemonSet
Some typical uses of DaemonSet
Run the cluster daemon on each node
Run the log collection daemon on each node
Run the monitoring daemon on each node
Create DaemonSet
vim daemonset-example.yaml

apiVersion: apps/v1
kind: DaemonSet
metadata:
  name: daemonset-example
  labels:
    k8s-app: nginx
spec:
  selector:
    matchLabels:
      name: nginx
  template:
    metadata:
      labels:
        name: nginx
    spec:
      containers:
      - name: nginx
        image: nginx
Run and view

Example 3: Jobs
The Job will create one or more Pods and will continue to retry the execution of Pods until the specified number of Pods are successfully terminated. With the successful completion of Pods, the Job tracks the number of successfully completed Pods. When the number reaches the specified threshold number of successes, the task (i.e. Job) ends. Deleting a Job will clear all Pods created. Suspending a Job will delete all active Pods of the Job until the Job is resumed again.
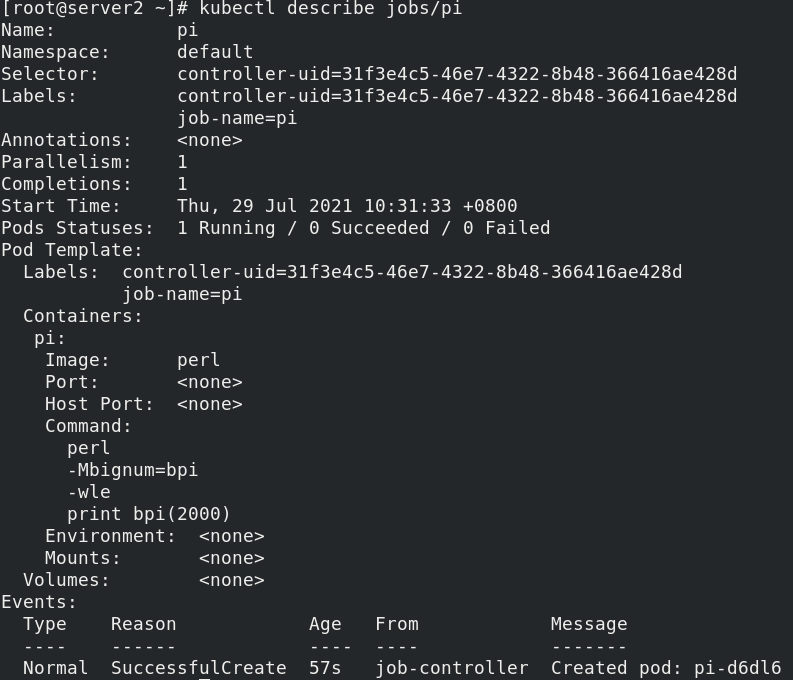
Create a Job Yaml file, run to check the Job
vim job.yaml

apiVersion: batch/v1
kind: Job
metadata:
  name: pi
spec:
  template:
    spec:
      containers:
      - name: pi
        image: perl
        command: ["perl",  "-Mbignum=bpi", "-wle", "print bpi(2000)"]
      restartPolicy: Never
  backoffLimit: 4

kubectl apply  -f job.yaml
kubectl describe jobs/pi