Linux deploy - (2) installation and configuration of pagoda panel
The last article talked about how to install linux deploy and install linux distribution in it. The following describes how to install and configure the pagoda panel and build a basic server environment
Pagoda panel is a free server management platform. You can install it on your server, and then you can easily manage your server and build various service platforms. This is about the installation on Android Linux deploy platform. On x86 platform, there is basically no problem and it is very simple. It can be done with one line of command.
IPv6 + Linux deploy + root is a perfect server
prerequisite
- You have installed linux deploy and installed a linux distribution, preferably ubuntu bionic, which I personally use
- This distribution system has been matched with the domestic software source, and the software can be updated. It's slow if you don't change domestic sources. Do not install other software first
- You'd better have a public ip address, ipv6 is OK, otherwise you can only play on the intranet
Let's start
Install pagoda panel
- ssh login to linux distribution
- Ordinary users use sudo to execute the installation command, or use su to switch to the root user to execute the command. They must use the root authority to execute the command. After execution, wait for the installation to complete. This process takes about half an hour
The order is as follows,
Centos Installation command:
yum install -y wget && wget -O install.sh http://download.bt.cn/install/install_6.0.sh && sh install.sh

Ubuntu/Deepin Installation command:
wget -O install.sh http://download.bt.cn/install/install-ubuntu_6.0.sh && sudo bash install.sh

Debian Installation command:
wget -O install.sh http://download.bt.cn/install/install-ubuntu_6.0.sh && bash install.sh

Fedora Installation command:
wget -O install.sh http://download.bt.cn/install/install_6.0.sh && bash install.sh
After installation, you will return to the link and user name and password of the web management interface. You can access the pagoda interface by using the browser to access the link. It is recommended to use the following solutions to unexpected situations, modify the default user name and password and lift the entry restrictions, so as to facilitate login. It is slow to change these things in the web interface
Unexpected situation
At the end of the installation, the ssh session may be closed. If you rewrite the connection, you will find that the installation is complete and the bt process has been started, but you don't know the port, user name and password
Solution: execute the command sudo bt, that is, start the bt process. The results are as follows: do it again on 5, 6, 11, 12, 13 and 16, and then select 1 to restart the panel. At this time, the default web interface port is 8888. Use the browser to access your IP address: 8888 to see the web management login interface
ubuntu@VM-4-3-ubuntu:~$ sudo bt
===============Pagoda panel command line==================
(1) Restart panel service           (8) Change panel port
(2) Stop panel service           (9) Clear panel cache
(3) Launch panel service           (10) Clear login restrictions
(4) Reload panel service           (11) Remove entry restrictions
(5) Modify panel password           (12) Remove domain name binding restrictions
(6) Modify panel user name         (13) cancel IP Access restrictions
(7) Forced modification MySQL password      (14) View panel default information
(22) Display panel error log      (15) Clean up system garbage
(23) close BasicAuth authentication     (16) Repair panel(Check for errors and update the panel file to the latest version)
(24) Turn off Google authentication          (17) Set whether log cutting is compressed
(25) Sets whether to save a historical copy of the file  (18) Set whether to automatically back up the panel
(0) cancel
===============================================
Please enter the command number:
Installation base environment
lnmp: NGINX+MySQL+PHP
lamp: Apache+MySQL+PHP
After logging into the web interface, it will let you choose the environment lnmp or lamp
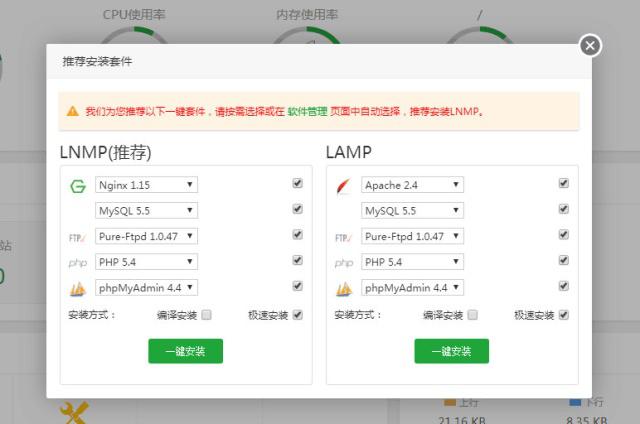
According to my own preferences, I choose lnmp for nginx. The installation method is very fast installation. It's best not to choose compilation. The installation is slow. Here's the point. The following is my own practical experience. PHP version 7.2 is better to install and supports more software. More importantly, it won't report any errors, and the default PHP5 6. There will be some hard to solve errors in this system. phpmyadmin installs the latest version. If it can't be installed in the end, you can choose the latest version in the software store. Pure FTP seems to be useless here. Because it's not used much, it doesn't solve this problem. It seems to be a permission problem. Select a good click to install, and then wait a long time for him to install.
debug, troubleshooting
I:
After the installation, you will find that NGINX and php are running normally, while MySQL and phpmyadmin cannot be started or have no effect
View MySQL log and find
Failed to create a socket for IPv4 '0.0.0.0': errno: 13.
Main idea: failed to create ipv4 socket (ipv4 network communication interface), error No. 13
Reason: it took a long time to find the correct answer given by a great God on the Internet, and the authority is insufficient
Solution: execute the following command to add network and network read permissions to mysql users
sudo usermod -a -G aid_inet,aid_net_raw mysql
There is no problem starting mysql again
II:
Since mysql has not started phpmyadmin before, it cannot be configured successfully. You need to reset the root password in the database on the pagoda panel, and then log in phpmyadmin to use it to manage database data
3: If the website deployed on the mount directory with one click cannot be configured successfully, you will be prompted with access deleted,
Reason: www and root users do not have permission to read external storage
Use the following command to solve the problem
sudo usermod -a -G aid_sdcard_rw www
sudo usermod -a -G aid_sdcard_rw root
It is not recommended to hang the website on the mount directory, because the system is always unable to obtain the file write permission of the mount directory. This is why in the first article, I suggested that the storage space should be allocated more. Don't expect to mount the directory. The mounted directory is just a shared file
4: An error may be reported when starting php
Failed loading /usr/local/zend/php56/ZendGuardLoader.so: /usr/local/zend/php56/ZendGuardLoader.so: cannot open shared object file: No such file or directory
Although my report will be wrong, it has no impact. The online solution is invalid. I have tried many methods, and none of them has a positive solution.
In fact, there are still many problems. It's a little far away. I can't remember. Write it down when I encounter it.
If there is no problem, you can use the pagoda panel to deploy your website,
When deploying the website, the domain name can be filled in freely, and the port must be unique
You can't start installing docker here. You can't solve the problem after looking for many stickers