Distributed storage Ceph
1: Classification of storage
1. Local file system
ntfs(windows),ext2,ext3,ext4,xfs
ext2 does not have logs, 3 and 4 have logs: the log function of the file system (to prevent the machine from suddenly powering down): all data will be saved in the log of the file system before saving data to the disk, so as to prevent the data from not being saved after the machine suddenly powering down. In this way, it can also copy the data from the log to the disk again.
2. Network file system -- remote sharing
Non distributed
nfs network file system – called nas storage (Network Attached Storage)
Distributed
hdfs distributed network file system
glusterfs distributed network file system, no management server is required
ceph, distributed network file system, block storage, object storage
3. Characteristics of distributed file system
1. Shared file system. The smallest unit of sharing is the file
2. Strong scalability and security. Achieve petabyte level storage
4. Distributed file system storage architecture
be careful:
1. Distributed storage is not necessarily object storage. All object storage must be distributed storage
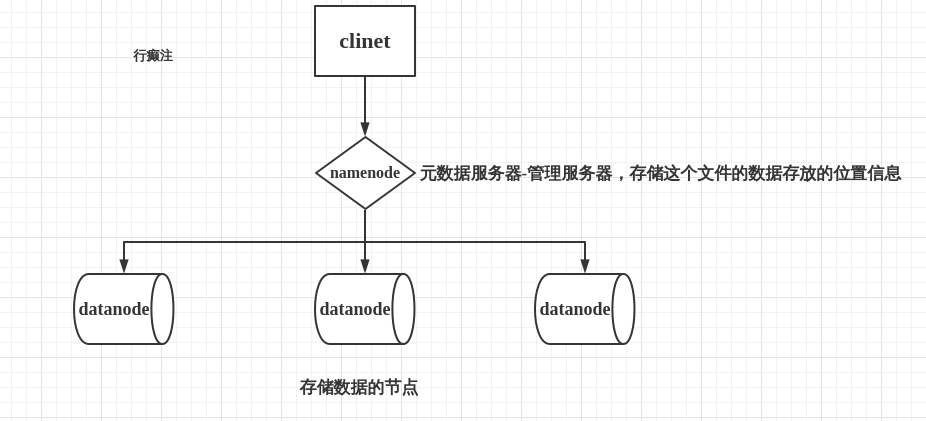
2. Location information of each data stored by the metadata server of the distributed file system
3. The metadata server of the object storage service stores the attribute information of the data
5. Non distributed file system
Typical devices: FTP, NFS server
In order to overcome the problem that block storage files cannot be shared, there is file storage. Installing FTP and NFS services on the server is file storage.
advantage:
The cost is low. Any machine can do it.
Facilitate file sharing.
Disadvantages:
Low read / write rate.
The transmission rate is slow.
Usage scenario:
Log storage.
File storage with directory structure.
6. Characteristics of distributed file system
Extensible
The distributed storage system can be extended to the cluster size of hundreds or even thousands of units, and the overall performance of the system increases linearly with the growth of the cluster size. The horizontal expansion of distributed storage has the following characteristics:
- After the node is expanded, the old data will be automatically migrated to the new node to achieve load balancing and avoid single point of failure;
- Horizontal expansion only needs to connect the new node and the original cluster to the same network, and the whole process will not affect the business;
low cost
The automatic fault tolerance and automatic load balancing mechanism of distributed storage system makes it possible to build it on an ordinary PC.
Easy to manage
The whole system can be configured and managed through a simple WEB interface, with simple operation and maintenance and very low management cost.
7. Block storage
Characteristics of block storage:
1. It is mainly used to map the raw disk space to the host, and the minimum shared unit is block
2. The switch used is optical fiber switch, which is expensive and costly
3. Best performance and good scalability
4. File system sharing is not allowed
The most typical is SAN(storage area network)(Storage area network)
There is a switch in a LAN. The switch is connected with servers. All servers are professional storage devices. They form a storage area network. When we use it, we only need to take space in this area network
Typical equipment: disk array, hard disk
advantage:
Data protection is provided by means of Raid and LVM.
Multiple cheap hard disks are combined to improve capacity.
A logical disk composed of multiple disks to improve reading and writing efficiency.
Disadvantages:
When the SAN architecture is adopted for networking, the optical fiber switch has high cost.
Data cannot be shared between hosts.
Usage scenario:
Virtual machine disk storage allocation.
Log storage.
file store.
8. Object storage
Why do you need object storage?
First, a file contains attributes (the term is metadata, metadata, such as the file size, modification time, storage path, etc.) and content (hereinafter referred to as data).
The object storage is independent of the metadata. The control node is called the metadata server (server + object storage management software), which is mainly responsible for storing the attributes of the object (mainly the information that the object data is scattered and stored in the distributed servers), while other distributed servers responsible for storing data are called OSD, It is mainly responsible for storing the data part of the file. When A user accesses an object, he will first access the metadata server. The metadata server is only responsible for feeding back the OSDs in which the object is stored. Assuming that the feedback file A is stored in three OSDs B, C and D, the user will directly access three OSD servers to read the data again. Since three OSDs transmit data externally at the same time, the transmission speed is accelerated. The greater the number of OSD servers, the greater the improvement of reading and writing speed. In this way, the purpose of fast reading and writing is realized.
On the other hand, object storage software has a special file system, so OSD is equivalent to a file server, so there is no difficulty in file sharing, and the problem of file sharing is also solved.
Therefore, the emergence of object storage combines the advantages of block storage and file storage.
advantage:
High speed read / write with block storage.
It has the characteristics of file storage and sharing.
Usage scenario: (suitable for updating data with less change)
Picture storage.
Video storage.
2: Common distributed storage (understand)
Hadoop HDFS
HDFS (Hadoop Distributed File System) is a distributed file system, an important part of hadoop ecosystem and a storage component in hadoop HDFS is a highly fault-tolerant system. HDFS can provide high-throughput data access, which is very suitable for applications on large-scale data sets.
-
Advantages of HDFS:
- High fault tolerance
Automatically save multiple copies of data
Automatically recover after a copy is lost - Good data access mechanism
Write once and read many times to ensure data consistency - Suitable for big data file storage
Terabytes, even petabytes of data
Strong scalability
- High fault tolerance
-
Disadvantages of HDFS:
- Massive small file access
The NameNode consumes a lot of memory - A file can only have one writer
Only append is supported
- Massive small file access
OpenStack object store Swift
OpenStack Object Storage (Swift) is one of the subprojects of OpenStack open source cloud computing project. Swift aims to use common hardware to build redundant and scalable distributed object storage clusters with a storage capacity of PB. Swift's is developed in Python
Its main features are:
1. All storage nodes are completely equal, which is a symmetrical system architecture.
2. No single point of failure: like object file storage, data will be stored in multiple copies. In the whole Swift cluster, no role is single point.
3. Without affecting the performance, the cluster expands by adding external nodes.
Swift can be used for the following purposes:
Picture and document storage
Long term saved log files
Store media libraries (photos, music, videos, etc.)
Summary: Swift is suitable for storing a large number of long-term objects that need to be backed up.
GlusterFS distributed file system
GlusterFS (GNU ClusterFile System) is a fully symmetric open source distributed file system. The so-called full symmetry means that GlusterFS adopts an elastic hash algorithm. There is no central node and all nodes are equal. GlusterFS has convenient configuration and good stability. It can easily reach PB capacity and thousands of nodes. It was acquired by red hat in 2011.
PB level capacity and high availability are based on file system level sharing and distributed decentralization
Type of glusgerfs storage volume
Basic types: stripe, copy, hash.
Sorting of various volumes
1. Distributed volume: when storing data, the files are randomly stored on the glusterfs machine.
Advantages: fast reading speed when storing data
Disadvantages: if a birck breaks, the file will be lost
2. Copy volume: when storing data, all files are stored on each glusterfs machine.
Advantages: for multiple backups of files, if one brick breaks, the file will not be lost, and there are backups on the bricks of other machines
Disadvantages: occupation of resources
3. Striped volume: when saving data, a file is stored separately on each glusterfs machine
Advantages: fast reading and writing speed for large files
Disadvantages: if a brick breaks, the file will break
3: Detailed explanation of ceph
Ceph introduction
Ceph is developed in C + + language. Sage Weil (publisher of Ceph paper) founded in 2011. INKBANK company leads the development and community maintenance of Ceph. In 2014, Redhat acquired INKBANK and released INKBANK Ceph Enterprise Edition (ICE) software, focusing on cloud, backup and archiving in business scenarios, supporting object storage, block storage and file system storage applications. Ceph open source community version and Redhat enterprise version appear.
The original intention of Ceph's main design is to become a unified distributed file system that can avoid single node failure, provide better performance, reliability and PB level scalability, and is an open source free software. Many integrated distributed file systems are developed based on Ceph.
Ceph characteristics
High scalability: support 10 ~ 1000 servers and TB to EB level expansion.
High reliability: no single point of failure, multiple data copies, automatic management and automatic repair.
High performance: balanced data distribution.
Basic storage system RADOS
Reliable, automated, and distributed object store, which is reliable, automated, and distributed object store. In fact, all user data stored in Ceph system is ultimately stored by this layer. Ceph's high reliability, high scalability, high performance, high automation and other characteristics are essentially provided by this layer.
Basic library librados
The function of this layer is to abstract and encapsulate RADOS, and provide APIs to the upper layer for application development directly based on RADOS. Since RADOS is an object storage system, the API implemented by librados is only for the object storage function. RADOS is a protocol that is difficult to access directly. Therefore, the upper RBD, RGW and CephFS are accessed through librados. At present, PHP, Ruby, Java, Python, C and C + + support are provided.
High level application interface
radosgw: object gateway interface (object store)
rbd: block storage
cephfs: file system
The function of storage is to provide an upper interface with a higher level of abstraction and more convenient for application or client based on the librados library
Basic components of Ceph
Ceph has three basic processes
-
OSD:
The full name of OSD is Object Storage Device, that is, the process responsible for returning specific data in response to client requests. A Ceph cluster usually has many OSDs. It is used to store all data and objects in the cluster. Handle the replication, recovery, backfilling and rebalancing of cluster data. And send heartbeat to other OSD daemons, and then provide Mon with some monitoring information.
When there are two copies of Ceph storage cluster configuration data (two copies in total), at least two OSD daemons, that is, two OSD nodes, are required for the cluster to reach the active+clean state -
MDS:
The full name of MDS is Ceph Metadata Server, which is the metadata service that cephfs service depends on. Provide metadata calculation, caching and synchronization for Ceph file system (that is, Ceph block device and Ceph object storage do not use MDS). In Ceph, metadata is also stored in the osd node. MDS is similar to the proxy cache server of metadata. The MDS node needs to be configured only when cephfs needs to be used.
-
Monitor:
Monitor the status of the whole cluster to ensure the consistency of cluster data.
-
Manager(ceph-mgr):
It is used to collect ceph cluster status and operation indicators, such as storage utilization, current performance indicators and system load. Provide external ceph dashboard (ceph ui).
-
Ceph structure consists of two parts:
ceph client: access the underlying services or components of ceph and provide various interfaces. For example: object storage interface, block storage interface and file level storage interface.
ceph node: the underlying service provider of ceph, that is, ceph storage cluster.
Ceph module and concept introduction
-
Object
The lowest storage unit of Ceph is Object - Object, and each Object contains metadata and original data.
-
PG
The full name of PG is Placement Groups, which is a logical concept. A PG contains multiple OSD s. The PG layer is actually introduced to better allocate and locate data.
-
CRUSH
CRUSH is the data distribution algorithm used by Ceph, which is similar to consistent hash to distribute data to the expected place.
-
RBD
The full name of RBD is RADOS block device, which is a block device service provided by Ceph
-
RGW
The full name of RGW is RADOS gateway. It is an object storage service provided by Ceph. The interface is compatible with S3 and Swift.
-
CephFS file storage
CephFS, the full name of Ceph File System, is a distributed file storage service provided by Ceph.
-
Ceph object store
Use the Ceph object gateway daemon (radosgw), which is an HTTP server used to interact with Ceph storage clusters. Because it provides OpenStack Swift and Amazon S3 compatible interfaces, Ceph object gateway can store data in the same Ceph storage cluster used to store data from Ceph file system clients or Ceph block device clients. S3 and swift APIs share a common namespace, so you can write data using one API and retrieve data using another API.
-
CEPH block storage
Ceph block devices are thin provisioned, adjustable in size, and stripe data to multiple OSDs in the cluster. Ceph block devices take advantage of many capabilities of RADOS, such as snapshot, replication and consistency. Ceph's RADOS block device (RBD) interacts with OSD using kernel modules or librbd libraries.
Stored procedure for Ceph data
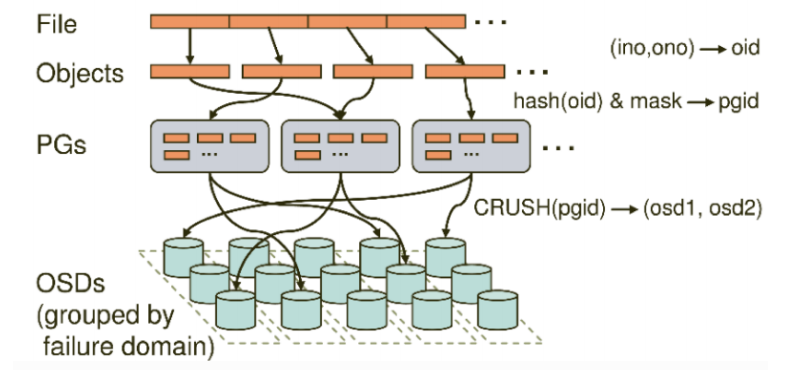
No matter which storage method (object, block, Mount) is used, the stored data will be cut into Objects.
The size of objects can be adjusted by the administrator, usually 2M or 4M. Each object will have a unique oid, which is generated by ino and ono. Ino is the File ID of the file, which is used to uniquely identify each file globally, and ono is the number of fragments. For example, if the FileID of a file is a and it is cut into two objects, one object is numbered 0 and the other is numbered 1, then the oid of these two files is A0 and A1. The advantage of oid is that it can uniquely identify each different object and store the dependency between the object and the file. Because all the data of ceph are virtual into uniform objects, the efficiency of reading and writing will be relatively high.
However, objects are not directly stored in OSD, because the size of objects is very small. There may be hundreds to tens of millions of objects in a large-scale cluster. The speed of traversal addressing of so many objects is very slow; Moreover, if the object is directly mapped to the OSD through a fixed mapping hash algorithm, when the OSD is damaged, the object cannot be automatically migrated to other OSDs. In order to solve these problems, ceph introduces the concept of homing group, namely PG.
PG is a logical concept. We can see objects directly in linux system, but we can't see PG directly. Its data addressing is similar to the index in the database: each object will be fixed mapped into a PG, so when we want to find an object, we only need to find the PG to which the object belongs, and then traverse the PG, without traversing all objects. In addition, during data migration, PG is also used as the basic unit for migration, and ceph will not directly operate on objects.
How are objects mapped into PG? Remember OID? First, hash the OID using the static hash function, take out the feature code, demodulate the number of feature code and PG, and the obtained serial number is PGID.
Finally, PG will replicate according to the number of replicas set by the administrator, and then store them on different OSD nodes through the crush algorithm (in fact, all objects in PG are stored on nodes). The first OSD node is the master node, and the rest are slave nodes.
4: Install Ceph cluster
Note: the version update is very fast. If there are problems, please refer to the official documents
Official documents: http://docs.ceph.com/
Prepare the environment
System version: CentOS 7.0 4 x86_ 64 server
Hardware configuration: 5 VMS, 1-core 1G memory, each node role machine shall mount at least one free disk of no less than 5 g for osd storage
admin 10.0.0.20 admin – install CEPH deploy
node1 10.0.0.22 mon / mgr / osd
node2 10.0.0.23 osd
node3 10.0.0.24 osd
ceph-client 10.0.0.21
1. Add a disk with a size of more than 5G to the three node nodes
2. All nodes modify host names and resolve each other
3. Close the firewall and selinux of all machines
4. All nodes create ordinary users and set passwords – all nodes operate
[root@admin ~]# useradd cephu
[root@admin ~]# passwd cephu
5. Ensure that the newly created user on each Ceph node has sudo permission - all node operations
[root@admin ~]# visudo -- add under root ALL=(ALL) ALL:
cephu ALL=(root) NOPASSWD:ALL
6. Realize ssh password less login (admin node operation)
[root@admin ~]# su - cephu
[cephu@admin ~]$ ssh-keygen
7. Copy the key generated by the cephu user of the admin node to each Ceph node
[cephu@admin ~]$ ssh-copy-id cephu@node1
[cephu@admin ~]$ ssh-copy-id cephu@node2
[cephu@admin ~]$ ssh-copy-id cephu@node3
[cephu@admin ~]$ ssh-copy-id cephu@ceph-client
8. Add ~ /. With root user in admin node ssh/config configuration file
And make the following settings so that Ceph deploy can log in to Ceph node with your user name
[root@admin ~]# mkdir ~/.ssh
[root@admin ~]# vim ~/.ssh/config
Host node1
Hostname node1
User cephu
Host node2
Hostname node2
User cephu
Host node3
Hostname node3
User cephu
9. Add download source and install CEPH deploy (admin node, root user)
[root@admin ~]# vim /etc/yum.repos.d/ceph.repo
[ceph-noarch]
name=Ceph noarch packages
baseurl=https://download.ceph.com/rpm-luminous/el7/noarch
enabled=1
gpgcheck=1
type=rpm-md
gpgkey=https://download.ceph.com/keys/release.asc
 Update source, install ceph-deploy:
[root@admin ~]# yum makecache
[root@admin ~]# yum update
 open yum cache
[root@admin ~]# vim /etc/yum.conf
keepcache=1
 install
[root@admin ~]# yum install ceph-deploy wget unzip -y
10. Install ntp (all nodes)
be careful!! Select any machine as the ntp time server, and the clients of other nodes as the time server synchronize the time with the server. I select admin:
[root@admin ~]# yum install -y ntp
[root@admin ~]# vim /etc/ntp.conf
There are four rows of server positions. Comment out the four rows of server and fill in the following two rows
server 127.127.1.0 # local clock
fudge 127.127.1.0 stratum 10
[root@admin ~]# systemctl start ntpd
[root@admin ~]# systemctl status ntpd
All other nodes:
# yum install ntpdate -y
# ntpdate time server ip
11. Deploy ceph cluster
#Attention!! There is no special description. All the following operations are performed under the admin node and cephu user
- 1. Create the directory of cephu operation:
[root@qfedu.com-admin ~]# su - cephu
[cephu@admin ~]$ mkdir my-cluster
After that, all CEPH deploy command operations must be performed in this directory
- 2. Create a cluster - an error is reported here. Check the following error sorting
First of all, you need to download a package and install it, otherwise an error will be reported, and then create a cluster
[cephu@admin ~]$ wget https://files.pythonhosted.org/packages/5f/ad/1fde06877a8d7d5c9b60eff7de2d452f639916ae1d48f0b8f97bf97e570a/distribute-0.7.3.zip
[cephu@admin ~]$ unzip distribute-0.7.3.zip
[cephu@admin ~]$ cd distribute-0.7.3
[cephu@admin distribute-0.7.3]$ sudo python setup.py install
Create cluster
[cephu@admin ~]$ cd my-cluster/
[cephu@admin my-cluster]$ ceph-deploy new node1
[cephu@admin my-cluster]$ ls
ceph.conf ceph-deploy-ceph.log ceph.mon.keyring
Three files will be created successfully: CEPH conf, ceph. mon. keyring, and a log file
- 3. Install luminous-12.2.13 (script mode on admin node)
Objective: install ceph and ceph radosgw master packages on node1, node2 and node3 nodes
Method 1: use the official script to install it automatically
#The script will help node1, node2 and node3 create epel source and ceph source, and automatically install ceph and ceph radosgw main packages
[cephu@admin my-cluster]$ ceph-deploy install --release luminous node1 node2 node3
#This step takes a long time and is easy to timeout. Manual installation can be used
If ceph and ceph radosgw are not installed, method 2 is used
Pay attention to the source of epel when doing experiments in Qianfeng (remember)
Test whether the installation is completed: confirm that the installed version is 12.2.13 in node1, node2 and node3 respectively
[cephu@node1 ~]$ ceph --version
ceph version 12.2.13 (584a20eb0237c657dc0567da126be145106aa47e) luminous (stable)
Method 2: manually deploy and install the three machines and create them respectively: the three node nodes operate the same
1)install epel source
# yum install -y epel-release
2)establish Ceph Source, as follows: official source
# vim /etc/yum.repos.d/ceph.repo
[Ceph]
name=Ceph packages for $basearch
baseurl=http://download.ceph.com/rpm-luminous/el7/$basearch
enabled=1
gpgcheck=1
type=rpm-md
gpgkey=https://download.ceph.com/keys/release.asc
priority=1
[Ceph-noarch]
name=Ceph noarch packages
baseurl=http://download.ceph.com/rpm-luminous/el7/noarch
enabled=1
gpgcheck=1
type=rpm-md
gpgkey=https://download.ceph.com/keys/release.asc
priority=1
[ceph-source]
name=Ceph source packages
baseurl=http://download.ceph.com/rpm-luminous/el7/SRPMS
enabled=1
gpgcheck=1
type=rpm-md
gpgkey=https://download.ceph.com/keys/release.asc
priority=1
#The following is Alibaba cloud's ceph source
# vim /etc/yum.repos.d/ceph.repo
[Ceph]
name=Ceph packages for $basearch
baseurl=http://mirrors.aliyun.com/ceph/rpm-luminous/el7/$basearch
enabled=1
gpgcheck=0
type=rpm-md
gpgkey=https://mirrors.aliyun.com/ceph/keys/release.asc
priority=1
[Ceph-noarch]
name=Ceph noarch packages
baseurl=http://mirrors.aliyun.com/ceph/rpm-luminous/el7/noarch
enabled=1
gpgcheck=0
type=rpm-md
gpgkey=https://mirrors.aliyun.com/ceph/keys/release.asc
priority=1
[ceph-source]
name=Ceph source packages
baseurl=http://mirrors.aliyun.com/ceph/rpm-luminous/el7/SRPMS
enabled=1
gpgcheck=0
type=rpm-md
gpgkey=https://mirrors.aliyun.com/ceph/keys/release.asc
priority=1
3)Respectively in node1,node2,node3 The node executes the following command to install the software,You can install it completely manually, but you need to yum of ceph Cache directory structure
$sudo yum install ceph ceph-radosgw -y
 If the installation fails due to slow speed, you can press ctrl+c,Created with it yum Cache directory. Manually download the installation package and save it to the cache directory/var/cache/yum/x86_64/Ceph/packages Execute the installation command again under the directory:
$sudo yum install ceph ceph-radosgw -y
 Test whether the installation is completed: respectively node1 node2 node3 Confirm that the installation version is 12.2.13
[cephu@node1 ~]$ ceph --version
ceph version 12.2.13 (584a20eb0237c657dc0567da126be145106aa47e) luminous (stable)
- 4. Initialize mon: admin node – executed by cephu user
[cephu@admin my-cluster]$ ceph-deploy mon create-initial
- 5. Give each node user name free permission to use commands:
[cephu@admin my-cluster]$ ceph-deploy admin node1 node2 node3
- 6. Installation of CEPH Mgr: only luminous is available to prepare for the use of dashboard
[cephu@admin my-cluster]$ ceph-deploy mgr create node1
- 7. Add osd:
Note: the disk size providing storage space on each node should not be too small, preferably more than 5G. Pay attention to check your disk name
[cephu@admin my-cluster]$ ceph-deploy osd create --data /dev/sdb node1
[cephu@admin my-cluster]$ ceph-deploy osd create --data /dev/sdb node2
[cephu@admin my-cluster]$ ceph-deploy osd create --data /dev/sdb node3
In the command, / dev/sdb is the free disk prepared for the osd on each node (there is no need to format the partition. If there is a partition, you need to specify a specific partition). View it through the following command:
[cephu@admin my-cluster]$ ssh node1 lsblk -f
Finally, view the cluster status through the following command:
[cephu@admin my-cluster]$ ssh node1 sudo ceph -s
If health is displayed_ OK, three OSD ups are successful
5: dashboard deployment
Operate on node1, install CEPH Mgr and CEPH mon on the same host, preferably only one CEPH Mgr
[root@node1 ~]# su - cephu
1. Create an administrative domain secret key:
[cephu@node1 ~]$ sudo ceph auth get-or-create mgr.node1 mon 'allow profile mgr' osd 'allow *' mds 'allow *'
[mgr.node1]
key = AQAePadeYsvJLxAA9Pnmib3S+0Kj1jAeuSQcKw==
2. Open CEPH Mgr management domain:
[cephu@node1 ~]$ sudo ceph-mgr -i node1
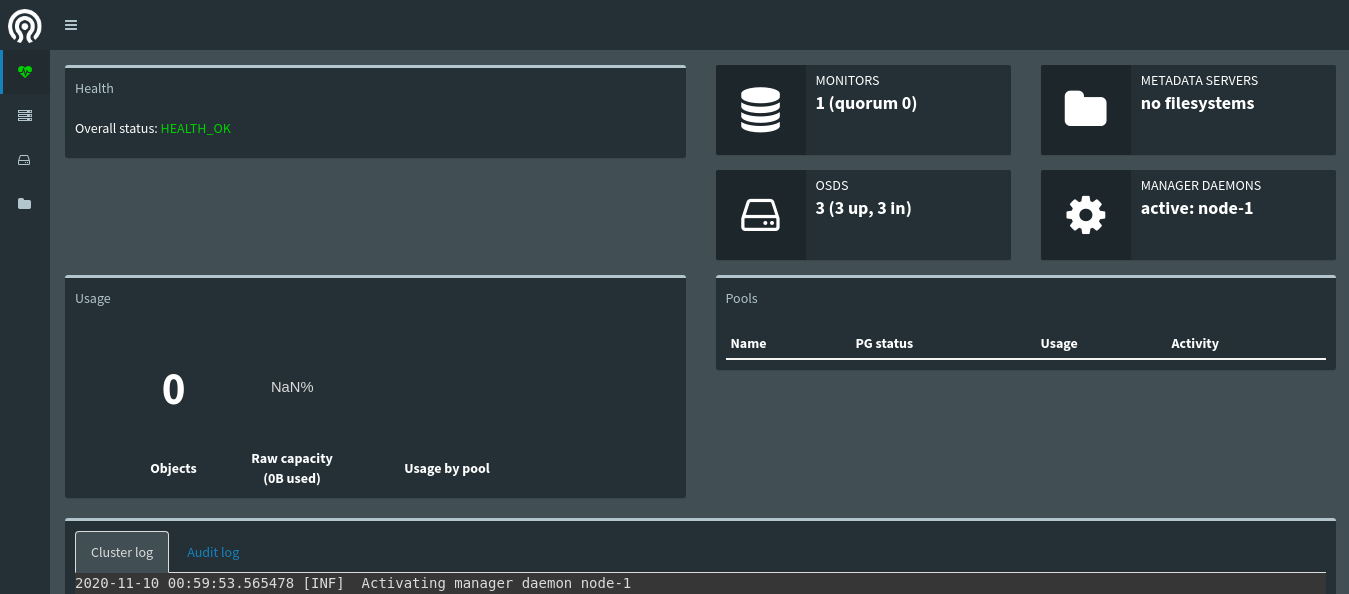
3. Check the status of ceph: confirm that the status of mgr is active:
[cephu@node1 ~]$ sudo ceph status
cluster:
id: aec06bc6-428c-49ff-a2c1-2d84808bcb54
health: HEALTH_OK
services:
mon: 1 daemons, quorum node1
mgr: node1(active, starting)
osd: 3 osds: 3 up, 3 in
data:
pools: 0 pools, 0 pgs
objects: 0 objects, 0B
usage: 3.01GiB used, 12.0GiB / 15.0GiB avail
pgs:
4. Open the dashboard module:
[cephu@node1 ~]$ sudo ceph mgr module enable dashboard
5. Bind the ip address of the CEPH Mgr node that enables the dashboard module:
[cephu@node1 ~]$ sudo ceph config-key set mgr/dashboard/node1/server_addr 10.0.0.22
# The ip address is the ip address of the mgr node, that is, the ip address of node1
6.web login: enter in the browser address bar:
mgr address: 7000
6: Configure client to use rbd
Before creating a block device, you need to create a storage pool. The storage pool related commands need to be mon Node execution--That is, planned node1 node
Create storage pool:
[cephu@node1 ~]$ sudo ceph osd pool create rbd 128 128
pool 'rbd' created
Notes: creating a pool
#If there are less than 5 OSD s, set pg_num is 128.
#5 ~ 10 OSD s, set pg_num is 512.
#10 ~ 50 OSD s, set pg_num is 4096.
Initialize storage pool
[cephu@node1 ~]$ sudo rbd pool init rbd
Prepare client:
Upgrade the client kernel to the latest version. Before the update, the kernel version is:
[root@ceph-client ~]# uname -r
3.10.0-693.el7.x86_64
 Upgrade method
 Import key
[root@client ~]# rpm --import https://www.elrepo.org/RPM-GPG-KEY-elrepo.org
 install elrepo of yum source
[root@client ~]# rpm -Uvh http://www.elrepo.org/elrepo-release-7.0-2.el7.elrepo.noarch.rpm
 View available system kernel packages
[root@client ~]# yum --disablerepo="*" --enablerepo="elrepo-kernel" list available
 Install kernel
[root@client ~]# yum --enablerepo=elrepo-kernel install kernel-ml-devel kernelml -y
 View kernel default boot order
[root@client ~]# awk -F\' '$1=="menuentry " {print $2}' /etc/grub2.cfg
CentOS Linux (5.7.8-1.el7.elrepo.x86_64) 7 (Core)
CentOS Linux (3.10.0-1062.el7.x86_64) 7 (Core)
CentOS Linux (0-rescue-f0079ffdc1064b91b9f525935ca9c3e7) 7 (Core)
Select the new kernel at position 0 as the default boot kernel
[root@client ~]# grub2-set-default 0
[root@client ~]# reboot
 Kernel version after restart:
[root@client ~]# uname -r
5.7.8-1.el7.elrepo.x86_64
 Delete old kernel
[root@client ~]# yum remove kernel -y
client installation ceph:
For environment preparation, refer to steps 2-5 of environment preparation at the beginning of the deployment ceph document
Install dependency package, epel, configure ceph source
[root@client ~]# yum install -y python-setuptools epel-release
[root@client ~]# vim /etc/yum.repos.d/ceph.repo
[Ceph]
name=Ceph packages for $basearch
baseurl=http://mirrors.aliyun.com/ceph/rpm-luminous/el7/$basearch
enabled=1
gpgcheck=0
type=rpm-md
gpgkey=https://mirrors.aliyun.com/ceph/keys/release.asc
priority=1
[Ceph-noarch]
name=Ceph noarch packages
baseurl=http://mirrors.aliyun.com/ceph/rpm-luminous/el7/noarch
enabled=1
gpgcheck=0
type=rpm-md
gpgkey=https://mirrors.aliyun.com/ceph/keys/release.asc
priority=1
[ceph-source]
name=Ceph source packages
baseurl=http://mirrors.aliyun.com/ceph/rpm-luminous/el7/SRPMS
enabled=1
gpgcheck=0
type=rpm-md
gpgkey=https://mirrors.aliyun.com/ceph/keys/release.asc
priority=1
[root@client ~]# yum install ceph ceph-radosgw -y
[root@client ~]# ceph --version
ceph version 12.2.13 (584a20eb0237c657dc05**67da126be145106aa47e) luminous (stable)**
In the admin node, give the client the user name free permission to use the command:
[cephu@admin my-cluster]$ ceph-deploy admin client
Modify the read permission of the file under client:
[root@client ~]# chmod +r /etc/ceph/ceph.client.admin.keyring
Modify the ceph configuration file under the client: this step is to solve the problem of errors in mapping images
[root@client ~]# vi /etc/ceph/ceph.conf #Under global section, add:
rbd_default_features = 1
The client node creates a block device image: the unit is M, here are 4 G
[root@client ~]# rbd create foo --size 4096
client node mapping to host:
[root@client ~]# rbd map foo --name client.admin
/dev/rbd0
client node format block device:
[root@client ~]# mkfs.ext4 -m 0 /dev/rbd/rbd/foo
client node mount Block device:
[root@client ~]# mkdir /mnt/ceph-block-device #Create mount point
[root@client ~]# mount /dev/rbd/rbd/foo /mnt/ceph-block-device #mount
After the client restarts, the device needs to be remapped, or it may get stuck
END