Virtual machine installation, Linux system and software installation
Environmental Science:
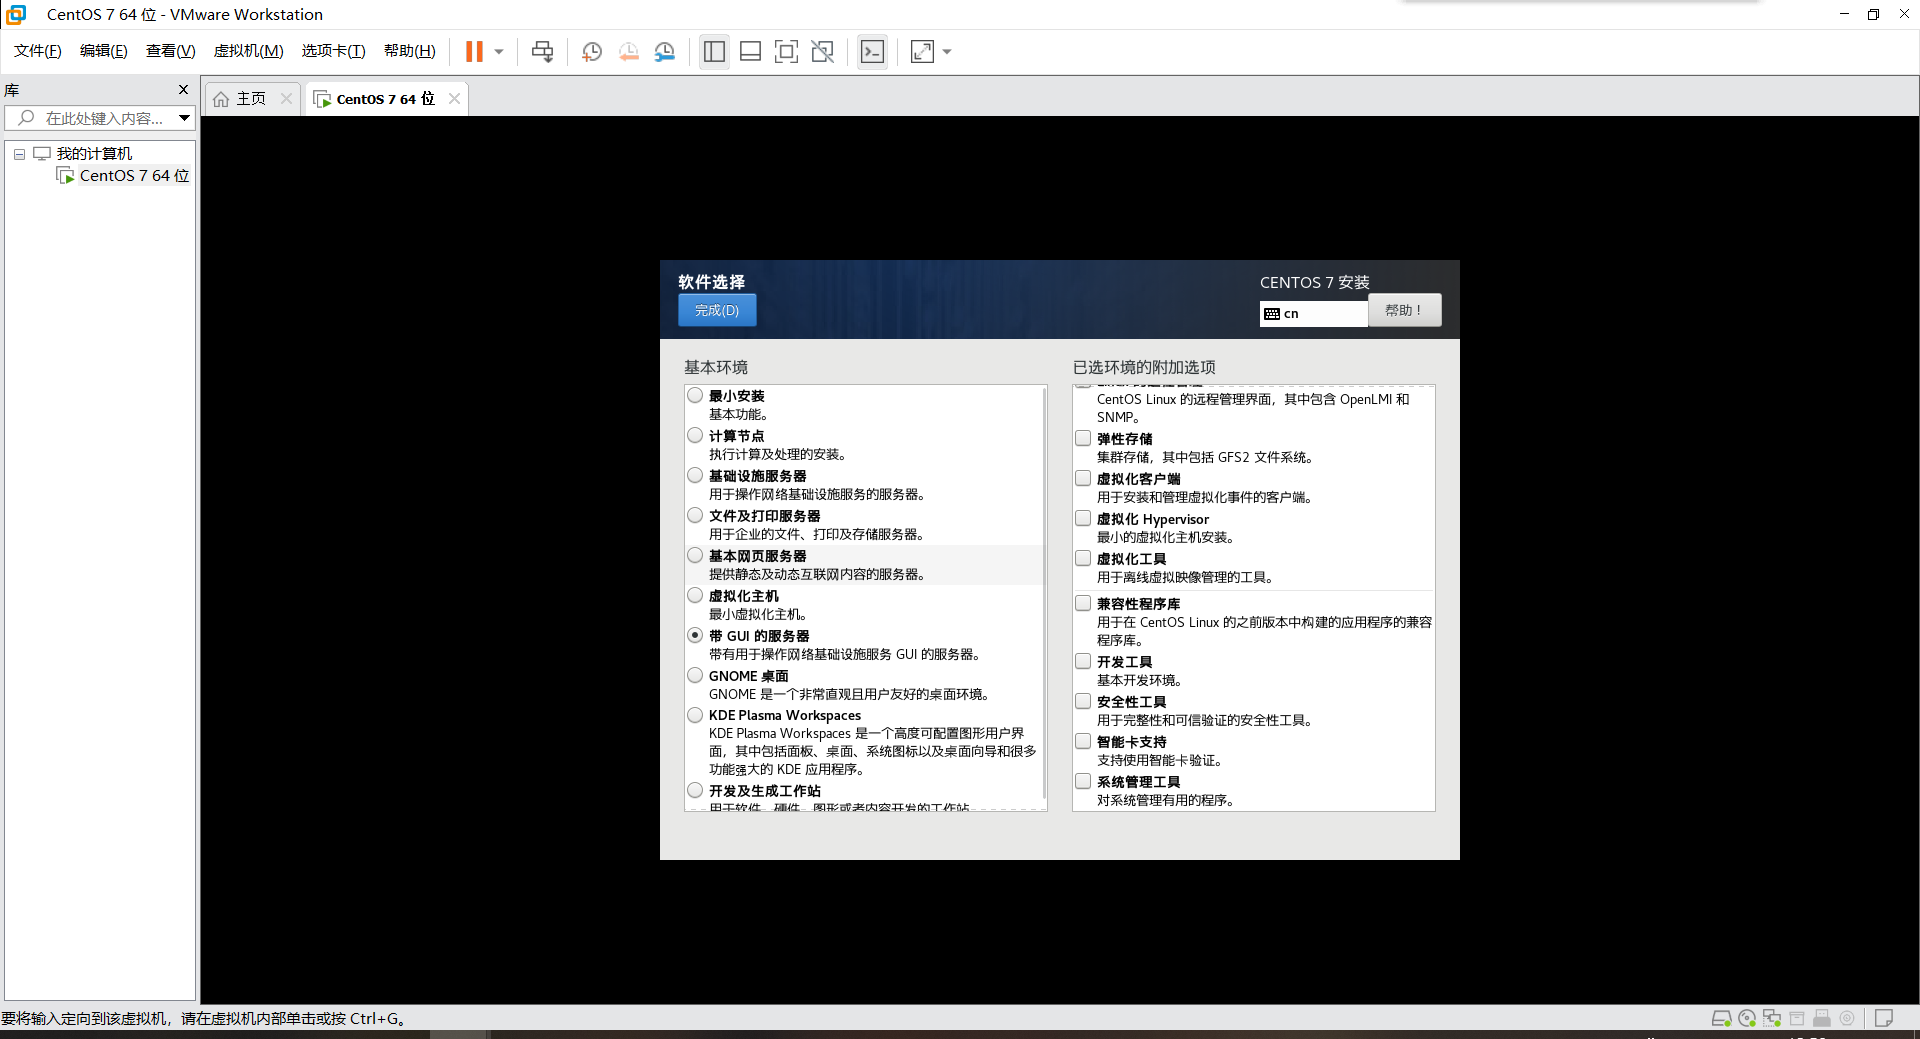
Software selection: server with GUI
Network type: use network address translation (NAT)
Power on automatic networking
cd /etc/sysconfig/network-scripts/
vim Network profile
//ONBOOT = "no" is changed to yes, and there is no need to connect manually next time.
ssh password free login
This hasn't been written yet
Installing JDK for Linux
1. Installation dependent environment
yum -y install glibc.i686
yum -y install libaio.so.1 libgcc_s.so.1 libstdc++.so.6
yum -y install gcc-c++
yum -y install libaio*
2. Check whether JDK has been installed before. If yes, uninstall it
rpm -qa | grep -i jdk
rpm -e --nodeps Program name just checked
3. Install JDK
//Unzip the installation package
tar -zxvf jdk-8u161-linux-x64.tar.gz
//rename
mv jdk-8u161-linux-x64.tar.gz jdk
//move file
mv jdk /usr/local/jdk
4. Configure environment variables
vim /etc/profile

//How to enter and exit vim editor in linux system: https://www.jianshu.com/p/8d04aab47c5c
//Find export path user login mail hostname histsize histcontrol and add
//Absolute path to install jdk
export JAVA_HOME=/usr/local/jdk
export CLASSPATH=.:$JAVA_HOME/lib/dt.jar:$JAVA_HOME/lib/tools.jar
export PATH=$JAVA_HOME/bin:$PATH

//Refresh profile
source /etc/profile
5. Check whether the configuration is successful
java -version
Installing Tomcat for Linux
1. Check whether Tomcat has been installed before. If so, uninstall it
rpm -qa | grep -i tomcat
rpm -e --nodeps Program name just checked
2. Install Tomcat
//Unzip the installation package
tar -zxvf Installation package -C /usr/local/tomcat/
//rename
mv apache-tomcat-8.5.55.tar.gz tomcat
//move file
mv tomcat /usr/local/tomcat
3. Configure environment variables
vim /etc/profile

//How to enter and exit vim editor in linux system: https://www.jianshu.com/p/8d04aab47c5c
//Find export path user login mail hostname histsize histcontrol and add
//Absolute path to install tomcat
export CATALINA_HOME=/usr/local/tomcat
export PATH=$CATALINA_HOME/bin:$PATH

//Refresh profile
source /etc/profile
4. Check whether the configuration is successful (open 8080 port)
/usr/local/tomcat/bin/startup.sh

//Go to the browser and enter the ip address and port 8080 of linux
//192.168.31.128:8080
//Success: the page appears
//Failed: https://blog.csdn.net/weixin_43634138/article/details/97268838

//View the status of firewall
firewall-cmd --state

//Open port 80
firewall-cmd --permanent --add-port=80/tcp
firewall-cmd --permanent --add-port=8080-8085/tcp

//View the open ports of the firewall
firewall-cmd --permanent --list-ports

//Restart the firewall (restart the firewall after modifying the configuration)
firewall-cmd --reload

//Finally, you can enter the corresponding ip address to check whether tomcat is started
External: start tomcat to view the real-time log file
/usr/local/tomcat/bin/shutdown.sh

//View real-time log files
/usr/local/tomcat/bin/startup.sh && tailf /usr/local/tomcat/logs/catalina.out

//sign out
Ctrl+C
Installing mysql for Linux
Reference link
Both links describe the easy installation of rpm:
https://www.jianshu.com/p/276d59cbc529
https://blog.csdn.net/qq_40241957/article/details/90343651 This is more comprehensive
Here is gz decompression installation method
1. Judge whether mysql has been installed on Linux, and uninstall it if it has been installed
rpm -qa | grep -i mysql
rpm -e --nodeps Program name just checked

    whereis mysql
rm -r -f Just got the file path
2. Install mysql
//Unzip the installation package
tar -zxvf Installation package
//rename
mv mysql-5.6.31-linux-glibc2.5-x86_64 mysql
//move file
mv mysql /usr/local/mysql
4. Copy the configuration file to the etc directory
[root@localhost support-files]# cp my-default.cnf /etc/my.cnf
//yes when you encounter whether to overwrite or not
5. Edit / etc / my cnf
vim /etc/my.cnf
//Remove the annotation of basedir and add the absolute path of the extracted directory, as shown in the following figure
basedir= /usr/local/mysql/
datadir = /usr/local/mysql/data
log-error = /usr/local/mysql/data/error.log
pid-file = /usr/local/mysql/data/mysql.pid
user = root
tmpdir = /tmp

6. Add mysqld service to startup self startup item
[root@localhost support-files]# cp mysql.server /etc/init.d/mysqld
[root@localhost support-files]# chkconfig --add mysqld
[root@localhost support-files]# chkconfig --list mysqld
When joining successfully, see the figure below:

7. Execute mysql_install_db script to initialize the data directory in mysql and create some system tables. (important)
[root@localhost mysql]# scripts/mysql_install_db --user=root

//If appear
please install the following Perl modules before executing scripts/mysql_install_db:
Data::Dumper

//Executable
yum -y install autoconf
8. Start
[root@localhost bin]# service mysqld start
//SUCCESS appears! It indicates that the startup is successful

//If appear
//Starting MySQL..The server quit without updating PID file //([FAILED]al/mysql/data/mysql.pid).
//Repeatable operation point 7
9. Login to mysql
[root@localhost bin]# ./mysql -u root -p
10. Set password for user group
//[ root@localhost  bin]# ./ Mysqladmin - U user password

[root@localhost bin]# ./mysqladmin -u root password
11. Modify mysql password for user group
[root@localhost bin]# . / mysqladmin -u root -p password "new password"
Enter password: (Enter old password (not shown)
12. Configure environment variables
vim /etc/profile
//Absolute path of the extracted file
export MYSQL_HOME=/usr/local/mysql
export PATH=$PATH:$MYSQL_HOME/bin

//Refresh profile
source /etc/profile
13. mysql on local connection virtual machine
//website: https://www.cnblogs.com/dump/p/9238543.html

//View the status of firewall
firewall-cmd --state

//Open 3306 ports
firewall-cmd --permanent --add-port=3306/tcp

//View the open ports of the firewall
firewall-cmd --permanent --list-ports

//Restart the firewall (restart the firewall after modifying the configuration)
firewall-cmd --reload

//Xshell login mysql
[root@localhost adc]# /usr/local/mysql/bin/mysql -u root -p

//Enter password (not shown)
Enter password:

//After successful login, create a root user that can allow all ip access
GRANT ALL PRIVILEGES ON *.* TO 'root'@'%' IDENTIFIED BY 'root User's password' WITH GRANT OPTION;


//Modify user password
update mysql.user set authentication_string=password('New password') where user='user name' and Host ='localhost';
flush privileges;


//The user name is root
//The password is the password of the root user

14. mysql create user
//When logged in
    GRANT ALL PRIVILEGES ON *.* TO 'root'@'%' IDENTIFIED BY 'root User's password' WITH GRANT OPTION;
flush privileges;
15. mysql modify user
Know the password to log in
update mysql.user set authentication_string=password('New password') where user='user name' and Host ='localhost';
16. mysql delete user
delete from user where user='XXX' and host='localhost';
flush privileges;
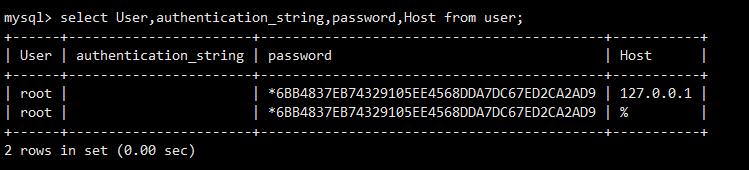
17. mysql view user
use mysql
select User,authentication_string,Host from user;
As shown in the figure:
- Reference link: https://blog.csdn.net/qq_40241957/article/details/90343651
18. mysql set time zone
set global time_zone = '+8:00';
show variables like '%time_zone%'; //View time zone
19. mysq modify port number
vim /etc/my.cnf
//add
port = 3295

//restart
service mysqld restart

//Log in to mysql to view the port number
Installing redis for Linux
1. Unzip redis-5.0.8 tar. gz
//Unzip the installation package
tar -zxvf redis-5.0.8.tar.gz
//rename
mv redis-5.0.8 redis
//move file
mv redis /usr/local/redis
2. Compile
[root@iZbp1jd98tb8u88yzc614iZ software]# cd /usr/local/redis
[root@localhost redis-5.0.8]# make MALLOC=lib
3. Installation
[root@localhost src]# make install
Success page:

4. Edit redis conf
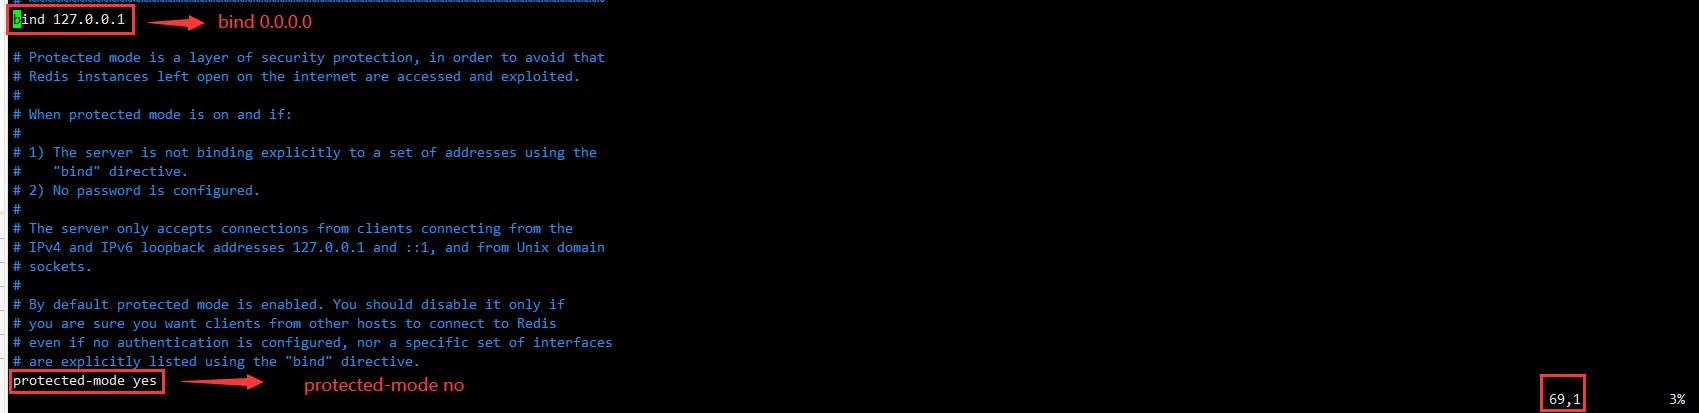
[root@localhost redis-5.0.8]# vim redis.conf
In line 69, change bind 127.0.0.0 to bind 0.0.0 (open Internet connection), and change protected mode yes to protected mode No
(shut down daemons)
5. Open 6379 port
//View the status of firewall
firewall-cmd --state

//Open 6379 port
firewall-cmd --permanent --add-port=6379/tcp

//View the open ports of the firewall
firewall-cmd --permanent --list-ports

//Restart the firewall (restart the firewall after modifying the configuration)
firewall-cmd --reload
6. Start service
[root@localhost adc]# cd /usr/local/redis/redis-5.0.8/

[root@localhost redis-5.0.8]# ./src/redis-server redis.conf
//report errors
//Fatal error, can't open config file 'redis.conf'
//I don't understand Baidu
Success page:

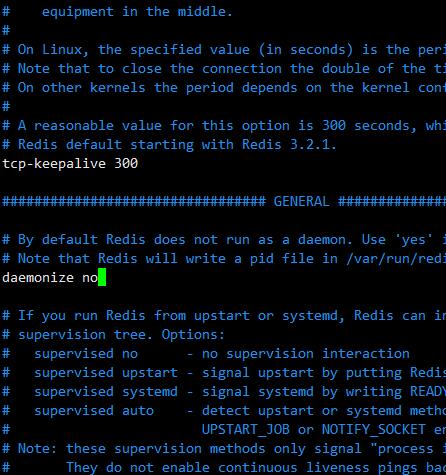
7. Set background startup
[root@localhost redis-5.0.8]# vim redis.conf
On line 136, set daemon to yes (background startup)
//Restart
[root@localhost redis-5.0.8]# ./src/redis-server redis.conf
8. Configure environment variables
8. Set startup and self startup (can be omitted)
Reference website: https://blog.csdn.net/eexiaoming/article/details/109049990?utm_medium=distribute.pc_relevant.none -task-blog-baidujs_ title-0&spm=1001.2101.3001.4242
cd /etc/init.d
touch redis
chmod 777 redis
vim redis
Edit script
#!/bin/bash
#chkconfig: 22345 10 90
#description: Start and Stop redis
REDISPORT=6379
EXEC=/usr/local/redis/src/redis-server
CLIEXEC=/usr/local/redis/src/redis-cli
PIDFILE=/var/run/redis.pid
CONF="/usr/local/redis/redis.conf"
case "$1" in
    start)
        if [ -f $PIDFILE ];then
            echo "$PIDFILE exists,process is already running or crashed"
        else
            echo "Starting Redis server..."
            $EXEC $CONF
        fi
        ;;
    stop)
        if [ ! -f $PIDFILE ];then
            echo "$PIDFILE does not exist,process is not running"
        else
            PID=$(cat $PIDFILE)
            echo "Stopping..."
        fi
        ;;
    restart)
        "$0" stop
        sleep 3
        "$0" start
        ;;
    *)
        echo "Please use start or stop or restart as first argument"
        ;;
esac
Execute the supporting commands to make the script effective
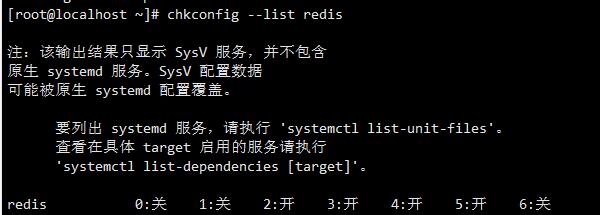
chkconfig --add redis

//View services
chkconfig --list redis
9. Turn off redis
[root@localhost redis-5.0.8]# redis-cli shutdown
10. Set password (can be omitted)
//In line 508 of the configuration file
#requirepass  powersi@redis Remove the comment and change foobared to your own password,
requirepass powersi@redis
 Then save and restart the service :  redis-server
cd /usr/local/bin
./redis-server /etc/redis.conf
 Test connection:./redis-cli
 input auth powersi@redis The password you just set