NFS introduction
Network file system is a network file system that shares files with other clients for mounting
nfs can only be shared between linux
characteristic
(1) Provide transparent file access and file transfer
(2) It is easy to expand new resources or software without changing the existing working environment
(3) High performance and flexible configuration
Installation configuration
Installation software: nfs-utils.x86_64 1:1.3.0-0.68.el7.2
Configuration file: / etc/exports
Start service: systemctl restart rpcbind;systemctl start nfs
Port: 2049
[root@nfsserver ~]# mkdir /nfs_dir

[root@nfsserver ~]# echo 123 > /nfs_dir/aa.txt

[root@nfsserver ~]# vim /etc/exports

/nfs_dir *(ro) # *All hosts; ro read only

/nfs_dir 192.168.206.0/24(ro)     #Authorized network segment

/nfs_dir 192.168.206.10/24(ro)    #Authorized ip

/nfs_dir 192.168.206.10/24(ro) 172.17.206.0/24(rw)   #Authorized ip and network segments


[root@nfsserver ~]# systemctl restart rpcbind

[root@nfsserver ~]# systemctl restart nfs
client:
[root@client ~]# showmount -e 192.168.206.20 view the total directory of the server
Export list for 192.168.206.20:
/nfsdir *

[root@client ~]# yum install nfs-utils

[root@client ~]# mount -t nfs 192.168.206.20:/nfs_dir/ /mnt

[root@client mnt]# cat /mnt/aa.txt

123
The client can read and write
Method 1:
The client can read and write
 Method 1:
[root@nfsserver ~]# vim /etc/exports
/nfs_dir *(rw)

[root@client ~]# touch /mnt/bb.txt
touch: could not be built"/mnt/bb.txt": insufficient privilege


[root@nfsserver ~]# chmod o+w /nfs_dir/


[root@client ~]# touch /mnt/bb.txt
Method 2:
[root@nfsserver ~]# vim /etc/exports

/nfs_dir *(rw,no_root_squash,sync)

#no_ root_ Square mount does not switch as root

#sync synchronous write async asynchronous write
2, NAS
1) vim /etc/rc.local

[root@client ~]# mount -t nfs 192.168.206.20:/nfs_dir /mnt/


2)[root@client ~]# vim /etc/fstab

192.168.206.20:/nfs_dir /mnt nfs defaults 0 0


3).[root@client ~]# vim /etc/auto.master

/nfsdir /etc/auto.nfsdir

[root@client ~]# vim /etc/auto.nfsdir

test -fstype=nfs 192.168.206.20:/nfs_dir
2, samba
samba can be between linux and linux, and linux provides storage for windows
Software installation: samba.x86_64 0:4.10.16-15.el7_9.rpm # yum install -y samba
samba-client.x86_64 0:4.10.16-15.el7_9.rpm
Configuration file: / etc/samba/smb.conf
Start service: systemctl restart smb
Share anonymously
[root@smbserver ~]# vim /etc/samba/smb.conf
security = user

security = user
map to guest = bad user  #Anonymous Access

[smb_dir]
        comment = test smb  #Describe the role of shared directories
        path = /smb_dir #Real shared path
        writable = yes   #Is it writable
        browseable = yes    #Visible
        public = yes #Public sharing
        guest ok = yes   #Guest user
[root@smbserver ~]# mkdir /smb_dir
[root@smbserver ~]# systemctl restart smb
client
[root@smbclient ~]#  yum install -y samba-client

[root@smbclient ~]# smbclient -L //192.168.10.250
Enter SAMBA\root's password:   #Anonymous login, no password, just enter
Anonymous login successful

        Sharename       Type      Comment
        ---------       ----      -------
        print$          Disk      Printer Drivers
        smb_dir         Disk      test smb
        IPC$            IPC       IPC Service (Samba 4.10.16)
Reconnecting with SMB1 for workgroup listing.
Anonymous login successful

        Server               Comment
        ---------            -------

        Workgroup            Master
        ---------            -------
Sign in
[root@smbclient ~]# smbclient //192.168.206.20/smb_dir
Enter SAMBA\root's password:   #Enter without password
Anonymous login successful
Try "help" to get a list of possible commands.
smb: \> ls
  .                                   D        0  Mon Nov 22 10:35:30 2021
  ..                                  D        0  Mon Nov 22 10:35:30 2021

                17811456 blocks of size 1024. 14982044 blocks available


Can't write.add permission
[root@smbserver ~]# chmod o+w /smb_dir/
Client mount:
[root@nfsserver ~]# yum install cifs-utils
[root@nfsserver ~]# mount -t cifs //192.168.10.250/smb_dir /mnt

windows
 Address bar:  \\192.168.206.20
User mode sharing:
[user_dir]

comment = test smb user

path = /user_dir

writable = yes

valid users = robin tong @test


[root@smbserver ~]# mkdir /user_dir

[root@smbserver ~]# chmod o+w /user_dir/

[root@smbserver ~]# systemctl restart smb

[root@smbserver ~]# useradd robin

[root@smbserver ~]# useradd zorro

[root@smbserver ~]# smbpasswd -a robin

[root@smbserver ~]# smbpasswd -a zorro add samba user

[root@smbserver ~]# smbpasswd -x zorro delete samba user
Querying smb users
[root@smbserver ~]# pdbedit -L

robin:1000:

tong:1003:
Test:
query
[root@smbclient ~]# smbclient -L //192.168.10.250

[root@smbclient ~]# smbclient -U robin%123 //192.168.10.250/user_dir

[root@smbclient ~]# mount -o username=robin,password=123 //192.168.10.250/user_dir /mnt/
robin is writable, and members of tong and test groups are read-only
[user_dir]

comment = test smb user

path = /user_dir

write list = robin

valid users = robin tong @test
robin is read-only, and tong and test group members are read-write
[user_dir]

comment = test smb user

path = /user_dir

writable = yes

read list = robin

valid users = robin tong @test
Auto Mount
1, Three ways to mount smb anonymous and user mode
1) vim /etc/rc.local

mount -t cifs -o username=boss,password=123 //192.168.206.20/hr /mnt/

2)[root@client /]# vim /etc/fstab

//192.168.206.20/hr /mnt cifs username=king,password=123 0 0

3)[root@client /]# vim /etc/auto.master

/smb /etc/auto.smb

[root@client /]# vim /etc/auto.smbdir

test -fstype=cifs,username=king,password=123 ://192.168.206.20/hr
3, ftp
ftp: file transfer protocol
vsftpd: service name
lftp: client name
Software installation: vsftpd-3.0.2-29.el7_9.x86_64.rpm
lftp-4.4.8-12.el7_8.1.x86_64.rpm
Configuration file: / etc/vsftpd/vsftpd.conf
Start service: systemctl restart vsftpd
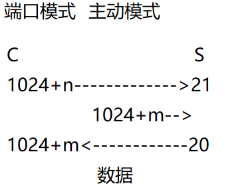
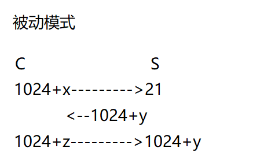
Port: passive mode 21 random port port mode: 21 20
Server data directory: / var/ftp / (all directories must be 755)
anonymous mode
[root@nfsserver ~]# vim /etc/vsftpd/vsftpd.conf

anonymous_enable=YES Anonymous mode on

write_enable=YES Can write

anon_upload_enable=YES Allow upload

anon_mkdir_write_enable=YES Allow creation

anon_umask=022 Allow upload file download

anon_max_rate=20000 Limit current speed 20 KB

anon_root=/ftp #Change data directory


mkdir /ftp
mkdir /ftp/pub
chmod o+x /ftp/pub
[root@nfsserver ~]# lftp 192.168.206.20
lftp 192.168.206.20:~> ls
-rw-r--r--    1 0        0            2307 Aug 19 06:16 passwd
drwxr-xr-x    2 0        0               6 Jun 09 16:15 pub
lftp 192.168.206.20:/> get passwd   #Download File
2307 bytes transferred
lftp 192.168.206.20:/> mirror pub/  #Download directory
Total: 1 directory, 0 files, 0 symlinks
lftp 192.168.206.20:~> lcd /tmp/   #Local system switching directory
lftp 192.168.206.20:/> cd pub
lftp 192.168.206.20:/pub> put /root/distroy.sh   #Upload file
lftp 192.168.206.20:/pub> mirror -R /boot/ #Upload directory
lftp 192.168.206.20:/> exit
User mode
[root@nfsserver ~]# useradd luci

[root@nfsserver ~]# useradd tong

[root@nfsserver ~]# passwd luci

[root@nfsserver ~]# passwd tong


[root@nfsserver ~]# lftp -u luci,123 192.168.206.20

[root@nfsserver ~]# lftp -u tong,123 192.168.206.20


[root@client ftp]# vim /etc/vsftpd/vsftpd.conf

local_enable=YES

write_enable=YES

local_umask=022

local_max_rate=40000

local_root = #Modify local user login location
Local users are not allowed to switch directories at will
[root@client ftp]# vim /etc/vsftpd/vsftpd.conf

allow_writeable_chroot=YES #Enable chroot when it is writable

chroot_local_user=YES #Restrict all users from switching to other directories


chroot_list_enable=YES #White list

chroot_list_file=/etc/vsftpd/chroot_list Users who write to this list can switch directories


[root@client ftp]# vim /etc/vsftpd/vsftpd.conf

allow_writeable_chroot=YES #Enable chroot when it is writable

chroot_local_user=NO #Users are not restricted and cannot switch to other directories


chroot_list_enable=YES #blacklist

chroot_list_file=/etc/vsftpd/chroot_list Users who write to this list cannot switch directories
Control user login
The user who wrote the file cannot log in ftp

[root@client ~]# vim /etc/vsftpd/ftpusers


Black and white list of login

blacklist

userlist_enable=YES

userlist_deny=YES


/etc/vsftpd/user_list The user who writes this file cannot log in


White list

userlist_enable=YES

userlist_deny=NO


/etc/vsftpd/user_list Users who write to this file can log in,Otherwise, you cannot log in
Working mode of vsftpd
Port mode: 21: the control port controls the client to establish a connection with the server 20: Data port Transfer data after connection is established


Default: both server modes are open, and the client selects the link mode
Client configuration file: / etc/lftp.conf
Set FTP: passive mode off active mode
Set FTP: passive mode on passive mode default comment
Virtual account:
1. Establish user database file
vim /etc/vsftpd/vipuser.txt
user111
pass111
user222
pass222
2. Install database conversion tool
yum install libdb-utils
db_load -T -t hash -f /etc/vsftpd/vipuser.txt /etc/vsftpd/vsftpd_vipuser.db
If you need to add an account, you need to re convert the user file
3. Establish verification mode file
# mv /etc/pam.d/vsftpd /etc/pam.d/vsftpd.bak
# vim /etc/pam.d/vsftpd
auth required /lib64/security/pam_userdb.so db=/etc/vsftpd/vsftpd_vipuser
account required /lib64/security/pam_userdb.so db=/etc/vsftpd/vsftpd_vipuser
4. Establish a system user for all virtual users
# useradd -d /home/vsftp virtual
# chmod 755 /home/vsftp
5. Modify the configuration file to enable virtual users
[root@client ~]# vim /etc/vsftpd/vsftpd.conf
guest_enable=YES # enable the virtual user function
guest_username=virtual # specifies the system user used by the virtual user
pam_service_name=vsftpd # uses / etc/pam.d / to verify that the file name is the same
[root@client ~]# systemctl restart vsftpd
Client test login
lftp -u user111,pass111 192.168. 206.20
lftp -u user222,pass222 192.168.206.20
Set different permissions for virtual users
Method 1
The virtual user uses the same permissions as the local user
virtual_use_local_privs=YES
Virtual users use the same permissions as anonymous users
virtual_use_local_privs=NO
Method 2
virtual_use_local_privs=YES
user_config_dir=/etc/vsftpd/vsftp_user_conf
mkdir /etc/vsftpd/vsftp_user_conf
[root@client nfs]# cat /etc/vsftpd/vsftp_user_conf/user111
write_enable=NO
local_max_rate=20000
local_root=/nfs
[root@client nfs]# cat /etc/vsftpd/vsftp_user_conf/user222
local_max_rate=100000
local_root=/nfs