An openSSH server
1. Introduction to ssh protocol
ssh Protocol is a secure channel protocol, which encrypts the communication data for remote management
2,openSSH
Service Name: sshd
 Server main program:/usr/sbin/sshd
 Server configuration file:/etc/ssh/sshd_config
2, Configure OpenSSH server
1,sshd_ Common options for config configuration files
| Configuration item | effect |
|---|---|
| vim /etc/ssh/sshd_config | Enter configuration file |
| Port 22 | The listening port is 22 |
| ListenAddress 0.0.0.0 | The listening address is any network segment. You can also specify the specific IP of the OpenSSH server |
| LonginGreaceTime 2m | The login verification time is 2 minutes |
| PermitRootLogin no | Disable root login |
| MaxAuthTries 6 | max retries |
| PermitEmptypasswords no | Prohibit users with blank passwords from logging in |
| UseDNS no | Disable DNS reverse resolution to improve the response speed of the server |
| AllowUsers user | Only one user is allowed to log in, multiple users are separated by spaces, and the white list effect |
| DenyUsers user | Only some users are forbidden to log in, and multiple users are separated by spaces. The blacklist effect |
Column: AllowUsers lisi@192.168.66.66 Only Lisi users are allowed to log in from 192.168.66.66 IP
AllowUsers and DenyUsers cannot be used at the same time
3, The sshd service supports two authentication methods
1. Password verification
It is easy to verify the login name and password of the local system user in the server, but it may be brutally cracked.
2. ssh client program
① . ssh [options] user @ IP address
		-P: Specifies the default port number. By default, port 22 is used
		ssh -p 66 luoxiang@192.168.66.66	To user luoxiang Port 66 login
② scp, remote replication
| option | explain |
|---|---|
| -1 | Force ssh protocol version 1 |
| -2 | Force ssh protocol version 2 |
| -4 | Force IPv4 address |
| -6 | Force IPv6 address |
| -A | Turn on the authentication agent connection forwarding function |
| -a | Turn off the authentication agent connection forwarding function |
| -b | Use the address specified by the machine as the source IP address of the peer-to-peer connection |
| -C | Request to compress all data |
| -F | Specify the SSH instruction configuration file. The default configuration file is "/ etc/ssh/ssh_config" |
| -f | Execute ssh instruction in the background |
| -g | Allow remote hosts to connect to local forwarding ports |
| -i | Specify identity file (i.e. private key file) |
| -l | Specify the login user name to connect to the remote server |
| -N | Do not execute remote instructions |
| -o | Specify configuration options |
| -p | Specify the port on the remote server |
| -q | In silent mode, all warning and diagnostic information is prohibited from being output |
(1) Downlink replication
	scp	 user@ip address:Directory to copy target files  /Copy to local location directory
 Columns: scp luoxiang@192.168.66.66:/etc/passwd  /root/	The remote host/etc/passwd Copy to local/root catalogue
(2) Uplink replication
	scp  /etc/passwd/  	luoxiang@192.168.66.66:/root/
	Connect the local /etc/passwd Copy to remote host root Directory

Non administrator users should pay attention to whether they have corresponding permissions.
4. sftp Secure FTP
Encryption is used/Decryption technology, so the transmission efficiency is higher than ordinary FTP Lower, but more secure
sftp user@IP address
 Enter user password
sftp>ls  Look at the files
sftp>get file name		Download the file to the directory at the time of current login
sftp>put file name		Upload files to the directory at the time of current login
sftp>quit			sign out
***Copy directory plus -r ****** For example: get -r  free
***The default is the current login directory. You can add a specific directory later,as get -r mmp  /opt copy mmp Directory to opt Directory.
3. Secret key verification
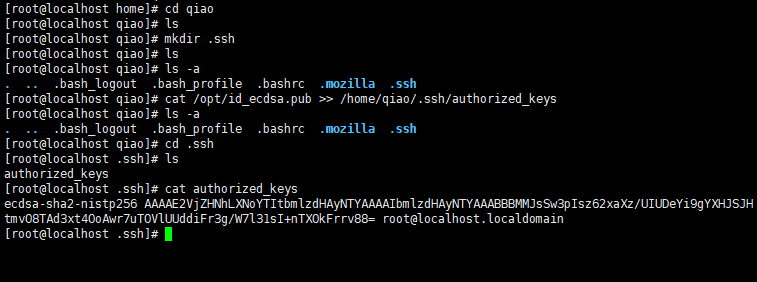
①It is required to provide matching secret key information to pass the verification. Generally, a pair of secret key files (public key and private key) are created in the client, and then the public key file is placed in the specified location in the server. During remote login, the system will decrypt with the public key and private key/Encrypted Association verification, secure and interaction free

②When both password authentication and secret key authentication are enabled, the server will give priority to secret key authentication,
vim /etc/ssh/sshd_config		Enter configuration file
| Configuration item | task |
|---|---|
| PasswordAuthentication yes | Enable password authentication |
| PubkeyAuthentication yes | Enable secret key authentication |
| AuthorizedKeyFile .ssh/authorized_keys | Specify public key library file |
1. Make secret key pair
1. Establish key pair
[root@host ~]$ ssh-keygen  <== Establish key pair
		Generating public/private rsa key pair.
		Enter file in which to save the key (/root/.ssh/id_rsa): <== Press Enter
		Created directory '/root/.ssh'.
	Enter passphrase (empty for no passphrase): <== Enter the key lock code, or press directly 	Enter leave a blank
	Enter same passphrase again: <== Enter the key lock code again
2. Upload public key to server
scp ~/.ssh/id_ecdsa.pub root@192.168.60.66:/opt
3. Import public key text in the server

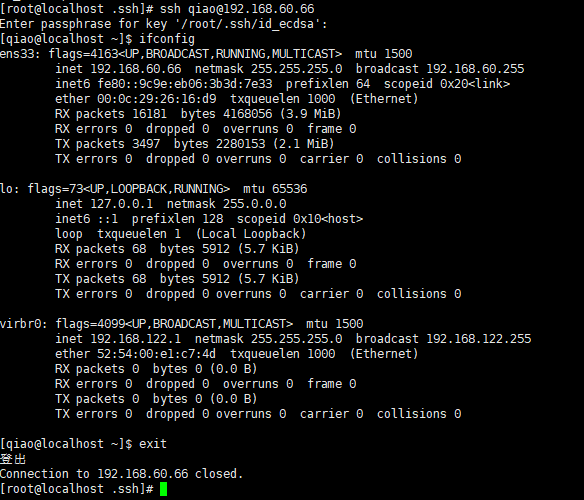
4. Use secret key authentication on the client
 **********************Log in with the user who created it********************