YUM overview
YUM
Software Update Mechanism Based on RPM Package Construction
Automatically resolving dependencies
All packages are provided by a centralized YUM software repository
The Way of Providing Software Warehouse
FTP service: ftp://...
HTTP service: http://...
Local directory: file://...
Sources of RPM Packages
Collection of RPM Packets Published by CentOS
RPM Packet Collection Published by Third Party Organizations
User-defined RPM package set
Building CentOS 7 Software Warehouse
RPM package from CentOS 7 CD
Provide to clients via FTP, HTTP, or local directories
FTP service name: vsftpd
FTP site: / var/ftp/centos7
Add unofficial RPM package groups to the software repository
Including all RPM packages with dependencies
Using createrepo Tool to Build Warehouse Data Files
View the YUM package
- yum info [software name] view service information
- yum list [software name] view yum repository
- Yum search & lt; keyword & gt; find out if there is software
Update YUM package
- yum update updates software packages, software and system kernels
- yun upgrade updates software packages, only updates software
Demo
Building remote YUM warehouse
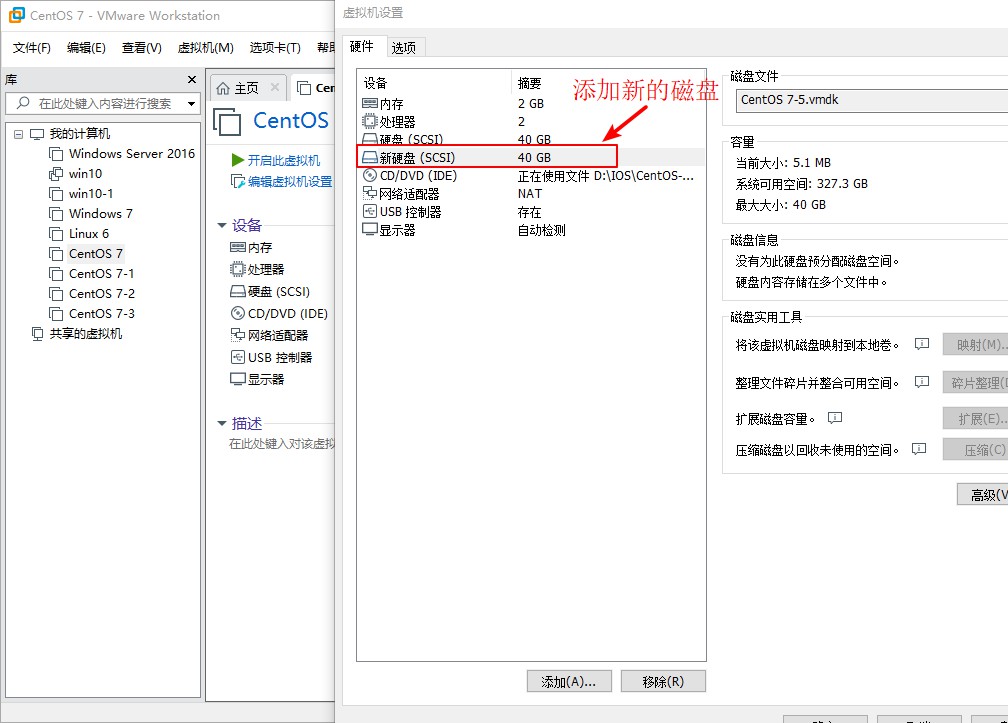
1. Open two CentOS 7 virtual machines in VMware 15. One serves as a server to build local YUM warehouse and FTP service. The other serves as a client to use server remote service. The server is renamed demo01 and the client is renamed demo02.
[root@localhost ~]# hostnamectl set-hostname demo01
[root@localhost ~]# su
[root@demo01 ~]#
[root@localhost ~]# hostnamectl set-hostname demo02
[root@localhost ~]# su
[root@demo02 ~]#
2. Mount the CentOS 7 Mirror File into the mnt directory in demo01
[root@demo01 ~]# Df-hT// View disk information to see if mirror files are added to CD-ROM
//File System Type Capacity Used Available% Mount Points
/dev/sda2      xfs        20G  3.3G   17G   17% /
devtmpfs       devtmpfs  898M     0  898M    0% /dev
tmpfs          tmpfs     912M     0  912M    0% /dev/shm
tmpfs          tmpfs     912M  9.0M  903M    1% /run
tmpfs          tmpfs     912M     0  912M    0% /sys/fs/cgroup
/dev/sda5      xfs        10G   37M   10G    1% /home
/dev/sda1      xfs       6.0G  174M  5.9G    3% /boot
tmpfs          tmpfs     183M   12K  183M    1% /run/user/42
tmpfs          tmpfs     183M   24K  183M    1% /run/user/0
/dev/sr0       iso9660   4.3G  4.3G     0  100% /run/media/root/CentOS 7 x86_64   //Read mirror files
[root@demo01 ~]# Mount/dev/sr0/mnt// Mount the mirror file to the MNT directory
mount: /dev/sr0 Write protection will be mounted as read-only
[root@demo01 ~]# Ls/mnt//Successful mounting
CentOS_BuildTag  EULA  images    LiveOS    repodata              RPM-GPG-KEY-CentOS-Testing-7
EFI              GPL   isolinux  Packages  RPM-GPG-KEY-CentOS-7  TRANS.TBL
3. Install FTP service in demo01, and often see if the FTP site is successfully created.
[root@demo01 ~]# yum install vsftpd -y
//Loaded plug-ins: fastest mirror, langpacks
Loading mirror speeds from cached hostfile
 * base: mirrors.zju.edu.cn
 * extras: mirrors.zju.edu.cn
 * updates: mirrors.zju.edu.cn
//Resolving dependencies
--> Inspection of affairs under way
---> software package vsftpd.x86_64.0.3.0.2-25.el7 Will be installed
...//Eliminate part of the content.
//Installation in progress: vsftpd-3.0.2-25.el7.x86_64 1/1
  //Verification: vsftpd-3.0.2-25.el7.x86_64 1/1

//Installed:
  vsftpd.x86_64 0:3.0.2-25.el7

//Complete!
[root@demo01 ~]# Ls/var//View directory information
account  cache  db     ftp    gopher    lib    lock  mail  opt       run    target  yp
adm      crash  empty  games  kerberos  local  log   nis   preserve  spool  tmp   //Successful creation of FTP site
4. Create a directory in the FTP site as the source of YUM warehouse, copy the mounted mirror file into the source directory of YUM warehouse, then create a directory, and use the createrepo tool to create an extended directory.
[root@demo01 ~]# Cd/var/ftp//Enter FTP Site Directory
[root@demo01 ftp]# ls // / View directory information
pub
[root@demo01 ftp]# mkdir centos7 // Create a directory as the source of YUM warehouse
[root@demo01 ftp]# ls // / Check to see if the creation was successful
centos7  pub
[root@demo01 ftp]# Cp-rf/mnt/* centos7/&// Copy all mounted mirror files into YUM warehouse source directory and execute in the background
[1] 2997
[root@demo01 ftp]# mkdir other// Create directories as extended directories
[root@demo01 ftp]# ls // / Check to see if the creation was successful
centos7  other  pub
[root@demo01 ftp]# Createrepo-g/mnt/repodata/repomd.xml other///Create extended data files using createrepo
Saving Primary metadata
Saving file lists metadata
Saving other metadata
Generating sqlite DBs
Sqlite DBs complete
[1]+  complete                  cp -i -rf /mnt/* centos7/                //Copy Mirror File Task Completion
[root@demo01 ftp]# ls centos7 / // Check whether the file was successfully copied into the directory
CentOS_BuildTag  EULA  images    LiveOS    repodata              RPM-GPG-KEY-CentOS-Testing-7
EFI              GPL   isolinux  Packages  RPM-GPG-KEY-CentOS-7  TRANS.TBL
[root@demo01 ftp]# cd other/repodata/// Enter the Extended Data File Directory
[root@demo01 repodata]# ls // / Check whether the data file was successfully created
01a3b489a465bcac22a43492163df43451dc6ce47d27f66de289756b91635523-filelists.sqlite.bz2
401dc19bda88c82c403423fb835844d64345f7e95f5b9835888189c03834cc93-filelists.xml.gz
5dc1e6e73c84803f059bb3065e684e56adfc289a7e398946574d79dac6643945-primary.sqlite.bz2
5f62201963ee83e178738d9f88078560377cc06f972a4c0094ab3be00cae515f-repomd.xml
6bf9672d0862e8ef8b8ff05a2fd0208a922b1f5978e6589d87944c88259cb670-other.xml.gz
7c36572015e075add2b38b900837bcdbb8a504130ddff49b2351a7fc0affa3d4-other.sqlite.bz2
c48538ac0f65ece36eb71d41b76f1eb1f98c58cc26777348490feaed8f38ab56-repomd.xml.gz
dabe2ce5481d23de1f4f52bdcfee0f9af98316c9e0de2ce8123adeefa0dd08b9-primary.xml.gz
repomd.xml
5. Open FTP service and check whether the port is successfully opened. Then close the firewall and enhanced security function to facilitate client access to the server.
[root@demo01 repodata]# cd ~// Home Directory
[root@demo01 ~]# System CTL start vsftpd // Open FTP service
[root@demo01 ~]# Netstat-ntap | grep 21 // / Check whether port 21 is open
tcp        0      0 127.0.0.1:6010          0.0.0.0:*               LISTEN      1621/sshd: root@pts
tcp        0      0 192.168.144.133:22      192.168.144.1:49340     ESTABLISHED 1621/sshd: root@pts
tcp6       0      0 :::21                   :::*                    LISTEN      3183/vsftpd    //Successfully opened
tcp6       0      0 ::1:6010                :::*                    LISTEN      1621/sshd: root@pts
[root@demo01 ~]# System CTL stop firewalld. service // / close firewall function
[root@demo01 ~]# setenforce 0//Turn off Enhanced Security Function
6. Install FTP tools in client demo02 and use FTP tools to access server FTP sites.
[root@demo02 ~]# Yum install ftp-y//install FTP tools
//Loaded plug-ins: fastest mirror, langpacks
base                                                                     | 3.6 kB  00:00:00
extras                                                                   | 3.4 kB  00:00:00
updates                                                                  | 3.4 kB  00:00:00
(1/4): base/7/x86_64/group_gz                                            | 166 kB  00:00:25
...//Eliminate part of the content.
  //Installation in progress: ftp-0.17-67.el7.x86_64 1/1
  //Verification: ftp-0.17-67.el7.x86_641/1

//Installed:
  ftp.x86_64 0:0.17-67.el7

//Complete!
[root@demo02 ~]# ftp 192.168.144.133//Access server FTP site
Connected to 192.168.144.133 (192.168.144.133).
220 (vsFTPd 3.0.2)
Name (192.168.144.133:root): ftp                     //Prompt for user name and use anonymous user access
331 Please specify the password.
Password:                                            //Input password prompt, anonymous user without password, just return directly.
230 Login successful.
Remote system type is UNIX.
Using binary mode to transfer files.                //Successful visit
ftp> ls                                              //View server FTP site information
227 Entering Passive Mode (192,168,144,133,94,209).
150 Here comes the directory listing.
drwxr-xr-x    8 0        0             220 Sep 17 09:00 centos7     //Established YUM Source Point Directory
drwxr-xr-x    3 0        0              22 Sep 17 09:00 other       //Extended data information
drwxr-xr-x    2 0        0               6 Oct 30  2018 pub
226 Directory send OK.
ftp> bye                                                      //Exit visit
221 Goodbye.
7. Enter the local YUM directory in the client, create a new directory in the directory, move the files from the source directory to the new directory, and then clear the YUM cache. Experiments are made to see if YUM can be used to install the software at this time.
[root@demo02 ~]# Cd/etc/yum.repos.d///Enter local Yum warehouse
[root@demo02 yum.repos.d]# ls // View
CentOS-Base.repo  CentOS-Debuginfo.repo  CentOS-Media.repo    CentOS-Vault.repo
CentOS-CR.repo    CentOS-fasttrack.repo  CentOS-Sources.repo
[root@demo02 yum.repos.d]# mkdir bak // Create a new directory
[root@demo02 yum.repos.d]# mv *.repo bak / // / Move all suffix repo files to the BAK directory
[root@demo02 yum.repos.d]# ls // / View directory information
bak
[root@demo02 yum.repos.d]# ls bak / see bak directory information
CentOS-Base.repo  CentOS-Debuginfo.repo  CentOS-Media.repo    CentOS-Vault.repo
CentOS-CR.repo    CentOS-fasttrack.repo  CentOS-Sources.repo       //Successful migration to bak directory
[root@demo02 yum.repos.d]# yum clean all // clear yum cache
//Loaded plug-ins: fastest mirror, langpacks
Loading mirror speeds from cached hostfile
There are no enabled repos.
 Run "yum repolist all" to see the repos you have.
 To enable Red Hat Subscription Management repositories:
     subscription-manager repos --enable <repo>
 To enable custom repositories:
     yum-config-manager --enable <repo>
[root@demo02 yum.repos.d]# yum install httpd // install http services using yum
//Loaded plug-ins: fastest mirror, langpacks
Loading mirror speeds from cached hostfile
There are no enabled repos.
 Run "yum repolist all" to see the repos you have.
 To enable Red Hat Subscription Management repositories:
     subscription-manager repos --enable <repo>
 To enable custom repositories:
     yum-config-manager --enable <repo>                  //could not be installed
8. Recreate the yum configuration file in the client Yum repository directory
[root@demo02 yum.repos.d]# vim centos7.repo//edit yum configuration file

[base]
name=centos7.Packages
baseurl=ftp://192.168.144.133/centos7//Write the location of yum warehouse software
enabled=1
gpgcheck=1                                       //Turn on key authentication
gpgkey=ftp://192.168.144.133/centos7/RPM-GPG-KEY-CentOS-7//Input Key Location

[other]
name=other.Packages
baseurl=ftp://192.168.144.133/other// Write an extended data file location for yum warehouse
enabled=1
gpgcheck=0
~
~
~
~
:wq                                        //Save and exit after completion
9. Reload the software information of Yum warehouse with the yum list command and install HTTP service with Yum to see if the yum warehouse is recreated
[root@demo02 yum.repos.d]# yum list//reload Yum repository
 Loaded plug-ins: fastest mirror, langpacks
Loading mirror speeds from cached hostfile
 ...
[root@demo02 yum.repos.d]# Yum install httpd-y// install http services using yum
 Loaded plug-ins: fastest mirror, langpacks
Loading mirror speeds from cached hostfile
 Resolving dependencies
 --> Inspecting business
 The package httpd.x86_64.0.2.4.6-67.el7.centos will be installed
 ...
Installed:
  httpd.x86_64 0:2.4.6-67.el7.centos

Installed as a dependency:
  apr.x86_64 0:1.4.8-3.el7                             apr-util.x86_64 0:1.5.2-6.el7
  httpd-tools.x86_64 0:2.4.6-67.el7.centos             mailcap.noarch 0:2.1.41-2.el7

Complete! // Successful installation
NFS Sharing Service
Network File System Network File System
Dependent on RPC (remote procedure call)
nsf-utils, rpcbind packages need to be installed
System Services nfs, rpcbind
Shared Profile: / etc/exports
Publishing shared resources using NFS
Install nfs-utils, rpcbind packages
yum install nfs-utils rpccbind
systemctl enable nfs
systemctl enable rpcbind
View service commands
Showmount-e to see if shared services are available
Demo
Building NFS Service
1. Open two CentOS 7 virtual machines in VMware 15. One serves as a server and the other serves as a client. The server provides storage space for the client to use. The server is renamed tast01 and the client is renamed tast02.
[root@localhost ~]# hostnamectl set-hostname tast01
[root@localhost ~]# su
[root@tast01 ~]#
[root@localhost ~]# hostnamectl set-hostname tast02
[root@localhost ~]# su
[root@tast02 ~]#
2. The newly added disk in the server is partitioned, formatted, and then automatically mounted in the mnt directory.
[root@tast01 ~]# Ls/dev/// Check the device directory to see if you can read the newly added hard disk
agpgart          hugepages           port      sr0     tty23  tty42  tty61    vcs5
autofs           hwrng               ppp       stderr  tty24  tty43  tty62    vcs6
block            initctl             ptmx      stdin   tty25  tty44  tty63    vcsa
bsg              input               pts       stdout  tty26  tty45  tty7     vcsa1
btrfs-control    kmsg                random    tty     tty27  tty46  tty8     vcsa2
bus              log                 raw       tty0    tty28  tty47  tty9     vcsa3
cdrom            loop-control        rtc       tty1    tty29  tty48  ttyS0    vcsa4
char             lp0                 rtc0      tty10   tty3   tty49  ttyS1    vcsa5
console          lp1                 sda       tty11   tty30  tty5   ttyS2    vcsa6
core             lp2                 sda1      tty12   tty31  tty50  ttyS3    vfio
cpu              lp3                 sda2      tty13   tty32  tty51  uhid     vga_arbiter
cpu_dma_latency  mapper              sda3      tty14   tty33  tty52  uinput   vhci
crash            mcelog              sda4      tty15   tty34  tty53  urandom  vhost-net
disk             mem                 sda5      tty16   tty35  tty54  usbmon0  vmci
dri              mqueue              sdb       tty17   tty36  tty55  usbmon1  vsock
fb0              net                 sg0       tty18   tty37  tty56  usbmon2  zero
fd               network_latency     sg1       tty19   tty38  tty57  vcs
full             network_throughput  sg2       tty2    tty39  tty58  vcs1
fuse             null                shm       tty20   tty4   tty59  vcs2
hidraw0          nvram               snapshot  tty21   tty40  tty6   vcs3
hpet             oldmem              snd       tty22   tty41  tty60  vcs4
[root@tast01 ~]# Fdisk/dev/sdb//Create disk partitions
//Welcome to fdisk (util-linux 2.23.2).

//Changes will stay in memory until you decide to write them to disk.
//Think twice before using write commands.

Device does not contain a recognized partition table
//Create a new DOS disk label using disk identifier 0xa928f95d.

//Command (Enter m for help):n
Partition type:
   p   primary (0 primary, 0 extended, 4 free)
   e   extended
Select (default p):
Using default response p
//Partition number (1-4, default 1):
//Start sector (2048-83886079, default 2048):
//The default value 2048 will be used
Last A sector, +A sector or +size{K,M,G} (2048-83886079,The default is 83886079):
//The default value 83886079 will be used
//Partition 1 has been set to the Linux type with a size of 40 GiB

//Command (Enter m for help):w
The partition table has been altered!

Calling ioctl() to re-read partition table.
//Synchronizing disks.
[root@tast01 ~]# Mkfs.xfs/dev/sdb1//formatted disk information
meta-data=/dev/sdb1              isize=512    agcount=4, agsize=2621376 blks
         =                       sectsz=512   attr=2, projid32bit=1
         =                       crc=1        finobt=0, sparse=0
data     =                       bsize=4096   blocks=10485504, imaxpct=25
         =                       sunit=0      swidth=0 blks
naming   =version 2              bsize=4096   ascii-ci=0 ftype=1
log      =internal log           bsize=4096   blocks=5119, version=2
         =                       sectsz=512   sunit=0 blks, lazy-count=1
realtime =none                   extsz=4096   blocks=0, rtextents=0
[root@tast01 ~]# Vim/etc/fstab//Enter Edit Automount Profile

#
# /etc/fstab
# Created by anaconda on Sat Aug 10 03:42:29 2019
#
# Accessible filesystems, by reference, are maintained under '/dev/disk'
# See man pages fstab(5), findfs(8), mount(8) and/or blkid(8) for more info
#
UUID=729c9a26-dfdc-40f9-ae91-1ade55be51bb /                       xfs     defaults        0 0
UUID=9559d8d9-8f6a-4adb-a41f-02862b167946 /boot                   xfs     defaults        0 0
UUID=5ed35562-b598-43e0-8f8a-db788aa06d40 /home                   xfs     defaults        0 0
UUID=bcc2cc5c-4f4e-4e1d-b4e1-245cfed5cf9d swap                    swap    defaults        0 0
/dev/sdb1/      /mnt    xfs     defaults        0 0           //Setting up automatic mounting of sdb1 disk
~
~
~
~
:wq                        //Save exit
[root@tast01 ~]# Mount-a//Load Automount Files
[root@tast01 ~]# Df-h//View Disk Information
//File system capacity used Available% mount point
/dev/sda2        20G  3.3G   17G   17% /
devtmpfs        898M     0  898M    0% /dev
tmpfs           912M     0  912M    0% /dev/shm
tmpfs           912M  9.0M  903M    1% /run
tmpfs           912M     0  912M    0% /sys/fs/cgroup
/dev/sda5        10G   37M   10G    1% /home
/dev/sda1       6.0G  174M  5.9G    3% /boot
tmpfs           183M   12K  183M    1% /run/user/42
tmpfs           183M     0  183M    0% /run/user/0
/dev/sdb1        40G   33M   40G    1% /mnt           //Successful mount
3. Install the NFS package in the server and set the service as boot-up and self-start
[root@tast01 ~]# Yum install nfs-utlis rpcbind-y//install software
//Loaded plug-ins: fastest mirror, langpacks
base                                                                     | 3.6 kB  00:00:00
extras                                                                   | 3.4 kB  00:00:00
updates                                                                  | 3.4 kB  00:00:00
(1/4): base/7/x86_64/group_gz                                            | 166 kB  00:00:25
...//Eliminate part of the content.
  //Verification: rpcbind-0.2.0-47.el7.x86_641/2
  //Verification: rpcbind-0.2.0-42.el7.x86_64 2/2

//Updated:
  rpcbind.x86_64 0:0.2.0-47.el7

//Complete!
[root@tast01 ~]# System CTL enable NFS // / Set up boot-up self-startup
Created symlink from /etc/systemd/system/multi-user.target.wants/nfs-server.service to /usr/lib/systemd/system/nfs-server.service.
[root@tast01 ~]# System CTL enable rpcbind // / Settings Open Self-Start
Created symlink from /etc/systemd/system/multi-user.target.wants/rpcbind.service to /usr/lib/systemd/system/rpcbind.service.
4. Edit the NFS service profile and start the service to see if the service is enabled; close the firewall and enhanced security functions; and then use the command to see if the service is available.
[root@tast01 ~]# Vim/etc/exports//edit shared service configuration file

/mnt    192.168.144.0/24(rw,sync,no_root_squash)  //Configuration of shared disks, usable segment information, readable and writable permissions, synchronization information, without degrading processing
~
~
~
:wq             //Save exit
[root@tast01 ~]# System CTL start NFS // start service
[root@tast01 ~]# System CTL start rpcbind // start service
[root@tast01 ~]# Netstat-ntap | grep RPC // / Check if the service is started
tcp        0      0 0.0.0.0:20048           0.0.0.0:*               LISTEN      3774/rpc.mountd
tcp        0      0 0.0.0.0:37286           0.0.0.0:*               LISTEN      3773/rpc.statd
tcp6       0      0 :::20048                :::*                    LISTEN      3774/rpc.mountd
tcp6       0      0 :::52041                :::*                    LISTEN      3773/rpc.statd   //Successful startup
[root@tast01 ~]# System CTL stop firewalld. service // / close firewall
[root@tast01 ~]# setenforce 0//Turn off Enhanced Safety Function
[root@tast01 ~]# Showmount-e//Check if the service is available
Export list for tast01:
/mnt 192.168.144.0/24                                     //Successful service delivery
5. Turn off the firewall function and enhanced security function in the client, because we need to use the client to provide website services to facilitate our access to the website, and then install http services.
[root@tast02 ~]# systemctl stop firewalld.service
[root@tast02 ~]# setenforce 0
[root@tast02 ~]# yum install httpd -y
 Loaded plug-ins: fastest mirror, langpacks
Loading mirror speeds from cached hostfile
 * base: mirrors.163.com
 * extras: mirrors.163.com
 * updates: mirrors.cn99.com
 Resolving dependencies
 --> Inspecting business
 The package httpd.x86_64.0.2.4.6-89.el7.centos.1 will be installed
 ...
Installed:
  httpd.x86_64 0:2.4.6-89.el7.centos.1

Installed as a dependency:
  apr.x86_64 0:1.4.8-3.el7_4.1                         apr-util.x86_64 0:1.5.2-6.el7
  httpd-tools.x86_64 0:2.4.6-89.el7.centos.1           mailcap.noarch 0:2.1.41-2.el7

Complete!
6. The client http service site uses the disk added in the server to store the website information, and automatically mounts the disk settings added by the server to the http service site in the client.
[root@tast02 ~]# Vim/etc/fstab//edit automount configuration file

#
# /etc/fstab
# Created by anaconda on Sat Aug 10 03:42:29 2019
#
# Accessible filesystems, by reference, are maintained under '/dev/disk'
# See man pages fstab(5), findfs(8), mount(8) and/or blkid(8) for more info
#
UUID=729c9a26-dfdc-40f9-ae91-1ade55be51bb /                       xfs     defaults        0 0
UUID=9559d8d9-8f6a-4adb-a41f-02862b167946 /boot                   xfs     defaults        0 0
UUID=5ed35562-b598-43e0-8f8a-db788aa06d40 /home                   xfs     defaults        0 0
UUID=bcc2cc5c-4f4e-4e1d-b4e1-245cfed5cf9d swap                    swap    defaults        0 0
192.168.144.133:/mnt    /var/www/html   nfs     defaults,_netdev        0 0   //Add automount entries
~
~
~
:wq        //Save exit
[root@tast02 ~]# Mount-a//reload mount information
[root@tast02 ~]# df -hT
//File System Type Capacity Used Available% Mount Points
/dev/sda2            xfs        20G  3.4G   17G   17% /
devtmpfs             devtmpfs  898M     0  898M    0% /dev
tmpfs                tmpfs     912M     0  912M    0% /dev/shm
tmpfs                tmpfs     912M  9.0M  903M    1% /run
tmpfs                tmpfs     912M     0  912M    0% /sys/fs/cgroup
/dev/sda5            xfs        10G   37M   10G    1% /home
/dev/sda1            xfs       6.0G  174M  5.9G    3% /boot
tmpfs                tmpfs     183M   12K  183M    1% /run/user/42
tmpfs                tmpfs     183M     0  183M    0% /run/user/0
192.168.144.133:/mnt nfs4       40G   33M   40G    1% /var/www/html      //Successful mount
7. Edit the index.html file in the http service site, and then enable the http service.
[root@tast02 ~]# Cd/var/www/html///Enter the site
[root@tast02 html]# ls // / See if there are any files
[root@tast02 html]# vim index.html//edit index.html file

<h1>this is nfs web </h1>              //Editorial content
~
~
~
:wq                                   //Save exit
[root@tast02 html]# cat index.html // View index.html content
<h1>this is nfs web </h1>                   //Display content information
[root@tast02 html]# System CTL start httpd // enable http services
8. Visit the http website built by the client in the host to see if the service is successfully built.
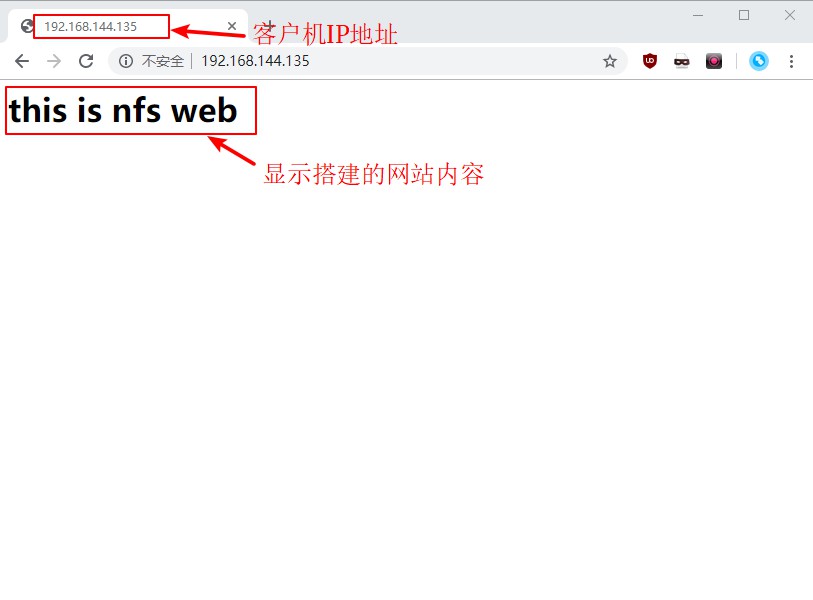
9. Go back to the server to see if there is an index.html file we edited in the mnt directory, and then check whether the content of the file is our edited content.
[root@tast01 ~]# Cd/mnt//Enter MNT directory
[root@tast01 mnt]# ls // / View directory content
index.html                    //Display the files we created
[root@tast01 mnt]# cat index.html // / View file content
<h1>this is nfs web </h1>             //Show what we wrote