Chapter 23 configuration management Ansible and Saltstack
1. Configuration management system
The most commonly used CM systems: Ansible, Salt, Puppet, Chef
Interpretation of configuration management terms
| Terms we use | Ansible | Salt |
|---|---|---|
| operation | task | state |
| op type | module (template) | function |
| Operation list (OP) | Tasks (multiple tasks) | states (state set) |
| binding | playbook (script) | top file (configuration management entry file) |
| master host | control | master (master) |
| client host | Host (host) | minion (controlled) |
Ansible easy to use
Saltstack, come on
Both need yaml
2,Ansible
Ansible has no server daemon and does not install its own software on the client, so it is actually a set of commands (the most notable of which are ansible plybook, ansible vault, and ansible) installed on the system you want to use to manage the client.
The default location of Ansible's main configuration file is / etc / Ansible / Ansible cfg. It is recommended to add the following line to the end of the file.
[ssh_connection]
pipelining = true
These two lines enable the pipelining feature of SSH, which can significantly improve performance.
Ansible can easily combine system wide configuration with personal configuration. Do not delete the system configuration, just create ~ / ansible.cfg and set the location of the manifest file and role directory to overwrite it.
[defaults]
inventory = ./hosts
roles_path = ./roles
The list is the list of the client system, and the role is the operation set that abstracts all aspects of the client configuration.
Client settings
- SSH access;
- python interpreter
- The client will not report home to Ansible, so you need to add it to Ansible's host list. By default, the manifest is a file named / etc/ansible/hosts.
[wedservers]
www[01:100].example.com
[dbservers]
db-[a:f].example.com
- For example, the following command selects the webservers group using an extended matching expression and Ping each member of the group.
$ ansible 'web*' -m ping
task list
Ansible calls the operation "task" and the task set in a single file "task list". Like most ansible configurations, the task list is YAML, so the file name suffix is yml.
Variable assignment: each host has its own set of variables defined in YAML format. By default, these definitions are saved in / etc/ansible/host_vars and / etc / ansible / group_ A file named after a host or group in the vars directory. It can be used if necessary yml as the suffix of the file name.
As follows: put the location of sudoers file and the user name of the administrator into a separate variable file, such as group_vars/all/admin.yml
sudoers_path: /etc/sudoers
admins:
    - { username: kolor }
    - { username: kolor }
The value of admins is a hash array, which is iterated to create all accounts. Iteration through with_items (it is the attribute of the task, not the operation performed by the task)
- name: Create personal groups for admins
  groups: name={{ item.username }}
  with_items: "{{ admins }}"
- name: Create admin accounts
  user:
    name: "{{ item.username }}"
    comment: "{{ item.fullname }}"
    group: "{{ item.username }}"
    groups: wheel
  with_items: "{{ admins }}"
From the perspective of YAML and JSON, each task forms a list. Each dash in the left margin indicates the start of a new task, and the task itself is described in a hash.
state parameter
In Ansible, the operation module often performs different tasks according to the state you request. For example, for the package module, state=present will install the package, state=absent will delete the package, and state=lastest will ensure that the package exists and is up-to-date.
Specifically: https://blog.csdn.net/qq_39578545/article/details/106795139
3,Saltstack
Salt's communication bus uses TCP ports 4505 and 4506 at the server to ensure that the firewall or packet filter between the server and the client allows the traffic on these ports to pass through.
Whether on the master server or the minion, the Salt configuration file is located in / etc/salt.
Salt maintains a separation between the configuration file (pillar) that sets the variable value and the configuration file (states) that defines the operation. This distinction extends to the top level: you must arrange different positions for the two configuration hierarchies. Both are under / srv by default, which is equivalent to / etc/salt/master file.
file_roots:
	base:
		- /srv/salt
pillar_roots:
	base:
		- /srv/pillar
Pillar is evaluated on the master side and then passed to minion as a single unified JSON hierarchy.
minion
Minion settings: / set master in etc/salt/minion, and restart salt minion after modifying the file.
master: salt.example.com
id: new-client.example.com
Salt master can accept client registration from any machine as long as these machines can access it, but each client can become active only after you use the salt key command on the main configuration server.
$ sudo salt-key -l unaccepted
$ sudo salt-key -yA

accept key Later pass test The module detects the connectivity of the server.
$ sudo salt new-client.example.com test.ping

new-client.example.com It looks like a host name, but it's not.
It's just a machine Salt ID,Should ID Is a string, which is the same as the host name by default,
But you can/etc/salt/minion Set it to whatever you like in the file, as shown above
minion matching
Example:
base:
  '*.example.com':
    - baseline
  'G@os:FreeBSD':
    - freebsd
Where the asterisk matches example All client ID S in. Com. You can only use '*' here, which is an extended matching pattern. The prefix G @ is used to match the grain value. The grain name to be checked is os, and the value to be searched is freebsd. Extended matching can also be used here.
Another intuitive way to write.
'os:FreeBSD':
	- match: grain
	- freebsd
However, the writing of @ can be clearly extended to complex expressions that design parentheses and Boolean operations.
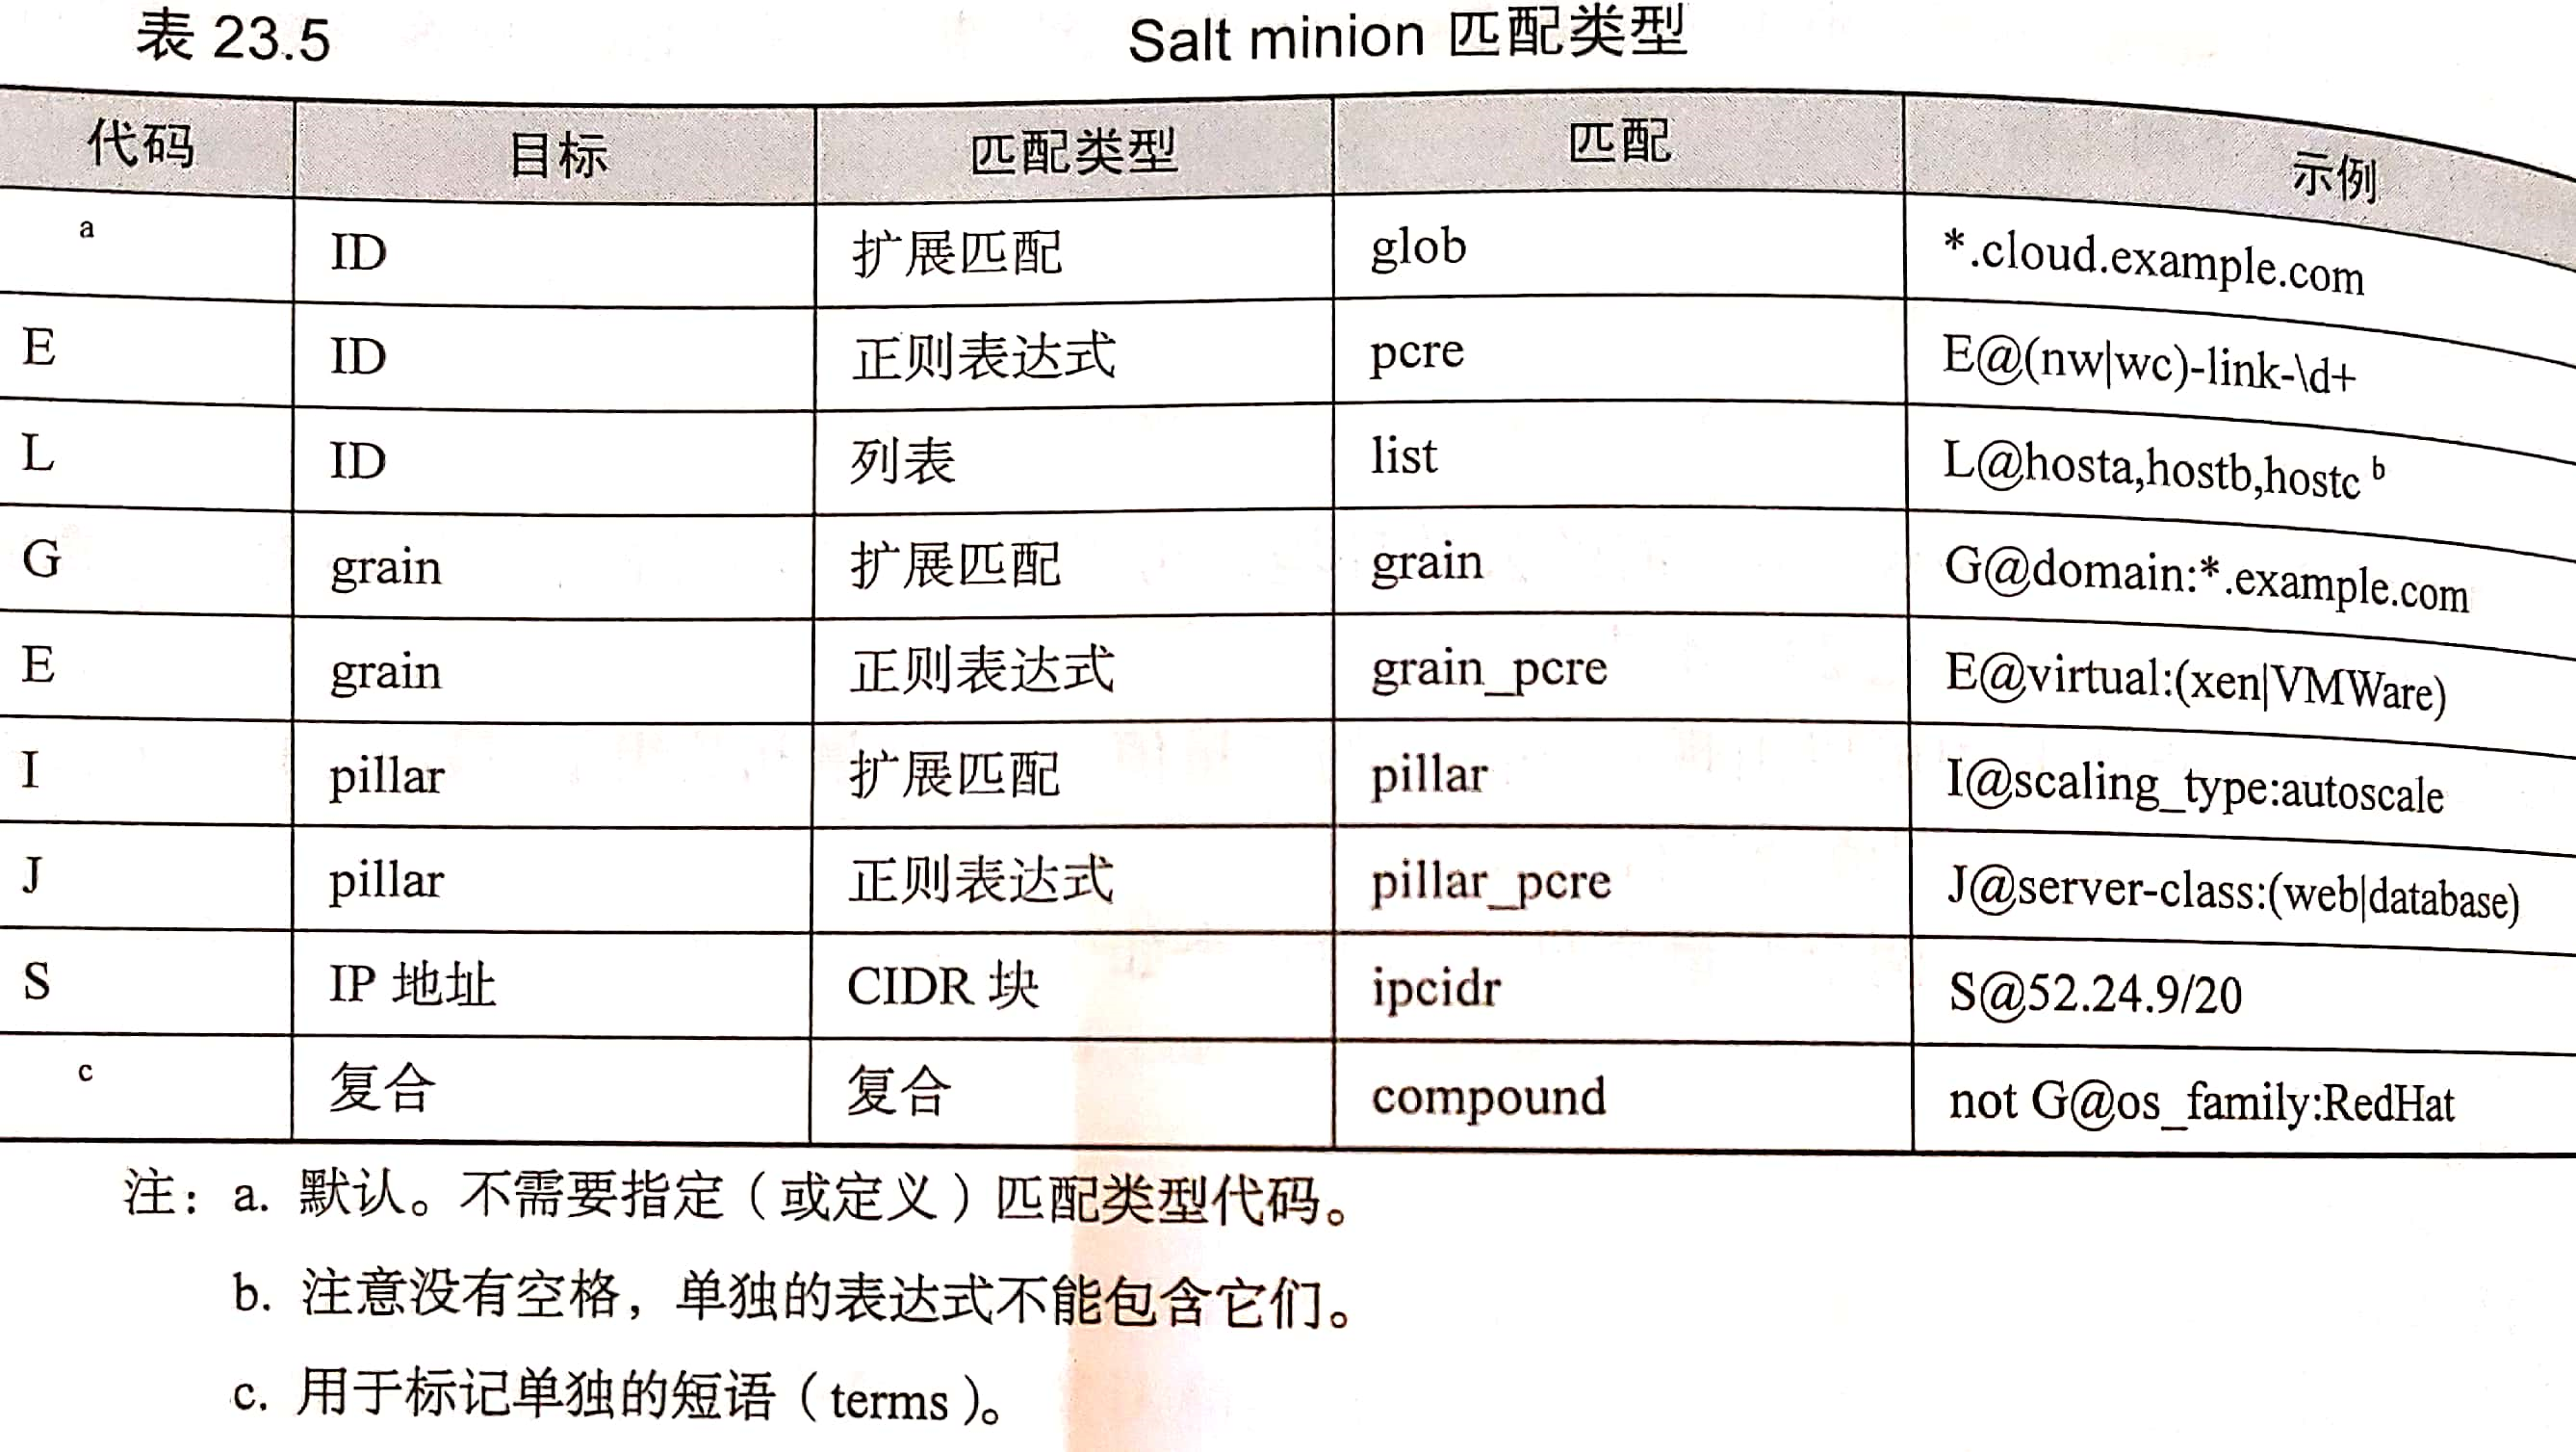
What is the value of the matched grain or pillar
$ salt minion grains.items
 or
$ salt minion pillar.items
State of saltstack SLS and state The difference between highstate
state. The default running environment of SLS is the base environment, but it does not read top SLS (top.sls defines the running environment and the SLS to be run). About state The official document of SLS is as follows:
salt.modules.state.sls(mods, saltenv='base', test=None, exclude=None, queue=False, env=None,**kwargs)
saltenv here refers to the running environment, and the default is the base environment.
state.highstate: This is the global. All environments and all States take effect. It will read the top of each environment sls, and effective for all sls.
Specifically: https://blog.csdn.net/qq_39578545/article/details/114994167
Chapter 24 Virtualization (omitted)
Hypervisor
Hypervisor, also known as virtual machine monitor (English: virtual machine monitor, abbreviated as VMM), is the software, firmware or hardware used to establish and execute virtual machines. The computers used by the hypervisor to execute one or more virtual machines are called host machine s, and these virtual machines are called guest machine s.
KVM: https://blog.csdn.net/qq_39578545/article/details/115052958
Chapter 25 containers
Docker: https://blog.csdn.net/qq_39578545/article/details/107741565
K8s: https://blog.csdn.net/qq_39578545/category_10080396.html
Chapter 26 continuous integration and delivery CI/CD
Jenkins: https://blog.csdn.net/qq_39578545/article/details/115042126
Git: https://blog.csdn.net/qq_39578545/article/details/115584985
CI&CD:
- Continuous integration focuses on integrating the work of various developers into a code warehouse, which is usually carried out several times a day. The main purpose is to find integration errors as soon as possible, so as to make the team more closely combined and cooperate better.
- The purpose of continuous delivery is to minimize the friction inherent in the team during deployment or release. Its implementation can usually automate each step of building and deployment, so that the code release can be completed safely at any time (ideally).
- Continuous deployment is a higher degree of automation. Whenever the code changes greatly, it will be built / deployed automatically.
We can realize fully automatic deployment + testing through Jenkins tool platform. It is an extensible continuous integration engine and an open source software project. It aims to provide an open and easy-to-use software platform to make the continuous integration of software possible. Jenkins is very easy to install and configure and easy to use. Facilitate the following personnel:
- Developers: after writing the code, you don't need to compile and package the source code yourself. You can store the code branches in SVN and GIT warehouses directly. war source code automatically puts the code on the server
- Operation and maintenance personnel: reduce the error rate of manual intervention. ansible can complete the complicated uploading code, manual backup and update of operation and maintenance personnel at the same time
Install Jenkins and associate Gitlab: https://blog.csdn.net/weixin_45310323/article/details/107497121
Examples of Automated Deployment Based on gitlab and jenkins: https://blog.csdn.net/aaaaaab_/article/details/82012044
git's official third-party service integration jenkins: https://gitee.com/help/articles/4193#article-header13
Automatic operation and maintenance Series II: actual combat between Jenkins and gitlab: https://blog.csdn.net/pcn01/article/details/105412495
Trigger jenkins with webhook of gitlab: https://www.jianshu.com/p/2b2c204dcbe2
The following occurs when Jenkins is installed: the instance of Jenkins appears to be offline.

modify/var/lib/jenkins/hudson.model.UpdateCenter.xml
 The file is jenkins Download the source address of the plug-in. Change the default address jenkins The default is: https://updates.jenkins.io/update-center.json
 Other domestic alternate addresses (optional):
https://mirrors.tuna.tsinghua.edu.cn/jenkins/updates/update-center.json
http://mirror.esuni.jp/jenkins/updates/update-center.json
Log in jenkins on the browser again and generate a pair of secret keys on the linux machine
# ssh-keygen -f ~/.ssh/jenkins # generate key pair
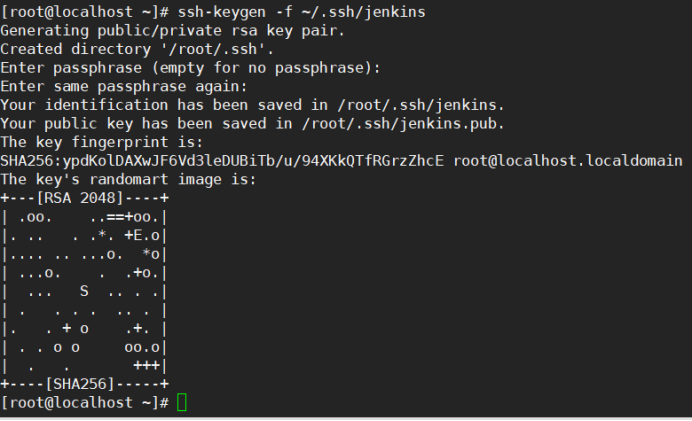
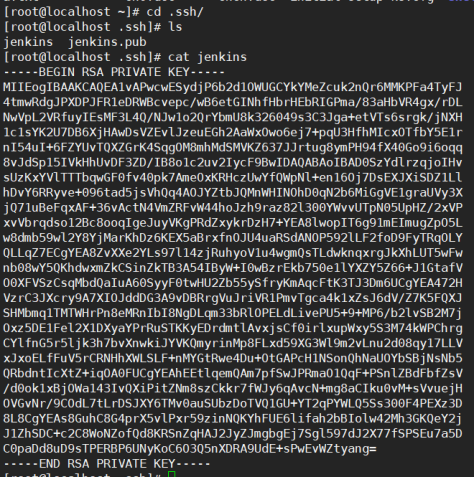
System management – > system settings, find the previously installed Publish over SSH plug-in, and fill in the password set when generating the secret Key. If not, leave it blank, leave Path to key blank, and paste the Key / root / SSH / Jenkins file content.

Then add SSH Servers and fill in the corresponding hostname, which is the machine to publish PHP code

Next, you need to copy the public key to the corresponding hostname machine (web)
Jenkins machine:
# cat jenkins.pub
hostname machine:
# cd ~/.ssh/
# vim authorized_keys				#Write content
Test whether there is a problem with the connection on the browser. Click Test Configuration. If there is no problem, Success will be displayed on the left.
Brief description of gitlab+jenkins service: https://blog.csdn.net/aaaaaab_/article/details/82012044
GitLab is a code warehouse used to manage code. Jenkins is an automated server that can run a variety of automated build, test, or deployment tasks.
Therefore, by combining the two, developers can submit code to GitLab, and Jenkins can automatically run the tasks of testing, construction and deployment at a certain frequency, so as to help the development team integrate and release code more efficiently.
Configure the secret free connection of gitlab:
[root@localhost ~]# cd .ssh/
[root@localhost .ssh]# ls
authorized_keys  id_rsa  id_rsa.pub  known_hosts
[root@localhost .ssh]# cat id_rsa.pub
ssh-rsa AAAAB3NzaC1yc2EAAAADAQABAAABAQDLfbD7Cp9UddglMLJgc+FHXXk54MrOi7ufyPhRcY2Ugibk8fIgnVKnhjxn5LjkXgqFb09hVeiM6iMnnn0/QkHLv6TuLAJkO5lFQWvivmzXZAvn/hbTyRoBX/Dokre0IGJSS+b/JUG9kXRYxt3GD38D6NbnCszkv+v/3VkzRvmkPxim2WsXu0tqUrU7ZmLxSehHQ0Rso9uChW3UeR+yEczOyuqOSxPuPJ1Vjm+K7KuyS+TPw49Uz/O9zD6bClWaFX8lrBZ6cxNXNSBfpJQqzPOdk/odTPeGyLx5/oiLC+iPpUjuhzBYHsgMTskTNOthcKNEzL9zStpNnC8rl2v2P0R3 root@localhost.localdomain
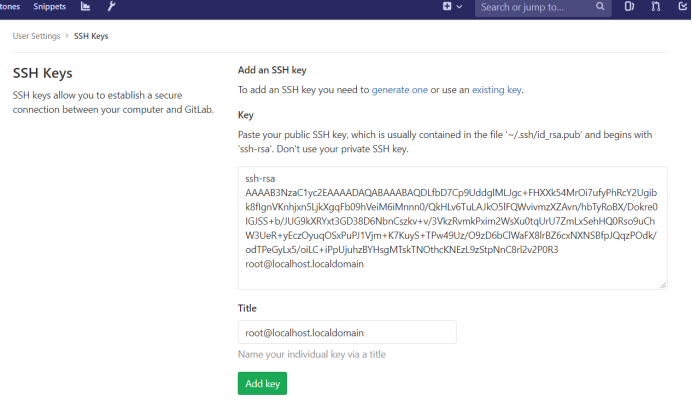
Access token:

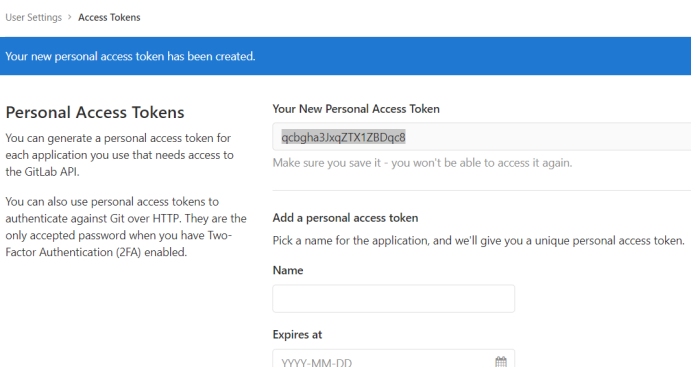
qcbgha3JxqZTX1ZBDqc8
jenkins executes the following command to obtain authentication through qcbgha3JxqZTX1ZBDqc8
[root@jenkins ~]# curl -X PUT --header "PRIVATE-TOKEN: qcbgha3JxqZTX1ZBDqc8" 'http://10.0.100.129/api/v4/application/settings?allow_local_requests_from_hooks_and_services=true'
The Secret Toekn in the figure below is 60d60e9f8499e16ce142adf4ddb34779 generated by jenkins trigger,
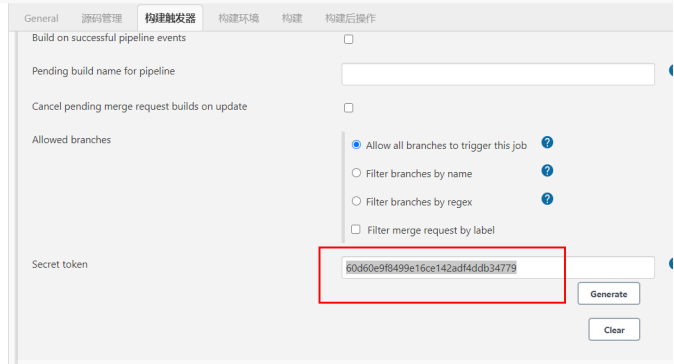
Then go back to the settings of the gitlab project. The URL is the address of the jenkins project, and the Secret Toekn is generated by the jenkins trigger.
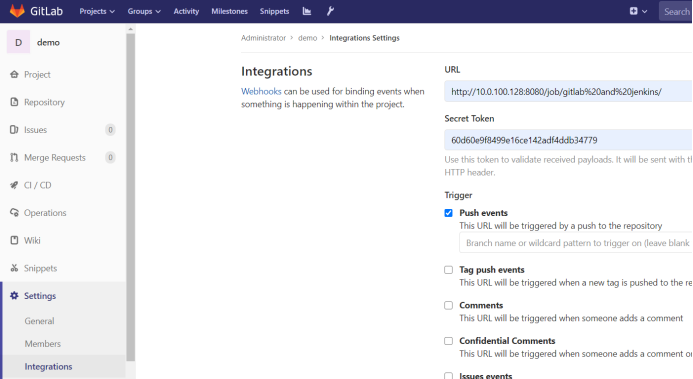
Pull down and click Add webhook
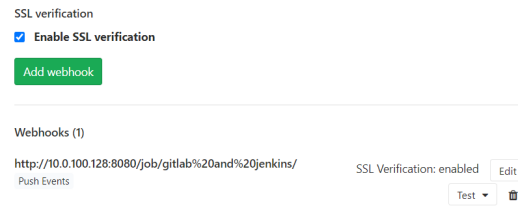
Ready to push it up
[root@localhost demo]# git add hello.txt
[root@localhost demo]# git commit -m "add hello.txt"

*** Please tell me who you are.
Run
  git config --global user.email "you@example.com"
  git config --global user.name "Your Name"
to set your account's default identity.
Omit --global to set the identity only in this repository.
fatal: unable to auto-detect email address (got 'root@localhost.(none)')

solve:
git config --global user.name "root"
git config --global user.email 123456@qq.com

git config --global user.email "Your email is git Email address"
git config --global user.name "Your username"

[root@web demo]# git add hello.txt
[root@web demo]# git commit -m "add hello.txt"
[master 6fb9c0c] add hello.txt
 1 file changed, 3 insertions(+)
 create mode 100644 hello.txt
[root@web demo]# git push origin master
Counting objects: 4, done.
Delta compression using up to 4 threads.
Compressing objects: 100% (2/2), done.
Writing objects: 100% (3/3), 287 bytes | 0 bytes/s, done.
Total 3 (delta 1), reused 0 (delta 0)
To git@10.0.100.129:root/demo.git
   242722d..6fb9c0c  master -> master
You can see the submission information on the Jenkins web page. This is the simple gitlab integration of Jenkins. You can also set email notification later,
The rest of the chapters are literary and may not be used in practical work. Therefore, I have roughly finished reading the technical manual for Linux system management.