The second part (Networking) describes the protocols used on UNIX system and the technology used to set up, expand and maintain network and Internet Oriented server. In addition, it also introduces the upper network software, including domain name system, e-mail, single sign on and Web hosting.
Chapter 13 TCP/IP networking
1. Basic knowledge
OSI seven layer model structure
- Application layer message message HTTPS DNS FTP application layer protocol
- Presentation layer PPDU
- Session layer SODU
- Transport layer segment message segment port: 16bit HTTP
- Network layer package / packet router IP:32bit
- MAC physical address length of frame switch in data link layer: 48bit
- Physical layer bit hub
Functions of each layer of OSI seven layer model
- Application layer function: an interface between network services and end users. Provide convenient interface and running program. (provides inter application communication)
Protocols: HTTP FTP TFTP SMTP SNMP DNS TELNET HTTPS POP3 DHCP
FTP active mode and passive mode
FTP in active mode means that the server actively connects to the data port of the client, and FTP in passive mode means that the server passively waits for the client to connect to its own data port. - Presentation layer function: encryption, which deals with the presentation of user information, such as coding, data format conversion, encryption and decryption. (processing data format, data encryption)
Formats include JPEG, ASCll, DECOIC, encryption format, etc - Session layer function: provide the method of establishing and using connection to the presentation layer of two entities (simplex, half duplex, full duplex). (establish, maintain and manage sessions)
- Transport layer function: complete end-to-end error detection and flow control (TCP for reliable connection, UDP for no connection and unreliable)
- Network layer function: determine how to select the route of the data packet from the source end to the destination end, that is, use the logical address for location selection. (addressing and routing)
The protocols are: ICMP IGMP IP (IPV4 IPV6) ARP RARP - Data link layer: it defines how to transmit data on a single link. The transmitted data unit is called data frame. MAC address addressing (providing media access, link management, etc.) establishes logical connection, hardware address addressing, error checking and other functions. The bits are combined into bytes and then into frames, and the medium is accessed with MAC address. The error is found but cannot be corrected
- Physical layer function: provide transmission equipment and interconnection equipment for data communication, and provide a reliable environment for data transmission. The transmitted data unit is called bit stream. (bitstream transmission)
Grouping and encapsulation:
Data is transmitted on the network in the form of packets, and the link layer limits the maximum length of data. Each group consists of a header and a payload. The header indicates where the group comes from and where to go. It also includes checksum, protocol specific information or other processing instructions. The load is the data to be transmitted.
The name of the original data unit depends on the specific protocol layer.
In the link layer, it is called frame;
In the network layer, it is called packet;
In the transport layer, it is called segment;
The link layer is divided into two parts:
- Media Access Control (MAC) sublayer.
- Logical Link Control (LLC) sublayer.
- The MAC sublayer processes the transmission medium and sends packets to the line. LLC is responsible for framing operation.
Maximum transmission unit (MTU): 1500 bytes
Address type
- Unicast: address pointing to a single network interface;
- Multicast: address pointing to a group of hosts;
- Broadcast: address to all hosts in the local subnet;
- Anycast: refers to the address of any one of a group of hosts.
- Multicast addressing helps to implement applications such as video conferencing because the same batch of packets must be sent to all participants. Internet Group Management Protocol (IGMP) can build and manage host groups, which can be regarded as a multicast target.
- Anycast address enables packets to be sent to the nearest one among multiple targets (from the perspective of network routing), so as to achieve load balancing at the network layer.
IPv4 address classification, first byte range
- Class A: 1 ~ 127
- Class B: 128 ~ 191
- Class C: 192 ~ 223
- Class D: 224 ~ 239
- Class E: 240 ~ 255
Private address:
- Class A address 10.0.0.0/8: 10.0.0.0 ~ 10.255.255.255
- Class B address 172.16.0.0/12: 172.16.0.0 ~ 172.31.255.255
- Class C address 192.168.0.0/16: 192.168.0.0 ~ 192.168.255.255
TCP/IP four layer model
TCP/IP model includes the following four layers: network interface layer, network layer, transport layer and application layer
- Application layer: directly provide services for the user's application process.
- Transport layer: responsible for providing services for the communication between two host processes.
- Internet layer: it is responsible for providing basic data packet transmission function, so that each data packet can reach the destination host.
- Network interface layer: receive and transmit IP packets, receive physical frames from the network, extract IP packets and transfer them to the next layer, and manage the actual network media.
TCP header content
- Serial number: seq serial number, accounting for 32 bits. It is used to identify the byte stream sent from the TCP source to the destination. It is marked when the initiator sends data.
- Confirmation No.: ack serial number, accounting for 32 bits. The confirmation serial number field is valid only when the ACK flag bit is 1. ack=seq+1
- Flag bits: 6 in total, namely URG, ACK, PSH, RST, SYN, FIN, etc. the specific meanings are as follows:
URG: emergency pointer valid
ACK: confirm that the serial number is valid
PSH: the receiver should deliver this message to the application layer as soon as possible.
RST: reset connection.
SYN: initiate a new connection.
FIN: release a connection.
Three handshakes and four waves

Concept: it refers to three interactions between the server and the client in the preparation stage of sending data
First handshake: when establishing a connection, the client sends a SYN packet to the server and enters SYN_ Send status, waiting for server confirmation.
Second handshake: when the server receives the request from the client, it should give the client an ACK of confirmation information and send SYN packet at the same time. At this time, the server enters SYN_RECV status.
The third Handshake: after receiving the ACK+SYN package sent by the server, the client sends an ACK to the server. After sending, the client and the server enter the ESTABLISHED(TCP connection succeeded) state and complete the three handshakes.
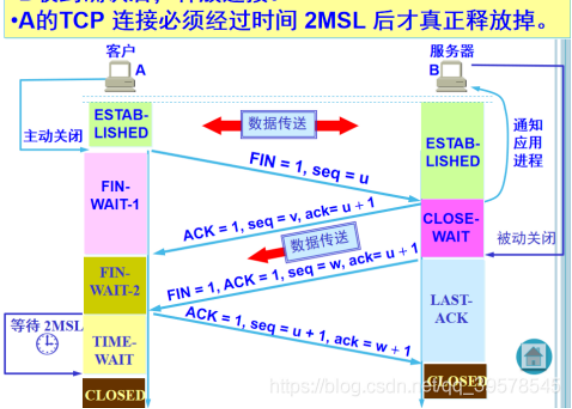
Concept: the so-called four wave refers to the process of closing a TCP connection. When a TCP connection is disconnected, the client and server need to send a total of four packets for confirmation.
First wave: the client sends a FIN to close the data transmission from the client to the server, and the client enters FIN_WAIT_1 status.
Second wave: after receiving FIN, the server sends an ACK to the client, confirms that the serial number is received serial number + 1 (the same as SYN, one FIN occupies one serial number), and the server enters CLOSE_WAIT status.
The third wave: the server sends a FIN to close the data transmission from the server to the client, and the server enters LAST_ACK status.
The fourth wave: after the client receives FIN, the client enters TIME_WAIT status, and then send an ACK to the server. Confirm that the serial number is received serial number + 1. The server enters the CLOSED state and completes four waves.
Subnet division and CIDR (classless inter domain routing)
Subnet Division: it is a direct extension.
CIDR: depending on the explicit network mask to define the boundary between the network and the host in the address, multiple networks can be aggregated through a short CIDR mask. Therefore, CIDR is sometimes called hypernetwork.
Class A address is 10.0.0.0 ~ 10.255.255.255, and its CIDR range is 10.0.0.0/8:
Network address translation NAT
There are three types of NAT:
- Static nat (static NAT) (one-to-one). Convert the private IP address of the internal network to the public IP address. The IP address pair is one-to-one and remains unchanged.
- Dynamic address nat (pooled NAT) (many to many). When converting the private IP address of the internal network to the public IP address, the IP address is uncertain and random. All private IP addresses authorized to access the Internet can be randomly converted to any specified legal IP address. In other words, as long as you specify which internal addresses can be converted and which legal addresses can be used as external addresses, dynamic NAT conversion can be carried out. Dynamic NAT is to configure an external IP address pool on the router. When an internal computer needs to communicate with the outside, it will dynamically take an external IP from the address pool and bind their corresponding relationship to the NAT table. After the communication is completed, the external IP will be released for other internal IP address conversion. This DHCP lease IP has similarities. When the legal IP address provided by ISP is slightly less than the number of computers in the network. Dynamic conversion can be adopted.
- Network Address Port Translation (NAPT) (port level NAT) (many to one). Change the source port of outgoing data packet and carry out port conversion, and adopt port multiplexing mode. All hosts in the internal network can share a legal external IP address to access the Internet, which can save IP address resources to the greatest extent. At the same time, it can also hide all hosts inside the network to effectively avoid attacks from the Internet. Therefore, at present, PAT rules are the most widely used in the network. This is the most commonly used NAT technology and one of the most important reasons why IPv4 can be maintained today. It provides a many-to-one way. For multiple intranet IP addresses, boundary routing can assign them an extranet IP and use different ports of this extranet IP to communicate with the outside world. NAPT is different from dynamic NAT. It maps the internal connection to a separate IP address in the external network, and adds a port number selected by the NAT device to the address.
NAPT is the most widely used conversion method, which is also mainly used in HomeGW. It also includes two conversion modes: SNAT and DNAT.
(1) Source NAT (SNAT): modify the source address of the packet. The Source NAT changes the source address of the first packet. It will always be completed before the packet is sent to the network. Packet camouflage is an example of a SNAT.
(2) destination nat (DNAT): modify the destination address of the packet. Destination NAT is just the opposite of SNAT. It changes the destination address of the first data slack. For example, load balancing, port forwarding and transparent agent belong to DNAT.
SNAT:
When the internal address wants to access the services on the public network (such as web access), the internal address will actively initiate the connection. The gateway on the router or firewall will make an address conversion for the internal address, and convert the private IP of the internal address into the public IP of the public network. This address conversion of the gateway is called SNAT, which is mainly used for internal shared IP to access the outside.
DNAT:
When external services need to be provided internally (such as publishing web sites externally), the external address initiates an active connection, and the gateway on the router or firewall receives the connection, and then converts the connection to the internal. In this process, the gateway with public IP replaces the internal service to receive the external connection, and then performs address conversion internally. This conversion is called DNAT
---
Routing
Routing table
- ip route show
- netstat -r
- netstat -rn to avoid DNS queries
Static routing settings
route add -net 132.236.220.64/26 gw 132.236.212.6 eth1
route add default gw 132.236.227.1 eth0
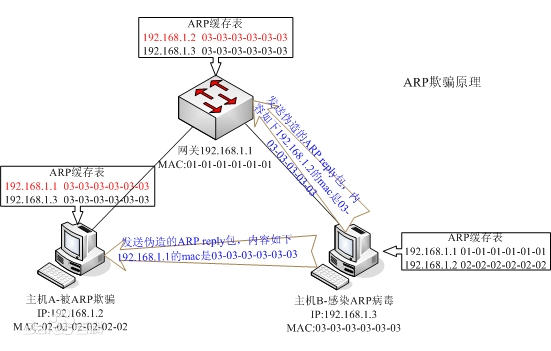
ARP protocol: address resolution protocol. When sending information, the host broadcasts the ARP request containing the target IP address to all hosts on the local area network and receives the return message to determine the physical address of the target; After receiving the return message, store the IP address and physical address in the local ARP cache and keep them for a certain time. Query the ARP cache directly in the next request to save resources.
- ARP request: whenever the host needs to find out the physical address of another host in the network, it can send an ARP request message, which packages the MAC address and IP address of the sender and the IP address of the receiver. Because the sender does not know the physical address of the receiver, this query packet will be broadcast in the network layer.
- ARP response: each host in the LAN will accept and process the ARP request message, and then verify to see whether the IP address of the receiver is its own address. Only the host that has successfully verified will return an ARP response message, which includes the IP address and physical address of the receiver. This message uses the physical address of the requester in the received ARP request message to send it directly to the requester of the ARP request message in the form of unicast.
ARP Spoofing: by spoofing the gateway MAC address of the visitor PC in the LAN, the visitor PC mistakenly thinks that the MAC address changed by the attacker is the MAC of the gateway, resulting in network failure. This attack can allow attackers to obtain data packets on the LAN, even tamper with data packets, and make specific computers or all computers on the network unable to connect normally.
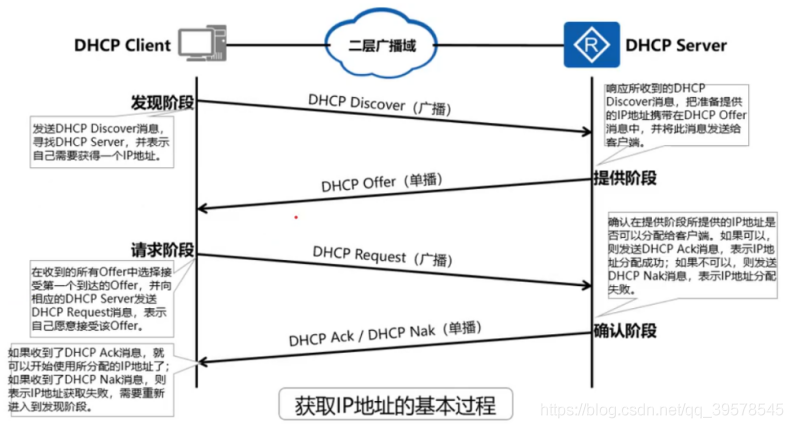
DHCP service
DHCP-UDP-67/68
DHCP adopts Client/Server model; DHCP Client needs to obtain various network configuration parameters from DHCP Server. This process is realized by interacting various DHCP messages between DHCP Client and DHCP Server. DHCP messages are encapsulated in UDP messages. DHCP Server uses port number 67 to receive DHCP messages, and DHCP Client uses port number 68 to receive DHCP messages
This process includes four stages: discovery stage, provision stage, request stage and confirmation stage
DNS Service
https://blog.csdn.net/qq_39578545/article/details/105016510
2. Network configuration
IP address, netmask and default route are set in / etc/sysconfig/network /.
| file | Set content |
|---|---|
| network | Host name, default route |
| network-scripts/ifcfg-ifname | Parameters of each interface: IP address, netmask, etc |
| network-scripts/route-ifname | Route of each interface: parameters of ip route |
In / etc/sysconfig/network, you can specify DNS domain and default gateway
NETWORKING=yes
NETWORKING_IPV6=no
HOSTNAME=kolor
DOMAINNAME=baidu
GATEWAY=192.168.1.254
The data of a specific interface is saved in / etc / sysconfig / network scripts / ifcfg ifname, where ifname is the name of the network interface. These profiles are responsible for setting the IP address, netmask, network and broadcast address of each interface, and a line is used to specify whether the interface is "activated" during boot.
DEVICE=eth0
IPADDR=192.168.1.13
NETMASK=255.255.255.0
NETWORK=192.168.1.0
BROADCAST=192.168.1.255
MTU=1500
ONBOOT=yes
DHCP based eth0 settings
DEVICE=eth0
BOOTPROTO=dhcp
ONBOOT=yes
After modifying the configuration information in / etc/sysconfig, execute ifdown ifname and then ifup ifname on the corresponding interface. If you configure multiple interfaces at one time, you can restart the network service systemctl restart network
ifconfig configure network interface
Set the IPv4 address and netmask of interface em0 and enable it
ifconfig em0 192.168.1.13/26 up
View network hardware information
The ethtool command can query and set specific media parameters of the network interface, such as link rate and duplex
# ethtool eth0
To lock the interface to 100Mbit/s and full duplex, you can use the command:
# ethtool -s eth0 speed 100 duplex full
For automatic negotiation in the test environment, you can force immediate renegotiation of link parameters through the ethtool -r command.
The changes made by using ethtool are not permanent. If you want to be permanent, you need to configure each interface, such as adding a line of ethtool in / etc / sysconfig / network scripts_ OPTS=. The ifup command passes the entire line as a parameter to ethtool.
3. TCP/IP related kernel parameters
The networking parameters are located in / proc/sys/net/ipv4 and / proc/sys/net/ipv6 directories.
Parameter setting
- echo
$ sudo sh -c "echo 1 > icmp_echo_ignore_broadcasts" - sysctl
$ sysctl net.ipv4.icmp_echo_ignore_broadcasts=1 - /etc/sysctl.conf
Permanently change these parameters (the sysctl command reads the file during system boot.)
net.ipv4.ip_forward=0 turns off the IP forwarding function of the host
Necessity of sh -c
Using echo and command redirection in Linux is a shortcut to write information to files.
For example, to test Write the contents of any point in the ASC file. You can:
$echo "info" > test asc
perhaps
$echo "info" > > test asc
Next, if test The ASC permission is set so that only the root user has permission to write:
$ sudo chown root.root test.asc
Then, we use sudo and echo command to modify the permission to test.exe again Write information in ASC file:
$sudo echo "another line of information" > > test asc
-bash: test.asc: Permission denied
At this time, you can see that bash refuses to do so, saying that the permission is insufficient. This is because the redirection symbols ">" and "> >" are also bash commands. We only use sudo to give the echo command root permission, but we don't give the ">" and "> >" commands root permission, so bash will think that neither command is like test The permission to write information to the ASC file.
There are two ways to solve this problem. The first is to use the "sh -c" command, which allows bash to execute a string as a complete command, so that the influence of sudo can be extended to the whole command. The specific usage is as follows:
$sudo sh -c 'echo "another line of information" > > test asc’
Another method is to use the pipeline and tee command, which can read information from standard input and write it to standard output or file. The specific usage is as follows:
$echo "the third message" | sudo Tee - a test asc
Note that the "- a" option of the tee command is equivalent to the "> >" command. If this option is removed, the tee command is equivalent to the ">" command
4. Network troubleshooting
ping,traceroute,tcpdump,wireshark.
When checking up and down the protocol stack, ask yourself some questions like the following.
- Are there physical line and link indicators?
- Is the interface configured correctly?
- Are there any other hosts displayed in the ARP table?
- Is there a firewall installed on the local machine?
- Is there a firewall between your current location and your destination?
- If there is a firewall, can you respond to ICMP ping?
- Can the local address (127.0.0.1) be ping ed?
- Can I ping the IP addresses of other local hosts?
- Is DNS working properly?
- Can I ping the host names of other local hosts?
- Can high-level services like Web and SSH work?
- Did you check the firewall?
ping: check whether the host is alive
To find out the cause of packet loss, first execute the traceroute command to understand the route through which the packet reaches the target host. Then ping the gateways on the way in order to see which link dropped the packet.
The ping command can send echo request packets of any size. By using packets larger than the network MTU (Ethernet is usually 1500 bytes), fragmentation can be forced. This method helps to identify media errors or other underlying problems such as network congestion or VPN- The s option specifies the packet size in bytes.
$ ping -s 1500 www.baidu.com
Packet tracking: traceroute
traceroute can reveal a series of gateways through which packets arrive at the destination from the source. Its working principle is to artificially set the time to live field of outbound packets to a lower value. When the packet arrives at the gateway, its TTL will be reduced. If the gateway reduces the TTL to 0, the packet will be discarded and the gateway will return the ICMP "time exceeded" message to the source host.
The asterisk * of traceroute may be caused by congestion or the "more practical" traffic of priority services. Having several asterisks does not mean that you are in trouble
If you find that all the time fields at a gateway have become asterisks and there is no "time exceeded" message, it may be that the gateway is broken.
If DNS fails, use traceroute -n to output the IP address in digital form. This option disables the lookup of host names.
traceroute needs root permission to use. If you want ordinary users to use it, you must install it in the form of setuid root.
tcpdump and wireshark: listening for network traffic
tcpdump: https://www.cnblogs.com/ggjucheng/archive/2012/01/14/2322659.html
tcpdump options:
-i option, specify the interface
-n option, no DNS name query
-v option to increase the amount of information
-vv option to add more information
-w option to save the results to a file. By default, only the group header is saved.
Unless you specify a multiple of - 92 bits for the entire header, you'd better use the - 92 bit option to capture information.
-r option, read
Monitors packets for the specified network interface
tcpdump -i eth1

Monitoring inbound traffic from a subnet Web flow
tcpdump src net 192.168.1.0/24 and dst port 80

Intercept all 210.27.48.1 All packets received and sent by the host
tcpdump host 210.27.48.1

Want to get host 210.27.48.1 In addition to and host 210.27.48.2 All hosts except ip Package, using the command:
tcpdump ip host 210.27.48.1 and ! 210.27.48.2

Intercept host 210.27.48.1 And host 210.27.48.2 Or 210.27.48.3 Communication
tcpdump host 210.27.48.1 and \ (210.27.48.2 or 210.27.48.3 \)
Wireshark (formerly ethereal) is a very simple and easy-to-use packet capturing tool under Windows. However, it is difficult to find a useful graphical packet capture tool under Linux.
Fortunately, there is Tcpdump. We can use the perfect combination of Tcpdump + Wireshark: capture the package in Linux, and then analyze the package in Windows.
tcpdump tcp -i eth1 -t -s 0 -c 100 and dst port ! 22 and src net 192.168.1.0/24 -w ./target.cap
(1)tcp: ip icmp arp rarp and tcp,udp,icmp These options should be placed in the position of the first parameter to filter the type of datagram
(2)-i eth1 : Only grab through the interface eth1 My bag
(3)-t : Do not show timestamp
(4)-s 0 : When fetching packets, the default fetching length is 68 bytes. add-S 0 After that, you can catch the complete packet
(5)-c 100 : Grab only 100 packets
(6)dst port ! 22 : Do not grab packets whose target port is 22
(7)src net 192.168.1.0/24 : The source network address of the packet is 192.168.1.0/24
(8)-w ./target.cap : Preservation cap File, easy to use ethereal(Namely wireshark)analysis
Network monitoring: SmokePing, iPerf, Cacti
5. Firewall iptables
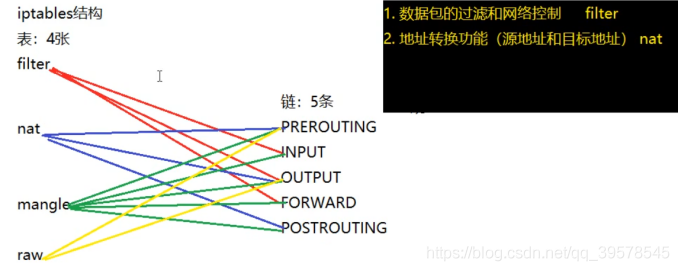
iptables
Four tables and five chains
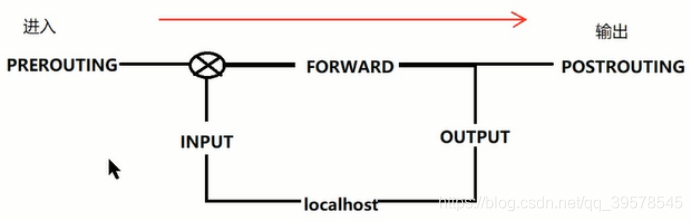
iptables [-t Table name] Command options [Chain name] [Rule number] [Condition matching] [-j Target action]
      a lowercase letter Capitalize  Capitalize      a lowercase letter    Capitalize

explain:
Table name and chain name: used to specify iptables The tables and chains that the command operates on
 Command options: used to specify management iptables Methods of rules (for example, insert, add, delete, view, etc.)
Rule number: used to specify the number of the rule
 Condition matching: used to specify the processing of data packets that meet the conditions (such as what protocol, access network card, etc.)
Destination address: used to specify the processing method of data packets (for example, allow processing, reject, discard, etc.)
iptables Common command options

Common command options
-L                see
-A                Append and place in the last one
-I                Insert, the first one is inserted by default
-D                delete
-F                empty flush
-P                Set default policy policy      Chain xxx (policy ACCEPT)
-R				  cover

Processing action:
filter Table:
-j ACCEPT     allow
-j DROP       Discard without any prompt
-j REJECT     Reject, with prompt. return ICMP Error message
-j LOG        Write log     /var/log/messages   The packet is then passed to the next rule

nat Table:
-j SNAT           Source address translation POSTROUTING
-j DNAT           Destination address translation PREROUTING
Iptables firewall must enable IP forwarding and ensure that all iptables modules have been loaded into the kernel.
Iptables - f chain name to clear all previous rules in the chain
Iptables - P chain name target, which sets the default policy of the chain. DROP is recommended as the default chain target
Iptables - a chain name - i interface - j target, append the current rule to the chain, - i option applies the rule to the specified interface, - j option identifies the target.
Command line options for iptables filters
| Subnet | Meaning or possible value |
|---|---|
| -p proto | Match according to protocol: tcp, udp, icmp |
| -s source-ip | Match host or source IP address (CIDR can be used) |
| -d dest-ip | Match host or destination IP address |
| --sport port | Match by source port |
| --dport port | Match by destination port |
| --icmp-type type | Match by ICMP type |
| ! | Negative clause |
| -t table | Specifies the table to which the command applies (filter by default) |
Example:
The first set of rules is responsible for initializing the filter table.
First, clear all chains in the table, then set the default target of INPUT and FORWARD chains to DROP, and discard all unauthorized packets.
iptables -F
iptables -P INPUT DROP
iptables -P FORWARD DROP
Second set of rules
Rules are evaluated in order, with the most frequently used rules at the top. The first rule allows all connections from the trusted network to pass through the firewall. The remaining three rules in the FORWARD chain allow you to establish a connection with the network server 10.1.1.2 through the firewall. Specifically, SSH, HTTP and HTTPS are allowed to pass through our Web server.
iptables -A FORWARD -i eth0 -p ANY -j ACCEPT
iptables -A FORWARD -d 10.1.1.2 -p tcp --dport 22 -j ACCEPT
iptables -A FORWARD -d 10.1.1.2 -p tcp --dport 80 -j ACCEPT
iptables -A FORWARD -d 10.1.1.2 -p tcp --dport 443 -j ACCEPT
Third set of rules
The first rule is that the only TCP traffic allowed to enter the firewall host (10.1.1.1) is SSH, which is very useful for managing the firewall itself. The second rule allows loopback traffic, which is always maintained inside the host. Article 3 allow ICMP echo from internal IP address_ Request grouping.
iptables -A INPUT -i eth0 -d 10.1.1.1 -p tcp --dport 22 -j ACCEPT
iptables -A INPUT -i lo -d 127.0.0.1 -p ANY -j ACCEPT
iptables -A INPUT -i eth0 -d 10.1.1.1 -p icmp --icmp-type 8 -j ACCEPT
Fourth set of rules
Prohibit all packets that are not explicitly allowed to end the INPUT and FORWARD chains. Although the iptables -P command has been used to force this behavior, the LOG target can let us know who wants to pass the firewall on Intern.
iptables -A INPUT -i eth1 -j LOG
iptables -A FORWARD -i eth1 -j LOG
Group V rules
The simple stateful FORWARD chain does not restrict the traffic leaving the network, but only allows the traffic related to the connection initiated by the host to enter.
iptables -A FORWARD -i eth0 -p ANY -j ACCEPT
iptables -A FORWARD -m state --state ESTABLISHED,RELATED -j ACCEPT
iptables to track complex network sessions such as FTP and IRC, some kernel modules must be loaded in advance. iptables will disable such connections if these modules are not loaded. Although stateful packet filtering can improve the security of the site, it also increases the complexity of the network and reduces the performance.
iptables -L -v may be the best way to debug iptables rules. You can know how many times each rule in the chain matches.
Sixth set of rules
NAT works by setting the kernel variable / proc/sys/net/ipv4/ip_forward is set to 1 to enable the IP forwarding function of the kernel. In addition, the corresponding kernel modules need to be inserted.
$ modprobe iptable_nat
$ modprobe ip_conntrack
$ modprobe ip_conntrack_ftp
iptables commands that use NAT to route packets are in the following form.
iptables -t nat -A POSTROUTING -o eth0 -j SNAT --to 128.138.101.4
-j SNAT           Source address translation POSTROUTING
-j DNAT           Destination address translation PREROUTING
https://blog.csdn.net/qq_39578545/article/details/105068208 NAT table
6. Cloud networking VPC
Ucloud's VPC products: https://docs.ucloud.cn/vpc/introduction/vpc
Introduction to private network
Virtual Private Cloud (VPC) is a logically isolated network environment belonging to users. In a private network, you can create a VPC of a specified network segment, create a subnet in the VPC and manage cloud resources independently, and realize security protection through network ACL. Private network VPC provides users with the following capabilities:
User defined network segment: three network segments can be combined freely, and VPC network segments can be increased or decreased at any time
Complete network management: gateway NAT, custom routing table, network ACL, intranet virtual IP and virtual network card. Users can freely choose configuration and set rules according to requirements.
Subnet cross availability zone: the subnet can cover any availability zone in the region to realize disaster recovery across availability zones.
High expansion: cross regional VPC s can be connected through high-speed channel (UDPN) to realize stable intranet transmission; Combined with dedicated line access, the hybrid Cloud Architecture of single point access and global interoperability is realized.
VPC routing
VPC routing is simpler than traditional hardware networks because the cloud does not simulate the physical topology. All accessible destinations can be reached with only one logical hop.
The network in the same VPC is interconnected by default, and the network between different VPCs is not connected by default. The VPC network interworking function can realize the network interworking between VPCs in different projects / regions. When VPCs in different regions need interworking, they need high-speed channels.
Interworking VPC network segments are not allowed to overlap.
Private network components
The private network includes VPC, subnet, NAT gateway, network ACL and other components:
- VPC: VPC is a logically isolated network environment belonging to users. In a private network, you can create a VPC of a specified network segment, create a subnet in the VPC, and manage cloud resources independently.
- Subnet: in order to scientifically and effectively divide the address space in VPC, it is divided into finer grained network segments. These independent network segments are called subnets.
- NAT Gateway: NAT gateway is an enterprise level VPC public network gateway, which can allow cloud resources in the subnet that are not bound with elastic IP to access the external network, or configure port forwarding rules to enable cloud resources to provide services.
- Network ACL: it is a subnet level security policy used to control the data flow in and out of the subnet. Users can accurately control the traffic in and out of the subnet by setting outbound rules and inbound rules.
- Routing table: routing table is a VPC level product, which can control the network traffic path of cloud resources. A routing table is composed of multiple routing rules. By binding with the subnet, it takes effect on all resources in the subnet.
Build VPC network
1. Create VPC. For example, change notes, change business groups, add network segments, etc
2. Create a subnet.
3. Add virtual machine. When creating a host instance, select the corresponding VPC and subnet. After the creation is successful, the virtual machine will exist in the VPC.
4. Create NAT gateway. Click the "create NAT gateway" button in the NAT gateway tab to create a NAT gateway instance, and select the VPC and subnet that have been created.
5. Bind network ACL
Chapter 14 and 15 physical networking and routing (omitted)
Unshielded twisted pair: UTP (nowadays, wireless networks have replaced UTP in many scenarios)
Unshielded Twisted Pair (UTP) is a kind of data transmission line, which is composed of four pairs of transmission lines with different colors. Each pair of lines with the same color transmits electric pulses in two directions back and forth. This design uses the principle of mutual offset of electromagnetic induction to shield electromagnetic interference. UTP is widely used in Ethernet (local area network) and telephone lines.
Standard 568A:
Green white-1, Green-2, orange white-3, blue-4, blue white-5,
Orange - 6, brown white - 7, Brown - 8
Standard 568B:
Orange white-1, orange-2, green white-3, blue-4, blue white-5,
Green - 6, brown white - 7, Brown - 8
Ethernet working mode (CSMA/CD)
- Carrier Sense means that each workstation on the network should confirm whether there is data transmission on the bus before sending data. If there is data transmission (called bus busy), no data will be sent; If there is no data transmission (the bus is called empty), send the prepared data immediately.
- Multiple Access means that all workstations on the network send and receive data, use the same bus, and the transmitted data is broadcast.
- "Conflict detection" means that while sending information frames, the sending node must also listen to the media to determine whether there is a conflict (whether other nodes are also sending information frames at the same time).
Hub: it is responsible for connecting Ethernet network segments at the physical layer. Now it is switch.
Automatic negotiation
- Automatic negotiation must be used for all interfaces with a rate of 1Gbit/s or above. This is required by the standard
- For interfaces with a rate of 100Mbit/s or less, either configure both ends of the link into automatic negotiation mode, or manually configure the rate and duplex mode at both ends. If automatic negotiation is only configured at one end, this section will not learn how to configure at the other end. The result is that the configurations at both ends are inconsistent, resulting in low network performance.
Routing protocol
OSPF: https://blog.csdn.net/qq_39578545/article/details/105397270
BGP agreement: https://blog.csdn.net/qq_39578545/article/details/105424896
BGP: border gateway protocol. BGP is an external routing protocol used to manage the traffic between autonomous systems.
Multicast address of routing protocol
| describe | IPv6 | IPv4 |
|---|---|---|
| All systems in this subnet | ff02::1 | 224.0.0.1 |
| All routers in this subnet | ff02::2 | 224.0.0.2 |
| Unassigned | ff02::3 | 224.0.0.3 |
| DVMRP router | ff02::4 | 224.0.0.4 |
| OSPF router | ff02::5 | 224.0.0.5 |
| OSPF DR router | ff02::6 | 224.0.0.6 |
| RIP router | ff02::9 | 224.0.0.9 |
| EIGRP router | ff02::10 | 224.0.0.10 |
Chapter 16 DNS domain name system
1. How DNS works
DNS is a distributed database. DNS queries consist of names and record types. The reply returned contains a set of resource records that respond to the query.
DNS query order
/etc/resolv.conf
DNS servers are found in order. As long as the first name server can answer the query, ignore the other servers. If there is a problem and the query times out, try the next name server. Try each server one by one, up to 4 times. With each failure, the timeout interval increases. The default timeout interval is 5s.
DNS namespace
DNS namespaces are organized in the form of a tree, which contains both forward and reverse mappings. The forward mapping is responsible for mapping the host name to the IP address, and the reverse mapping is responsible for mapping the IP address to the host name.
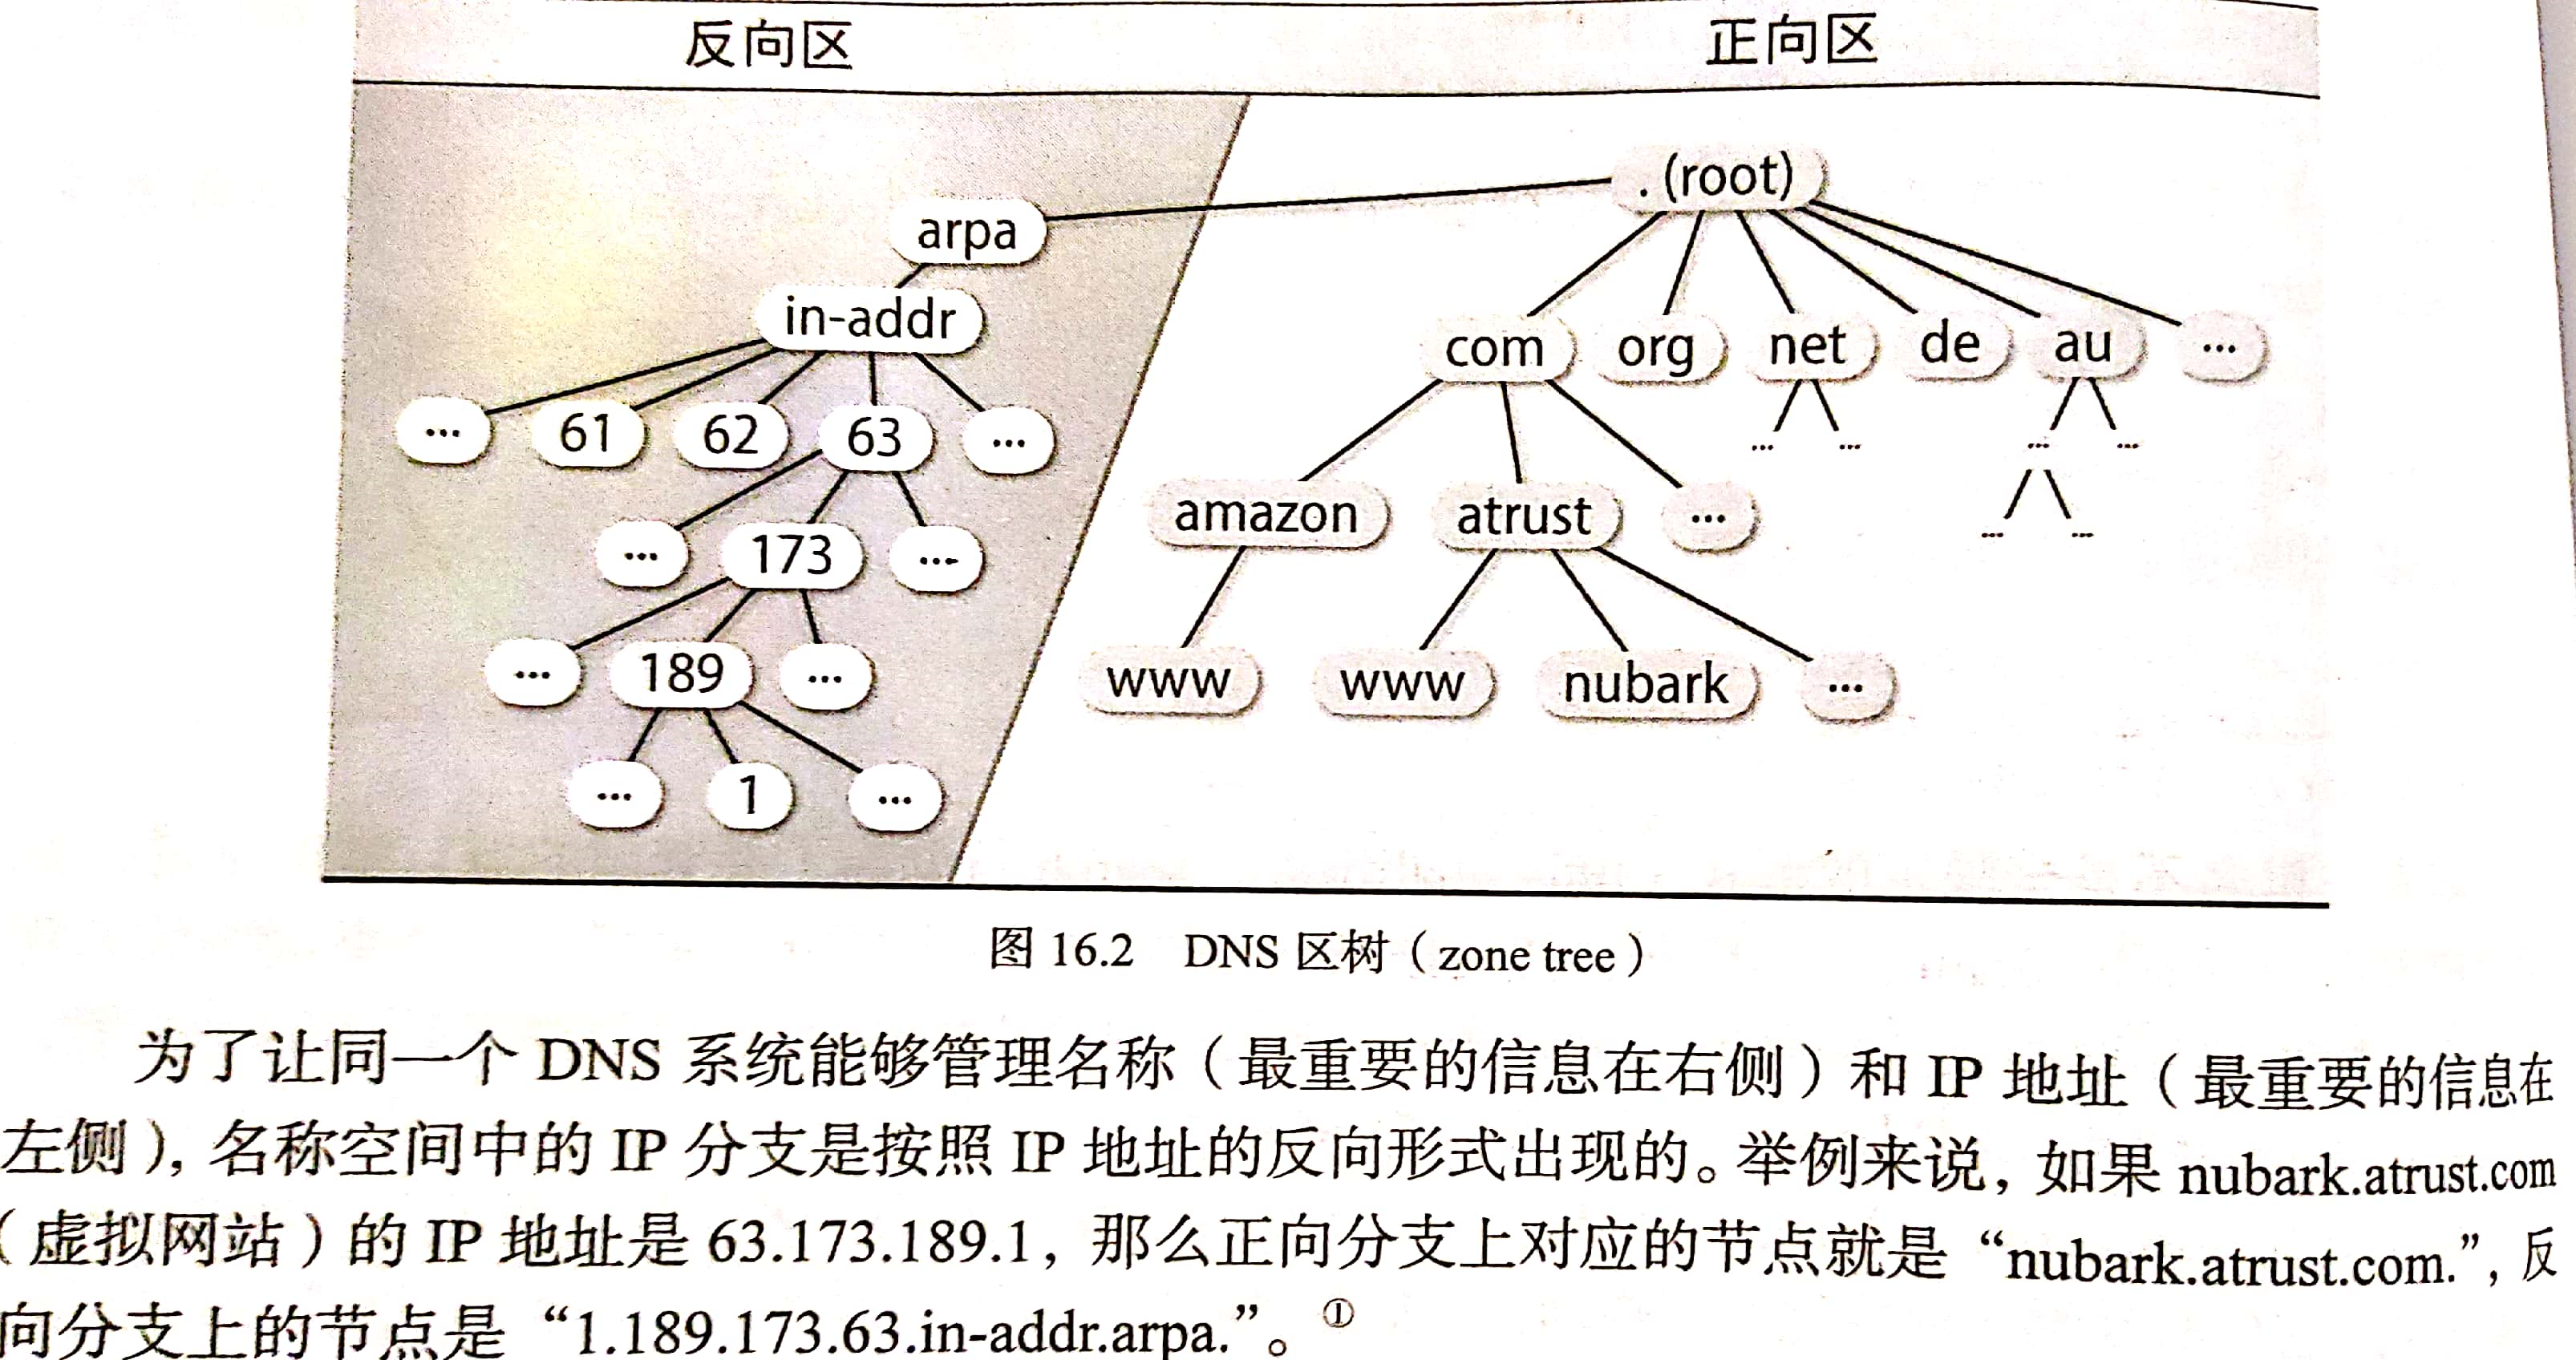
A period without an end is sometimes called a fully qualified hostname.
How DNS works
Name server classification
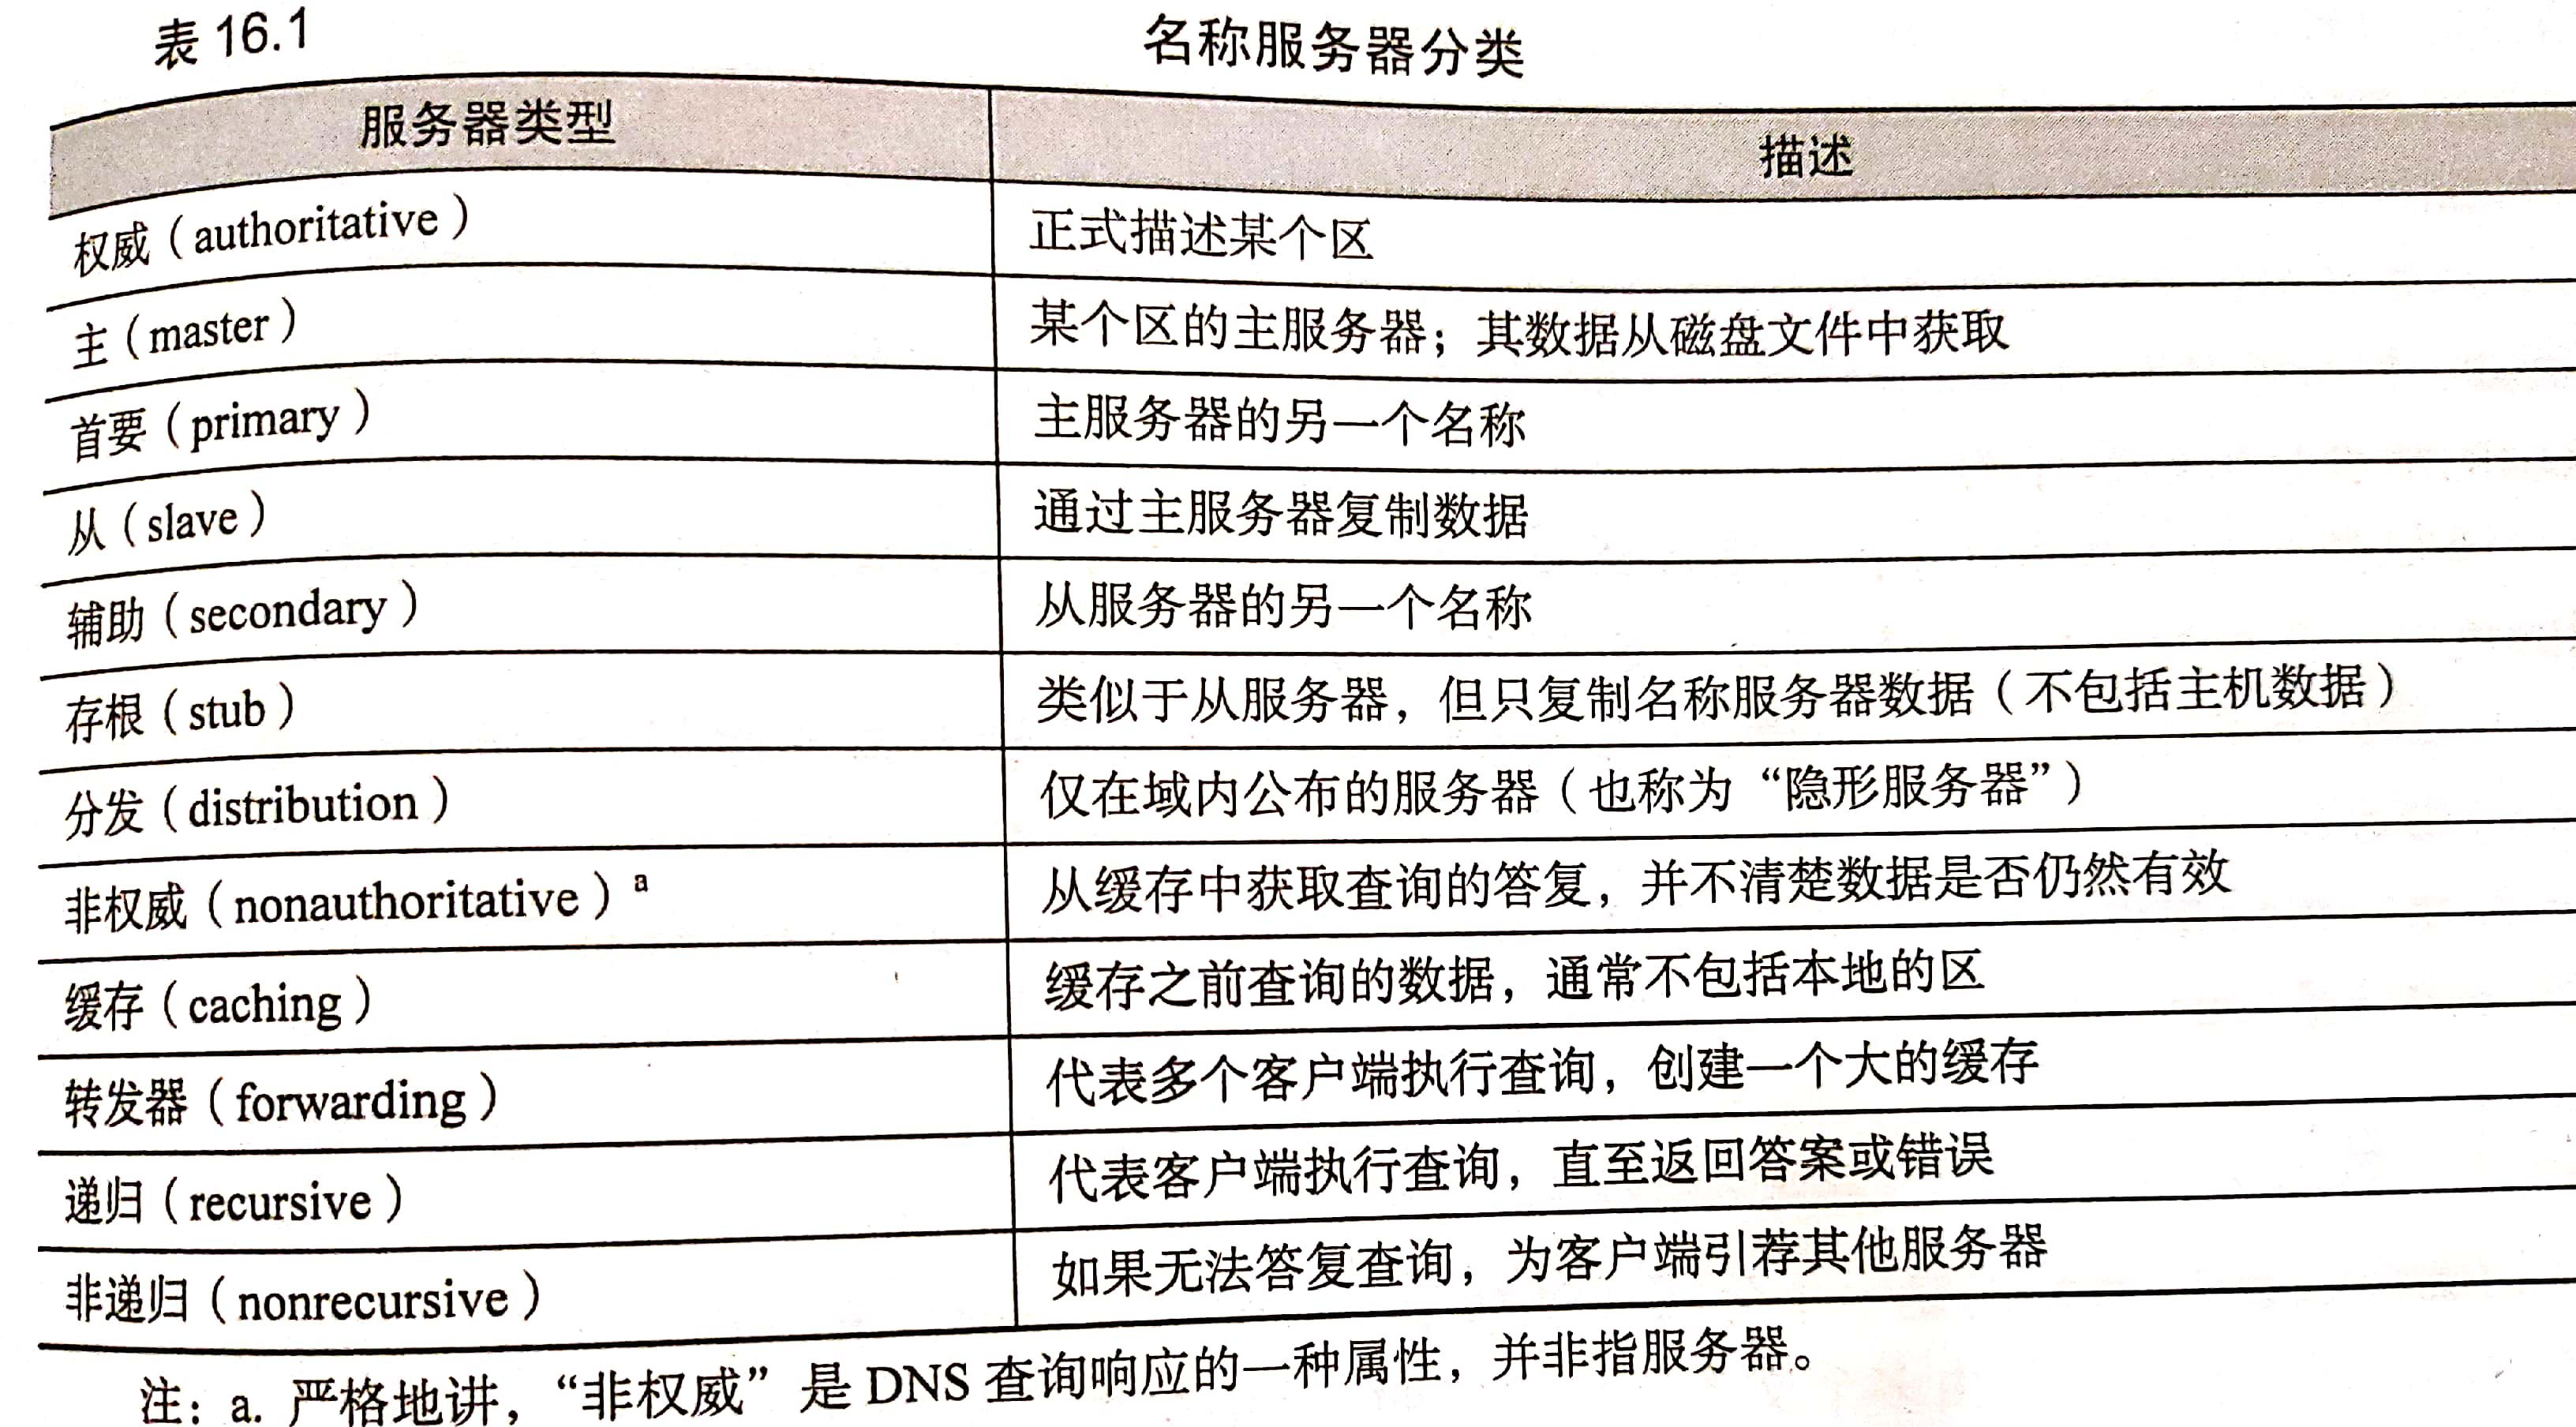
These classifications depend on the data source of the name server (authority, cache, master and slave), the type of data saved (stub), the query path (forwarder), the integrity of the answer (recursive, non recursive) and the visibility of the server (distribution).
Authoritative server and cache only server
The master server is authoritative for its own area, but it is not authoritative for the information of other areas cached.
Only the name server executing the cache obtains the address of the root domain server from the startup file, and accumulates the remaining data by caching the resolved query. This server does not have its own data and does not have the authority of any area (except the localhost area)
---
Recursive and non recursive servers
Name servers are either recursive or non recursive.
If the non recursive server caches the query results of previous transactions, or has authority over the domain of all queries, it can provide the correct response. Otherwise, it will not return the real answer, but recommend authoritative servers in other domains that may know the answer better. Clients of non recursive servers must be prepared to accept and process these recommended servers. (iteration)
Authoritative servers (such as root servers and top-level domain servers) are non recursive because they may process tens of thousands of queries per second, and it is forgivable to do less.
The recursive server only returns the real answer and error information. It will follow the recommended server and reduce the burden on the client.
---
to grant authorization
All name servers can find the root server through the local configuration file. The root server knows the name servers of com, net, fi, de and other top-level domains. Go down this chain, know, go on edu,berkeley.edu et al. Each domain can authorize the authority of its sub domain to other servers.
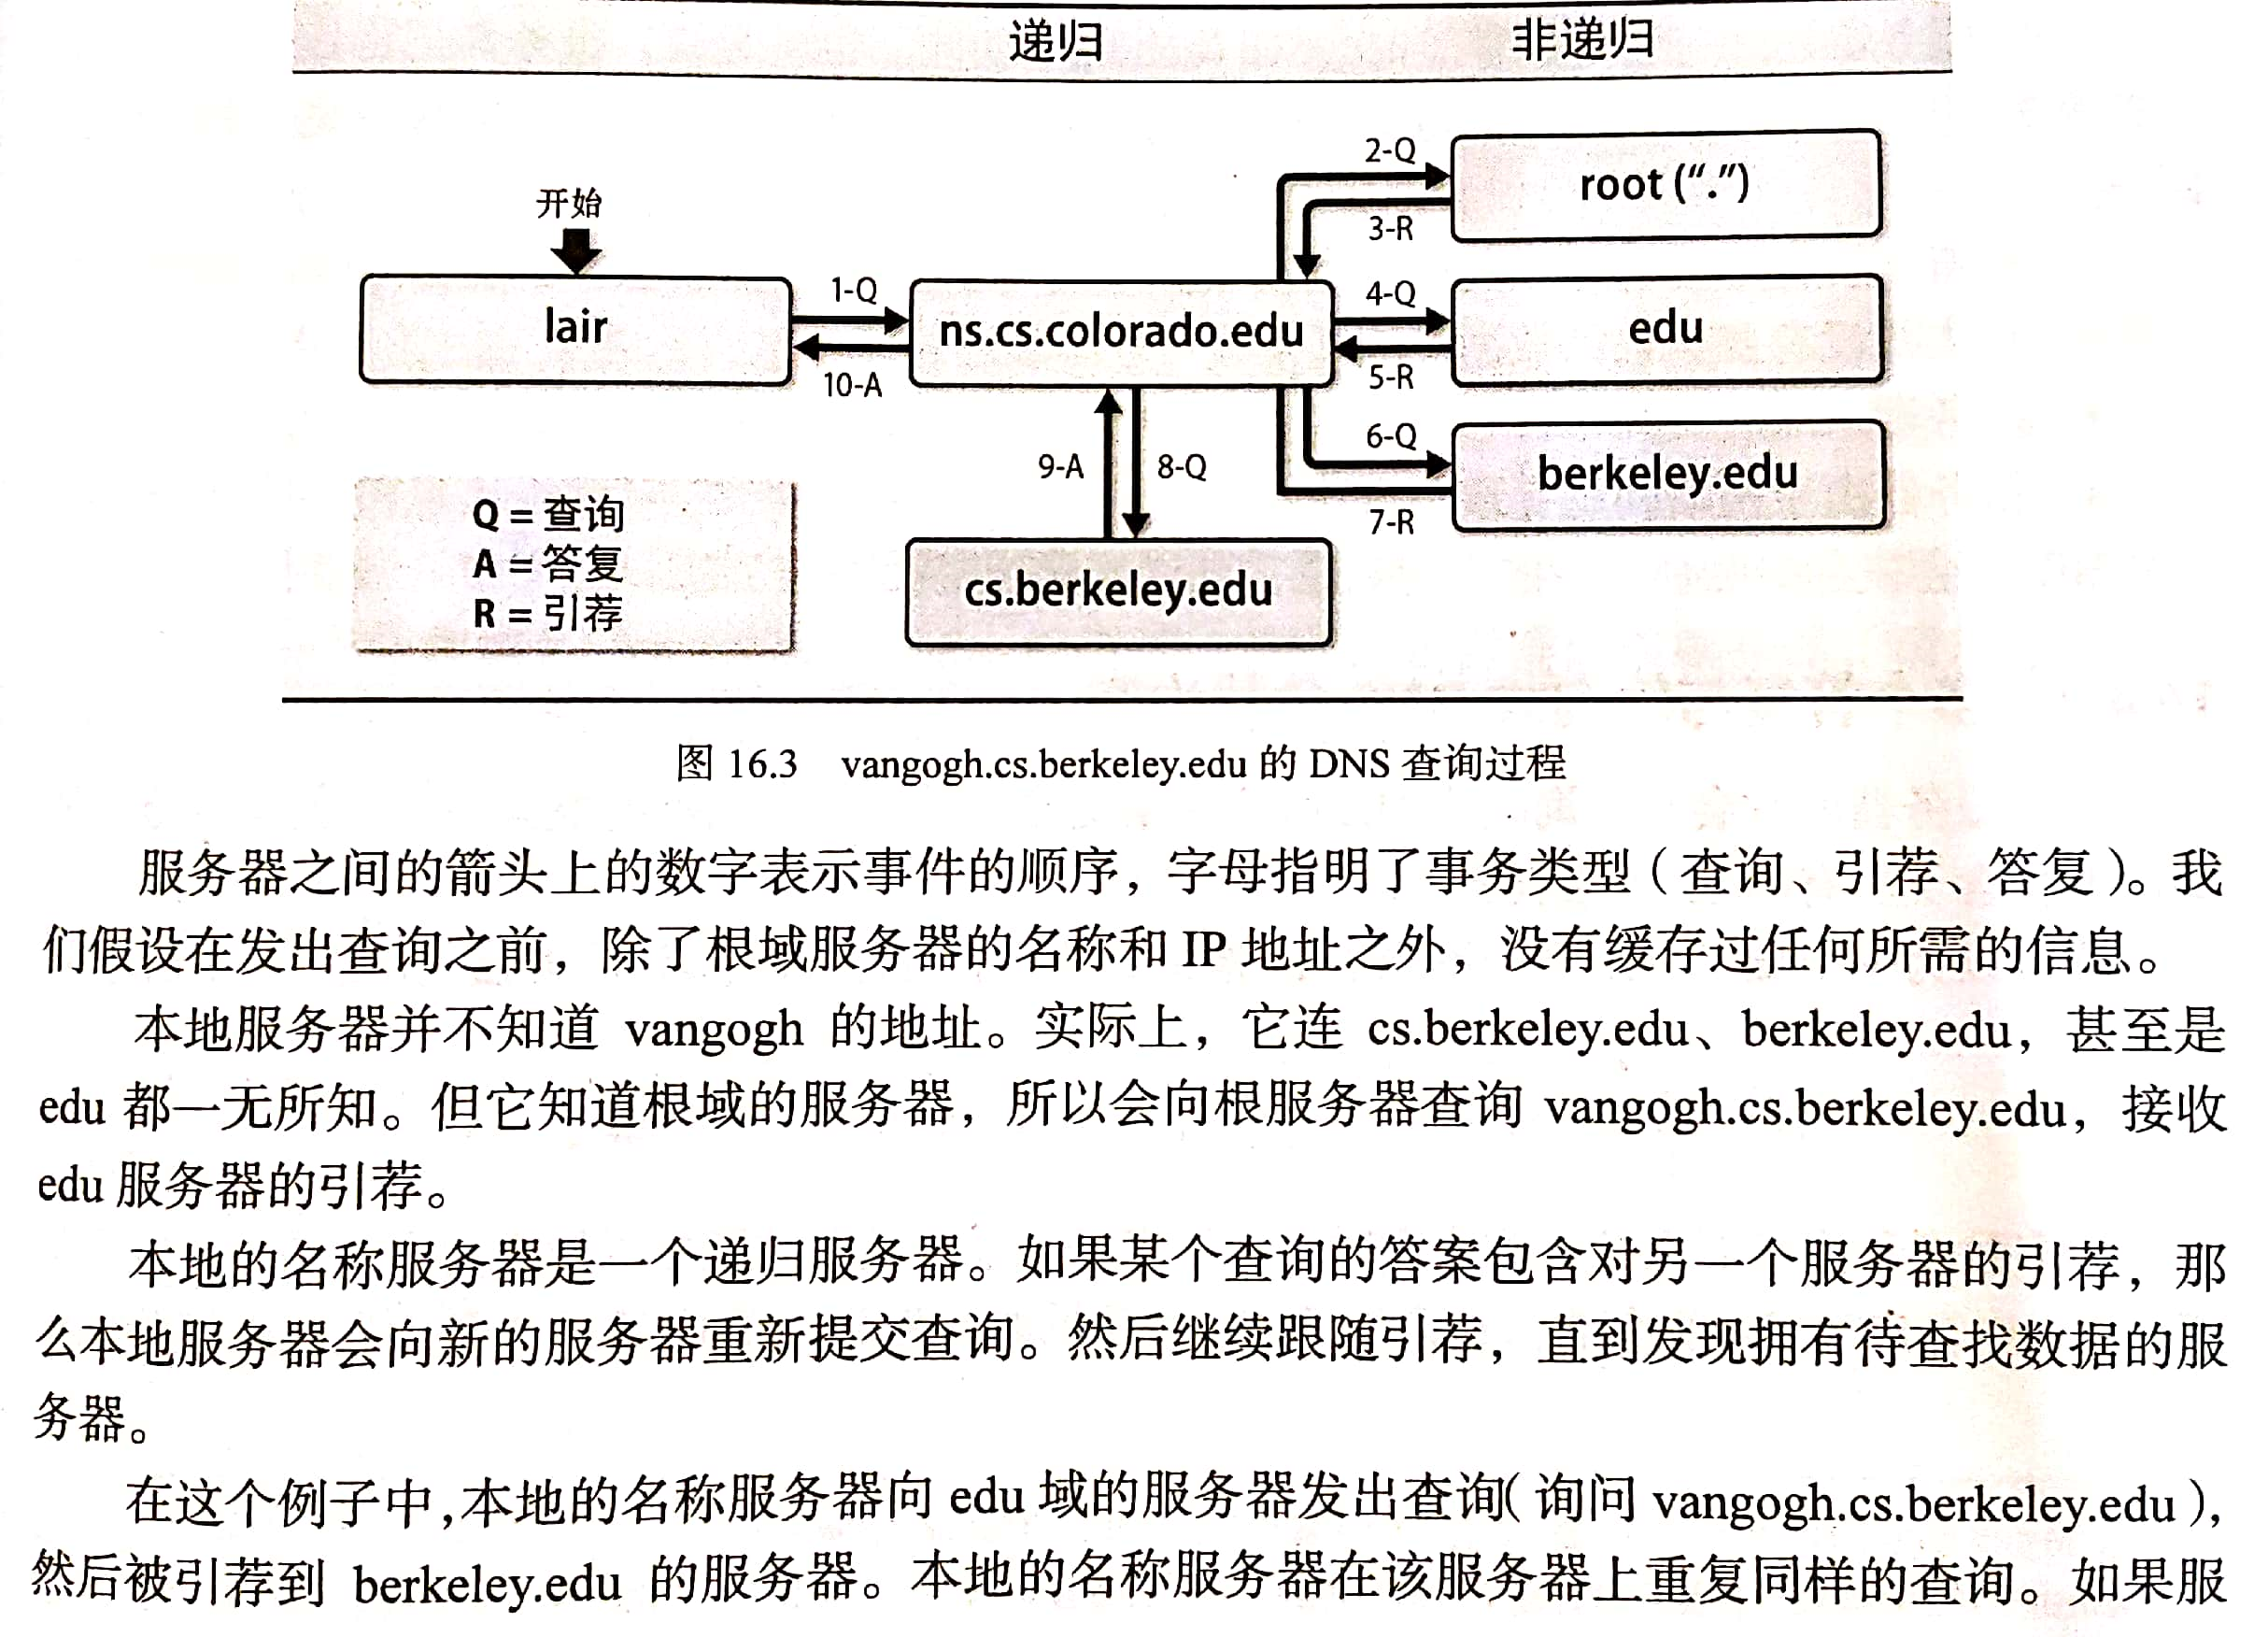
Let's look at a real example through the host lair cs. colorado. Find the host vangogh.com on edu cs. berkeley. Edu's address. The host lair will ask the local name server ns cs. colorado. Edu, in order to get the answer.

---
Debugging with query tool
The most common use of dig is to determine the record returned by a specific name.
- If only the AUTHORITY response is returned, you are directed to another name server.
- If the ANSWER response is returned, it indicates that the query issued has been answered directly (and may contain other information)
Manually follow the authorization chain from the root server to verify if there is a problem.
Example: processing domain name www.viawest.com Com. First, we query the root server and request the start of authority (SOA) record to see who is interested in viawest COM is authoritative. Query the specified name server with the parameter @ nameserver.
$ dig @a.root-server.net viawest.com soa
;; xxxx,status: NOERROR, id: 7824
;; AUTHORITY SECTION:
com.	172800 IN NS c.gtld-servers.net.
Note that the status returned is NOERROR. This indicates that there are no obvious errors in the response message. Other common states are NXDOMAIN and servfile. NXDOMAIN indicates that the requested name does not exist (or is not registered), and servfile usually indicates that there is an error in the configuration of the name server itself.
The AUTHORITY SECTION tells us that the global top level domain (gTLD) server is the next link in the authorization chain of the specified domain name. So, let's pick one of them and repeat the same query.
$ dig @c.gtld-servers.net viawest.com soa
;; AUTHORITY SECTION:
viawest.com. 172800 IN NS ns1.viawest.net
The content of this response knows that the next server to query is NS1 viawest. com
$ dig @ns1.viawest.net viawest.com soa
;; ANSWER SECTION:
viawest.com.	3600	IN	SOA	mvec.viawest.net.	hostmaster.
The query returned viawest ANSWER response of COM domain. Now that we know the authoritative name server, we can query the required www.viawest.com Com
$ dig @ns1.viawest.net www.viawest.com any
;; ANSWER SECTION:
www.viawest.com.	60	IN CNAME hm-d8ebfa-via1.threatx.io.
Show the last query The CNAME record of COM points to hm-d8ebfa-via1 threatx. IO, which means that it is another name for the threatx host. If the query is a server with recursive name, it will follow the whole authorization chain instead of you. However, when debugging, it is usually better to check each link of the authorization chain,
2. DNS database zone
The area database is a group of text files maintained by the system administrator on the main name server of the area. These text files are often called zone files. The zone file contains two types of entries: interpreter commands (for example, $ORIGIN and $TTL) and resource records. Only resource records are the real part of the database, and parser commands only provide some convenient means to input records.
Interpreter instructions in area files
Users can embed instructions in the area file to improve its readability and maintainability.
Three instructions ($ORIGIN, $INCLUDE, $TTL) belong to the standard commands implemented by all DNS, and the fourth instruction $GENERATE can only be used for BIND. The instruction must start from the first column and occupy one row.
According to the processing order from top to bottom, the reading and parsing of area files can be completed only once. While the name server reads the zone file, it adds the default domain (or starting domain) to the name that is not fully qualified. The default starting domain of the domain name is specified in the configuration file of the name server. However, you can set or change the starting field in the area file using the $ORIGIN command.
$ORIGIN domain-name
Where fully qualified names are required, using relative names saves a lot of input work and greatly improves the readability of area files.
Many sites use the $INCLUDE command in the zone file to separate overhead records from data records, divide the zone file into multiple logical parts, or save the key in a file with limited permissions. Its syntax is:
$INCLUDE filename [origin]
When the $INCLUDE instruction is encountered, the specified file will be read into the area database. If filename does not take an absolute path, it is interpreted as the home directory relative to the name server.
Note: after executing the $INCLUDE instruction, the value of the starting field cannot be restored to the previous value. You may need to reset the start field at the end of the included file or on the next line of the $INCLUDE command.
The $TTL instruction can set the default value of the TTL field in the following resource records. It must be the first line of the zone file. The default unit of TTL is s seconds. For example, the following lines can set $TTL to 1 day.
$TTL 86400
$TTL 24h
$TTL 1d
Increasing the value of ttl to 1 week will significantly reduce network traffic and DNS LOAD. A single resource record is cached by the outside (outside the local area network), and it cannot be forcibly discarded. If you plan to carry out large-scale address reassignment, and the previous ttl is 1 week, reduce the value of $ttl at least 1 week before the implementation of the plan (for example, to 1H). This preparation step can ensure that the resource record with ttl of one week has been replaced by the resource record with ttl of 1H. So we can be sure that all the updates will be disseminated within 1h. After the update, you can change ttl back to its original value.
resource record
Each zone in the DNS hierarchy has a set of resource records corresponding to it. Its basic format is:
[name] [ttl] [class] type data
The fields are separated by blank characters (tabs or spaces). The fields can contain special characters in subscripts. The special characters in resource records are shown in the figure.
| character | meaning |
|---|---|
| ; | Introduce comments |
| @ | Name of the current zone |
| () | Allow data to cross rows |
| * | Wildcard (name field only) |
- The name field identifies the entity (usually host or domain) described by the resource record. If multiple consecutive resource records refer to the same entity, the name field after the first record can be ignored as long as the subsequent records start with a blank character. If there is a name field, it must start in the first column.
Names can be either relative or absolute. An absolute name is a complete domain name that ends with a dot. Internally, the software only processes absolute names. It adds the current starting field and point number to any name that does not end with a point number. This feature can shorten the name length, but it can also cause errors.
For example, if the current domain name is CS colorado. Edu, then the name anchor can be interpreted as anchor cs.colorado.edu. If you miss the ending point, write the name as anchor cs.colorado.edu, the name will be regarded as a relative name, and the result is anchor cs.colorado.edu. cs.colorado.edu. This is a common mistake. - class specifies the network type, and the default type IN represents the Internet
- type
- A (host), that is, a record, also known as host record, is the mapping from DNS name to IP address, which is used for forward resolution.
- CNAME: CNAME record is also an alias record, which is used to define the alias of A record.
- MX (mail exchange): mail exchange record, which is used to tell the mail server process to send mail to another designated mail server. (the server knows how to deliver mail to the final destination).
- NS: NS record, which is used to identify the DNS server of the zone, that is, the authoritative name server responsible for the DNS zone, and which DNS server is used to resolve the zone. There may be multiple ns records in an area, such as ZZ Com may have a primary server and multiple secondary servers.
- PTR: is the mapping from IP address to DNS name, which is used for reverse resolution.
- SOA: used for the beginning of a zone. All information after the SOA record is used to control the zone. Each zone database file must contain an SOA record and must be the first resource record to identify the starting location of DNS server management. SOA indicates which DNS server in the zone can be resolved is the master server.
- The content of the data field depends on the type of resource record. DNS queries for specific domains and record types return all matching resource records from the zone file.
SOA record
An initial authorization (SOA) record identifies a zone, that is, a set of resource records located in the same location in the DNS namespace. Each zone has only one SOA record. SOA records include the zone name, the main name of the zone, the server, the technical contact, and various timeout values. Comments can be introduced with semicolons.
; Start of authority record for atrust
atrust. 	IN SOA	ns1.atrust.com.	hostmaster.atrust.com. (
	2017110200	; Serial number
	10800		; Refresh (3 hours)  Refresh
	1200		; Retry	(20 minutes) retry
	3600000		; Expire (40+ days)  be overdue
	3600 )		; Minimum (1 hour)   minimum

refresh Field specifies how often the slave server should check the master server to see if the serial number of the zone configuration file has changed.
As long as there are changes, the slave server must update the parent of the area data. The serial number is compared from the server. If the serial number of the master server is larger, the data is transmitted from the server request area to update the data.

Instead of letting the slave server passively wait for a timeout, install BIND The master server will actively remind the slave server every time the zone is updated. But update reminder
 It may be lost due to network congestion, so it should be said refresh Set the field to a reasonable value.

expire Field determines how long the authority of domain data can be maintained in the server in the absence of the master server.

minimum Field to set the lifetime of cached negative replies. The default lifetime of a positive reply (that is, the actual resource record) is determined by the top of the area file`$TTL`Command set.

$TTL,expire,minimum Will eventually force DNS The client discards old data.
The name field of SOA record (in this case, atrust.com) often appears with the symbol @, which is the abbreviation of the current zone name@ The value of is the file name The domain name specified by the zone statement in conf. This value can be changed in the area file using the $ORIGIN parser instruction. (@ symbol can be specified by $ORIGIN keyword)
IN the above example, there is no ttl field. The IN of the class field represents the Internet, the type field is SOA, and the rest is the content of the data field. The numerical parameters IN parentheses are timeout values. If they are not annotated, they are usually written IN one line.
ns1.atrust.com. Is the main name of the area called server.
hostmaster.atrust.com. Is the email address of the base contact.
Parentheses can make SOA records span multiple lines. The first numerical parameter is the serial number of the area configuration data. The serial number is used by the slave server to decide when to get new data. The serial number can be any 32-bit certificate. Whenever there is a change in the area data file, the change value will be added. Many sites will incorporate the modification date of the zone file into the serial number. For example, 2017110200 represents the first change of district data on November 2, 2017.
Serial numbers are not required to be continuous, but must be monotonically increasing. Only when the serial number of the master server is greater than that of the slave server will the latter request new data. If you accidentally set a fairly large value on the master server and this value has been passed to the slave server, even correcting the serial number on the server will not help. There are two ways to solve this problem.
A common mistake is to modify the area data file, but forget to update the serial number. As a result, changes cannot be propagated to the slave server.
-------
NS record
NS (name server) identifies the authoritative server of a zone (that is, all master servers and slave servers) and authorizes the sub domain to other organizations. NS records are usually placed directly after the SOA records in the area.
Wait, these records. See the details later through the BIND configuration file
DNS structure

Root domain:
First level domain name < top level domain | country domain > com . edu . gov . net . cn
Secondary domain name: QQ com baidu. com
If you ask once and get the result, you can query C-S recursively
If the query results are obtained multiple times, the iterative query S-S
3. BIND software
The domain name resolution of DNS is udp/53, and the data transmission between master and slave uses tcp/53 by default
DNS software: Bind is an open source DNS server software that supports various Unix and Windows platforms
BIND consists of four main components:
- The name server daemon named named is responsible for answering queries;
- Resolver library to query DNS server on behalf of users;
- Command line interface of DNS, i.e. nslookup, dig, host;
- named remote control program called rndc
named. Statements used in conf
| sentence | function |
|---|---|
| include | Import file |
| options | Set global configuration options / defaults |
| acl | Define access control lists |
| key | Define authentication information |
| server | Specify individual server options |
| masters | Define master name servers for stub and slave areas |
| logging | Specify the logging classification and its destination |
| statistics-channels | Output real-time statistics in XML format |
| zone | Definition area |
| controls | Defines the channel used when using rndc to control named |
| view | Define area data view |
| lwres | Specify named as the parser |
The address matching list can be used as a parameter to many statements and options. The following example
{ ! 1.2.3.13; 1.2.3/24; };
Host 1 is excluded.2.3.13,But it includes network 1.2.3.0/24 All remaining hosts in.

The first matching algorithm makes the order of table items very important. If this example is reversed, because 1.2.3.13 Successfully matched to 1.2.3.0/24,Negative items have no chance to deal with at all.
include statement
include "path";
option statement
The option statement specifies global settings, some of which may then be overwritten by the configuration of a specific regional server. The general format of this statement is:
options {
	option;
	option;
	..
};

options {
	// 1. File location
	directory "path";  directory Statement will make named Switch to the specified directory.
	key-directory "path";

	// 2. Name server ID
	version "string";
	hostname "string";
	server-id "string";   join hostname and server-id The purpose of using the parameters of anycast and root server is to copy gTLD Instance of the server.

	// 3. Zone synchronization
	notify yes | master-only | explicit | no;	[yes]
	also-notify server-ipaddrs;		[empty]
	allow-notify address-match-list;	[empty]
	// The notify and also notify clauses apply only to the primary name server. Allow notify applies only to slave name servers.
	   notify It can be used as a global option or as an option for a specific area. This can significantly improve the convergence speed of area files after data changes.
	// As long as notify is set to yes, once the zone database is overloaded, the named on the primary server will notify the other party. From the server and then with the master
	   The server meets to see if the file in the area has changed. If it has changed, update the copy of the file.
	// If notify is set to master only, the dissemination behavior can be limited to sending notifications from the name server to those areas where the server is the primary name server.
	   Dissemination means that each authoritative server will send updates to other authoritative servers.
	   notify Set to explicit,that named Only through also-notify The servers listed in clause.

	// 4. Recursive query
	recursion yes | no;		[yes]
	allow-recursion { address-match-list };		[all hosts]
	// The recursion option specifies whether named should handle recursive queries on behalf of the user.
	   join allow-recursion Clause, so named You can distinguish the query from the site and the remote query.

	// 5. Use cache
	recursive-clients number;	[1000] // It controls the number of recursive queries that the server can process at the same time. Each query needs about 20KB of memory.
	max-cache-size number;	[ulimited] // Limits the amount of memory the server can use to cache query responses. If the cache occupancy is too large, named will delete the recorded TTL before it expires, keeping the cache occupancy below the limit.

	// 6.IP port utilization
	use-v4-udp-ports { range begin end; };	[range 1024 65535]
	use-v6-udp-ports { range begin end; };	[range 1024 65535]

	avoid-v4-udp-ports { port-list };	[empty]
	avoid-v6-udp-ports { port-list };	[empty]

	query-source v4-address [port]	[any]
	query-source-v6 v6-address [port]	[any]
	// The query source option specifies the IP address used to issue the query.

	// 7. Forwarding
	forwarders { in_addr; in_addr; ... };	[empty list]
	forward only | first;	[first]
	// By assigning servers as forwarders, you don't have to let all name servers perform external queries themselves.
	   natural DNS The query starts from the root server and then follows the recommendation chain, and the use of forwarder bypasses this normal process. (be careful not to cause forwarding loop)
};

	// 8. Authority
	allow-query { address-match-list };	[all hosts]
	allow-query-cache { address-match-list };	[all hosts]
	allow-transfer { address-match-list };	[all hosts]
	allow-update { address-match-list };	[none]
	blackhole { address-match-list };	[empty]
	// The blackhole address list identifies the servers you don't want to deal with at all. named doesn't accept queries from these servers and will never ask them.

	// 9. Group size
	edns-udp-size number;	[4096]
	max-udp-size number;	[4096]

	// 10.DNSSEC control
    dnssec-enable yes | no; [yes]  Security extension mechanism (signature authentication), default yes
    dnssec-validation yes | no;	[yes]
    dnssec-must-be-secure domain yes | no;	[none]
	// DNSSEC domain name system security is the security extension protocol of DNS
		DLV DNSSEC Backup key
		These security mechanisms are designed to protect DNS The data security between the server and the user can avoid the deception of malicious data to the user

	// 11. Statistics
	zone-statistics yes | no	[no]
	// This option enables named to maintain both the statistics of a single area and the global statistics. Running rndc state can dump statistics to a file
    // statistics-file "/var/named/data/named_stats.txt";   Statistics
    // memstatistics-file "/var/named/data/named_mem_stats.txt";    Memory statistics

	// 12. Performance adjustment P379
	clients-per-query init; [10]
	.....
	tcp-clients init;	[100]

};
If named If the options statement does not appear in conf, the default value is used.
acl statement
A control list is a list of address matches with names.
acl acl-name {
	address-match-list
};

any: All hosts
localnets: All hosts in the local network
localhost: Host (all networks directly connected to the host, network address and network mask modulus of the host)
none: No hosts
acl must be named The top-level statement in conf (don't put it in other option declarations), named Conf is only read once, so the access control list must be defined before use.
----—
server statement
master statement
logging statement
zone statement
----—
The BIND configuration file is as follows:
DNS-server On completion
1.Turn off firewalls and selinux
#service iptables stop
#chkconfig iptables off
#getenforce
Enforcing
#Setenforce0 / / temporarily closed
#getenforce
Permissive
#vim /etc/sysconfig/selinux / / permanently shut down
#grep ^SELINUX /etc/sysconfig/selinux
SELINUX=disabled
SELINUXTYPE=targeted

2.to configure yum source

3.Software Trilogy
#yum list | grep bind 	 // View and install software
#yum -y install bind
#rpm -q bind 			// Confirm successful installation
#rpm -ql bind / / view the list of software files
 I saw it NetwrokManager ,This needs to be turned off. Otherwise, the configuration file will be refreshed
etc/named     //Home directory of configuration files
/etc/named.conf      //Master profile
/etc/named.rfc1912.zones     //zone file, defining domain
/etc/rc.d/init.d/named       //Startup script

/usr/sbin/named      //Binary command of program
/usr/sbin/named-checkconf    //The command to check the configuration file named conf  named. rfc1912. zones
/usr/sbin/named-checkzone    //Command to check configuration file

/var/log/named.log   //log file
/var/named           //Home directory of data file, area file
/var/named/named.ca  //The root domain server, so the DNS server knows where the root is
/var/named/named.localhost   //Template for forward parsing zone file
/var/named/named.loopback    //Template for reverse parsing zone file
/var/named/slaves            //Default path to download files from dns server
/var/run/named               //Process file


4.Understanding profiles
 Master profile:/etc/named.conf
options {
        listen-on port 53 { 127.0.0.1; any; };      Monitoring mode, any Indicates network wide monitoring
        listen-on-v6 port 53 { ::1; };
        directory       "/var/named";
        dump-file       "/var/;named/data/cache_dump.db";    DNS Cache file
        statistics-file "/var/named/data/named_stats.txt";  Statistics
        memstatistics-file "/var/named/data/named_mem_stats.txt";   Memory statistics
        allow-query     { localhost; any; };    Who is allowed to query,any anybody
        recursion yes;      Recursive

        dnssec-enable no;   Security extension mechanism (signature authentication), default yes
        dnssec-validation yes;
        dnssec-lookaside auto;

        /* Path to ISC DLV key */
        bindkeys-file "/etc/named.iscdlv.key";

        managed-keys-directory "/var/named/dynamic";
};
explain:
DNSSEC Domain name system security, yes DNS Security extension protocol
DLV DNSSEC Backup key
 These security mechanisms are designed to protect DNS The data security between the server and the user can avoid the deception of malicious data to the user

zone "." IN {               Root server
        type hint;
        file "named.ca";
};

include "/etc/named.rfc1912.zones";
include "/etc/named.root.key";
 ----------------------------
The domain is defined in the sub configuration file
 Sub profile: /etc/named.rfc1912.zones
/etc/named.rfc1912.zones
//Forward template
zone "localhost.localdomain" IN {
        type master;
        file "named.localhost";     Note that the configuration of the files in quotation marks will be modified below
        allow-update { none; };
};
//Reverse template IP reverse write
zone "1.0.0.127.in-addr.arpa" IN {
        type master;
        file "named.loopback";
        allow-update { none; };
};


#cd /var/named
#cat named.localhost forward template
@The symbol already has its meaning here, so it is separated by dots
#cat named.loopback reverse template
cat /etc/named/named.localhost
 Forward
$TTL 1D                             Lifecycle cache
@   IN SOA  @ rname.invalid. (
                    0   ; serial
                    1D  ; refresh
                    1H  ; retry
                    1W  ; expire
                    3H )    ; minimum
    NS  @
    A   127.0.0.1
    AAAA    ::1

@ = zonename = itcast.com  Current domain
IN internet
SOA START agreement
NS dns Server
A ipv4 Forward
AAAA ipv6
CNAME alias
MX Mail interaction record 5 indicates that the smaller the priority number, the higher the priority

reverse
$TTL 1D
@   IN SOA  @ rname.invalid. (
                    0   ; serial            Update serial number
                    1D  ; refresh           Update interval (download data from server)
                    1H  ; retry             Failed to retry
                    1W  ; expire            Expiration time of area file
                    3H )    ; minimum       Minimum life cycle of cache
    NS  @
    A   127.0.0.1
    AAAA    ::1
    PTR localhost.

5.According to the requirements, modify the configuration file to complete the service construction
 Requirement 1: www.misshou.io Resolve to 192.168.1.2             (Requirement 3 (the environment of requirement 1 and requirement 2 has been cleared)
1.Modify master profile /etc/named.conf ->Monitoring method and who is allowed to query
#cp /etc/named.conf  /etc/named.conf.bak
#cp /etc/named.rfc1912.zones /etc/named.rfc1912.zones.bak
#vim /etc/named.conf
options {
	listen-on port 53 { 127.0.0.1;any; };     any Whole network monitoring
	listen-on-v6 port 53 { ::1; };
	directory 	"/var/named";
	dump-file 	"/var/named/data/cache_dump.db";
        statistics-file "/var/named/data/named_stats.txt";
        memstatistics-file "/var/named/data/named_mem_stats.txt";
	allow-query     { localhost;any; };   any Allow everyone to query
	recursion yes;

	dnssec-enable no;          close
	dnssec-validation no;      close
	dnssec-lookaside auto;

	/* Path to ISC DLV key */
	bindkeys-file "/etc/named.iscdlv.key";

	managed-keys-directory "/var/named/dynamic";
};
.......................

2.Modify sub profile /etc/named.rfc1912.zones Define management domain - define management domain misshou.io
www.misshou.io
[root@server desktop]# cp /etc/named.conf /etc/named.conf.bak
[root@server desktop]# cp /etc/named.rfc1912.zones /etc/named.rfc1912.zones.bak
[root@server desktop]# vim /etc/named.rfc1912.zones
 Add the following at the end of the document:
 43 zone "misshou.io" IN {
 44         type master;
 45         file "misshou.io.zone";  //As like as two peas, the name of the file is not required, but the same name must be created in /var/name.
 46         allow-update { none; };
 47 };

3.stay/var/named Create corresponding in the directory zone file
/var/named/named.localhost   Forward template
!!!Remember not to change the file attributes, and an error will be reported due to the permission problem.
By copying, -p : Copy it together with the attributes of the file instead of using the default attributes;
[root@server desktop]# touch /var/named/misshou.io.zone
[root@server desktop]# cp -p /var/named/named.localhost /var/named/misshou.io.zone
[root@server desktop]# ll /var/named/misshou.io.zone
 Total consumption 4
-rw-r----- 1 root named 152 6 September 21, 2007 named.localhost

#vim /var/named/misshou.io.zone
$TTL 1D
@       IN SOA  misshou.io.  rname.invalid. (
                                        0       ; serial
                                        1D      ; refresh
                                        1H      ; retry
                                        1W      ; expire
                                        3H )    ; minimum
@       NS      dns1.misshou.io. //Represents the DNS server name / / you can specify dns1 here, abc is OK, but it should be consistent with the following A record
dns1    A       10.1.1.2           //The first two key lines must be the IP address of the current DNS server
www     A       192.168.1.254      //This is the address corresponding to the domain name. The DNS server only helps to resolve it, which has nothing to do with the DNS network segment

4.Use the command to check the syntax of the configuration file
[root@server ~]# named-checkconf /etc/named.conf / / nothing means OK
[root@server ~]# named-checkconf /etc/named.rfc1912.zones / / nothing means OK
[root@server ~]# cd /var/named enter the directory to check zone file
[root@server named]# ls
data     misshou.io.zone  named.empty      named.loopback
dynamic  named.ca         named.localhost  slaves
[root@server named]# named-checkzone misshou.io.zone misshou.io.zone / / write the zone file name twice
zone misshou.io.zone/IN: loaded serial 0
OK


6.Start the service and start it automatically
[root@server named]# service named start
[root@server named]# chkconfig named on
[root@server named]# netstat -nltup|grep 53 / / check whether the port is enabled

7.Test verification
client: 10.1.1.3          Temporary changes:#ifconfig eth0 10.1.1.3/24
www.misshou.io 192.168.1.254
 Specify first DNS The server❤
[root@client ~]# echo nameserver 10.1.1.2 > /etc/resolv.conf
[root@client ~]# cat /etc/resolv.conf
nameserver 10.1.1.2

First command nslookup
[root@client desktop]# nslookup www.misshou.io
Server:		10.1.1.2
Address:	10.1.1.2#53

Name:	www.misshou.io
Address: 192.168.1.254

 ----- -----
[root@client ~]# which nslookup
/usr/bin/nslookup
[root@client ~]# rpm -qf /usr/bin/nslookup
bind-utils-9.8.2-0.17.rc1.el6_4.6.x86_64
[root@client ~]# nslookup www.misshou.io
Server:     10.1.1.2
Address:    10.1.1.2#53

Name:   www.misshou.io
Address: 192.168.1.254
  ----- -----

Second command dig
[root@client ~]# dig @10.1.1.2 www.misshou.io

; <<>> DiG 9.8.2rc1-RedHat-9.8.2-0.17.rc1.el6_4.6 <<>> @10.1.1.2 www.misshou.io
; (1 server found)
;; global options: +cmd
;; Got answer:
;; ->>HEADER<<- opcode: QUERY, status: NOERROR, id: 22390
;; flags: qr aa rd ra; QUERY: 1, ANSWER: 1, AUTHORITY: 1, ADDITIONAL: 1

;; QUESTION SECTION:
;www.misshou.io.            IN  A

;; ANSWER SECTION:
www.misshou.io.     86400   IN  A   192.168.1.254

;; AUTHORITY SECTION:
misshou.io.     86400   IN  NS  dns1.misshou.io.

;; ADDITIONAL SECTION:
dns1.misshou.io.    86400   IN  A   10.1.1.2

;; Query time: 1 msec
;; SERVER: 10.1.1.2#53(10.1.1.2)
;; WHEN: Wed Apr 24 18:36:41 2019
;; MSG SIZE  rcvd: 83

Third command host
[root@client ~]# host www.misshou.io
www.misshou.io has address 192.168.1.254

result:
1.Seeing the above information indicates that there is no problem with forward parsing
2.Cannot reverse parse because there is no configuration
3.If there is no error in the configuration file and the service is started but still cannot be parsed, check the firewall selinux And network
4. DNS segmentation and view statement
The view statement contains several access lists that can control which users can see which views, some options that apply to all areas in the view, and the area itself. So that internal and external users can see different host data.
There must be a match clients clause, which is used to filter the source IP address of DNS query. It usually provides an internal and external view of site DNS data.
view view-name {
	match-clients { address-match-list };	[any]
	match-destinations { address=match-list };	[any]
	match-recursive-only yes | no;	[no]
	view-option;	...
	zone-statement;		...
};

match-destinations Clause view DNS Query the destination address sent to.
match-recursive-only Clause requirements DNS The query is recursive and can recursion yes;
Views are processed in order, and all views with the most restrictions are placed first.
If views are used, then named All in the configuration file zone Statement must appear in view In the context of.
give an example:
Since China's network is currently divided into two regions - South China Telecom and North China Unicom. Users on the two networks have very low efficiency in accessing hosts on each other's networks, general service providers now provide the same services of the two networks, such as www.abc.com COM, in order to improve the customer experience on the two networks of Telecom and Netcom, so that users can experience the fastest access speed. It is decided to set up two servers for Telecom and Netcom respectively, one of which is connected to the telecom special line and the other to the Netcom special line. However, to make users access this website transparently, users do not need to make manual website selection. We can use the view function in the DNS server to point different IP s to hosts on different networks. For example, let's browse www.abc.com Netcom users on this website browse the host set up on the Netcom line.
The experimental environment is as follows:
Resolved host name: www.abc.com com
DNS server ip: 172.25.0.10
Telecom client ip: 172.25.0.11. I hope the result is 192.168.11.1
Netcom client ip: 172.25.0.12. I hope the resolution result is 22.21.1.1
The results of client parsing of other operators are 1.1.1.1
The configuration is as follows:
1) Define view field
[root@servera ~]# vim /etc/named.conf
options {
        listen-on port 53 { any; };
        listen-on-v6 port 53 { ::1; };
        directory       "/var/named";
        dump-file       "/var/named/data/cache_dump.db";
        statistics-file "/var/named/data/named_stats.txt";
        memstatistics-file "/var/named/data/named_mem_stats.txt";
        allow-query     { any; };

        /*
         - If you are building an AUTHORITATIVE DNS server, do NOT enable recursion.
         - If you are building a RECURSIVE (caching) DNS server, you need to enable
recursion.
         - If your recursive DNS server has a public IP address, you MUST enable access
           control to limit queries to your legitimate users. Failing to do so will
           cause your server to become part of large scale DNS amplification
           attacks. Implementing BCP38 within your network would greatly
           reduce such attack surface
        */
        recursion yes;

        dnssec-enable yes;
		dnssec-validation yes;
        dnssec-lookaside auto;

        /* Path to ISC DLV key */
        bindkeys-file "/etc/named.iscdlv.key";

        managed-keys-directory "/var/named/dynamic";

        pid-file "/run/named/named.pid";
        session-keyfile "/run/named/session.key";
};

logging {
        channel default_debug {
                file "data/named.run";
                severity dynamic;
        };
};
view "dxclient" {
        match-clients { 172.25.0.11; };
        zone "." IN {
                type hint;
                file "named.ca";
        };
        zone "abc.com" IN {
                type master;
                file "dx.abc.com.zone";
        };

include "/etc/named.rfc1912.zones";
};
view "wtclient" {
        match-clients { 172.25.0.12; };
        zone "." IN {
                type hint;
                file "named.ca";
        };
        zone "abc.com" IN {
                type master;
                file "wt.abc.com.zone";
        };

include "/etc/named.rfc1912.zones";
};
view "other" {
        match-clients { any;};
         zone "." IN {
                type hint;
                file "named.ca";
        };
        zone "abc.com" IN {
                type master;
                file "other.abc.com.zone";
        };

include "/etc/named.rfc1912.zones";

};

include "/etc/named.root.key";
2) Generate data file
[root@servera named]# cp -p named.localhost dx.abc.com.zone
[root@servera named]# cp -p dx.abc.com.zone wt.abc.com.zone
[root@servera named]# cp -p dx.abc.com.zone other.abc.com.zone
[root@servera named]# vim dx.abc.com.zone
$TTL 1D
@       IN SOA  @ rname.invalid. (
                                        0       ; serial
                                        1D      ; refresh
                                        1H      ; retry
                                        1W      ; expire
                                        3H )    ; minimum
        NS      @
        A       172.25.0.10
www     A       192.168.11.1

[root@servera named]# vim wt.abc.com.zone
$TTL 1D
@       IN SOA  @ rname.invalid. (
                                        0       ; serial
                                        1D      ; refresh
                                        1H      ; retry
                                        1W      ; expire
                                        3H )    ; minimum
        NS      @
        A       172.25.0.10
www     A       22.21.1.1
[root@servera named]# vim other.abc.com.zone
$TTL 1D
@       IN SOA  @ rname.invalid. (
                                        0       ; serial
                                        1D      ; refresh
                                        1H      ; retry
                                        1W      ; expire
                                        3H )    ; minimum
        NS      @
        A       172.25.0.10
www     A       1.1.1.1
3) Restart service
[root@servera named]# chgrp named abc.com.*
Detection syntax:
[root@servera named]# named-checkconf
[root@servera named]# named-checkzone  abc.com /var/named/dx.abc.com.zone
zone abc.com/IN: loaded serial 10
OK
[root@servera named]# named-checkzone  abc.com /var/named/wt.abc.com.zone
zone abc.com/IN: loaded serial 10
OK
[root@servera named]# named-checkzone  abc.com /var/named/other.abc.com.zonee
zone abc.com/IN: loaded serial 10
OK
[root@servera named]# service named start
[root@servera named]# chkconfig named on
4) Testing
[root@serverb ~]# nslookup
> server 172.25.0.10
Default server: 172.25.0.10
Address: 172.25.0.10#53
> www.abc.com
Server: 172.25.0.10
Address: 172.25.0.10#53

Name: www.abc.com
Address: 192.168.11.1

[root@serverc ~]# nslookup
> server 172.25.0.10
Default server: 172.25.0.10
Address: 172.25.0.10#53
> www.abc.com
Server: 172.25.0.10
Address: 172.25.0.10#53

Name: www.abc.com
Address: 22.21.1.1
As you can see, analyze www.abc.com Com requests are sent to the server 172.25.0.10 at the same time. However, the results parsed by different clients are inconsistent. This is the role of DNS view.
If the request does not come from the area specified in the first view, the request will select other view comparison downward, so it can be seen that the view comparison is from top to bottom. If the requested area is in the previous view, it will not be requested to the next view, even if you put this area in the next view.
----
Supplement: configuration of ACL parameters
Sometimes, we may match a wide range of IP addresses. Since matchclients may need to define many network segments, bind introduces acl keyword to define variable replacement, so that only the least symbols appear in matchclients, and the addition of network segments can be carried out in external files. This can be done in the following ways:
acl "foosubnet" { 192.168.1/24;192.168.2/24; };
give an example:
At present, the clients of Telecom are 172.25.0.11 and 172.25.0.12 servers
At present, the clients of Netcom are 172.25.0.13 and 172.25.0.14
The corresponding configuration is completed through acl, which can be realized through the following writing method.
1)Define the read configuration parameters of external files in the main configuration file
[root@servera named]# vim /etc/named.conf
# Change the following parameters, and the other parameters remain unchanged
include "/etc/dx.cfg";
include "/etc/wt.cfg";
view "dxclient" {
        match-clients { "dx"; };
        zone "." IN {
                type hint;
                file "named.ca";
        };
        zone "abc.com" IN {
                type master;
                file "dx.abc.com.zone";
        };

include "/etc/named.rfc1912.zones";
};
view "wtclient" {
        match-clients { "wt"; };
        zone "." IN {
                type hint;
                file "named.ca";
        };
        zone "abc.com" IN {
                type master;
                file "wt.abc.com.zone";
        };

include "/etc/named.rfc1912.zones";
};

view "other" {
        match-clients { any;};
         zone "." IN {
                type hint;
                file "named.ca";
        };
        zone "abc.com" IN {
                type master;
                file "other.abc.com.zone";
        };

include "/etc/named.rfc1912.zones";

};
2)Generate external files
[root@servera named]# cd /var/named/chroot/
[root@servera chroot]# ls
dev  etc  run  usr  var
[root@servera chroot]# cd etc/
[root@servera etc]# ls
localtime  named.conf        named.rfc1912.zones  pki
named      named.iscdlv.key  named.root.key       rndc.key
[root@servera etc]# pwd
/var/named/chroot/etc
[root@servera etc]# vim dx.cfg
acl "dx" {
        172.25.0.11;
        172.25.0.12;
};

[root@servera etc]# vim wt.cfg
acl "wt" {
        172.25.0.13;
        172.25.0.14;
};
3)Restart service
[root@servera etc]# systemctl restart named-chroot
4)Access test strategy
5. BIND configuration example
DNS Service: https://blog.csdn.net/qq_39578545/article/details/105016510
(1) localhost area
Here is / etc / named Configuration line of localhost in conf
zone "localhost" IN {
        type master;
        file "localhost";     Note that the configuration of the files in quotation marks will be modified below
        allow-update { none; };
};
//Reverse template IP reverse write
zone "0.0.127.in-addr.arpa" IN {
        type master;
        file "127.0.0";
        allow-update { none; };
};
The following is the configuration line in the forward partition file / var/named/localhost
$TTL 30D                             Lifecycle cache
; localhost.
@   IN SOA  @ rname.invalid. (
                    0   ; serial
                    1D  ; refresh
                    1H  ; retry
                    1W  ; expire
                    3H )    ; minimum
    NS  @
    A   127.0.0.1
    AAAA    ::1

@ = zonename = localhost  Current domain
IN internet
SOA START agreement
NS dns Server
A ipv4 Forward
AAAA ipv6
CNAME alias
MX Mail interaction record 5 indicates that the smaller the priority number, the higher the priority
The following is the reverse zone file / var/named/
$TTL 1D
@   IN SOA  @ localhost. (
                    0   ; serial            Update serial number
                    1D  ; refresh           Update interval (download data from server)
                    1H  ; retry             Failed to retry
                    1W  ; expire            Expiration time of area file
                    3H )    ; minimum       Minimum life cycle of cache
    NS  @
    A   127.0.0.1
    AAAA    ::1
    PTR localhost.

@It means "0" here.0.127.in-addr.apra"
6. DNS Security Issues
P393 description is very detailed. No more details.
Chapter 17 single sign on (omitted)
Both users and system administrators want account information to magically spread to all computers in the whole environment, so that they can log in to any system with the same credentials. This feature is commonly referred to as single sign on (SSO).
SSO involves two core security concepts: identity and authentication.
- User identity is an abstract representation of individuals who need to access the system or application. It usually includes various attributes, such as user name, password, user ID, e-mail address.
- Authentication is the act of proving that an individual is the legal owner of an identity.
Although there are more than one way to set up SSO, there are usually four elements that are essential in all scenarios.
- Centralized directory storage containing user identity and authentication information. The most common solution is a directory service based on Lightweight Directory Access Protocol (LDAP).
- A tool for managing user information in a directory. For the native LDAP implementation, Apache Directory Studio is recommended, which can be used to import, add, modify and delete directory entries. You can also use the Windows native MMC unit "Active Directory Users and Computers" to manage user information.
- User authentication mechanism. Although user authentication can be performed directly against LDAP storage, it is also common to use ticket based Kerberos authentication system. In the Windows environment, Active Directory provides LDAP access to user identity. In terms of authentication, it adopts the customized version of Kerberos.
- C library routines that understand centralized identity and authentication will find user attributes. Routines (such as getpwent) read flat file s (such as / etc/passwd and / etc/group) and answer queries about the contents of these files.
Chapter 18 email (omitted)
SMTP protocol - port number 25
Simple Mail Transport Protocol (SMTP): sent from the client to the post office server.
POP protocol - port number 110
Post Office Protocol: used to receive e-mail. The third version is commonly used, so it is called POP3 for short.
Chapter 19 Web server
1. HTTP: Hypertext Transfer Protocol
The main features of HTTP protocol can be summarized as follows:
- Support client / server mode.
- Simple and fast: when a client requests a service from the server, it only needs to send the request method and path. The common request methods are GET, HEAD and POST. Each method specifies the type of contact between the client and the server. Due to the simple HTTP protocol, the program scale of HTTP server is small, so the communication speed is very fast.
- Flexible: HTTP allows any type of data object to be transmitted. The type being transferred is marked by content type.
- No connection: no connection means that only one request can be processed for each connection. After the server processes the customer's request and receives the customer's response, it disconnects. In this way, the transmission time can be saved.
- Stateless: HTTP protocol is a stateless protocol. Stateless means that the protocol has no memory ability for transaction processing. The lack of status means that if the previous information is required for subsequent processing, it must be retransmitted, which may increase the amount of data transmitted per connection. On the other hand, when the server does not need previous information, its response is faster.
What is the difference between http 1.0 and http 1.1? What are the main changes or advantages of http 2.0?
difference:
- HTTP/1.0 protocol uses non persistent connection, that is, under non persistent connection, a tcp connection transmits only one Web object,;
- HTTP/1.1 uses persistent connections by default (however, clients and servers of HTTP/1.1 protocol can be configured to use non persistent connections). Under the persistent connection, it is not necessary to establish a new connection for the transmission of each Web object. Multiple objects can be transmitted in one connection!
Advantages of http 2.0:
- Transmit data in binary format instead of http1 1 text format and binary format bring more advantages and possibilities in the analysis, optimization and expansion of the protocol
- Using Hpack to compress the message header can save the network traffic occupied by the message header, http1 1 each request will carry a lot of redundant header information, wasting a lot of broadband resources.
- Asynchronous connection multiplexing
- Server Push: the server can push resources to the client faster.
- Maintaining backward compatibility with HTTP 1.1 semantics is also a key to this version
The main differences between https and http are as follows:
- http is a hypertext transmission protocol. Information is transmitted in plaintext and does not provide any way of data encryption; HTTPS protocol is a network protocol built by SSL/TLS+HTTP protocol, which can carry out encrypted transmission and identity authentication. HTTPS protocol requires ca to apply for certificate.
- http and https use completely different connection methods. http connection is very simple and stateless, and the port used is also different. The former is 80 and the latter is 443.
There are five different categories of HTTP status codes:
1xx: Message: the server receives the request and needs the requester to continue the operation
2xx: successful. The operation is successfully received and processed
3xx: redirection, further operation is required to complete the request
4xx: client error, request contains syntax error or cannot complete the request.
5xx: server error. The server encountered an error while processing the request.
The first number of the response status code of the five categories is the only representative.
200 OK The server successfully processed the request

300 Multiple options. The requested resource can include multiple locations, and a list of resource characteristics and addresses can be returned for user terminal (e.g. browser) selection
301 Moved Permanently Redirection, resources (web pages, etc.) are permanently transferred to other URL
302 Found
304 Not modified. The requested resource has not been modified. When the server returns this status code, no resource will be returned.

400 The syntax of the client request is incorrect and the server cannot understand it
403 Forbidden Request resource forbidden access
404 Not Found Resource not found, requested resource (web page, etc.) does not exist

500 Internal server error, the server encountered an error that prevented it from servicing the request
502 Gateway error. The server working as a gateway or proxy received an invalid response from the remote server when trying to execute the request
503 Service Unavailable Due to overload or system maintenance, the server is temporarily unable to process the client's request
504 Gateway timeout( Gateway timeout),It refers to that the server acts as a gateway or agent, but does not receive the request from the upstream server in time.
505 HTTP Wrong version
Difference of error detection between data link layer and transport layer
The purpose of error detection in data link layer is to achieve "no bit error". CRC error detection technology using only cyclic redundancy check.
The purpose of error detection in the transport layer is to achieve "no transmission error". That is to make up for frame loss, frame repetition and frame out of order.
The request of the GET client specifies the resource information, and the server returns the specified resource.
HEAD only requests the HTTP header content in the response message.
POST submits the data from the client to the server.
PUT replaces the document content of the specified document with the data transmitted from the client to the server.
DELETE requests the server to DELETE the resource identified by the request URI.
MOVE requests the server to MOVE the specified page to another network address.
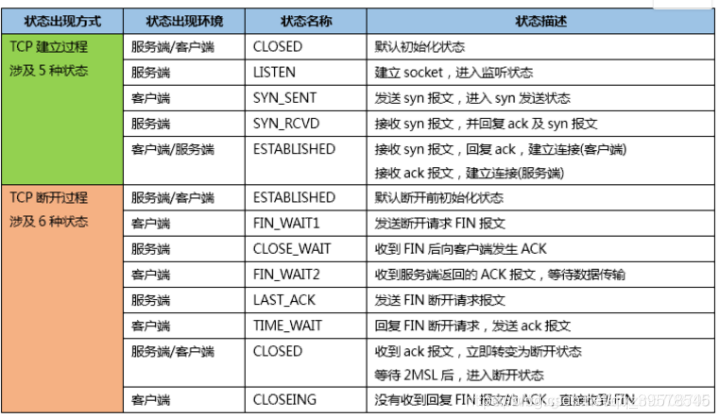
Common HTTP headers
The header specifies the metadata related to the request or response, for example, whether compression is allowed; What type of data is accepted, expected or provided; How the intermediate cache should handle the data.
curl: HTTP on the command line
A command line HTTP client.
The payload of the response is curl itself. Some suggestive information can be hidden through the - o /dev/null and - s options. In addition, we have added the - v option to require curl to display detailed output including header.
$ curl -s -v -o /dev/null http://admin.com
Lines starting with < and > represent HTTP responses and requests, respectively. In the request, the client tells the server that the user agent is curl.
curl -H option explicitly sets the header
The curl -O option allows you to download files. The following example is to download curl's source code compressed archive file to the current directory.
$ curl -O http://curl.haxx.se/snapshots/curl-7.46.tar.gz
curl usage guide: http://www.ruanyifeng.com/blog/2019/09/curl-reference.html
2. Load balancing
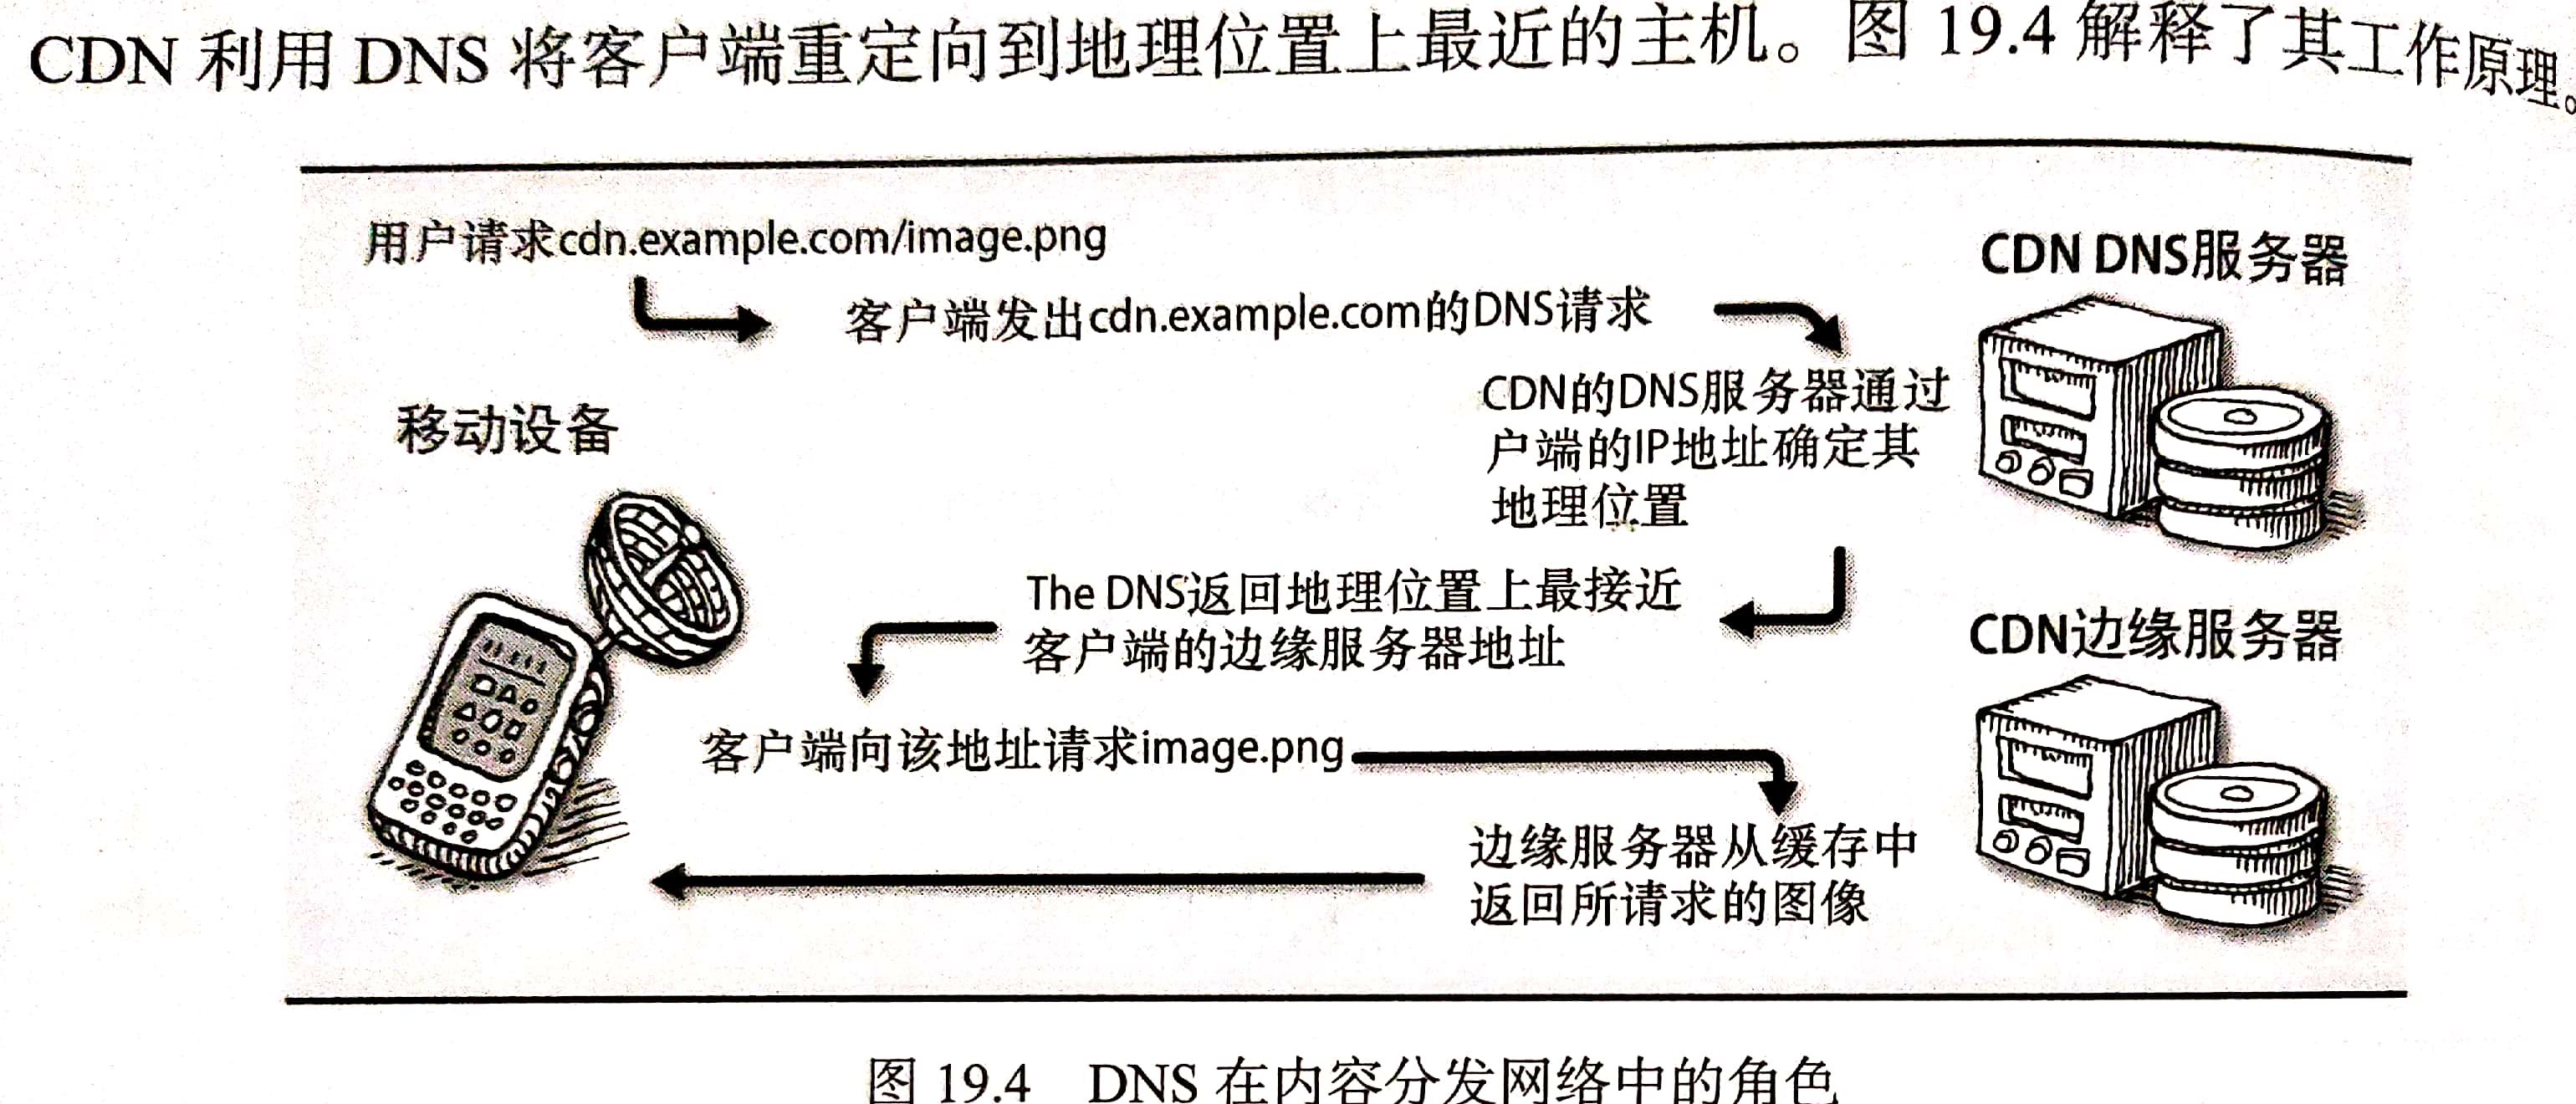
3,Apache httpd
Linux APACHE build server https://blog.csdn.net/qq_39578545/article/details/105043444
Virtual host configuration
When the HTTP request arrives, httpd determines the virtual host to be selected by querying the HTTP Host header and network port. Then match the path part of the requested URL with the Files, Directory, or Location directive to determine how to provide the required content. This mapping process is called request routing.
The following example shows the HTTP and HTTPS configuration of the admin website.
<VirtualHost *:80>
	ServerName admin.com
	ServerAlias	www.admin.com
	ServerAlias	ulsah.admin.com
	Redirect / https://admin.com/
</VirtualHost>

<VirtualHost *:443>
	ServerName admin.com
	ServerAlias	www.admin.com
	ServerAlias	ulsah.admin.com
	DocumentRoot /var/www/admin.com/
	CustomLog /var/log/apache2/admin_com_access combined
	ErrorLog /var/log/apache2/admin_com_error
	SSLEngine on
	SSLCertificateFile "/etc/ssl/certs/admin.com.crt"
	SSLCertificateKeyFile "/etc/ssl/private/admin.com.key"
	<Directory "/var/www/admin.com">
	  Require all granted
	</Directory>
	<Directory "/var/www/admin.com/photos">
	  Options +Indexes
	</Directory>
	<IfModule mod_rewrite.c>
	  RewriteEngine on
	  RewriteRule ^/(usah|lsah)$ /ulsah
	</IfModule>
	ExtendedStatus On
	<Location /server-status>
	  SetHandler server-status
	  Require ip 10.0.10.10/32
	</Location>
</VirtualHost>
- The first VirtualHost responds on port 80 and redirects the HTTP request to HTTPS;
- For admin The request of COM / photos will receive the index of all files in the directory;
- Requests for / usah or / lsah are rewritten to / ulsah.
Server status (which can be accessed through www.admin.com/server-status in this configuration) is a module that can display useful runtime performance information, including CPU and memory usage statistics of daemon, request status, average number of requests per second, etc. The monitoring system can use this function to collect relevant data of Web server for early warning, reporting and visualization of HTTP traffic. Here, only the IP address 10.0.10.10 can access the server status.
HTTP Basic Authentication
https://blog.csdn.net/qq_39578545/article/details/105043444
4,Nginx
https://blog.csdn.net/qq_39578545/article/details/105945481
Virtual host, through the combination of listen and server_name instruction,
server {
	listen 10.0.10.10:80
	server_name admin.com www.admin.com;
	root /var/www/admin.com/site1;
}
server {
	listen 10.0.10.11:80
	server_name admin.com www.admin.com;
	root /var/www/admin.com/site2;
}
proxy_pass instructs Nginx to act as a proxy and relay the client's request to another downstream server.
The following example uses location with proxy_ The pass instruction instructs Nginx to process most requests from the Web root directory, but will http://www.admin.com/nginx Forward your request to the Nginx official website.
server {
	server_name admin.com www.admin.com;
	root /var/www/admin.com;
	location /nginx/ {
		proxy_pass http://nginx.org/;
	}
}
Case:
(1) Configure TLS for Nginx
Enable TLS and point to certificate and private key files.
https://www.cnblogs.com/Garnett-Boy/p/11076210.html
server {
	listen 443;
	ssl on;
	ssl_certificate /etc/ssl/certs/admin.com.crt;
	ssl_certificate_key /etc/ssl/private/admin.com.crt;
	ssl_protocols TLSv1 TLSv1.1 TLSv1.2;
	ssl_ciphers ECDHE-RSA-AES128-GCM-SHA256:ECDHE...
	ssl_prefer_server_ciphers on;

	server_name admin.com www.admin.com;
	root /var/www/admin.com/site1;
}
Note: generally generated directories,It should be nginx/conf/ssl catalogue
1.Create server certificate key file server.key:
openssl genrsa -des3 -out server.key 1024
 Enter the password, confirm the password, and define it yourself, but remember, it will be used later.
2.Create application file for server certificate server.csr
openssl req -new -key server.key -out server.csr
 The output content is:
Enter pass phrase for root.key: ← Enter the password you created earlier
Country Name (2 letter code) [AU]:CN ← Country code, China input CN
State or Province Name (full name) [Some-State]:BeiJing ← Full name of province, Pinyin
Locality Name (eg, city) []:BeiJing ← The full name of the city, Pinyin
Organization Name (eg, company) [Internet Widgits Pty Ltd]:MyCompany Corp. ← English name of the company
Organizational Unit Name (eg, section) []: ← You can leave it blank
Common Name (eg, YOUR name) []: ← Do not enter at this time
Email Address []:admin@mycompany.com ← E-mail, optional
Please enter the following 'extra' attributes
to be sent with your certificate request
A challenge password []: ← You can leave it blank
An optional company name []: ← You can leave it blank
4.Back up a server key file
cp server.key server.key.org
5.Remove file password
openssl rsa -in server.key.org -out server.key
6.Generate certificate file server.crt
openssl x509 -req -days 365 -in server.csr -signkey server.key -out server.crt
(2) Load balancing using Nginx
1.stay http Under node, add upstream Node.
upstream admin-servers{
      server web1.admin.com:8080 max_fails=2;
      server web2.admin.com:8080 max_fails=2;
}

2.take server Under node location In node proxy_pass Configured as: http:// +upstream name, i.e“
http://admin-servers".
http {
	server {
		server_name admin.com www.admin.com;
		location / {
		    proxy_pass http://admin-servers;
		    health_check interval=30 fails=3 passes=1 uri=/health_check match=admin-health
		}
	}
	match admin-health {
		status 200;
		header Content-Type = text/html;
		body ~ "Red Leader,Standing By";
	}
}
Here, admin COM and www.admin Com traffic is distributed to web1 and web2 servers in a circular manner (default). The configuration also sets the health check of the back-end server, and checks / health every 30s (interval=30)_ Check the server on the endpoint once. If it fails three times in a row (failures = 3), Nginx will mark the server, but as long as it passes one check later (passes=1), it will be added to the rotation list.
The match keyword is unique to Nginx. It specifies the circumstances under which a health check is passed.
The upstream context adds another condition that sets the maximum number of failed connection attempts to 2. That is, if Nginx fails to connect to the server in both attempts, it abandons and removes the server from the server pool. This is an additional connectivity check that perfects health_check clause.
5,HAProxy
HAproxy is the most widely used open source load balancing software. It can proxy HTTP and TCP, support the use of sticky sessions to fix the specified client to a specific Web server, and provide advanced health check functions.
The configuration of HAProxy is usually contained in a single file / etc / HAProxy / HAProxy In CFG.
Example: make HAProxy listen on port 80 and distribute requests between Web servers web1 and web2 in a circular manner on port 8080.
global
	daemon
	maxconn 5000
defaults
	mode http
	timeout connect 5000
	timeout client 10000
	timeout server 10000
frontend http-in
	bind *:80
	default_backend webservers
backend webservers
	balance			roundrobin
	server	web1	10.0.0.10:8080
	server	web2	10.0.0.11:8080
The client initiates a request, HAProxy listens to the request on port 80, and then proxies the request to the Web server on port 8080
frontend specifies how HAProxy receives requests from clients: which addresses and ports to use, what types of traffic to handle, and other considerations for clients. backend is responsible for configuring a set of servers that handle requirements.
Multiple frontend/backend pairs can appear in a single configuration file, enabling HAProxy to provide services for multiple sites
(1) Health examination
(2) Server statistics
(3) Sticky session
(4) TLS termination