Common commands
1. System command
sync #Synchronize data from memory to hard disk
shutdown -h now #Turn it off immediately
reboot #restart
hostnamectl set-hostname kali #Set the host name to kali
2. Directory operation
cd / #Open root directory
cd ~ #Open current user directory
cd ./ #current directory
cd .. #Return to the previous directory
pwd #Displays the current directory
ls #Displays the contents of the current directory
ls -a #View all files, including hidden files
ls -l #View all file details, excluding hidden files
ls -ll #Show file details
tar -zxvf *.gz #Unzip file
mkdir document #Create directory
mkdir -p test2/test3/test4 #Create directory recursively
mv(Move file or directory, rename)
-f force
-u Replace only files that have been updated
mv file.gz document #Move file GZ file to document directory
rmdir test2 #Delete directory test2 (empty directory only)
rmdir -p test2/test3/test4 #Delete hierarchical folders test2, 3 and 4
cp file.gz document #Copy file GZ file to document directory
rm((remove file or directory)
-r Recursively delete directory
-f Ignore nonexistent files, no warning, forced deletion!
-i Interactive, ask whether to delete
rm -rf document #Delete directory (file)
3. File operation
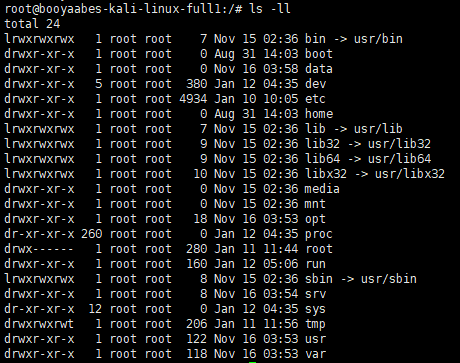
In Linux, the first character represents that the file is a directory, a file, a linked file, and so on.
When d is the directory
When - is a file;
If l, it is expressed as a link file;
If b, it represents the interface device (random access device) that can be stored in the device file;
If c, it means the serial port device in the device file, such as keyboard and mouse (one-time reading device).
In the following characters, three are a group, and all are combinations of three parameters of rwx. Where r stands for read, w stands for write, and x stands for execute. It should be noted that the position of these three permissions will not change. If there is no permission, a minus sign - just appears.
The attributes of each file are determined by the 10 characters in the first part on the left (as shown in the figure below).
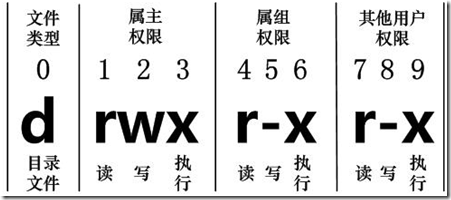
The numbers 0-9 are used from left to right.
Bit 0 determines the file type, and bits 1-3 determine that the owner (the owner of the file) has the permission of the file.
Bits 4-6 determine that the group (the same group user of the owner) has the permission of the file, and bits 7-9 determine that other users have the permission of the file.
Among them, bits 1, 4 and 7 indicate read permission. If it is represented by r character, it has read permission; if it is represented by - character, it has no read permission;
Bits 2, 5 and 8 indicate write permission. If w character is used, there is write permission; if - character is used, there is no write permission; Bits 3, 6 and 9 indicate the executable permission. If it is represented by the x character, it has the execution permission; if it is represented by the - character, it has no execution permission.
- chgrp: change file array
chgrp [-R] generic group name file name
-R: Recursively change the file group - chmod: change 9 attributes of the file
chmod [-R] 777 file name
-R: Changing file properties recursively
r:4 w:2 x:1 4+2+1=7
777:-rwxrwxrwx
4. View files
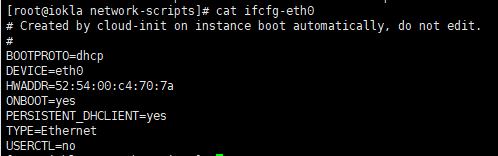
cat file view file
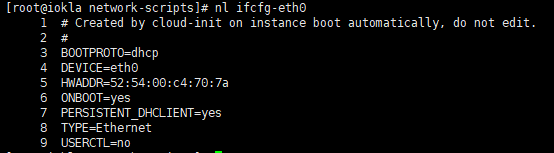
nl file display line number view file
Touch f1create f1 file
Echo "insert" > > f1 input the string insertd to the f1 file
5. VIM
:wq! Force save exit
6. Account management
1. Add account
useradd - option username
-m: Automatically create user home directory
2. Delete account
userdel -r sam
#Delete the records of user sam in system files (mainly / etc/passwd, /etc/shadow, /etc/group, etc.), and delete the user's home directory at the same time
3. Modify account
usermod - option username
usermod -l new_username old_username
-L (lowercase L) | - login ## modify the login name of the user
To change the user directory at the same time, we need to add the - d option while executing the usermod command
-d | - home ## modify the user's home directory, which is usually used with the - m option
-m | - move home ## modifies the user's home directory, which is usually used with the - d option
usermod -d /home/susan -m susan
#Modify susan user directory to / home/susan
7. Process management
ps view the information of various processes
-a displays all process information
-u displays the process with user information
-x displays the parameters of the background running process
pstree view through directory tree
-p displays the parent id
-u display user groups
kill -9 process id
ps -aux|grep
#grep looks for strings that match the criteria
pstree -pu
#The directory tree shows all processes
kii -9 process id
#Force end id process
8. rpm installation
Take installing jdk as an example
java -version #Detect the existence of java environment
#If it exists, it needs to be uninstalled
rpm -qa|grep jdk #Detect jdk version information
rpm -e --nodeps jdk_ #Delete the detected jdk version
rpm -ivh jdk-8u311-linux-x64.rpm #After uninstalling, you can install the jdk
java -version #Check whether the installation is successful
Configure the environment variable vim /etc/profile
JAVA_HOME=/usr/java/jdk1.8.0_311-amd64
CLASSPATH=%JAVA_HOME%/lib;%JAVA_HOME%/jre/lib
PATH=$JAVA_HOME/bin;$JAVA_HOME/jre/bin
export PATH CLASSPATH JAVA_HOME
9. Install yum
yum -y install Package name
yum -y install gcc
yum -y install gcc-c++
10. Decompression
1,*.tar use tar –xvf decompression
tar -zxvf apache-tomcat-9.0.56.tar.gz
2,*.gz use gzip -d perhaps gunzip decompression
3,*.tar.gz and*.tgz use tar –xzf decompression
4,*.bz2 use bzip2 -d Or use bunzip2 decompression
5,*.tar.bz2 use tar –xjf decompression
6,*.Z use uncompress decompression
7,*.tar.Z use tar –xZf decompression
8,*.rar use unrar e decompression
9,*.zip use unzip decompression
unzip goby-linux-x64-1.9.320.zip
11. docker installation
Official course https://docs.docker.com/engine/install/centos/
sudo yum remove docker \
                  docker-client \
                  docker-client-latest \
                  docker-common \
                  docker-latest \
                  docker-latest-logrotate \
                  docker-logrotate \
                  docker-engine
sudo yum install -y yum-utils
sudo yum-config-manager \
    --add-repo \
    https://download.docker.com/linux/centos/docker-ce.repo
Alibaba cloud tutorial https://developer.aliyun.com/mirror/docker-ce
#aliyun
# step 1: install some necessary system tools
sudo yum install -y yum-utils device-mapper-persistent-data lvm2
# Step 2: add software source information
sudo yum-config-manager --add-repo https://mirrors.aliyun.com/docker-ce/linux/centos/docker-ce.repo
# Step 3
sudo sed -i 's+download.docker.com+mirrors.aliyun.com/docker-ce+' /etc/yum.repos.d/docker-ce.repo
# Step 4: update and install docker CE
sudo yum makecache fast
sudo yum -y install docker-ce
# Step 4: start Docker service
sudo service docker start

# be careful:
# The official software source enables the latest software by default. You can obtain the software packages of various versions by editing the software source. For example, the official does not make the software source of the test version available. You can open it in the following ways. Similarly, various test versions can be opened.
# vim /etc/yum.repos.d/docker-ce.repo
#   Change enabled=0 under [docker CE test] to enabled=1
#
# Install the specified version of docker Ce:
# Step 1: find docker CE version:
# yum list docker-ce.x86_64 --showduplicates | sort -r
#   Loading mirror speeds from cached hostfile
#   Loaded plugins: branch, fastestmirror, langpacks
#   docker-ce.x86_64            17.03.1.ce-1.el7.centos            docker-ce-stable
#   docker-ce.x86_64            17.03.1.ce-1.el7.centos            @docker-ce-stable
#   docker-ce.x86_64            17.03.0.ce-1.el7.centos            docker-ce-stable
#   Available Packages
# Step 2: install the specified version of docker Ce: (version, for example, 17.03.0.ce.1-1. EL7. CentOS above)
# sudo yum -y install docker-ce-[VERSION]