Introduction to main modes of vim
vim command mode
Q: are vi and vim installed in the same package?
A: NO, vim is an added version of vi. the most obvious difference is that vim can be syntax highlighted. It is fully compatible with vi
Check a command, which software package is installed:
[root@xuegod63 ~]# rpm -qf /usr/bin/vim
[root@xuegod63 ~]# which vim
[root@xuegod63 ~]# rpm -qf `which vim`     #`Back quotation mark, the key under esc key, and the command can be executed in back quotation mark
 order
[root@xuegod63 ~]# rpm -qf $(which vi)     #$(executable command)
$()  And`` You can perform command replacement. Command replacement is similar to variable replacement. It is used to reorganize the command line. First, complete the replacement in quotation marks
 And then replace the result with a new command line
Four operation modes of vim editor
1.Vim has four common modes
Normal mode (commonly known as command mode), command line mode
Insert mode (commonly known as edit mode), Visual mode (commonly known as visual block mode)
root@xuegod63 ~]# cp /etc/passwd a.txt
[root@xuegod63 ~]# vim a.txt
 First entry file   ----Normal mode(Normal mode,Commonly known as command mode)
Press I Key, appears“ Insert"  ----Insert mode(Insert mode  ,Commonly known as editing mode)
Press Esc Key, and then enter the colon:   ----Command line mode(Command-line mode)
Example 1 how to switch from edit mode to command line mode?
Edit mode - > ESC - > command mode - > command line mode
Note that in the command mode, when the input command is invalid, check whether the input method is Chinese input method and switch to English input method
Example 2 character operation (how to enter editing mode?)
Enter edit mode a i o A I O
explain:
i  Insert before current character (Before cursor)
I  Line beginning insertion   (Line beginning)
a  Insert after current character (After cursor)
A  End of line insertion(End of line)
o Insert next line (Start another line)
O Insert previous line(Insert previous line)
x  Delete one character backward
X  Delete one character forward
 Equivalent to  delete
u  Undo step
 Undo every time you press
ctrl+r  Restore, restore every time you press
r  replace
Operation in normal mode
1. Cursor positioning
hjkl
 Lower left, upper right
0  and home Key means to switch to the beginning of the line,  $and end  Key to switch to the end of the line
gg  Quickly navigate to the first line of the document ,    G  Navigate to an unselected row
3gg  Or 3 G    Quickly navigate to line 3
/string(character string)     -----Find or locate the word or content you are looking for, and then hit enter. If there are many matching contents, we can
 To pass N,n To find up and down, and vim The found content will be highlighted and UN highlighted :noh
/^d
----Angle bracket^What does the meaning begin with? Look for a letter d  Content at the beginning
-----$What does the meaning end with? Look for letters bash  Ending content
/bash$
vim + /etc/passwd   When the file is opened, the cursor is automatically placed on the last line of the file. Learn about this technique.
vim +23 /etc/passwd   After opening the file, the cursor will automatically be located on line 23 of the file to facilitate later troubleshooting. E.g. service
 The device starts with an error. On the 23rd, there is a syntax error. use vim +23 /etc/passwd You can quickly navigate to line 23.
Share my experience: I prefer vim to open the file, then press G to jump to the end. Because of this vim + a.txt
I'm sure I'll forget it for a while. There are too many tips in Linux. You should remember those commonly used.
2. Edit text in normal mode
Delete, copy, paste, undo
yy  Copy entire row
 copy N that 's ok: Nyy    ,For example: 2 yy  ,Indicates that 2 rows are copied
dd(Delete, in behavioral units, delete the current cursor line)
delete N that 's ok: Ndd    ,For example: 2 dd  ,Indicates that 2 rows are deleted
p  :  P  paste
 Cut:  dd
x  Delete the character at the cursor position
D  Delete from cursor to end of line
u
 Undo operation
ctrl+r
 Restore the revoked operation. Restore the revoked operation back, that is, what it was like before revocation, and then restore it
 What kind
r  Replace, or modify a character
 Summary: vim  How to enter other modes
a A   o O    i I Both can be inserted and edited
:   Enter command line mode
ctrl+v  Enter visual block mode
R  Erase, overwrite and enter the replacement mode
 After you enter the above mode and want to exit, press  esc
Visual mode visual block mode
When programming or modifying the server configuration file, multi line comments are required, and Visual mode will be used.
1. Enter the batch deletion in Visual mode as follows:
Delete: press ctrl+v again to enter the visual block mode; Move the cursor down or up; Select part of the content and press d to delete the note
Interpretive symbols.
Example: set sshd_ Delete the # number before lines 17 to 20 in the config file
[root@xuegod63 ~]# vim /etc/ssh/sshd_config
Change:
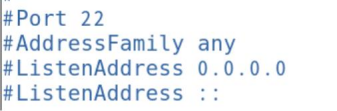
Is:

2. Enter the batch modification in Visual mode as follows:
1) . ctrl+v enter column editing mode
2) Move the cursor down or up to select the beginning of the line to be commented or edited
4) , then press capital I
5) , and then insert the comment or the symbol you need to insert, such as "#"
6) Press Esc again, and all comments or additions will be made
Example: in sshd_ Add a # sign before lines 17 to 20 in the config file
[root@xuegod63 ~]# vim /etc/ssh/sshd_config
Change:
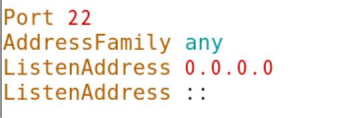
Is:

Command line operation skills in command line mode
1. Command line operation skills in command line mode
:w  preservation save
:w!  Force save
:q  No changes have been made. Exit quit
:q!  Modified, do not save, forced exit
:wq  Save and exit
:wq!  Force save and exit
:x  Save exit
:e!  Restore: restore to the state when the file is opened without modification. Many changes have been made. If you don't want to save or restore, press: e!
In normal mode, press uppercase ZZ,You can also save and exit
Example: wq! Force save and exit
[root@xuegod63 ~]# ll /etc/shadow
----------. 1 root root 1179 9 December 19:57 /etc/shadow
[root@xuegod63 ~]# vim /etc/shadow
Example 1: calling an external file or command
Syntax: in command line mode, enter:  !+command
 Example: in vim Edit document to write MAC  Address.
[root@xuegod63 ~]# cp /etc/passwd a.txt
[root@xuegod63 ~]# vim a.txt
:!ifconfig
#Invoke the ifconfig command in vim
 Read other files. (append the contents of other files to the current document)
:r /etc/hosts
2. Text replacement
Format: range (where% all content) s separator old content separator new content (separator can be customized)
The default is the first qualified word in each line (/ g all)
[root@xuegod63 ~]# vim a.txt
:1,3 s/bin/xuegod
:1,3 s/bin/xuegod/g
:3 s/xue/aaaaa/g
#Replace the first bin in lines 1 to 3 with xuegod
#Replace all the bin found in lines 1 to 3 with xuegod
#Just replace all xue in line 3 with AAA
 modify a.txt ,First, insert a few randomly in the file do  and DO  character
:% s/do/xuegod/g
:% s/do/xuegod/gi
#Replace all do in the text with xuegod
#Replace all do in the text with xuegod, and ignore the case of do
:% s@xuegod@do@g    #Replace all xuegod in the text with do. When replacing, you can also use @ as the separator
Customize vim usage environment
1. Temporary settings
[root@xuegod63 ~]# vim a.txt
:set nu
 set nu
:set nonu  Unset line number
:noh
 set nohlsearch
2. Permanent setting environment
vim /etc/vimrc   #After setting, it will affect all users of the system
~/.vimrc  #In the user's home directory, create one vimrc.  This only affects a certain user and does not build one yourself
Example 1: temporarily customize vim to enable the function of displaying line number
[root@xuegod63 ~]# echo "set nu" >  /root/.vimrc
[root@xuegod63 ~]# vim  /etc/passwd  #It is found that the default line number already exists
3. vim opens multiple files
Method 1: open two documents under the situation above and below
[root@xuegod63 ~]# vim -o /etc/passwd /etc/hosts
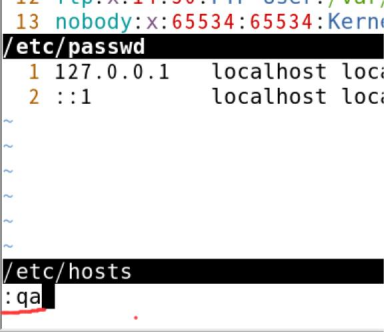
Note: Enter: qa to exit all open files at once
Method 2: open two documents left and right
[root@xuegod63 ~]# vim -O /etc/passwd /etc/hosts
Note: ctrl+ww switches between two documents for editing. The upper case o is divided into left and right screens, and the lower case o is divided into upper and lower screens
Compare the contents of two files
[root@xuegod63 ~]# cp /etc/passwd mima.txt
[root@xuegod63 ~]# echo aaa >> mima.txt
Method 1:
[root@xuegod63 ~]# diff /etc/passwd mima.txt
40a41 > aaa
Method 2:
[root@xuegod63 ~]# vimdiff /etc/passwd mima.txt
Other editors
nano editor
emacs editor
GHOME editor gedit
Example:
[root@xuegod63 ~]# gedit /etc/passwd
Actual combat: restore files deleted by mistake under ext4 file system on Centos6/RHEL6
[root@xuegod63 ~]# rm -rf /
#Can this be executed successfully?
If the execution is unsuccessful,
rm:  stay"/" Recursive operations are dangerous
rm:  use --no-preserve-root  Option skip safe mode
[root@xuegod63 ~]# rm -rf /*       #This can be executed successfully.
After deleting files on the ext4 file system, you can restore: extundelete, ext3 restore: ext3grep
windows restores the wrongly deleted file: final data v2 0 Chinese version and easyrecovery
If you delete files on the xfs file system, there is no good way to recover them completely. You need to find a professional data recovery company
Extension:
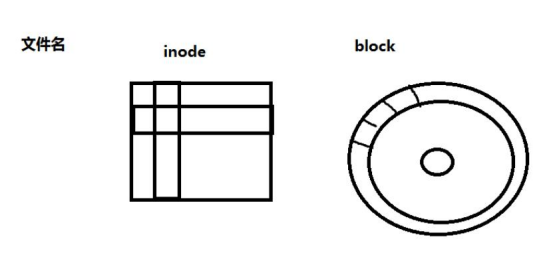
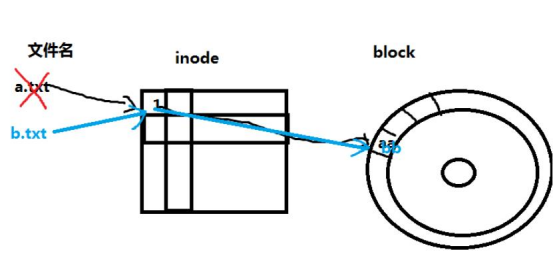
Linux The file system consists of three parts: file name, inode,block
windows  It also consists of these three parts.
a.txt     -->inode    --> block
 The file name stores the file metadata information and really stores the data
View file name:
[root@xuegod63 ~]# cp /etc/passwd a.txt
[root@xuegod63 ~]# ls a.txt
a.txt
View inode number:
Common sense: each file has an inode number.
[root@xuegod63 ~]# ls -i a.txt
440266 a.txt
View file attributes in inode; View the contents contained in the inode through the stat command
[root@xuegod63 ~]# stat a.txt     #To view inode information:
[root@xuegod63 ~]# ls -l a.txt
-rw-r--r-- 1 root root 1720 Oct 25 10:21 a.txt
Block block: the place where data is actually stored
Logical deletion:
Why is deletion faster than replication?
What is the first thing to do after deleting a file by mistake??? You don't want to delete the blockbuster that has been saved for decades.
Avoid overwriting the contents of accidentally deleted files. How to avoid?
Unmount the partition that needs to recover files or mount it as read-only
Actual combat: recover files deleted by mistake on ext4 file system
Download extundelete
http://sourceforge.net/
Prepare test partition:
Open source software distribution center
Add a hard disk first

[root@xuegod63 /]# fdisk /dev/sdb   #Create an sdb1 partition
WARNING: DOS-compatible mode is deprecated. It's strongly recommended to
switch off the mode (command 'c') and change display units to
sectors (command 'u').
Command (m for help):  p
#View existing partition tables
Disk /dev/sda: 21.5 GB, 21474836480 bytes
255 heads, 63 sectors/track, 2610 cylinders
Units = cylinders of 16065 * 512 = 8225280 bytes
Sector size (logical/physical): 512 bytes / 512 bytes
I/O size (minimum/optimal): 512 bytes / 512 bytes
Disk identifier: 0x000b8b35
Device Boot  Start  End   Blocks  Id  System /dev/sda1
* 1   204800  83   Linux
Partition 1 does not end on cylinder boundary.
/dev/sda2   /dev/sda3
26  1301   1428   10240000  1024000  83
Linux
1301  82
Linux swap / Solaris
Command (m for help):  n
Command action
#Create a new partition
e
extended
p
primary partition (1-4)
p
#Create a primary partition
Selected partition 4
First cylinder (1428-2610, default 1428):
Using default value 1428
Last cylinder, +cylinders or +size{K,M,G} (1428-2610, default 2610): +1G   #Specify partition size
Command (m for help): w   #preservation
The partition table has been altered!
Calling ioctl() to re-read partition table.
WARNING: Re-reading the partition table failed with error 16: Device or resource busy.
The kernel still uses the old table. The new table will be used at
the next reboot or after you run partprobe(8) or kpartx(8)
Syncing disks.
[root@xuegod63 ~]#reboot
 or
[root@xuegod63 ~]# partx -a /dev/sdb   #Get new partition table
Extension:
What if you delete a file under the root and want to restore it?
Method 1: power off immediately, and then mount the disk in read-only mode to another computer for recovery
Method 2: put the extundelete on the virtual machine (the virtual machine system should be the same as the server version), install it in advance, and then copy it to the U
Insert the USB flash disk into the server. During recovery, the recovered files should be saved to the USB flash disk (do not write / download the recovered data, which will overwrite the previously deleted files)
Use the new partition table:
[root@xuegod63 /]# mkdir /tmp/sdb1  #Create mount point
[root@xuegod63 ~]# mkfs.ext4 /dev/sdb1 #format
[root@xuegod63 ~]# mount /dev/sdb1 /tmp/sdb1 #mount
Prepare test environment
Copy some test files, then delete them, and then demonstrate recovery:
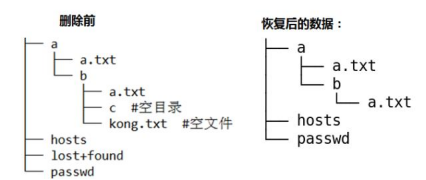
[root@xuegod63 ~]# cp /etc/passwd /tmp/sdb1
[root@xuegod63 ~]# cp /etc/hosts /tmp/sdb1
[root@xuegod63 ~]# echo aaa > a.txt
[root@xuegod63 ~]# mkdir -p /tmp/sdb1/a/b/c
[root@xuegod63 ~]# cp a.txt /tmp/sdb1/a
[root@xuegod63 ~]# cp a.txt /tmp/sdb1/a/b
[root@xuegod63 ~]# touch /tmp/sdb1/a/b/kong.txt
 install tree  Command:
[root@xuegod63 ~]# rpm -ivh /mnt/Packages/tree-1.5.3-2.el6.x86_64.rpm
[root@xuegod63 ~]# tree /tmp/sdb1
/tmp/sdb1/
├──  a
├──  a.txt
└──  b
├──  a.txt
├──  c   #Empty directory
└──  kong.txt   #Empty file
├──  hosts
├──  lost+found
└──  passwd
lost+found
A directory generated by using the standard ext3/ext4 file system format. The purpose is to set a directory when an error occurs in the file system
Put some missing fragments into this directory.
Can delete  rm -rf  lost+found
 Can create  mklost+found
Delete file:
[root@xuegod63 ~]# cd /tmp/sdb1/
[root@xuegod63 sdb1]# ls
a  hosts   lost+found    passwd
[root@xuegod63 sdb1]# rm -rf a hosts passwd
What is the first thing to do after deleting a file by mistake???
How to avoid overwriting the contents of deleted files???
Unmount the partition where files need to be recovered: or mount it as read-only
[root@localhost ~]#cd /root
[root@localhost ~]# umount /tmp/sdb1
Install extundelet
Upload extundelete to linux:
from windows upload extundelete File to linux,install  xmanager v5 perhapsCRT
[root@xuegod63 ~]# rpm -ivh /mnt/Packages/lrzsz-0.12.20-27.1.el6.x86_64.rpm
 After installation, there will berzCommand andszcommand rz:
upload windows Files in to  linux
sz  File name: download, will linux File transfer in  windows
Unzip and install extundelet
[root@centos63~]#mount /dev/sr0 /mnt
[root@centos63~]# vim /etc/yum.repos.d/Centos-6.repo
[CentOS6]
name=CentOS-server
baseurl=file:///mnt
enabled=1
gpgcheck=0
[root@xuegod63]# yum -y install e2fsprogs-devel gcc gcc-c++ gcc-g77
[root@xuegod63 extundelete-0.2.4]# tar xf extundelete-0.2.4.tar.bz2
[root@xuegod63 ~]# cd extundelete-0.2.4
[root@xuegod63 extundelete-0.2.4]# ./configure     #Check the system installation environment
[root@xuegod63 extundelete-0.2.4]# make
-j 4   #Compile, compile the source code into executable binary files.
-j 4     Use 4 processes to compile at the same time to improve the compilation speed or use 4 cores CPU  Compile at the same time.
[root@xuegod63 extundelete-0.2.4]# make install   #install
install  and cp What's the difference?
install  You can specify permissions when copying   cp  may not
 Example:
[root@xuegod63 ~]# install -m 777 /bin/find /opt/find
[root@xuegod63 ~]# ll /opt/
Recover data
Method 1: restore through inode node
Method 2: restore by file name
Method 3: restore a directory, such as all files in directory a:
Method 4: restore all files
[root@xuegod63 ~]# umount /tmp/sdb1/
[root@xuegod63 ~]# mkdir test   #Create a directory to store the recovered data
[root@xuegod63 ~]# cd test/
Method 1:
View the deleted file name through the inode node:
[root@xuegod63 test]# extundelete /dev/sdb1 --inode 2
lost+found  11
passwd     12   Deleted
hosts   13     Deleted
a  7313   Deleted
Extension: the inode value of the partition root directory of ext4 file system is 2, and the inode value of the xfs partition root directory is 64
[root@xuegod63 test]# ls -id /     #xfs file system
64  /
[root@xuegod63 test]# mount /dev/sdb1 /tmp/sdb1/
[root@xuegod63 test]# ls -id /tmp/sdb1/
2  /tmp/sdb1/
[root@xuegod63 test]# umount /tmp/sdb1/
Method 1: restore through inode node
root@xuegod63 test]# extundelete /dev/sdb1 --restore-inode 12
NOTICE: Extended attributes are not restored.
Loading filesystem metadata ... 9 groups loaded.
Loading journal descriptors ... 63 descriptors loaded.
[root@xuegod63 test]# ls
RECOVERED_FILES
[root@xuegod63 test]# diff /etc/passwd RECOVERED_FILES/file.12
#No output, the description is the same
Method 2: restore by file name
[root@xuegod63 test]# extundelete /dev/sdb1 --restore-file hosts
[root@xuegod63 test]# diff /etc/passwd RECOVERED_FILES/hosts
#No output, the description is the same
Method 3: restore a directory, such as all files in directory a:
[root@xuegod63 test]# extundelete /dev/sdb1 --restore-directory  a
[root@xuegod63 test]# tree RECOVERED_FILES/a/
RECOVERED_FILES/a/
├──  a.txt
└──  b
└──  a.txt
 The following is the original directory structure:
[root@xuegod63 ~]# tree /root/sdb1-back/a/
/root/sdb1-back/a/
├──  a.txt
└──  b
├──  a.txt
├──  c
└──  kong.txt
Method 4: restore all files
[root@centos6 test]# rm -rf RECOVERED_FILES/
[root@xuegod63 test]# extundelete /dev/sdb1 --restore-all
[root@centos6 test]# tree RECOVERED_FILES/
Data before and after deletion:
Actual combat: use xmmanager and other remote connection tools to manage Linux
1. Introduction to common remote connection tools under Linux

2. Usage of xmmanager
Open after installation
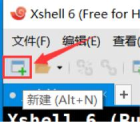
1. xshell usage
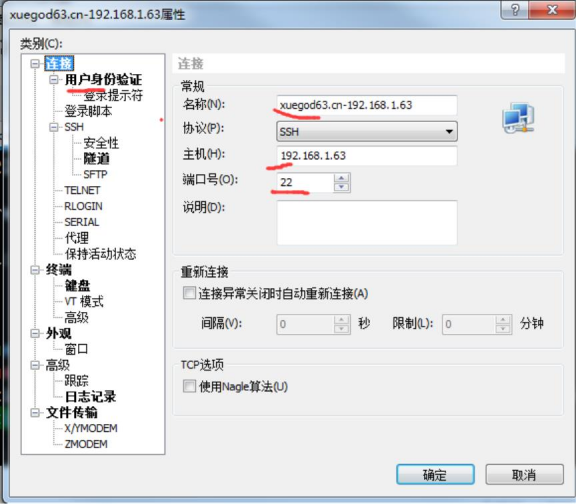
Example 1: connect a new server
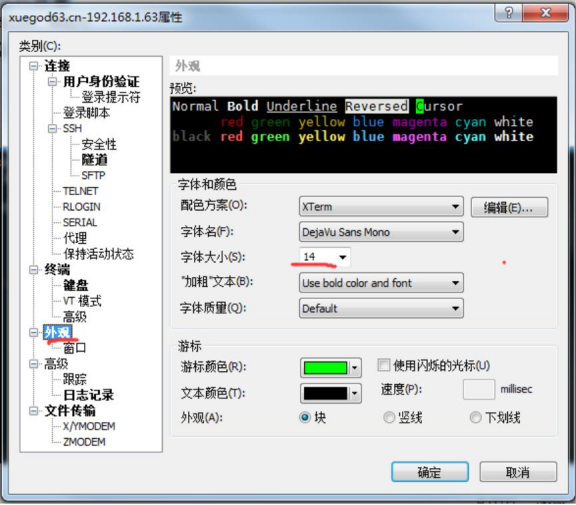
Example 2: adjust xshell font size
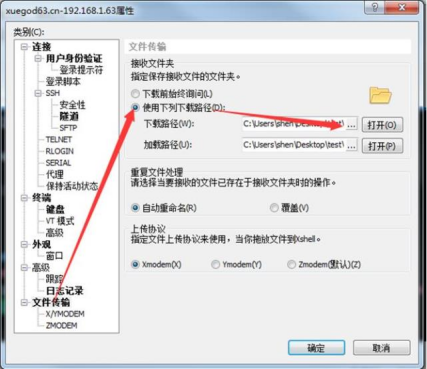
Example 3: adjust the default path of rz and sz commands
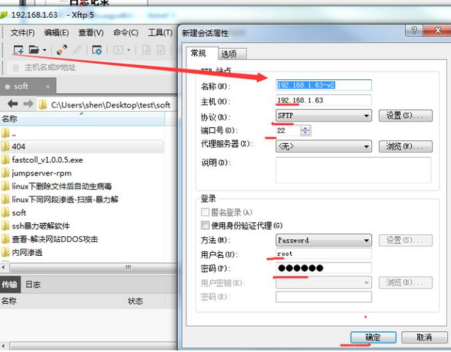
2. xftp usage
Example 1: upload a folder to a Linux server
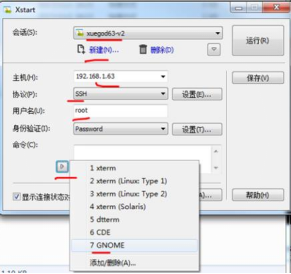
3. How to use xstart
Method 1: use xshell to directly run the program with graphical interface
Example 1:[ root@xuegod63 ~]# gnome-terminal
Example 2:[ root@xuegod63 ~]# firefox &
Method 2: use xstart to call the desktop
Note: after using xmangaer5 installed by MK, it will run later and prompt to update to the new version. Do not update, update, it is possible
The serial number cannot be used.
https://www.netsarang.com/zh/free-for-home-school/
You can also download the official free version
                              You guys want to learn video+Notes and materials
                                 Add our little sister and you can get it!