This article is shared from Huawei cloud community< Use openharmory3 on Micro bear pie 0 lit LED(1)LED driver development >, author: shenlongju city.
Project overview
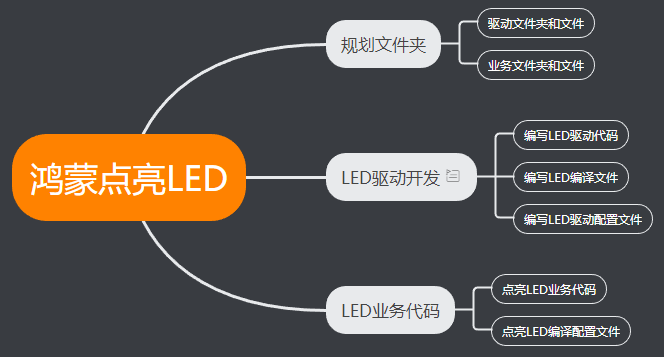
As a representative and complete development, this case can be divided into three parts: code file planning, LED lamp driving development and LED lighting business development.
1, LED Driver Development
1.1. Determine directory structure
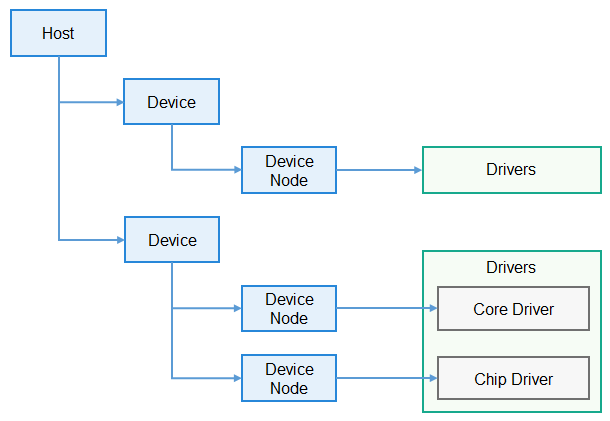
1.1.1. According to the HDF framework, which takes the component-based driver model as the core design idea, the HDF framework puts a class of device drivers in the same host. Developers can also develop and deploy the driver functions hierarchically and independently, supporting one driver for multiple node s. The HDF driver model is shown in the following figure
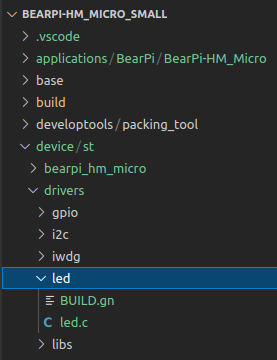
1.1.2. Catalogue of this case
Yes/ Create a new led directory under the device/st/drivers path to store the driver source code files.
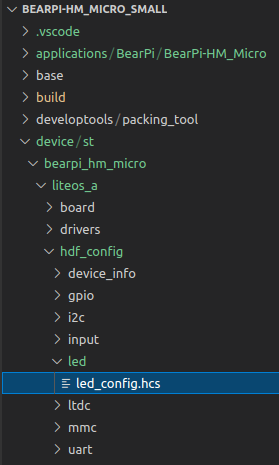
Yes/ device/st/bearpi_ hm_ micro/liteos_ a/hdf_ Create a new led folder under the config path and create a driver configuration file_ config. hcs
1.2.LED driver implementation
1.2.1. The driver implementation includes the driver business code and driver entry registration, which is displayed in LED Add the following code to the C file
#include "hdf_device_desc.h"
#include "hdf_log.h"
#include "device_resource_if.h"
#include "osal_io.h"
#include "osal.h"
#include "osal_mem.h"
#include "gpio_if.h"

#define HDF_LOG_TAG led_driver / / print the label contained in the log. If it is not defined, the default HDF is used_ Tag tag
#define LED_WRITE_READ 1 / / read / write operation code 1

enum LedOps {
    LED_OFF,
    LED_ON,
    LED_TOGGLE,
};

struct Stm32Mp1ILed {
    uint32_t gpioNum;
};
static struct Stm32Mp1ILed g_Stm32Mp1ILed;
uint8_t status = 0;
// Dispatch is used to process messages sent from user status
int32_t LedDriverDispatch(struct HdfDeviceIoClient *client, int cmdCode, struct HdfSBuf *data, struct HdfSBuf *reply)
{
    uint8_t contrl;
    HDF_LOGE("Led driver dispatch");
    if (client == NULL || client->device == NULL)
    {
        HDF_LOGE("Led driver device is NULL");
        return HDF_ERR_INVALID_OBJECT;
    }

    switch (cmdCode)
    {
    /* Received led from user status_ WRITE_ Read command */
    case LED_WRITE_READ:
        /* Read the data in data and assign it to contrl */
        HdfSbufReadUint8(data,&contrl);
        switch (contrl)
        {
        /* turn on the light */
        case LED_ON:
            GpioWrite(g_Stm32Mp1ILed.gpioNum, GPIO_VAL_LOW);
            status = 1;
            break;
        /* Turn off the lights */
        case LED_OFF:
            GpioWrite(g_Stm32Mp1ILed.gpioNum, GPIO_VAL_HIGH);
            status = 0;
            break;
        /* State flip */
        case LED_TOGGLE:
            if(status == 0)
            {
                GpioWrite(g_Stm32Mp1ILed.gpioNum, GPIO_VAL_LOW);
                status = 1;
            }
            else
            {
                GpioWrite(g_Stm32Mp1ILed.gpioNum, GPIO_VAL_HIGH);
                status = 0;
            }
            break;
        default:
            break;
        }
        /* Write the status value of the LED into reply, which can be brought to the user program */
        if (!HdfSbufWriteInt32(reply, status))
        {
            HDF_LOGE("replay is fail");
            return HDF_FAILURE;
        }
        break;
    default:
        break;
    }
    return HDF_SUCCESS;
}

// Read driver private configuration
static int32_t Stm32LedReadDrs(struct Stm32Mp1ILed *led, const struct DeviceResourceNode *node)
{
    int32_t ret;
    struct DeviceResourceIface *drsOps = NULL;

    drsOps = DeviceResourceGetIfaceInstance(HDF_CONFIG_SOURCE);
    if (drsOps == NULL || drsOps->GetUint32 == NULL) {
        HDF_LOGE("%s: invalid drs ops!", __func__);
        return HDF_FAILURE;
    }
    /* Read led Led in HCS_ gpio_ Value of num */
    ret = drsOps->GetUint32(node, "led_gpio_num", &led->gpioNum, 0);
    if (ret != HDF_SUCCESS) {
        HDF_LOGE("%s: read led gpio num fail!", __func__);
        return ret;
    }
    return HDF_SUCCESS;
}

//Drive the service capabilities provided externally and bind the relevant service interfaces to the HDF framework
int32_t HdfLedDriverBind(struct HdfDeviceObject *deviceObject)
{
    if (deviceObject == NULL)
    {
        HDF_LOGE("Led driver bind failed!");
        return HDF_ERR_INVALID_OBJECT;
    }
    static struct IDeviceIoService ledDriver = {
        .Dispatch = LedDriverDispatch,
    };
    deviceObject->service = (struct IDeviceIoService *)(&ledDriver);
    HDF_LOGD("Led driver bind success");
    return HDF_SUCCESS;
}

// Interface that drives the initial of its own business
int32_t HdfLedDriverInit(struct HdfDeviceObject *device)
{
    struct Stm32Mp1ILed *led = &g_Stm32Mp1ILed;
    int32_t ret;

    if (device == NULL || device->property == NULL) {
        HDF_LOGE("%s: device or property NULL!", __func__);
        return HDF_ERR_INVALID_OBJECT;
    }
    /* Read hcs private attribute value */
    ret = Stm32LedReadDrs(led, device->property);
    if (ret != HDF_SUCCESS) {
        HDF_LOGE("%s: get led device resource fail:%d", __func__, ret);
        return ret;
    }
    /* Configure GPIO pin as output */
    ret = GpioSetDir(led->gpioNum, GPIO_DIR_OUT);
    if (ret != 0)
    {
        HDF_LOGE("GpioSerDir: failed, ret %d\n", ret);
        return ret;
    }
    HDF_LOGD("Led driver Init success");
    return HDF_SUCCESS;
}

// Interface driving resource release
void HdfLedDriverRelease(struct HdfDeviceObject *deviceObject)
{
    if (deviceObject == NULL)
    {
        HDF_LOGE("Led driver release failed!");
        return;
    }
    HDF_LOGD("Led driver release success");
    return;
}

// The object defining the driver entry must be a global variable of type HdfDriverEntry (defined in hdf_device_desc.h)
struct HdfDriverEntry g_ledDriverEntry = {
    .moduleVersion = 1,
    .moduleName = "HDF_LED",
    .Bind = HdfLedDriverBind,
    .Init = HdfLedDriverInit,
    .Release = HdfLedDriverRelease,
};

// Call HDF_INIT registers the driver entry into the HDF framework
HDF_INIT(g_ledDriverEntry);
1.2.2. Compile script file
In LED / build Add the following code to the GN file to add led C compiled into hdf_led
import("//drivers/adapter/khdf/liteos/hdf.gni")
hdf_driver("hdf_led") {
sources = [
"led.c",
]
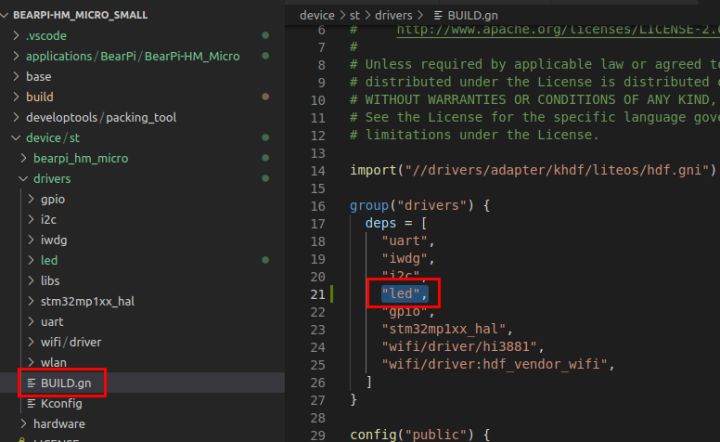
}At / device / St / Drivers / build Add the following code to the GN file to hdf_led compiled into the kernel, "led" is a new content
1.3. Drive configuration
HDF uses HCS as the configuration description source code. The driver configuration includes two parts: the driver device description defined by the HDF framework and the private configuration information of the driver.
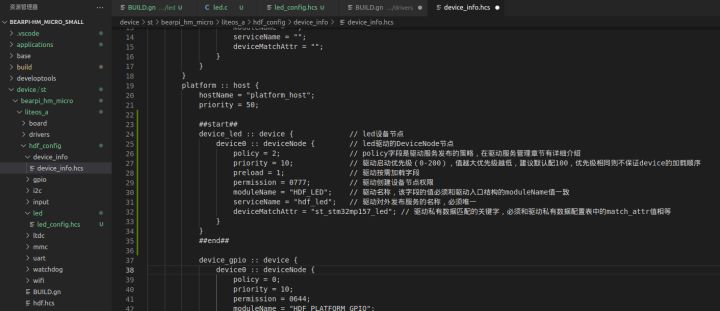
The information required by the HDF framework to load the driver comes from the driver device description defined by the HDF framework. Therefore, the driver developed based on the HDF framework must be in the device defined by the HDF framework_ info. Add the corresponding device description in the HCS configuration file, so we need to add it in device \ St \ bearpi_ hm_ micro\liteos_ a\hdf_ config\device_ info\device_ info. Add LED device description to HCS
device_led :: device {             // led device node
    device0 :: deviceNode {        // led driven DeviceNode node
        policy = 2;                // The policy field is the policy of driving service publishing, which is described in detail in the chapter of driving service management
        priority = 10;             // Drive startup priority (0-200). The higher the value, the lower the priority. It is recommended to configure 100 by default. If the priority is the same, the loading order of device s is not guaranteed
        preload = 1;               // Drive on demand fields
        permission = 0777;         // Driver create device node permission
        moduleName = "HDF_LED";    // Driver name. The value of this field must be consistent with the moduleName value of the driver entry structure
        serviceName = "hdf_led";   // The name of the driver publishing service must be unique
        deviceMatchAttr = "st_stm32mp157_led"; // The keyword matching the driver private data must match the keyword in the driver private data configuration table_ Equal attr values
    }
} 
1.4. Private driver information configuration
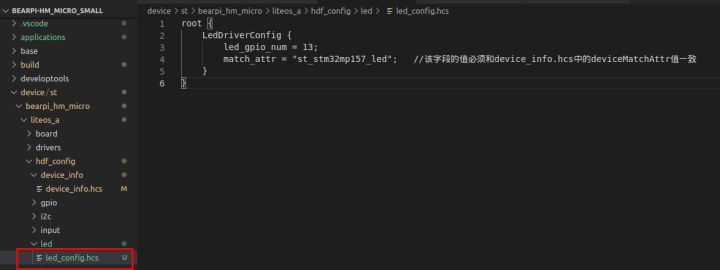
If the driver has private configuration, you can add a driver configuration file to fill in some default configuration information of the driver. When loading the driver, the HDF framework will obtain and save the corresponding configuration information in the property in the HdfDeviceObject and pass it to the driver through Bind and Init, so we need to enter it in device \ St \ bearpi_ hm_ micro\liteos_ a\hdf_ config\LED\led_ config. Add LED private configuration description to HCS.
root {
    LedDriverConfig {
        led_gpio_num = 13;
        match_attr = "st_stm32mp157_led";   //The value of this field must be the same as device_ info. The deviceMatchAttr value in HCS is consistent
    }
}
1.5. Board level configuration entry file
After the configuration information is defined, you need to add the configuration file to the board level configuration entry file device\st\bearpi_hm_micro\liteos_a\hdf_config\hdf.hcs
#include "device_info/device_info.hcs"
#include "led/led_config.hcs"
2, Lighting LED service code
2.1. Create directory
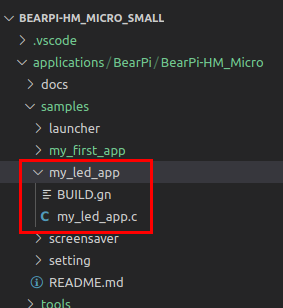
When writing business, be sure to write it first/ applications/BearPi/BearPi-HM_ Create a new directory (or a set of directory structure) under the micro / samples path to store the business source code files
Add my in the samples folder_ led_ App folder and create a new build Gn and my_led_app.c two documents
2.2. Write business code
In my_ led_ app. Add the following business code to C
#include <fcntl.h>
#include <sys/stat.h>
#include <sys/ioctl.h>
#include <unistd.h>
#include <stdio.h>
#include "hdf_sbuf.h"
#include "hdf_io_service_if.h"

#define LED_WRITE_READ 1
#define LED_SERVICE "hdf_led"

static int SendEvent(struct HdfIoService *serv, uint8_t eventData)
{
    int ret = 0;
    struct HdfSBuf *data = HdfSBufObtainDefaultSize();
    if (data == NULL)
    {
        printf("fail to obtain sbuf data!\r\n");
        return 1;
    }

    struct HdfSBuf *reply = HdfSBufObtainDefaultSize();
    if (reply == NULL)
    {
        printf("fail to obtain sbuf reply!\r\n");
        ret = HDF_DEV_ERR_NO_MEMORY;
        goto out;
    }
    /* Write data */
    if (!HdfSbufWriteUint8(data, eventData))
    {
        printf("fail to write sbuf!\r\n");
        ret = HDF_FAILURE;
        goto out;
    }
    /* Send to driver via Dispatch */
    ret = serv->dispatcher->Dispatch(&serv->object, LED_WRITE_READ, data, reply);
    if (ret != HDF_SUCCESS)
    {
        printf("fail to send service call!\r\n");
        goto out;
    }

    int replyData = 0;
    /* Read the reply data of the driver */
    if (!HdfSbufReadInt32(reply, &replyData))
    {
        printf("fail to get service call reply!\r\n");
        ret = HDF_ERR_INVALID_OBJECT;
        goto out;
    }
    printf("\r\nGet reply is: %d\r\n", replyData);
out:
    HdfSBufRecycle(data);
    HdfSBufRecycle(reply);
    return ret;
}

int main(int argc, char **argv)
{
    int i;

    /* Get service */
    struct HdfIoService *serv = HdfIoServiceBind(LED_SERVICE);
    if (serv == NULL)
    {
        printf("fail to get service %s!\r\n", LED_SERVICE);
        return HDF_FAILURE;
    }

    for (i=0; i < argc; i++)
    {
        printf("\r\nArgument %d is %s.\r\n", i, argv[i]);
    }

    SendEvent(serv, atoi(argv[1]));

    HdfIoServiceRecycle(serv);
    printf("exit");

    return HDF_SUCCESS;
}
2.3. Write a build that will build the business code GN file
BUILD. The GN file consists of three parts (target, source file and header file path), which should be completed by the developer. With my_led_app, for example, needs to be created/ applications/BearPi/BearPi-HM_Micro/samples/my_led_app/BUILD.gn, and complete the following configuration
import("//build/lite/config/component/lite_component.gni")

HDF_FRAMEWORKS = "//drivers/framework"

executable("led_lib") {
    output_name = "my_led"
    sources = [
        "my_led_app.c",
    ]

    include_dirs = [
    "$HDF_FRAMEWORKS/ability/sbuf/include",
    "$HDF_FRAMEWORKS/core/shared/include",
    "$HDF_FRAMEWORKS/core/host/include",
    "$HDF_FRAMEWORKS/core/master/include",
    "$HDF_FRAMEWORKS/include/core",
    "$HDF_FRAMEWORKS/include/utils",
    "$HDF_FRAMEWORKS/utils/include",
    "$HDF_FRAMEWORKS/include/osal",
    "//drivers/adapter/uhdf/posix/include",
    "//third_party/bounds_checking_function/include",
    "//base/hiviewdfx/hilog_lite/interfaces/native/innerkits",
    ]

    deps = [
        "//base/hiviewdfx/hilog_lite/frameworks/featured:hilog_shared",
        "//drivers/adapter/uhdf/manager:hdf_core",
        "//drivers/adapter/uhdf/posix:hdf_posix_osal",
    ]
}

lite_component("my_led_app") {
    features = [
        ":led_lib",
    ]
}- First, import the gni component and transfer the source code to my_led_app.c compiled into led_lib library file
- The name of the output executable is determined by output_name is defined as my_led
- include_ Add my to dirs_ led_ app. C what needs to be used in it h header file path
- Add the dependent library to deps.
- Then turn the LED_ Package lib into lite_component, named my_led_app component.
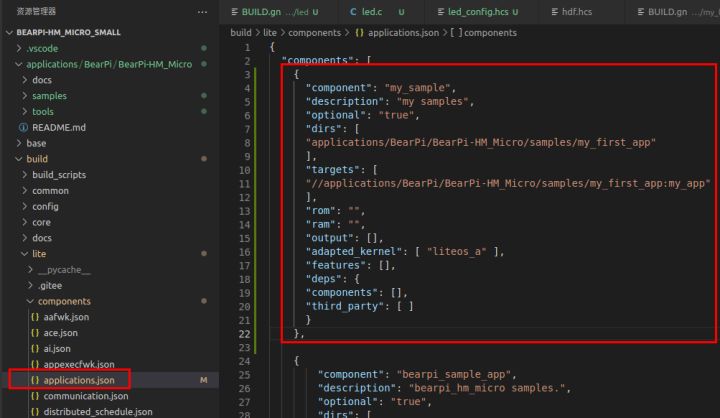
2.4. Add new component
Modify the file build / LITE / components / applications JSON, add component my_sample configuration
{
        "component": "my_sample",
        "description": "my samples",
        "optional": "true",
        "dirs": [
            "applications/BearPi/BearPi-HM_Micro/samples/my_first_app",
            "applications/BearPi/BearPi-HM_Micro/samples/my_led_app"
        ],
        "targets": [
            "//applications/BearPi/BearPi-HM_Micro/samples/my_first_app:my_app",
            "//applications/BearPi/BearPi-HM_Micro/samples/my_led_app:my_led_app"
        ],
        "rom": "",
        "ram": "",
        "output": [],
        "adapted_kernel": [ "liteos_a" ],
        "features": [],
        "deps": {
        "components": [],
        "third_party": [ ]
        }
    },
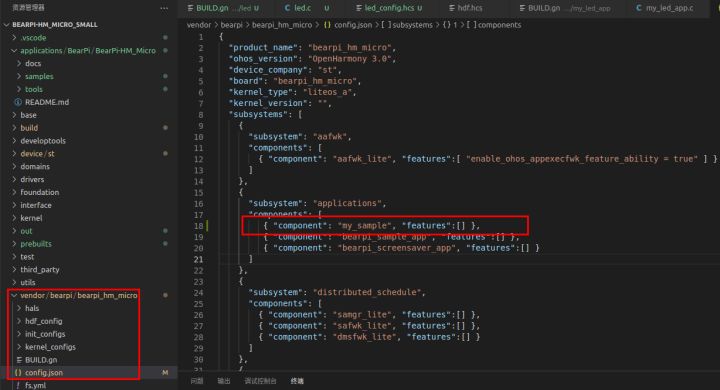
2.5. Modify board configuration file
Modify the vendor / bearpi / bearpi file_ hm_ micro/config. JSON, add my_ Entries for the sample component
{
      "subsystem": "applications",
      "components": [
         { "component": "my_sample", "features":[] },
         { "component": "bearpi_sample_app", "features":[] },
         { "component": "bearpi_screensaver_app", "features":[] }
      ]
},
3, Compile
Execute hb set to set the development board under the root directory of the project. There is only one. Press enter

Execute compile command
hb build -t notest --tee -f
After the compilation is completed, the words "build success" appear on the screen, indicating that the compilation is successful.
After compiling, you can directly view the final compiled firmware. The specific path is: \ project \ bearpi HM_ micro_ small\out\bearpi-hm_ micro\bearpi-hm_ micro
Folder structure description
- OHOS_Image.stm32: system image file
- rootfs_vfat.img: root file system
- userfs_vfat.img: user file system
Execute the following three instructions to copy the above three files to applications / bearpi / bearpi HM_ Micro/tools/download_ IMG / kernel / for subsequent burning systems
cp out/bearpi_hm_micro/bearpi_hm_micro/OHOS_Image.stm32 applications/BearPi/BearPi-HM_Micro/tools/download_img/kernel/
cp out/bearpi_hm_micro/bearpi_hm_micro/rootfs_vfat.img applications/BearPi/BearPi-HM_Micro/tools/download_img/kernel/
cp out/bearpi_hm_micro/bearpi_hm_micro/userfs_vfat.img applications/BearPi/BearPi-HM_Micro/tools/download_img/kernel/
4, Summary
So far, the complete project has been developed, and the next step is to burn and run.
For more learning content, please pay attention to IoT IOT community , add Huawei cloud IoT assistant wechat (HWC IoT) and reply to "read" for more information.
Click follow to learn about Huawei's new cloud technology for the first time~