Author: Li Shuai
introduce
KubeSphere multi tenancy is a very needed function in actual production and use. This function meets the needs of different users logging in to the KubeSphere platform. For example, development, operation and maintenance and testing all need to log in to KubeSphere platform, and different permissions need to be configured for users with different identities. When there are many users who need to access KubeSphere in the company, it is not flexible for the administrator to manually create an account for the user. KubeSphere includes a built-in OAuth service and account system. Users can authenticate the API by obtaining OAuth access token. We can provide authentication information by accessing LDAP or OIDC.
Multi tenant scheme
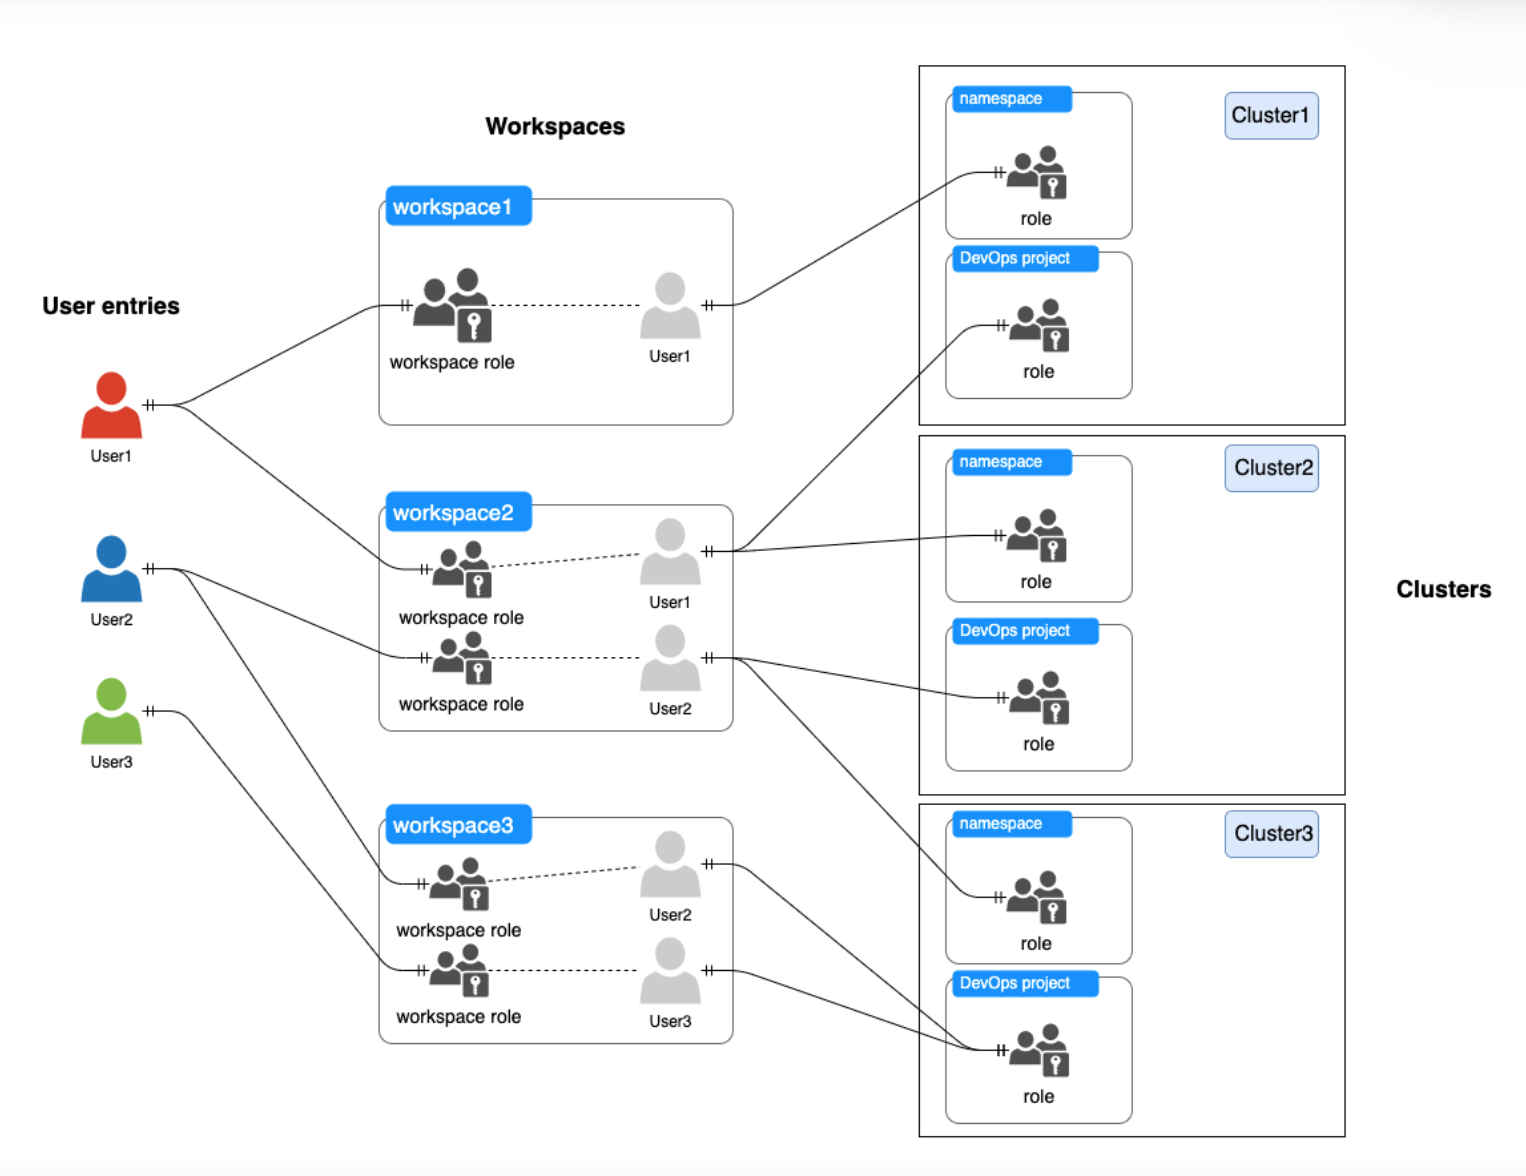
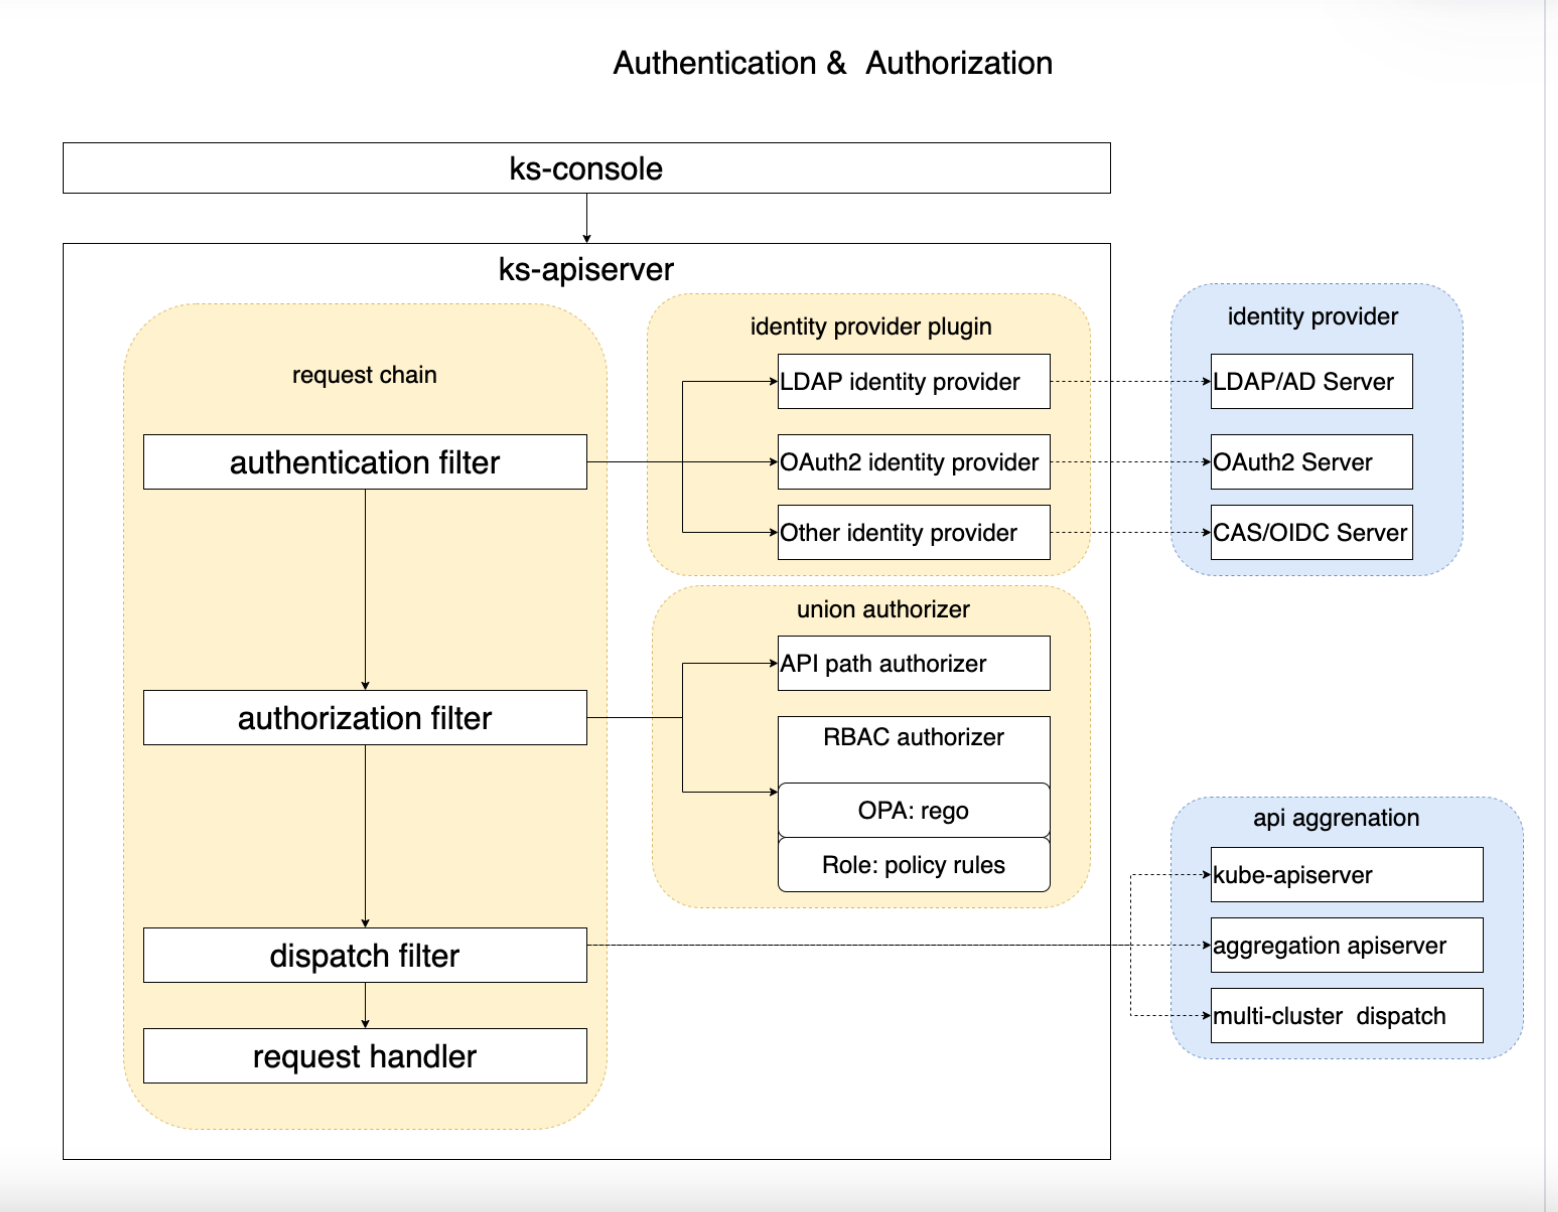
Authentication link
use
It is assumed that KubeSphere has been installed in the cluster. Here, we use the OIDC identity provider for authentication, access to GitLab through Dex, and use the users in GitLab to complete authentication.
Installing Dex
Dex is an authentication service that uses OpenID Connect to drive the authentication of other applications. Dex acts as a portal for other identity providers through "connectors". Dex can push authentication to LDAP servers, SAML providers, or established identity providers (such as GitHub, Gitlab, Google, Active Directory, etc.). The client writes authentication logic to interact with Dex for authentication, and then Dex forwards it to the backend user authenticator through the connector for authentication, and returns it to the client Oauth2 Token. Similar identity authentication services include keyloak, auth0, etc.
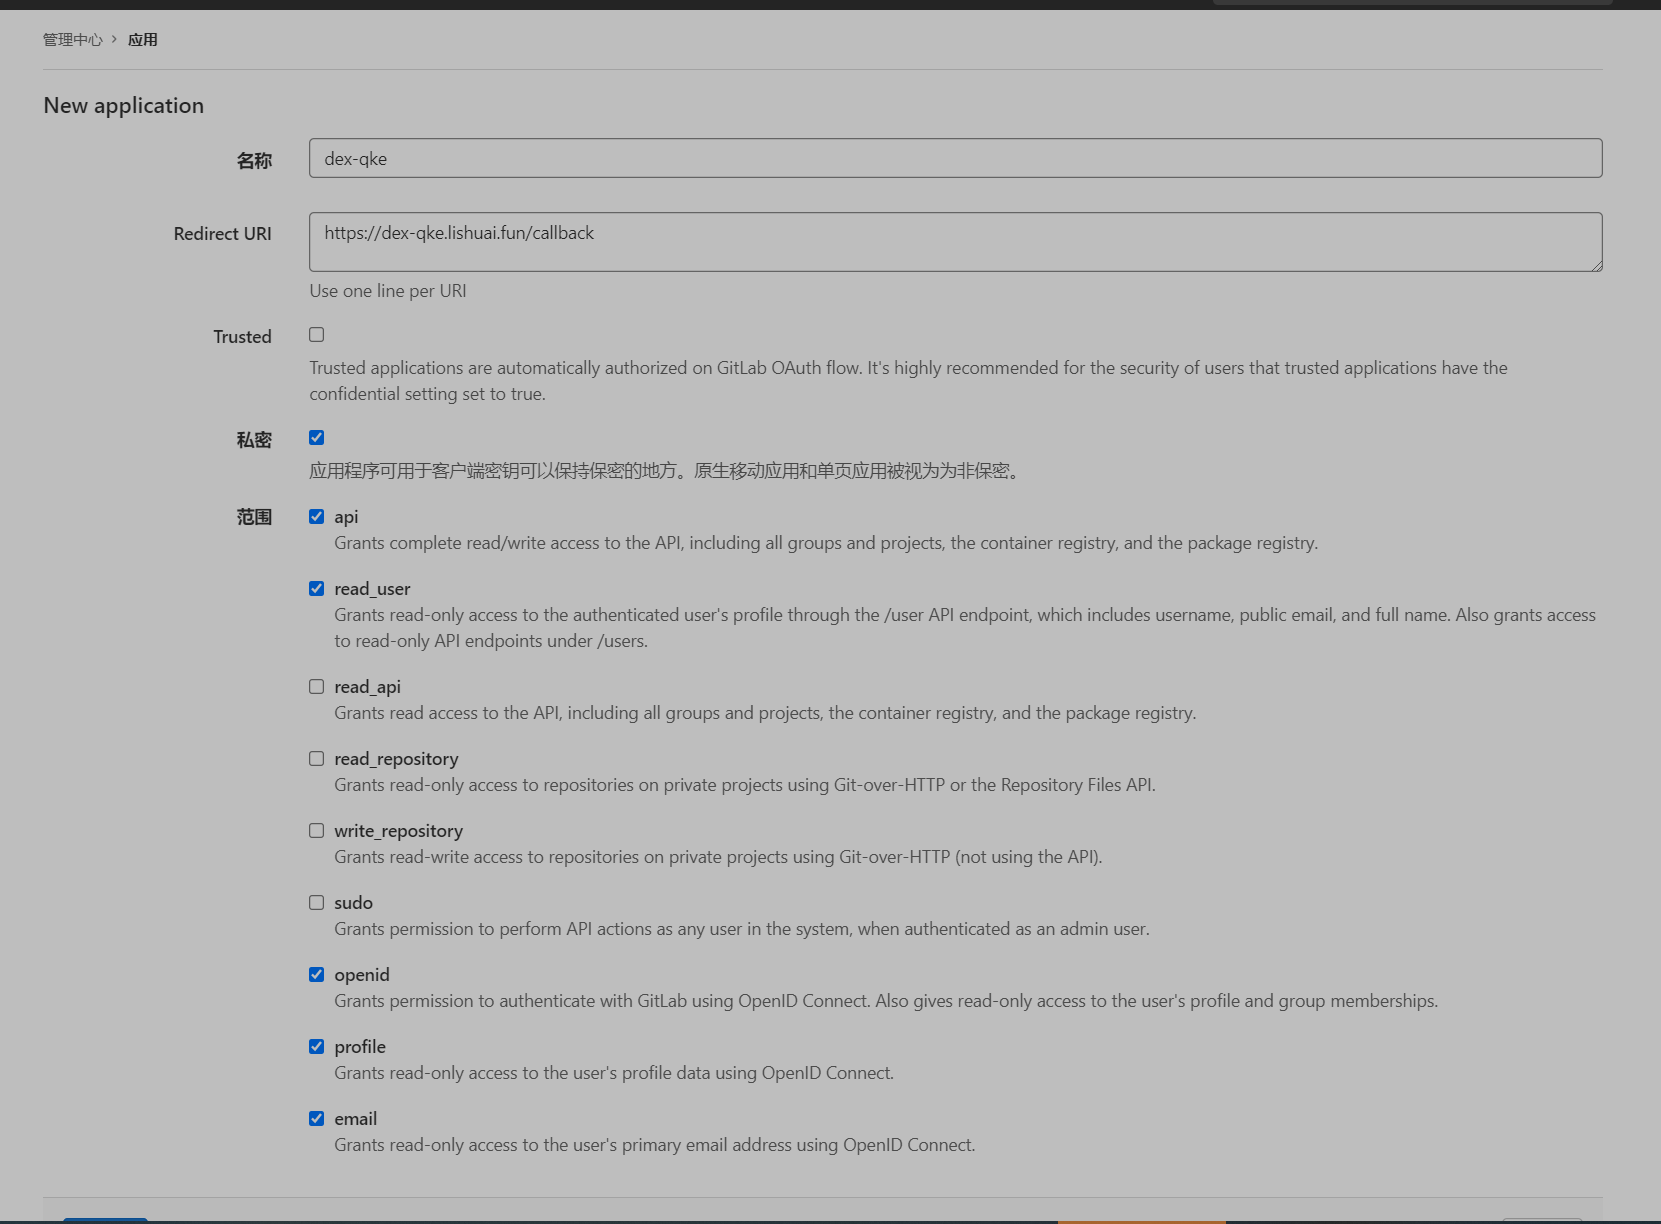
First of all, you need to create an application on gitlab and check these reads in the scope_ User profile email openid. After creation, you need to remember the application id and password on the page, which will be used later.
#Add helm warehouse of dex
root@i-tsfhx8p6:~/qke-k8s/dex# helm repo add dex https://charts.dexidp.io
"dex" has been added to your repositories
#Download the chart file of dex to the local
root@i-tsfhx8p6:~/qke-k8s/dex# helm pull dex/dex
root@i-tsfhx8p6:~/qke-k8s/dex# ls
dex-0.5.0.tgz
root@i-tsfhx8p6:~/qke-k8s/dex# tar xf dex-0.5.0.tgz
root@i-tsfhx8p6:~/qke-k8s/dex# ls
dex  dex-0.5.0.tgz
root@i-tsfhx8p6:~/qke-k8s/dex# ls dex
Chart.yaml  LICENSE  README.md  ci  templates  values.yaml
Modify values Yaml file
replicaCount: 1

image:
  repository: dexidp/dex
  pullPolicy: IfNotPresent
  tag: "v2.29.0"

imagePullSecrets: []

nameOverride: ""

fullnameOverride: ""

hostAliases: []

https:
  # -- Enable the HTTPS endpoint.
  enabled: false

grpc:
  # -- Enable the gRPC endpoint.
  # Read more in the [documentation](https://dexidp.io/docs/api/).
  enabled: false

configSecret:
  # -- Enable creating a secret from the values passed to `config`.
  # If set to false, name must point to an existing secret.
  create: true

  # -- The name of the secret to mount as configuration in the pod.
  # If not set and create is true, a name is generated using the fullname template.
  # Must point to secret that contains at least a `config.yaml` key.
  name: ""

config:
  issuer: https://dex-qke.lishuai.fun # modify to your actual address
  storage:
    type: kubernetes
    config:
      inCluster: true
  web:
    http: 0.0.0.0:5556
  telemetry:
    http: 0.0.0.0:5558
  expiry:
    signingKeys: "6h"
    idTokens: "24h"
  logger:
    level: debug
    format: json
  oauth2:
    responseTypes: ["code", "token", "id_token"]
    skipApprovalScreen: true
  connectors:
  - type: gitlab
    id: gitlab
    name: GitLab
    config:
      baseURL: https://gitlab.lishuai.fun # modify to your actual gitlab address
      clientID: ca14d16e376b6f6634*********57378d1267e946e9d3e758e2f0     #Modify the clientid for your gitlab application
      clientSecret: 15dcb3501becd17******1b82b05874e2ef893b7a0888fdaaa37885fd9387  #Modify the client secert for your gitlab application
      redirectURI: https://dex-qke.lishuai.fun/callback # changes to your actual address in the format of (dex issuer)/callback
      groups:
      - k8s-auth
      - k8s-auth/dashboard
      - k8s-auth/dashboard/show  ##gitlab project team, only members of the dashboard project team are allowed to access
  staticClients:
  - id: dex-k8s-authenticator
    name: dex-k8s-authenticator
    secret: generatedLongRandomPhrase
    redirectURIs:
    - 'http://kubesphere.lishuai.fun/oauth/redirect/dex '# this is the callback address of kubesphere. For DEX authentication, the format is kubesphere_url/oauth/redirect/dex

volumes: []

volumeMounts: []

envFrom: []

env: {}

serviceAccount:
  # -- Enable service account creation.
  create: true

  # -- Annotations to be added to the service account.
  annotations: {}

  # -- The name of the service account to use.
  # If not set and create is true, a name is generated using the fullname template.
  name: "dex-sa"

rbac:
  create: true

podAnnotations: {}

podDisruptionBudget:
  enabled: false
  minAvailable:
  maxUnavailable:
priorityClassName: ""
podSecurityContext: {}
  # fsGroup: 2000

securityContext: {}
  # capabilities:
  #   drop:
  #   - ALL
  # readOnlyRootFilesystem: true
  # runAsNonRoot: true
  # runAsUser: 1000

service:
  annotations: {}
  type: ClusterIP

  ports:
    http:
      port: 5556
      nodePort:
    https:
      port: 5554
      nodePort:
    grpc:
      port: 5557
      nodePort:

ingress:
  enabled: true
  className: ""

  annotations:
    kubernetes.io/ingress.class: nginx
    kubernetes.io/tls-acme: "true"
    cert-manager.io/cluster-issuer: tls  #CERT manager has been installed in the cluster, and the certificate is issued through cert manager

  hosts:
    - host: dex-qke.lishuai.fun
      paths:
        - path: /
          pathType: ImplementationSpecific
  tls:
  - secretName: dex-tls
    hosts:
      - dex-qke.lishuai.fun

resources: {}
  # limits:
  #   cpu: 100m
  #   memory: 128Mi
  # requests:
  #   cpu: 100m
  #   memory: 128Mi

autoscaling:
  enabled: false
  minReplicas: 1
  maxReplicas: 100
  targetCPUUtilizationPercentage: 80
  # targetMemoryUtilizationPercentage: 80

nodeSelector: {}

tolerations: []

affinity: {}
Here are a few points to note:
- The groups under Gitlab configuration are project groups, which need to be filled in according to the actual situation. Only the members of the project group filled in here can be allowed to pass Dex for identity authentication
- If cert manager is not installed in the cluster, you need to manually create a certificate secert
Execute the following command to install.
root@i-tsfhx8p6:~/qke-k8s/dex# ls
dex  dex-0.5.0.tgz
#Execute in current directory
kubectl create ns dex
kubectl -n dex install dex dex

root@i-tsfhx8p6:~/qke-k8s/dex# kubectl -n dex get pod
NAME                                  READY   STATUS    RESTARTS   AGE
dex-d8c5cdfc-577gf                    1/1     Running   0          21h
Configure KubeSphere
After installing Dex, you need to modify the cluster configuration yaml.
apiVersion: installer.kubesphere.io/v1alpha1
kind: ClusterConfiguration
metadata:
  name: ks-installer
  namespace: kubesphere-system
  labels:
    version: v3.1.1
spec:
  persistence:
    storageClass: "longhorn"        # If there is no default StorageClass in your cluster, you need to specify an existing StorageClass here.
  authentication:
    jwtSecret: ""
    authenticateRateLimiterMaxTries: 10
    authenticateRateLimiterDuration: 10m0s
    oauthOptions:
      accessTokenMaxAge: 1h
      accessTokenInactivityTimeout: 30m
      identityProviders:
      - name: dex
        type: OIDCIdentityProvider
        mappingMethod: auto
        provider:
          clientID: 'dex-k8s-authenticator'
          clientSecret: 'gener*******ongRandomPhrase'
          issuer: https://dex-qke.lishuai.fun
          redirectURL: http://kubesphere.lishuai.fun/oauth/redirect/dex
          scopes:
          - openid
          - email
......
Parameter interpretation:
- Authenticateratelimitermaxtries: the maximum number of consecutive login failures allowed during the period specified by authenticatelalimiterduration. If the number of consecutive login failures reaches the limit, the user will be blocked.
- authenticateRateLimiterDuration: acts on authenticateRateLimiterMaxTries.
- loginHistoryRetentionPeriod: the retention period of user login records. Expired entries will be automatically deleted.
- maximumClockSkew: controls the maximum clock offset allowed when performing time sensitive operations (such as verifying the expiration time of user tokens). The default value is 10 seconds.
- multipleLogin: allows multiple users to log in from different locations at the same time. The default value is true.
- jwtSecret: the key that issues the user token. The minimum length is 32 characters. Matters needing attention in multi cluster environment.
oauthOptions: OAuth settings
- accessTokenMaxAge: access token validity period. For member clusters in a multi cluster environment, the default value is 0h, which means that the access token never expires. For other clusters, the default value is 2h.
- accessTokenInactivityTimeout: token idle timeout. This value indicates the maximum interval between refreshing the user token after the token expires. If the user identity token is not refreshed within this time window, the user will need to log in again to obtain access.
- identityProviders: identity provider settings
- Name: the name of the identity provider.
- Type: the type of identity provider.
- mappingMethod: account mapping method The value can be auto or lookup.
- The default value is auto, and the associated account is automatically created when logging in through a third-party account.
- If the value is lookup, you need to manually associate the third-party account with the KubeSphere account.
- provider: Identity provider configuration. The fields in this section vary according to the type of identity provider
provider:
- clientID: OAuth2 client ID
- clientSecret: OAuth2 client secret
- issuer: address of dex
- Redirect URL: the URL to redirect to KS console. Note that this address should also be configured in dex
After modification, execute kubectl apply - f cluster configuration yaml .
You can also modify the authentication configuration with the following command:
kubectl -n kubesphere-system edit cc ks-installer
Configuration example:
apiVersion: installer.kubesphere.io/v1alpha1
kind: ClusterConfiguration
metadata:
  name: ks-installer
spec:
  authentication:
    jwtSecret: ********************************
    authenticateRateLimiterMaxTries: 10
    authenticateRateLimiterDuration: 10m
    oauthOptions:
      accessTokenInactivityTimeout: 30m
      accessTokenMaxAge: 1h
      identityProviders:
      - mappingMethod: auto
        name: github
        type: GitHubIdentityProvider
        provider:
...
After modifying the above configuration, you need to wait for the configuration to take effect. You can view the relevant progress and logs through the following commands:
kubectl -n kubesphere-system logs -l app=ks-installer -f
After reapplying, open the login page and you will find that there are more buttons to log in through dex on the login page.
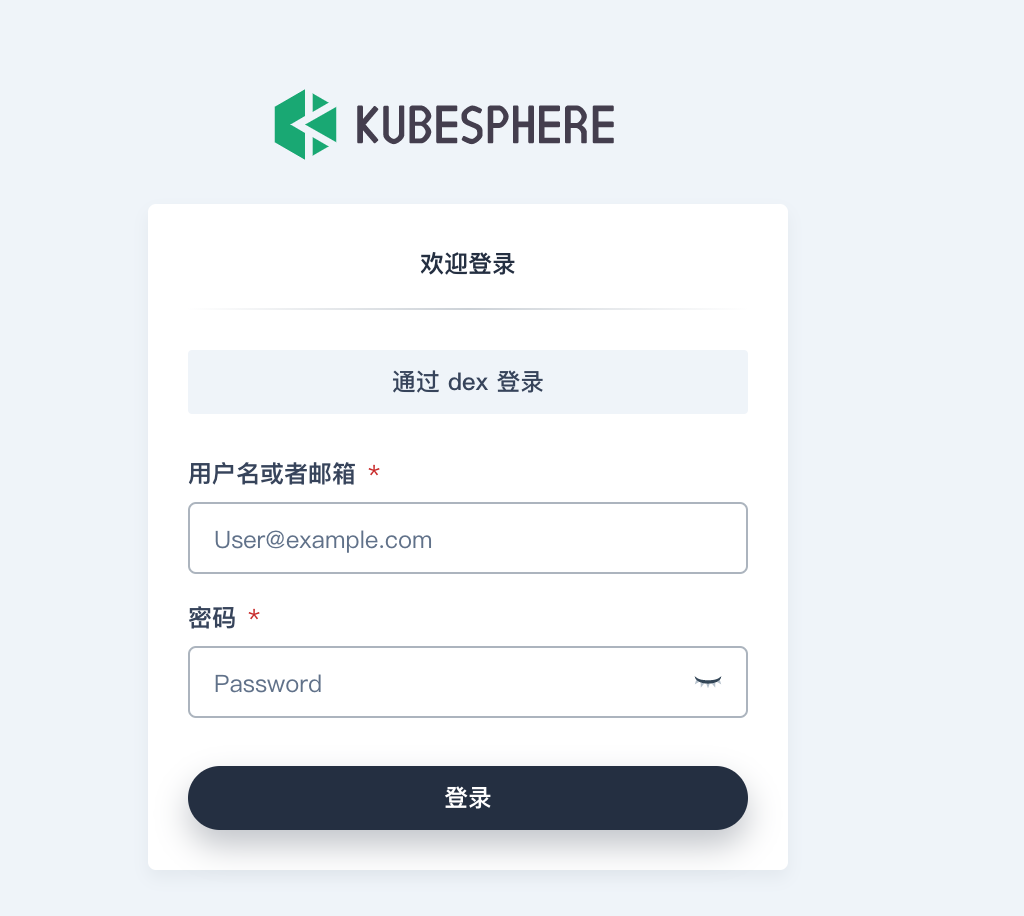
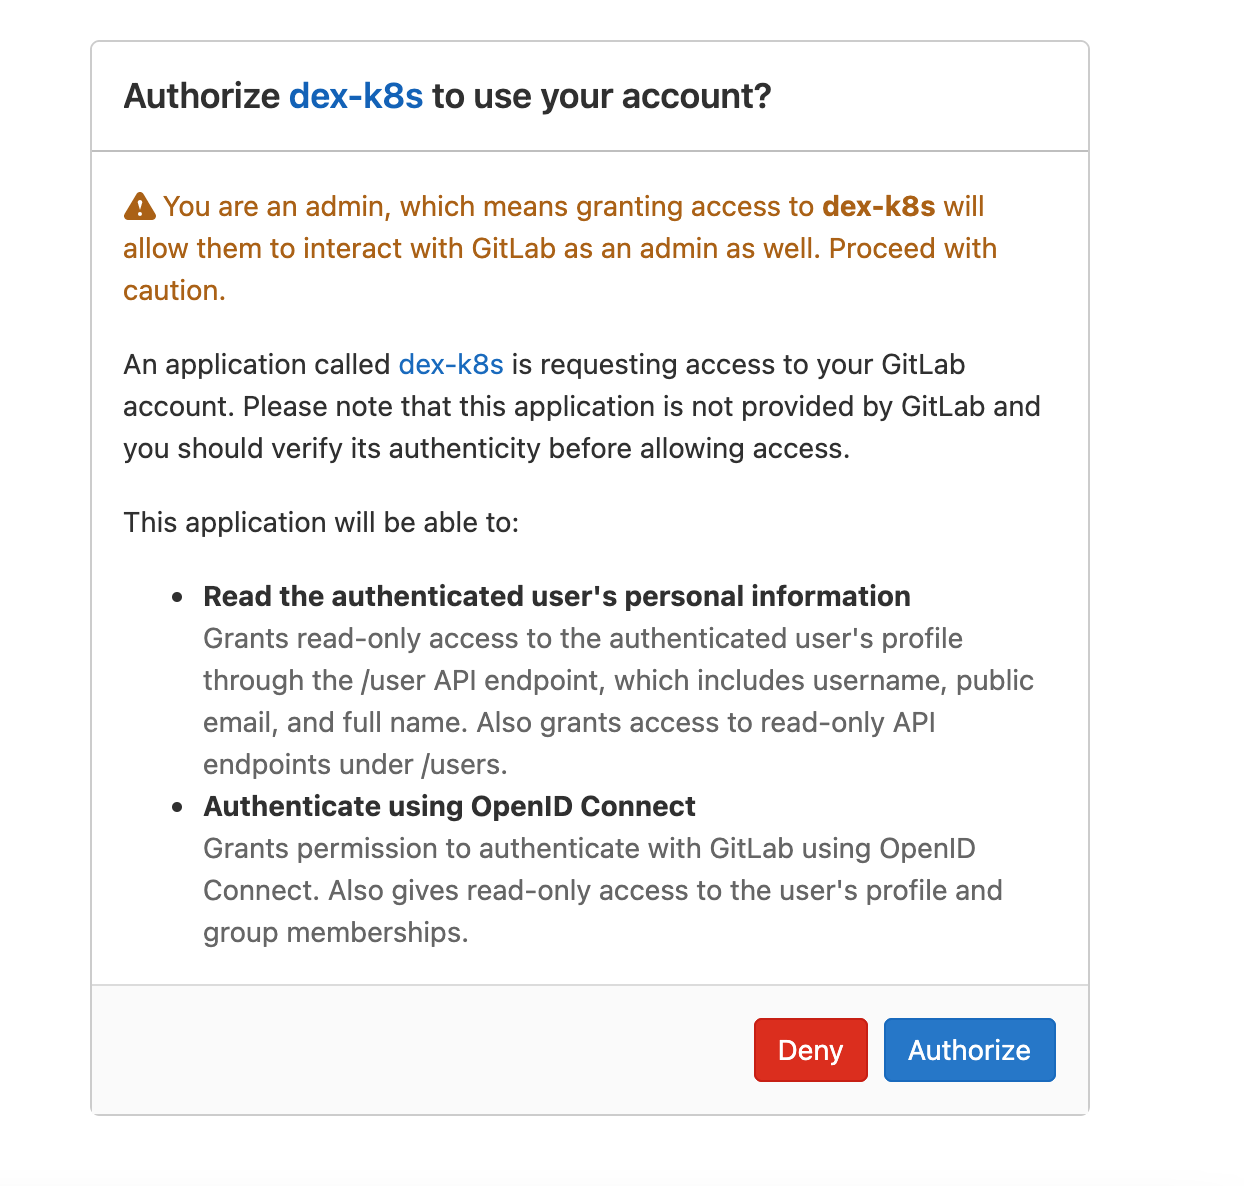
After clicking, it will automatically jump to Gitlab for authentication. The first login needs to authorize the application to access. Here, it should be noted that the Gitlab users of KubeSphere that are allowed to access are the users in the Gitlab project group defined in Dex service. In fact, we can set a specific project group and add users to the project group to realize the restriction of user login.
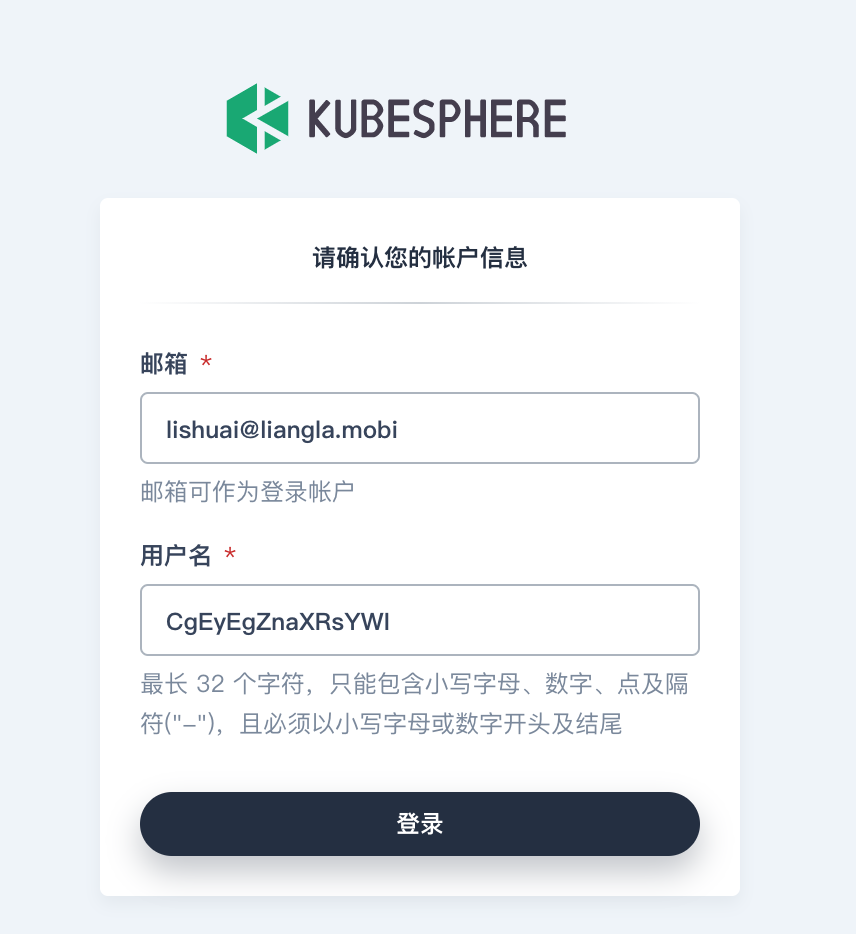
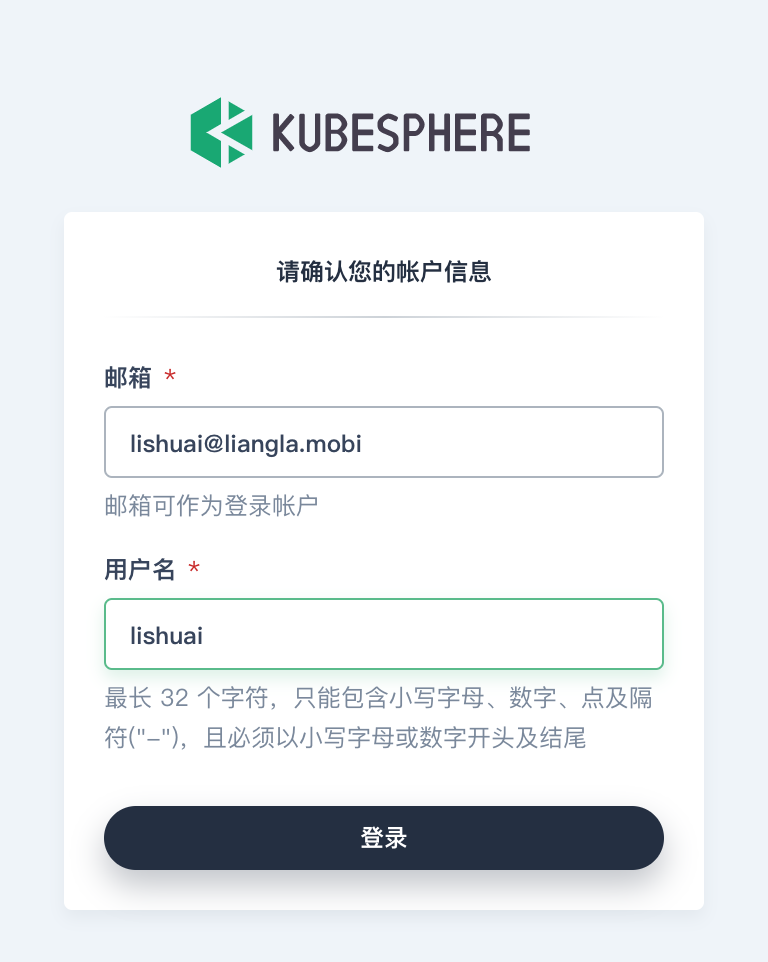
After clicking authorize, KubeSphere will ask us to confirm the account information. At this time, we need to modify the user name reasonably.
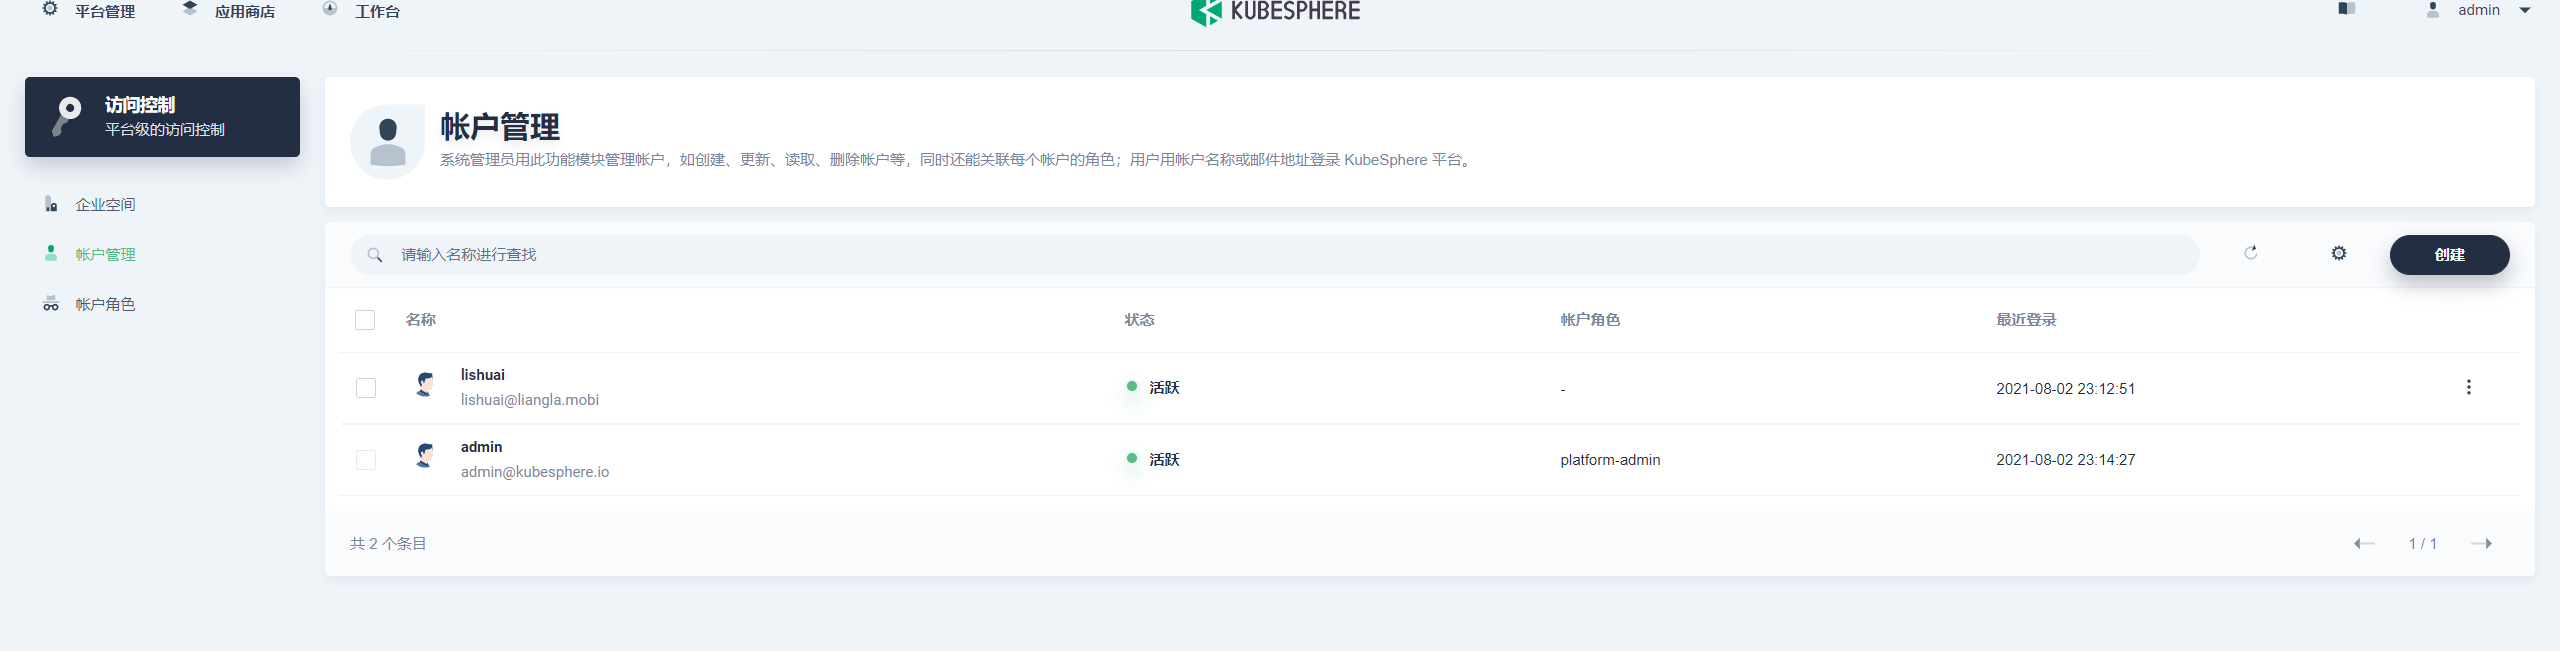
After setting, you can enter KubeSphere. At this time, the user does not have any access rights, and the administrator needs to authorize the user to use it normally. I hope KubeSphere can support authorizing the user group before the user logs in, or collecting money from the user through the mailbox in advance, so as to avoid after the user logs in, Administrators also need to create permissions manually.
This article is composed of blog one article multi posting platform OpenWrite release!